
How To: Install Mini H1 4.0 Projectors into 96-00 Civic
 08-17-2011, 11:44 AM
#1
Honda-Tech Member
Thread Starter
Join Date: Jul 2005
Location: New York
Posts: 1,392
Likes: 0
Received 0 Likes
on
0 Posts
Before we begin, I know the projectors are already in. My passenger side headlight was building up condensation inside so I had to pull them apart to re-seal them. I figured while they were apart, I would write a quick and easy How To!
This How To is for the Mini H1 4.0 projectors off theretrofitsource.com. They are now called the Mini H1 4.1. I don't know what the difference is. I think you can get a different shroud or something. Regardless, the install should be the same.
-----------------------------------------------------------------------
Tools needed (may vary depending on your car and what screws/bolts are being used to hold the car together):
- Conventional Oven
- Flathead screwdriver (variety of sizes)
- Philips screwdriver (variety of sizes)
- 10mm socket with extension and socket wrench
- Flat surface with sufficient space to work on
I didn't include pictures for EVERY step. Some are self-explanatory. The pictures are click-able thumbnails.
-----------------------------------------------------------------------
Step 1:
Begin by parking on a flat surface with a flat wall ahead of you (this will come in handy later).
Step 2:
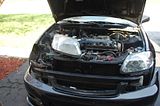
Remove your front bumper and upper grill.
Step 3:
Remove your headlights.
(I only removed my passenger one since that's the one that needed to be worked on):
Step 4:
Set your oven to 225 and wait until it's ready (you can also do this while you're taking your car apart if you've done it before and can do it quickly).
Step 5:
Remove everything you can off of the headlight and then put it in the oven for 10 minutes.
Step 6:
CAUTION: THE HEADLIGHT WILL BE HOT. USE HOT PADS, GLOVES, ETC.
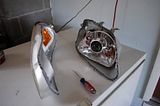
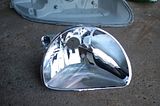
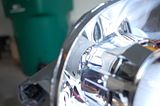
Once 10 minutes are up, pull the headlight out and onto your flat work surface. Take a smaller flathead screwdriver and start to pry open the headlight. Don't worry if you break the little tabs that help hold them together. It happens. The sealant does most of the work anyways. Pry the tabs up and off from the headlight cover and then pull the cover and back part away from each other.
This would also be a good time to put in your other headlight! Just don't forget about it!
You should have this when done:
Step 7:
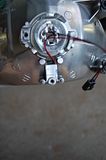
Once you have your headlight apart, take your 10mm socket and extension and a phillips head screwdriver and turn the 2x 10mm bolts and the far left adjuster until the front reflector pops off. You may have to pull on the reflector cone while you turn the adjuster. Neither of the bolts actually come out. They just turn out of the reflector cone.
TAKE NOTE OF HOW FAR EACH BOLT GOES INTO EACH HOLE!!!! When you go to put them back together later, you'll want to put them in around the same distance.
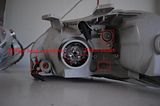
You should have the following when you're done:
Step 8:
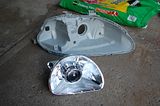
Take a phillips head screwdriver and remove the screw that holds on the halogen reflector.
(It's the bottom empty hole in the pic below)
When you're all done:
Step 9:
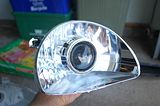
Now take out your projectors from the packaging and screw in the shrouds with the 4 long screws provided. Take your time doing it and put them in straight.
Step 10:
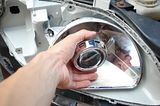
Now look at the back of the projector. Remove the big nut and the 3 tiny screws with a phillips head CAREFULLY. You have to apply pressure as you turn otherwise you'll ruin them. They're annoying to put in / take out. Be careful where you set the screws because they are small! Take off the little tab the screws hold on and set that aside with the nut and screws.
When you're done:

Step 11:
Once you have the back off, gather the following pieces in the order below:
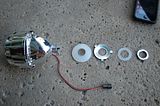
Here is a mock up of how the parts go on the projector:
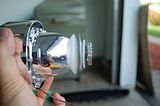
Step 12:
Before you put the projector into the headlight, be sure it's right side up. Please know it can only go in one way because of the unique way the H4 adapter plate is shaped but this will help avoid any confusion some people may have.
Once you've faced it the right way, take the biggest white rubber "washer" and put it on the back of the projector and slide it into the reflector cone (make sure you pull the wire through too!). Next take the H4 adapter plate and put it so the bulge (if you look at it sideways) is facing away from the projector. Then take the other little white rubber "washer" and put it on. Finally screw the nut back on.
Step 13:
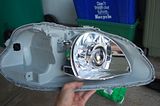
After you've got the projector secure in the reflector cone, put the 3 tiny screws and metal tab back onto the back of the projector.
When you're all done, here is where you should be:

Step 14:
Now put the reflector cone back onto the back piece of the headlight in reverse method of taking it off. You don't have to go crazy with the bolts and adjuster. Just enough to they're at least in. You're going to have to adjust the headlights later anyways.
When you're done:
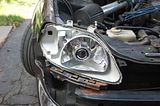
Step 15:
With the headlight cover still off, bolt the headlight back onto the car:
Step 16:
Hook up your HID's and carefully put the bulb into the projector (it takes a little wiggling and struggling. Just DON'T force it in).
Step 17:
Turn on the HID's and make sure the cut off is horizontal on the wall. If it isn't, just grab the shroud and GENTLY turn the projector until it is horizontal like so:
Please remember that you can also bolt the headlight into the car at a certain angle so it turns the cut off. You do not want to try to turn the projector too much because the adapter plate is holding it in a specific place and there is VERY VERY little room for the projector to turn.
Step 18:
When you have the cut off level, turn off the HID's, disconnect everything and remove the headlight. Now is a good time to wipe off any oil or finger prints your hands left when touching all the shiny surfaces. TRS should have provided an alcohol wipe. Do not make the mistake I did and use wet paper towel. It will leave streaks!!! Spray some windex onto a piece of paper towel if the alcohol wipe starts to get dry and you still need to clean more.
Step 19:
Push the headlight cover back onto the headlight as much as you can and then put it back into the oven @ 225 for 10 minutes.
Step 20.:
Once 10 minutes have passed, take the headlight out (CAUTION: THE HEADLIGHT WILL BE HOT. USE HOT PADS, GLOVES, ETC.), and work the headlight back together. Make sure you push the tabs back over the tiny flaps. The tabs may make a click sound when it gets pushed over a tab, you'll know that it's on.
If you feel like the sealant is getting a little hard and you've spent too much time diddling with it, put it back in the oven for however long (based on how cool the sealant is) and work it more again.
Step 21:
Once you're all set putting the headlight back together, put the headlight back on the car and repeat for the other headlight.
When you're done with both, be sure to aim them!!! Park on a level surface, 25ft away from a wall, perpendicular to it, and align them. I've adjusted mine over a dozen times at this point. It may take a few times to find the right spot. Keep driving around and seeing where your cut off lands on cars, signs, etc.
-----------------------------------------------------------------------
Enjoy your cut off!!!

This How To is for the Mini H1 4.0 projectors off theretrofitsource.com. They are now called the Mini H1 4.1. I don't know what the difference is. I think you can get a different shroud or something. Regardless, the install should be the same.
-----------------------------------------------------------------------
Tools needed (may vary depending on your car and what screws/bolts are being used to hold the car together):
- Conventional Oven
- Flathead screwdriver (variety of sizes)
- Philips screwdriver (variety of sizes)
- 10mm socket with extension and socket wrench
- Flat surface with sufficient space to work on
I didn't include pictures for EVERY step. Some are self-explanatory. The pictures are click-able thumbnails.
-----------------------------------------------------------------------
Step 1:
Begin by parking on a flat surface with a flat wall ahead of you (this will come in handy later).
Step 2:
Remove your front bumper and upper grill.
Step 3:
Remove your headlights.
(I only removed my passenger one since that's the one that needed to be worked on):

Step 4:
Set your oven to 225 and wait until it's ready (you can also do this while you're taking your car apart if you've done it before and can do it quickly).
Step 5:
Remove everything you can off of the headlight and then put it in the oven for 10 minutes.
Step 6:
CAUTION: THE HEADLIGHT WILL BE HOT. USE HOT PADS, GLOVES, ETC.
Once 10 minutes are up, pull the headlight out and onto your flat work surface. Take a smaller flathead screwdriver and start to pry open the headlight. Don't worry if you break the little tabs that help hold them together. It happens. The sealant does most of the work anyways. Pry the tabs up and off from the headlight cover and then pull the cover and back part away from each other.
This would also be a good time to put in your other headlight! Just don't forget about it!
You should have this when done:

Step 7:
Once you have your headlight apart, take your 10mm socket and extension and a phillips head screwdriver and turn the 2x 10mm bolts and the far left adjuster until the front reflector pops off. You may have to pull on the reflector cone while you turn the adjuster. Neither of the bolts actually come out. They just turn out of the reflector cone.
TAKE NOTE OF HOW FAR EACH BOLT GOES INTO EACH HOLE!!!! When you go to put them back together later, you'll want to put them in around the same distance.

You should have the following when you're done:

Step 8:
Take a phillips head screwdriver and remove the screw that holds on the halogen reflector.
(It's the bottom empty hole in the pic below)

When you're all done:

Step 9:
Now take out your projectors from the packaging and screw in the shrouds with the 4 long screws provided. Take your time doing it and put them in straight.
Step 10:
Now look at the back of the projector. Remove the big nut and the 3 tiny screws with a phillips head CAREFULLY. You have to apply pressure as you turn otherwise you'll ruin them. They're annoying to put in / take out. Be careful where you set the screws because they are small! Take off the little tab the screws hold on and set that aside with the nut and screws.
When you're done:

Step 11:
Once you have the back off, gather the following pieces in the order below:

Here is a mock up of how the parts go on the projector:

Step 12:
Before you put the projector into the headlight, be sure it's right side up. Please know it can only go in one way because of the unique way the H4 adapter plate is shaped but this will help avoid any confusion some people may have.
Once you've faced it the right way, take the biggest white rubber "washer" and put it on the back of the projector and slide it into the reflector cone (make sure you pull the wire through too!). Next take the H4 adapter plate and put it so the bulge (if you look at it sideways) is facing away from the projector. Then take the other little white rubber "washer" and put it on. Finally screw the nut back on.
Step 13:
After you've got the projector secure in the reflector cone, put the 3 tiny screws and metal tab back onto the back of the projector.
When you're all done, here is where you should be:


Step 14:
Now put the reflector cone back onto the back piece of the headlight in reverse method of taking it off. You don't have to go crazy with the bolts and adjuster. Just enough to they're at least in. You're going to have to adjust the headlights later anyways.
When you're done:

Step 15:
With the headlight cover still off, bolt the headlight back onto the car:

Step 16:
Hook up your HID's and carefully put the bulb into the projector (it takes a little wiggling and struggling. Just DON'T force it in).
Step 17:
Turn on the HID's and make sure the cut off is horizontal on the wall. If it isn't, just grab the shroud and GENTLY turn the projector until it is horizontal like so:

Please remember that you can also bolt the headlight into the car at a certain angle so it turns the cut off. You do not want to try to turn the projector too much because the adapter plate is holding it in a specific place and there is VERY VERY little room for the projector to turn.
Step 18:
When you have the cut off level, turn off the HID's, disconnect everything and remove the headlight. Now is a good time to wipe off any oil or finger prints your hands left when touching all the shiny surfaces. TRS should have provided an alcohol wipe. Do not make the mistake I did and use wet paper towel. It will leave streaks!!! Spray some windex onto a piece of paper towel if the alcohol wipe starts to get dry and you still need to clean more.
Step 19:
Push the headlight cover back onto the headlight as much as you can and then put it back into the oven @ 225 for 10 minutes.
Step 20.:
Once 10 minutes have passed, take the headlight out (CAUTION: THE HEADLIGHT WILL BE HOT. USE HOT PADS, GLOVES, ETC.), and work the headlight back together. Make sure you push the tabs back over the tiny flaps. The tabs may make a click sound when it gets pushed over a tab, you'll know that it's on.
If you feel like the sealant is getting a little hard and you've spent too much time diddling with it, put it back in the oven for however long (based on how cool the sealant is) and work it more again.
Step 21:
Once you're all set putting the headlight back together, put the headlight back on the car and repeat for the other headlight.
When you're done with both, be sure to aim them!!! Park on a level surface, 25ft away from a wall, perpendicular to it, and align them. I've adjusted mine over a dozen times at this point. It may take a few times to find the right spot. Keep driving around and seeing where your cut off lands on cars, signs, etc.
-----------------------------------------------------------------------
Enjoy your cut off!!!

Last edited by amej8; 10-03-2011 at 03:42 AM.
 10-03-2011, 03:30 AM
#3
Honda-Tech Member
Thread Starter
Join Date: Jul 2005
Location: New York
Posts: 1,392
Likes: 0
Received 0 Likes
on
0 Posts
One issue I have noticed (that apparently others have experienced) is the cut off shield doesn't come back up all the way (when going from high beam to low beam) sometimes which makes the cut off blurry. It also makes the ends of the cut off flare up on each end. I've opened my headlights almost half a dozen times now in the past several months so I'm being too lazy to fix it. But the cut off definitely is not sharp anymore  . I've gotta fix it before it's gets too cold and then I REALLY won't want to fix it.
. I've gotta fix it before it's gets too cold and then I REALLY won't want to fix it.
10-03-2011, 04:47 AM
#4
Honda-Tech Member
I believe i read to fix this you can use fine sandpaper to sand down the plastic part of the hi-lo mechanism that resides within the return spring, and possibly using a stronger spring and/or lubricant of some kind. hidplanet had a thread on it but it was a few weeks ago that i looked at it last.
10-03-2011, 06:35 AM
#5
Honda-Tech Member
I have the 3rd gen H1's and sanded down the plunger by inserting it inside of a drill, then wrap it in 1000 grit sandpaper and let it spin for a minute. Then apply a thin coat of liquid graphite. Finally, to put a little more tension on the spring, you stretch it slightly.
I did this over a year ago and haven't had any problems with it sticking.
Give it a shot, and good luck.
I did this over a year ago and haven't had any problems with it sticking.
Give it a shot, and good luck.
10-03-2011, 08:11 AM
#6
Honda-Tech Member
Thread Starter
Join Date: Jul 2005
Location: New York
Posts: 1,392
Likes: 0
Received 0 Likes
on
0 Posts
My beams don't stick. I don't have a problem switching back and forth. What I think I did was about a month ago, I had just put the headlight back together when I noticed that there were water droplets that dried on the projector glass. So instead of correctly taking the projector apart, I left the headlight together and shoved a screwdriver in through the back where the bulb goes in. I tried to wipe as much as possible with paper towel wrapped on the end of the screw driver and I may have altered the shield positioning in the process. I REALLY don't want to take the headlights apart AGAIN.....
10-03-2011, 08:38 AM
#7
Honda-Tech Member
I don't blame you. I've taken my headlights apart literally 8 or 9 times to make adjustments. They need taken apart again, but I don't have the motivation to do it. If I do open them up, a set of TL's or RX350 bi-xenon projectors are going in.
It's possible you may have pushed the hinge out of position. That's the one major issue I have with the Mini's. The whole shield assembly is made up of loosely fitting parts. Other than that, they're a great projector for the money. I hear the 4.0's are a bit better than the 3rd gens.
It's possible you may have pushed the hinge out of position. That's the one major issue I have with the Mini's. The whole shield assembly is made up of loosely fitting parts. Other than that, they're a great projector for the money. I hear the 4.0's are a bit better than the 3rd gens.
Trending Topics


Thread
Thread Starter
Forum
Replies
Last Post
Eran
Honda Civic / Del Sol (1992 - 2000)
7
06-21-2006 09:31 PM
Greg123
Honda Civic / Del Sol (1992 - 2000)
2
02-11-2003 07:01 PM