
DIY: Civic del Sol owners - Making clock into a boost guage.
 10-17-2005, 09:24 PM
#1
Honda-Tech Member
Thread Starter
I searched and didn't see any topics relating to this. I got bored tonight (and needed to take my cluster out anyway to repair the tach) and decided to see if I could make my old VDO boost guage fit in the cluster. Ever since putting my JRSC on, I havn't had a boost guage because:
A.) I hate A pillar pods
B.) Where else besides like.. the drivers vent can you put one in a Sol?
As useful as the Clock / outline of the Del Sol is (telling you that your top is locked or a brake light is out) ... I decided to remove it. Took about 20 minutes to do everything and the dimmer etc all still work. I hooked up the VDO's lighting stuff to the stock dimmer, so it's all in sync. Nothing was done irreversably either, should I ever wanna put in my baller clock again.. I can. I think this is the ultimate in sleeper guages for your Sol.
Enjoy
---
Edit: Here is my gimpy "howto" I apologize for the pics being in the 'done' state. My camera battery was dead when I was doing this. These should help you out a bit though if you're confused. Sorry some are blurry, camera sucks
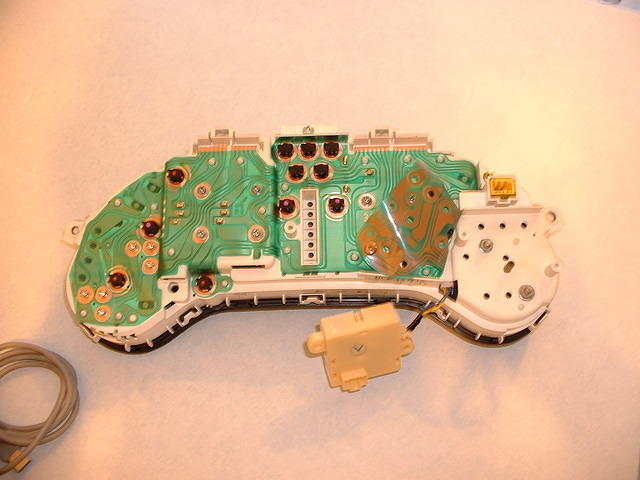
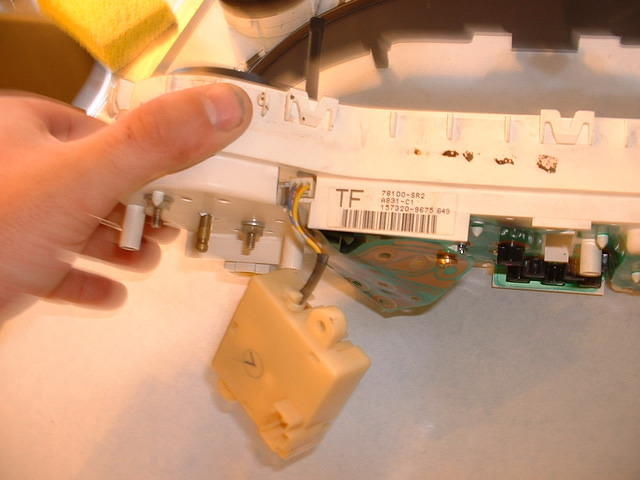
1.) Lay the cluster face down on your work area. Put something soft down, so you don't scratch it. In the clock region, remove the 2 gold colors screws that hold a small plastic box to the cluster. Carefully pull this little box up and off and unplug its little wire pigtail from the dimmer. Then remove all of the silver screws in the clock area. Carefully pry the circuit board/plastic thing back and out of the way.. as you'll most likely be making small holes in this region. I had to remove the CEL, oil etc light bulbs to make prying this back possible/safe. My advice (and this is how I did it) is to gently curl it back flat towards the tach. I then secured it there utilizing an empty screw hole and one of the left over gold screws from the dimmer box.

2.) Flip the cluster over and remove the clear plastic cover, this should be pretty self explainatory. You must remove the top mounting bracket + screw and then carefully pop the face out of its clasps. Remember to GENTLY pull the trip reset and dimmer ***** off! They might take a lil yank, but they WILL come off in one piece.
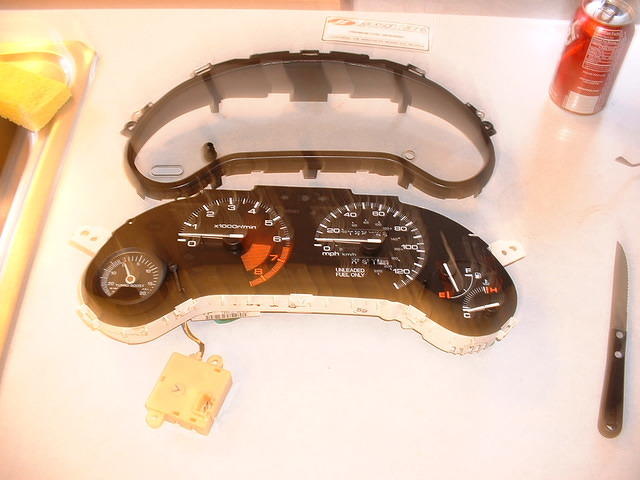
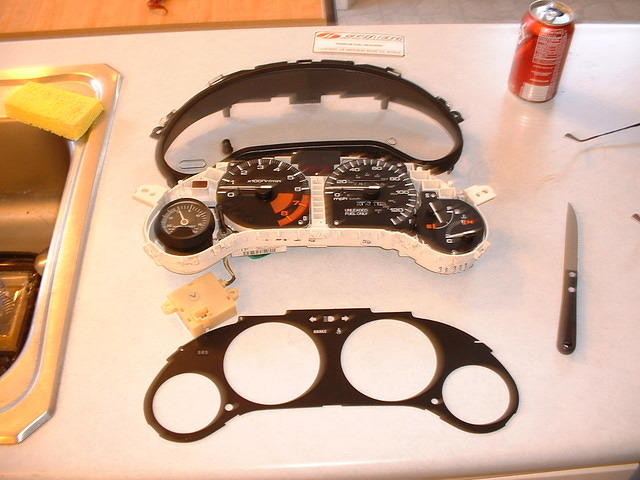
3.) Carefully lift up on the bezel (the large black piece that goes AROUND the guages) thats underneith the clear plastic cover.
4.) The clock should lift up & out, without resistance.
5.) This is where you test fit your guage, mark holes to drill ( I had to drill 2 small ones for the mounting threads on the back). Obviously this will vary depending on what guage you use. Make sure you lay the black bezel back down (removed in step 4) to ensure you have your guage centered well.
6.) Using an 11mm (7/16) open end wrench, remove the nut on the dimmer and pull it out of the clock. Note the dimmer switches orientation (ie where the connector is) Using a hacksaw (or whatever you prefer), CAREFULLY cut its mounting tab OFF THE CLOCK. Use the side of the clock as your guide... take your time! Put the dimmer back into the new cut mount. Using hot glue, I then glued dimmer back into its original position.

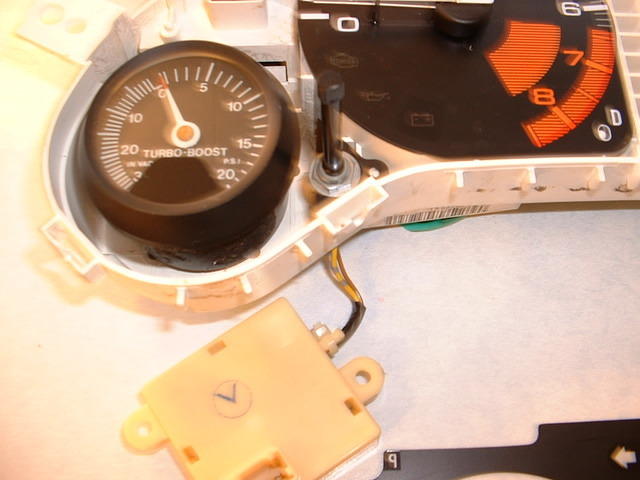
7.) Close the cluster all back up! That little box you removed in step 1 needs to be reattached to the dimmer. Due to the way my boost guage works, i couldnt reattach it to the cluster.. no biggie. It hangs out behind the cluster with plenty of room to spare
---
This should give you a good idea of what will need to be done here. As a previous poster said, I have some small gap around my guage.. and its a tad annoying with the lights on (small ring of light around it) I plan on taking the cluster back out and using a black piece of paper or something to go around and seal/block that gap out.
This is basically the finished product:

Modified by GimpyAccord at 8:53 PM 10/18/2005
A.) I hate A pillar pods
B.) Where else besides like.. the drivers vent can you put one in a Sol?
As useful as the Clock / outline of the Del Sol is (telling you that your top is locked or a brake light is out)
... I decided to remove it. Took about 20 minutes to do everything and the dimmer etc all still work. I hooked up the VDO's lighting stuff to the stock dimmer, so it's all in sync. Nothing was done irreversably either, should I ever wanna put in my baller clock again.. I can. I think this is the ultimate in sleeper guages for your Sol.Enjoy
---
Edit: Here is my gimpy "howto" I apologize for the pics being in the 'done' state. My camera battery was dead when I was doing this. These should help you out a bit though if you're confused. Sorry some are blurry, camera sucks
1.) Lay the cluster face down on your work area. Put something soft down, so you don't scratch it. In the clock region, remove the 2 gold colors screws that hold a small plastic box to the cluster. Carefully pull this little box up and off and unplug its little wire pigtail from the dimmer. Then remove all of the silver screws in the clock area. Carefully pry the circuit board/plastic thing back and out of the way.. as you'll most likely be making small holes in this region. I had to remove the CEL, oil etc light bulbs to make prying this back possible/safe. My advice (and this is how I did it) is to gently curl it back flat towards the tach. I then secured it there utilizing an empty screw hole and one of the left over gold screws from the dimmer box.
2.) Flip the cluster over and remove the clear plastic cover, this should be pretty self explainatory. You must remove the top mounting bracket + screw and then carefully pop the face out of its clasps. Remember to GENTLY pull the trip reset and dimmer ***** off! They might take a lil yank, but they WILL come off in one piece.
3.) Carefully lift up on the bezel (the large black piece that goes AROUND the guages) thats underneith the clear plastic cover.
4.) The clock should lift up & out, without resistance.
5.) This is where you test fit your guage, mark holes to drill ( I had to drill 2 small ones for the mounting threads on the back). Obviously this will vary depending on what guage you use. Make sure you lay the black bezel back down (removed in step 4) to ensure you have your guage centered well.
6.) Using an 11mm (7/16) open end wrench, remove the nut on the dimmer and pull it out of the clock. Note the dimmer switches orientation (ie where the connector is) Using a hacksaw (or whatever you prefer), CAREFULLY cut its mounting tab OFF THE CLOCK. Use the side of the clock as your guide... take your time! Put the dimmer back into the new cut mount. Using hot glue, I then glued dimmer back into its original position.
7.) Close the cluster all back up! That little box you removed in step 1 needs to be reattached to the dimmer. Due to the way my boost guage works, i couldnt reattach it to the cluster.. no biggie. It hangs out behind the cluster with plenty of room to spare
---
This should give you a good idea of what will need to be done here. As a previous poster said, I have some small gap around my guage.. and its a tad annoying with the lights on (small ring of light around it) I plan on taking the cluster back out and using a black piece of paper or something to go around and seal/block that gap out.
This is basically the finished product:
Modified by GimpyAccord at 8:53 PM 10/18/2005
Last edited by GimpyAccord; 12-13-2013 at 10:52 PM.

 10-17-2005, 09:41 PM
#5
Member
Join Date: Mar 2004
Location: racine, Wi, usa
Posts: 2,239
Likes: 0
Received 0 Likes
on
0 Posts
looks good but unless I'm missing it wheres the how to part? I just see the pictures, I want to know how you did this, because it could be ussed to put any guage you would want in there not just boost.
Note:
Ive seen a nice insert that goes into where the center vent fits, I belive Foz makes them or knows of who can make them.
Note:
Ive seen a nice insert that goes into where the center vent fits, I belive Foz makes them or knows of who can make them.
10-17-2005, 09:56 PM
#6
Honda-Tech Member
Thread Starter
I've seen those inserts too, but this is my DD and I enjoy cool cool breeze in mah face. On my DSM those vent bezels disrupt a lot of airflow.
Modified by GimpyAccord at 8:46 PM 10/18/2005
Modified by GimpyAccord at 8:46 PM 10/18/2005
10-17-2005, 10:02 PM
#7
Junior Member

Join Date: Aug 2005
Location: wa
Posts: 828
Likes: 0
Received 0 Likes
on
0 Posts
very nicely done! ive been eyeing my clock and contemplating the same thing except replacing the clock with a Innovative wideband gauge. good job on the write up too.
Trending Topics

 10-17-2005, 11:40 PM
#10
Junior Member
Join Date: May 2005
Location: naperville, IL, USA
Posts: 264
Likes: 0
Received 0 Likes
on
0 Posts
Cant wait for pics... i just dont want to mess up the circuit board. I knew i wasnt the only one that hated a-piller gauges
10-18-2005, 02:01 AM
#13
Junior Member
Join Date: Jun 2005
Location: Brick,NJ / Orlando, fl, usa
Posts: 373
Likes: 0
Received 0 Likes
on
0 Posts
<TABLE WIDTH="90%" CELLSPACING=0 CELLPADDING=0 ALIGN=CENTER><TR><TD>Quote, originally posted by BlueIntegraBoy »</TD></TR><TR><TD CLASS="quote">Very cool </TD></TR></TABLE>
10-18-2005, 07:33 AM
#16
Honda-Tech Member
Thread Starter
Well, I'm not suprised this has been posted & done before. I mean it seemed to obvious when you looked at the clock size/shape that a guage should go there
I'll take the pictures of the cluster tonight when I get home for those of you who wanted them still!
I'll take the pictures of the cluster tonight when I get home for those of you who wanted them still!
10-18-2005, 07:37 AM
#17
Honda-Tech Member
Join Date: Jul 2005
Posts: 2,041
Likes: 0
Received 0 Likes
on
0 Posts
<TABLE WIDTH="90%" CELLSPACING=0 CELLPADDING=0 ALIGN=CENTER><TR><TD>Quote, originally posted by Redline96LX »</TD></TR><TR><TD CLASS="quote">Sweet! It looks like it came that way!</TD></TR></TABLE>
10-18-2005, 08:25 AM
#20
Member
Join Date: Mar 2004
Location: racine, Wi, usa
Posts: 2,239
Likes: 0
Received 0 Likes
on
0 Posts
Yea I think your going to need pics, Theres a circuit board behind the cluster you need to be carefull not to drill thro you dident mention, if you get pics that will help a lot and you'll remember some more details. Good work cant wait for the pics
10-18-2005, 07:46 PM
#22
Honda-Tech Member
Thread Starter
okay guys, the gimped out howto + pics is above in the original post. enjoy.