
Compensator arm question (pic) - How fix broken bolt?
 08-20-2007, 07:20 PM
#1
Honda-Tech Member
Thread Starter
Join Date: Dec 2006
Location: Vancouver, BC, Canada
Posts: 420
Likes: 0
Received 0 Likes
on
0 Posts
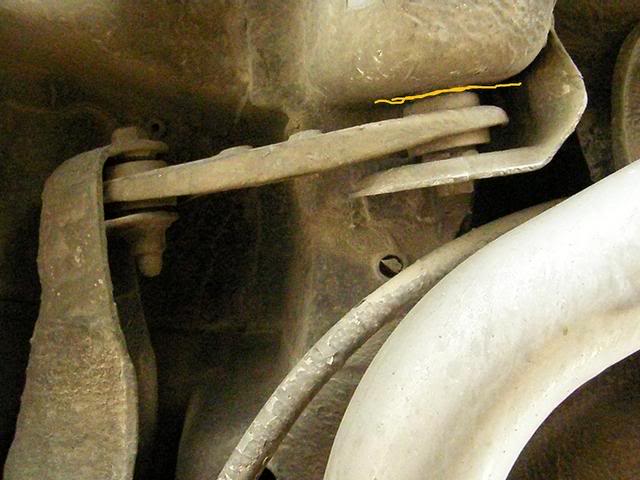
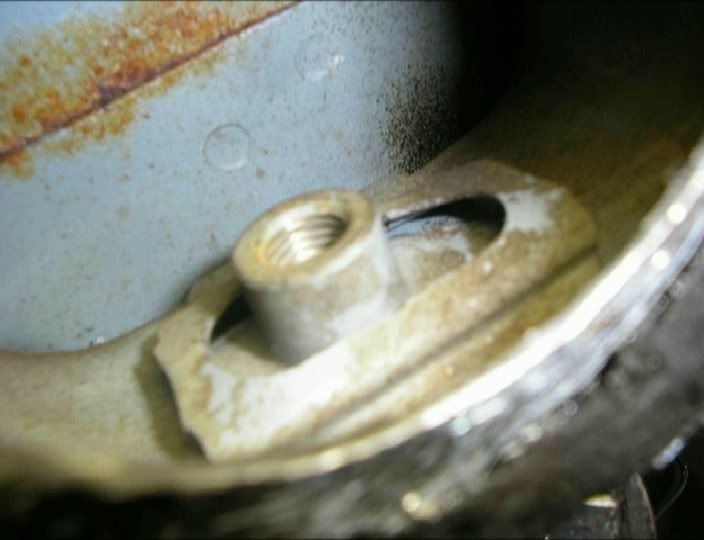
I broke the bolt head that connects the compensator arm to the chassis a while ago. The arm only recently broke loose and I figure it is time to do something about it.
My question is regarding what the bolt threads into. I know that the compensator arm is meant to be able to slide back and forth (when loose) in order to get the alignment right so I don't think the bolt would thread straight into something rigid. So, if I cut the bolt/bushing where the yellow line is in my picture, will I be able to somehow take the remains of the bolt and whatever it threads into, out?
Any suggestions? I don't think I will be able to just drill it out as it's in a pretty tight area.
note: this picture is from the side without the broken bolt.
 08-20-2007, 10:02 PM
#4
Member
Join Date: Aug 2006
Location: louEVIL, ky
Posts: 1,246
Likes: 0
Received 0 Likes
on
0 Posts
there is a nut inside the subframe, i had to remove that bolt and it fell down into that hump, lets just say some big tin snips fixed it...
08-20-2007, 10:58 PM
#5
Cool Cool Island Breezes. BOY-EE
iTrader: (1)
Join Date: Sep 2006
Location: TRILLINOIS....WAY downtown, jerky.
Posts: 11,953
Likes: 0
Received 4 Likes
on
4 Posts
yeah you just cut a hole where the nut usually resides. You have to get that style nut to fit inside the slot that's in there. You'll see what im talking about. Or you can use a regular bolt since there will be a hole there. Use a dremel or something with some heavy duty blades.
It's not really a high stress point there. So no worries. Use some spray paint so it wont rust after all the cutting.
It's not really a high stress point there. So no worries. Use some spray paint so it wont rust after all the cutting.
08-20-2007, 11:26 PM
#7
Honda-Tech Member
Thread Starter
Join Date: Dec 2006
Location: Vancouver, BC, Canada
Posts: 420
Likes: 0
Received 0 Likes
on
0 Posts
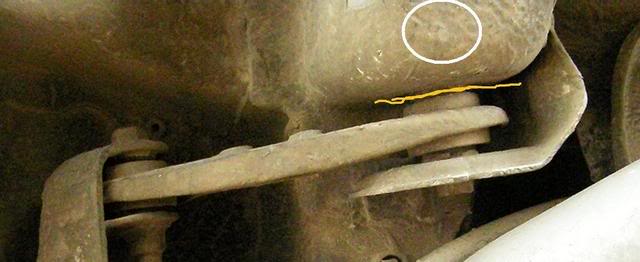
So are you saying I should cut a hole like shown in the pic (white circle) or just cut the hole (after I remove the compensator arm and bolt) where the bolt goes to the nut, bigger?
cheers,
cheers,
Trending Topics
08-20-2007, 11:32 PM
#8
Cool Cool Island Breezes. BOY-EE
iTrader: (1)
Join Date: Sep 2006
Location: TRILLINOIS....WAY downtown, jerky.
Posts: 11,953
Likes: 0
Received 4 Likes
on
4 Posts
<TABLE WIDTH="90%" CELLSPACING=0 CELLPADDING=0 ALIGN=CENTER><TR><TD>Quote, originally posted by Dann6968 »</TD></TR><TR><TD CLASS="quote">So are you saying I should cut a hole like shown in the pic (white circle) or just cut the hole (after I remove the compensator arm and bolt) where the bolt goes to the nut, bigger?
cheers,
 </TD></TR></TABLE>
bigger. You'll see. Cut a hole about 1.5'' X 1.5''. Square hole. those are easier to cut.
Once you start cutting, you'll figure it out. I mean by all means cut a smaller hole if possible. start out at like .75''X.75''. But you have to get your fingers in there and all that jazz. You have kinda pound the nut out of it's slot as well. So cut the bolt where you orignally wanted to, take out the toe control link, and then pound out the nut.
Hit the cut off stud towards the front of the car with a punch. The nut will fall out of its slot.
lol this sounds very complicated, but it's not. Just cut the hole, and you should see exactly what im talking about.
cheers,
</TD></TR></TABLE>bigger. You'll see. Cut a hole about 1.5'' X 1.5''. Square hole. those are easier to cut.
Once you start cutting, you'll figure it out. I mean by all means cut a smaller hole if possible. start out at like .75''X.75''. But you have to get your fingers in there and all that jazz. You have kinda pound the nut out of it's slot as well. So cut the bolt where you orignally wanted to, take out the toe control link, and then pound out the nut.
Hit the cut off stud towards the front of the car with a punch. The nut will fall out of its slot.
lol this sounds very complicated, but it's not. Just cut the hole, and you should see exactly what im talking about.
01-22-2012, 04:15 PM
#10
Honda-Tech Member

Join Date: Feb 2009
Posts: 7
Likes: 0
Received 0 Likes
on
0 Posts
sorry for bringing back an old thread just trying to help people who may have this problem in the future. this was orginally posted by 93allmotorcoupe and i take no credit for it.
hope this helps!
also as a side note does anyone know what the part number of this flange type nut is?
Well as promised here is my short How-To on how to fix this problem. There are probably a number of ways you can go about this, however after a few days of thinking about it we decided that this would be best for our situation. Our idea was to drill a circular hole through the bottom of the subframe. Other good suggestions which you might want to consider were to:
1. Use a powerful magnet to get the nut back in its original location.
-We thought this wouldve been way too tedios and time consuming
2. Cut a small notch towards the front just large enough to hold up a wrench with a new nut.
-This was a good idea, however the old nut would still be inside the subframe.
3. Cut an I shape in the bottom and bend the tabs down to open it up.
-Also a good idea, however this required more advanced cutting. The position of the car made this hard to do, and we also werent crazy about bending and rebending the soft sheetmetal of the subframe.
Now that we're through that, Ill show you what we did. We used a 2" hole saw bit to drill a hole up through the bottom of the subframe. This would allow us to make one very simple cut, allow us enough room to fix the problem, and also provide a very simple way to weld the are back shut. If youre doing this on your own, remember to wear safety goggles and some type of MechanxWear style gloves (which is why my hands are so clean in the pics ).
).
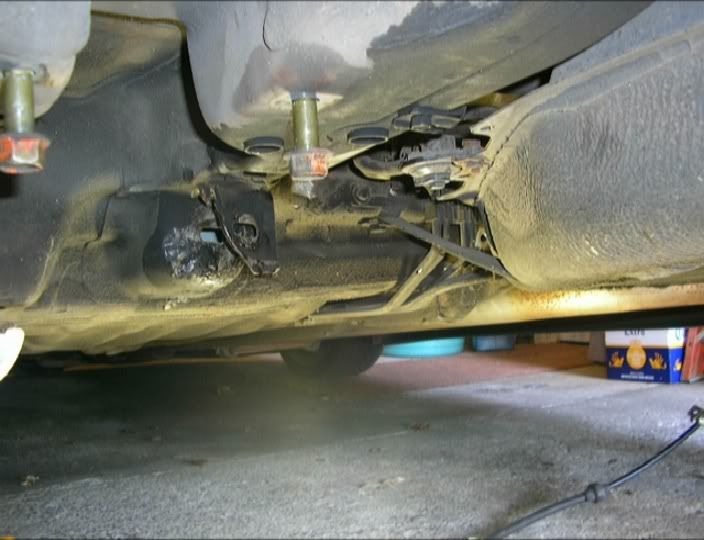
Sorry, no photos during the drilling but here are a few shots of the hole after the cut was made:
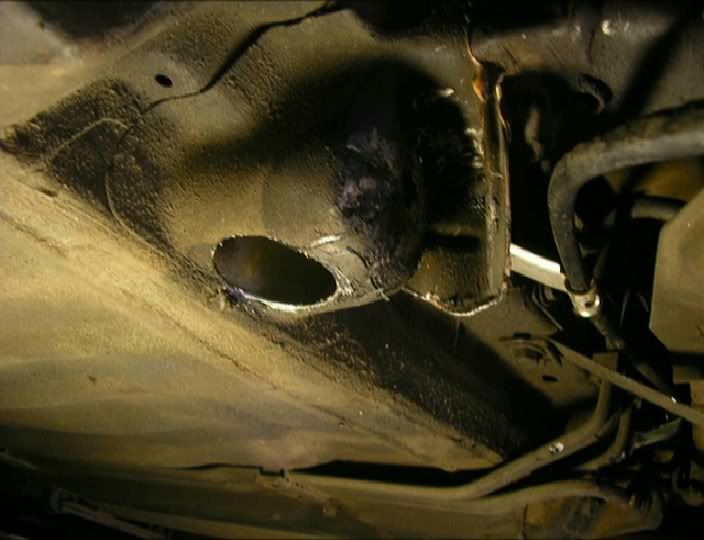

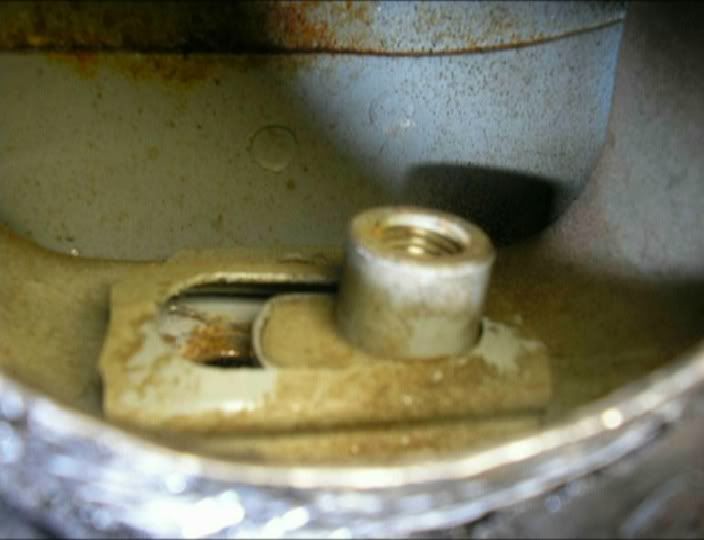
The hole you just made will have small,sharp shards of metal everywhere. You may want to smooth it out with a grinder before sticking your fingers through it. This is also why I mentioned to wear gloves. After cutting, the nut will fall out the bottom through the hole you just made, find it immediately! Here's what mine looked like:
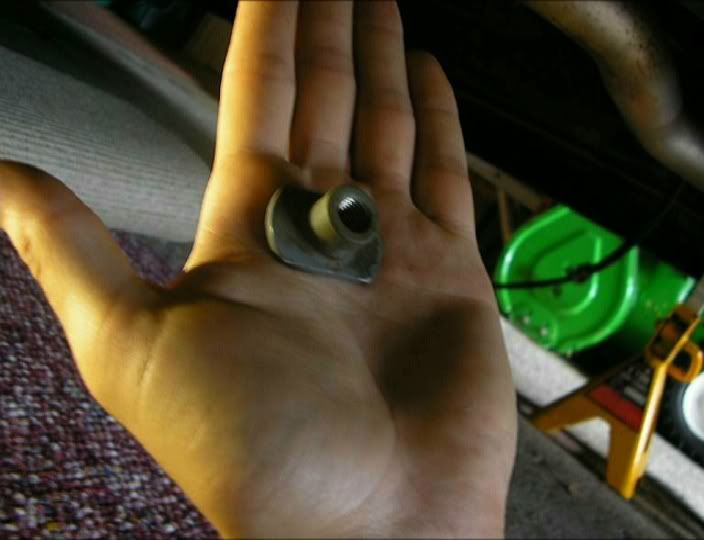
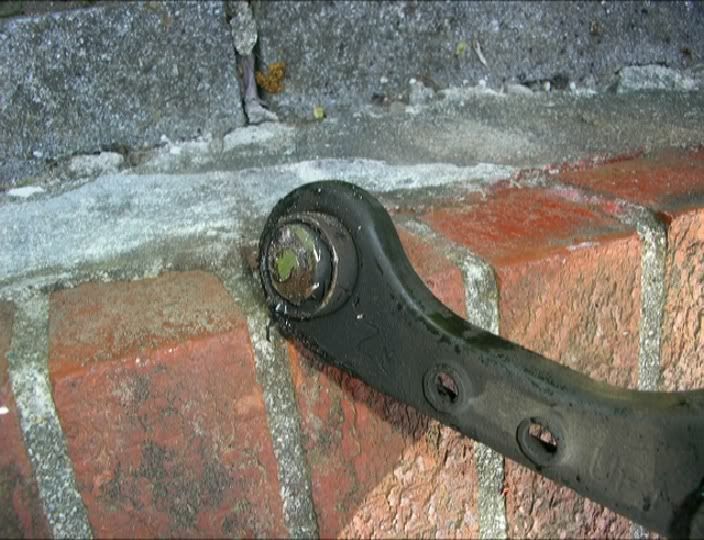
You can see there is a flange with a threaded nut on the other side. When re-installing, the flange faces towards the back of the car and the nut faces towards the front. Or, in other words (and if youre working on a different area of the car with the same problem) the bolt goes through the flange first, and then gets threaded into the nut.
Now that youve seen the nut, Ill show you where it goes inside the subframe. Here are a few shots through the hole we made. They are very blurry, but you still get the idea.
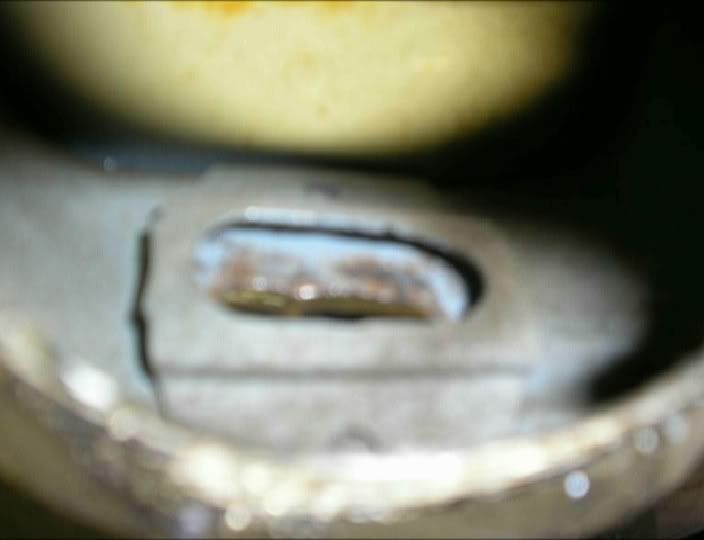
You can see above the small slot that is supposed to hold this nut in place. Mine did not appear to be bent or in any way out of shape. The slot is big enough for the nut to go back through it easily, which obviously means that its big enough for it to fall out very easily. In my opinion, its a pretty bad design flaw, but back on topic...
Grab the nut with a couple of fingers, and again with the flange side going in first, reach it up through the hole and back into the slot where it belongs. It may take some time and finesse, but you'll get it in there. Once its in, be sure to slide it back and forth as if you were doing it with the arms on adjusting the Toe. Make sure there are no high spots or low spots, and if there are you may want to bend those back to normal. Mine seemed to be straight, so we didnt need to make any changes with it.
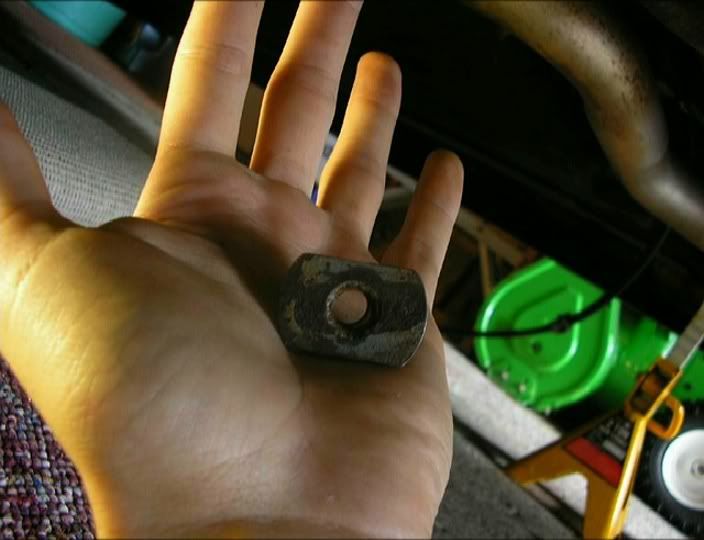
Here are photos of the nut back in the slot:
Once we are finished bolting everything back together and the car is driveable, we are taking it to a friend of mine's shop to get welded back shut. We dont have any welding experience or we would do it ourselves But please, DO NOT cut a hole like this if you are not planing on welding it once youre done. Water will get in there and your subframe will start to rust and corrode from the inside out. It is also a structural region of the car that needs to be supported properly. With a gaping hole in it, its not going to be as strong as it should be. Also be sure to cover the area with a good undercoating.
1. Use a powerful magnet to get the nut back in its original location.
-We thought this wouldve been way too tedios and time consuming
2. Cut a small notch towards the front just large enough to hold up a wrench with a new nut.
-This was a good idea, however the old nut would still be inside the subframe.
3. Cut an I shape in the bottom and bend the tabs down to open it up.
-Also a good idea, however this required more advanced cutting. The position of the car made this hard to do, and we also werent crazy about bending and rebending the soft sheetmetal of the subframe.
Now that we're through that, Ill show you what we did. We used a 2" hole saw bit to drill a hole up through the bottom of the subframe. This would allow us to make one very simple cut, allow us enough room to fix the problem, and also provide a very simple way to weld the are back shut. If youre doing this on your own, remember to wear safety goggles and some type of MechanxWear style gloves (which is why my hands are so clean in the pics
). Sorry, no photos during the drilling but here are a few shots of the hole after the cut was made:
The hole you just made will have small,sharp shards of metal everywhere. You may want to smooth it out with a grinder before sticking your fingers through it. This is also why I mentioned to wear gloves. After cutting, the nut will fall out the bottom through the hole you just made, find it immediately! Here's what mine looked like:
You can see there is a flange with a threaded nut on the other side. When re-installing, the flange faces towards the back of the car and the nut faces towards the front. Or, in other words (and if youre working on a different area of the car with the same problem) the bolt goes through the flange first, and then gets threaded into the nut.
Now that youve seen the nut, Ill show you where it goes inside the subframe. Here are a few shots through the hole we made. They are very blurry, but you still get the idea.
You can see above the small slot that is supposed to hold this nut in place. Mine did not appear to be bent or in any way out of shape. The slot is big enough for the nut to go back through it easily, which obviously means that its big enough for it to fall out very easily. In my opinion, its a pretty bad design flaw, but back on topic...
Grab the nut with a couple of fingers, and again with the flange side going in first, reach it up through the hole and back into the slot where it belongs. It may take some time and finesse, but you'll get it in there. Once its in, be sure to slide it back and forth as if you were doing it with the arms on adjusting the Toe. Make sure there are no high spots or low spots, and if there are you may want to bend those back to normal. Mine seemed to be straight, so we didnt need to make any changes with it.
Here are photos of the nut back in the slot:
Once we are finished bolting everything back together and the car is driveable, we are taking it to a friend of mine's shop to get welded back shut. We dont have any welding experience or we would do it ourselves
But please, DO NOT cut a hole like this if you are not planing on welding it once youre done. Water will get in there and your subframe will start to rust and corrode from the inside out. It is also a structural region of the car that needs to be supported properly. With a gaping hole in it, its not going to be as strong as it should be. Also be sure to cover the area with a good undercoating.also as a side note does anyone know what the part number of this flange type nut is?
07-14-2012, 11:05 PM
#11
Honda-Tech Member

Join Date: Apr 2011
Posts: 9
Likes: 0
Received 0 Likes
on
0 Posts
These last few pictures helped a ton to understand how to compensator arm works. I am getting an alignment after installing kyb gr2 shocks and stock springs, and the rear toe is at like .13. I watched the tech loosen the rear bolt, but instead of pushing the compensator arm/trailing arm to decrease toe, he simply just kept turning the compensator adjustment bolt. In the end of course he said he couldn't get the toe any lower.
Before these pictures I was unable to visualize what pushing or pulling the arm would do, but now I see that the flange that the nut attaches to has a little bit of wiggle room in it's "slot." Once the correct toe setting is achieved, the nut it torqued down to 45 pounds to secure the position!!
Before these pictures I was unable to visualize what pushing or pulling the arm would do, but now I see that the flange that the nut attaches to has a little bit of wiggle room in it's "slot." Once the correct toe setting is achieved, the nut it torqued down to 45 pounds to secure the position!!


Thread
Thread Starter
Forum
Replies
Last Post
brendon.richey
Honda Civic / Del Sol (1992 - 2000)
7
02-25-2013 04:16 PM