
01-03 CL seats in EJ6/8
 02-02-2013, 05:43 PM
#1
B*a*n*n*e*d
Thread Starter

Join Date: Feb 2008
Location: Charlottesville, VA, USA
Posts: 6,420
Likes: 0
Received 5 Likes
on
5 Posts
Almost everyone, at some point, has looked at the old, beat up seats in their hatch, coupe, or sedan, and said "Damn, I wish these seats didn't suck so bad". Well, I decided to do something about it.
The OEM seats:
bU3Qsw~~_1_1709_1.JPG)
Lets be honest - they suck. Sure, cloth is nice, but leather is better. No heated seat option. Manual seats. The back adjustment is sloppy. They're also at least 13 years old now - steam clean them all you want, they still look dirty.
The donor seats:

01-03 Acura CL seats. Available in cloth or leather, so whether you're converting your interior, or just updating it a little, you'll be able to find seats that match. 4 or 8 way power, heated, side curtain air bags. Comfortable. Form fitting. Great bottom and side bolster support. Driver side adjustable lumbar. Better in every way, shape, and form.
Every write-up and how-to online says swap the rails, and they're a direct bolt in. Sure, you can do that, but the power adjusting motors are all bolted to the rails. You'll still be able to move the seats forward and back, but the seat back will forever be locked where it is - the adjusting mechanism is on the seat back itself on the original seats, but it's on the rail for the CL seats.
That aside, here's how you put fully functional, power adjusting heated seats in your 96-00 Civic! For the sake of this write-up, whenever I say "OEM", I'm talking about the Civic seats. Whenever I say "original", I'm talking about the CL seats.
Tools necessary:
Replacement seats
Angle grinder
Two metal cutting wheels
Drill, preferably wired
Drill bit
Bench C clamp
Basic socket set w/ extensions
Basic wrench set
Parts necessary:
12 five pin relays, sockets HIGHLY recommended.
2 fuse blocks.
Plenty of wire. At bare minimum, I recommend one roll of red, and one roll of black, both ~12g. If you have a hard time keeping wires straight, also pick up a roll of yellow.
2 fuse-style breakers. We won't be using the stock recline max sensors, so you can either get a breaker, or replace the fuse every time someone accidentally maxes out your seat reclines. Worth the to me.
Cost of tools and parts:
Seats - $30/ea at a junk yard. Online prices range anywhere from $100-$400
Angle grinder - Hitachi 4.5", $50 at Lowes
Cutting wheels - $2/ea at Lowes
Drill - Hitachi 5/8" Hammer, $70 at Lowes
Drill bit - Dewalt 7/16" Cobalt bit, $15 at Lowes
Bench clamp - If you have a bench, you have one. If you don't, it isn't worth buying just for this. Pick up a couple of locking pliers. $15/ea maybe?
Socket and wrench sets: If you don't already have these, you probably aren't reading this.
Total price: $250 if you have a bench, $280 if you don't.
Time investment:
Removal of OEM seats - 15 minutes
Removal of CL seats - 30 minutes
Modification of original bracket - 30 minutes per side
Wiring - 30 minutes passenger side, 1 hour driver's side (est.)
Re-installation of CL seats - 15 minutes
Total time: 2.5-3 hours
You will be cutting and drilling through quarter inch reinforced steel, so it's important to have good tools. Your Dremel isn't going to cut it.
On the bottom of the seat, three brackets are tack welded in, the fourth is bolted on. It's the rear inside bracket. In the CL, it bolts to the outside of the center tunnel, but in the EJ6/8 the seat is bolted to the floor. The other three bolt holes line up perfectly though. You all know how I am with keeping things 100% legal, though, so we're going to make that fourth bolt line up!
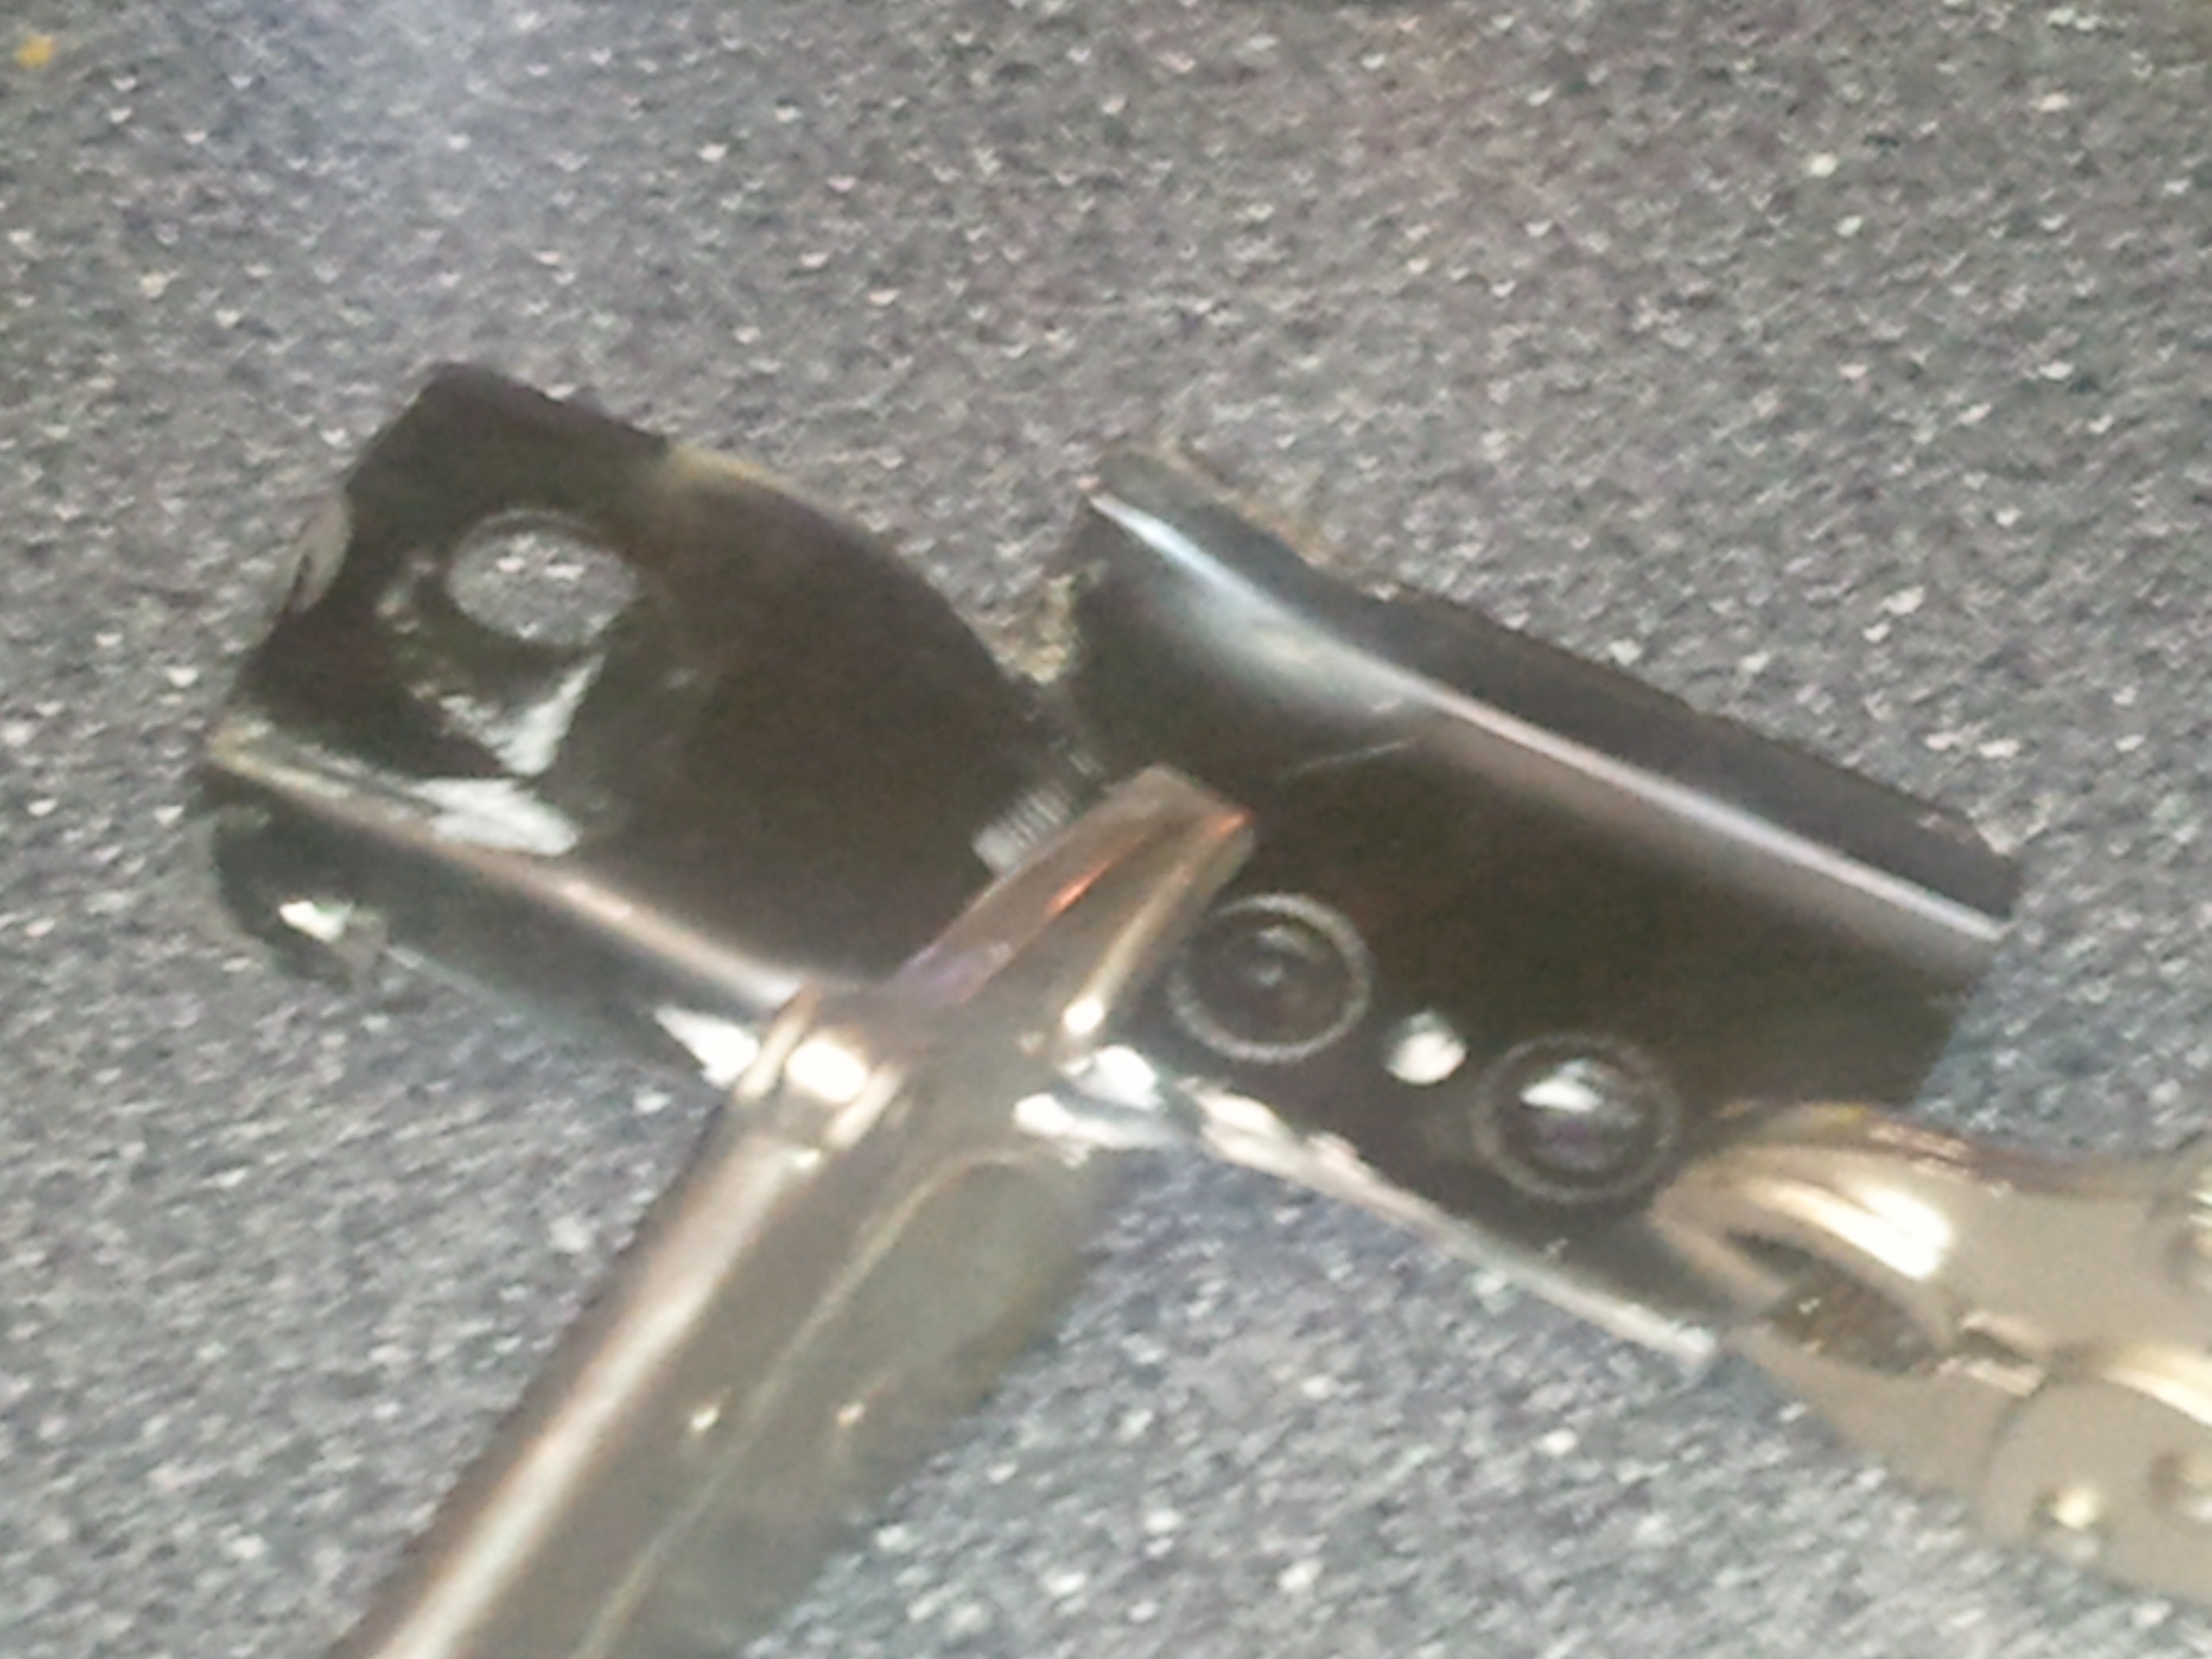
Here's the bracket that needs to be modified (already removed from the seat)
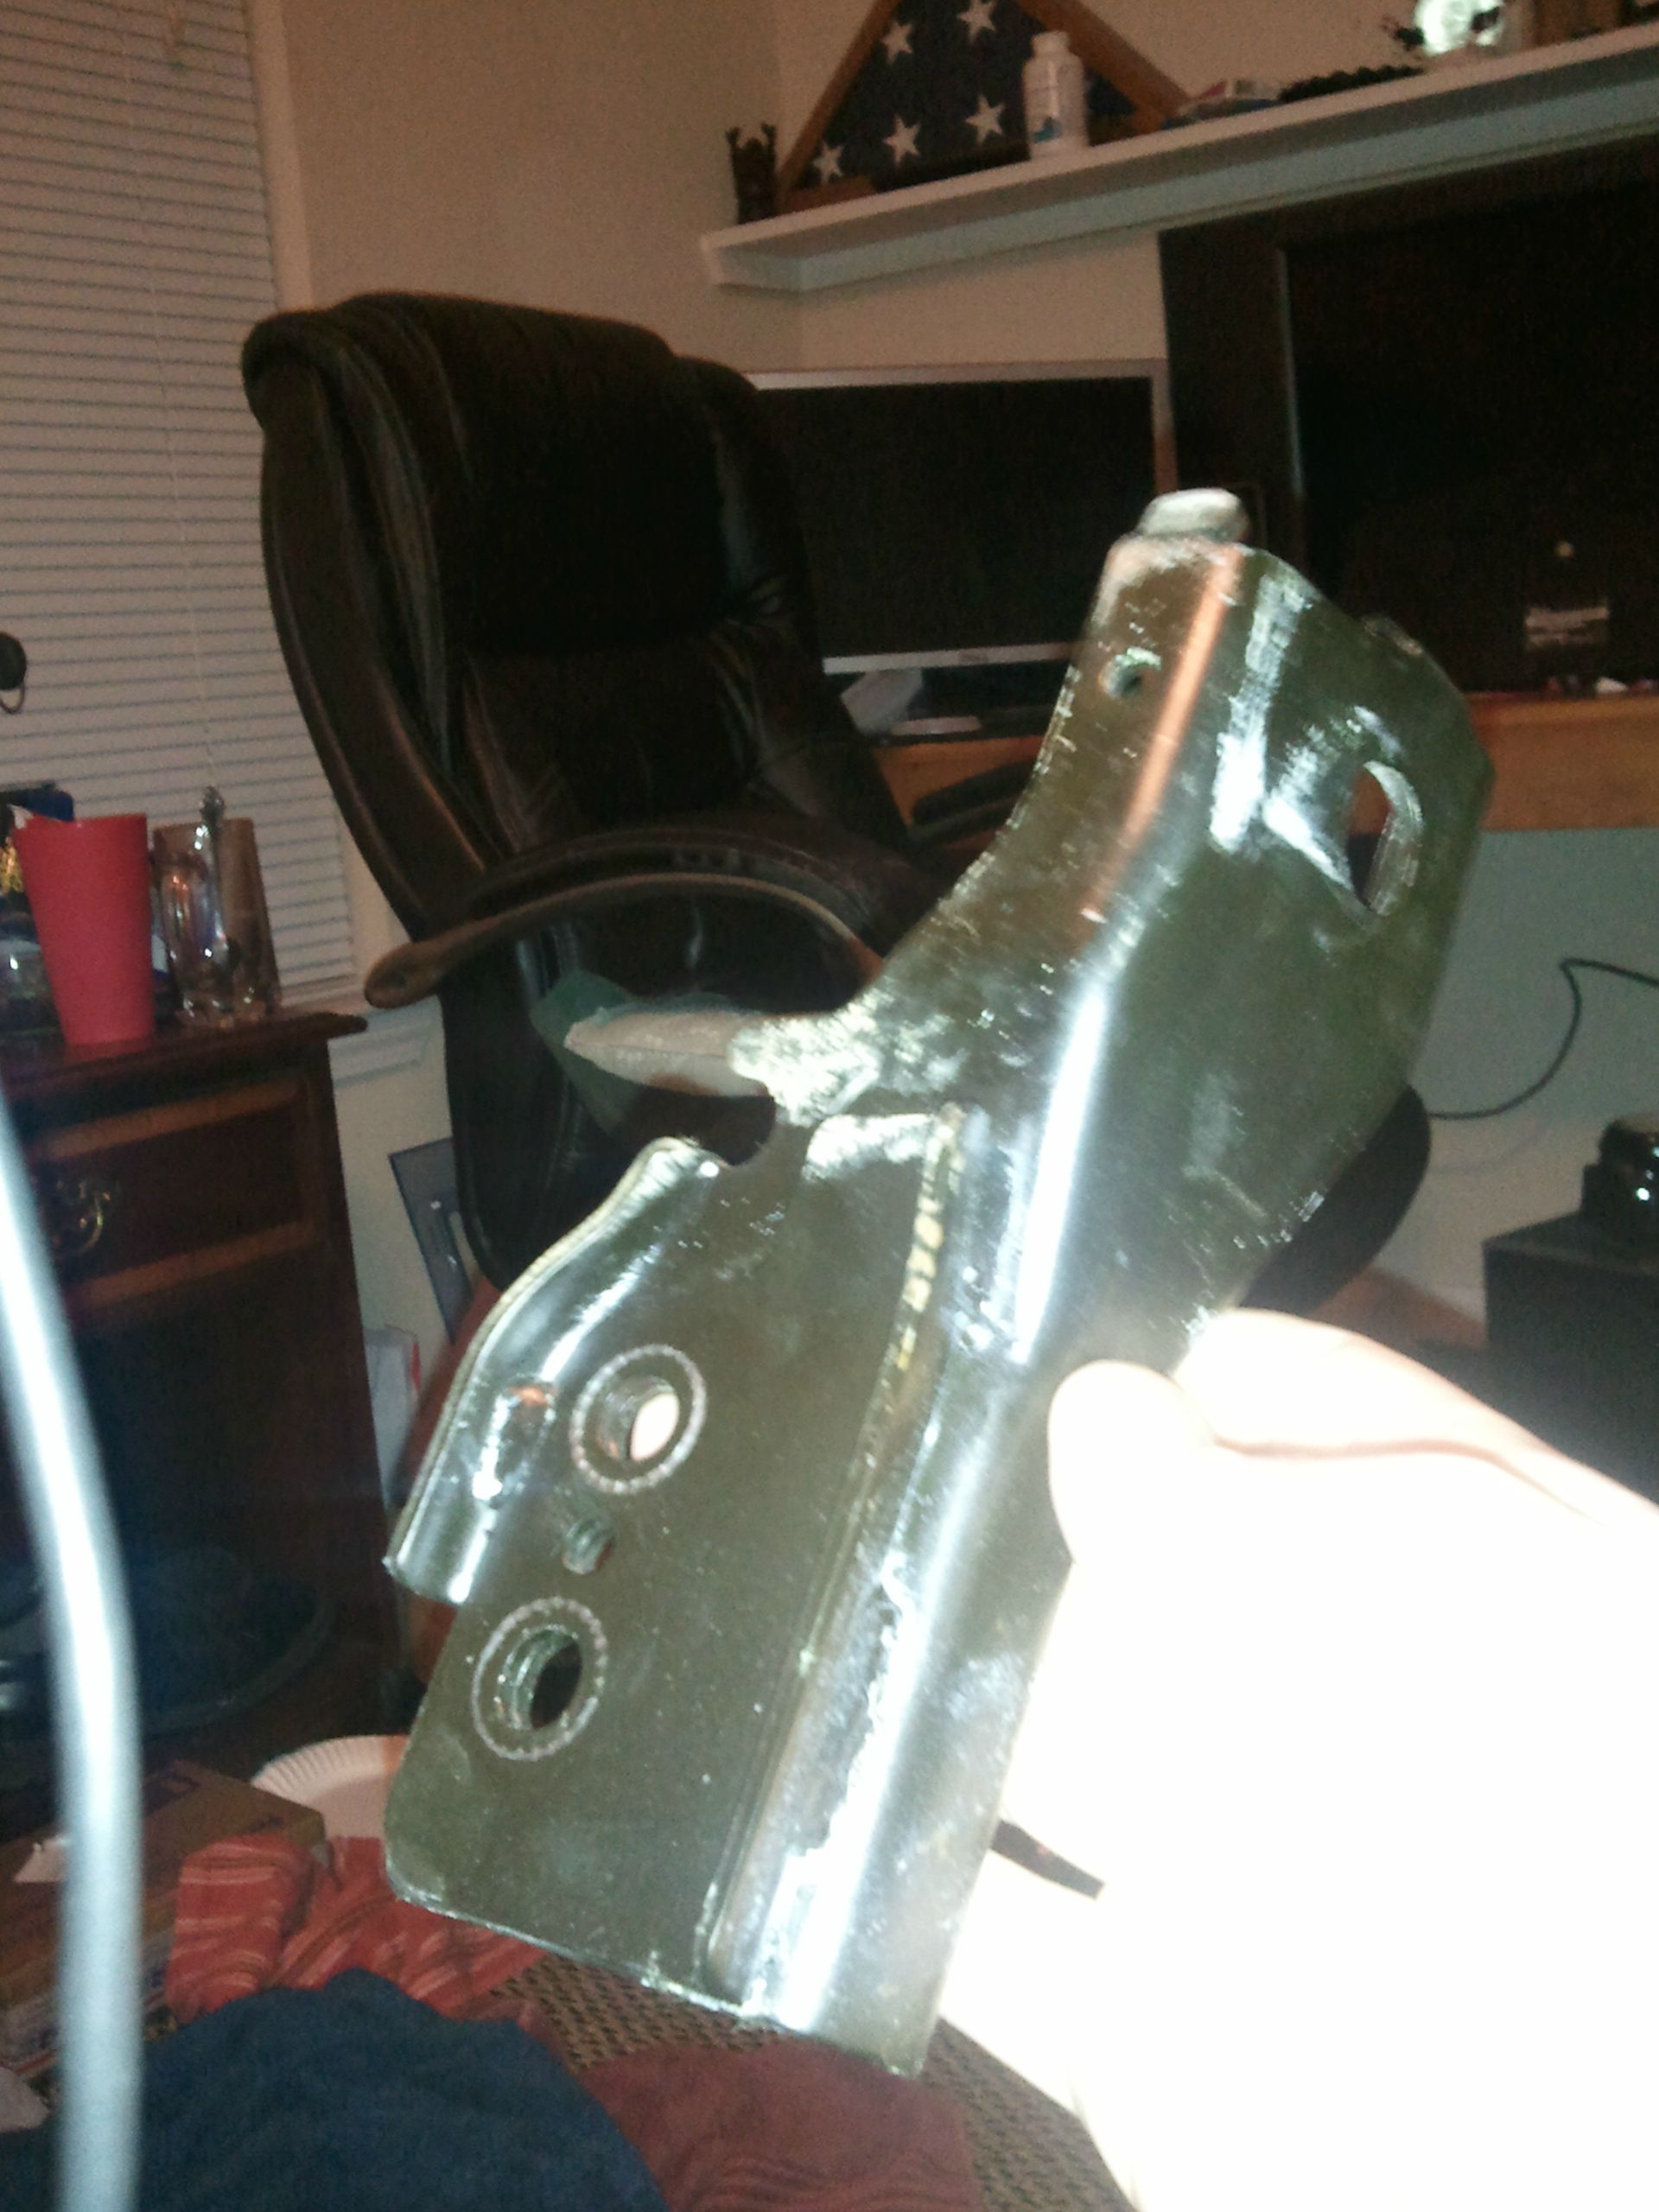
First, take your angle grinder and remove the reinforcement plate. You'll be left with the large bracket, and this. Hold onto it! You'll need it later.
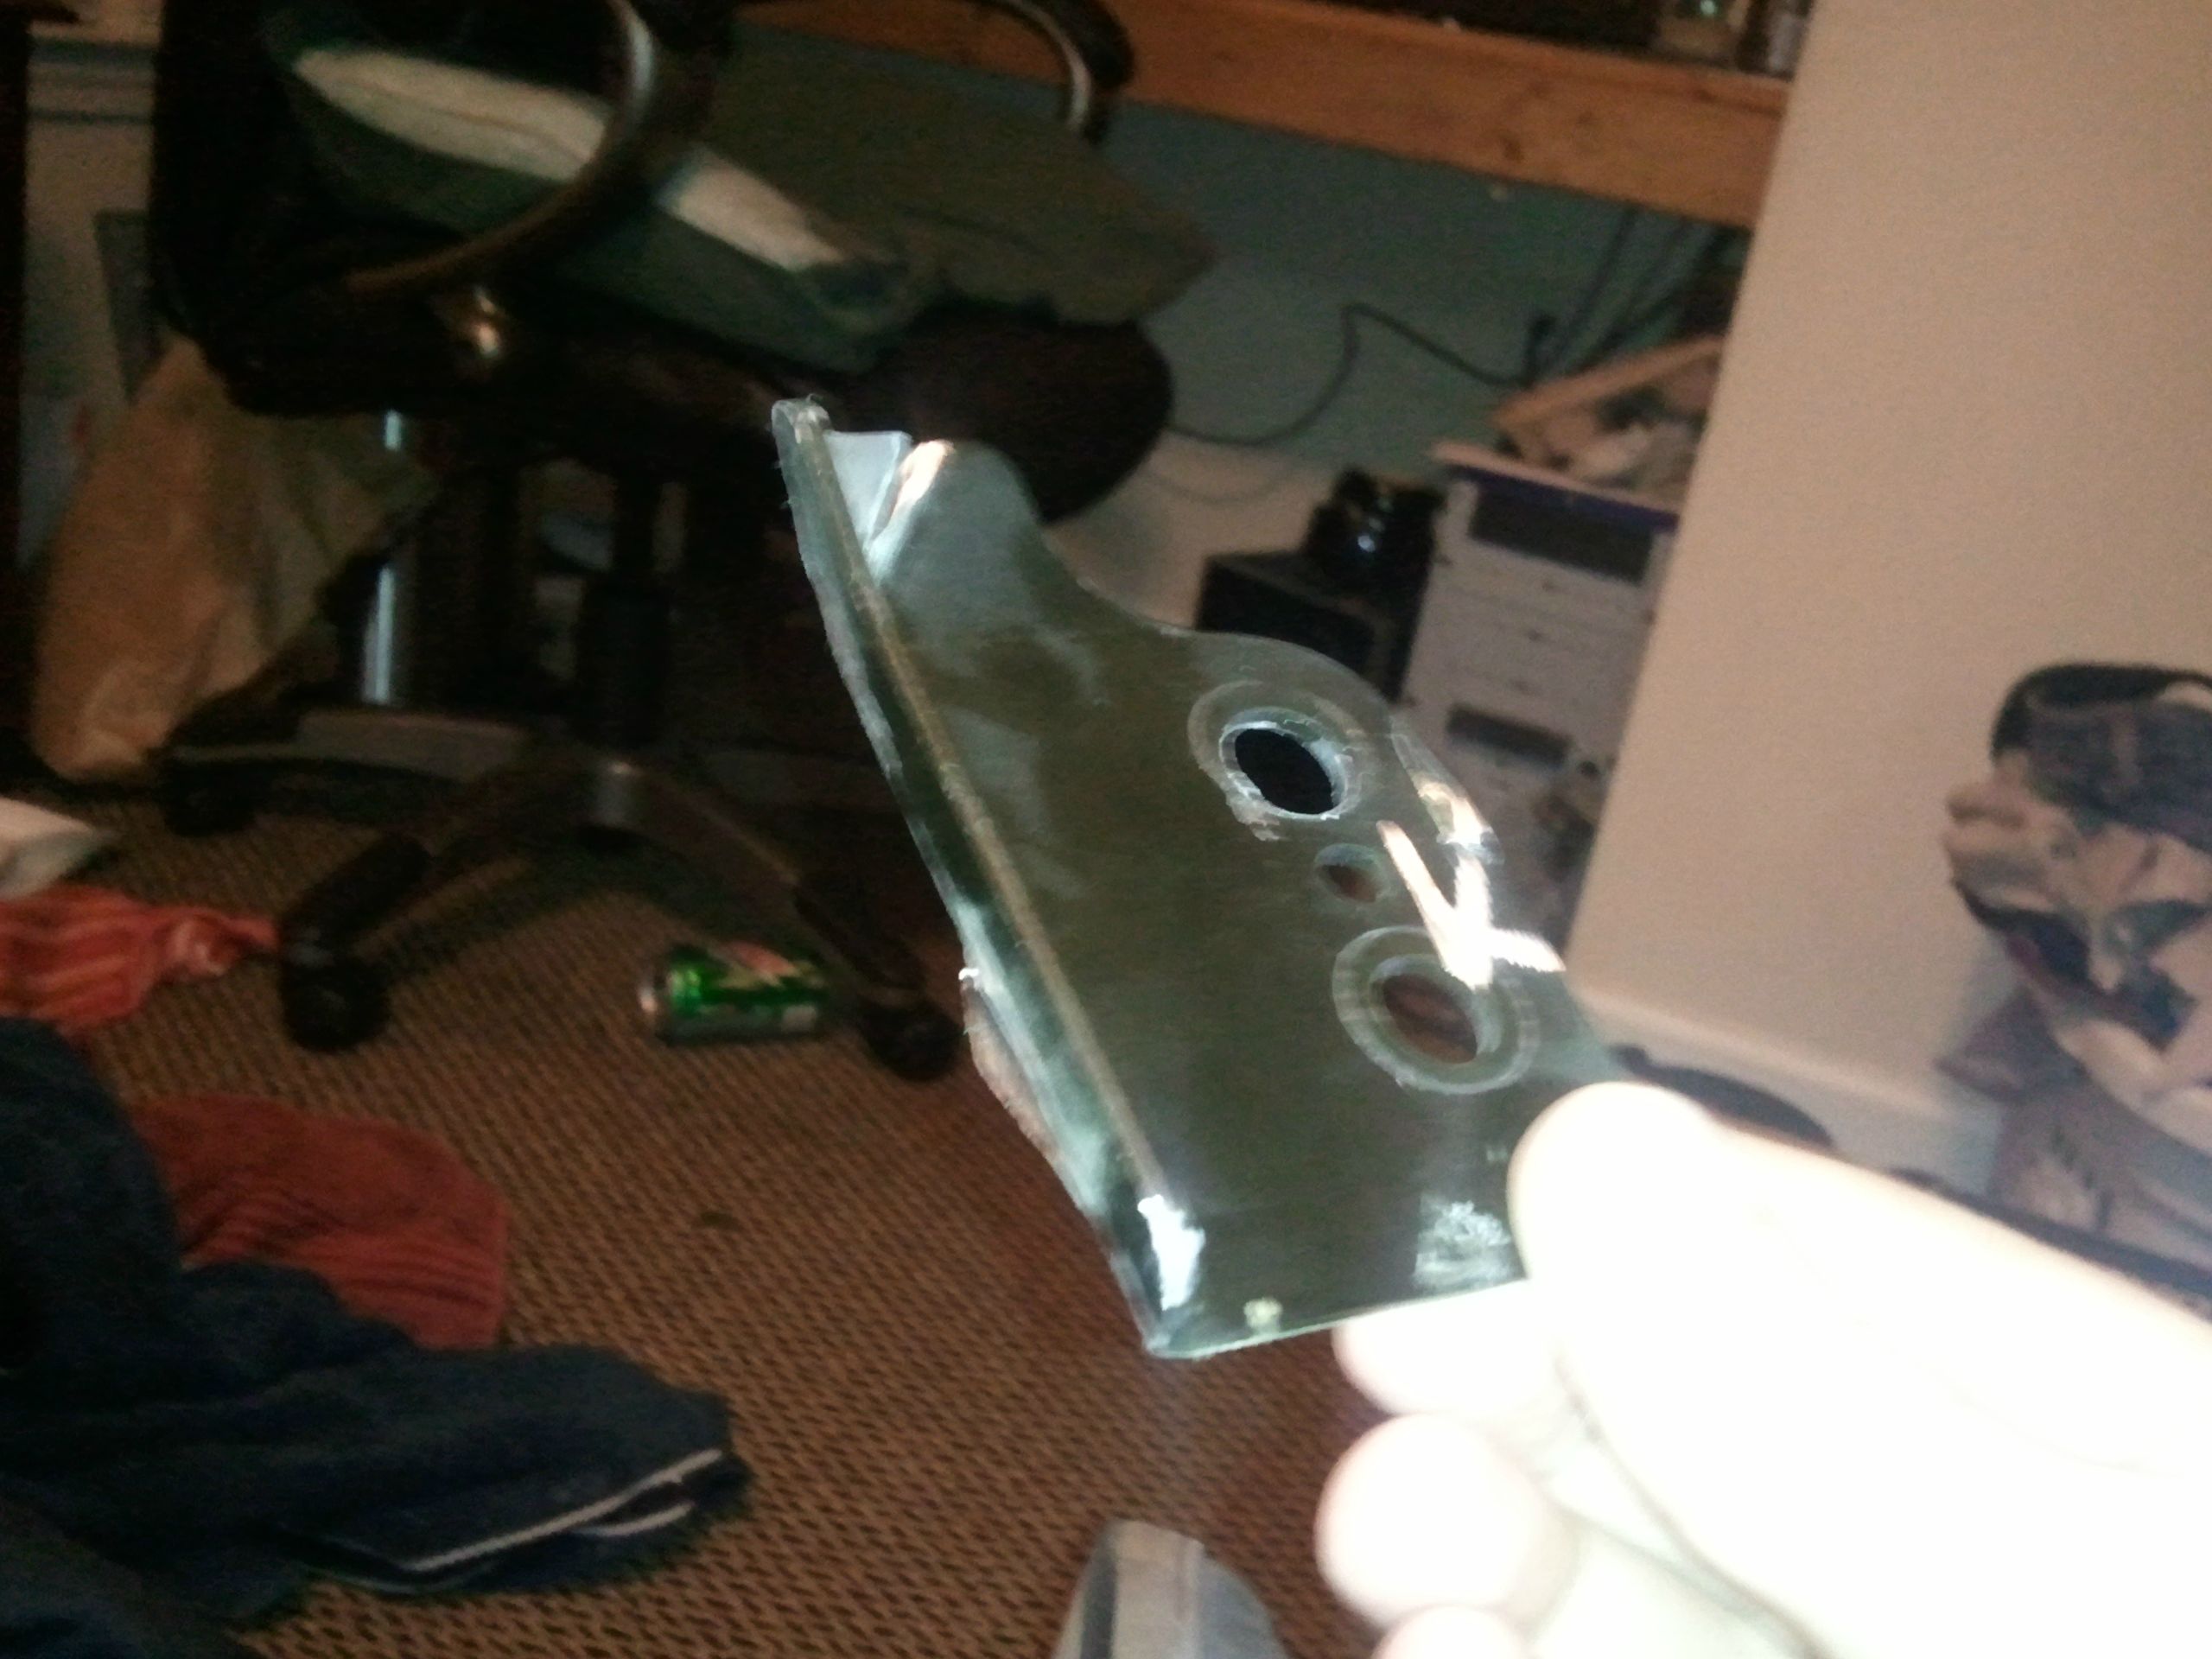
Next, you'll need to shave down the original bracket to make it fit. It will be bolted back on upside down, so you need to cut along the red line I've drawn on both sides, so it can sit flush with the original rail. As a side note, MS Paint is so full of win.

After the initial cuts:
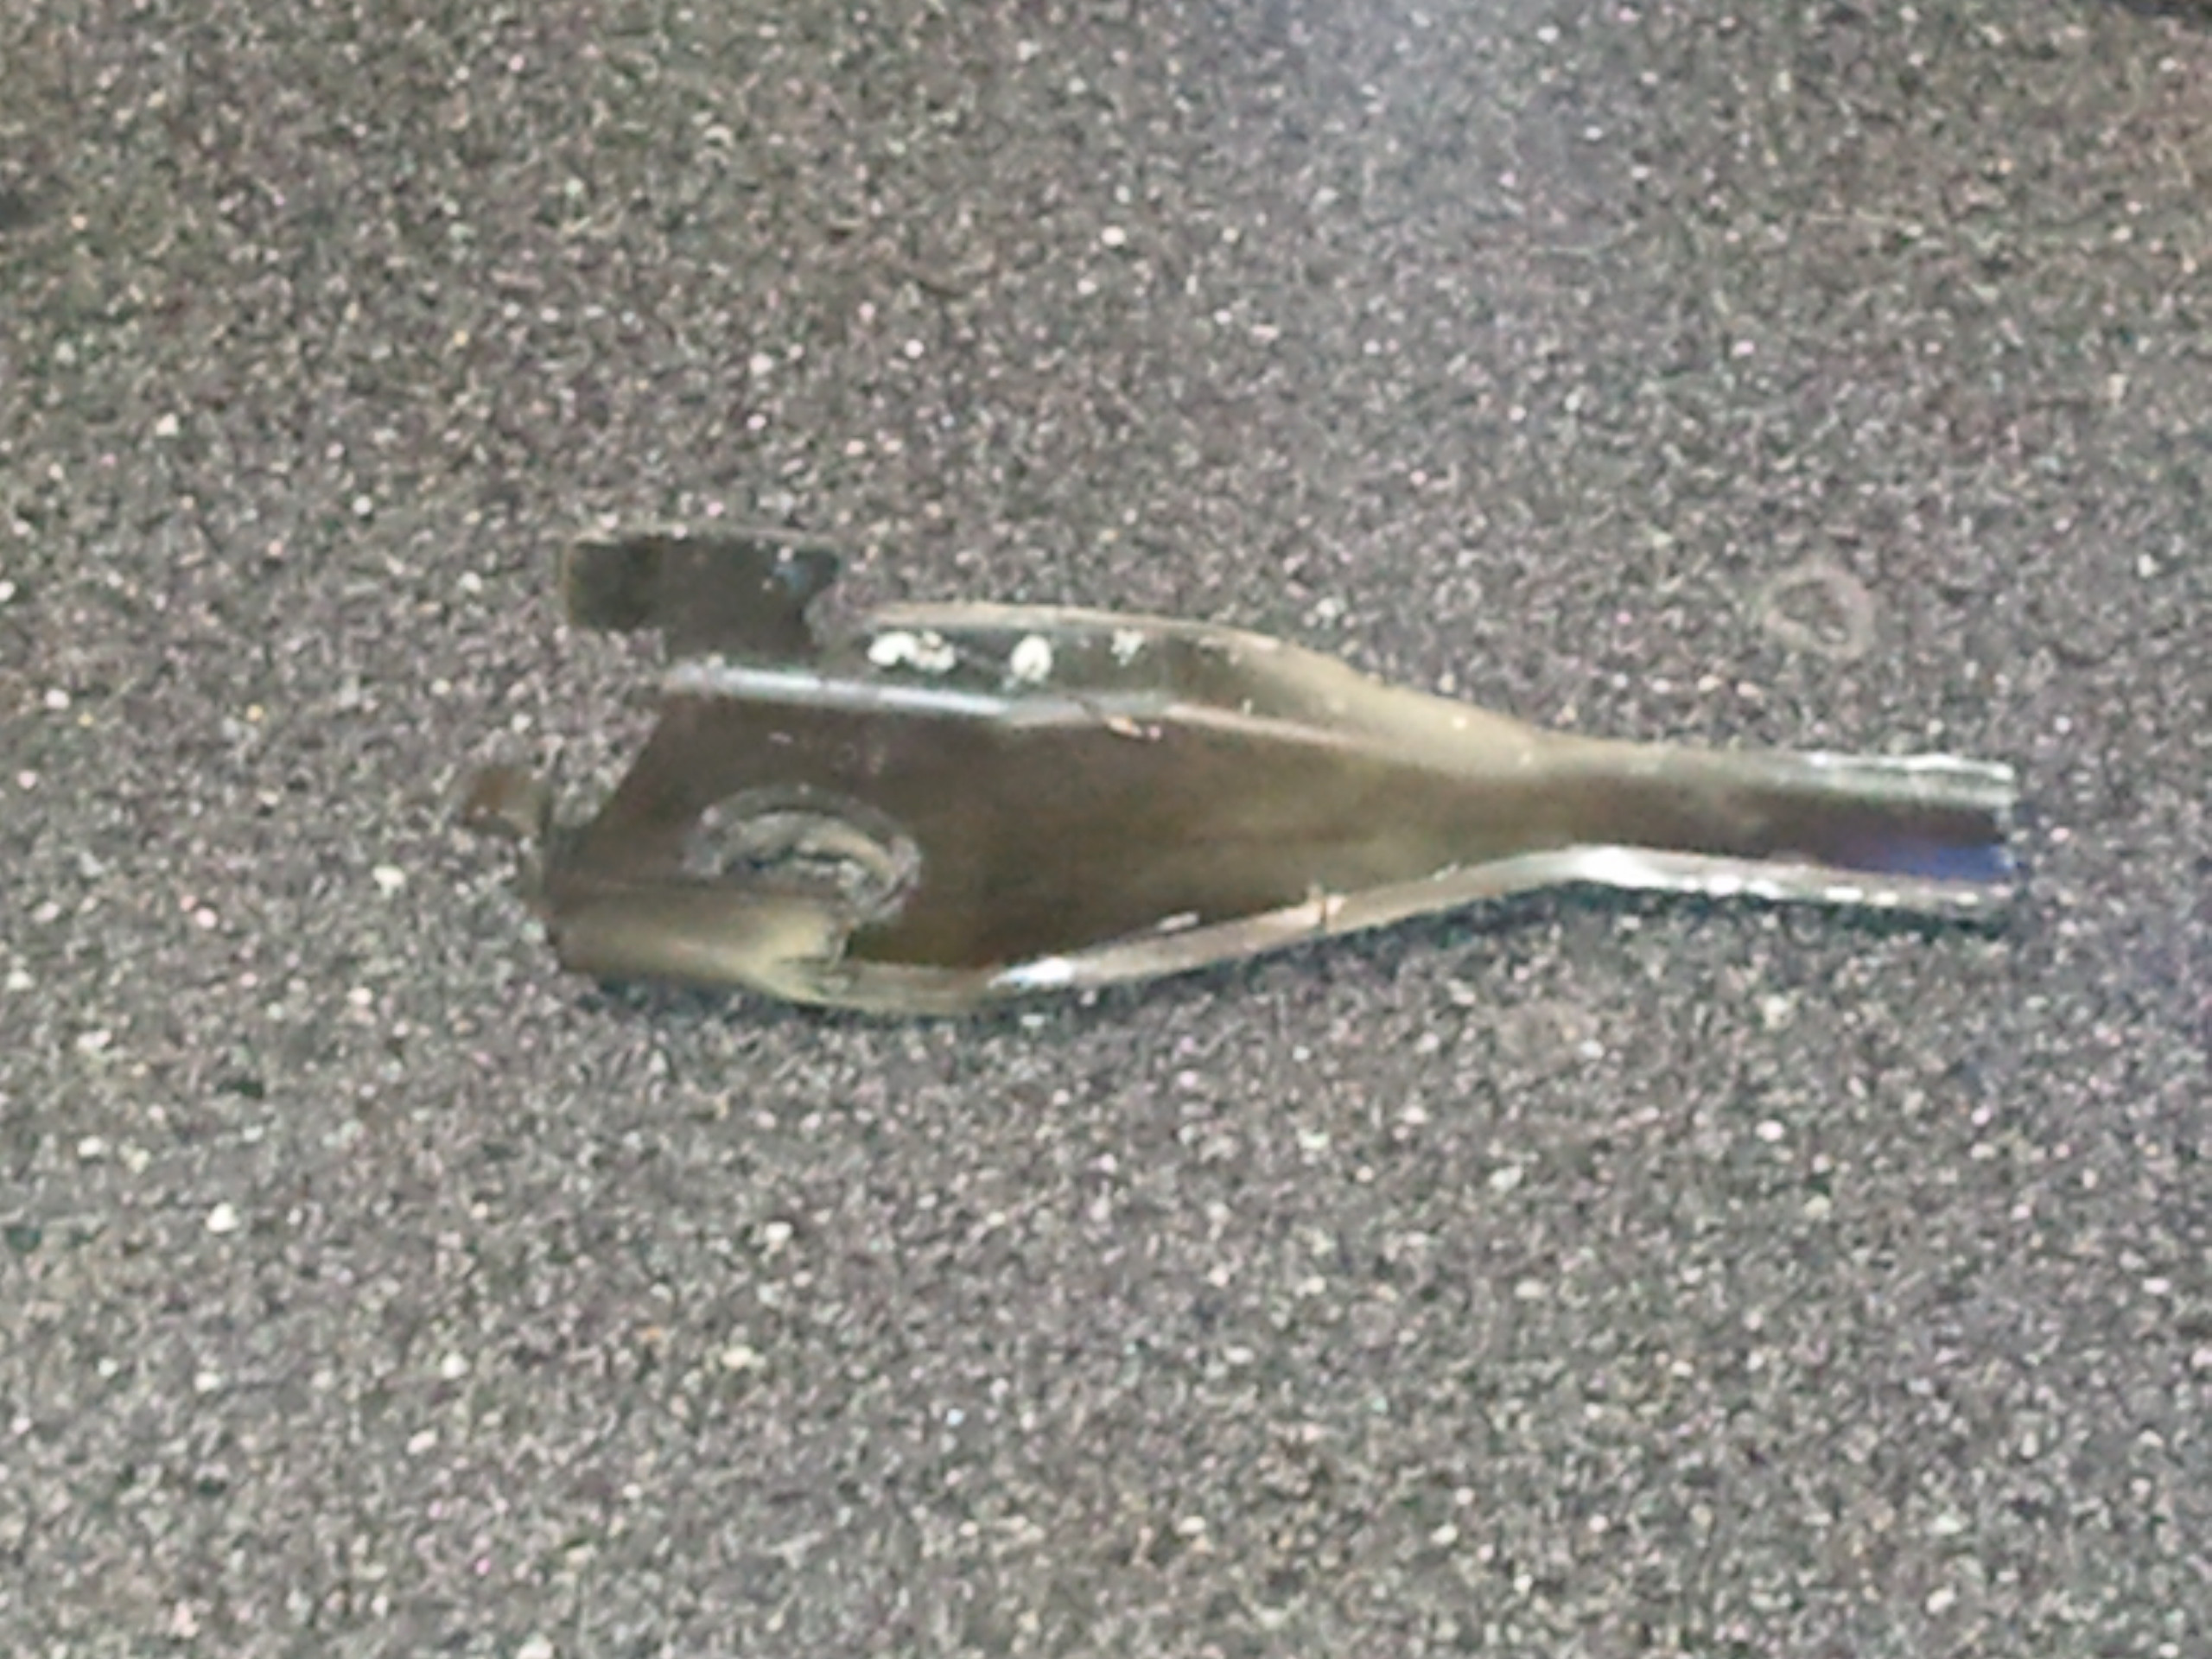
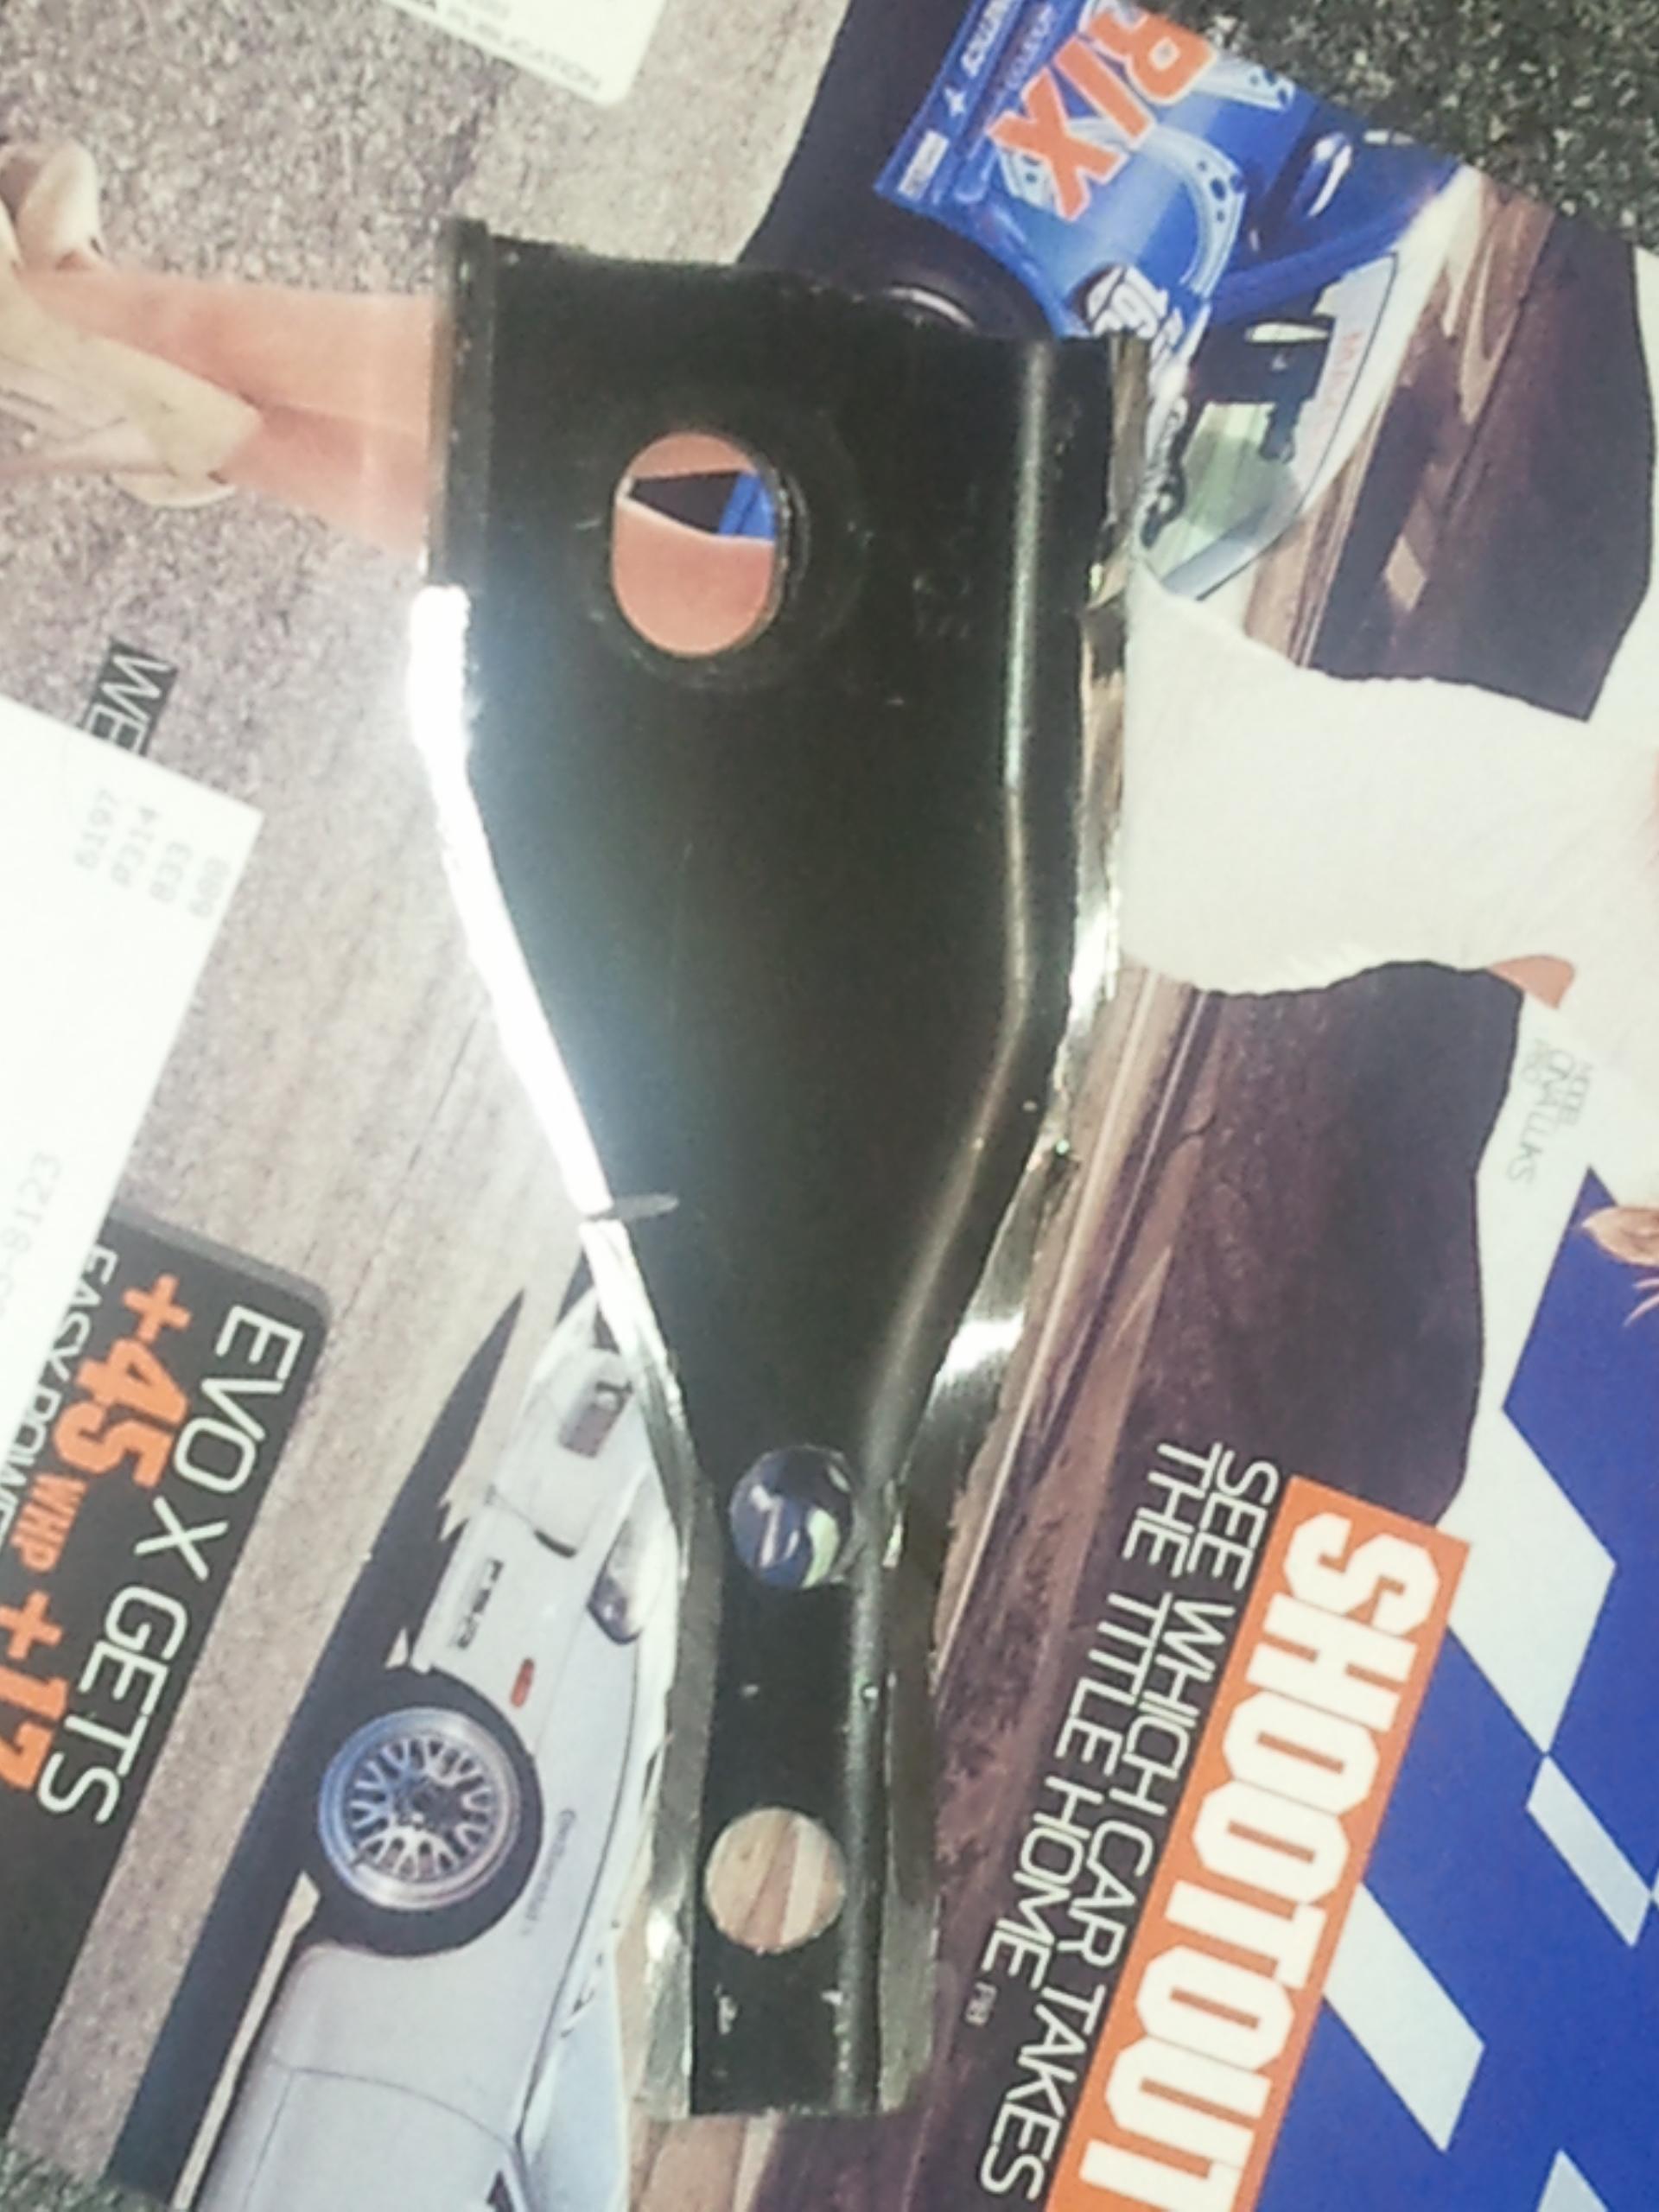
After you've shaved down the bracket, we'll need to make new holes. Remember that reinforcement plate I said to hold onto? Now you need it! Use your bench vice or locking pliers to hold it in place. You should use a tape measure to line everything up, but I just eyeballed it and it came out fine. Your drill holes should be approximately as shown here. The top hole will be half on the curve of the plate. Use the reinforcement plate to find the location for the back hole. The drill bit should fit in the holes of the reinforcement plate with a little boring out. See that little tab on the top of the plate, in front of the large hole? Do yourself a favor and cut that off, too - it'll get in the way of your wrench when you try to put the seats in.
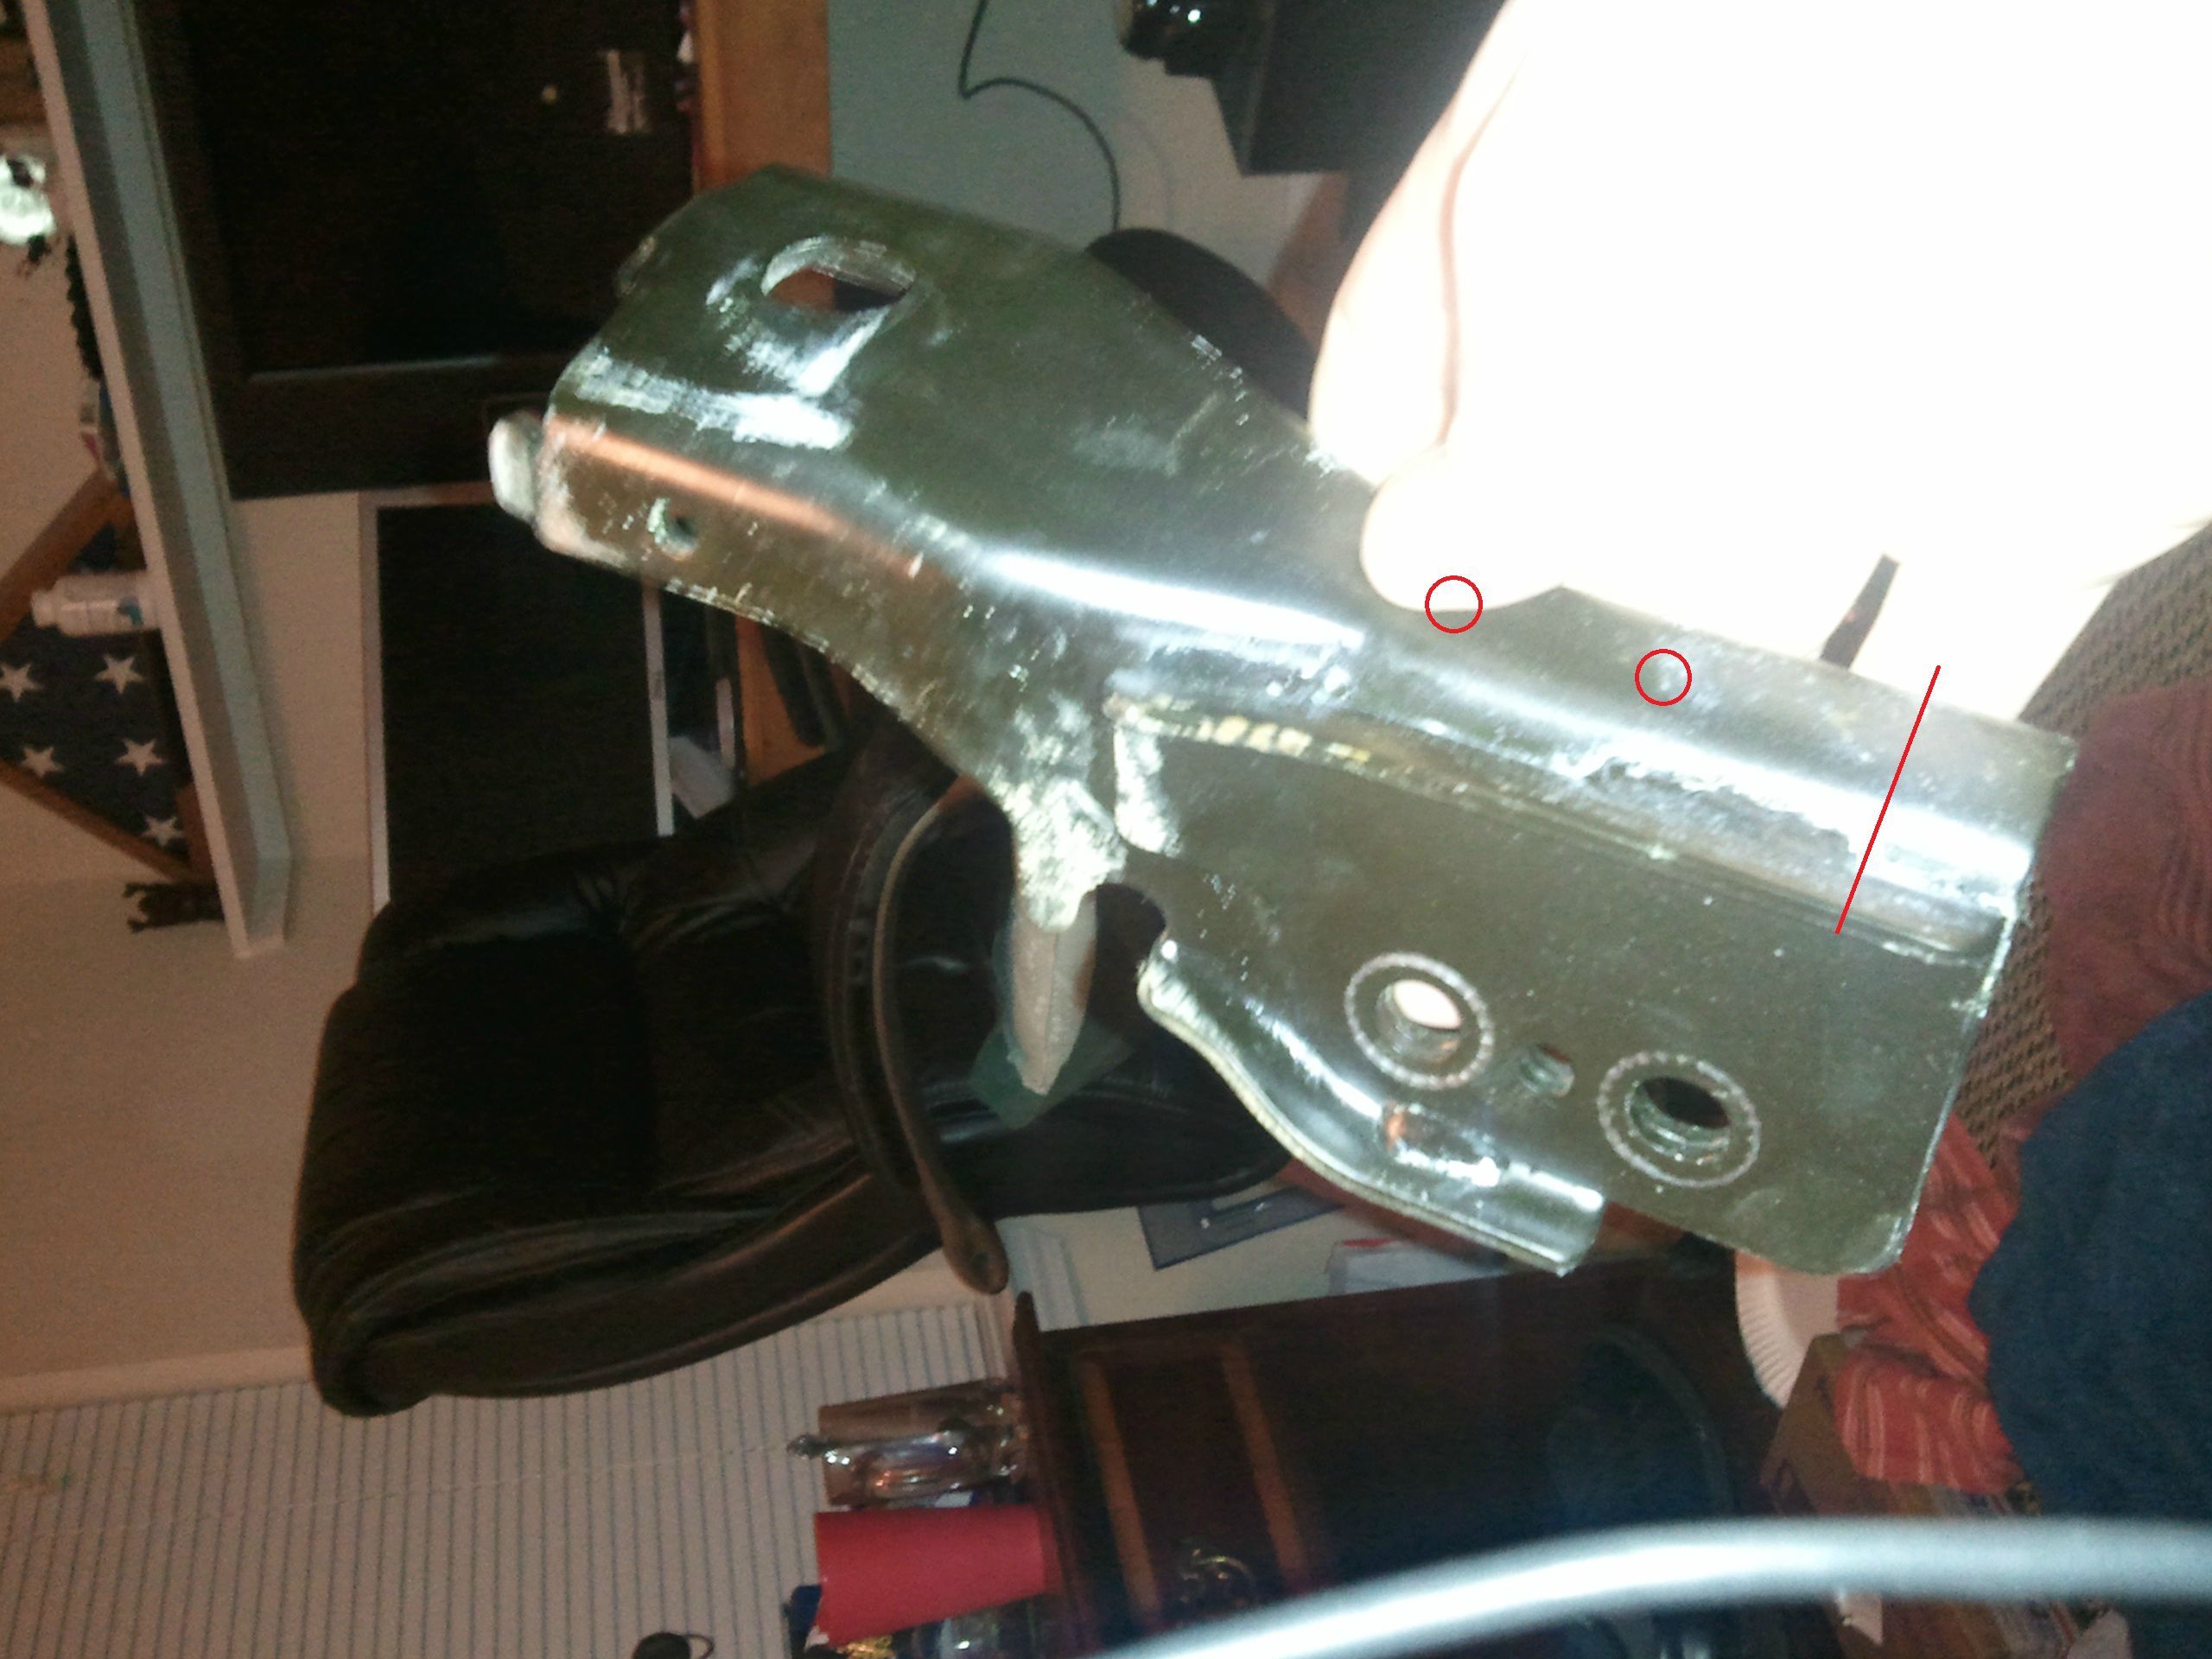
Using the reinforcement plate as a drill jig:
Here's how it should look after the holes are drilled, the end is cut down, and the tab is removed:
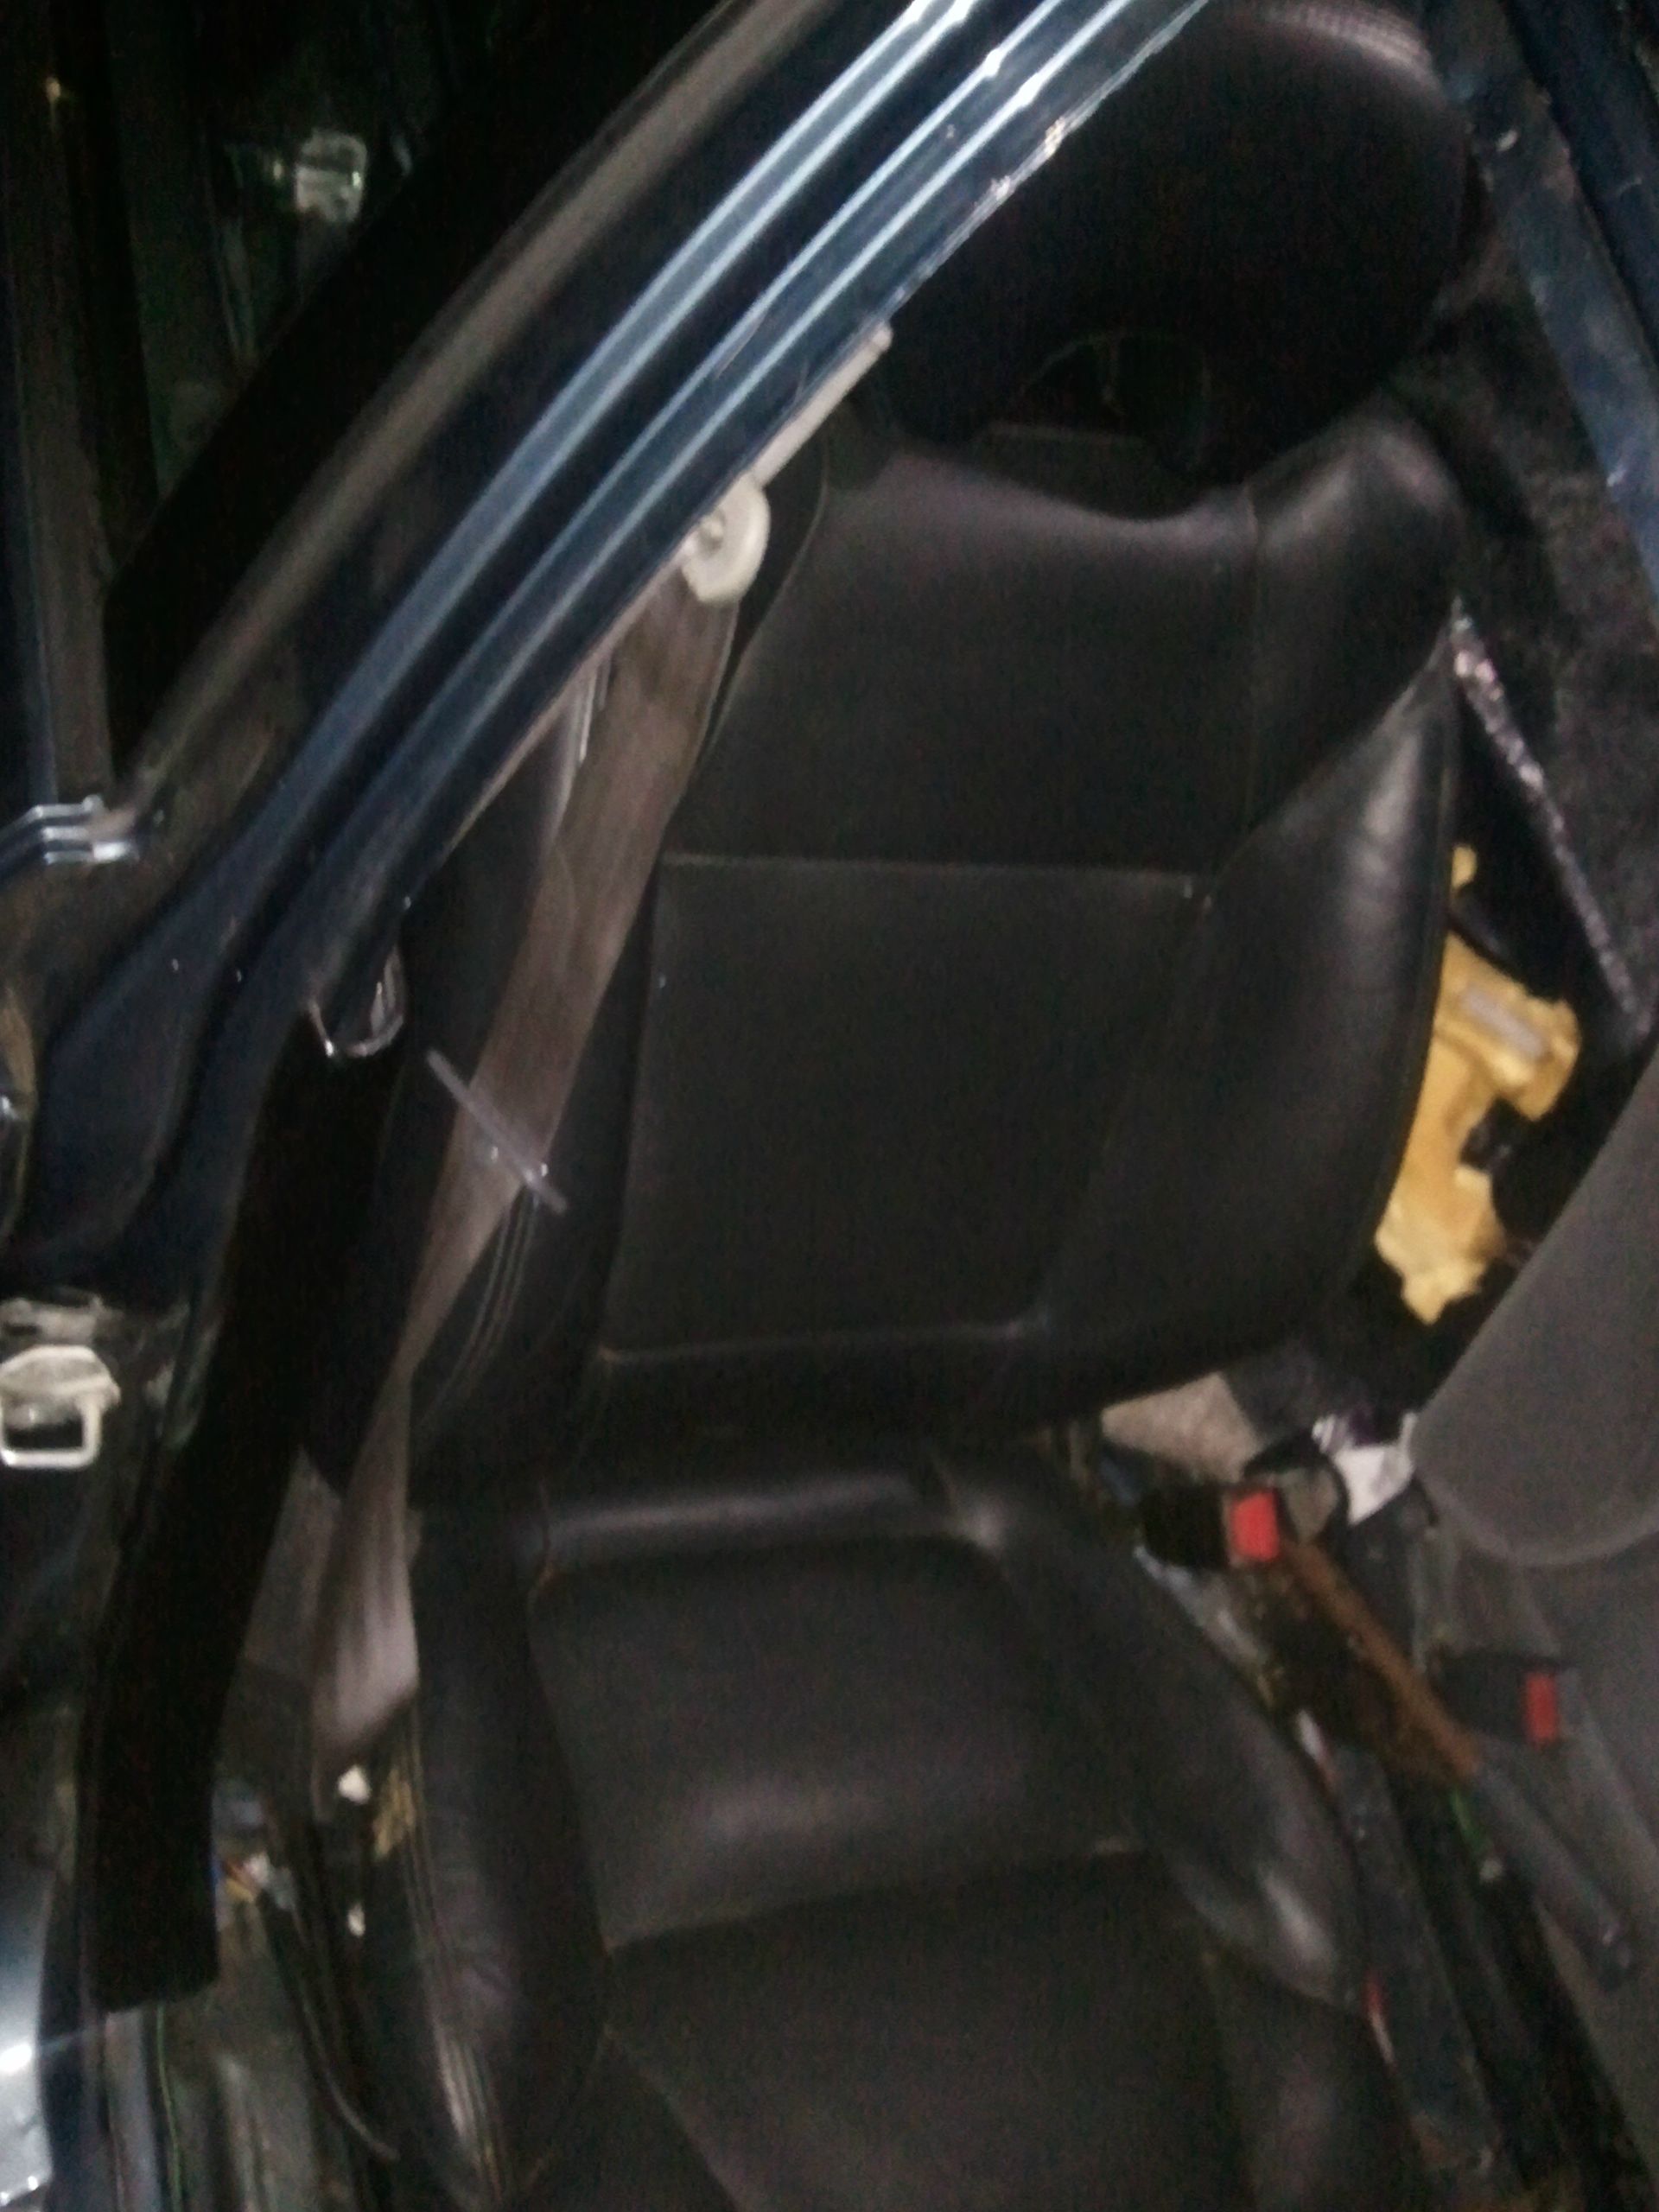
Now that you've chopped up that bracket, use the newly made holes to bolt it back onto the seat. You can do this with all of the original hardware. Now you just need to sort out your wiring, and bolt the seats in! Here's the passenger seat we test-fit in my sedan.
It fits perfectly. You'll sit a hair higher in the CL seats than you would in the OEM seats, but the driver seat is 8-way adjustable, so that can be fixed. I'm still trying to sort out the wiring, and I'll update this with full wiring information when I do.
Yes, the OEM seat belts will latch into the CL seat belt clips. Yes, the seats feel absolutely amazing, and will hold your body just as well, if not better, than GSR seats.
Props to 92ColeSI for helping me scour Pick-A-Part for the seats and helping with the fab work, props to naumananis for having the wiring diagram on his photobucket account, and props to utahhondas.net for bringing CL seats to my attention in the first place.
The OEM seats:
Lets be honest - they suck. Sure, cloth is nice, but leather is better. No heated seat option. Manual seats. The back adjustment is sloppy. They're also at least 13 years old now - steam clean them all you want, they still look dirty.
The donor seats:
01-03 Acura CL seats. Available in cloth or leather, so whether you're converting your interior, or just updating it a little, you'll be able to find seats that match. 4 or 8 way power, heated, side curtain air bags. Comfortable. Form fitting. Great bottom and side bolster support. Driver side adjustable lumbar. Better in every way, shape, and form.
Every write-up and how-to online says swap the rails, and they're a direct bolt in. Sure, you can do that, but the power adjusting motors are all bolted to the rails. You'll still be able to move the seats forward and back, but the seat back will forever be locked where it is - the adjusting mechanism is on the seat back itself on the original seats, but it's on the rail for the CL seats.
That aside, here's how you put fully functional, power adjusting heated seats in your 96-00 Civic! For the sake of this write-up, whenever I say "OEM", I'm talking about the Civic seats. Whenever I say "original", I'm talking about the CL seats.
Tools necessary:
Replacement seats
Angle grinder
Two metal cutting wheels
Drill, preferably wired
Drill bit
Bench C clamp
Basic socket set w/ extensions
Basic wrench set
Parts necessary:
12 five pin relays, sockets HIGHLY recommended.
2 fuse blocks.
Plenty of wire. At bare minimum, I recommend one roll of red, and one roll of black, both ~12g. If you have a hard time keeping wires straight, also pick up a roll of yellow.
2 fuse-style breakers. We won't be using the stock recline max sensors, so you can either get a breaker, or replace the fuse every time someone accidentally maxes out your seat reclines. Worth the to me.
Cost of tools and parts:
Seats - $30/ea at a junk yard. Online prices range anywhere from $100-$400
Angle grinder - Hitachi 4.5", $50 at Lowes
Cutting wheels - $2/ea at Lowes
Drill - Hitachi 5/8" Hammer, $70 at Lowes
Drill bit - Dewalt 7/16" Cobalt bit, $15 at Lowes
Bench clamp - If you have a bench, you have one. If you don't, it isn't worth buying just for this. Pick up a couple of locking pliers. $15/ea maybe?
Socket and wrench sets: If you don't already have these, you probably aren't reading this.
Total price: $250 if you have a bench, $280 if you don't.
Time investment:
Removal of OEM seats - 15 minutes
Removal of CL seats - 30 minutes
Modification of original bracket - 30 minutes per side
Wiring - 30 minutes passenger side, 1 hour driver's side (est.)
Re-installation of CL seats - 15 minutes
Total time: 2.5-3 hours
You will be cutting and drilling through quarter inch reinforced steel, so it's important to have good tools. Your Dremel isn't going to cut it.
On the bottom of the seat, three brackets are tack welded in, the fourth is bolted on. It's the rear inside bracket. In the CL, it bolts to the outside of the center tunnel, but in the EJ6/8 the seat is bolted to the floor. The other three bolt holes line up perfectly though. You all know how I am with keeping things 100% legal, though, so we're going to make that fourth bolt line up!
Here's the bracket that needs to be modified (already removed from the seat)
First, take your angle grinder and remove the reinforcement plate. You'll be left with the large bracket, and this. Hold onto it! You'll need it later.
Next, you'll need to shave down the original bracket to make it fit. It will be bolted back on upside down, so you need to cut along the red line I've drawn on both sides, so it can sit flush with the original rail. As a side note, MS Paint is so full of win.
After the initial cuts:
After you've shaved down the bracket, we'll need to make new holes. Remember that reinforcement plate I said to hold onto? Now you need it! Use your bench vice or locking pliers to hold it in place. You should use a tape measure to line everything up, but I just eyeballed it and it came out fine. Your drill holes should be approximately as shown here. The top hole will be half on the curve of the plate. Use the reinforcement plate to find the location for the back hole. The drill bit should fit in the holes of the reinforcement plate with a little boring out. See that little tab on the top of the plate, in front of the large hole? Do yourself a favor and cut that off, too - it'll get in the way of your wrench when you try to put the seats in.
Using the reinforcement plate as a drill jig:
Here's how it should look after the holes are drilled, the end is cut down, and the tab is removed:
Now that you've chopped up that bracket, use the newly made holes to bolt it back onto the seat. You can do this with all of the original hardware. Now you just need to sort out your wiring, and bolt the seats in! Here's the passenger seat we test-fit in my sedan.
It fits perfectly. You'll sit a hair higher in the CL seats than you would in the OEM seats, but the driver seat is 8-way adjustable, so that can be fixed. I'm still trying to sort out the wiring, and I'll update this with full wiring information when I do.
Yes, the OEM seat belts will latch into the CL seat belt clips. Yes, the seats feel absolutely amazing, and will hold your body just as well, if not better, than GSR seats.
Props to 92ColeSI for helping me scour Pick-A-Part for the seats and helping with the fab work, props to naumananis for having the wiring diagram on his photobucket account, and props to utahhondas.net for bringing CL seats to my attention in the first place.
Last edited by jbpnoman; 08-12-2013 at 01:04 AM.
 02-02-2013, 05:46 PM
#2
B*a*n*n*e*d
Thread Starter
Join Date: Feb 2008
Location: Charlottesville, VA, USA
Posts: 6,420
Likes: 0
Received 5 Likes
on
5 Posts
We'll be doing the second seat either tomorrow, or next weekend, and I'm aiming to have the wiring done next weekend. I'll be updating the thread with more detailed pictures when we do the second seat, and updating with wiring information when I do that.
02-02-2013, 06:38 PM
#4
B*a*n*n*e*d
Thread Starter
Join Date: Feb 2008
Location: Charlottesville, VA, USA
Posts: 6,420
Likes: 0
Received 5 Likes
on
5 Posts
Pick-A-Part uses a flat rate, $30 for car seats, period. I'm not saying it's the norm, but it's definitely possible. Going rate online seems to be $100-$400, like I said.
02-02-2013, 06:42 PM
#5
Honda-Tech Member
Join Date: Oct 2007
Posts: 226
Likes: 0
Received 0 Likes
on
0 Posts
I actually had these in mind haha. I had the previous model CL seats in my 5th gen Prelude, and was wondering if these would fit. Props man, can't wait to see a better pic of the finished result
 interested in seeing the finished product
Trending Topics
02-03-2013, 08:54 PM
#10
B*a*n*n*e*d
Thread Starter
Join Date: Feb 2008
Location: Charlottesville, VA, USA
Posts: 6,420
Likes: 0
Received 5 Likes
on
5 Posts
The wiring diagram is for the wrong donor chassis. I'm removing it. If you have access to the under-seat wiring diagram for an 03 Acura CL Sport, PLEASE post or PM it! I will love you forever. There might even be cookies involved.
We diced up the bracket for the driver's side, and I got some more detailed pictures. Unfortunately, the owner of the donor car was a bit...ghetto, so I can't bolt in the driver's seat until I figure out the wiring. No way in hell I'm driving my five speed when the seat is so far back and reclined that I can't push the clutch all the way down, and I can't see over the steering wheel if my back is fully on the seat. Also, that wiring diagram is for the wrong car - I'll be removing it shortly. Some of the individual connector colors match, but NONE of the main plug colors match (unless I'm reading it incorrectly). I'm in the process of procuring an 01-03 Acura CL FSM, but until I do, if you have access to the wiring diagram for an 03 CL-S, please post or PM it! I will love you forever.
Getting the seats in the car is the easiest upgrade I've ever done. I'd rather modify and bolt in these seats than replace the exhaust - it's that easy.
These seats are complementing a full black leather conversion I'm doing in my 98 sedan. Next weekend will be a 3 day weekend for me, so hopefully I'll have the wiring figured out by then, and have them bolted in and powered up by the end of next weekend. Then I'll be recoating the door cards and the dash, and installing all of my freshly painted interior plastics. As soon as I get the seats bolted in and powered, I will definitely be posting some "after" pictures.
02-05-2013, 12:11 AM
#15
B*a*n*n*e*d
Thread Starter
Join Date: Feb 2008
Location: Charlottesville, VA, USA
Posts: 6,420
Likes: 0
Received 5 Likes
on
5 Posts

Found some wiring schematics on Autozone's website. I have a spare battery laying around, so I'm going to play with the plugs this weekend and see what moves when. Once I have it all wired correctly, I'll post the diagrams, as well as some pictures of how I ran the wires.
 02-05-2013, 08:35 AM
#17
B*a*n*n*e*d
Thread Starter
Join Date: Feb 2008
Location: Charlottesville, VA, USA
Posts: 6,420
Likes: 0
Received 5 Likes
on
5 Posts
You sir, are a life saver. The diagrams I found on AZ are similar, but those are MUCH more detailed.
Only problem I see is that I don't have the Seat Heater Relay. I wonder where I can source one.
Only problem I see is that I don't have the Seat Heater Relay. I wonder where I can source one.
02-05-2013, 09:29 AM
#21
Honda-Tech Member
Join Date: Oct 2007
Posts: 226
Likes: 0
Received 0 Likes
on
0 Posts
deschlong to save the day haha. If there was a rep system on here like I've seen on other forums, I'm pretty sure you would have maxed that system out by now. Just browsing around the FAQs, you probably posted 90% of the DIYs I've been studying haha.
08-03-2013, 04:26 PM
#22
B*a*n*n*e*d
Thread Starter
Join Date: Feb 2008
Location: Charlottesville, VA, USA
Posts: 6,420
Likes: 0
Received 5 Likes
on
5 Posts
Just an FYI, I haven't let this project die. Between other projects, weather, work, and family, I just haven't had time to dedicate that this deserved. As far as I can tell, this is something that actually hasn't been (properly) done before, so I'm making sure to do it 100% so I can recreate it. Everyone else that I've seen with CL-S seats in their EJ's just swapped the rails, killing the functionality of them.
I have the passenger seat harness done, sans heat so far (only because I haven't sat down to do the heater wiring yet). The Honda OEM wiring harness is obscenely complicated. I've removed all of the unnecessary wires, and have turned picture 1 and 2 into picture 3. It's definitely coming along!
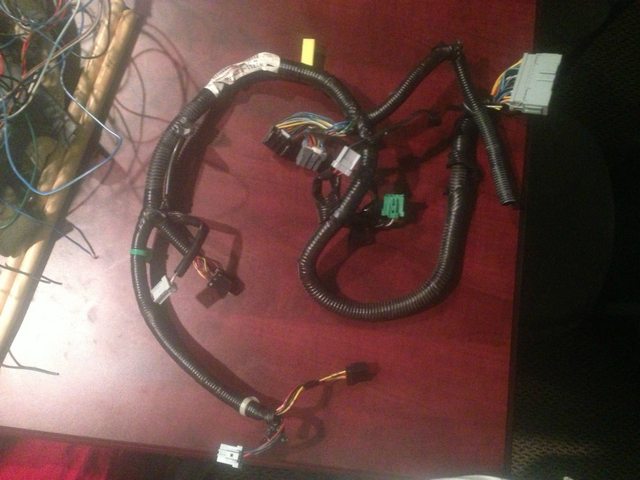


Notice the two 5 pin relays, a new fuse block, and a 7.5A breaker-style fuse. The wiring doesn't look much better, but I promise you it is MUCH less complicated, and when I finish my proper write-up, I will include what to wire where. Unfortunately it's started raining, and I'm one relay short of finishing the driver's seat, so that will all probably have to wait until next weekend.
I have the passenger seat harness done, sans heat so far (only because I haven't sat down to do the heater wiring yet). The Honda OEM wiring harness is obscenely complicated. I've removed all of the unnecessary wires, and have turned picture 1 and 2 into picture 3. It's definitely coming along!
Notice the two 5 pin relays, a new fuse block, and a 7.5A breaker-style fuse. The wiring doesn't look much better, but I promise you it is MUCH less complicated, and when I finish my proper write-up, I will include what to wire where. Unfortunately it's started raining, and I'm one relay short of finishing the driver's seat, so that will all probably have to wait until next weekend.
08-12-2013, 12:53 AM
#23
B*a*n*n*e*d
Thread Starter
Join Date: Feb 2008
Location: Charlottesville, VA, USA
Posts: 6,420
Likes: 0
Received 5 Likes
on
5 Posts
Just a teaser. The passenger seat is in and fully functional. Now I need to order 8 more 5 pin relays for the driver's seat (**** you, Honda engineers), wire heat, and it'll be done.
10-14-2013, 07:41 AM
#24

bump!!!
i pulled a full interior from a cl at harrys u-pull it for $225. that was for front and rear seats, all panels, headliner, rug and center console. i didnt take the dash because that is a wiring nightmare when it comes to switching from manual climate control (94 CD7) to electronic climate control. anyway i need help with wiring up the driver seat, my driver seat is reclined all the way back and i can't bolt it into the car. any luck with the wiring diagram? i went back to the jy and cut the harness that was in that car and i have the plug that connects to the seat.
were you able to finish the wiring on the seats?
any help is greatly appreciated
