
[FAQ]/[DIY] Distributor Cap and Rotor Replacement (56k, 8 pics)
 07-31-2005, 01:51 PM
#1
Honda-Tech Member
Thread Starter
Join Date: Jul 2004
Location: Minneapolis, MN
Posts: 1,863
Likes: 0
Received 0 Likes
on
0 Posts
So, you wana replace that distributor cap and rotor? Then you're at the right place. Recently my gas mileage has been getting progressively worse, so I decided to give this a try and see if it helps any. OK, on to the writeup.
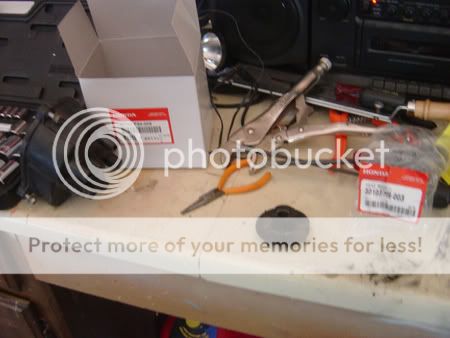
What you will need for this job:
-Phillips head screw driver
-17 mm socket/driver, depending on how lucky you are.
-a small flat screw driver
Here's a pic for all of you

You will also need some new parts. yay
-Distributor cap part # 20295
-Rotor, part # 20296
mmm, OEM Honda.
Now, you should be starting off with something that looks like this:

Good. Now, the first thing I always do when I work on my car, regardless of where it is, is to disconnect the battery. Next, unplug the wires from the cap. I wrote down the wire numbers so I wouldn't forget which goes where. I suggest you do the same.

Now, take off these 3 screws

yeah yeah yeah, the wires are still on there. I took the pic in the wrong order.
You should have something now that should look like this

Don't worry, that's a good thing.
Now you might be wondering, how do I get the rotor off? I'll show you. See the white arrow pointing to the set screw in this picture?

You unscrew that, and out comes the rotor. Now if you happen to be so unlucky that the screw is not there, you will need to take off your front driver side wheel and crank the engine by hand. Here's where your 17mm socket comes into play.

A little tip: if you take out your spark plugs, it is easier to turn.

Now, screw in your new rotor. But before you put on your new cap, remember to change the gasket as well. It should have came with your cap assemply. Pry the old one out with your flat screwdriver, and put the new one in. Now, put your cap back on with the 3 screws, plug your wires back in, connect your battery, and start it up.
Simple and easy, yes.
Modified by green00EX at 5:26 PM 7/31/2005
What you will need for this job:
-Phillips head screw driver
-17 mm socket/driver, depending on how lucky you are.
-a small flat screw driver
Here's a pic for all of you
You will also need some new parts. yay
-Distributor cap part # 20295
-Rotor, part # 20296
mmm, OEM Honda.
Now, you should be starting off with something that looks like this:
Good. Now, the first thing I always do when I work on my car, regardless of where it is, is to disconnect the battery. Next, unplug the wires from the cap. I wrote down the wire numbers so I wouldn't forget which goes where. I suggest you do the same.
Now, take off these 3 screws
yeah yeah yeah, the wires are still on there. I took the pic in the wrong order.
You should have something now that should look like this
Don't worry, that's a good thing.
Now you might be wondering, how do I get the rotor off? I'll show you. See the white arrow pointing to the set screw in this picture?
You unscrew that, and out comes the rotor. Now if you happen to be so unlucky that the screw is not there, you will need to take off your front driver side wheel and crank the engine by hand. Here's where your 17mm socket comes into play.
A little tip: if you take out your spark plugs, it is easier to turn.
Now, screw in your new rotor. But before you put on your new cap, remember to change the gasket as well. It should have came with your cap assemply. Pry the old one out with your flat screwdriver, and put the new one in. Now, put your cap back on with the 3 screws, plug your wires back in, connect your battery, and start it up.
Simple and easy, yes.
Modified by green00EX at 5:26 PM 7/31/2005
 07-31-2005, 02:03 PM
#2
Honda-Tech Member
Good simple write up. Just a few tips for next time. Use a smaller extension on your ratchet next time so you do not have to remove the wheel to turn the crank. Also removing the plug wires from the spark plugs does not make it easier to turn the crank. Just give it some more muscle and it will move. Good write up though  .
.
.
07-31-2005, 02:06 PM
#3
Honda-Tech Member
Join Date: Jul 2004
Location: 239
Posts: 614
Likes: 0
Received 0 Likes
on
0 Posts
**Not to jack your post or anything but....
if you pull the old cap off with the wires attached you can just pull each wire off one by one and attach to the new cap.
also if the screw for the rotor is not on top, you can leave the cap off and turn the ignition key so the engine only turns over once until the screw is on top!!!
**good job though**
07-31-2005, 02:22 PM
#4
Honda-Tech Member
Join Date: Feb 2002
Location: Eating Ramen, CA
Posts: 2,462
Likes: 0
Received 0 Likes
on
0 Posts
<TABLE WIDTH="90%" CELLSPACING=0 CELLPADDING=0 ALIGN=CENTER><TR><TD>Quote, originally posted by green00EX »</TD></TR><TR><TD CLASS="quote">
A little tip: if you disconnect your spark plug wires from the plugs, it makes it easier to turn.
</TD></TR></TABLE>
I dunno about your motor...But I have to take my Spark Plugs out completely...not just the plug wires, for my motor to turn over easier.
A little tip: if you disconnect your spark plug wires from the plugs, it makes it easier to turn.
</TD></TR></TABLE>
I dunno about your motor...But I have to take my Spark Plugs out completely...not just the plug wires, for my motor to turn over easier.
07-31-2005, 04:25 PM
#5
Honda-Tech Member
Thread Starter
Join Date: Jul 2004
Location: Minneapolis, MN
Posts: 1,863
Likes: 0
Received 0 Likes
on
0 Posts
Thanks for the replies.
<TABLE WIDTH="90%" CELLSPACING=0 CELLPADDING=0 ALIGN=CENTER><TR><TD>Quote, originally posted by JOEY F. »</TD></TR><TR><TD CLASS="quote">
I dunno about your motor...But I have to take my Spark Plugs out completely...not just the plug wires, for my motor to turn over easier. </TD></TR></TABLE>
Yeah, my mistake. Thanks for catching it. I was thinking one thing and typing another.
<TABLE WIDTH="90%" CELLSPACING=0 CELLPADDING=0 ALIGN=CENTER><TR><TD>Quote, originally posted by JOEY F. »</TD></TR><TR><TD CLASS="quote">
I dunno about your motor...But I have to take my Spark Plugs out completely...not just the plug wires, for my motor to turn over easier.
</TD></TR></TABLE>Yeah, my mistake. Thanks for catching it. I was thinking one thing and typing another.
07-31-2005, 05:43 PM
#6
Honda-Tech Member
Join Date: Feb 2005
Location: Daphne, AL
Posts: 1,148
Likes: 0
Received 0 Likes
on
0 Posts
I agree. Its a hole heck of alot easier to just turn the key and get the rotor in the right spot.
Also, doing this helps greatly. I got rid of a sputter and bogging I was having. Also replaced the wires and plugs too.
Also, doing this helps greatly. I got rid of a sputter and bogging I was having. Also replaced the wires and plugs too.

Trending Topics
 .
07-31-2005, 09:55 PM
.
07-31-2005, 09:55 PM
#9
Member
Join Date: Mar 2004
Location: racine, Wi, usa
Posts: 2,239
Likes: 0
Received 0 Likes
on
0 Posts
<TABLE WIDTH="90%" CELLSPACING=0 CELLPADDING=0 ALIGN=CENTER><TR><TD>Quote, originally posted by 1995Ex_Sedan »</TD></TR><TR><TD CLASS="quote">I agree. Its a hole heck of alot easier to just turn the key and get the rotor in the right spot. </TD></TR></TABLE>
Thats exactly how I do it on my car.
Thats exactly how I do it on my car.
02-04-2007, 03:28 AM
#10
Honda-Tech Member
Join Date: Feb 2005
Location: Beaverton, OR, USA
Posts: 197
Likes: 0
Received 0 Likes
on
0 Posts
I have a quick question. It looks like the screw that's holding my rotor in the is stripped. Any suggestions on how I would be able to take it off? Or am I going to have to replace the dizzy? The screw is on there pretty tight.
02-04-2007, 04:31 AM
#11

Join Date: Jan 2006
Location: Fakeville, USA, USA
Posts: 838
Likes: 0
Received 0 Likes
on
0 Posts
<TABLE WIDTH="90%" CELLSPACING=0 CELLPADDING=0 ALIGN=CENTER><TR><TD>Quote, originally posted by oo3 »</TD></TR><TR><TD CLASS="quote">I have a quick question. It looks like the screw that's holding my rotor in the is stripped. Any suggestions on how I would be able to take it off? Or am I going to have to replace the dizzy? The screw is on there pretty tight.</TD></TR></TABLE>
That car was taken to a mechanic for sure. Most of them overtighten that ****. Had the same thing on my EK when I bought it.
You can use needle nose vice grips

or
Buy or rent a impact driver like this to take it out. Don't be crazy and hit it super hard. You don't want to shatter the ferrite sensors or bend the shaft. Just enough to get it out.

That car was taken to a mechanic for sure. Most of them overtighten that ****. Had the same thing on my EK when I bought it.
You can use needle nose vice grips
or
Buy or rent a impact driver like this to take it out. Don't be crazy and hit it super hard. You don't want to shatter the ferrite sensors or bend the shaft. Just enough to get it out.
 02-04-2007, 12:15 PM
#14
Honda-Tech Member
Join Date: Feb 2005
Location: Beaverton, OR, USA
Posts: 197
Likes: 0
Received 0 Likes
on
0 Posts
<TABLE WIDTH="90%" CELLSPACING=0 CELLPADDING=0 ALIGN=CENTER><TR><TD>Quote, originally posted by F20Cteg »</TD></TR><TR><TD CLASS="quote">
That car was taken to a mechanic for sure. Most of them overtighten that ****. Had the same thing on my EK when I bought it.
You can use needle nose vice grips
or
Buy or rent a impact driver like this to take it out. Don't be crazy and hit it super hard. You don't want to shatter the ferrite sensors or bend the shaft. Just enough to get it out.
</TD></TR></TABLE>
Cool thanks, I'll try out the needle nose vice grips.
02-04-2007, 01:15 PM
#17
Join Date: Jan 2006
Location: Fakeville, USA, USA
Posts: 838
Likes: 0
Received 0 Likes
on
0 Posts
<TABLE WIDTH="90%" CELLSPACING=0 CELLPADDING=0 ALIGN=CENTER><TR><TD>Quote, originally posted by type B16 »</TD></TR><TR><TD CLASS="quote">how can i crank the car without shooting fuel into the cylinder or using the distributor</TD></TR></TABLE>
Remove the ecu fuse.
Remove the ecu fuse.
02-04-2007, 02:10 PM
#18
Honda-Tech Member
<TABLE WIDTH="90%" CELLSPACING=0 CELLPADDING=0 ALIGN=CENTER><TR><TD>Quote, originally posted by type B16 »</TD></TR><TR><TD CLASS="quote">how can i crank the car without shooting fuel into the cylinder or using the distributor</TD></TR></TABLE>
you can also unplug the injectors
you can also unplug the injectors
02-04-2007, 02:21 PM
#19
Senior Member

Join Date: Dec 2006
Location: by a lake
Posts: 1,347
Likes: 0
Received 0 Likes
on
0 Posts
<TABLE WIDTH="90%" CELLSPACING=0 CELLPADDING=0 ALIGN=CENTER><TR><TD>Quote, originally posted by 1995Ex_Sedan »</TD></TR><TR><TD CLASS="quote">I agree. Its a hole heck of alot easier to just turn the key and get the rotor in the right spot. </TD></TR></TABLE>
x4
x4
02-04-2007, 06:05 PM
#20
Join Date: Jan 2006
Location: Fakeville, USA, USA
Posts: 838
Likes: 0
Received 0 Likes
on
0 Posts
<TABLE WIDTH="90%" CELLSPACING=0 CELLPADDING=0 ALIGN=CENTER><TR><TD>Quote, originally posted by igo4bmx »</TD></TR><TR><TD CLASS="quote">
you can also unplug the injectors</TD></TR></TABLE>
Are ******* serious.
Let's see, pull a fuse or unclip injectors, hmmm, kind of a no-brainer.
You could also drain all the fuel out of the tank and the lines too, but one is a whole lot easier. There are many ways to skin a fish, but...............
Get my point?
 02-06-2007, 08:27 AM
#23
Join Date: Jan 2006
Location: Fakeville, USA, USA
Posts: 838
Likes: 0
Received 0 Likes
on
0 Posts
<TABLE WIDTH="90%" CELLSPACING=0 CELLPADDING=0 ALIGN=CENTER><TR><TD>Quote, originally posted by brick top »</TD></TR><TR><TD CLASS="quote">i find unplugging my injectors fairly simple.</TD></TR></TABLE>
What's easier, a single fuse or 4 plugs.
<TABLE WIDTH="90%" CELLSPACING=0 CELLPADDING=0 ALIGN=CENTER><TR><TD>Quote, originally posted by CXtypeR »</TD></TR><TR><TD CLASS="quote">so pulling the ecu fuse kills the fuel and distributor???</TD></TR></TABLE>
Yes. If the ecu has no power it can not fire the injectors or signal the igniter.
02-06-2007, 10:01 AM
#24
Honda-Tech Member
<TABLE WIDTH="90%" CELLSPACING=0 CELLPADDING=0 ALIGN=CENTER><TR><TD>Quote, originally posted by F20Cteg »</TD></TR><TR><TD CLASS="quote">
Are ******* serious.
Let's see, pull a fuse or unclip injectors, hmmm, kind of a no-brainer.
You could also drain all the fuel out of the tank and the lines too, but one is a whole lot easier. There are many ways to skin a fish, but...............
Get my point?
</TD></TR></TABLE>
yeah wtf
unclipping injectors are alot easier, especially when you don't have girly hands that can get into the fuse box easily
Are ******* serious.
Let's see, pull a fuse or unclip injectors, hmmm, kind of a no-brainer.
You could also drain all the fuel out of the tank and the lines too, but one is a whole lot easier. There are many ways to skin a fish, but...............
Get my point?
</TD></TR></TABLE>yeah wtf
unclipping injectors are alot easier, especially when you don't have girly hands that can get into the fuse box easily
