
[DIY] OEM JDM/EDM 1992-95 Honda Civic Low Fuel Indicator Retrofit
 04-04-2011, 11:30 AM
#1
OEM JDM/EDM 1992-95 Honda Civic Low Fuel Indicator Retrofit
Preface
Although a very good write-up on this topic was recently written by H-T user “tlarimer”, I would consider it a minor tragedy if I did not finish and finally post my own DIY which I have been slowly chipping away at for many months. The install has dragged on for as much time due to other priorities. This DIY also has two important distinctions from the other one: 1. I detail how to retrofit the Low Fuel gauge indicator into a CDM/USDM cluster; and, 2. Details about the removal of the Fuel Level Sender (Meter), which can be tricky.
Introduction
Many older higher-end vehicles commonly feature a low fuel indicator light, as well as most new ones nowadays of all classes. Many tuner-oriented 92-95 Civic owners who install a JDM white-faced SiR gauge cluster, or a much-coveted UKDM black-faced 145 mph-speedo VTi cluster, will see that these gauges (and a few select others) have the Low Fuel Indicator. However, no North American 92-95 Civics were equipped with a Low Fuel Indicator so new owners of these clusters cannot make use of this feature which was standard equipment on these vehicles in their respective markets. Only in 1996 did the North American domestic market models see such a feature on the Civic line.
This DIY is going to show you how to use OEM Honda parts to retrofit a Low Fuel Indicator to either make the best use of your new cluster, or, if you desire a retrofit into your current CDM/USDM cluster, I will show you how to do that too. You will have then made a practical improvement to your ride, as well as have it feature an attribute common only to the highest-end 5G Honda Civics.
Herein, I give detailed instructions on what to remove, and *some* details on how to remove it and re-install it, but I EXPECT you to have a USDM/CDM Helms Service Manual to consult for the major details on how to take stuff on your car apart, and for how to access some of the areas I describe below. No sense in me trying to tell you how to do this, when they have already done an excellent job of it already. If you don’t know already, there are plenty of places to look *online* for a version of the text.
How the circuit works, from the Helms Service Manual: “A thermistor mounted in the fuel tank unit. When the thermistor is cool, its resistance is very high. When the thermistor temperature increases, its resistance increases. Fuel in the fuel tank transfers heat away from the thermistor fast enough to keep it cool so the thermistor's resistance stays high and the low fuel indicator light does not come on. When the fuel level drops below the thermistor, the thermistor's temperature increases. Without the fuel to cool it, the thermistor's resistance decreases, allowing current to flow through the low fuel indicator light and the thermistor to ground, and the low fuel indicator light comes on.”
Preparation
Tool List
The bare minimum you will need is:
Tools:
WIDE flat head screwdriver or blunt punch
Hammer or mallet (preferred)
Eye protection
Clean rag or approved fuel container
Shop-Vac
Tiny screwdriver for removing wiring pins from connectors
Metric socket set
Misc. other tools such as Philips screwdrivers, needle-nose pliers
Common sense
Tools for basic vehicle wiring:
Wire bullet connectors (available at Radio Shack or online, see below) or equipment for soldering wires
Wire snips
Electrical tape or whatever you decide to use to cover up your wiring work (like heat-shrink tubing)
Multi-meter for testing your connection
Paper clip as a jumper if you want to test the low-fuel light
Harvested from the wreckers:
Pigtail from behind the cluster (has special cluster pins)
GRN/RED wire from parking brake + additional GRN/RED wiring
Optional: RED/GRN wire from dash harness of a 92-95 Civic (i.e., this section of the parking brake wire), as this wire has the correct cluster pin, extends down to the under-dash fuse box, and is the exact length you require
Low-fuel bulb from the cluster of a 96-00 Civic, or other Honda (e.g., CR-V, Integra)
Retrofitting indicator on a CDM/USDM cluster:
Acetone (Nail polish remover) NOT Acetone. Use Paint Thinner or Mineral Spirits as these do not cloud the plastic. I used the paint thinner (but it has mineral spirits in it anyway).
Q-tips (handful)
Laser printable transparency paper & clear, high-quality tape OR sticky-backed transparency paper
Laser printer (1200+ dpi preferable)
Tweezers
Notes on wiring
Connecting and installing the wiring properly will likely take you the most time out of all the operations involved in this project. I haven't hack-jobbed or jerry-rigged anything in this write-up - I firmly believe that this is about as close to a clean OEM retrofit as you can get.
My recommendation is, and if you're like me and want as clean an install as possible, you will spend time pulling the correct colour of wires from a salvage yard vehicle. This guide will tell you where to find the colour of wires in a 92-95 Civic to match the OEM colours.
Extracting the wiring -- while painful -- makes the re-wiring exercise considerably more pleasant, gives you the exact OEM wire colours, and means you don't have to go out and buy your OWN wire.
Wiring Connectors
When you do have to patch together cut wires, I recommend using Bullet connectors. These attach & detach readily and are self-shielding. I suppose a cautious person would electrical-tape all the connections, but I didn't. As I am in Canada, I purchased my electronics parts over the phone from A-1 Electronics - see A1 Electronic Parts - Serving the Toronto area for 30 years! (WARNING: TERRIBLE WEBSITE. GODAWFUL.); these had the best prices around Canada that I could find, and domestic shipping was a flat $10. A long time ago I ordered a pack of 100 for each of Male & Female 14-16 (blue) & 16-18 (red) gauge Bullet connectors, and a pack of 100 of each of 14-16 (blue) & 16-18 gauge wire-taps (T-Taps), and they are still serving me well. This amount might be overkill for you, but I had a bunch of projects I wanted to wire up so it was a good investment for me.
Americans can just look on eBay; there's dozens of dealers selling large bulk packs of bullet connectors.
Pin Removal
You may have to do a bit of this. A tiny screwdriver is your friend. Look up on honda-tech.com the correct way to remove pins from connectors, or consult this comprehensive guide.
Project Difficulty and Time Commitment
This project is not difficult, especially since I've given you all the information you need to perform the install. But, it is a bit tedious at times. Provided all goes well with the removal of your old fuel level sender, I would budget a 1/2 to 3/4 of a day to perform the retrofit, once you have sourced all your parts.
Acknowledgments
Some text is quoted verbatim or paraphrased from an old defunct web page of “Mark Paco” (I believe) who was active in the Honda Civic scene about 10 years ago. Text like this marked in single quotes.
Also, this DIY would not be possible without the efforts of H-T user “tlarimer” and of course his excellent DIY and pictures.
Disclaimer
Or, "Don't point fingers, you only have yourself to blame"
Every effort has been made to make these instructions as complete and accurate as possible, but no warranty or fitness is implied. The information is provided on an “as is” basis. The author(s) and the website/publisher(s) shall have neither liability nor responsibility to any person or entity with respect to any loss or damages or inconvenience arising from the information contained herein, nor due to any omissions. Read: Don't muck up your vehicle and try to blame me or anyone else. You are responsible for your own due diligence and research.
Parts Required & Removal Instructions
From the Salvage Yard
Find a 5G 92-95 Honda Civic...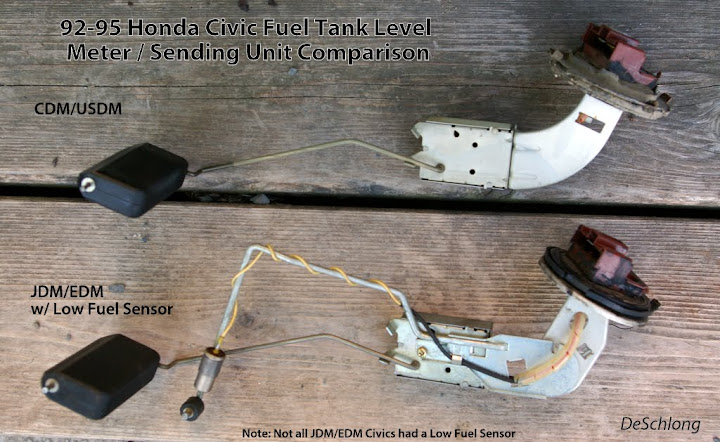
Figure 1.
Installation Instructions
Before You Begin
Figure 2.
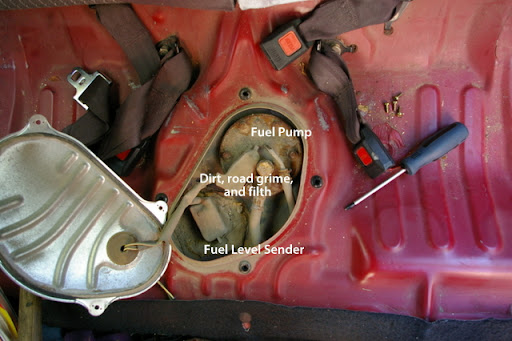
Figure 3.

Figure 4.
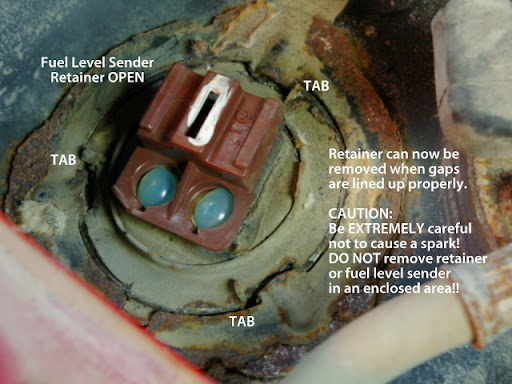
Figure 5.
Fuel Level Sender Wiring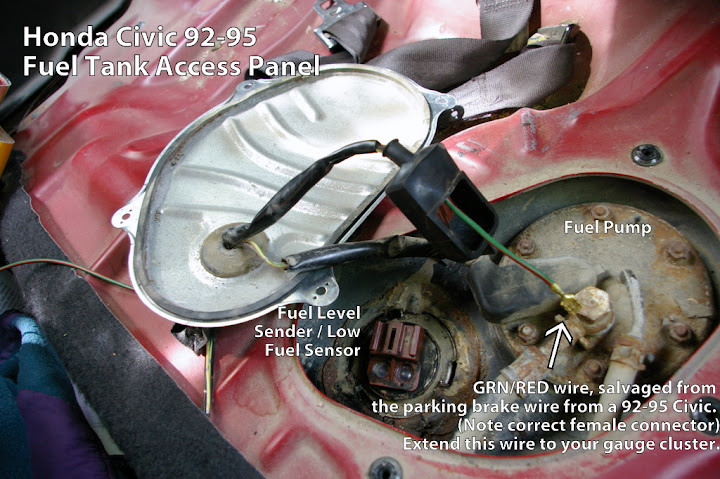
Figure 6.
Figure 7a.

Figure 7b.

Figure 7c.
Cluster Wiring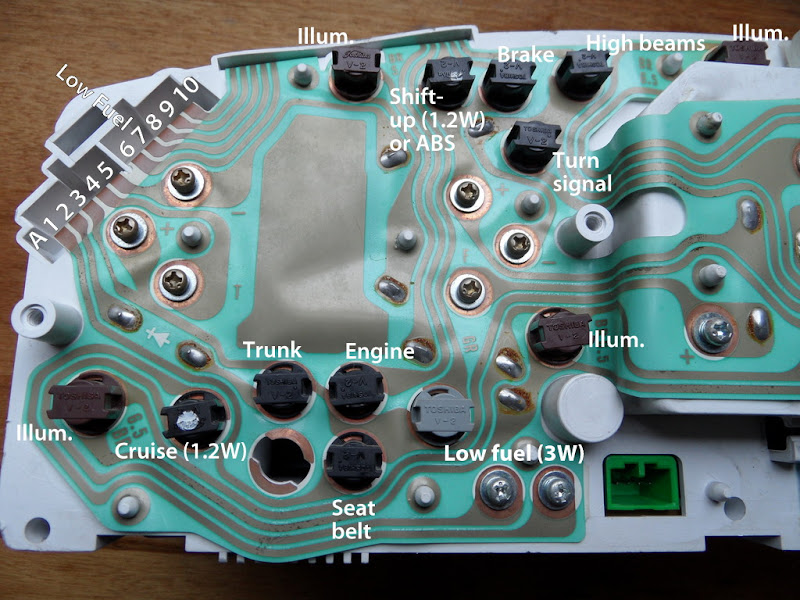
Figure 8.
Low Fuel Cluster Indicator Retrofit
If you are not using a JDM or EDM cluster with an existing low-fuel indicator then you will want to add one to your existing CDM/USDM gauge; this is especially true if you want to retain your cruise and seat belt indicators. (Figure 9)
Figure 9.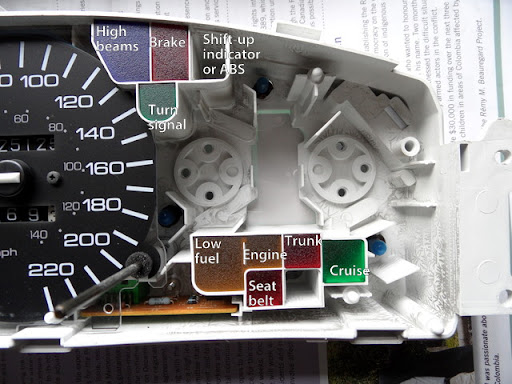
Figure 10.
Figure 11.

Figure 12. I used acetone originally, but I now (Nov 2016) recommend paint thinner or mineral spirits.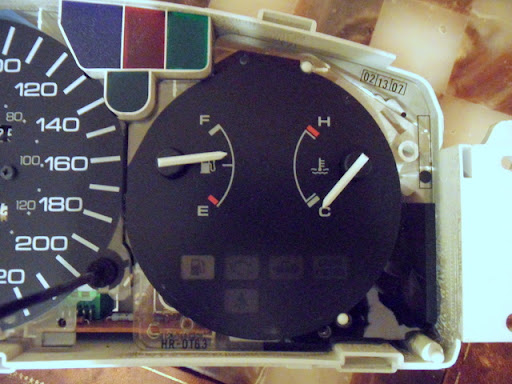
Figure 13.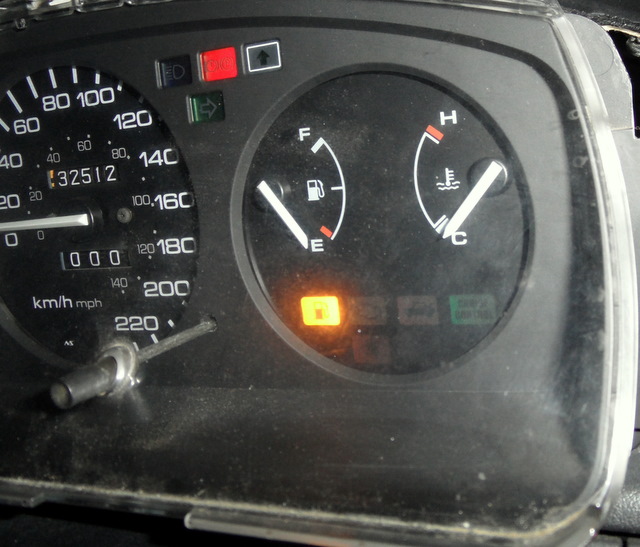
Figure 14.
Good Luck, and by every indication, you'll see you've made a practical improvement to your ride.
deschlong
April, 2011
Preface
Although a very good write-up on this topic was recently written by H-T user “tlarimer”, I would consider it a minor tragedy if I did not finish and finally post my own DIY which I have been slowly chipping away at for many months. The install has dragged on for as much time due to other priorities. This DIY also has two important distinctions from the other one: 1. I detail how to retrofit the Low Fuel gauge indicator into a CDM/USDM cluster; and, 2. Details about the removal of the Fuel Level Sender (Meter), which can be tricky.
Introduction
Many older higher-end vehicles commonly feature a low fuel indicator light, as well as most new ones nowadays of all classes. Many tuner-oriented 92-95 Civic owners who install a JDM white-faced SiR gauge cluster, or a much-coveted UKDM black-faced 145 mph-speedo VTi cluster, will see that these gauges (and a few select others) have the Low Fuel Indicator. However, no North American 92-95 Civics were equipped with a Low Fuel Indicator so new owners of these clusters cannot make use of this feature which was standard equipment on these vehicles in their respective markets. Only in 1996 did the North American domestic market models see such a feature on the Civic line.
This DIY is going to show you how to use OEM Honda parts to retrofit a Low Fuel Indicator to either make the best use of your new cluster, or, if you desire a retrofit into your current CDM/USDM cluster, I will show you how to do that too. You will have then made a practical improvement to your ride, as well as have it feature an attribute common only to the highest-end 5G Honda Civics.
Herein, I give detailed instructions on what to remove, and *some* details on how to remove it and re-install it, but I EXPECT you to have a USDM/CDM Helms Service Manual to consult for the major details on how to take stuff on your car apart, and for how to access some of the areas I describe below. No sense in me trying to tell you how to do this, when they have already done an excellent job of it already. If you don’t know already, there are plenty of places to look *online* for a version of the text.
How the circuit works, from the Helms Service Manual: “A thermistor mounted in the fuel tank unit. When the thermistor is cool, its resistance is very high. When the thermistor temperature increases, its resistance increases. Fuel in the fuel tank transfers heat away from the thermistor fast enough to keep it cool so the thermistor's resistance stays high and the low fuel indicator light does not come on. When the fuel level drops below the thermistor, the thermistor's temperature increases. Without the fuel to cool it, the thermistor's resistance decreases, allowing current to flow through the low fuel indicator light and the thermistor to ground, and the low fuel indicator light comes on.”
Preparation
Tool List
The bare minimum you will need is:
Tools:
WIDE flat head screwdriver or blunt punch
Hammer or mallet (preferred)
Eye protection
Clean rag or approved fuel container
Shop-Vac
Tiny screwdriver for removing wiring pins from connectors
Metric socket set
Misc. other tools such as Philips screwdrivers, needle-nose pliers
Common sense
Tools for basic vehicle wiring:
Wire bullet connectors (available at Radio Shack or online, see below) or equipment for soldering wires
Wire snips
Electrical tape or whatever you decide to use to cover up your wiring work (like heat-shrink tubing)
Multi-meter for testing your connection
Paper clip as a jumper if you want to test the low-fuel light
Harvested from the wreckers:
Pigtail from behind the cluster (has special cluster pins)
GRN/RED wire from parking brake + additional GRN/RED wiring
Optional: RED/GRN wire from dash harness of a 92-95 Civic (i.e., this section of the parking brake wire), as this wire has the correct cluster pin, extends down to the under-dash fuse box, and is the exact length you require
Low-fuel bulb from the cluster of a 96-00 Civic, or other Honda (e.g., CR-V, Integra)
Retrofitting indicator on a CDM/USDM cluster:
Q-tips (handful)
Laser printable transparency paper & clear, high-quality tape OR sticky-backed transparency paper
Laser printer (1200+ dpi preferable)
Tweezers
Notes on wiring
Connecting and installing the wiring properly will likely take you the most time out of all the operations involved in this project. I haven't hack-jobbed or jerry-rigged anything in this write-up - I firmly believe that this is about as close to a clean OEM retrofit as you can get.
My recommendation is, and if you're like me and want as clean an install as possible, you will spend time pulling the correct colour of wires from a salvage yard vehicle. This guide will tell you where to find the colour of wires in a 92-95 Civic to match the OEM colours.
Extracting the wiring -- while painful -- makes the re-wiring exercise considerably more pleasant, gives you the exact OEM wire colours, and means you don't have to go out and buy your OWN wire.
Wiring Connectors
When you do have to patch together cut wires, I recommend using Bullet connectors. These attach & detach readily and are self-shielding. I suppose a cautious person would electrical-tape all the connections, but I didn't. As I am in Canada, I purchased my electronics parts over the phone from A-1 Electronics - see A1 Electronic Parts - Serving the Toronto area for 30 years! (WARNING: TERRIBLE WEBSITE. GODAWFUL.); these had the best prices around Canada that I could find, and domestic shipping was a flat $10. A long time ago I ordered a pack of 100 for each of Male & Female 14-16 (blue) & 16-18 (red) gauge Bullet connectors, and a pack of 100 of each of 14-16 (blue) & 16-18 gauge wire-taps (T-Taps), and they are still serving me well. This amount might be overkill for you, but I had a bunch of projects I wanted to wire up so it was a good investment for me.
Americans can just look on eBay; there's dozens of dealers selling large bulk packs of bullet connectors.
Pin Removal
You may have to do a bit of this. A tiny screwdriver is your friend. Look up on honda-tech.com the correct way to remove pins from connectors, or consult this comprehensive guide.
Project Difficulty and Time Commitment
This project is not difficult, especially since I've given you all the information you need to perform the install. But, it is a bit tedious at times. Provided all goes well with the removal of your old fuel level sender, I would budget a 1/2 to 3/4 of a day to perform the retrofit, once you have sourced all your parts.
Acknowledgments
Some text is quoted verbatim or paraphrased from an old defunct web page of “Mark Paco” (I believe) who was active in the Honda Civic scene about 10 years ago. Text like this marked in single quotes.
Also, this DIY would not be possible without the efforts of H-T user “tlarimer” and of course his excellent DIY and pictures.
Disclaimer
Or, "Don't point fingers, you only have yourself to blame"
Every effort has been made to make these instructions as complete and accurate as possible, but no warranty or fitness is implied. The information is provided on an “as is” basis. The author(s) and the website/publisher(s) shall have neither liability nor responsibility to any person or entity with respect to any loss or damages or inconvenience arising from the information contained herein, nor due to any omissions. Read: Don't muck up your vehicle and try to blame me or anyone else. You are responsible for your own due diligence and research.
Parts Required & Removal Instructions
From the Salvage Yard
Find a 5G 92-95 Honda Civic...
- Pull the GRN/RED wire from the parking brake switch (under the center console) all the way to, well, however long you can get.
- You’ll need additional GRN/RED, too, because the wire needs to go from the cluster all the way to the fuel pump area under the back seat - so, that gives you an idea of how much you’ll need.
- Get a pigtail from the cluster connector. These have special pins that are specific to the cluster and getting one will make your life easier. Actually, you just need one wire, so just get that I guess.
- If you are doing a retrofit on a CDM/USDM cluster (or you want an extra), get the low fuel light bulb from behind the cluster. This is a special 3W bulb with a large, (ie,. larger than “normal” indicator lights) grey base (Figure 8).
- Bulbs from other Hondas will also probably work (eg., Integra) - I just know for sure that the p/n for the bulb is the same for 96-00 Civics as it is for JDM/EDM Civics with this low fuel light feature.
- See below (“Online” section) ...
- The correct fuel level sender IS available from US Honda dealerships, p/n 37800-S04-305. (Figure 1) Either swallow it and buy it at full price (actually, not that bad) or else try desperately to find one in a junk yard where you’re going to spend way more than $30 (approx price difference new vs. used) in your own time (and fuel) trying to locate the ONE (1) model of 1997 Japan-built sedan with the correct fuel level sender. ALL other 1996-2000 CDM/USDM Civics (Canada, US and Japan-built) have a DIFFERENT style of fuel level sender which is incompatible with the 92-95 fuel tank.
- You *might* be able to source one online (eBay), but be prepared to play the waiting game, and you’ll still probably pay a fair bit for it (unless you’re like me and luck out finding one for ~$25 shipped … booyeah)
Figure 1.
Installation Instructions
Before You Begin
- Remove the negative cable of your battery before performing any electrical work on your vehicle.
- My car doesn't have SRS, but I take it they can blow up in your face, so take necessary precautions to disable if required or desired. Your Helms manual is explicit in this regard.
- Position the vehicle in an open area and open its windows or doors for lots of ventilation
- Remove the rear seat (consult Helms if necessary)
- Remove the fuel pump / fuel level sender access panel (Figure 2)
- Clear out the dirt and grime on top of the fuel pump and level sender (Figure 3)
- ‘Wear safety glasses for this step! Using a blunt punch or slotted screwdriver and rubber mallet, remove the fuel level sender retainer by impacting the retainer in such a manner to rotate it counterclockwise. That means you need to hit it tangent to the circular profile of the retainer. If you have problems figuring what to do, look closely at the sending unit and you will see 3 little tabs sticking out of it. (Figures 4 and 5) You need to hit any one of them. Sometimes you can rotate the retainer by hitting one tab, sometimes you need to hit all 3. Honda offers a tool to do this but, unless you are a mechanic that replaces fuel level sending units for a living, do it this way. It will take some brute force so be liberal.’
- NOTE: If you need to leave the fuel tank exposed / opened for any length of time, either cover the hole with a clean rag to reduce noxious and explosive fumes from escaping or drain the tank into an approved container (there’s a fuel drain bolt).
- Common sense dictates NOT TO SMOKE OR HAVE AN OPEN FLAME NEARBY.
- Remove the original fuel level sender and insert your replacement fuel level sender with low-fuel sensor (a bit awkward, but it fits)
- Reinstall retaining ring
Figure 2.
Figure 3.
Figure 4.
Figure 5.
Fuel Level Sender Wiring
- Run your salvaged GRN/RED wire through the grommet of the access panel and into the rubber cover of the connector. (Figure 6)
Figure 6.
- ‘Remove the white retaining clip from the harness [connector]. Pull it out from the […] wire side using your fingers or a needle nose pliers.’
- Insert the pin that was originally connected to the parking brake into the connector in the open slot. This is a near-perfect fit. Try to get some of the dielectric grease that’s in there on your pin. This helps protect it from the elements.
- Run the wire parallel to existing cabin wiring, securing with electrical tape where necessary, and through the side-sill wiring retainers. I used bullet connectors to connect my lengths of wire. (Figures 7a, 7b and 7c).
Figure 7a.
Figure 7b.
Figure 7c.
Cluster Wiring
- You should send your wire through the OEM connectors in the wiring harnesses as you progress towards the cluster. “tlarimers” DIY gives great instructions on how to do this, and I recommend you follow it, so I will not expound on the point.
- Connect your wire to the cluster wire with pin that you salvaged.
- Insert this into position A7 of the cluster connector. (Figure 8)
Figure 8.
Low Fuel Cluster Indicator Retrofit
If you are not using a JDM or EDM cluster with an existing low-fuel indicator then you will want to add one to your existing CDM/USDM gauge; this is especially true if you want to retain your cruise and seat belt indicators. (Figure 9)
Figure 9.
- Remove the fuel/temp gauge from the housing. Notice how Honda makes it easy for you to do this mod: ALL clusters (with tach) have yellow coloured plastic behind the indicator location for the low fuel light. (Figure 10) This is a 1-piece of plastic shared with the engine light indicator next to it. Very convenient. Thank-you Honda.
Figure 10.
- Use mineral spirits or paint thinner on a Q-Tip (Figure 11) to remove the paint under the fuel level gauge to expose the blank indicator square. This should not adversely affect the gauge plastic. Acetone works faster but WILL cloud the plastic, I used it the first time I did this project (in 2011) but having done another one now (Nov 2016), I don't recommend it. (Figure 12) NOTE: USE A CIRCULAR MOTION ALWAYS. NEVER BACK AND FORTH IN A STRAIGHT LINE AS THIS WILL START TO POLISH THE UNDERLYING PLASTIC AND DISCOLOUR IT.
Figure 11.
Figure 12. I used acetone originally, but I now (Nov 2016) recommend paint thinner or mineral spirits.
- Print out on a high quality (1200+ dpi) printer my fuel pump glyph (PDF link) on a transparency sheet or sticky-backed transparency sheet. Don't scale it up or down!!
- If printing on a sticker you may need to invert the image.
- Cut it out (being careful of proper dimensions) and attach this by either carefully placing the sticker using tweezers or by taping down the transparency.
- If using a sticker, be careful there are no air bubbles caught underneath.
- On my cluster this process reflected about 90% of the quality of the OEM symbol. The last stumbling block which I have not been able to resolve is the slight shade difference between the clear areas of the original indicators and the retrofit one. (Figure 13)
- The other symbols (cruise, seatbelt, engine...) have a slight *grey* hue to the area around the symbol. It's like there's a glossy glaze applied that changes the colour slightly and light transmission.
- Something I do know is that at some point Honda changed the way it paints the symbols on. Later years (94, 95) glyphs are painted on the back while early years (92, 93) they are painted on the front. If you use a gauge from 92/93 I suspect you would not have a problem because of the way it's designed. Lesson learned.
Figure 13.
- Reassemble the fuel/temp gauge into the cluster housing BUT DO NOT OVER TIGHTEN THE SCREWS. THE GAUGE IS VERY SUSCEPTIBLE TO DAMAGE! The tiny wires that are in the gauge can be torn/broken by over-tightening. I've done this before and it is NOT A FUN REPAIR. BE VERY CAREFUL. I recommend you hand-tighten the 6 screws on the back of the fuel/temp gauge and just use a screwdriver to tighten a Ľ or ˝ turn.
- Reconnect your battery.
- At this point you may be able to test your light by grounding between GRN/RED and BLK/WHT on the fuel level sender and with the ignition in IG1. (Figure 14) A paper clip will work.
- However, normal operation will involve:
- The light will come on with less than 6.5 litres (1.7 U.S. Gal, 1.4 Imp. Gal) fuel remaining in your tank. It should come on within 4 minutes when the fuel level reaches the thermistor sensor. (This amount may differ if you have the smaller VX or USDM CX fuel tank.)
- The light will come on with less than 6.5 litres (1.7 U.S. Gal, 1.4 Imp. Gal) fuel remaining in your tank. It should come on within 4 minutes when the fuel level reaches the thermistor sensor. (This amount may differ if you have the smaller VX or USDM CX fuel tank.)
Figure 14.
- If it does not work on the first try, troubleshoot all your connections.
- I wouldn't completely reassemble all your parts before your first test try. Leave off certain pieces of trim to make it easier to troubleshoot if you encounter problems.
Good Luck, and by every indication, you'll see you've made a practical improvement to your ride.
deschlong
April, 2011
Last edited by deschlong; 06-02-2017 at 02:48 PM. Reason: 11/2016: Changes to text and technique. 08/2012: Corrected a missing figure number.

 04-07-2011, 11:22 PM
#4
Honda-Tech Member
my vx with the 10 gal tank is showing the fuel gauge inaccurately with the new sending unit. I may need to "recalibrate"it.
04-07-2011, 11:27 PM
#5
Honda-Tech Member
Join Date: May 2008
Location: CA
Posts: 3,591
Likes: 0
Received 0 Likes
on
0 Posts
Wow just wow amazing write up! Haven't seen people like you on Honda-tech for a while lol. *clap clap clap
04-08-2011, 12:51 AM
#6
Honda-Tech Member
Join Date: May 2010
Location: Southern Indiana
Posts: 221
Likes: 0
Received 0 Likes
on
0 Posts
At first I was unsure I wanted to do this mod because of price of the new sending unit, unsure of the amount of labor involved, etc... but now that I've seen this detailed DIY I feel much more comfortable with doing it and will do it in the near future. I enjoy reading your diy's and even more so actually using them. Keep up the good work Deschlong 
04-08-2011, 06:36 AM
#7
NP, Ronnoc. Am glad this has inspired you to do your own mod.
Unfortunately, I am running low on new DIY topics as I slowly work through all the available options for this vehicle....
Unfortunately, I am running low on new DIY topics as I slowly work through all the available options for this vehicle....
Trending Topics
04-14-2011, 10:18 AM
#8
Honda-Tech Member
Instead of messing with the gauge, I wonder if I bend the float arm slightly if I would get a more accurate reading since my tank is 10gal vs 12gal?
04-14-2011, 10:49 AM
#9
Yes, I would compare your old vs. new and put them about at the same position/location when right at the bottom.
I have a giant dent in my tank (an encounter with a rock that could have gone way worse, ie., destroyed my oil pan) so I had to do some fiddling with my float, but mostly I had to mess with the low fuel sensor.
I have a giant dent in my tank (an encounter with a rock that could have gone way worse, ie., destroyed my oil pan) so I had to do some fiddling with my float, but mostly I had to mess with the low fuel sensor.
04-14-2011, 10:31 PM
#10
Honda-Tech Member
Its not off by much, just enough to annoy me. I guess its better to show it too low than too full. My up-shift light turned on today, I had approx 1.2 gallons left when it first started glowing. The bulb is 1.2w on the up-shift. I might get the 3w in the future.
05-18-2011, 06:24 AM
#14
Last edited by deschlong; 05-18-2011 at 08:15 AM.
11-25-2013, 05:36 PM
#16
Honda-Tech Member
Join Date: Feb 2013
Location: Vansterdam, BC
Posts: 139
Likes: 0
Received 0 Likes
on
0 Posts
Well I wanted a EDM cluster but today I got a white faced JDM Sir one for $110 locally which is pretty fair out here. I spent my afternoon pulling ebrake wire all the way to the cluster and connectors, so all thats left is to order the sender. Did you order your sender from a local Canadian honda dealer? If so I'm ordering that sucker tomorrow.
Seeing as I have a new shell I have to pull the dash on, I figure what better time than now to do this.
Seeing as I have a new shell I have to pull the dash on, I figure what better time than now to do this.
11-25-2013, 06:00 PM
#17
No, I picked mine up originally used from overseas (Europe). Second one I pillaged from my JDM SiR-S donor EG6. I'm not sure if they have this part at Canadian dealers but plug the p/n into torontohondaparts.com to find out - otherwise it's time to shop in the USA.
 11-25-2013, 06:28 PM
#19
Honda-Tech Member
Join Date: Feb 2013
Location: Vansterdam, BC
Posts: 139
Likes: 0
Received 0 Likes
on
0 Posts
Bad news is that part number doesn't fly on the magical Torontah parts site (though it is an amazing site, if I was rich I would buy every panel piece they sell for an eg and weld one together myself Lol)
Good news is I only live an hour from Yankee Land and need to go pickup my steering wheel and hub next week. Hopefully I can sort it out to pickup at the same time. I assume just the parts number should do it ? or is there a specific model it came from in USDM ?
EDIT: yeah reread Tlarimer's thread, got it. will be ordering tomorrow. Thanks for the help. Gonna be nice to have. http://www.realhondaparts.com/rwhond...=37800-S04-305 $100 CDN shipped to Blaine, WA. vs NorthWest Honda in Bellingham for $139.80 USD
Last edited by SozeHuck; 11-26-2013 at 04:40 PM. Reason: Price match
04-21-2014, 05:26 PM
#20
Honda-Tech Member
Thanks for the write-up Deschlong! Love the little features.
Last edited by deschlong; 04-21-2014 at 10:08 PM. Reason: Fixed my username spelling ;)
04-23-2014, 04:32 PM
#21
Honda-Tech Member
Installed this yesterday, and it turned out perfect! Wouldn't have been able to do it without your DIY. Thanks deschlong!
Last edited by deschlong; 04-23-2014 at 04:43 PM. Reason: Anonymizer ;)
06-02-2017, 01:00 PM
#24
Honda-Tech Member

Join Date: Dec 2009
Posts: 45
Likes: 0
Received 0 Likes
on
0 Posts
Print out on a high quality (1200+ dpi) printer https://honda-tech.com/attachment.php?attachmentid=175443&d=1290272844&qu ot;=]my fuel pump glyph[/url] (PDF link) on a transparency sheet or sticky-backed transparency sheet. Don't scale it up or down!!