
[DIY] Honda Civic 92-95 EDM Heated Seats DIY Retrofit Install Guide
 09-25-2009, 09:12 AM
#1
[DIY] Honda Civic 92-95 EDM Heated Seats DIY Retrofit Install Guide
NOTE: See the end of the post for my experience with the aftermarket seat heater element retailer's excellent customer service!
Introduction
No Canadian Domestic Market (CDM) nor US Domestic Market (USDM) 1992-1995 Honda Civics had Heated Seats as standard or even optional equipment. This is common for many Honda vehicles in North America as they are perceived, rightly or wrongly, as being "low-end". It isn't until you reach the upper-end model Acuras will you start seeing such luxuries as Heated Seats on this continent.
This isn't the case, however, for our friends in Europe. Europeans, especially in colder climates, have long had such luxuries in their "low-end" model vehicles, likely due to greater competitiveness between car manufacturers and more fickle car owners (as well as their appreciation that a compact car can also have more amenities). This includes the 1992-1995 Honda Civics, which, in some regions, came with Heated Seats as a standard feature, similar to what is shown in Figure 1a and 1b.
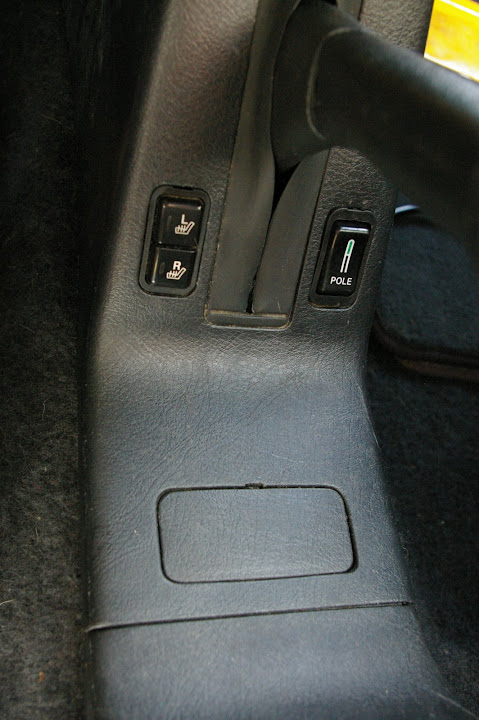
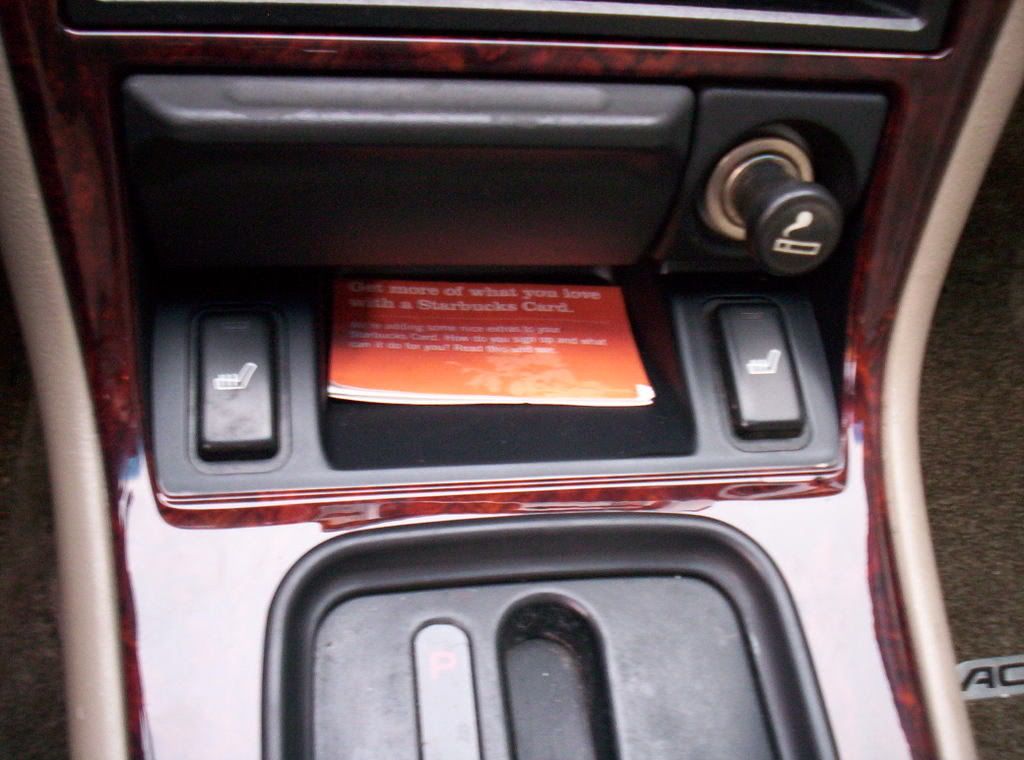
Figure 1a. View of armrest console with dual-Heated Seat switch installed (and bumper/parking pole switch).
 Figure 1b: Close-up of OEM Honda/Acura Heated Seat Switch mounted in a CDM 1994 3DR Honda Civic CX.
I find this to be a little unfair. I live in Canada, arguably one of the coldest countries in the world, and we have to buy a big pricey car to get some heated seats? But we North Americans like to spend so much time in our cars! (Actually, I live in an urban area and can walk/bike most places.) Well, since we know that Honda Civic parts are largely interchangeable like pieces of LEGO, who says we in North America can't add this little EDM goodie to our ride? I certainly don't, and this DIY Install Guide will walk you through the steps you need to take to get your Heated Seats up and running in your Civic.
Note that this write-up pertains specifically to modifications to a 5th Generation 92-95 3DR Honda Civic Hatchback. The DIY modifications will mostly translate to a 4DR Sedan, with the minor(?) exception that the seat/cushion fabric & moulding design on a Sedan differs from that of a Hatchback. Be sure to explore and understand any differences thoroughly before performing your modifications to a Sedan. The 2DR Coupe uses the same style of seats/cushions as a Hatchback.
Preparation
Notes on wiring
Connecting and installing the wiring properly will likely take you the most time out of all the operations involved in this project. I haven't hack-jobbed or jerry-rigged anything in this write-up - I firmly believe that this is about as close to a clean OEM retrofit as you can get.
My recommendation is, and if you're like me and want as clean an install as possible, you will spend time pulling the correct colour of wires from a salvage yard vehicle. This guide will tell you where to find the colour of wires in a 92-95 Civic to match the OEM colours.
Extracting the wiring harnesses -- while painful -- makes the re-wiring exercise considerably more pleasant, gives you the exact OEM wire colours, and means you don't have to go out and buy your OWN wire. Though I don't usually bother getting BLK (ground) wires all the way to their terminus, I did so in this project, and I consider that a wise decision, as I needed to ground some wires using a terminal ring and I was able to use the existing BLK wires which ended with a large terminal ring (the one under the carpet by the driver's seat). You may need additional BLK wire, so buy yourself a 25ft roll of 16 gauge, and you'll be set for this project and for many future projects.
**NOTE:** Many connections to the specific pins on the under-dash fuse box were not explicitly identified in either the CDM/USDM or foreign market Helms manuals. Therefore, I had to determine the correct pins through 'ohm-ing out' with my multimeter, between the fuse location and the pins. For example, the wiring diagram for the seat heater switch in one of the Helms manuals shows that power for the seat heater relay is connected from the under-dash fuse box, through Fuse No. 2 (20A), and out to a WHT/BLK wire to the relay. It does NOT specify the correct connector junctions and pins where these wires connect to the fuse box. I had to discover this manually. Remarkably, this is new information not found anywhere else on the web or in other service manuals (eg., Haynes, Mitchell), and I have marked it in this DIY with a "**" to indicate that you won't be able to substantiate this information with any other source.
Fuse Box Connections
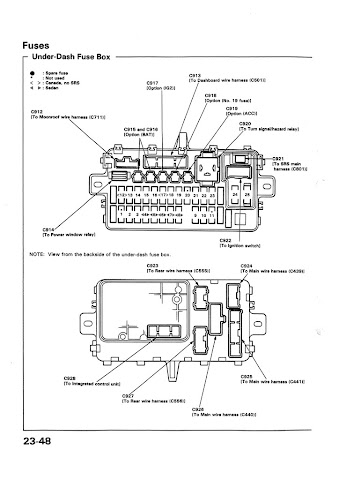
I make reference numerous times to the connector numbers (eg., C555) in the write up. This is referencing the connector numbers as described in the CDM/USDM Helms manual, typically at the under-dash fuse box. I guess this can seem pretty obscure to those of you unfamiliar with this nomenclature. I've reproduced the page below as a quick reference to give you an idea of what I'm talking about. (Click it to enlarge.)
Wiring Connectors
I will stress: Don't cut wiring if you don't have to. This makes for a much cleaner reinstall. Unplug the pins where you can; there will be many times when you will need the pins at the end of the wire, and you will be glad you have them.
When you do have to patch together cut wires, I recommend using Bullet connectors. These attach & detach readily and are self-shielding. I suppose a cautious person would electrical-tape all the connections, but I didn't. You will need a few Wire Tap ("T-Taps") connectors, too. As I am in Canada, I purchased my electronics parts over the phone from A-1 Electronics - see http://www.a1parts.com/ (WARNING: TERRIBLE WEBSITE. GODAWFUL.); these had the best prices around Canada that I could find, and domestic shipping was a flat $10. I ordered a pack of 100 for each of Male & Female 14-16 (blue) & 16-18 (red) gauge Bullet connectors, and a pack of 100 of each of 14-16 (blue) & 16-18 gauge wire-taps (T-Taps). This amount might be overkill for you, but I had a bunch of projects I wanted to wire up so it was a good investment for me.
Americans can just look on eBay; there's dozens of dealers selling large bulk packs of bullet connectors and wire taps.
Pin Removal
You'll have to do a bit of this. A tiny screwdriver is your friend. Look up on honda-tech.com the correct way to remove pins from connectors, or consult this comprehensive guide.
Note on Order of Operations
The instructions, as written below, aren't necessarily meant to be followed linearly as a step-by-step process of removal and then re-installation. Read the whole thing through, first, to get an idea of what you're up against. You will have to jump around a bit from section to section as you see fit. There is no real "wrong" order to do the install, but you will run in to obvious roadblocks, in which case you'll have to figure out on your own what a logical order to proceed is.
Project Difficulty and Time Commitment
This project is not difficult, especially if you can read a wiring diagram. Expect to spend a day foraging for parts in the salvage yard. It is hard for me to gauge exactly how long I worked on the specific installation of the Heated Seats as I was also retrofitting wiring for additional Civic options such as the Power Mirrors/Power Windows/Power Locks, Rear Wiper, Rear Fog Light and Headlight Washers. Expect it to take the equivalent of 2 days of work to install.
Disclaimer
Or, "Don't point fingers, you only have yourself to blame"
Every effort has been made to make these instructions as complete and accurate as possible, but no warranty or fitness is implied. The information is provided on an “as is” basis. The author(s) and the website/publisher(s) shall have neither liability nor responsibility to any person or entity with respect to any loss or damages or inconvenience arising from the information contained herein, nor due to any omissions. Read: Don't muck up your vehicle and try to blame me or anyone else. You are responsible for your own due diligence and research.
Parts Required & Removal Instructions
Online

Figure 2. OEM Heated Seat switches for 92-95 Honda Civics.
Honda P/N 38535-SR3-S01.

Figure 3. OEM Heated Seats switch for 1997 Acura CL 3.0 Premium.
Acura P/N 38535-SS8-A01.
Hardware and/or Electronics Store
From the Salvage Yard
Cabin: Dashboard
Cabin: Under Dash/Footwell
Relay:
Wiring:
Optional Wiring:
Installation Instructions
Before You Begin
Cabin: Seats
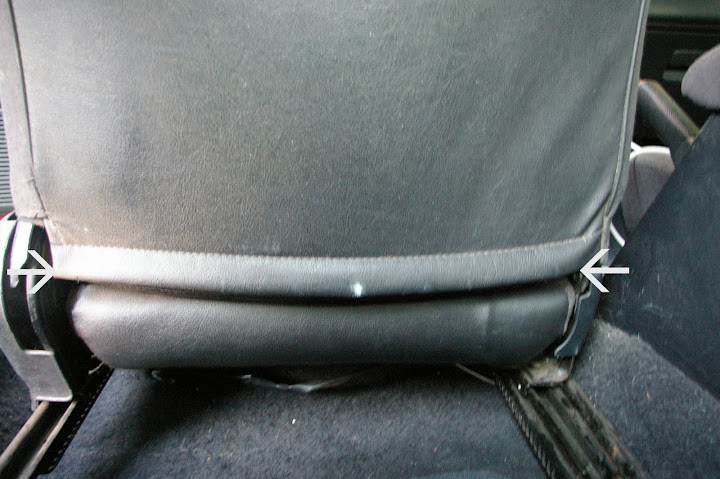
Figure 4. Arrows point to hog rings which are difficult to remove at the seat back cushion. I did eventually manage to remove them but if they're giving you trouble then wire cutters or tin snips are required to cut and remove.
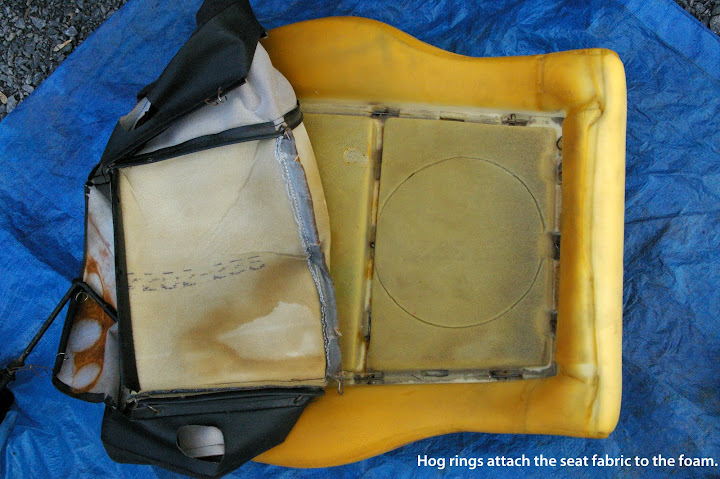
Figure 5: More hog rings hold down the seat cover fabric.
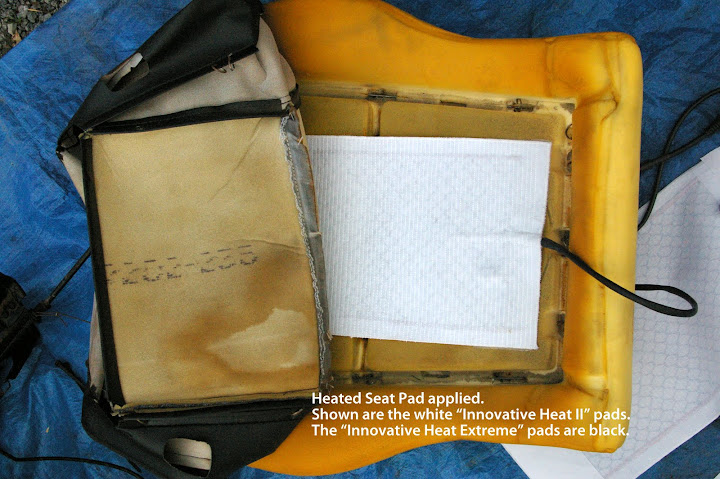
Figure 6. Seat heater pad installed on bottom cushion. Important: Tuck the seat heater pad down a little into the dip where the metal bar lays across. This isn't shown because I realized I should do it only after I took the picture.
 Figure 7. Hog rings attach the fabric to the cushion across middle-centre of the seat, and the suggested replacements
when installing a Heated Seat pad. Note that the missing centre hog ring make little or no difference to the fitment of the fabric.
Cabin: Under Dash/Footwell
Wiring
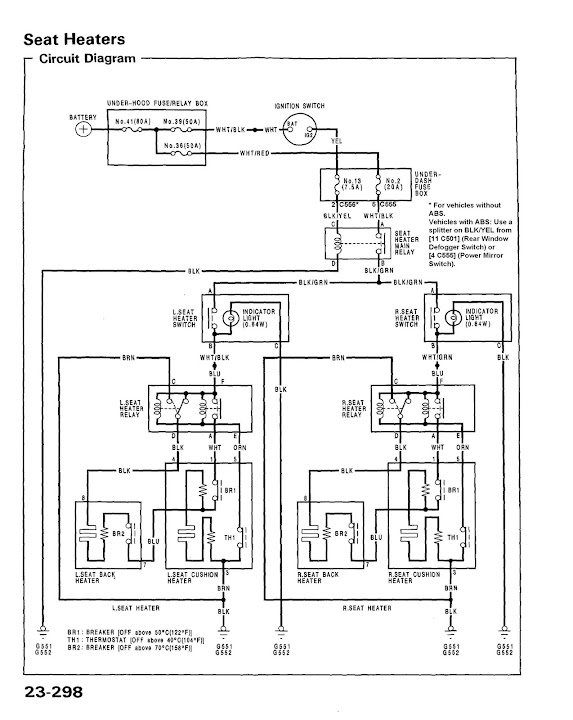 Figure 8. Heated Seat Wiring Diagram for a 92-95 Civic, excerpt from the Helms
service manual. Click image for a link to a PDF version of this document.
Note that the Seat Heater relay mentioned at the end of the PDF is NOT
the same relay as the MAIN seat heater relay attached to the under-dash fuse box.
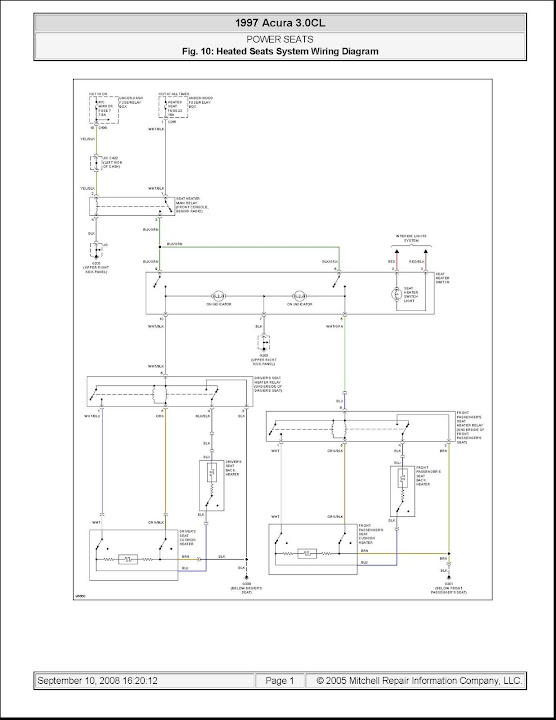 Figure 9. Heated Seat switch wiring diagram for a 1997 Acura CL 3.0 Premium,
excerpted from Mitchell OnDemand5. Click image for a link to a PDF version of this document.
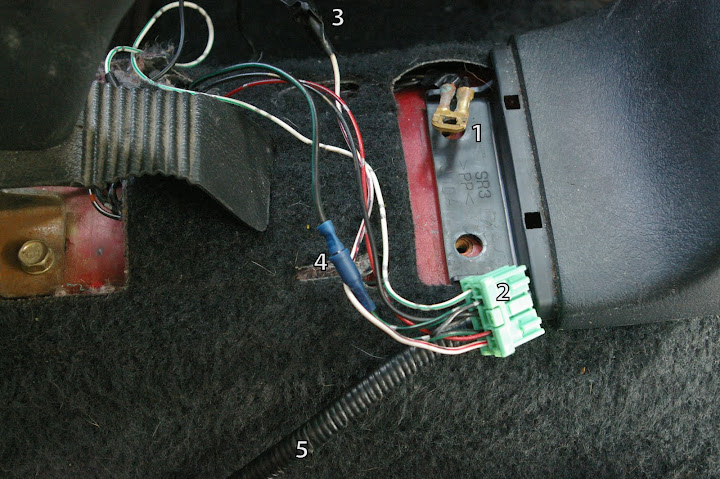 Figure 10. Heated Seat wiring terminating at the centre console. (1) is BLK wires at terminal ring. Both the ring you see and the BLK terminal ring from the Heated
Seat Pad will be grounded at the bolt hole here. (2) is 10-pin connector for 1997 Acura CL Heated Seat switch. (3) is connection between WHT/BLK and D/S
Heated Seat pad. I used a small nut & screw through terminal rings on each end of the wire, and covered in electrical tape, thus preserving the Heated Seat
wiring harness from spliced wires. (4) is the split of BLK/GRN wire from the under-dash fuse box to the power input for the D/S and P/S Heated Seats. (5) is OEM Bumper/Parking Pole wiring harness.

Figure 11. Heated Seat wiring coiled under D/S seat.

Figure 12. Heated Seat wiring at centre console. (1a) is gap where you can feed the terminal ring through. (1b) is bolt that now doubles as a
Ground bolt. (2) is Heated Seat wiring connector. (3) is Bumper/Parking Pole connector.
Test Drive
Good Luck and enjoy your newly warmed buns. My girlfriend and I certainly do!
UPDATE NOV 2011: I finally diagnosed a long-standing problem I had with one of the elements. I documented the problem and reported it to the retailer (http://heatedseatkits.com). They sent me a replacement element after I paid a nominal amount for shipping ($5). Fantastic! Wow! They stand behind their product.
DeSchlong
September, 2009
(updated Oct/2009, Dec/2009, June/2010, Nov/2011, Dec/2012, Sep/2013)
NOTE: See the end of the post for my experience with the aftermarket seat heater element retailer's excellent customer service!
Introduction
No Canadian Domestic Market (CDM) nor US Domestic Market (USDM) 1992-1995 Honda Civics had Heated Seats as standard or even optional equipment. This is common for many Honda vehicles in North America as they are perceived, rightly or wrongly, as being "low-end". It isn't until you reach the upper-end model Acuras will you start seeing such luxuries as Heated Seats on this continent.
This isn't the case, however, for our friends in Europe. Europeans, especially in colder climates, have long had such luxuries in their "low-end" model vehicles, likely due to greater competitiveness between car manufacturers and more fickle car owners (as well as their appreciation that a compact car can also have more amenities). This includes the 1992-1995 Honda Civics, which, in some regions, came with Heated Seats as a standard feature, similar to what is shown in Figure 1a and 1b.
Figure 1a. View of armrest console with dual-Heated Seat switch installed (and bumper/parking pole switch).
I find this to be a little unfair. I live in Canada, arguably one of the coldest countries in the world, and we have to buy a big pricey car to get some heated seats? But we North Americans like to spend so much time in our cars! (Actually, I live in an urban area and can walk/bike most places.) Well, since we know that Honda Civic parts are largely interchangeable like pieces of LEGO, who says we in North America can't add this little EDM goodie to our ride? I certainly don't, and this DIY Install Guide will walk you through the steps you need to take to get your Heated Seats up and running in your Civic.
Note that this write-up pertains specifically to modifications to a 5th Generation 92-95 3DR Honda Civic Hatchback. The DIY modifications will mostly translate to a 4DR Sedan, with the minor(?) exception that the seat/cushion fabric & moulding design on a Sedan differs from that of a Hatchback. Be sure to explore and understand any differences thoroughly before performing your modifications to a Sedan. The 2DR Coupe uses the same style of seats/cushions as a Hatchback.
Preparation
Notes on wiring
Connecting and installing the wiring properly will likely take you the most time out of all the operations involved in this project. I haven't hack-jobbed or jerry-rigged anything in this write-up - I firmly believe that this is about as close to a clean OEM retrofit as you can get.
My recommendation is, and if you're like me and want as clean an install as possible, you will spend time pulling the correct colour of wires from a salvage yard vehicle. This guide will tell you where to find the colour of wires in a 92-95 Civic to match the OEM colours.
Extracting the wiring harnesses -- while painful -- makes the re-wiring exercise considerably more pleasant, gives you the exact OEM wire colours, and means you don't have to go out and buy your OWN wire. Though I don't usually bother getting BLK (ground) wires all the way to their terminus, I did so in this project, and I consider that a wise decision, as I needed to ground some wires using a terminal ring and I was able to use the existing BLK wires which ended with a large terminal ring (the one under the carpet by the driver's seat). You may need additional BLK wire, so buy yourself a 25ft roll of 16 gauge, and you'll be set for this project and for many future projects.
**NOTE:** Many connections to the specific pins on the under-dash fuse box were not explicitly identified in either the CDM/USDM or foreign market Helms manuals. Therefore, I had to determine the correct pins through 'ohm-ing out' with my multimeter, between the fuse location and the pins. For example, the wiring diagram for the seat heater switch in one of the Helms manuals shows that power for the seat heater relay is connected from the under-dash fuse box, through Fuse No. 2 (20A), and out to a WHT/BLK wire to the relay. It does NOT specify the correct connector junctions and pins where these wires connect to the fuse box. I had to discover this manually. Remarkably, this is new information not found anywhere else on the web or in other service manuals (eg., Haynes, Mitchell), and I have marked it in this DIY with a "**" to indicate that you won't be able to substantiate this information with any other source.
Fuse Box Connections
I make reference numerous times to the connector numbers (eg., C555) in the write up. This is referencing the connector numbers as described in the CDM/USDM Helms manual, typically at the under-dash fuse box. I guess this can seem pretty obscure to those of you unfamiliar with this nomenclature. I've reproduced the page below as a quick reference to give you an idea of what I'm talking about. (Click it to enlarge.)

Wiring Connectors
I will stress: Don't cut wiring if you don't have to. This makes for a much cleaner reinstall. Unplug the pins where you can; there will be many times when you will need the pins at the end of the wire, and you will be glad you have them.
When you do have to patch together cut wires, I recommend using Bullet connectors. These attach & detach readily and are self-shielding. I suppose a cautious person would electrical-tape all the connections, but I didn't. You will need a few Wire Tap ("T-Taps") connectors, too. As I am in Canada, I purchased my electronics parts over the phone from A-1 Electronics - see http://www.a1parts.com/ (WARNING: TERRIBLE WEBSITE. GODAWFUL.); these had the best prices around Canada that I could find, and domestic shipping was a flat $10. I ordered a pack of 100 for each of Male & Female 14-16 (blue) & 16-18 (red) gauge Bullet connectors, and a pack of 100 of each of 14-16 (blue) & 16-18 gauge wire-taps (T-Taps). This amount might be overkill for you, but I had a bunch of projects I wanted to wire up so it was a good investment for me.
Americans can just look on eBay; there's dozens of dealers selling large bulk packs of bullet connectors and wire taps.
Pin Removal
You'll have to do a bit of this. A tiny screwdriver is your friend. Look up on honda-tech.com the correct way to remove pins from connectors, or consult this comprehensive guide.
Note on Order of Operations
The instructions, as written below, aren't necessarily meant to be followed linearly as a step-by-step process of removal and then re-installation. Read the whole thing through, first, to get an idea of what you're up against. You will have to jump around a bit from section to section as you see fit. There is no real "wrong" order to do the install, but you will run in to obvious roadblocks, in which case you'll have to figure out on your own what a logical order to proceed is.
Project Difficulty and Time Commitment
This project is not difficult, especially if you can read a wiring diagram. Expect to spend a day foraging for parts in the salvage yard. It is hard for me to gauge exactly how long I worked on the specific installation of the Heated Seats as I was also retrofitting wiring for additional Civic options such as the Power Mirrors/Power Windows/Power Locks, Rear Wiper, Rear Fog Light and Headlight Washers. Expect it to take the equivalent of 2 days of work to install.
Disclaimer
Or, "Don't point fingers, you only have yourself to blame"
Every effort has been made to make these instructions as complete and accurate as possible, but no warranty or fitness is implied. The information is provided on an “as is” basis. The author(s) and the website/publisher(s) shall have neither liability nor responsibility to any person or entity with respect to any loss or damages or inconvenience arising from the information contained herein, nor due to any omissions. Read: Don't muck up your vehicle and try to blame me or anyone else. You are responsible for your own due diligence and research.
Parts Required & Removal Instructions
Online
- Heated Seat switch
- Technically, the correct switches for the 92-95 Honda Civic are Honda P/N 38535-SR3-S01 (Figure 2).
- These are not available from a North American Honda dealer, but may be found at Canadian Acura dealers, as the same or similar part is found on 98-00 Acura EL Premiums. These are naturally very difficult to find.
- You would also need two of them, which would occupy both console slots, leaving you with zero left over for other future 'options'. Not great.
- Thankfully, there is a solution for those of us in North America. Acura P/N 38535-SS8-A01, which came ONLY on the 1997 Acura CL 3.0 Premium, is both a part that is available here, and one that will not occupy both console slots, as it is a 2-in-1 Left/Right Dual Seat Heater switch (Figure 3).
- To purchase it new online will run you ~$100 from the dealer.
- A used one will run about half that - just keep your eye out on eBay.
- New information (as of Oct/09) indicates that a similar switch was available on the 2nd Generation CR-V
- 2006 USDM SE came with heated seats, though possibly others, too.
- 2002-06 CDM EX-L came with heated seats.
- Technically, the correct switches for the 92-95 Honda Civic are Honda P/N 38535-SR3-S01 (Figure 2).
Figure 2. OEM Heated Seat switches for 92-95 Honda Civics.
Honda P/N 38535-SR3-S01.
Figure 3. OEM Heated Seats switch for 1997 Acura CL 3.0 Premium.
Acura P/N 38535-SS8-A01.
- Aftermarket Heated Seat kit.
- You don't want to try to source an OEM Honda heated seat contraption. Here's why:
- They're really expensive, and you'll never find the one made specifically for your Civic anyway.
- Early 90's Heated Seat technology was pretty crap (read: basically a bunch of thin wires that get hot). The technology from today is considerably improved ("carbon fibre" or something-a-rather).
- I purchased mine from heatedseatkits.com, and was pleasantly surprised with the quality of the components. I purchased the "Innovative Heat Extreme", product #29799 (faster heating) for the driver's side, and the regular "Innovative Heat II" #29798 for the passenger.
- The reason for the difference is that I thought that as the driver I shouldn't have to wait to get warm - if I'm the one who has to be driving, I want to feel the heat right away. My passenger can wait! This is especially useful if you are only driving a short distance and the car won't warm up in that time anyway... you will feel some warmth from the seat heater underneath you.
- It fit perfectly width-wise and length-wise along the seat and the back.
- You don't want to try to source an OEM Honda heated seat contraption. Here's why:
- Hog rings
- Never heard of these either? Neither had I until I started fumbling about with upholstery. These are used to fasten/tighten the seat fabric/cover over the cushion foam.
- You need some to replace ones that you can't remove.
- I bought the ones from Honda, P/N 04810-SB3-000. They come in packs of 30, and I got two - serious overkill.
- However, I think these things are pretty standard issue in upholstery circles. I'm sure you could find some for cheap, but I just couldn't be bothered to hunt around.
- Pretty sure you can just use cable ties as a replacement, and in fact I did use a couple.
- Never heard of these either? Neither had I until I started fumbling about with upholstery. These are used to fasten/tighten the seat fabric/cover over the cushion foam.
Hardware and/or Electronics Store
- Handful of cable ties
- Need a couple of these to fasten back the seat fabric down between the seat fabric and the top of the cushion foam (directly underneath where you sit).
- Handful of Scotch-lock wire-taps, 22-16ga (red).
From the Salvage Yard
Cabin: Dashboard
- Hazard Switch Connector: Connector for the Dual Heated Seat switch.
- If you didn't get a pigtail with your switch purchase, the 10-pin connector for the hazard switch is exactly the same.
- If you didn't get a pigtail with your switch purchase, the 10-pin connector for the hazard switch is exactly the same.
- (Optional) "Neo-wedge bulbs": bulbs that light up dashboard switches. There is a chance that the Heated Seat switch has blown bulbs, so to resolve this problem, grab some extra bulbs. These are very, very handy to have around.
- Pry out the eg., rear defrost switch and/or hazard light switch and twist out the bulbs with a flathead screwdriver. The bulbs are all the same and will fit your new switch.
- Put these somewhere safe/padded from impacts and the wrath of your tools.
Cabin: Under Dash/Footwell
Relay:
- Mitsuba RC-2201: Relay that connects the Heated Seat buttons to power.
- This is the same as a horn relay on a vehicle with SRS. (Also the relays used on a vehicle with A/C, located under-hood at front D/S near headlight.)
- Clip the wiring so you have a pigtail.
Wiring:
- Here's where you'll gather a lot of your wiring.
- WHT/BLK: Runs a short distance from Fuse No. 2 (20A) to the Heated Seat main relay mounted on the under-dash fuse box.
- Get it from the thick WHT/BLK wire that runs between the fuse box and the ignition. I de-pinned it as the pin at the one end will fit perfectly inside the relay mentioned above.
- You also need a piece that runs from the connector at the back of the under-dash fuse box w/ a small pin to connect to the large wire mentioned in the above bullet. See below.
- Get it from the thick WHT/BLK wire that runs between the fuse box and the ignition. I de-pinned it as the pin at the one end will fit perfectly inside the relay mentioned above.
- WHT/BLK: Runs power from the Heated Seat switch to the D/S Heated Seat pad.
- There's no other 14-16ga wire that's WHT/BLK on the Civic. I took a 1ft-long wire that was WHT/RED and used a Sharpie to change the RED stripe into BLK. Job done. Look around under the fuse box for something that's 14-16ga and mostly WHT. Also, you need a short wire w/ pin for the back of the under-dash fuse box, as mentioned above.
- There's no other 14-16ga wire that's WHT/BLK on the Civic. I took a 1ft-long wire that was WHT/RED and used a Sharpie to change the RED stripe into BLK. Job done. Look around under the fuse box for something that's 14-16ga and mostly WHT. Also, you need a short wire w/ pin for the back of the under-dash fuse box, as mentioned above.
- WHT/GRN: Runs power from the Heated Seat switch to the P/S Heated Seat pad.
- Again, you need about a foot. WHT/GRN wire runs from the under-dash fuse box to power the door lock control unit, and is used for the turn signals.
- BLK/YEL: Runs a short distance from Fuse No. 13 (7.5A) to the Heated Seat relay mounted on the under-dash fuse box.
- Lots of BLK/YEL in the fuse box area. You need about 1ft.
- BLK/GRN: Runs from the main relay to the Heated Seat switch in the centre console.
- Needs to be pretty long. The wire for the Rear Window Defogger is the same colour, and is a nice heavy gauge wire as well. It runs from the under-dash fuse box and along the gap between the door sill and the driver's seat. You will need to remove a bunch of stuff (trunk opener cover, some carpeting) to get at it.
- I split this wire near the connector to the proper pins for the D/S and P/S Heated Seat power at the switch, so you'll need two short leads of BLK/GRN, too. Acutally, at this point I don't think I cared about wire colours anymore and may have used some GRN/BLK that I had laying around. "Close enough." I said.
- BLK: Runs from the relay to Ground.
- Lots of BLK down there too. Get enough to ground the wire. I grounded it in its correct location (deep in the footwell), but you might want to ground it by the steering column, for example, where the OEM fog light dash harness grounds.
- GROUND BOLT: Get a bolt that fits the hole where you're going to ground it.
- BLK: Grounds the Heated Seat pad, and the switch.
- Technically, the Heated Seat pad and switch should be grounded at G552 (near where the D/S seat bolts down).
- However, I thought it was silly to run the wiring back to here, so I grounded it closer to the switch. But, I still used the BLK wires that terminate at this ring.
- Get about a foot of wire if you're going to ground it like I did (see below), or extract longer BLK wiring if you want to run your wiring back to this spot to ground it like OEM.
- WHT/BLK: Runs a short distance from Fuse No. 2 (20A) to the Heated Seat main relay mounted on the under-dash fuse box.
Optional Wiring:
- The following is optional, as it diverges from the original way that the seat heaters were wired in the 92-95 Civic.
- RED/BLK: Runs a long way from the interior lights (dash lights) Fuse No. 19 (10A) to the Dual Heated Seats switch light.
- On the Acura, the switch sits on the console towards the dashboard so it lights up (and dims) with the dashboard lights.
- You can run RED/BLK to have your switch light up with your dash lights in your armrest/parking brake on your Civic.
- BLK (or RED): Grounds (or dims) the Seat Heater switch light.
- I just grounded the light with a BLK, but you could run a RED wire all the way back to the under-dash area to have the light dim with your dash lights. This didn't make any sense to me because the purpose of dimming the dash lights (I think) is to reduce glare, but glare should not be a problem where this switch is located in your console.
- RED/BLK: Runs a long way from the interior lights (dash lights) Fuse No. 19 (10A) to the Dual Heated Seats switch light.
Before You Begin
- Remove the negative cable of your battery before performing any electrical work on your vehicle.
- My car doesn't have SRS, but I take it they can blow up in your face, so take necessary precautions to disable. Your Helms manual is explicit in this regard.
- Take the front seat(s) out. You'll need access underneath them, and to remove the fabric cover to insert the Heated Seat pads.
Cabin: Seats
- Follow the Helms manual instructions for seat removal.
- Follow your instructions to install the Heated Seat pads.
- No need to clip the hog rings, I found I could pry them open with a pair of needle-nosed pliers.
- Figure 3a and 3b shows the under side of the passenger seat with attachment using hog rings.
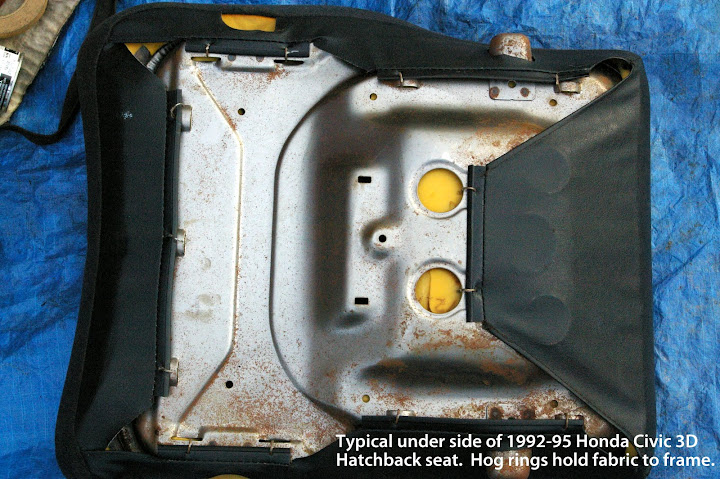
Figure 3a: Under side of 1994 Civic Hatchback front passenger seat.

Figure 3b: Close-up of your victim: hog rings.-
- The ones that fasten down the seat back cover, at the bottom rear (ie., the cushion against your back, Figure 4), will need some force to be pried open. At first I thought these were impossible to open but with some decent pliers and the right angle you can bend them open enough to unhook them. If you do need to cut them then I recommend tin snips as these will cut through them like butter.
Figure 4. Arrows point to hog rings which are difficult to remove at the seat back cushion. I did eventually manage to remove them but if they're giving you trouble then wire cutters or tin snips are required to cut and remove.
- One snag I ran into was in laying the Heated Seat pad down on the bottom seat cushion (Figure 5 & 6).
- There are three hog rings that fasted the fabric down at the crease mid-way up the cushion. There is a small metal bar/rod that runs the width of the cushion/fabric.
- The heated seat pad fits well enough between the two outer fastener locations, but you can't reattach the one at the centre.
- The instructions with my Heated Seat pad said I could make holes it in, but I really didn't want to, nor would I advise you to! It diminishes the functionality of the pad.
- The instructions with my Heated Seat pad said I could make holes it in, but I really didn't want to, nor would I advise you to! It diminishes the functionality of the pad.
- I just omitted the middle fastening point -- you really can't tell the difference once it's reassembled (Figure 7).
- Tuck the seat heater pad down a little into the dip where the bar lays across. This isn't shown in Figure 6 because I realized I should do it only after I took the picture.
- I used plastic cable ties to fasten the metal bar back down at the two outer points (Figure 7), for two reasons:
- A. Way easier to dick around with in those cramped quarters than trying to manipulate a set of pliers in there.
- B. A plastic cable tie doesn't conduct heat away from the Heated Seat pad, like a hog ring would, as it would connect the metal bar, in contact with the Heated Seat pad, to the metal frame of the rest of your seat.
- The seat back heater pad was really easy to install. You can just slide it in under the fabric and barely have to fiddle with the hog rings at all (except for the ones at the back, as mentioned above). NOTE: As of early 2012 when I received a replacement seat back pad, the dimensions seem to have increased.
Figure 5: More hog rings hold down the seat cover fabric.
Figure 6. Seat heater pad installed on bottom cushion. Important: Tuck the seat heater pad down a little into the dip where the metal bar lays across. This isn't shown because I realized I should do it only after I took the picture.
when installing a Heated Seat pad. Note that the missing centre hog ring make little or no difference to the fitment of the fabric.
Cabin: Under Dash/Footwell
Wiring
- To find the correct SLOT number for a pin, look at the connector from the wire side and begin counting from the top left corner. The "top" is always the side with the connector clip.
- For the Heated Seat main relay:
- Refer to the diagram above and page 23-68 of your CDM/USDM Helms manual to ensure that you are putting the pins in the right spot in the connector (ie., A, B, C & D).
- This mounts on the side of the under-dash fuse box (note how the horn relay is mounted on a vehicle equipped with SRS).
- Wiring diagrams: Attached to this post are some wiring diagrams which will help you.
- Figure 8 (click image for PDF link) is the Seat Heaters wiring diagram from the Helms manual.
- Figure 9 (click image for PDF link) is the Heated Seat switch wiring diagram for a 1997 Acura CL 3.0 that I printed from Mitchell OnDemand 5. It has the pin-out locations for the switch.
service manual. Click image for a link to a PDF version of this document.
Note that the Seat Heater relay mentioned at the end of the PDF is NOT
the same relay as the MAIN seat heater relay attached to the under-dash fuse box.
- WHT/BLK wire
- Pin into **SLOT 5 on C555 connector.**
- This pin routes power from Fuse No. 2 (20A) to the Heated Seat main relay at Position A.
- BLK/YEL wire
- On a vehicle without ABS:
- Pin into SLOT 2 on C556 connector.
- On a vehicle WITH ABS:
- Use a T-Taps splitter on BLK/YEL from SLOT 11, on C501 (for Rear Window Defogger Switch) or SLOT 4, on C555 (for Power Mirror Switch).
- This pin routes power from Fuse No. 13 (7.5A) to the Heated Seat main relay at Position C.
- On a vehicle without ABS:
- 20A Fuse.
- Plug it in to Fuse No. 2.
- For the Heated Seat:
- For the most part, just follow the wiring diagrams for BLK/GRN, RED/BLK, WHT/BLK and WHT/GRN up to the point where they begin to send power to the Heated Seat pad (ie., the WHT/BLK and WHT/GRN wires that emerge from the switch), substituting the pin locations on the connector for the switch from the original Honda Civic Helms diagram with the 2-in1 connector from the Acura CL.
- Pull up your carpeting to reveal the wiring for the parking brake. Snake your Heated Seat wires along next to the door sill, then parallel to the GRN/RED parking brake wire. I managed to pry the clips out and fit all the Heated Seat wiring into the existing clips to keep everything in place. Alternatively, use electrical tape to attach your new wiring alongside the clips.
- Connect these power wires to the correct wire on your aftermarket Heated Seat kit that you bought (this was a RED wire on mine) (Figure 10).
- Coil, tuck and cable-tie all the extra wiring as neatly as possible under the seat (Figure 11).
- I grounded the switch and pads at the bolt that fastens down the shifter console (Figure 10 and 12).
- The terminal ring shown was the G552 one I poached from the salvage vehicle that I mentioned above.
- The BLK terminal ring from the Heated Seat pad is also grounded here. The bolt fits nicely through the ring, which is nice.
- It takes a bit of manipulation, but you can fit the terminal ring through the space in the area shown in Figure 9 when you replace the armrest/parking brake cover. Then slide the bolt through the rings and fasten it down.
- For the most part, just follow the wiring diagrams for BLK/GRN, RED/BLK, WHT/BLK and WHT/GRN up to the point where they begin to send power to the Heated Seat pad (ie., the WHT/BLK and WHT/GRN wires that emerge from the switch), substituting the pin locations on the connector for the switch from the original Honda Civic Helms diagram with the 2-in1 connector from the Acura CL.
Seat Pad will be grounded at the bolt hole here. (2) is 10-pin connector for 1997 Acura CL Heated Seat switch. (3) is connection between WHT/BLK and D/S
Heated Seat pad. I used a small nut & screw through terminal rings on each end of the wire, and covered in electrical tape, thus preserving the Heated Seat
wiring harness from spliced wires. (4) is the split of BLK/GRN wire from the under-dash fuse box to the power input for the D/S and P/S Heated Seats. (5) is OEM Bumper/Parking Pole wiring harness.
Figure 11. Heated Seat wiring coiled under D/S seat.
Figure 12. Heated Seat wiring at centre console. (1a) is gap where you can feed the terminal ring through. (1b) is bolt that now doubles as a
Ground bolt. (2) is Heated Seat wiring connector. (3) is Bumper/Parking Pole connector.
Test Drive
- Reconnect your battery, start the car and try it out while the car is parked.
- Normal operation will involve:
- Turning on your parking lights or headlamps will light up the switch (if you wired them to do this).
- Press the Heated Seat switch. The indicator light should illuminate. You seat should soon become warm.
- The power should be interrupted to the Heated Seat as you are turning your key to engage the starter on your car (the indicator light should go off), ie., when key is in START.
- Normal operation will involve:
- If it does not work on the first try, troubleshoot all your connections.
- I suggest that testing your ground connections (all of 'em) is a good test to begin with.
- A blown bulb will not affect the operation of your switch, but should be replaced.
- I wouldn't completely reassemble all your parts before your first test try. Leave off certain pieces of trim to make it easier to troubleshoot if you encounter problems.
Good Luck and enjoy your newly warmed buns. My girlfriend and I certainly do!
UPDATE NOV 2011: I finally diagnosed a long-standing problem I had with one of the elements. I documented the problem and reported it to the retailer (http://heatedseatkits.com). They sent me a replacement element after I paid a nominal amount for shipping ($5). Fantastic! Wow! They stand behind their product.
DeSchlong
September, 2009
(updated Oct/2009, Dec/2009, June/2010, Nov/2011, Dec/2012, Sep/2013)
Last edited by deschlong; 09-04-2013 at 11:05 PM. Reason: Fixed broken pic links.
 09-26-2009, 04:45 PM
#3
Junior Member

Join Date: Aug 2009
Location: New Jersey
Posts: 11
Likes: 0
Received 0 Likes
on
0 Posts
Wow, great writeup. You mention that you don't want to poke a hole in your heated pad to re-attach the middle hog ring. I would not want to poke a hole in the pad either. And leaving the middle hog ring out should be fine. But there is a solution. There is a special fabric glue used for this purpose. Looking at my current spray can it's made by 'Craft Bond' and says 'Acid free multi-purpose spray adhesive' on the label. The nice thing about this glue is that if you ever have to pull the fabric off at a later time the glue lets go rather easily without damaging anything. In your case you would spray it on the bottom of the heated pad/foam and then on the top of the heated pad/fabric to hold the fabric down. It would hold the whole thing in place.
This is really a minor point but I thought I'd mention this because I've worked on some car seats that don't use hog rings in the middle of the seat cushion - they use the glue from the factory.
This is really a minor point but I thought I'd mention this because I've worked on some car seats that don't use hog rings in the middle of the seat cushion - they use the glue from the factory.
09-27-2009, 08:26 AM
#4
^^^ Hey, that is a good alternative solution. Thanks for the contribution!
So far after 7 months of installation, I haven't had a problem with the fabric loosening. As I said, it was only one hog ring. However, I know that the Sedan seat is different so your suggestion might work really well for someone performing this installation on a 4dr.
So far after 7 months of installation, I haven't had a problem with the fabric loosening. As I said, it was only one hog ring. However, I know that the Sedan seat is different so your suggestion might work really well for someone performing this installation on a 4dr.
10-06-2009, 07:44 AM
#5
Honda-Tech Member

Join Date: Jul 2009
Location: Cleveland, Ohio
Posts: 86
Likes: 0
Received 0 Likes
on
0 Posts
Funny, I was just writing similar topic for 2005 Civic EX (about wiring heated seats) when I came across your post for older civics. My post (says check out switches!) is under 2001-2005 Civics currently. I Pm'd you about your dual switch. Anyhow, any ideas for a DIY for wiring heated seats on newer 01-05 2dr coupe Civic EX? I have leather ones also, is that a problem? If you can check out my post also and let me know if those part #'s, specifically for the horizontal switch which I've never seen (supplied by Canadian reader) would fit my year of car. Thanks, any help is appreciated.
11-15-2009, 11:38 AM
#6
Honda-Tech Member

Join Date: Jun 2009
Posts: 226
Likes: 0
Received 0 Likes
on
0 Posts
dude! I love you! This writeup will also help a lot of Luders as well. Same principles apply and the 2 in one switch will fit the Prelude. No need to waste 2 slots for heated switches. Props to you for making all these great write-ups! 

Trending Topics
02-03-2010, 09:07 PM
#13
Honda-Tech Member
mind = blown lol awesome write up and deffinately something you dont hear much about. Cloth seats dont get too cold but damn my leather S2K's in the cold ahhh
02-03-2010, 09:23 PM
#14
^^ Hah! Thanks for the comments. These are really fantastic ... probably my favourite mod so far. I can start to feel the heat by the time I reach the end of my alleyway ... so, so blissful.
I sometimes wonder who reads these write-ups of mine ... there's rarely many comments. I figure most peoples' eyes glaze over when all the text hits them. Ah, well.
I sometimes wonder who reads these write-ups of mine ... there's rarely many comments. I figure most peoples' eyes glaze over when all the text hits them. Ah, well.
02-03-2010, 11:21 PM
#16
Honda-Tech Member

Join Date: Feb 2010
Location: Wheeling
Posts: 55
Likes: 0
Received 0 Likes
on
0 Posts
wow unbelievable write up... very nice attention to detail! i might have to give this one a try when i get back into an eg.
03-18-2010, 04:10 PM
#17
TRIAL USER

Join Date: Mar 2010
Posts: 1
Likes: 0
Received 0 Likes
on
0 Posts
Switch from the 2nd gen CR-V looks the same from the front. Have no idea about the socket.
P/N: 38535-S9A-S01ZA
Bonus: It's about half the price of the Acura one. ~$52 USD
P/N: 38535-S9A-S01ZA
Bonus: It's about half the price of the Acura one. ~$52 USD
08-18-2010, 10:42 AM
#18
Honda-Tech Member
found this out the hard way.
Switches from 99-03 TL, CL, RL etc acuras and the 03-07 Pilots are easy to find and cheap but they don't fit very well. They are the right width but are about 5mm too short.
I have 2 pics showing the height difference between the switches the knockouts from the EG/EKs. I chose these switches since they have duel stage heat and that was something i wanted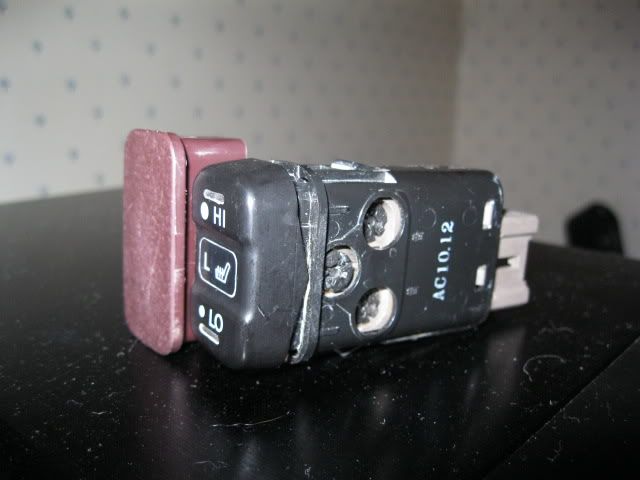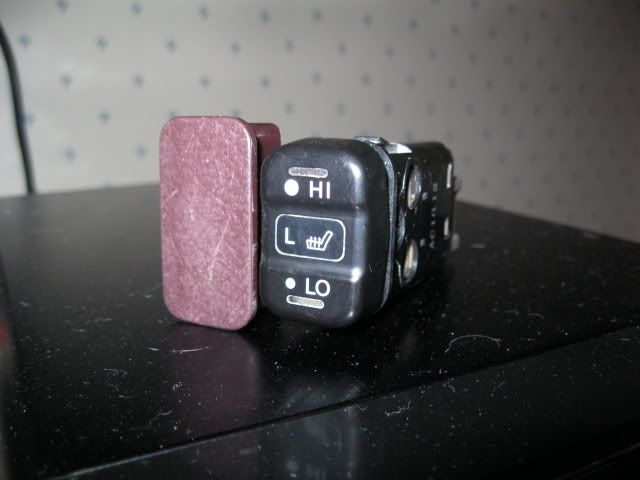
08-18-2010, 11:16 AM
#19
^ I suspected as much - and thanks for confirming (at your cost! boo.  ). Two things come to mind:
1. I believe the mid-90's Acura Legend came with a switch in the correct dimensions that has a dial. IIRC, the switch has a built-in resistor allowing you to precisely adjust the temperature (changes resistance). I haven't seen a retrofit with this, yet, though I think user 'rickkane' was headed that way. This is the only switch of the correct dimension I've seen that has adjustable temperature.

2. I honestly think that adjustable temperature heated seats are a bit of a gimmick. I can't count the number of times I've wanted it on "LOW" because there haven't been any. Besides, if you're mounting the aftermarket ones I mention in the DIY, it already comes with a HI/LO switch. This I've mounted discreetly but accessible under the seat. For the zero times I've wanted to switch it to "LOW", I least knew I could if I wanted. Maybe in the fall it will come in handy during the cool evenings.
PS. Applause for owning a Civic with the burgundy/wine coloured interior! I found one at a wreckers not long ago, too. Not very common. Also: which heated seat elements are you using to retrofit into the Civic sedan seats? run in to any trouble?
). Two things come to mind:1. I believe the mid-90's Acura Legend came with a switch in the correct dimensions that has a dial. IIRC, the switch has a built-in resistor allowing you to precisely adjust the temperature (changes resistance). I haven't seen a retrofit with this, yet, though I think user 'rickkane' was headed that way. This is the only switch of the correct dimension I've seen that has adjustable temperature.
2. I honestly think that adjustable temperature heated seats are a bit of a gimmick. I can't count the number of times I've wanted it on "LOW" because there haven't been any. Besides, if you're mounting the aftermarket ones I mention in the DIY, it already comes with a HI/LO switch. This I've mounted discreetly but accessible under the seat. For the zero times I've wanted to switch it to "LOW", I least knew I could if I wanted. Maybe in the fall it will come in handy during the cool evenings.
PS. Applause for owning a Civic with the burgundy/wine coloured interior! I found one at a wreckers not long ago, too. Not very common. Also: which heated seat elements are you using to retrofit into the Civic sedan seats? run in to any trouble?
08-18-2010, 06:47 PM
#20
Honda-Tech Member
i was eyeballing that same switch. Yep its from the older Legands. i'm on a lookout for one in the junkyards to see if it fits.
i dug up another acura p/n 38535-SM4-S01
its from the 98-99 CL.
I can't find any of the honda switch part numbers in stock.
i haven't got the heaters yet. Are there any you would recommend?
So far i am trying to get all the parts together before i do this.
I took the pic with the burgundy knockout because it gave me better contrast, i don't actually own one. I knew someone who did, it came from her car.
08-18-2010, 07:43 PM
#21
This is what that switch p/n looks like:
Source here.
For seat heaters I recommend the ones I purchased in the DIY. Good quality. If you're really adventurous you could pull the OEM kit out of a wrecked vehicle, but be careful because I suspect they are not friendly to being removed (easy to break the OEM ones).
There's a 1997 Acura CL switch just like the one I have in my write up for sale on eBay. I just saw it there yesterday. $25 I think?
08-19-2010, 09:54 PM
#22
Honda-Tech Member
Awesome, thanks for the heads up! I got that switch now i just need one for the passenger side.
10-25-2010, 06:41 AM
#24
38535-SM4-S01 SWITCH ASSY., HEATED SEAT (TEC)
So was that a confirmation that these switches will work in place of 38535-SR3-S01, since I cannot locate the 97 CL dual switch?
So was that a confirmation that these switches will work in place of 38535-SR3-S01, since I cannot locate the 97 CL dual switch?


