
DIY - Full Coilover and Camber kit install
 06-04-2007, 09:03 PM
#1
Honda-Tech Member
Thread Starter
Join Date: Sep 2006
Location: Seattle, WA, USA
Posts: 510
Likes: 0
Received 0 Likes
on
0 Posts
Okay, any input on this DIY is helpful since it is for the community here and I will be linking to it...
I installed the B&G Full Coilovers and SPC front/rear camber kits in approx 14 hours total. This is mostly due to my lack of previous experience with a job of this calibur, and also the lack of proper tools (I had to walk to a store 3 times for sundry parts) and/or air tools and a buddy to help with some of the tougher parts. Oh, not to mention lack of instructions . On a scale of 1-10, 10 being hardest, this job was a 7, but if you factor in the time it took and all the hiccups I ran into, it was more like a 9
  . Learn from my mistakes!
Parts you'll need:
Honda Civic 06-07 Maintenance guide with torque specs
10, 12, 14, 16, 21/22mm (can't remember) socket wrench sizes.
A pass through 19mm socket wrench that will be able to get to the top strut bolt sitting in the recession.
3/16in. socket wrench.
Hex Set
Flat head screwdriver
Zip ties
2x 8mm 1.25 nuts
Spring Compressor!! Don't start without it.
Hydrolic jack (2ton)
Smaller 1.5ton jack (optional)
2/4x jack stands
Patience and Muscle!
Any ways, here goes:
Start with the fronts just to leave the easier to handle rear last.
1) Break the lug nuts before lifting the vehicle.
2) Jack the front up by the front cross member and place jack stands at both front jack points (see manual), then remove both front tires.
3) Pop the hood and look for the cowling plates that are hiding the front strut's top mounting bolts.
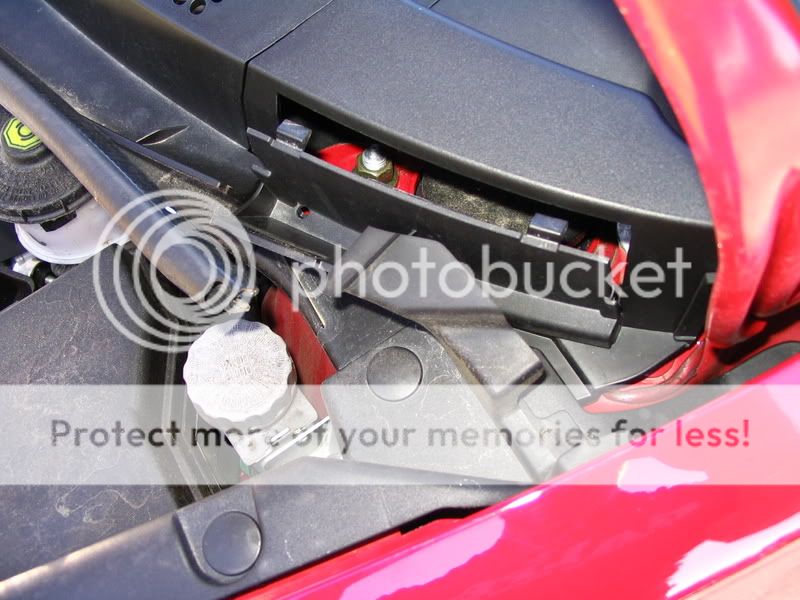
4) Loosen all 3 smaller bolts (remove two if you like), then take your 19mm open ended socket wrench and break the thread on the strut bolt. It's a pain, but it's SOOO much easier while the strut in on the car. DO NOT TAKE IT OFF!
5) Take the ABS line off the strut, and also the brake line, and make sure they are hanging out of the way.

6) Take off the top strut assembly bolt, then the bottom - make sure you take the top one off, then tilt the rotor towards yourself so the strut doesn't stick on the mounting point. Be careful when taking off that last bolt, the front struts have quite a bit of compression left in them. Also, use a block/brick/tire/spare jack to hold the wheel assembly up so it doesn't just fall down once the bolts are out.
7) Once the bolts are out, pull the strut assembly off to the side so it isn't hitting your speedo/brake lines or CV boot, then take off the bolts at the top holding the strut on and pull the strut assembly out carefully. (NOTE: If you have problems removing the strut, work the Spring Compressors in there and compress the spring to give you a little more wiggle room. Be careful of your CV Boot Joint!!)
8) Now that it's out, compress the spring using the spring compressors (VERY necessary! It wasn't on EP3s, but FA/FG's are compressed WAY more), then take the top strut bolt the rest of the way off. (This is what took me forever since I didn't have a open wrench that could get a grip on the bolt, and I didn't loosen the bolt while it was on the car.)

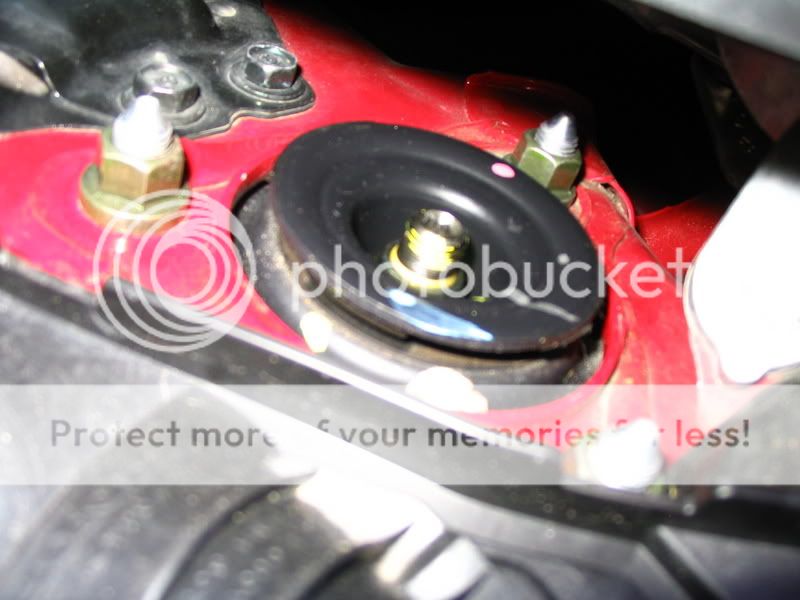
9) After it's off, remove the spring compressors, take the Top Hat/Pillow ball mount off the stockers, and put them on the B&G's. (NOTE: This isn't necessary if you bought aftermarket pillowball mounts!). Also make sure you notice the arrow on the top hat, it should be facing in towards the engine when you install it back in.
10) Adjust the height on the front Coilovers if they have that option, then put the Coilover assembly back in the same way you took the stock ones out, put the 3 top bolts on to hold it in place.
11) If you got the SPC front camber bolts, put the camber bolt in the top bolt hole.
12) Tighten the top 3 bolts, then tighten the top strut bolt with the 19mm open ended socket wrench 'till it turns the thread.
13) Now the B&Gs I got didn't have a long enough stem for the ABS line to clip back into. I need to send pics to CorSport which will be relayed to B&G about this. So for now, loosely zip tie the ABS line to keep it out of the way while driving. I honestly don't think it would catch or pull or get snagged while driving w/o a zip tie, but better be safe than sorry.
14) Attach the brake line to the mounting point, and use the 8mm 1.25 threaded nuts that you bought. The stockers are welded onto the stock assembly .
.
15) Put your Front wheels back on, adjust camber using the SPC bolts, then lower the vehicle.
Fronts are done!
Rears:
1) Break the rear wheel lug nuts.
2) Use the rear cross member (in front of the gas tank, behind the sway bar) to lift the vehicle, then put jack stands under the two rear jack points. (see manual)
3) Take the wheels off.
4) Pop the brake line out of the bracket. Use a flat head screwdriver carefullly.

5) Unbolt the brake line bracket from the body.

6) Take the ABS line out of it's bracket.

7) Loosen the rear shock bolt on the top. Just pull back the trunk lining and use a wrench and a hex key to loosen it.

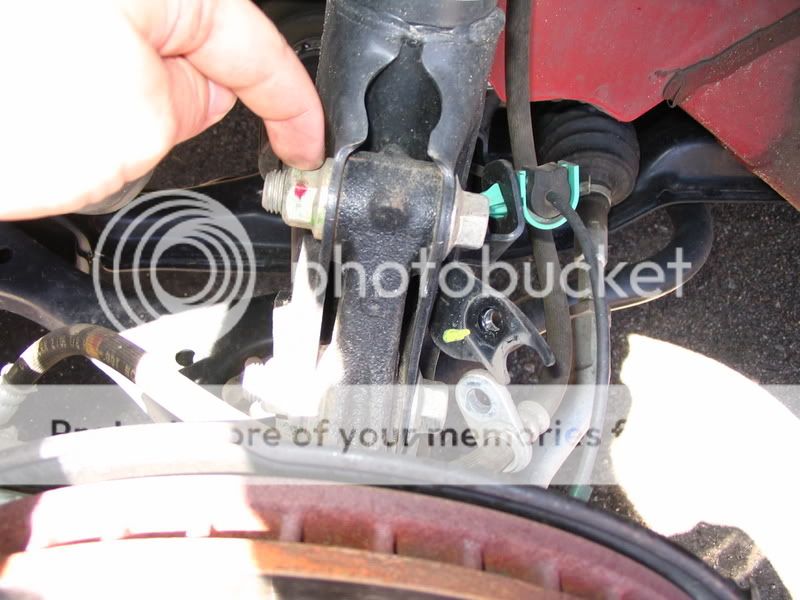
8) Here's where you can do one of two things. Loosen the lower camber arm bolt itself, or loosen the 10mm bolt, then use two wrenches to break the death grip thread.


^^ The little nut is holding the black nut and welded base in place. It turns easier than the other side, but if you have air tools or big muscles, it's unncessary.
9) Put a block/jack/tire under the wheel assemby with a bit of pressure so it doesn't just fall.
10) Make sure you bolt the 10mm bolt back into the base after pulling the camber bolt out.
11) Take out the bolt holding the shock in place.

12) Remove the top bolt holding on the endlink under the vehicle, and loosen the bottom one so the end link is not connected to the sway bar. You will probably need a hex key to loosen the bolts.

13) Remove the two bolts holding the Camber arm in place and remove it if you are going to replace it with an aftermarket one. Otherwise, leave it alone.
14) Here's a pic of the SPC rear arm compared to the stock one.

15) Remove the bolt holding the shock in from the top, then remove the shock.
16) Remove the stock coils. Just twist them away from cables to get it out.
17) Put the new shock from the coilover kit back up in the hole. The B&G came with a washer for the top, and a washer for the bottom of the hole. Tighten it down.
18) Put the SPC/Aftermarket camber arm in place on the body. Just follow the directions that came with it. A note on the SPC camber arms though, the "B" holes START at -3 degrees camber!! So put the bolts in the "A" holes (lol) to get daily driver camber. Here's a link to 8thcivic's DIY for the camber arm and some pics of the SPC.
DIY on 8th Civic. Props to 06blaksi!:
http://www.8thcivic.com/forums...32040
Adjustible camber bolt for the rear arm:

Camber bracket (in the "B" holes!):

Camber arm mounted up and somewhat adjusted:

19) Install the Coils now. Adjust them to the height you want! On B&Gs, you will probably want to leave like 1 or 2 thread only if you are trying to get the tire a little in the well when it's just sitting. Oh, FYI, you can't install the B&Gs upside down...the holes are different I know!

20) Re-install the Camber bolt to the wheel assembly.
21) Re-install the bolt to the bottom of the shock.
22) Re-install the endlink to the sway bar.
23) Re-install the brake line bracket, and ABS line.
24) Put wheels back on.
25) Adjust camber
26) Lower vehicle.
DONE!
Of course, make sure all bolts are tightened back to specification while doing this!! And after you are all done, take the car out for a VERY short jaunt down the street, progressively gaining speed and listen for noises. The fronts will pop once each side (at least they did in mine), and that should be it. After driving it, lift it up, check all the bolts, change the height if you want, and lower it back down again. And then get an alignment
With the B&Gs, I started out at full soft on rebound/dampning, and just now upped the fronts to 11, and rears to 9 (out of 18). Seems to be the best for my style of driving, but I'm sure I will change them after a little while to fit my needs.
All in all, the B&Gs handle AWESOMELY. It has turned my fun handling car into something that I absolutely love to drive around corners in and feel like I'm in full control! I just need some summer tires to take full advantage of this fun now
Feel free to point out mistakes, or better methods to my madness. Remember this is all without previous coil install experience. I'm proud to have done this all myself.
Modified by MonkeyConQueso at 1:44 PM 6/21/2007
I installed the B&G Full Coilovers and SPC front/rear camber kits in approx 14 hours total. This is mostly due to my lack of previous experience with a job of this calibur, and also the lack of proper tools (I had to walk to a store 3 times for sundry parts) and/or air tools and a buddy to help with some of the tougher parts. Oh, not to mention lack of instructions
. On a scale of 1-10, 10 being hardest, this job was a 7, but if you factor in the time it took and all the hiccups I ran into, it was more like a 9 . Learn from my mistakes!Parts you'll need:
Honda Civic 06-07 Maintenance guide with torque specs
10, 12, 14, 16, 21/22mm (can't remember) socket wrench sizes.
A pass through 19mm socket wrench that will be able to get to the top strut bolt sitting in the recession.
3/16in. socket wrench.
Hex Set
Flat head screwdriver
Zip ties
2x 8mm 1.25 nuts
Spring Compressor!! Don't start without it.
Hydrolic jack (2ton)
Smaller 1.5ton jack (optional)
2/4x jack stands
Patience and Muscle!
Any ways, here goes:
Start with the fronts just to leave the easier to handle rear last.
1) Break the lug nuts before lifting the vehicle.
2) Jack the front up by the front cross member and place jack stands at both front jack points (see manual), then remove both front tires.
3) Pop the hood and look for the cowling plates that are hiding the front strut's top mounting bolts.
4) Loosen all 3 smaller bolts (remove two if you like), then take your 19mm open ended socket wrench and break the thread on the strut bolt. It's a pain, but it's SOOO much easier while the strut in on the car. DO NOT TAKE IT OFF!
5) Take the ABS line off the strut, and also the brake line, and make sure they are hanging out of the way.
6) Take off the top strut assembly bolt, then the bottom - make sure you take the top one off, then tilt the rotor towards yourself so the strut doesn't stick on the mounting point. Be careful when taking off that last bolt, the front struts have quite a bit of compression left in them. Also, use a block/brick/tire/spare jack to hold the wheel assembly up so it doesn't just fall down once the bolts are out.
7) Once the bolts are out, pull the strut assembly off to the side so it isn't hitting your speedo/brake lines or CV boot, then take off the bolts at the top holding the strut on and pull the strut assembly out carefully. (NOTE: If you have problems removing the strut, work the Spring Compressors in there and compress the spring to give you a little more wiggle room. Be careful of your CV Boot Joint!!)
8) Now that it's out, compress the spring using the spring compressors (VERY necessary! It wasn't on EP3s, but FA/FG's are compressed WAY more), then take the top strut bolt the rest of the way off. (This is what took me forever since I didn't have a open wrench that could get a grip on the bolt, and I didn't loosen the bolt while it was on the car.)
9) After it's off, remove the spring compressors, take the Top Hat/Pillow ball mount off the stockers, and put them on the B&G's. (NOTE: This isn't necessary if you bought aftermarket pillowball mounts!). Also make sure you notice the arrow on the top hat, it should be facing in towards the engine when you install it back in.
10) Adjust the height on the front Coilovers if they have that option, then put the Coilover assembly back in the same way you took the stock ones out, put the 3 top bolts on to hold it in place.
11) If you got the SPC front camber bolts, put the camber bolt in the top bolt hole.
12) Tighten the top 3 bolts, then tighten the top strut bolt with the 19mm open ended socket wrench 'till it turns the thread.
13) Now the B&Gs I got didn't have a long enough stem for the ABS line to clip back into. I need to send pics to CorSport which will be relayed to B&G about this. So for now, loosely zip tie the ABS line to keep it out of the way while driving. I honestly don't think it would catch or pull or get snagged while driving w/o a zip tie, but better be safe than sorry.
14) Attach the brake line to the mounting point, and use the 8mm 1.25 threaded nuts that you bought. The stockers are welded onto the stock assembly
.15) Put your Front wheels back on, adjust camber using the SPC bolts, then lower the vehicle.
Fronts are done!
Rears:
1) Break the rear wheel lug nuts.
2) Use the rear cross member (in front of the gas tank, behind the sway bar) to lift the vehicle, then put jack stands under the two rear jack points. (see manual)
3) Take the wheels off.
4) Pop the brake line out of the bracket. Use a flat head screwdriver carefullly.
5) Unbolt the brake line bracket from the body.
6) Take the ABS line out of it's bracket.
7) Loosen the rear shock bolt on the top. Just pull back the trunk lining and use a wrench and a hex key to loosen it.
8) Here's where you can do one of two things. Loosen the lower camber arm bolt itself, or loosen the 10mm bolt, then use two wrenches to break the death grip thread.
^^ The little nut is holding the black nut and welded base in place. It turns easier than the other side, but if you have air tools or big muscles, it's unncessary.
9) Put a block/jack/tire under the wheel assemby with a bit of pressure so it doesn't just fall.
10) Make sure you bolt the 10mm bolt back into the base after pulling the camber bolt out.
11) Take out the bolt holding the shock in place.
12) Remove the top bolt holding on the endlink under the vehicle, and loosen the bottom one so the end link is not connected to the sway bar. You will probably need a hex key to loosen the bolts.
13) Remove the two bolts holding the Camber arm in place and remove it if you are going to replace it with an aftermarket one. Otherwise, leave it alone.
14) Here's a pic of the SPC rear arm compared to the stock one.
15) Remove the bolt holding the shock in from the top, then remove the shock.
16) Remove the stock coils. Just twist them away from cables to get it out.
17) Put the new shock from the coilover kit back up in the hole. The B&G came with a washer for the top, and a washer for the bottom of the hole. Tighten it down.
18) Put the SPC/Aftermarket camber arm in place on the body. Just follow the directions that came with it. A note on the SPC camber arms though, the "B" holes START at -3 degrees camber!! So put the bolts in the "A" holes (lol) to get daily driver camber. Here's a link to 8thcivic's DIY for the camber arm and some pics of the SPC.
DIY on 8th Civic. Props to 06blaksi!:
http://www.8thcivic.com/forums...32040
Adjustible camber bolt for the rear arm:
Camber bracket (in the "B" holes!):
Camber arm mounted up and somewhat adjusted:
19) Install the Coils now. Adjust them to the height you want! On B&Gs, you will probably want to leave like 1 or 2 thread only if you are trying to get the tire a little in the well when it's just sitting. Oh, FYI, you can't install the B&Gs upside down...the holes are different
I know!20) Re-install the Camber bolt to the wheel assembly.
21) Re-install the bolt to the bottom of the shock.
22) Re-install the endlink to the sway bar.
23) Re-install the brake line bracket, and ABS line.
24) Put wheels back on.
25) Adjust camber
26) Lower vehicle.
DONE!
Of course, make sure all bolts are tightened back to specification while doing this!! And after you are all done, take the car out for a VERY short jaunt down the street, progressively gaining speed and listen for noises. The fronts will pop once each side (at least they did in mine), and that should be it. After driving it, lift it up, check all the bolts, change the height if you want, and lower it back down again. And then get an alignment
With the B&Gs, I started out at full soft on rebound/dampning, and just now upped the fronts to 11, and rears to 9 (out of 18). Seems to be the best for my style of driving, but I'm sure I will change them after a little while to fit my needs.
All in all, the B&Gs handle AWESOMELY. It has turned my fun handling car into something that I absolutely love to drive around corners in and feel like I'm in full control! I just need some summer tires to take full advantage of this fun now
Feel free to point out mistakes, or better methods to my madness. Remember this is all without previous coil install experience. I'm proud to have done this all myself.
Modified by MonkeyConQueso at 1:44 PM 6/21/2007
 06-04-2007, 09:05 PM
#2
Honda-Tech Member
Thread Starter
Join Date: Sep 2006
Location: Seattle, WA, USA
Posts: 510
Likes: 0
Received 0 Likes
on
0 Posts
Oh, and what would this thread be without pics of the car AFTER it's been lowered!


Fronts:
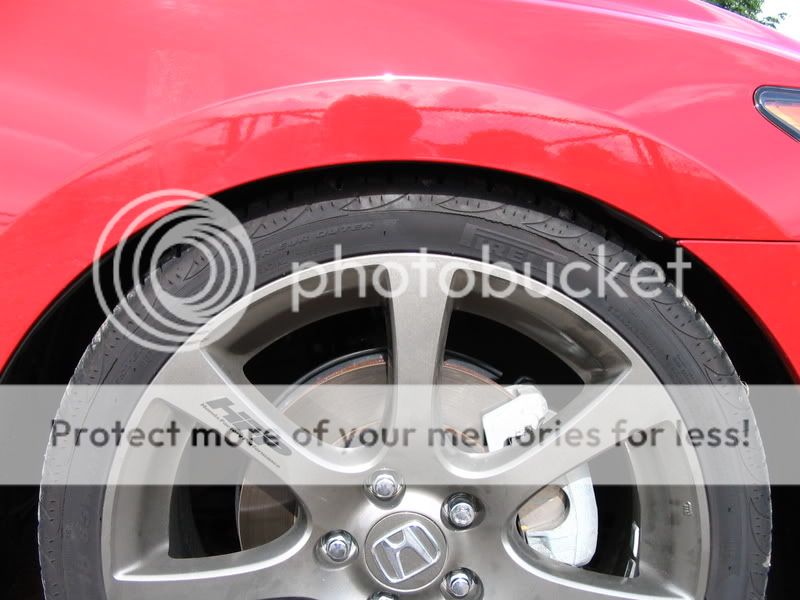
Rears:

Note: I lowered the rears about another .5 inches since this pic, and this was the day I finished installing them. So expect some settling
Better pics coming soon too!
Fronts:
Rears:
Note: I lowered the rears about another .5 inches since this pic, and this was the day I finished installing them. So expect some settling
Better pics coming soon too!
06-04-2007, 09:19 PM
#4
Honda-Tech Member
Join Date: Oct 2002
Location: New Jersey
Posts: 12,620
Likes: 0
Received 0 Likes
on
0 Posts
<TABLE WIDTH="90%" CELLSPACING=0 CELLPADDING=0 ALIGN=CENTER><TR><TD>Quote, originally posted by exhaust_note »</TD></TR><TR><TD CLASS="quote"> nice write-up!</TD></TR></TABLE>
nice write-up!</TD></TR></TABLE>
06-04-2007, 09:20 PM
#5
Honda-Tech Member
Thread Starter
Join Date: Sep 2006
Location: Seattle, WA, USA
Posts: 510
Likes: 0
Received 0 Likes
on
0 Posts
Thanks man! I feel bad because I missed a couple of pics. Like the front Camber bolts (easy install though!), and taking out the rear coils, and some other various pics. I just hope that I aquired enough so people could do an install. Honestly, I would do it again, but I would have waited for help this time A friend would have been amazingly helpful.
A friend would have been amazingly helpful.
06-04-2007, 09:28 PM
#7
Member
Join Date: Sep 2005
Location: Let me warn ya. Northern California
Posts: 1,063
Likes: 0
Received 0 Likes
on
0 Posts
<TABLE WIDTH="90%" CELLSPACING=0 CELLPADDING=0 ALIGN=CENTER><TR><TD>Quote, originally posted by exhaust_note »</TD></TR><TR><TD CLASS="quote"> nice write-up!</TD></TR></TABLE>
x3.
go lower
x3.
go lower
Trending Topics
06-04-2007, 09:50 PM
#8
Honda-Tech Member
Thread Starter
Join Date: Sep 2006
Location: Seattle, WA, USA
Posts: 510
Likes: 0
Received 0 Likes
on
0 Posts
<TABLE WIDTH="90%" CELLSPACING=0 CELLPADDING=0 ALIGN=CENTER><TR><TD>Quote, originally posted by IGotNoSwap »</TD></TR><TR><TD CLASS="quote">
x3.
go lower </TD></TR></TABLE>
I will once I get the hell out of pothole country, and the coils settle over the next 2 or so weeks.
<TABLE WIDTH="90%" CELLSPACING=0 CELLPADDING=0 ALIGN=CENTER><TR><TD>Quote, originally posted by elohel »</TD></TR><TR><TD CLASS="quote">
Car looks insanely hot </TD></TR></TABLE>
Thanks man! I'm slowly but surely getting this ride to my personal liking. It's a damn fun car to pamper
x3.
go lower
</TD></TR></TABLE>I will once I get the hell out of pothole country, and the coils settle over the next 2 or so weeks.
<TABLE WIDTH="90%" CELLSPACING=0 CELLPADDING=0 ALIGN=CENTER><TR><TD>Quote, originally posted by elohel »</TD></TR><TR><TD CLASS="quote">
Car looks insanely hot
</TD></TR></TABLE>Thanks man! I'm slowly but surely getting this ride to my personal liking. It's a damn fun car to pamper
06-04-2007, 10:04 PM
#10
Honda-Tech Member
Thread Starter
Join Date: Sep 2006
Location: Seattle, WA, USA
Posts: 510
Likes: 0
Received 0 Likes
on
0 Posts
<TABLE WIDTH="90%" CELLSPACING=0 CELLPADDING=0 ALIGN=CENTER><TR><TD>Quote, originally posted by 06civicracer »</TD></TR><TR><TD CLASS="quote">i see a curb rash lol,how much did that setup cost you?</TD></TR></TABLE>
Yeah...damn potholes Arvada, CO sucks badly, and I'm damn happy I'm moving south of Seattle, WA. The roads rock!
The B&G coils were $1200 shipped.
The SPC camber kits (front/rear) were about $294 shipped.
Both purchased from CorSport.
Yeah...damn potholes
Arvada, CO sucks badly, and I'm damn happy I'm moving south of Seattle, WA. The roads rock!The B&G coils were $1200 shipped.
The SPC camber kits (front/rear) were about $294 shipped.
Both purchased from CorSport.
06-04-2007, 10:40 PM
#12
Honda-Tech Member
Join Date: Nov 2005
Location: SoCAL
Posts: 2,168
Likes: 0
Received 0 Likes
on
0 Posts
<TABLE WIDTH="90%" CELLSPACING=0 CELLPADDING=0 ALIGN=CENTER><TR><TD>Quote, originally posted by exhaust_note »</TD></TR><TR><TD CLASS="quote"> nice write-up!</TD></TR></TABLE>
x4!
car looks dope
x4!
car looks dope
06-05-2007, 04:45 AM
#13
Junior Member
Join Date: Oct 2006
Location: Villa Park, IL
Posts: 522
Likes: 0
Received 0 Likes
on
0 Posts
Congrats on the DIY, love to see FG2 owners get down and dirty w/ their rides. It' aint yours till you bleed on it.
Damn I didn't use a spring compressor,
Whole heartedly agree loosen the strut bolt while on the car, makes it easier.
Enjoy your ride, it looks great
Damn I didn't use a spring compressor,
Whole heartedly agree loosen the strut bolt while on the car, makes it easier.
Enjoy your ride, it looks great
06-21-2007, 08:03 AM
#19
Honda-Tech Member
Thread Starter
Join Date: Sep 2006
Location: Seattle, WA, USA
Posts: 510
Likes: 0
Received 0 Likes
on
0 Posts
Thanks man
I'll be having some updated pics soon-ish, and maybe some updated pics of the B&Gs actually installed. I have to disassemble the struts because I have to look at the driver side pillowball mount - it's making squishing noises due to a bad pothole on the freeway. So, anything I can post to make it easier for people to see how this is done, the better
I'll be having some updated pics soon-ish, and maybe some updated pics of the B&Gs actually installed. I have to disassemble the struts because I have to look at the driver side pillowball mount - it's making squishing noises due to a bad pothole on the freeway. So, anything I can post to make it easier for people to see how this is done, the better
 06-21-2007, 11:51 AM
#21
Honda-Tech Member
Thread Starter
Join Date: Sep 2006
Location: Seattle, WA, USA
Posts: 510
Likes: 0
Received 0 Likes
on
0 Posts
<TABLE WIDTH="90%" CELLSPACING=0 CELLPADDING=0 ALIGN=CENTER><TR><TD>Quote, originally posted by STATracing.com »</TD></TR><TR><TD CLASS="quote">Don't have much experience with the B&G for the FG. How do you like the ride? Can you compare it to other coilover kits?</TD></TR></TABLE>
I don't have any experience with other coil-overs. I had eibach springs in my '91 Audi Coupe Quattro, but I've never installed any type of suspension upgrade on any of my other cars.
I wish I had enough money to compare, or could swap with someone with Tein or any other coil setup in their car to test it out.
I have a feeling that people who want to slam their car down will want to get something other than B&G since the rears don't go down that far. 18"s aren't tucked, but there's no finger space at least all the way down. The fronts will go WAAAAY down, however.
As far as the ride, I like it! I've created a Auto-X capable monster (which I would like to test out soooon) with no more understeer. But damn those sharp bumps make me cringe every time I hit them. Probably just like every other coilover setup that is set up as low as I am in the front.
As far as daily driving the way I have it set up, I don't scrape, I don't have to slow down too much for speed bumps, I do have to avoid potholes more than normal, as well as sharp changes in the road (or just slow down), but freeway and city street DD is still comfortable.

Thread
Thread Starter
Forum
Replies
Last Post
scansel912
Honda Civic (2001 - 2005)
28
09-05-2009 08:10 PM
88crx-si
Honda CRX / EF Civic (1988 - 1991)
2
05-09-2006 07:22 PM
allmotorEG-SI
Honda Civic / Del Sol (1992 - 2000)
2
07-18-2004 11:33 AM

