
DIY: Oil Change (With Pictures)
 12-21-2007, 05:46 AM
#1
Thread Starter
Join Date: Dec 2006
Location: Knoxville, TN, U.S.A.
Posts: 227
Likes: 0
Received 0 Likes
on
0 Posts
DIY: Oil Change (With Pictures) ***This is a work in progress, and I will add pictures when I change my oil next. I just wanted to go ahead and get this posted so I don't lose any of my work I've started on.
I felt like re-doing Miracle's "DIY: Oil Change" to include pictures (and add more detailed information). I hope this DIY will be easy enough to follow to allow someone who has never changed oil in their car, to save a few bucks, and ensure it is done properly! And Honda-Tech needed a detailed Oil Change DIY with Pictures!
This oil/oil fitler change should be performed every 3,000 miles or every 3 months (or so)�
Tools/Materials needed:
3/8 drive and 17mm socket (or 17mm wrench)
Oil Drain Pan
A couple of clean rags (that you don't mind getting dirty)
Optional Tools/Materials:
Funnel
Torque Wrench (helpful if you are unsure of yourself on tightening things)
Oil Filter Wrench (if old oil filter is on really tight)
Rubber Gloves (if you want to keep your hands clean!)
Parts needed:
High quality oil filter (I use Mobil 1 M1-110) ***DO NOT USE FRAM!!!
4 Quarts of your choice of oil (I use Mobil 1 5W-20 synthetic)
New Crush Washer (for oil drain bolt)
1. Before beginning, make sure you have all the required tools, materials, and parts on hand.
2. Warm engine oil will drain better than cold engine oil, so warm the engine to your likings. If you are starting with a cold engine, then run it for a few minutes to let the engine oil warm up. If you just returned from the parts store, then you may let the engine cool for a few minutes before beginning.
3. With the engine off, ensure the car is in gear/park and engage the parking brake. Pop the hood while you are inside the car. Chock the rear wheels to prevent the car from rolling.
4. Go ahead and open the hood of your car. Jack up the front of the car and secure both sides on jack stands. DO NOT WORK UNDER ANY CAR IF IT IS ONLY BEING HELD UP BY A JACK!!!
5. Locate the oil drain plug under the car (some oil pans may say "Engine Oil", mine does not). Regardless, it will be directly beneath the engine centered towards the driver's side of the car. Position your oil drain pan under this bolt. Use your 3/8 drive and 17mm socket (or 17mm wrench) to get the bolt loose (counter clockwise). Once the bolt is loose, then use your hand to loosen the
drain plug the rest of the way. As you loosen the drain plug, apply pressure (towards the oil pan) to keep as much oil from leaking until the plug is all the way loose. You should be able to "feel" when the drain plug has been loosened all the way, and you can pull it from the hole quickly, and allow the oil to drain out into the drain pan without getting all over your hand. Make sure the oil drain pan is properly positioned to catch all of the oil draining out.
6. Loosen the oil fill cap to relieve vacuum from the engine (this kind of helps the oil drain better). If you are a neat freak, then wipe off your oil fill cap with one of your rags.
7. As the oil is draining, take the oil drain plug and dispose of the old washer. Take one of your rags and wipe the bolt clean of old oil. Go ahead and set the NEW crush washer on the bolt and set both on the ground under the front of the car (you'll be installing it next).
8. If you are in a hurry, you can replace the drain plug once the oil starts "dripping". But I prefer to take my time and let it drain out a little longer after it starts dripping. Before you screw in the drain plug, take your rag and wipe the hole where the oil was draining out of. Make certain the old washer is not stuck to the oil pan. Hand thread your clean drain plug with new crush washer into oil pan and tighten it as tight as you can with your hand. Take one of your rags and wipe around the bolt and oil pan so you will be able to see if you have a leak later on. Now, Take your 3/8 drive and 17mm socket (or 17mm wrench) and tighten (clockwise) it to:
"33 lb/ft for US LX, LX SE, DX, VP, Canadian model DX, REVERB, and LX. On the US EX, EX SE, HX, and Canadian Si: 29 lb/ft." Taken from Miracle's DIY.
***This is where the Torque Wrench would come in handy (if you are unsure of yourself).
9. Next you will want to locate the old oil filter. Crawl back under your engine, and look on the back side of the engine above where you just drained the oil. It will be just above your driver's side driveaxle.
***You may notice that there is no channel to allow the old oil (from the old oil filter) to drain straight down into your Drain Pan once the Oil Filter is removed. I've seemed to have problems with the old oil draining toward the transmission, and wanting to settle between the transmission case and the lower cover. This causes the old oil to slowly drip from the under the transmission casing, and can be quite annoying. I�ve found that if you take one of your rags and stuff it in the crack to the bottom right (5 O�Clock position) of the oil filter, it prevents the oil from draining that way. And it keeps the mess to a minimum.
10. After you have located your old oil filter, position your oil drain pan beneath the oil filter. (You may need to use your oil filter wrench here) Now you will want to loosen the old oil filter to the point that it starts leaking some oil out. Once it starts dripping, then keep out of the way and allow the old oil to drain down into your oil drain pan. Once oil stops dripping from the old oil filter, then remove it all of the way (keep in mind there will be some old oil left in the old oil filter). Dump the oil out of the old oil filter into your oil drain pan and dispose of the old oil filter properly.
***Keep in mind, if you are lying directly under the old oil filter while you remove it, the old oil will drain right down on you. I�ve found it easy to lay off to the side (under the car, but up again the driver�s side wheel) while I�m loosening the old oil filter, or you could come from behind the driver�s side tire, whichever you prefer.
11. Now you will want to take the rag that you stuffed in the 5 O�Clock position of the oil filter and wipe away any oil that may be beneath the oil filter threads and resting above the oil pan. Take the same rag (find a clean spot on it) and wipe the oil filter threads and mounting surface to remove old oil and any foreign material. As you are wiping the mounting surface clean, feel to verify there is no old gasket material stuck here.
12. Remove your new oil filter from the box (and double check that it does not say FRAM on it!). Use your new engine oil and wipe a small amount of oil onto the rubber gasket of your new Oil Filter (stick your finger into the oil bottle and spread your finger around the gasket).
13. Climb back under your car (with the new oil filter in hand). Screw your new oil filter (clockwise) onto the threads where the old one was removed from. (As you are crawling under your car, make sure you don�t touch the oiled oil filter gasket to anything b/c you might get dirt stuck to it, which could potentially cause a leak on down the road). Hand tighten the new oil filter until it makes contact with the block. After it makes contact, then tighten it (clockwise) another � turn (a little more than � won�t hurt much either). You can look at your new oil filter to see what they recommend on tightening it�basically you don�t want it super tight or way too loose�find the perfect median!
***I�m not sure if this is true, but it is something that has been told to me. After I tighten the new oil filter all the way, I will ever so slightly loosen it just a tad (I�m talking a very small amount-to where you can barely feel it move). I was told some technical explanation on this, but it supposedly makes it easier to remove the oil filter next oil change due to how the gasket seats, without compromising the seal. I�ve never had any problems doing this, but it is not required. Feel free to skip this little step if you are unsure of it.
14. IDIOT CHECK: Verify that you have your oil drain plug and new crush washer installed in the oil pan, and that it has been tourqed down to specifications. Also verify that you have your new (NON FRAM) oil filter installed and properly tightened. Once you have double checked these then proceed to the next step!!!
15. Remove your oil drain pan and any other tools/materials from under the car. Go ahead and lower the car down from the jack stands (Just make sure before you lower the car to the ground, you�ve made sure there is nothing under or around the car that might damage it!)
16. After the car is back on level ground, insert your funnel into oil fill location. Take your new engine oil and pour in approximately 3 Quarts of new engine oil (it holds more than 3 Quarts, but this will prevent over filling). After pouring in the new engine oil, wait a minute and look underneath you car and make sure nothing is leaking out. If you do not see anything leaks, then remove the funnel and re-install the oil fill cap. Start your car and let it idle for short period of time (few seconds � no more than a minute). This will allow engine oil to be pumped into your new oil filter.
17. After you let the car idle for a few seconds, then shut the engine off. Let the engine sit for a few minutes to allow the oil to settle into the oil pan (AGAIN, this will help prevent you from overfilling the oil�if you wanted to have it overfilled you should have taken it to Wal-Mart in the first place!) Take this time to visually look under your car for any leaks (if you did everything correctly, you should not have any). Also go ahead and put away your tools, and dispose of any trash. Make sure your old engine oil is in a suitable container, and plan on taking somewhere to dispose of it properly.
18. After the car has sat for a few minutes, pull the dipstick and wipe it clean. Re-insert the dipstick back into the hole and pull it out to see how your oil level looks. From here, you will want to add oil accordingly and in small amounts. It is better for it to be a tad low, than a tad too full. I like to fill it about � full, and then drive it for a few minutes (don�t race it around your neighborhood, but give it some gas to get the juices flowing), and then bring it home to let the engine sit off for about 30 minutes. Then when you go to recheck the oil, it will have moved up closer to full from �.
19. For the first few days, peek under your car to make sure any leaks haven�t developed. And also check your oil level the first few days to ensure it is filled properly. And it would be wise to check your oil level each time you fill up your tank.
Savings:
Approximate cost to have oil changed with Synthetic Oil (Wal-Mart): $50
Approximate cost for you to change the oil yourself: $30
-$10 for high quality Oil Filter (Parts Store)
-$20 for Synthetic Oil (Wal-Mart)
-$0.20 for crush washer (Stealership)
Having the piece of mind that your oil was changed correctly and with high quality products: PRICELESS
-Some oil change places WON�T replace your crush washer.
-Some oil change places use cheap oil/filters that they buy in bulk.
-Some oil change places are in a hurry and will overfill your oil, over tighten your oil filter, or forget to put your oil fill cap back on.
Oh�and you save about $20 each time you change your oil yourself!
Credits:
-Miracle: For his torque specs!
 12-21-2007, 06:05 AM
#2
Honda-Tech Member
Join Date: Oct 2006
Location: MD, Japan
Posts: 683
Likes: 0
Received 0 Likes
on
0 Posts
Props for a well thought out but very lengthy writeup. The size of your DIY will scare some first timers lol. Im always an advocate for DIY but there are times where its just not feasible to do your own oil change. In those cases, buy your own oil, filter, and washer and bring it to a reputable shop.
12-21-2007, 06:45 AM
#4
Junior Member
Join Date: Jan 2006
Location: Killafornia
Posts: 342
Likes: 0
Received 0 Likes
on
0 Posts
Good write up
I suggest people who change their oil themselves to invest in some car ramps instead of jacking up your car. You don't have to worry about the jack stands failing (I have read a post on a VW board about someone being crushed to death after the jack stands failed on him). I bought my ramp from a local auto parts store for $25.
I suggest people who change their oil themselves to invest in some car ramps instead of jacking up your car. You don't have to worry about the jack stands failing (I have read a post on a VW board about someone being crushed to death after the jack stands failed on him). I bought my ramp from a local auto parts store for $25.
12-21-2007, 07:56 AM
#6
Thread Starter
Join Date: Dec 2006
Location: Knoxville, TN, U.S.A.
Posts: 227
Likes: 0
Received 0 Likes
on
0 Posts
<TABLE WIDTH="90%" CELLSPACING=0 CELLPADDING=0 ALIGN=CENTER><TR><TD>Quote, originally posted by InanimateCarbonRod »</TD></TR><TR><TD CLASS="quote">Question: Why are Fram filters crap?</TD></TR></TABLE>
More FRAM filters go bad, compared to other high quality oil filters. I'm know that Matt has explained this subject before, and probably will again.
I think the main problem with them (off the top of my head) is something to do with their gasket...either they are prone to leaking and/or coming off of the oil filter.
Trending Topics
12-21-2007, 08:48 AM
#8
Thread Starter
Join Date: Dec 2006
Location: Knoxville, TN, U.S.A.
Posts: 227
Likes: 0
Received 0 Likes
on
0 Posts
<TABLE WIDTH="90%" CELLSPACING=0 CELLPADDING=0 ALIGN=CENTER><TR><TD>Quote, originally posted by awang »</TD></TR><TR><TD CLASS="quote">IIRC, Honda filters are rebranded Fram filters...</TD></TR></TABLE>
Yep...I think Matt said somewhere, that there is a way to distinguish the real Honda filters from the relabeled FRAMS. Something about the number on the filter.
Yep...I think Matt said somewhere, that there is a way to distinguish the real Honda filters from the relabeled FRAMS. Something about the number on the filter.
12-21-2007, 08:41 PM
#9
Function>Fashion
<TABLE WIDTH="90%" CELLSPACING=0 CELLPADDING=0 ALIGN=CENTER><TR><TD>Quote, originally posted by JimmyM86 »</TD></TR><TR><TD CLASS="quote">
-Some oil change places WON�T replace your crush washer.
-Some oil change places use cheap oil/filters that they buy in bulk.
-Some oil change places are in a hurry and will overfill your oil, over tighten your oil filter, or forget to put your oil fill cap back on.
</TD></TR></TABLE>
mmm, When I used to work at Jiffy Lube these happened all the time. The last one, not so much though. I did break an oil cap before, being in a hurry.
12-22-2007, 07:42 PM
#10
Honda-Tech Member
Join Date: Apr 2005
Location: Lincoln, Ne, USA
Posts: 1,895
Likes: 0
Received 0 Likes
on
0 Posts
Not a bad write up, I can save you some steps though:
1. Jack up car
2. Drain oil
3. Remove filter
4. Replace drain plug
5. Install new oil filter
6. lower car
7. fill oil
1. Jack up car
2. Drain oil
3. Remove filter
4. Replace drain plug
5. Install new oil filter
6. lower car
7. fill oil
12-23-2007, 03:09 AM
#11
Thread Starter
Join Date: Dec 2006
Location: Knoxville, TN, U.S.A.
Posts: 227
Likes: 0
Received 0 Likes
on
0 Posts
<TABLE WIDTH="90%" CELLSPACING=0 CELLPADDING=0 ALIGN=CENTER><TR><TD>Quote, originally posted by k24em2 »</TD></TR><TR><TD CLASS="quote">Not a bad write up, I can save you some steps though:
1. Jack up car
2. Drain oil
3. Remove filter
4. Replace drain plug
5. Install new oil filter
6. lower car
7. fill oil</TD></TR></TABLE>
Thanks...but the purpose of this was to make it somewhat easy for someone to follow who has never changed the oil in their car before. I know most people probably know how to change their oil, but for the few that may be unsure, this might help them.
12-23-2007, 07:10 PM
#12
Honda-Tech Member
anybody know how much the oil drain bolt is and washer is from honda, mine is badly strip
and since i didnt know Fram filters are crap(what i been using my life time)which would recommend? other than mobil, to expensive
and since i didnt know Fram filters are crap(what i been using my life time)which would recommend? other than mobil, to expensive
12-23-2007, 08:47 PM
#13
Honda-Tech Member
Join Date: Apr 2005
Location: Lincoln, Ne, USA
Posts: 1,895
Likes: 0
Received 0 Likes
on
0 Posts
<TABLE WIDTH="90%" CELLSPACING=0 CELLPADDING=0 ALIGN=CENTER><TR><TD>Quote, originally posted by Honda Rules »</TD></TR><TR><TD CLASS="quote">anybody know how much the oil drain bolt is and washer is from honda, mine is badly strip
and since i didnt know Fram filters are crap(what i been using my life time)which would recommend? other than mobil, to expensive</TD></TR></TABLE>
the drain plugs are usually <$5, as for filters, use one that doesnt leak.
and since i didnt know Fram filters are crap(what i been using my life time)which would recommend? other than mobil, to expensive</TD></TR></TABLE>
the drain plugs are usually <$5, as for filters, use one that doesnt leak.
12-23-2007, 10:09 PM
#14
Honda-Tech Member
<TABLE WIDTH="90%" CELLSPACING=0 CELLPADDING=0 ALIGN=CENTER><TR><TD>Quote, originally posted by k24em2 »</TD></TR><TR><TD CLASS="quote">
the drain plugs are usually <$5, as for filters, use one that doesnt leak.</TD></TR></TABLE>
yeah that will work
the drain plugs are usually <$5, as for filters, use one that doesnt leak.</TD></TR></TABLE>
yeah that will work
12-25-2007, 10:29 AM
#15
<TABLE WIDTH="90%" CELLSPACING=0 CELLPADDING=0 ALIGN=CENTER><TR><TD>Quote, originally posted by InanimateCarbonRod »</TD></TR><TR><TD CLASS="quote">Question: Why are Fram filters crap?</TD></TR></TABLE>
believe it or not, i just made a lengthy presentation about this at school. most honda filters are actually made by filtech, not fram, but the ones made by fram are made to honda specs which are far superior parts, and construction.
stay away from FRAM unless you get the tough gaurd, which is still only an 'ok' filter. OEM or mobil 1 would be the best choices because they use non synthetic elements. unlike K&N, which offers GREAT filtration, but restricts flow over time and becomes saturated in particles faster. so in other words, it's great for high performace situations where the car is run hard but oil changed frequently, while the OEM filters provide adequate filtration for an extended period of time. which is why honda suggests changing the oil filter every 2 oil changes.. which i hope no one really does "it's like taking a **** without wiping your ***"..
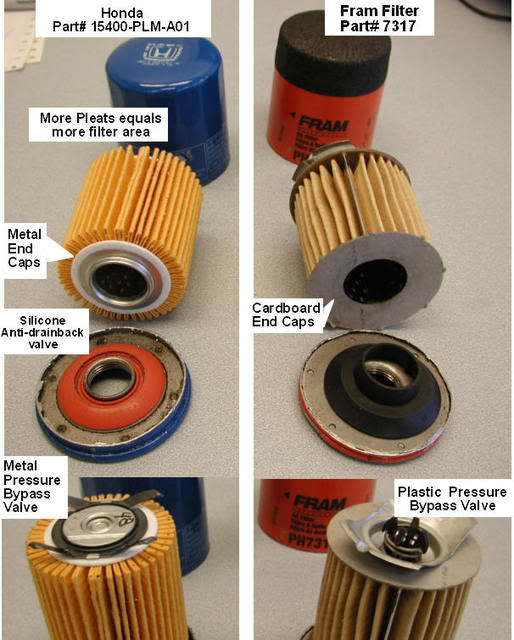
edit: oil filters rarely 'fail'... what distinguishes a good filter from a bad one is simply the quality of materials, ie. silicone vs rubber, and quality of construction, ie. more pleats for more filter area and crimped metal end caps versus glued cardboard endcaps..and if youre going to be picky about the oil you use, but not the filter, you practically defeat the purpose of spending the extra cash on good oil. do yourself a favor and match the quality of your filter to your oil.
believe it or not, i just made a lengthy presentation about this at school. most honda filters are actually made by filtech, not fram, but the ones made by fram are made to honda specs which are far superior parts, and construction.
stay away from FRAM unless you get the tough gaurd, which is still only an 'ok' filter. OEM or mobil 1 would be the best choices because they use non synthetic elements. unlike K&N, which offers GREAT filtration, but restricts flow over time and becomes saturated in particles faster. so in other words, it's great for high performace situations where the car is run hard but oil changed frequently, while the OEM filters provide adequate filtration for an extended period of time. which is why honda suggests changing the oil filter every 2 oil changes.. which i hope no one really does "it's like taking a **** without wiping your ***"..
edit: oil filters rarely 'fail'... what distinguishes a good filter from a bad one is simply the quality of materials, ie. silicone vs rubber, and quality of construction, ie. more pleats for more filter area and crimped metal end caps versus glued cardboard endcaps..and if youre going to be picky about the oil you use, but not the filter, you practically defeat the purpose of spending the extra cash on good oil. do yourself a favor and match the quality of your filter to your oil.
12-25-2007, 09:11 PM
#16
Honda-Tech Member
[QUOTE=skipbarber]
which i hope no one really does "it's like taking a **** without wiping your ***"..
lol, good explanation, very thorough
which i hope no one really does "it's like taking a **** without wiping your ***"..
lol, good explanation, very thorough
12-26-2007, 07:50 PM
#17
Honda-Tech Member
Join Date: Oct 2007
Location: Maplewood, NJ, USA
Posts: 517
Likes: 0
Received 0 Likes
on
0 Posts
This thread helped me a lot i just did my 1st oil change a few hours ago and it started raining on me but i got it done but i used a STP oil filter.. did i make a bad choice? (with Castrol GTX 5w-20)
 01-11-2008, 12:51 PM
#19
Honda-Tech Member
got these
Mobil 1 M1-110
Mobil 1 5W-20 synthetic
Filled with premium, runs awesome, great choices, cost $45 but worth every penny
Mobil 1 M1-110
Mobil 1 5W-20 synthetic
Filled with premium, runs awesome, great choices, cost $45 but worth every penny
01-11-2008, 02:50 PM
#22
Member
Join Date: Oct 2005
Location: Los Angeles, CA, USA
Posts: 1,114
Likes: 0
Received 0 Likes
on
0 Posts
well i had a good buddy do mine the last time at his garage but i've done it a few times same crush washer didn't have any problems.
what problems would there be? i had no leaks.
what problems would there be? i had no leaks.
01-11-2008, 04:35 PM
#24
Thread Starter
Join Date: Dec 2006
Location: Knoxville, TN, U.S.A.
Posts: 227
Likes: 0
Received 0 Likes
on
0 Posts
<TABLE WIDTH="90%" CELLSPACING=0 CELLPADDING=0 ALIGN=CENTER><TR><TD>Quote, originally posted by oddmut »</TD></TR><TR><TD CLASS="quote">well i had a good buddy do mine the last time at his garage but i've done it a few times same crush washer didn't have any problems.
what problems would there be? i had no leaks.</TD></TR></TABLE>
A crush washer is designed to be "crushed" once...Do you reuse the o-ring on your oil filter?
Each time you re-use the crush washer, you'll have to tighten the bolt harder to make it seal properly...this can lead to damaged threads in your oil pan. Then you'll have to buy a new oil pan b/c you couldn't spare $.20 each oil change.
01-13-2008, 09:18 PM
#25
I said I don't want a title!

19 steps on how to change oil? I applaud the effort, but if someone really can't figure it out with simpler steps they shouldn't be under there in the first place.
BTW, Mobil1 oil filters are a complete waste of money. They are made by Champion Labs, which also make the K&N oil filters, Luberfiner, SuperTech, STP, Doestch, (U.S.) Bosch Premium, Champ, Lee...and whatever OEM contract they get for that year.
The Mobil1 filters filter well, but really not any better than the much cheaper Purolator Pure One. I only use Purolator in all of my cars.
Also, I had a Mobil1 filter split apart on my 97 GSR. Found a puddle of oil under my car. Champion Labs refunded my money for the filter. They were damn lucky I caught it and my motor didn't seize up, or they would have been paying for that, too.

