

 03-25-2015, 09:26 AM
Last edit by: IB Advertising
See related guides and technical advice from our community experts:
Browse all: Engine and Powertrain
- Honda Accord: How to change serpentine belt
Step by step instructions for do-it-yourself repairs.
Browse all: Engine and Powertrain

How-To: Replace Timing Belt, Timing Balancer Belt and Water Pump on a F22B1
12-31-2007, 02:49 PM
#126
Honda-Tech Member
Join Date: Sep 2006
Location: Co Springs, Co, El Paso
Posts: 135
Likes: 0
Received 0 Likes
on
0 Posts
After 30+ years, I know one thing- HONDA doesn't want you to do this, this is a "bread and butter" job for them. Thus, the CRANK BOLT. I advise you use the tool he states, I do. Otherwise you may never break the crank bolt-(then again, you will probably "break" it!) You should try the one on my Avalon! Nice write up!
And antifreeze will kill ANY animal, even in very small amounts! Ask any vet-an animal comes in poisoned, it's the first thing they ask about! It's very "sweet" to the taste, but very deadly. Keep it clean, or you may lose pets. Wrenchy
And antifreeze will kill ANY animal, even in very small amounts! Ask any vet-an animal comes in poisoned, it's the first thing they ask about! It's very "sweet" to the taste, but very deadly. Keep it clean, or you may lose pets. Wrenchy
 01-01-2008, 05:40 AM
#127
H-T Order of Merit
Thread Starter
<TABLE WIDTH="90%" CELLSPACING=0 CELLPADDING=0 ALIGN=CENTER><TR><TD>Quote, originally posted by wrenchy »</TD></TR><TR><TD CLASS="quote">Nice write up!</TD></TR></TABLE>
Thanks
<TABLE WIDTH="90%" CELLSPACING=0 CELLPADDING=0 ALIGN=CENTER><TR><TD>Quote, originally posted by wrenchy »</TD></TR><TR><TD CLASS="quote">And antifreeze will kill ANY animal, even in very small amounts! Ask any vet-an animal comes in poisoned, it's the first thing they ask about! It's very "sweet" to the taste, but very deadly. Keep it clean, or you may lose pets. Wrenchy</TD></TR></TABLE>
very true, lost a dog because of this when I was younger, the neighbor didn't dispose of it properly and after it rained it leaked into our yard. When stripping the Accord in my moms garage a few years ago, I caught her/our dog under the passenger side fender area. I called her and looked in there and there was 2-3 drops of coolant even though I'm always very careful about this for obvious reasons. Not wanting to risk anything we took her to the vet and had her treated. They gave her that charcoal stuff, I felt so bad. But by the time you see symptoms it's too late. She was fine and nothing ever happened but we wanted to be sure.
Also, most AutoZones will not accept antifreeze like they will oil. I found out the city I now live in accepts oil, antifreeze, etc. at the DPW where you get your recycle bins and that. So look into it and dispose of the stuff the right way.
01-03-2008, 04:10 PM
#128
Honda-Tech Member
Join Date: Jun 2005
Location: simpsonville, sc, 29681
Posts: 35
Likes: 0
Received 0 Likes
on
0 Posts
Thanks for taking the time to post this write-up.
I do have a couple dumb questions:
1) at what step do you set to TDC? Before taking the crank bolt off? I did not see the step that listed "setting to TDC". Just "make sure that it is", which is after the crank bolt is removed. Also, rotate counter clockwise? My 928 is the opposite.
2) I have a leak coming from under the cover. What else needs to be removed to get to the three seals? Is there a DIY for this?
Thanks!
01-04-2008, 05:49 AM
#129
H-T Order of Merit
Thread Starter
<TABLE WIDTH="90%" CELLSPACING=0 CELLPADDING=0 ALIGN=CENTER><TR><TD>Quote, originally posted by ckabee1 »</TD></TR><TR><TD CLASS="quote">1) at what step do you set to TDC? Before taking the crank bolt off? I did not see the step that listed "setting to TDC". Just "make sure that it is", which is after the crank bolt is removed. Also, rotate counter clockwise? My 928 is the opposite.</TD></TR></TABLE>
You can set TDC either before or after you've removed the crank pulley bolt, crank pulley and side covers. If before, just pull the valve cover and upper side cover and rotate the engine so the UP on the cam gear is up and that the marks on the cam gear line up with the head/plastic cover. I usually just do it after I remove the crank pulley and side covers, I just slide the crank pulley back on real fast and use my pulley holding tool to rotate the engine instead of putting the bolt back in and using that.
Yes, CCW (counter clockwise) rotation.
<TABLE WIDTH="90%" CELLSPACING=0 CELLPADDING=0 ALIGN=CENTER><TR><TD>Quote, originally posted by ckabee1 »</TD></TR><TR><TD CLASS="quote">2) I have a leak coming from under the cover. What else needs to be removed to get to the three seals? Is there a DIY for this?</TD></TR></TABLE>
well, you would have to remove the crank pulley, side timing covers, balancer belt, timing belt, balancer belt drive gear, timing belt drive gear, cam gear and front balancer shaft gear.
I don't have a DIY on this from the Accord, sorry. I did take a few quick pictures of how I did it on a Civic though, that should should you how to do it.
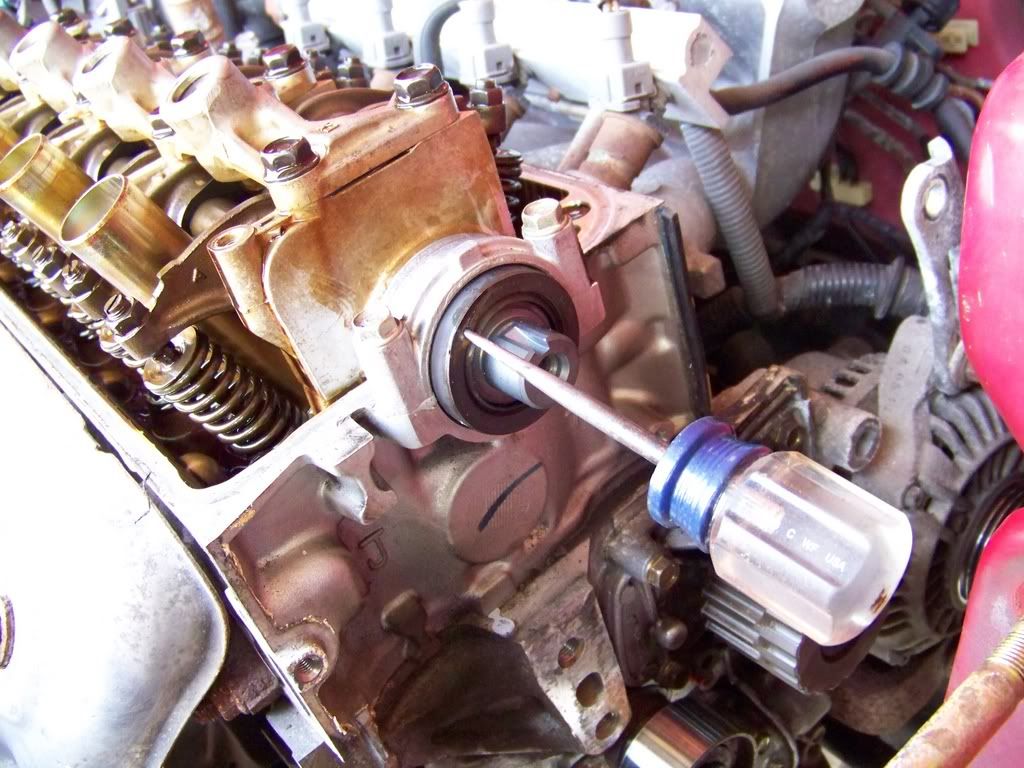
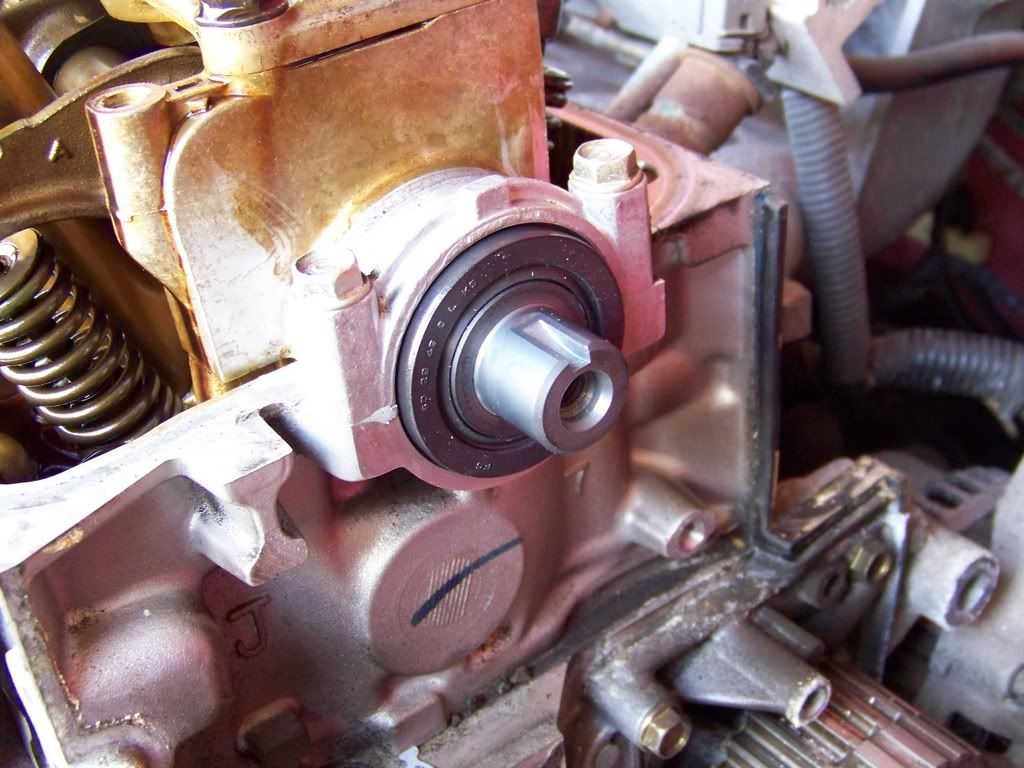
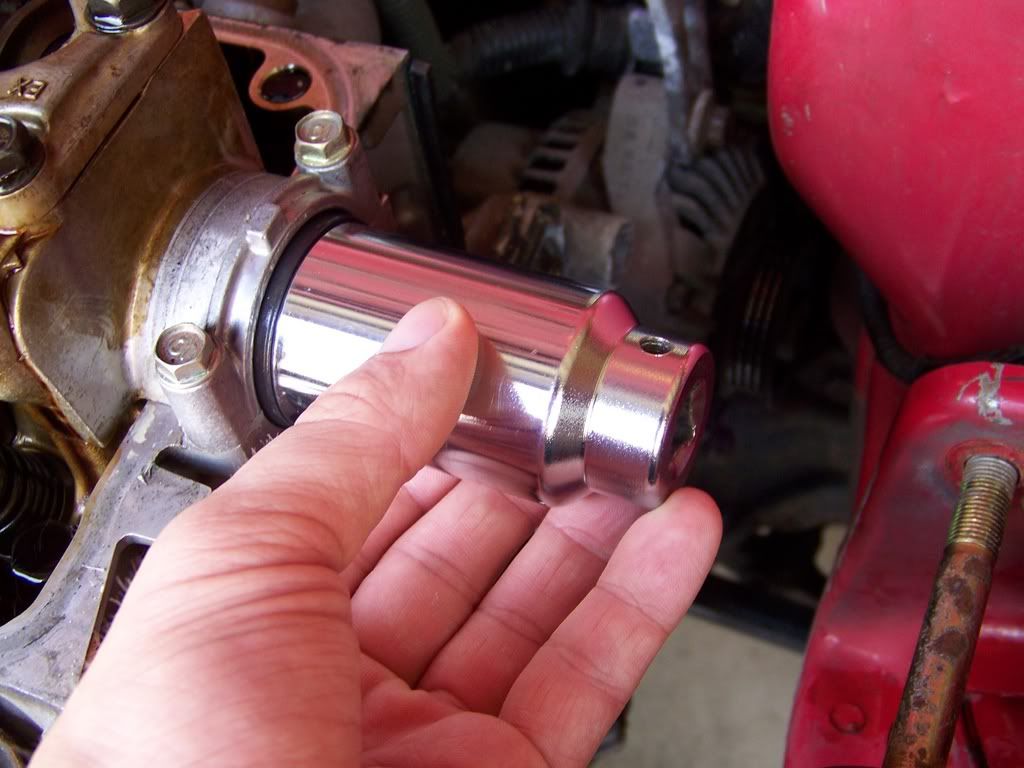
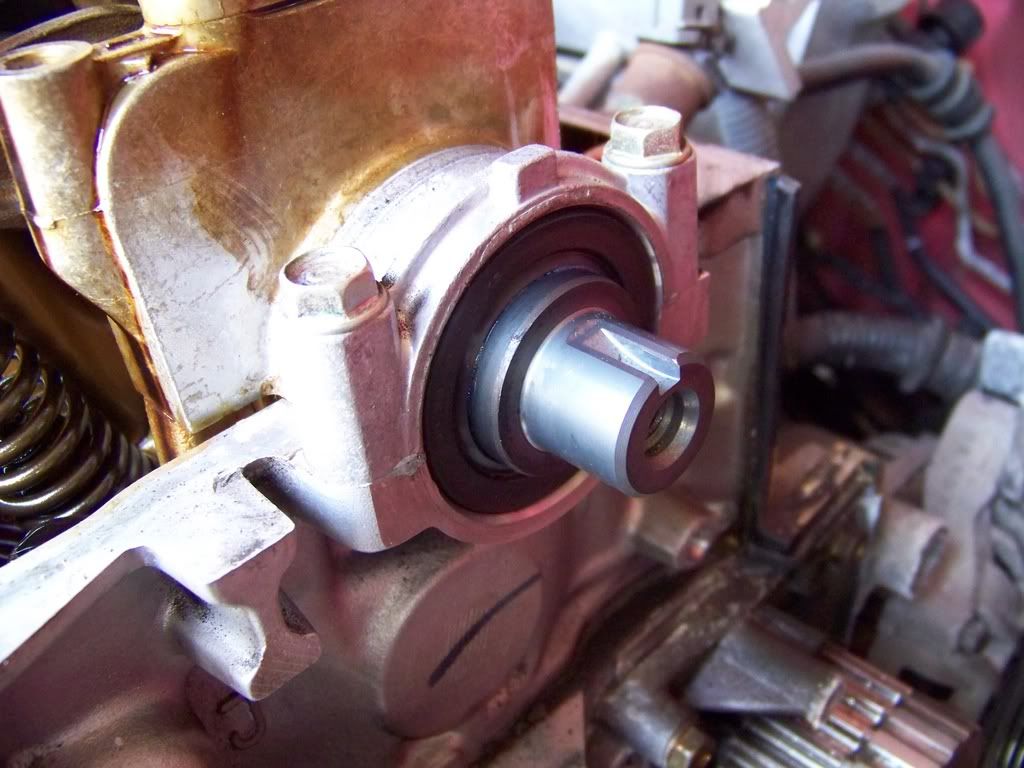
I used a scratch awl (can be found at Sears in the screwdriver isle). I just punched it through the face of the seal and pried the seal out making sure to not scratch the shaft or where the outside of the seal is at. Then I took the new seal, put a light coat of oil on the outside of the seal and slid it into place. I took a large socket and hammer, then lightly tapped the new seal into place. Here is a few pictures to give you an idea.


You can set TDC either before or after you've removed the crank pulley bolt, crank pulley and side covers. If before, just pull the valve cover and upper side cover and rotate the engine so the UP on the cam gear is up and that the marks on the cam gear line up with the head/plastic cover. I usually just do it after I remove the crank pulley and side covers, I just slide the crank pulley back on real fast and use my pulley holding tool to rotate the engine instead of putting the bolt back in and using that.
Yes, CCW (counter clockwise) rotation.
<TABLE WIDTH="90%" CELLSPACING=0 CELLPADDING=0 ALIGN=CENTER><TR><TD>Quote, originally posted by ckabee1 »</TD></TR><TR><TD CLASS="quote">2) I have a leak coming from under the cover. What else needs to be removed to get to the three seals? Is there a DIY for this?</TD></TR></TABLE>
well, you would have to remove the crank pulley, side timing covers, balancer belt, timing belt, balancer belt drive gear, timing belt drive gear, cam gear and front balancer shaft gear.
I don't have a DIY on this from the Accord, sorry. I did take a few quick pictures of how I did it on a Civic though, that should should you how to do it.
I used a scratch awl (can be found at Sears in the screwdriver isle). I just punched it through the face of the seal and pried the seal out making sure to not scratch the shaft or where the outside of the seal is at. Then I took the new seal, put a light coat of oil on the outside of the seal and slid it into place. I took a large socket and hammer, then lightly tapped the new seal into place. Here is a few pictures to give you an idea.
 01-04-2008, 10:24 AM
#131
H-T Order of Merit
Thread Starter
yep, np
nope, no pullers required. Just unbolt them and pull them off. Sometimes the crank pulley can get a little stuck but some PB Blaster should help free it if it is.
nope, no pullers required. Just unbolt them and pull them off. Sometimes the crank pulley can get a little stuck but some PB Blaster should help free it if it is.
01-13-2008, 07:10 AM
#132
Junior Member
Join Date: Jan 2008
Location: Mount Airy, MD
Posts: 18
Likes: 0
Received 0 Likes
on
0 Posts
Found the pulley tool for $23. About 7$ shipping, or maybe you can find it in the store:
http://www.partsamerica.com/Pr...=3491
http://www.partsamerica.com/Pr...=3491
01-14-2008, 04:20 AM
#133
H-T Order of Merit
Thread Starter
yep, that should work.
Haven't looked recently because I have one but back when I was first looking for one (~4 yrs ago) no parts store in my area had anything if they even knew what I was talking about to start with.
Haven't looked recently because I have one but back when I was first looking for one (~4 yrs ago) no parts store in my area had anything if they even knew what I was talking about to start with.
01-14-2008, 07:08 AM
#134
Junior Member
Join Date: Dec 2007
Location: Atlanta, GA, USA
Posts: 219
Likes: 0
Received 0 Likes
on
0 Posts
Amazon has this tool for $24.99. You can add something to make the total over $25.00 and the shipment will be free.
http://www.amazon.com/gp/product/B0000TMLWQ
http://www.amazon.com/gp/product/B0000TMLWQ
05-05-2008, 11:59 PM
#137
Join Date: May 2008
Posts: 1
Likes: 0
Received 0 Likes
on
0 Posts
Many thanks for the excellent photodocumentation, useful questions, and thorough responses. I'm applying this knowledge to work that is about to be done on wife's VTEC Prelude by an independent Honda garage. A "minor" noise turned out to be the timing belt rattling against the cover at some rpm's because of a dead or dying autotensioner. The garage wants to change out lots more than the autotensioner (total bill near $1400)--timing and balance belts, both t&b tension adjusters, cam, crank, and balance shaft seals, and the water pump. My Helm manual tells how to do it but I wanted to know why; now I do. (I do minor stuff on the car, but this is way beyond my skill level and tool base).
My take-aways: 1. Let the garage do everything on their list, even replacing the innocent bystander water pump.
2. Use only Honda parts, including all the seals (they had some aftermarket seals on their quote).
3. Have them check the valve clearances while it's open.
4. Replace the P/S and alternator belts since they are off anyway and are original.
The car has barely over 50K miles but it's nearly 7 years old, which is when the manual says to change the timing belts, but I was surprised that all the other parts need to be changed as well.
05-06-2008, 03:36 AM
#138
H-T Order of Merit
Thread Starter
the main reason for changing the water pump, seals, etc all at this time is because the timing belt and balancer belt need to be removed to get to it anyway. So since they are off at this time it makes sense to do it now. You'd hate to have to pay for the labor fee twice if something fails and you have to go back in for another fix because you didn't have it taken care of while it was all apart already.
BTW, if you are mechanically inclined and have a Helm manual (which it sounds like you are and do)... I would seriously consider doing this yourself. $1400 is a lot IMO, but then I'm not used to paying labor fees since I do much of the work on our cars myself.
A bit off topic, but there is a point... right now, I'm helping a friend on his Civic w/ GSR motor. He was blowing smoke but compression was fine, when we removed the exhaust manifold we saw cylinders 3 and 4 were leaking oil heavily into the exhaust ports from most likely the valve stem seals. Cylinder 2 only had 1 valve stem seal leaking and the other was fine while cylinder 1 was good. So we pulled the head to do a good cleaning and make sure his valves were sealing correctly. Right now we are waiting for the parts (valve stem seals) to reassemble the head. So yesterday after checking the valves with prussian blue I was asking him how hard he felt it's been so far since before we started he thought it was going to be real hard from whats others were telling him. He said with a few special tools, a good basic set of tools and some guidance he said it isn't too bad and much easier than he first thought, just takes time. Before this, he hadn't done anything other than basic quick jobs. Now he feels confident enough to do the timing belt and that on his girls Integra. So my point is, if you are mechanically inclined and have a good basic set of tools, seriously look into what it would cost for you to do it yourself and figure 1 full day to get it all done or even a weekend if you don't want to feel rushed.
 06-01-2008, 05:24 PM
#141
New User
Join Date: Jun 2008
Location: IE
Posts: 1
Likes: 0
Received 0 Likes
on
0 Posts
Nice write-up, I read the entire thread but didn�t see my question asked/answered. Maybe I�m blind lol.
So here I go�
I recently did an engine swap to a 97 Accord and I ordered a motor from the local JDM people. They sent me a wrong motor that required me to swap over the oil pump and a few other things from the U.S. motor. Anyway, I�m cool with that since it cost about $200 less. Now on to my questions�
Is there any way for the oil pump to be out of timing? If so, what would be the symptoms of this?
06-10-2008, 06:51 PM
#142
Join Date: Jun 2008
Location: Appleton, WI, USA
Posts: 6
Likes: 0
Received 0 Likes
on
0 Posts
do you remember that thread with changing the timing belt on the 94-97 accord? I am doing a 93 right now and am wondring if I do the step that has to do with rotating the crank counterclockwise until you are 3 teeth on the cam. do you know if this step is used on the F22A 93 Accord EX? I tried it and does not start but if its right I will move on to different problem. thanks for your time
06-11-2008, 06:42 AM
#143
Honda-Tech Member
Join Date: Aug 2002
Posts: 397
Likes: 0
Received 0 Likes
on
0 Posts
I just want to say it is probably best to use the long pipe to remove the crank pulley bolt instead of a impact gun. I am doing this now on a new Accord I just bought. I was hitting this bolt with a 780 ft-lb gun after soaking the bolt in PB blaster for 1.5 days, NOTHING. This is truly the devil's bolt, it is a bitch! Then I had a long extension (maybe 24") but it was an adapter that went from a 1/2" to a 3/8" drive that I was using with the 'long pipe method', I twisted the 3/8" end off of that thing. So off to Sears. I had to buy two 10" 1/2" drive extensions and put them together and try again. It finally popped. I am estimating that it took about 1200 ft-lbs, just rediculous.
06-11-2008, 08:34 AM
#144
H-T Order of Merit
Thread Starter
<TABLE WIDTH="90%" CELLSPACING=0 CELLPADDING=0 ALIGN=CENTER><TR><TD>Quote, originally posted by bnuts59 »</TD></TR><TR><TD CLASS="quote">do you remember that thread with changing the timing belt on the 94-97 accord? I am doing a 93 right now and am wondring if I do the step that has to do with rotating the crank counterclockwise until you are 3 teeth on the cam. do you know if this step is used on the F22A 93 Accord EX? I tried it and does not start but if its right I will move on to different problem. thanks for your time</TD></TR></TABLE>
from what I've seen so far most Honda's with a timing belt (as opposed to a chain) use the same "rotate crankshaft counter clockwise 3 teeth on camshaft" to tension the belt(s).
also, this would not cause the car not to start as this is only to properly tension the belt. You could have something mis-aligned or not hooked back up. I would go back over everything and see if you missed something on assembly.
06-11-2008, 08:35 AM
#145
H-T Order of Merit
Thread Starter
<TABLE WIDTH="90%" CELLSPACING=0 CELLPADDING=0 ALIGN=CENTER><TR><TD>Quote, originally posted by Bird333 »</TD></TR><TR><TD CLASS="quote">I just want to say it is probably best to use the long pipe to remove the crank pulley bolt instead of a impact gun. I am doing this now on a new Accord I just bought. I was hitting this bolt with a 780 ft-lb gun after soaking the bolt in PB blaster for 1.5 days, NOTHING. This is truly the devil's bolt, it is a bitch! Then I had a long extension (maybe 24") but it was an adapter that went from a 1/2" to a 3/8" drive that I was using with the 'long pipe method', I twisted the 3/8" end off of that thing. So off to Sears. I had to buy two 10" 1/2" drive extensions and put them together and try again. It finally popped. I am estimating that it took about 1200 ft-lbs, just rediculous.</TD></TR></TABLE>
I've never tried an impact to remove this but I've always :knocks on wood: had good luck with using my method described in this how-to. I've done it this way 6 or more times now and it's worked great every time.
I've never tried an impact to remove this but I've always :knocks on wood: had good luck with using my method described in this how-to. I've done it this way 6 or more times now and it's worked great every time.
08-04-2008, 12:47 PM
#146
Honda-Tech Member
Join Date: Sep 2002
Location: hittin corners so hard you can taste my rims..
Posts: 5,415
Likes: 0
Received 0 Likes
on
0 Posts
i recently took the plunge and dove into the old lady's 2000 LX sedan.
everything went smooth. i started at DTC and ended at TDC. took a good 4 hours. but now it seams the car is LOUDer than before. like engine vroom. kinda like a intake modification. what would cause this?
we changed both tensioners, all the belts, and the water pump.
as far as i know, everything was aligned.. i know for a fact the cam and crank are, it runs very smooth. but im uncertain about the other 2 pully's ive never seen before untill now. the one on the left.. with the long shaft... and the other one just under the water pump. i tried to align it as close as possible, but im not convinced.
what would happen if these were out of balance? would the car not run smooth? would it make noise? there isn't any CEL's.. just seams to be louder than before.. not a tick, not clunk, but louder engine noise. similar to a short ram intake, but its completely stock.
only other thing i can think of is the alt. and a/c belt. i put them on pretty damn tight. and im wondering if they could cause this loud moan. the moan is constant with engine RPM not load. as a intake would only be loud when your in throttle and not all the time, as where i am, coasting as long as you have RPM.. you have noise.
did i align those 2 balancer pully's wrong? are the alt. and A/C belts too tight? the car runs fine.. no CEL's.. so im stumped.
08-05-2008, 04:15 AM
#147
H-T Order of Merit
Thread Starter
first of all... glad to hear everything went smoothly.
I responded to your other thread so I wont go into it all again but I will say this...
If the shafts are out of time you'll probably notice more vibration and noise from the engine. The car would most likely run fine just with some added vibration and noise and you wouldn't see any cel from this.
now, a timing belt thats too tight will also cause some noise. Usually thats more a whine though and you mentioned it being more of a moan sound. Also in your other thread you mentioned working on B series engines so I will assume you know what a over-tight timing belt sounds like.
If you are sure that you aligned the balance shafts correctly it's worth the time to take the side covers back off and recheck.
I'm not sure if the alt and ac belts being too tight would cause what you are noticing but if you think it may be the cause, thats at least quicker and easier to try first than taking the side covers back off.
08-06-2008, 02:48 PM
#148

Join Date: Aug 2008
Posts: 6
Likes: 0
Received 0 Likes
on
0 Posts
Thank you so much for this tutorial. I would not be able to do it though because of lack of right tools and space. I called a honda dealer and they asked me to pay $500 to do the timing belt and water pump. I am still thinking about it and considering to take it to a local shop and see iif I can get a cheaper price. Thank you again for all your efforts
Modified by raub21 at 11:18 PM 8/6/2008
Modified by raub21 at 11:18 PM 8/6/2008
08-06-2008, 06:20 PM
#149

Join Date: Jul 2008
Location: podunk, fl, usa
Posts: 15
Likes: 0
Received 0 Likes
on
0 Posts
If you are in a hurry, can't get to a welder, and can't wait on a delivery and cannot find the tool locally, you can build a tool to hold the crank shaft in place while you get the crank nut off. I Bought several 1 and 1/2 inch black iron pipe fittings from a local plumping supply. One with a two inch nut on the end (don't really remember what the fitting was called it was some kind of union or coupling)to fit in the crank, connected a coupling, then to a 10 inch piece of 1.5" pipe into a T. Off the tee I ran a 16" length of 1.5" pipe. The whole assembly cost me 16$ The only draw back was that even though I used a pipe wrench and bench vise, the engine went a couple of revolutions until the threads on all the pipes bottomed out and the nut broke. Also, it won't exactly fit in the tool box when you are done. Not really a great suggestion unless you are really in a pinch, deadly cheap, a plumber or metal recycler. I tried a big electric impact wrench and it did nothing at all. And I wasn't really down with putting a screwdriver in the flywheel once I realized how much it was torqued.
08-07-2008, 03:31 AM
#150
H-T Order of Merit
Thread Starter
<TABLE WIDTH="90%" CELLSPACING=0 CELLPADDING=0 ALIGN=CENTER><TR><TD>Quote, originally posted by raub21 »</TD></TR><TR><TD CLASS="quote">Thank you so much for this tutorial. I would not be able to do it though because of lack of right tools and space. I called a honda dealer and they asked me to pay $500 to do the timing belt and water pump. I am still thinking about it and considering to take it to a local shop and see iif I can get a cheaper price. Thank you again for all your efforts</TD></TR></TABLE>
you're welcome
think of it this way... you spend ~$200-250 in OEM parts, you have some tools but not all so you spend another say ~$100 on some tools. Now you've just spent ~$300-350 in tools and parts which is still less than that $500 the dealership quoted you. Plus now you have those tools, you know more about your engine, you save ~$150-200 and if you have to do it again it'll only cost you parts since you have all the tools.
being limited on space shouldn't be too bad. In this write-up we did this in the parking lot of my apartment. Not ideal but it was ok. Just yesterday I went to my friends house to help him replace his crankshaft seal on his GSR engine because it was leaking. We did that right in the driveway and thats pretty much a timing belt job minus replacing the water pump and cam seals.
also, be careful of those other local shops giving you a cheaper price and also cheaper parts, stick with OEM parts on this if you can.