
Round 3: Aztec Green Pearl EJ2 Coupe -94! OEM Goodies


 10-01-2013, 10:34 AM
#29
Wow, I can see we are very much alike with our attention to detail. For example, not many other people would take the time to source the original OEM wire colours for each feature being added. I honestly thought I might be the only person to do this.
I see you are doing a lot of mods that I have also done. I really enjoyed seeing the progression, especially the DIY repair which often times requires some real creativity. A couple of comments come to mind as well as questions which I hope you could elaborate on!


I see you are doing a lot of mods that I have also done. I really enjoyed seeing the progression, especially the DIY repair which often times requires some real creativity. A couple of comments come to mind as well as questions which I hope you could elaborate on!
- I see you repaired how the side sills attached to the carpet. Can you tell me size/thread screw you used plus what you used as a washer? Is it holding up?
- What paint/etc. did you use to cover up the exposed metal you grinded down in the interior?
- If and when you get the headlight washers installed, do you think you could post up the info about which connectors the wires pass through at the fuse box and the firewall? This info is not available anywhere, it seems.
- How well did my template work for the bumper pole installation? Does it need any modification? What metal did you use and did you run in to any troubles?
- The power steering cooling line was looped like that because the tubing that ran in front of the bumper area isn't really needed. It also rusts quickly. Do not be concerned.
- What product did you use to polish up the cover of your bronze 1-DIN pocket?
- Seat belt indicator is ICU-dependent but I believe only for the annoying chime. If you have a fuel/temp gauge with the seat belt light, it will still light up if you wire it in properly.
- Did you polish up the stainless steel side sills? What process did you use?
- The power folding mirror relay doesn't mount in that spot officially; it goes in a really annoyingly inaccessible (when dashboard is in) spot tucked high in the driver's footwell. But the place where you put it is where I put it too since I have a DRL relay and the headlight washer relay mounted on the cruise control brain bracket. There are two mounting spots on the cruise control bracket, you can put your relay here, and it will be more "official".
10-02-2013, 05:31 AM
#32
Honda-Tech Member
Thread Starter

First things first, Big thanks to all for the awesome comments! I really appreciate them alot. 
I must say that you and your great DIY:s have inspired me greatly. I want to work with best possible methods to achieve a good result in first try, so there is no need to do same things twice. There�s little perfectionist in me. So thats why I�m doing wiring work with OEM colors, just like you The reason why I�m adding all the things that are in my mind in a same time, is that I dont want to do alot of disassembling in a future to add those things later Couple of guys in Finnish forums have laughed at me when I have wanted to buy OEM Cable Channel and OEM Wiring in different colors. Its annoying, how it is so hard to understand that some people (like you and me) think that its the best and the only way to go?
Okay! Lets list! (I actually did this listing twice, but the first one is now somewhere in the bit-universe. So this one is not as clear as the first one would have been, sorry  )
)
I recently bought Viper 5904 Alarm/Remote Start system to this project, just waiting it to arrive from USA
The reason why I�m adding all the things that are in my mind in a same time, is that I dont want to do alot of disassembling in a future to add those things later Couple of guys in Finnish forums have laughed at me when I have wanted to buy OEM Cable Channel and OEM Wiring in different colors. Its annoying, how it is so hard to understand that some people (like you and me) think that its the best and the only way to go? )- Its holding up very nicely! I cant remember what size of screws/washers I used (I didnt measure them), but they were small philips screws that are meant to be used attaching different kind of parts to plastic. If you take out the side sill, you can easily see that the sills sticks that holds up with carpet, are actually hollow, which eases up the repair greatly! All you have to watch out is that the screws arent too long, so they wont accidentally leave a mark to the plastic sills.
- I used 2 products, one is "Motip Zinc spray" and other is Isopon Zinc 182, which is brushable paint. You could also use etching primer. In all situations just make sure not to leave any rust under the paint.
- Yes, I can post the correct wiring route/pin layout
- It worked flawless! I made the bracket exactly like it was in template and measured the correct bending angle. There was a very slight additional bending (in a different part that the actual bend) that was needed to do to get the pole 100% straight, but its really nothing, so no modifications needed, its perfect. I used 1,2mm thick sheet metal that had the right stiffness.
- Okay, thanks for this info!
- Firstly i used silicone remover to remove any dirt and previous solvents from it. Then i used cotton and microfiber cloth and AutoGlym Super Resin Polish to polish it up. I tested the polishing work by removing the SRN wax from the lid by using silicone remover to see if there was any scratches remain under the wax. If there was, i kept polishing. When it was perfect i left it that way. I still need to protect it with some car detailer product, but I havent bought any yet.
- Okay, if your car has the Seat Belt Indicator, could you test if its part of the bulb check circuitry? Does it light up for a small time when key is in ACC position?
- I just cleaned them with Silicone Remover. There is a correct process of polishing up the brushed stainless steel, and i think that its needed to be done with professionals so the brushed surface doesnt get hurt. However, i think that the Civic emblem can be polished up using Metal Polish paste.
- Thanks for the info! Its really annoying place. Im putting my CC computer there and i dont want any additional wire harnesses there so the PF relay will be left to this current place
I recently bought Viper 5904 Alarm/Remote Start system to this project, just waiting it to arrive from USA
Last edited by HiTec; 10-03-2013 at 03:23 AM.


 10-25-2013, 12:44 AM
#34
Honda-Tech Member
Thread Starter
Some misc work done, looks very dirty, but its not:


Eliminating Headlight Washer relay rattle against the Cruise Control unit. Cruise Control bracket also gets the Power Folding Mirror relay:


Cleaning ECU bracket with Deox-Gel:


Epoxy/Zinc paint:

New yellow passivated bolts:

Removing the AC-line cover (I will install JDM Auto Climate Control system to this from my EG8):

I removed the heaterbox to clean it up (pita to remove):


Cleaned:

Installing Auto Climate Control:


I bought push mount zip ties to ease up wiring work:

Then i bought 1,5mm thick single sided foam tape to repair my Coupe third brake light:

This light leak was the problem:

Tape is exactly like OEM, so it was easy to replace the cracked one with new :


My next part order is already in transit. BNIB OEM Hood Insulator and EK JDM Air Refiner :lol:


Eliminating Headlight Washer relay rattle against the Cruise Control unit. Cruise Control bracket also gets the Power Folding Mirror relay:
Cleaning ECU bracket with Deox-Gel:
Epoxy/Zinc paint:
New yellow passivated bolts:
Removing the AC-line cover (I will install JDM Auto Climate Control system to this from my EG8):
I removed the heaterbox to clean it up (pita to remove):
Cleaned:
Installing Auto Climate Control:
I bought push mount zip ties to ease up wiring work:
Then i bought 1,5mm thick single sided foam tape to repair my Coupe third brake light:
This light leak was the problem:
Tape is exactly like OEM, so it was easy to replace the cracked one with new
:My next part order is already in transit. BNIB OEM Hood Insulator and EK JDM Air Refiner :lol:
Last edited by HiTec; 11-06-2013 at 06:26 AM.
10-28-2013, 11:34 PM
#35
Honda-Tech Member
Thread Starter
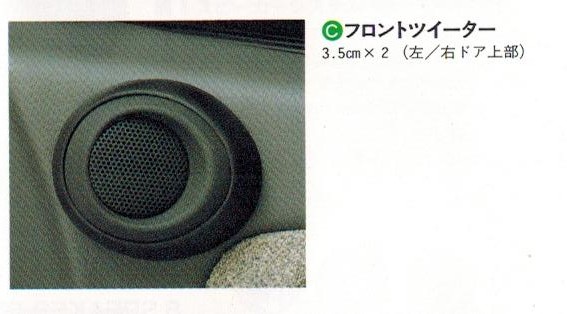
Next order; OEM Gathers optional tweeters from New Zealand. I thought to test if i could revive the door cards with these. If not, then I have to try to find a door cards that dont have holes for aftermarket tweeters. The problem is that the previous owner installed the aftermarket tweeters to wrong location thats way of from the original Acoustic Research installation point. Thats why i needed to improvise and thats one of the reasons why i ordered 4D Gathers tweeters instead of 2/3D ones. (4D versions are much more slimmer than 2/3Ds)
Gathers:
Acoustic Research:

The set that i ordered is missing the tweeter grills. But that isnt a problem cause I will install aftermarket tweeters and use their grills Here is a pic about the differences between 2/3D and 4D versions:
Gathers 4D:
Gathers 2/3D:
Then I installed the Coupe third brake light:


I thought that what could I do to those aftermarket speaker holes.

In this case i was lucky. The holes are safely inside the original Acoustic Research speaker cover, so i just need to get these:

And these to get a clean install

Here is a pic that shows the factory holes:

Here is couple pics about the brake light, the rear window is scratched and it has a 5% tint on it:


Gathers:
Acoustic Research:
The set that i ordered is missing the tweeter grills. But that isnt a problem cause I will install aftermarket tweeters and use their grills
Here is a pic about the differences between 2/3D and 4D versions:Gathers 4D:
Gathers 2/3D:
Then I installed the Coupe third brake light:
I thought that what could I do to those aftermarket speaker holes.
In this case i was lucky. The holes are safely inside the original Acoustic Research speaker cover, so i just need to get these:
And these to get a clean install
Here is a pic that shows the factory holes:
Here is couple pics about the brake light, the rear window is scratched and it has a 5% tint on it:
11-10-2013, 09:39 AM
#36
Honda-Tech Member
Thread Starter
Okay, so I disassembled the heater box and cleaned it up:
Then i routed the parking poles harness and optical cable from here (also Power Folding Heated Mirrors and ITR Spec98 ABS Harness will go from there:


And wire tucking, again:


Then i removed the Automatic Climate Control from my SuperBlack and started to install it to this Coupe.
Heaterbox with Auto AC, RHD to LHD modded air mix motor + water temp sensor:

I used some Arctic Alumina coolant paste between the sensor and heater core:
Then i needed to change the bezels, because 92-93 Civics have slightly different shade in some interior elements than 94-95:

Some randomnes; my cat Leevi :D

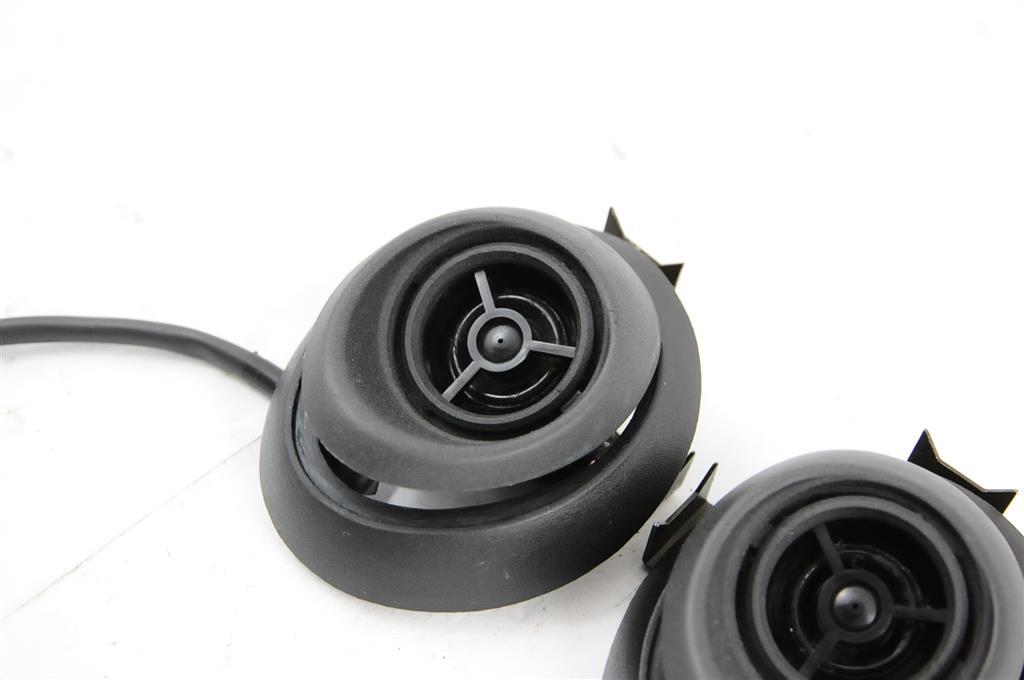
And then we are coming to this day, Gathers optional OEM tweeters arrived from NZ:

Grills are missing and one tweeter cone is damaged, but otherwise very clean conditioned. Those arent big things to me, cause i will change the tweeters to better ones and use their tweeter grills
Okay, then i went to my garage place to check out how these tweeters line up with doorcards. These tweeters are taken from 4D Civic. Now you think why i bought them and not the 2/3D versions?
Well, there is differences. 4D tweeters are installed upper and further than 2/3D versions. I need them to be installed like that, cause some of the cars previous owners installed the aftermarket tweeter way of from OEM-install location.
So, lets try it
Doorcards:

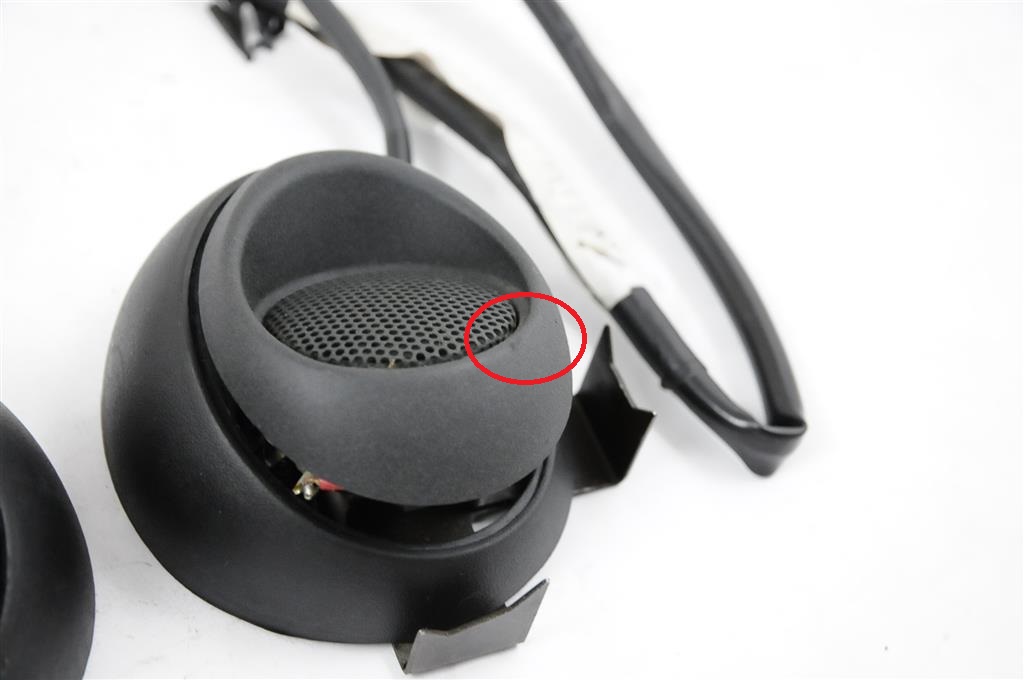
This is the location where 4D tweeters are perfect fit with 2/3D doorcards. There is no gaps in anywhere. The tweeter rings are perfectly lined up in this pic, but the pic is not good it looks like they are not lined up with each others:

This dent is the only visible thing that reminds me of those aftermarket tweeters. I cant ditch this under the tweeter ring, cause then the ring wouldnt sit with the doorcard withouth gaps. But i can get this dent up. Soap water and heat is the right recepy and i will do it someday when i have more time

And here is OEM 2/3D tweeter hole highlighted. If i would have installed tweeters there, the aftermarket tweeter holes would have been visible:

Then i drawed some lines, cut the vinyl away and started drilling:


Test fit, tweeters look more grey than they really are, must be something to do with the flash:

Different angles:


And just for a reference; here is installation point for Sedan:
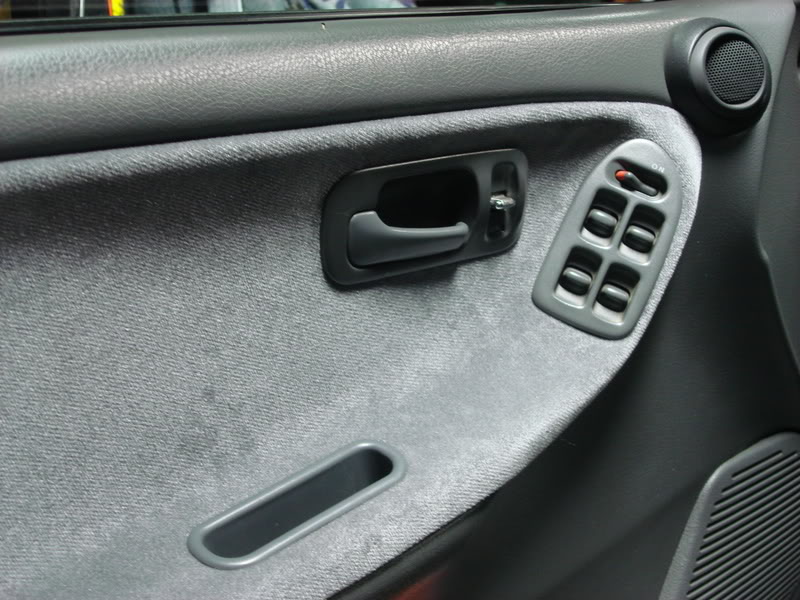
And here Coupe/HB:
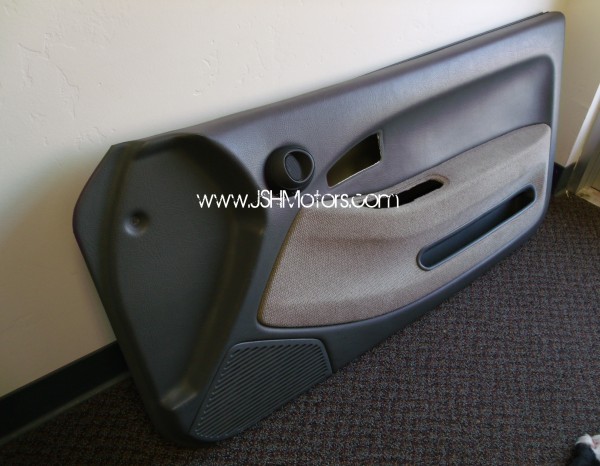
In my opinion this custom work worked out perfectly! They dont look so bulky as 2/3D versions, they are higher, better aimed and the most important; they cover up the aftermarket tweeter holes perfectly and there is no gaps
Here is some disassembly done with the drivers side tweeter:


And here is just one test pic of how the Hertz tweeter would see behind Gathers cover:

Then i routed the parking poles harness and optical cable from here (also Power Folding Heated Mirrors and ITR Spec98 ABS Harness will go from there:
And wire tucking, again:
Then i removed the Automatic Climate Control from my SuperBlack and started to install it to this Coupe.
Heaterbox with Auto AC, RHD to LHD modded air mix motor + water temp sensor:
I used some Arctic Alumina coolant paste between the sensor and heater core:
Then i needed to change the bezels, because 92-93 Civics have slightly different shade in some interior elements than 94-95:
Some randomnes; my cat Leevi :D
And then we are coming to this day, Gathers optional OEM tweeters arrived from NZ:
Grills are missing and one tweeter cone is damaged, but otherwise very clean conditioned. Those arent big things to me, cause i will change the tweeters to better ones and use their tweeter grills
Okay, then i went to my garage place to check out how these tweeters line up with doorcards. These tweeters are taken from 4D Civic. Now you think why i bought them and not the 2/3D versions?
Well, there is differences. 4D tweeters are installed upper and further than 2/3D versions. I need them to be installed like that, cause some of the cars previous owners installed the aftermarket tweeter way of from OEM-install location.
So, lets try it
Doorcards:
This is the location where 4D tweeters are perfect fit with 2/3D doorcards. There is no gaps in anywhere. The tweeter rings are perfectly lined up in this pic, but the pic is not good it looks like they are not lined up with each others:
This dent is the only visible thing that reminds me of those aftermarket tweeters. I cant ditch this under the tweeter ring, cause then the ring wouldnt sit with the doorcard withouth gaps. But i can get this dent up. Soap water and heat is the right recepy and i will do it someday when i have more time
And here is OEM 2/3D tweeter hole highlighted. If i would have installed tweeters there, the aftermarket tweeter holes would have been visible:
Then i drawed some lines, cut the vinyl away and started drilling:
Test fit, tweeters look more grey than they really are, must be something to do with the flash:
Different angles:
And just for a reference; here is installation point for Sedan:
And here Coupe/HB:
In my opinion this custom work worked out perfectly! They dont look so bulky as 2/3D versions, they are higher, better aimed and the most important; they cover up the aftermarket tweeter holes perfectly and there is no gaps
Here is some disassembly done with the drivers side tweeter:
And here is just one test pic of how the Hertz tweeter would see behind Gathers cover:
12-05-2013, 05:23 AM
#37
Honda-Tech Member
Thread Starter
Updates:
Shipment from Malaysia:
OEM BNIB Civic 92-00 Hood Insulator:


Honda Access Air Refiner:


I wanted to see what was inside, so I disassembled it:

Then I ordered Toyota 4Runner/Camry charcoal pollen filter from ebay which has nearly correct thickness for this use.
Installation:
Couple of "shims" before bracket:

Bracket installed:


Tweeters:


My alarms remote

Shipment from Malaysia:
OEM BNIB Civic 92-00 Hood Insulator:
Honda Access Air Refiner:
I wanted to see what was inside, so I disassembled it:
Then I ordered Toyota 4Runner/Camry charcoal pollen filter from ebay which has nearly correct thickness for this use.
Installation:
Couple of "shims" before bracket:
Bracket installed:
Tweeters:
My alarms remote
12-05-2013, 05:35 AM
#38
Honda-Tech Member
Thread Starter
Then I ordered Integra Type-R Spec 98 main harness with ABS for my custom ABS-retrofit and it came pretty quickly from UK:
DC2 harnesses in a box:

Carefully removing the ABS harness from the main harness:

I managed to remove the ABS main harness pretty neatly from the main harness. Only couple of wires are attached to main harness and they are pictured in here:
GRN/WHT, Brake switch signal:

BRN, Service check connector signal:

...Which goes to the left:

BLU/RED: Warning lamp signal:

GRN/RED: Parking brake signal:

BLK/BLU (UKDM), the only wire color that didnt match to USDM schematics. USDM wire color is BLK/YEL: IG2.

Then i removed the ABS-computers second bracket and modified the integrated bracket to fit to Civics body:

Then the most painfully part, the hybrid version of EG and DC2 ABS harness.
I started to route rear ABS-sensor harness:


These clipses are used in these holes:

Rear ABS-harness was pretty much plug and play with EG/EJ body, I needed to remove some excess wire from it, but otherwise it was easy.


ITR ABS-harness in stock:

As you can see in the picture above, the harness that goes through the firewall (from under hood fusebox to the ABS-computer) is 40cm long. That aint gonna work with my Civics body and electronics. The main reason for this is that UKDM cars are RHD. So, i needed to de-pin all compatible wires from EG harness. The wire colors from ABS computer to the under dash fusebox are: BRN, BLK/YEL, GRN/RED, GRN/WHT, BLU/RED:

Then i needed to start thinking about other ABS-parts location so i could do a right length harness. I left open the thought about K-Series, and if this project ever goes to K-Series i think that its going to be a tight fit with ABS-parts. So, I will relocate the battery to the trunk to get some space for ABS-parts:
ABS fusebox test fit with double sided tape:


EG ABS-harness without major de-pinning:

I also got a OEM-front foglight wire from ITR-harness (my car really didnt have this wire!)

Is it true that DC5 ABS hydraulic unit has integrated ABS-computer? Cause i studied some DC2 vs DC5 ABS systems and they look very much like the same. I thought that if DC5 hydraulic unit doesnt have integrated ABS-computer, it might be possible to use it with DC2 ABS setup. DC5 unit is much smaller and lighter than DC2 hydraulics.


Comparison:


I measure every wire that i solder. I�m electronic engineer, but just to make sure everything works

DC2 harnesses in a box:
Carefully removing the ABS harness from the main harness:
I managed to remove the ABS main harness pretty neatly from the main harness. Only couple of wires are attached to main harness and they are pictured in here:
GRN/WHT, Brake switch signal:
BRN, Service check connector signal:
...Which goes to the left:
BLU/RED: Warning lamp signal:
GRN/RED: Parking brake signal:
BLK/BLU (UKDM), the only wire color that didnt match to USDM schematics. USDM wire color is BLK/YEL: IG2.
Then i removed the ABS-computers second bracket and modified the integrated bracket to fit to Civics body:
Then the most painfully part, the hybrid version of EG and DC2 ABS harness.
I started to route rear ABS-sensor harness:
These clipses are used in these holes:
Rear ABS-harness was pretty much plug and play with EG/EJ body, I needed to remove some excess wire from it, but otherwise it was easy.
ITR ABS-harness in stock:
As you can see in the picture above, the harness that goes through the firewall (from under hood fusebox to the ABS-computer) is 40cm long. That aint gonna work with my Civics body and electronics. The main reason for this is that UKDM cars are RHD. So, i needed to de-pin all compatible wires from EG harness. The wire colors from ABS computer to the under dash fusebox are: BRN, BLK/YEL, GRN/RED, GRN/WHT, BLU/RED:
Then i needed to start thinking about other ABS-parts location so i could do a right length harness. I left open the thought about K-Series, and if this project ever goes to K-Series i think that its going to be a tight fit with ABS-parts. So, I will relocate the battery to the trunk to get some space for ABS-parts:
ABS fusebox test fit with double sided tape:
EG ABS-harness without major de-pinning:
I also got a OEM-front foglight wire from ITR-harness (my car really didnt have this wire!)
Is it true that DC5 ABS hydraulic unit has integrated ABS-computer? Cause i studied some DC2 vs DC5 ABS systems and they look very much like the same. I thought that if DC5 hydraulic unit doesnt have integrated ABS-computer, it might be possible to use it with DC2 ABS setup. DC5 unit is much smaller and lighter than DC2 hydraulics.
Comparison:
I measure every wire that i solder. I�m electronic engineer, but just to make sure everything works
12-05-2013, 06:06 AM
#39
Honda-Tech Member
Thread Starter
As for a ABS-computer mounting, I thought to add some vibration damping to it. I used computer fan/HDD silicone dampers:


Unit installed (I still need to do some weather protection to it):

Wire harness will go inside a wire mesh and they are clipped together with optical cable and 4AWG main power cable:


ABS-rear sensor wires "meshed up":


I didnt want to cut wires if there wasnt need to, so I tucked excess wires behind the ECU. The engine bay wire harness clips to that orange connector and its removable without removing ECU.

Then to the other things:
Front fogs to the CF ones (screws will be swapped to black ones):


Trunk light swapped to the version with a switch ( ):
):

Heaterbox ripped insulation foams swapped to new ones (model "P"):

Cleaned:

New:


There is still lots of wiring work ahead...

Then we go back to the PFHM:
Adding heat wire to Mirror switch connector. Color BLU, PIN8:

I removed OEM-relay connector from the old wiring harnesses and then i just swapped a right colored wires with pin endings to connector housing:

Wrong BLU/BLK swapped to BLU. The right wire with gold plated connector was taken from old heater harness:


Then i tried to find a OEM-install location to Mirror Heat Relay, but then i thought to install it between the Power Folding relay and sunroof relays. I bought OEM Mitsuba RC-2201 relay. I had aftermarket OEM Japan style relays, but the clicking sound from them was annoying when compared to OEM-relay, so thats why i bought OEM.

(After taking this picture, i realized that under dash fusebox has a perfect spot for mounting this relay, so i swapped it to there.)
I didnt wire up PFHM harness like it should have been wired in installation manuals. I wanted a cleaner install, so i routed it in a side of cars main harness, between the insulation and a firewall. Thanks to Deschlongs help (again!) i managed to route the wires to OEM door connectors (with correct pins ofc), so all the wires are going to the doors are going through the OEM door connectors

Tablet is a must have in these kind of works. Expecially if its dark:

The relay that i received with the mirrors is from Prelude, and thats why its has its own channel to the right and left mirrors. I didnt use both channels, cause it works with singe just fine. I will use the remaining channel to control a retractable front licence plate
This is how i did the Air Refiner filter: I cut out right size of piece. Opened it up a little bit (so it gets little more thin) and then used a cardboard to do the sides to it. Just hotglued the cardboard to the sides. Even that its already a charcoal activated filter, i still want to buy a thin charcoal pre-filter to it, so it looks cleaner and the Toyota filter is not visible


I also bought STP Black Gold Bulk Pack. 4,5 square meters STP:s new sound deadening mat.
Unit installed (I still need to do some weather protection to it):
Wire harness will go inside a wire mesh and they are clipped together with optical cable and 4AWG main power cable:
ABS-rear sensor wires "meshed up":
I didnt want to cut wires if there wasnt need to, so I tucked excess wires behind the ECU. The engine bay wire harness clips to that orange connector and its removable without removing ECU.
Then to the other things:
Front fogs to the CF ones (screws will be swapped to black ones):
Trunk light swapped to the version with a switch (
):Heaterbox ripped insulation foams swapped to new ones (model "P"):
Cleaned:
New:
There is still lots of wiring work ahead...
Then we go back to the PFHM:
Adding heat wire to Mirror switch connector. Color BLU, PIN8:
I removed OEM-relay connector from the old wiring harnesses and then i just swapped a right colored wires with pin endings to connector housing:
Wrong BLU/BLK swapped to BLU. The right wire with gold plated connector was taken from old heater harness:
Then i tried to find a OEM-install location to Mirror Heat Relay, but then i thought to install it between the Power Folding relay and sunroof relays. I bought OEM Mitsuba RC-2201 relay. I had aftermarket OEM Japan style relays, but the clicking sound from them was annoying when compared to OEM-relay, so thats why i bought OEM.
(After taking this picture, i realized that under dash fusebox has a perfect spot for mounting this relay, so i swapped it to there.)
I didnt wire up PFHM harness like it should have been wired in installation manuals. I wanted a cleaner install, so i routed it in a side of cars main harness, between the insulation and a firewall. Thanks to Deschlongs help (again!) i managed to route the wires to OEM door connectors (with correct pins ofc), so all the wires are going to the doors are going through the OEM door connectors
Tablet is a must have in these kind of works. Expecially if its dark:
The relay that i received with the mirrors is from Prelude, and thats why its has its own channel to the right and left mirrors. I didnt use both channels, cause it works with singe just fine. I will use the remaining channel to control a retractable front licence plate
This is how i did the Air Refiner filter: I cut out right size of piece. Opened it up a little bit (so it gets little more thin) and then used a cardboard to do the sides to it. Just hotglued the cardboard to the sides. Even that its already a charcoal activated filter, i still want to buy a thin charcoal pre-filter to it, so it looks cleaner and the Toyota filter is not visible
I also bought STP Black Gold Bulk Pack. 4,5 square meters STP:s new sound deadening mat.
12-05-2013, 06:09 AM
#40
Honda-Tech Member
Thread Starter
Then i did some prototyping of copying those Gathers tweeter housings:


I also bought a USDM door lock control module (94-95 model) to ease up the alarms door lock circuit. If i would have used my EDM/JDM door lock control unit, i would have needed additional relays to control my original door lock control unit. The USDM control unit accepts pulse signals from alarm and EDM/JDM door lock control unit accepts only constant signal. If the negative control signal is lost, the door lock will lock/unlock itself.
Differences:
EDM/JDM:


USDM:


I also bought a USDM door lock control module (94-95 model) to ease up the alarms door lock circuit. If i would have used my EDM/JDM door lock control unit, i would have needed additional relays to control my original door lock control unit. The USDM control unit accepts pulse signals from alarm and EDM/JDM door lock control unit accepts only constant signal. If the negative control signal is lost, the door lock will lock/unlock itself.
Differences:
EDM/JDM:
USDM:
12-05-2013, 11:38 AM
#42
Honda-Tech Member
Join Date: Dec 2005
Location: NE Washington, USA
Posts: 312
Likes: 0
Received 0 Likes
on
0 Posts
^Agreed. Love the attention to detail, esp. on the wiring.
I do have so say though.... That air refiner kind of looks like a ceiling vent/fan in a RV bathroom, lol.
I do have so say though.... That air refiner kind of looks like a ceiling vent/fan in a RV bathroom, lol.
") 12-09-2013, 01:38 AM
12-09-2013, 01:38 AM
#44
Honda-Tech Member
Thread Starter
Little update: Added automatic climate controls outside temp sensor wires (BRN, PNK) to the cars harness:

This is how the glove box side AC harness connector looks like:

Adding BRN:

Adding PNK:

Those are the OEM-wire terminal locations for outside temp sensor.
Then I did the passengers side wire tuck. Relocated all wire exept engine harness under the fender:


Then i started to finish up the Heated Mirror portion of the option harness. According to deschlongs schematics, heated mirror option uses one IGN2 slot from the fusebox, but the heated mirrors harness has a split, so the same slot can be used to something else. I started to build the OEM-looking split:

Blue tape, just like in OEM-harness i think? (Maybe deschlong can confirm?)


Then i cleaned my fusebox and installed OEM-front foglight and heated mirror relays. I swapped my Mitsuba RC-2201 relays to Densos, cause Densos are smaller.

Fuseboxes have these slots in both sides. I think that these are meant for the relays, so I installed front foglight relay to the right side and heated mirror relay to the left side:


Now i just need some Honda OEM-inline fuse holders to my options, i dont want to use generic ones, cause they cant be clipped to the fusebox to achieve a clean install. Can someone point me to the right direction where i could get those inline fuse holders with clip capability? I dont want my under dash look like this (pic when i bought this car
 12-09-2013, 08:10 PM
#45
I roughed this out a while ago but polished it up for your benefit. I should add this to my DIY I guess. This is the harness I received with my switch when I bought it back in 2008.

Also, here is how the harness is run through the car according to the original accessory installation instructions:

Finally, in case you have any troubles (I doubt you will), here is the wiring diagram for the JDM AUTO Climate Control from the Service Manual. Note that the diagram incorrectly labelled some wires as BLK when they should be BRN and I have fixed this. The JDM ETM has them labelled correctly.
Also, here is how the harness is run through the car according to the original accessory installation instructions:
Finally, in case you have any troubles (I doubt you will), here is the wiring diagram for the JDM AUTO Climate Control from the Service Manual. Note that the diagram incorrectly labelled some wires as BLK when they should be BRN and I have fixed this. The JDM ETM has them labelled correctly.
12-18-2013, 06:58 AM
#47
Honda-Tech Member
Thread Starter
Thanks!
Update. I ordered some parts:
Cluster with door-open indicator. Bought it from ebay cause it was cheap (auto, bad condition etc).


Power Folding Heated Mirror switch (The seller hasnt even shipped my full set, so i bought other switch from different seller. Just in case):

There is some fading in a power folding button, but i will make a perfect switch using my other power folding switch.
Then i ordered some parts for my custom ICU for alarm. Omron relays, diodes, pcb accessories etc etc. I will build it inside an old power door lock unit to achieve OEM-looking installation. I think i will install it here:

Then i bought some sensors to my alarm:
DEI 506T glass break sensor:

DEI 507M tilt sensor:

DEI 530T to control my sunroof:

Then I thought how to wire the aux channels:
Alarm channel: Rear defogger output. Devices: Rear defrog and heated mirrors. Required electronics: Omron SPST G6RN-1A 12V 8A relay & 2pcs 1N4004 diode. Function: When you remote start the car the rear defrog and heated mirrors are automatically switched on after the car has run for 10seconds and if its under 12 celsius degrees. The function can also be manually turned on from alarms remote if the car is running. Omron relay converts the negative output from the alarm to the cars +12v control. Diodes separate the heating mirror button and the rear defrog from each others, so when pressing the heated mirror button, the defrog wont turn on. Cars own ICU takes care the timing mode of rear defrog, so you dont forger it on. Because there is no space for rear defrog button, the function relays fully on alarms automation and manual use from alarms remote.
Alarm channel: Trunk release. Devices: Trunk release actuator. Required electronics: Omron G2R-1A 12DC 10A relay. Function: 2 second press from remotes trunk release button opens up the trunk if alarm is not armed.
Alarm channel: AUX1 (&Ground When Armed). Devices: Side window automation. Required electronics: DEI530T & 1pcs 1N4004 diode. Function: 3-4 second press from remotes AUX1 button opens up the side windows. Shorter presses open the windows about 3cm at the time. When you arm the alarm, windows closes. If you want to leave them open, just press AUX1 button one time before arming the alarm. The closing command is controlled by the alarms ground when armed output. Drivers side window switches have one touch up and down for both drivers and passenger side windows.
Alarm channel: AUX2 (&Ground When Armed). Devices: Sunroof automation. Required electronics: DEI530T & 1pcs 1N4004 diode. Function: 3-4 second press from remotes AUX2 button opens up the sunroof fully. Shorter presses open up the sunroof about 3cm at the time. Arming the alarm closes up the sunroof. You can leave the sunroof open by pressing the remotes AUX2 button one time before arming the alarm. Sunroof closing command is controlled by the alarms ground when armed and gwa is separeted from the other devices with 1N4004 diode to avoid any DEI530T backfeed. Cars original sunroof switches have now one touch open and close buttons.
Alarm channel: AUX3. Devices: Power Folding side mirrors. Required electronics: Omron SPST Omron SPST G6RN-1A 12V 8A relay & 2pcs 1N4004 diode. Function: Locking up the car, AUX3 channel sends the signal to the OEM Power Folding relay via additional relay, to turn the mirrors. And when opening up the locks, same thing happens. You can also turn the mirrors with AUX3 button and the AUX3 channel is fully programmable to either close, open or both commands. And it can be also disabled for winter
Alarm channel: AUX4. Devices: Leave home/coming home lights. Required electronics: Relay (I havent designed this function yet, so i dont know the type of the relay.) Function: When locking or opening the cars locks, the function turns on the cars low lights for 30seconds. (The time is programmable) The lights can also be controlled with remotes AUX4 buttons and the lights are timed so you dont forget them on.
Update. I ordered some parts:
Cluster with door-open indicator. Bought it from ebay cause it was cheap (auto, bad condition etc).
Power Folding Heated Mirror switch (The seller hasnt even shipped my full set, so i bought other switch from different seller. Just in case):
There is some fading in a power folding button, but i will make a perfect switch using my other power folding switch.
Then i ordered some parts for my custom ICU for alarm. Omron relays, diodes, pcb accessories etc etc. I will build it inside an old power door lock unit to achieve OEM-looking installation. I think i will install it here:
Then i bought some sensors to my alarm:
DEI 506T glass break sensor:
DEI 507M tilt sensor:
DEI 530T to control my sunroof:
Then I thought how to wire the aux channels:
Alarm channel: Rear defogger output. Devices: Rear defrog and heated mirrors. Required electronics: Omron SPST G6RN-1A 12V 8A relay & 2pcs 1N4004 diode. Function: When you remote start the car the rear defrog and heated mirrors are automatically switched on after the car has run for 10seconds and if its under 12 celsius degrees. The function can also be manually turned on from alarms remote if the car is running. Omron relay converts the negative output from the alarm to the cars +12v control. Diodes separate the heating mirror button and the rear defrog from each others, so when pressing the heated mirror button, the defrog wont turn on. Cars own ICU takes care the timing mode of rear defrog, so you dont forger it on. Because there is no space for rear defrog button, the function relays fully on alarms automation and manual use from alarms remote.
Alarm channel: Trunk release. Devices: Trunk release actuator. Required electronics: Omron G2R-1A 12DC 10A relay. Function: 2 second press from remotes trunk release button opens up the trunk if alarm is not armed.
Alarm channel: AUX1 (&Ground When Armed). Devices: Side window automation. Required electronics: DEI530T & 1pcs 1N4004 diode. Function: 3-4 second press from remotes AUX1 button opens up the side windows. Shorter presses open the windows about 3cm at the time. When you arm the alarm, windows closes. If you want to leave them open, just press AUX1 button one time before arming the alarm. The closing command is controlled by the alarms ground when armed output. Drivers side window switches have one touch up and down for both drivers and passenger side windows.
Alarm channel: AUX2 (&Ground When Armed). Devices: Sunroof automation. Required electronics: DEI530T & 1pcs 1N4004 diode. Function: 3-4 second press from remotes AUX2 button opens up the sunroof fully. Shorter presses open up the sunroof about 3cm at the time. Arming the alarm closes up the sunroof. You can leave the sunroof open by pressing the remotes AUX2 button one time before arming the alarm. Sunroof closing command is controlled by the alarms ground when armed and gwa is separeted from the other devices with 1N4004 diode to avoid any DEI530T backfeed. Cars original sunroof switches have now one touch open and close buttons.
Alarm channel: AUX3. Devices: Power Folding side mirrors. Required electronics: Omron SPST Omron SPST G6RN-1A 12V 8A relay & 2pcs 1N4004 diode. Function: Locking up the car, AUX3 channel sends the signal to the OEM Power Folding relay via additional relay, to turn the mirrors. And when opening up the locks, same thing happens. You can also turn the mirrors with AUX3 button and the AUX3 channel is fully programmable to either close, open or both commands. And it can be also disabled for winter
Alarm channel: AUX4. Devices: Leave home/coming home lights. Required electronics: Relay (I havent designed this function yet, so i dont know the type of the relay.) Function: When locking or opening the cars locks, the function turns on the cars low lights for 30seconds. (The time is programmable) The lights can also be controlled with remotes AUX4 buttons and the lights are timed so you dont forget them on.
12-20-2013, 02:30 AM
#49
Honda-Tech Member
Thread Starter
Thanks!
Just received my switch to complete my heated mirrors retrofit, just need to swap some parts to make it looking fresh again:


I also bought blue tinted side mirror replacement glasses, now I just need some heat pads
Just received my switch to complete my heated mirrors retrofit, just need to swap some parts to make it looking fresh again:
I also bought blue tinted side mirror replacement glasses, now I just need some heat pads
12-25-2013, 01:15 PM
#50
Honda-Tech Member

Join Date: Dec 2013
Location: France
Posts: 34
Likes: 0
Received 0 Likes
on
0 Posts
Amazing work here !  Good job
This PFHM switch is just..
..
I want one !
About Heated mirror on ebay in Uk, I have seen for EG mirror with defrosting !
Good job This PFHM switch is just..
..
I want one !
About Heated mirror on ebay in Uk, I have seen for EG mirror with defrosting !