
Controversial Alabama Hatch build :D (Not 56k friendly in the slightest!)
 07-10-2009, 04:13 PM
#1
Honda-Tech Member
Thread Starter
Join Date: Nov 2003
Location: Birmingham, AL
Posts: 294
Likes: 0
Received 0 Likes
on
0 Posts
I just wanted to start off by saying, that if you don’t like this build or disagree with it, feel free to state your opinion. Just try to stay halfway civil about it! 
Another note: Me and my Pops did all the work on this car! I did the whole bay by myself, and it actually kind of shows since it was my first time doing any bodywork! Lol. Dad has done the paint, and helped with everything else.
ALSO, keep in mind that most of the project I was unemployed (finally got another job a couple of weeks ago), so money was tight and I had to work with materials we had at the house already to get stuff done. This is not a SUPER BALLER build or anything, and I am saving as much money as I can/trying to find the best deals/modifying stock stuff to make it work as I can to make the project as inexpensive as possible. So just keep that in mind if you see something that looks kind of ghetto
Anyways, I first acquired this car when I was 17 for $700. It’s a 1992 CX Hatchback. It was slammed on ebay coilovers, had a no name exhaust, and wheels, and the motor had a rod sticking out of the block. Oh, and by pure chance it had some authentic Denji headlights! Other than that, it was actually in great shape! I brought it home, and immediately dropped in a fresh d16z6 that we already had into it, and she was good as new. Couple of weeks later, I bought a carbon fiber hood for $200 and shortly after that sold the car to a kid for $3500! So, made $2600 off that one over a very short amount of time. Gotta love those! Plus I still had my other hatch at the time (93 Si), so I was very happy.
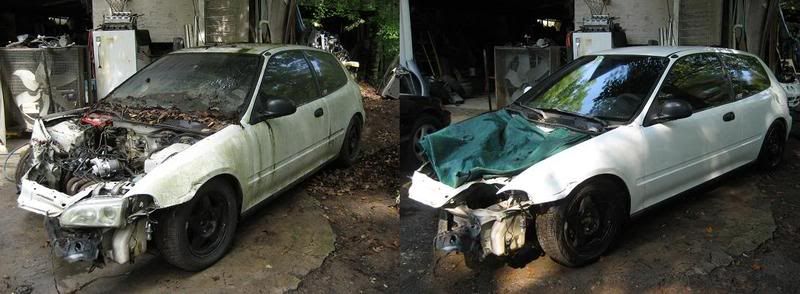
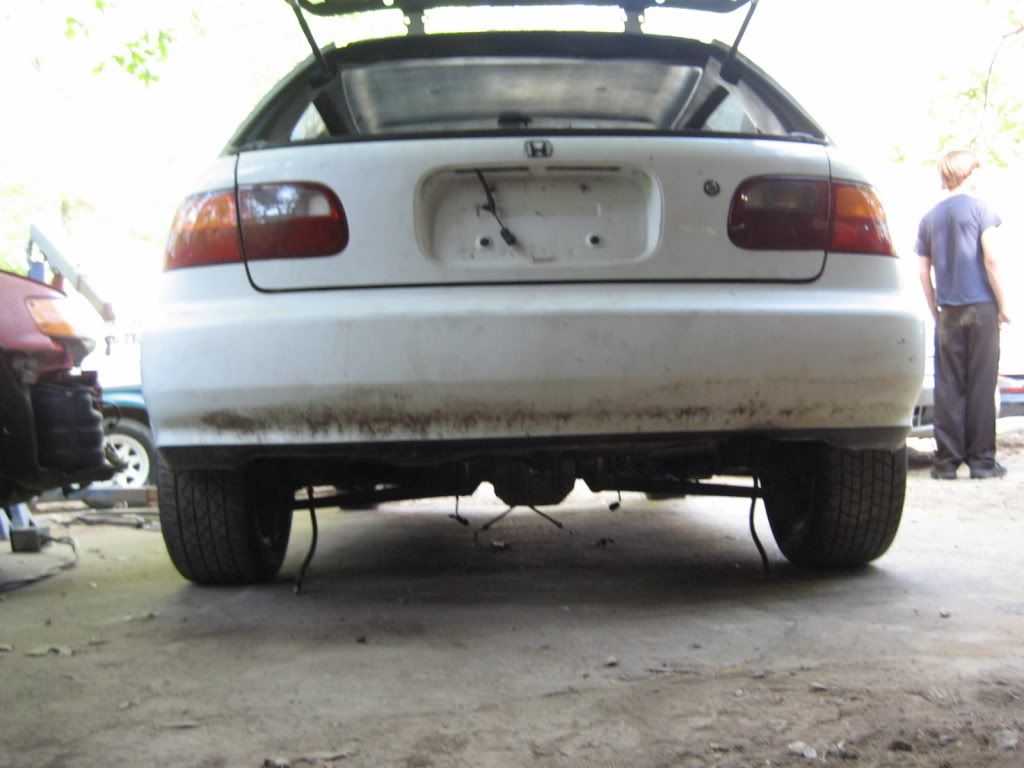
Well, as it turns out, dummy who I sold the car to, slams it into a tree MAYBE a month later! It did hurt me a little bit, cause I did kind of fall in love with the car the short time I had it, but then again the money in my pocket told me I didn’t care that much. And as luck would have it, the kid just gave me the car back! I didn’t buy it back, he just let me have it back! So that was good. At the time I was way too disheartened to do anything with the car, because everytime I looked at it, I cringed! You’ll see why in the pics below.
So, after a couple of years, a few projects, and just sitting, collecting dust, and looking down right pitiful, I decided to revive her. Also decided to go a little different route with her and make her semi one of a kind. I had had the plan in mind for quite some time at this point and everything just kind of fell into place for me to be able to do it. After doing some research, a couple of people had already done what I had in mind, so that kind of bummed me a little bit since I wanted to be the first. But that’s what being broke gets ya! Gotta have the money to get started, and at the time I didn’t! I had (still do) a 1997 Toyota Supra that needed reviving as well, and at the time it took every penny I had to get it done. But now, I have finally started on this project and so far it’s moving along quite good.
So lets get started………….
My plans are to do a 4g63 motor swap as well as the AWD conversion on the car. So far I have got the engine in, the rearend is done, as well as 90% of the wiring. I still need to convert the front suspension to 5-lug, figure out front axles, build the driveshaft, paint the rest of the car, run the exhaust, etc. etc. So a pretty good bit of work still to be done, but got the grunt out of the way. We are also gonna re-do the engine mounts, but not entirely. Basically just gonna modify what we got a little bit, because the engine is sitting to low. The trans actually. Plus, it’s every so slightly crooked and leaning in the bay. But a couple hours of work and that situation will be remedied. Sucks that we already had the bay painted and will have to repaint it after modifying the trans mount, but that’s no big deal since it’s all free to me anyways. Plus, just gonna try to get by with just repainting the passenger side to save paint, and if that don’t work out right, we’ll respray the whole thing.
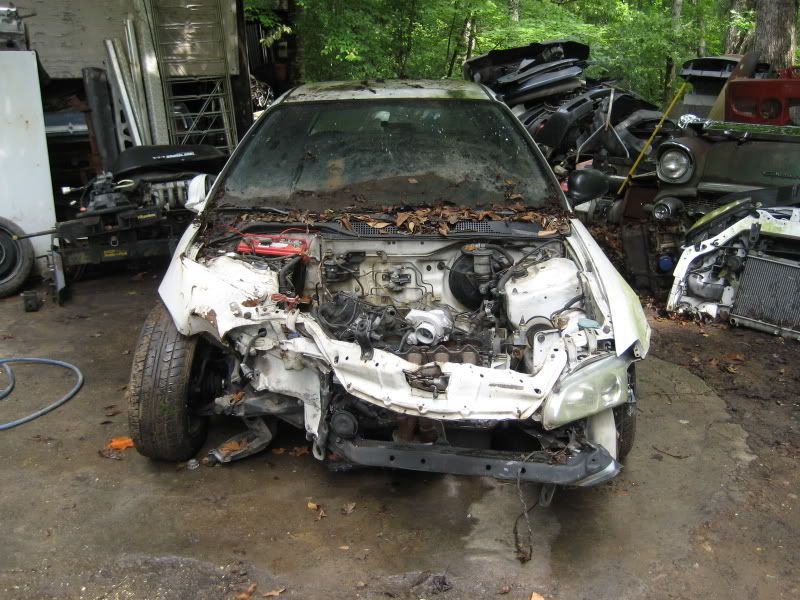
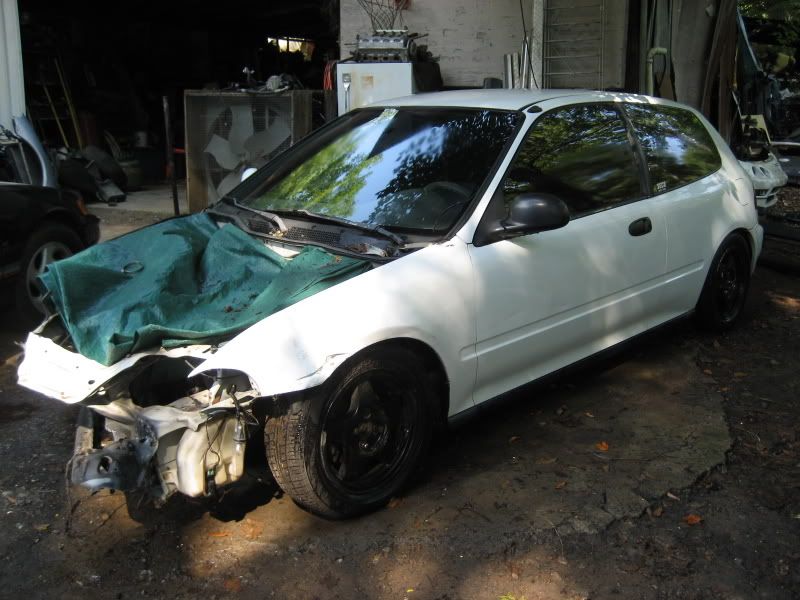
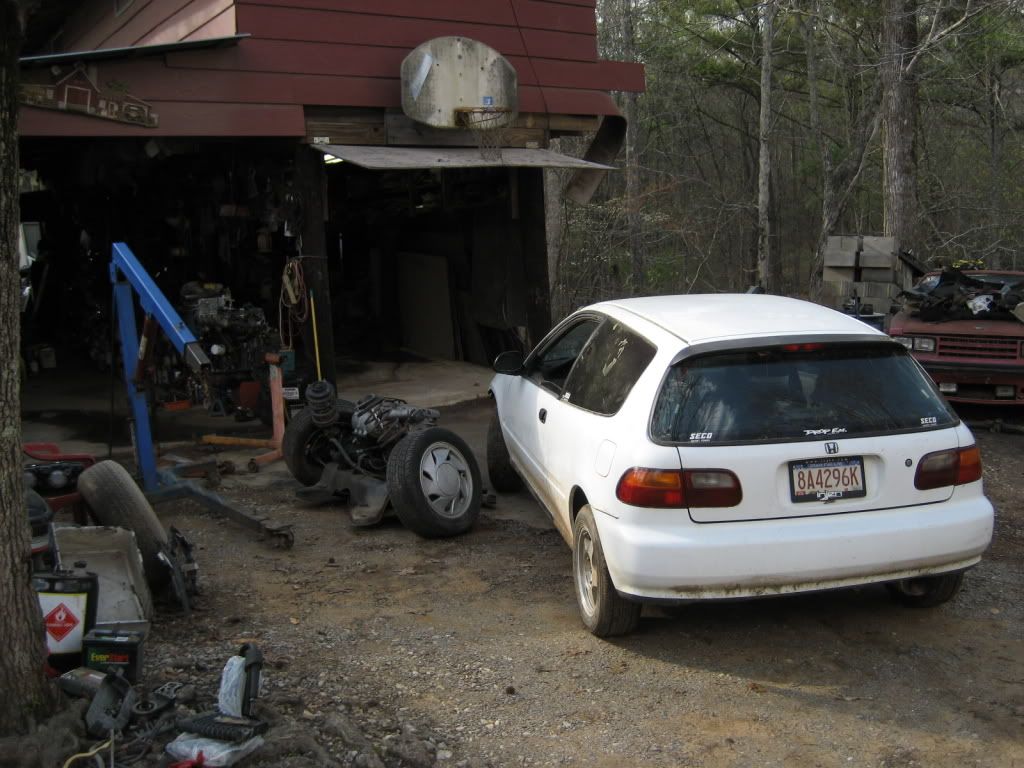
Here we go. Unfortunately I don’t have any pics of the car the first time I had it, but this is what it looked like when I first dove into it again and after the kid wrecked it. So much for those Denji’s that I loved so much

In this pic you can see how “cool” this kid was!
And if you didn’t see it there, then how bout this?
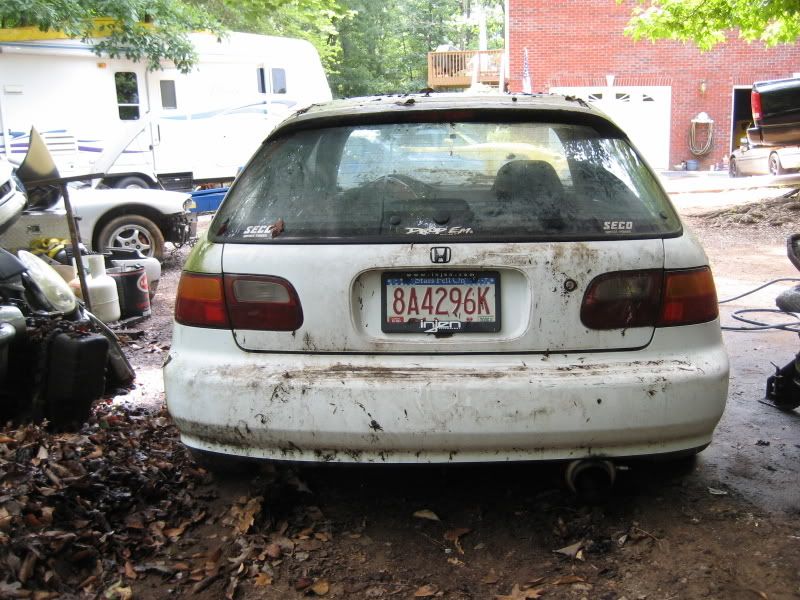
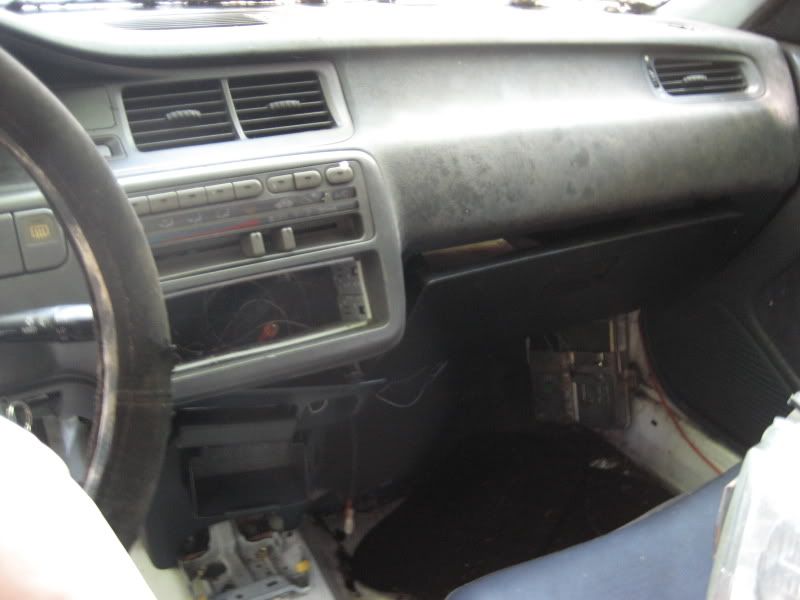
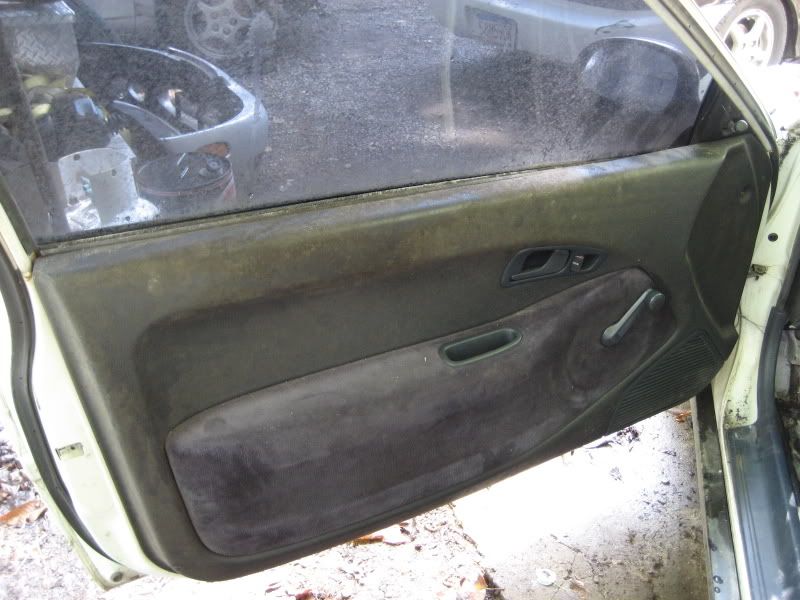
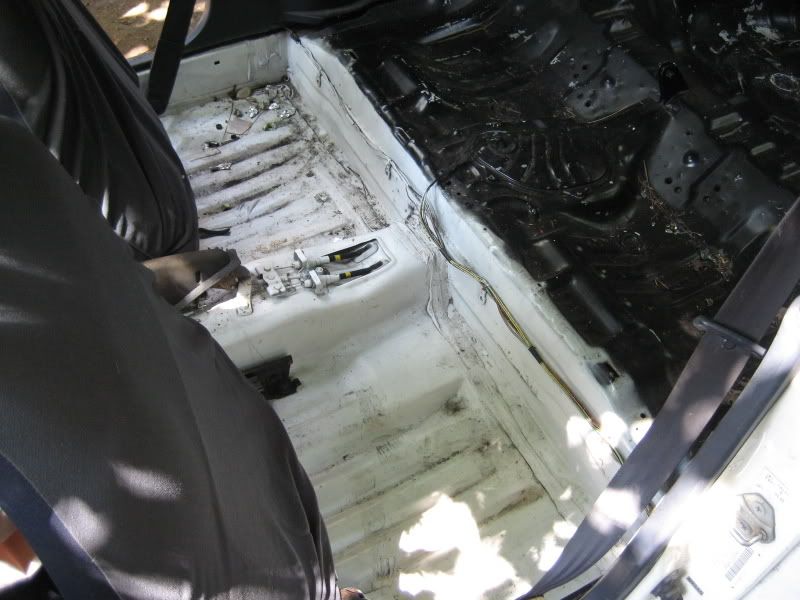
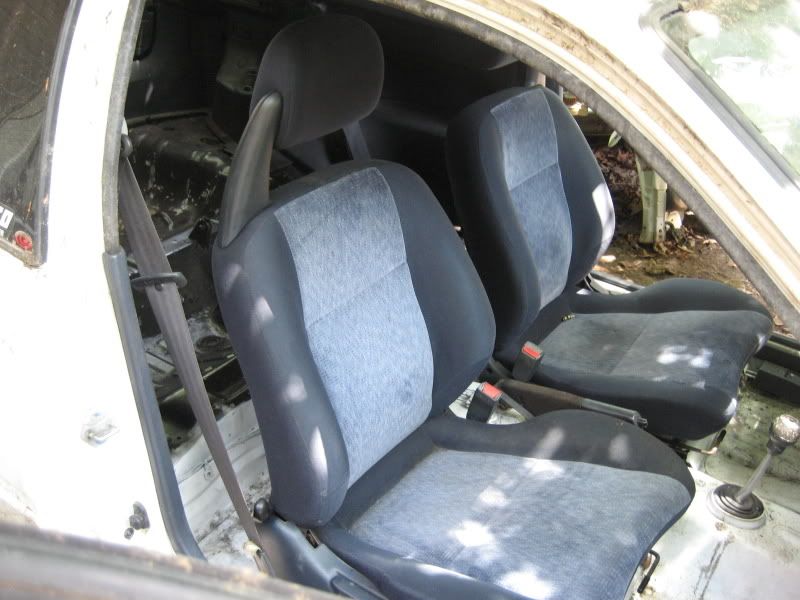
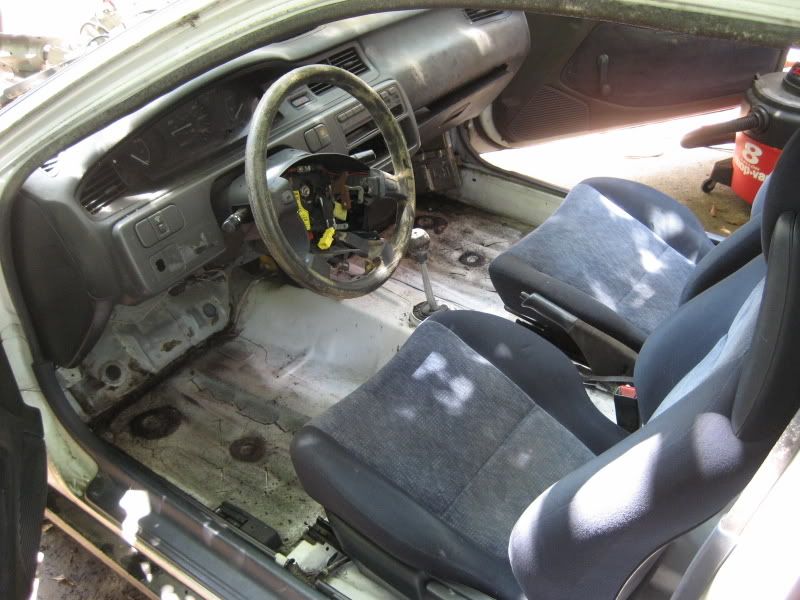
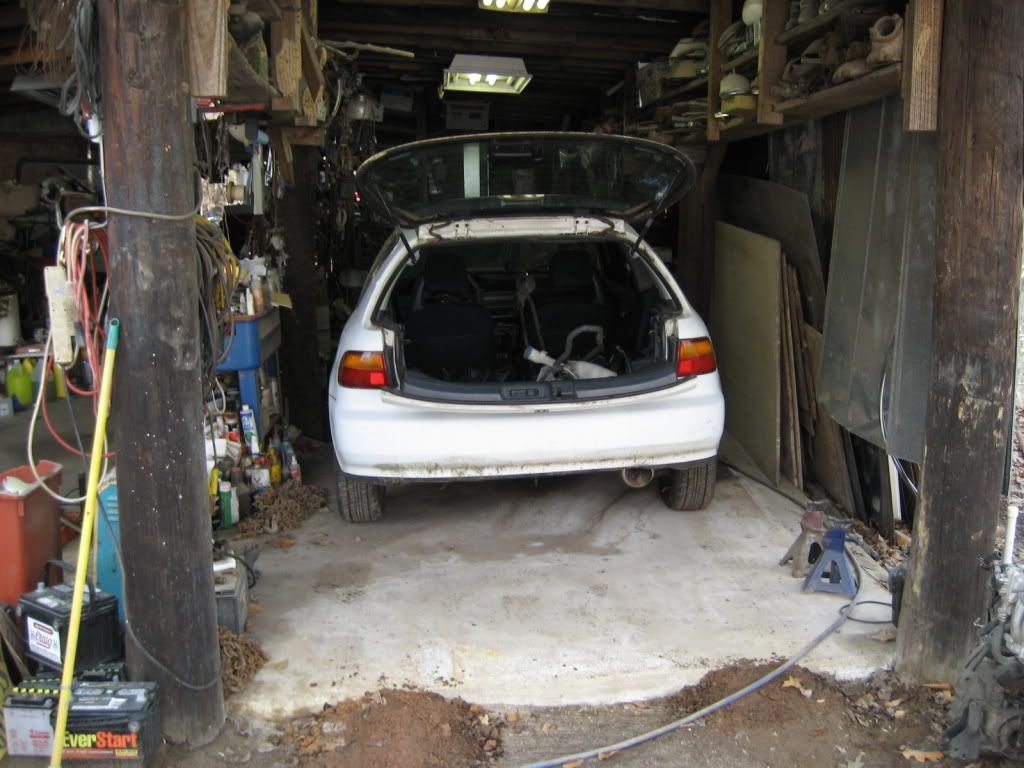
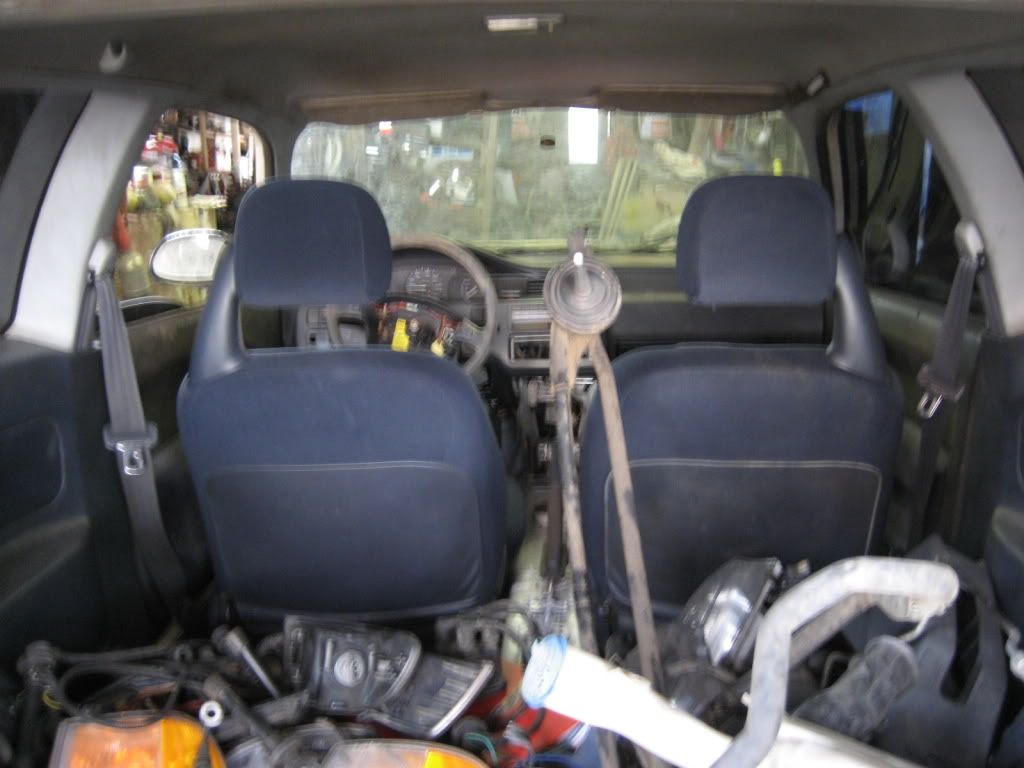
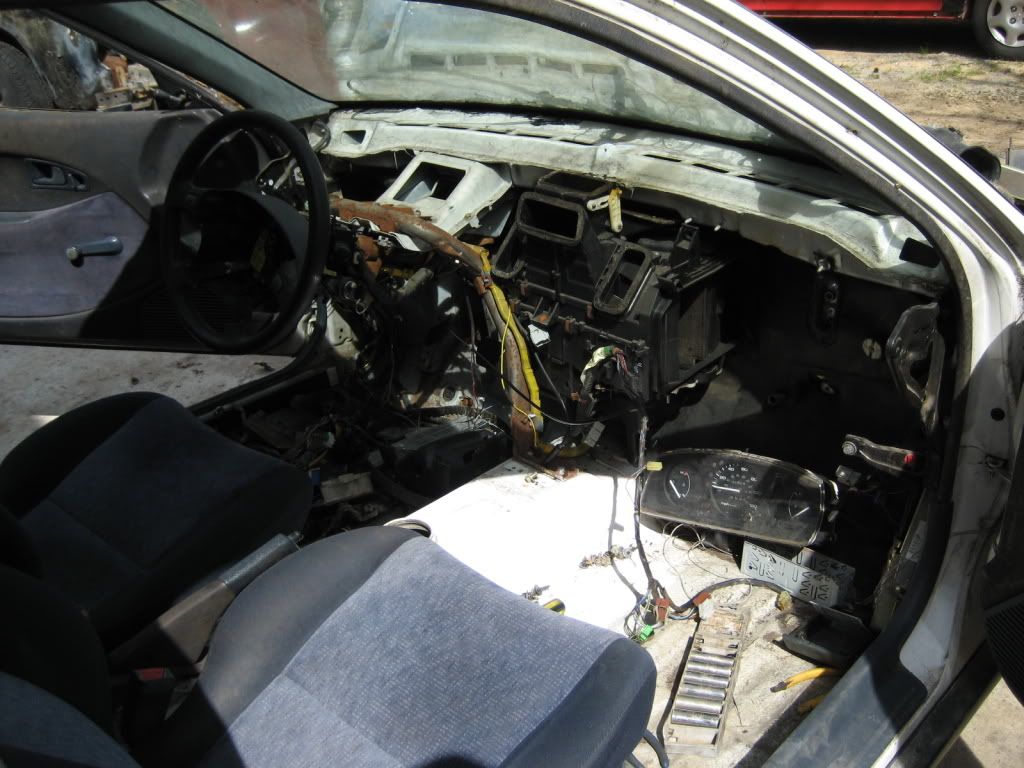
Some interior shots. Gross!
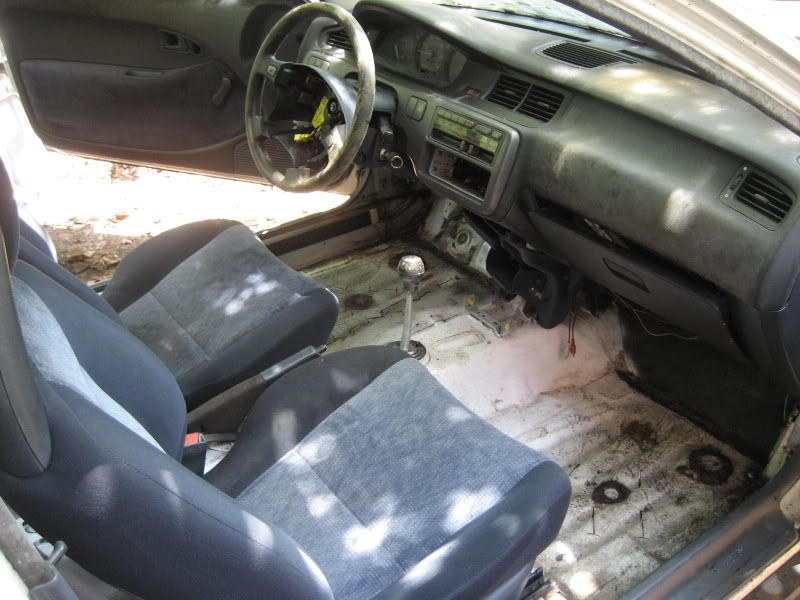
Started doing a little bit of cleaning. Can you believe the kid had put seat covers on the seats? These babies were mint!

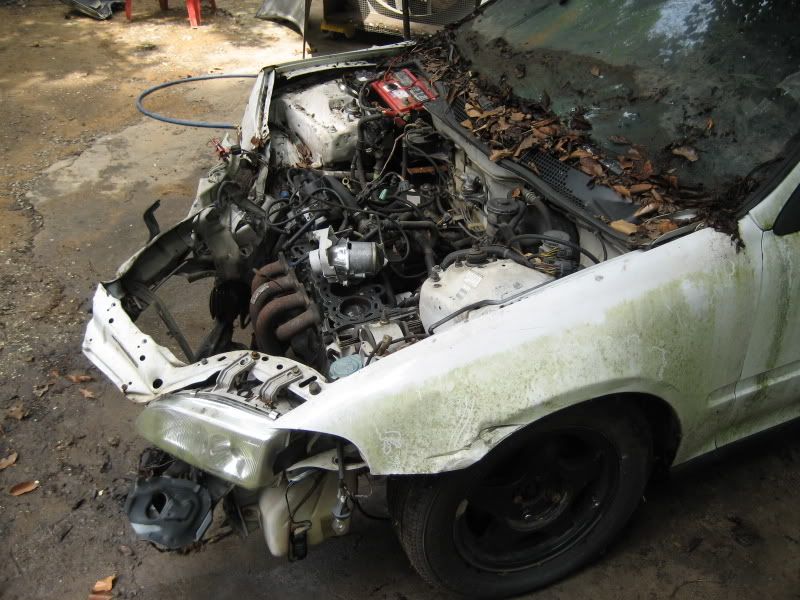
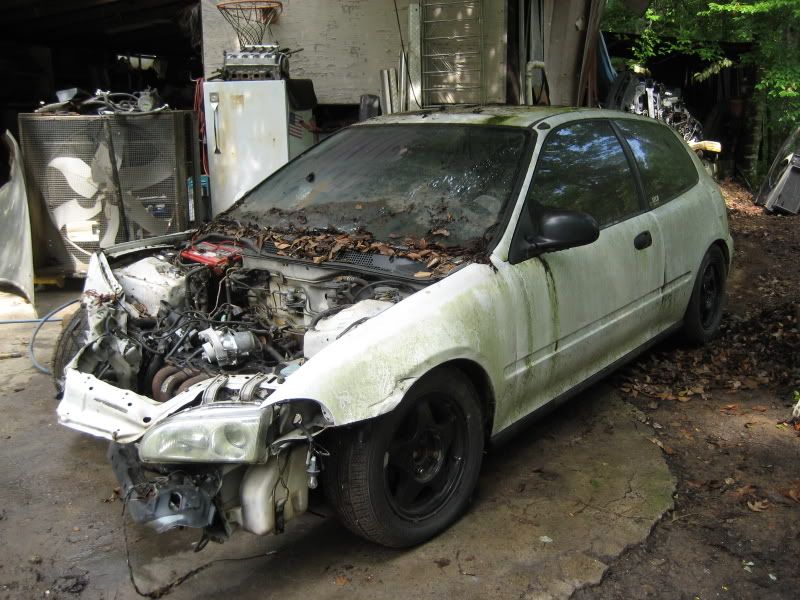
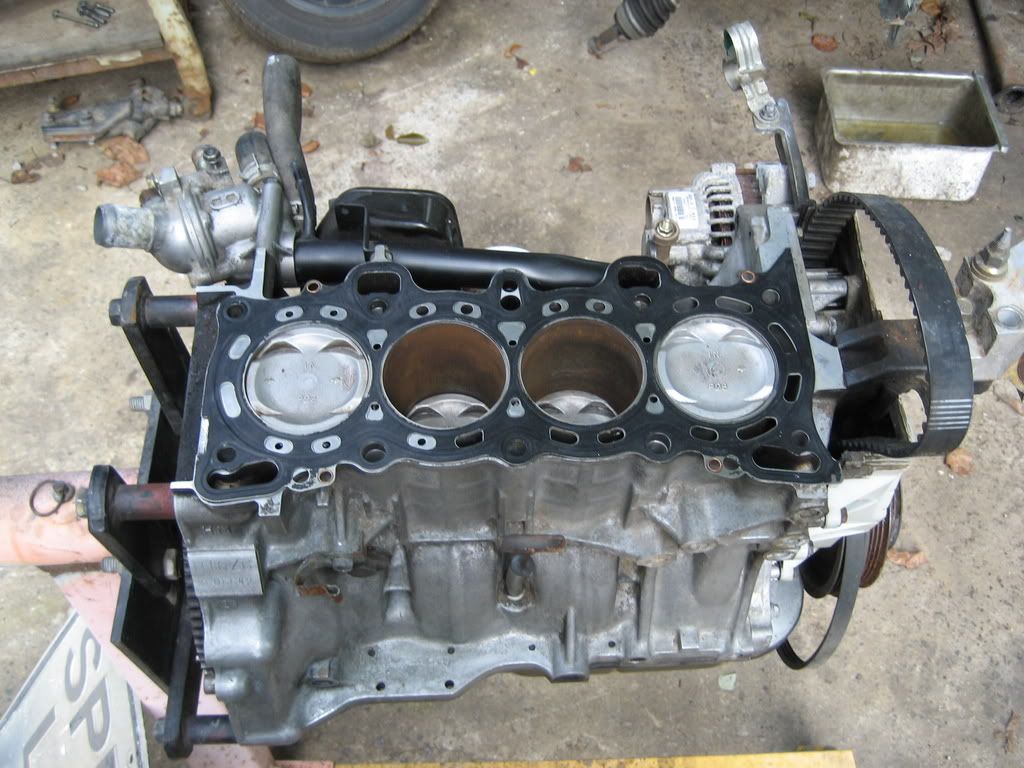
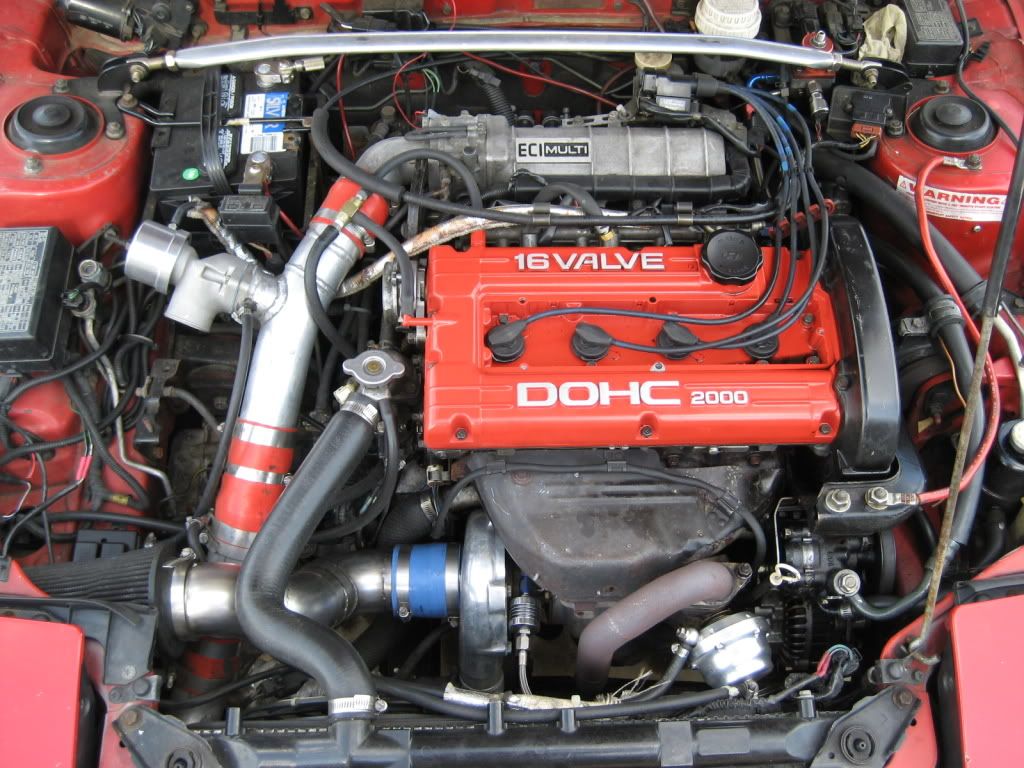
So as you can see, the car actually cleaned up really well. To be the front end still looked like a crushed beer can! Here’s a pic of the motor out of the car after some cleaning. Don’t even know what I bothered since it was never destined to go back in the car.
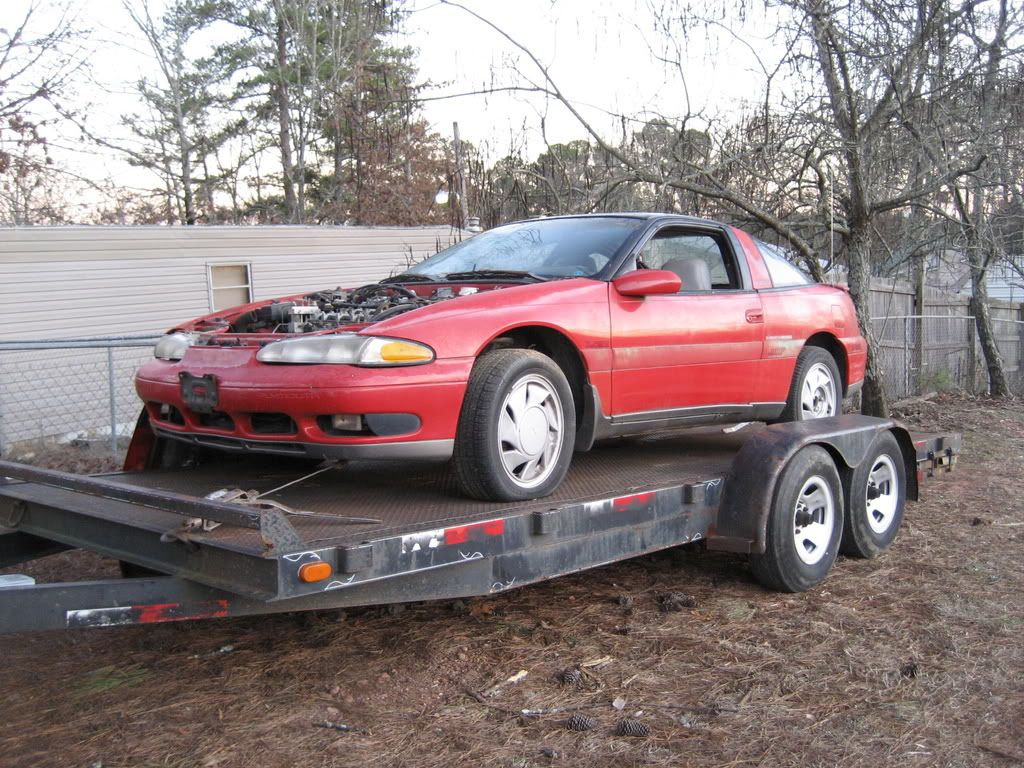
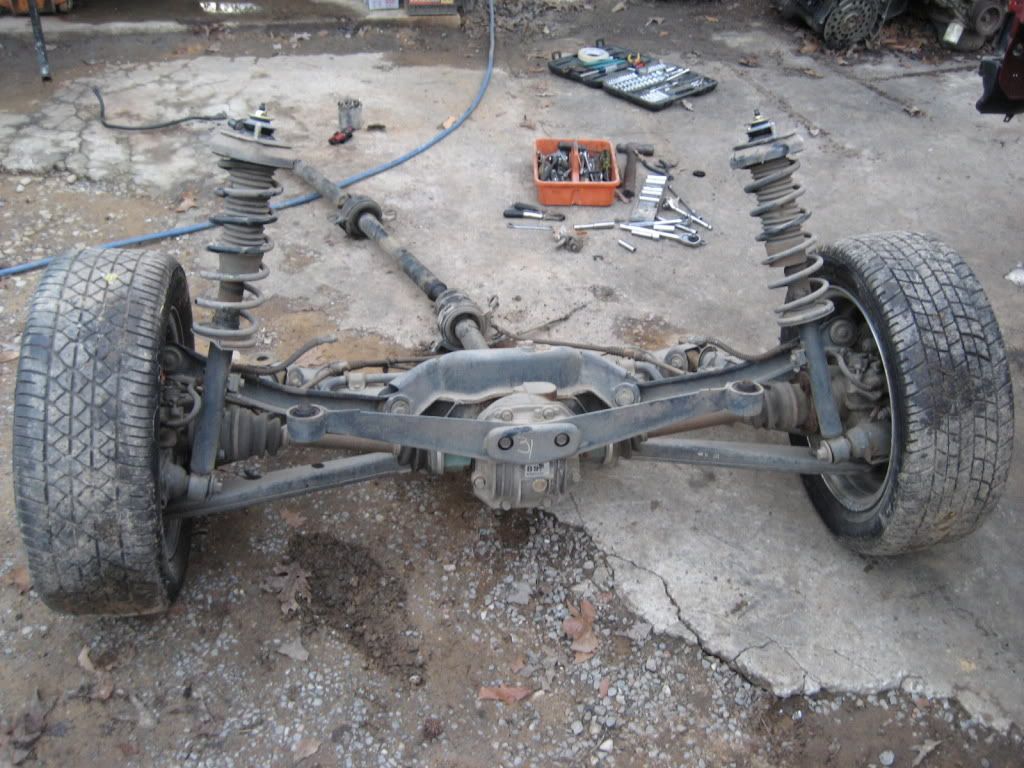
Then, the best part of the project happened! I stumbled upon a 1992 Plymouth Laser RS AWD that I snagged for $450!!!! It was a complete car minus the turbo/manifold, injectors, and ecu. And for those of you who don’t know, this is the exact year model that you want! It has the 6-bolt motor as well as the 4-bolt rearend! Both of which are stronger than their 7-bolt/3-bolt counterparts. It had everything I need to get going: the complete rearend, the complete motor (minus a few tiny tidbits), full trans, shift cables, mounts, wiring harnesses, etc. etc. Did I mention the car only had 103K original miles and that the motor was BRAND NEW 0miles! They had rebuilt it and never got to finish putting it back together once they got it in the car! Talk about a find!

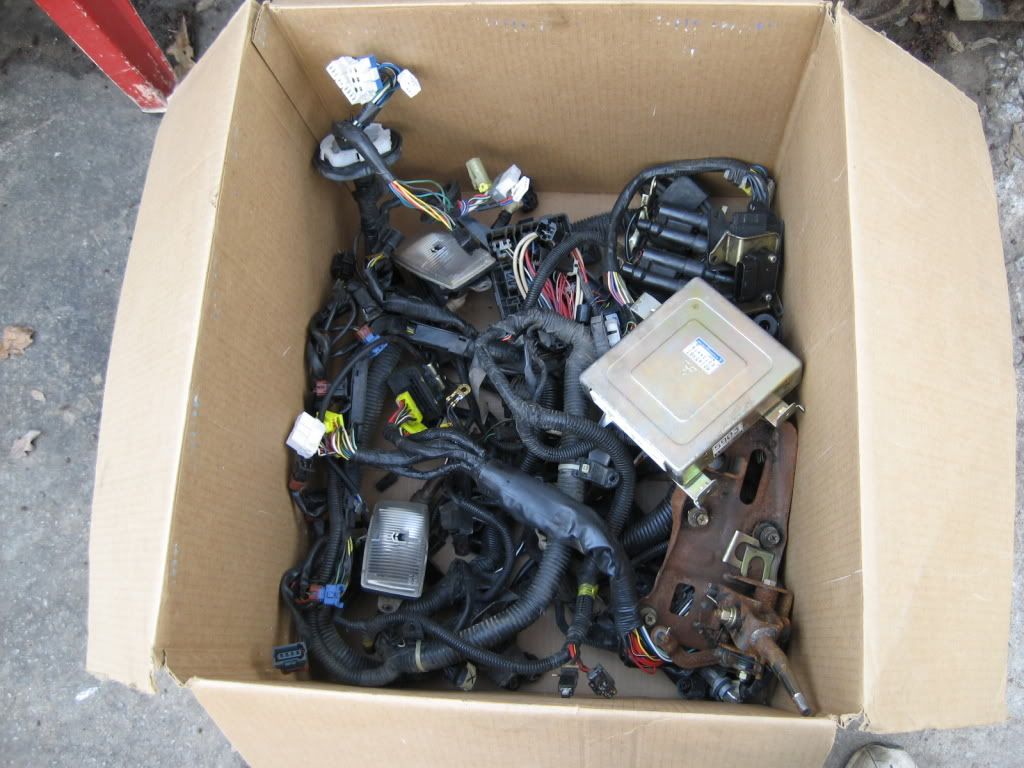
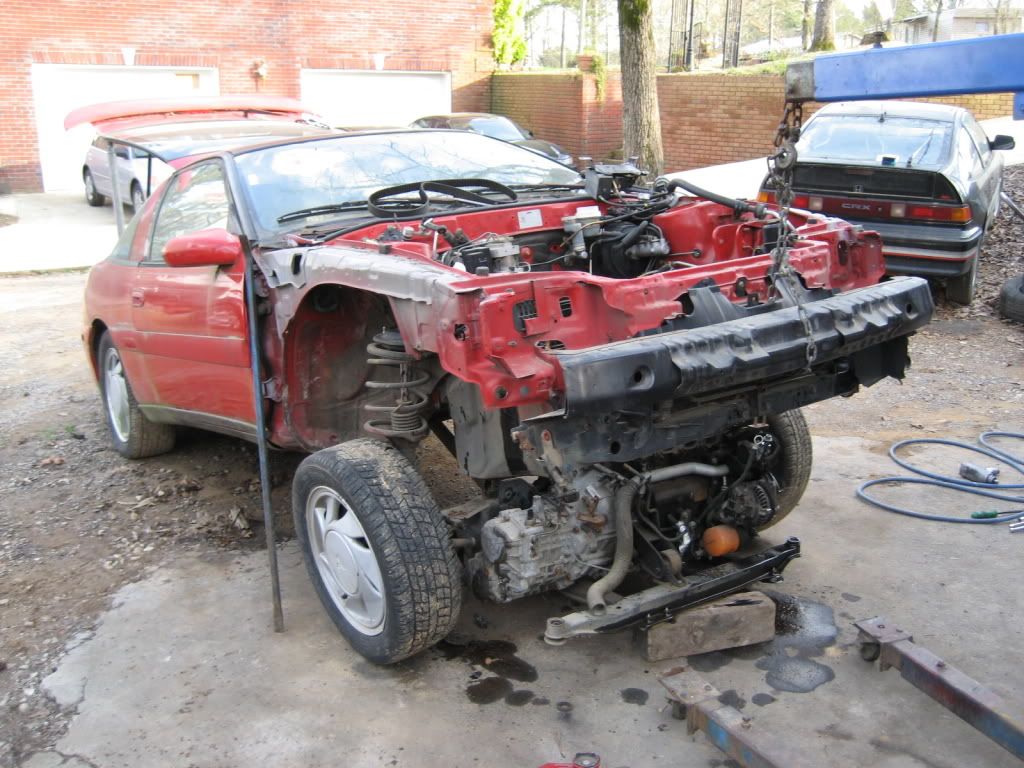
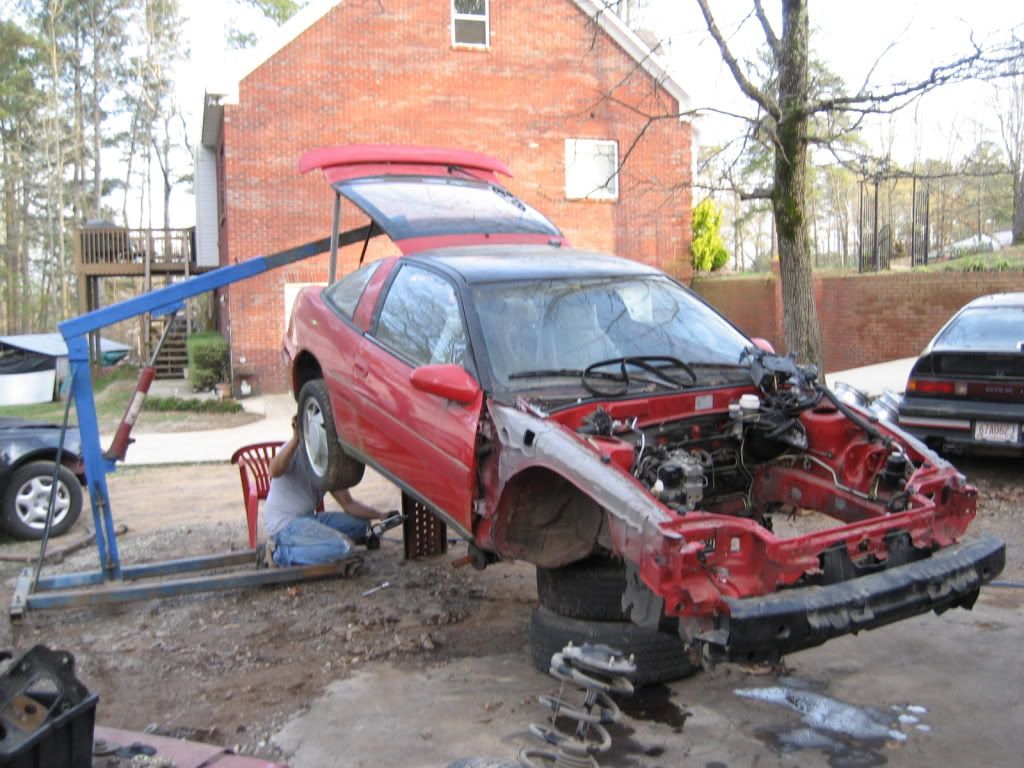
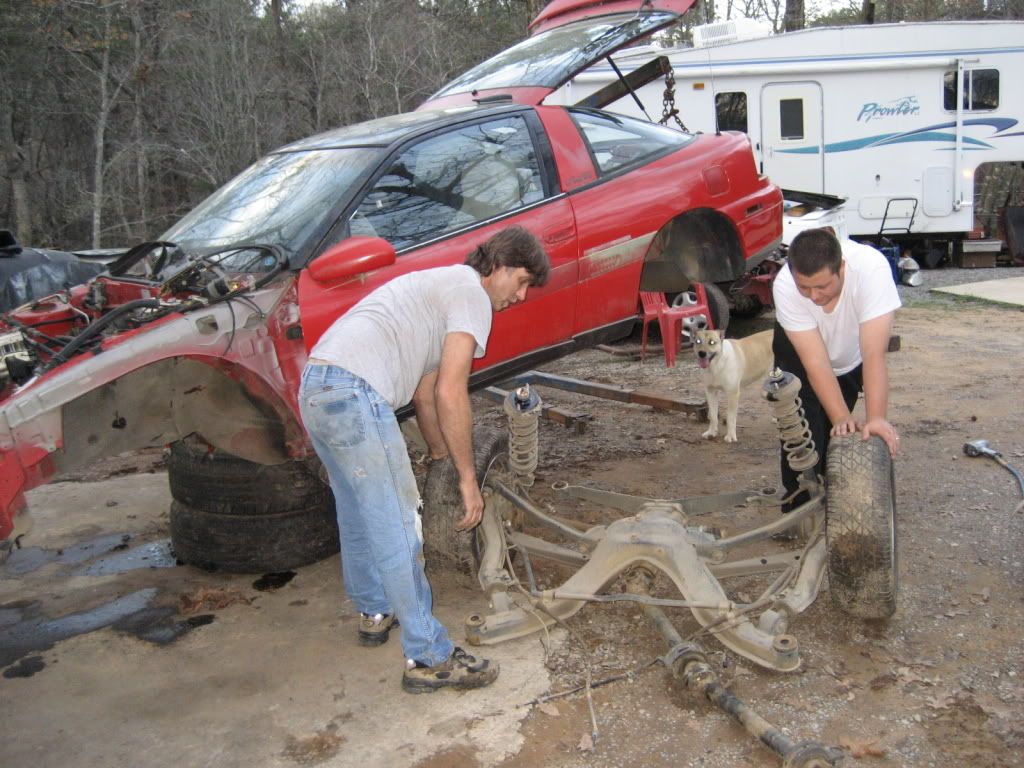
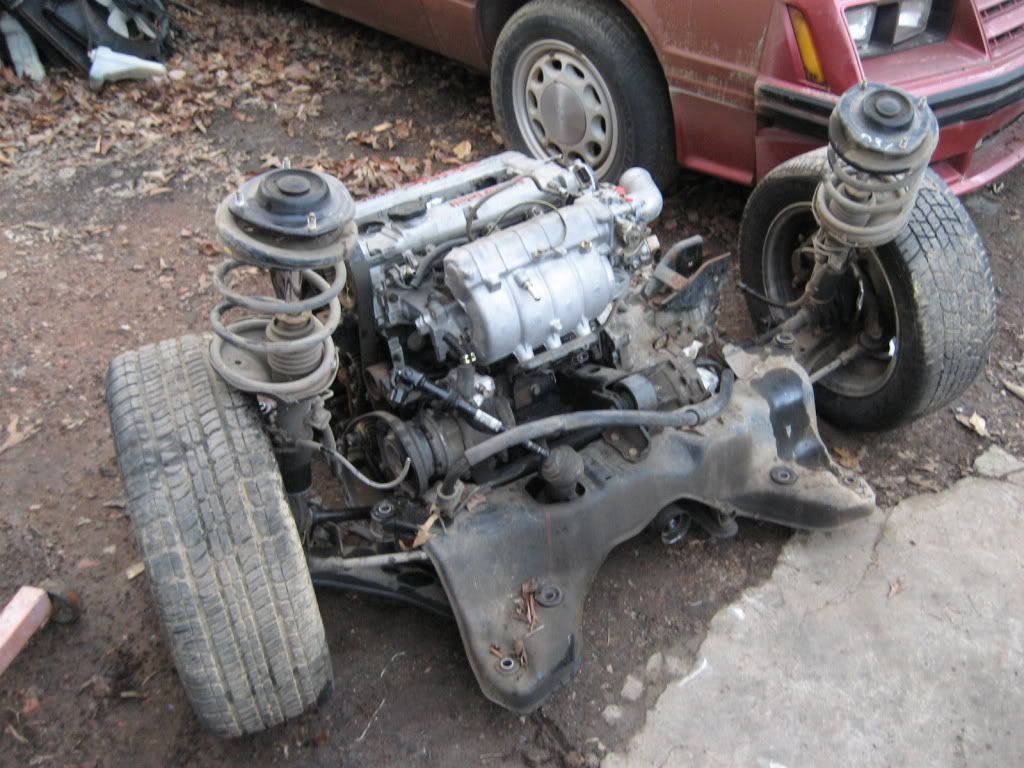
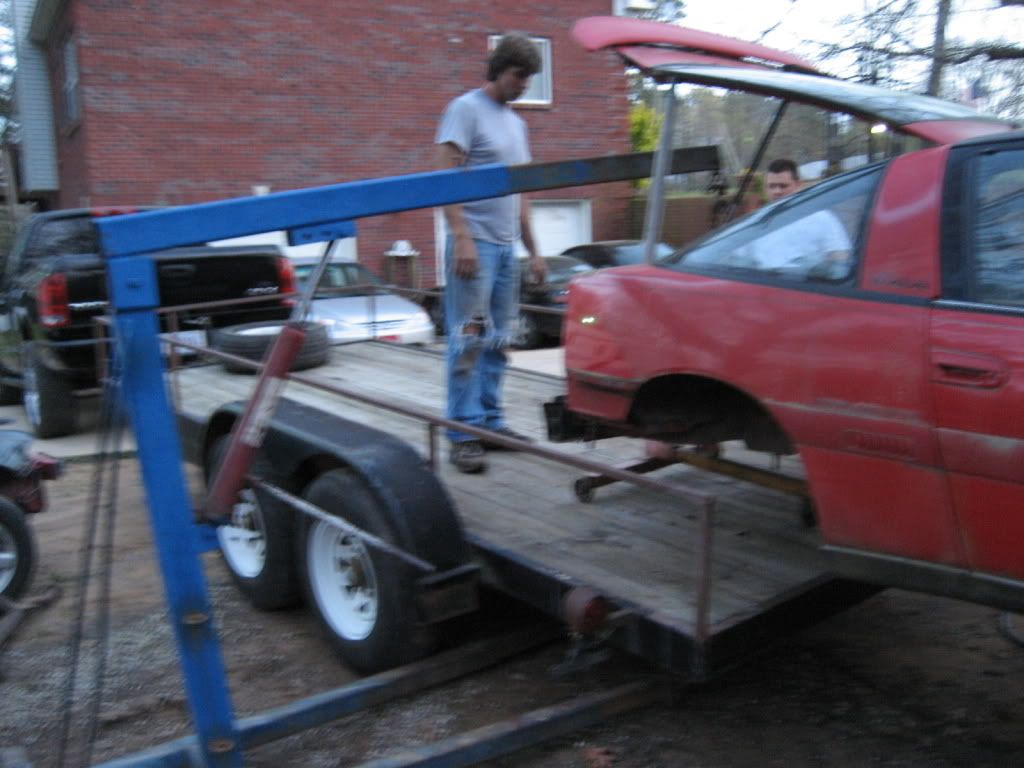
Didn’t waste a second. Dove right in and started removing the chassis harness, the engine harness, the whole front subframe including the motor, as well as the entire rear subframe. How do you like our SUPER GHETTO and HIGHLY DANGEROUS lift? LMAO, I told you we worked with what we already had! Plus, it seemed the only logical way that we were going to load the shell onto the trailer after stripping it of everything. You can see my Dad and a buddy of mine in a couple of the pics.

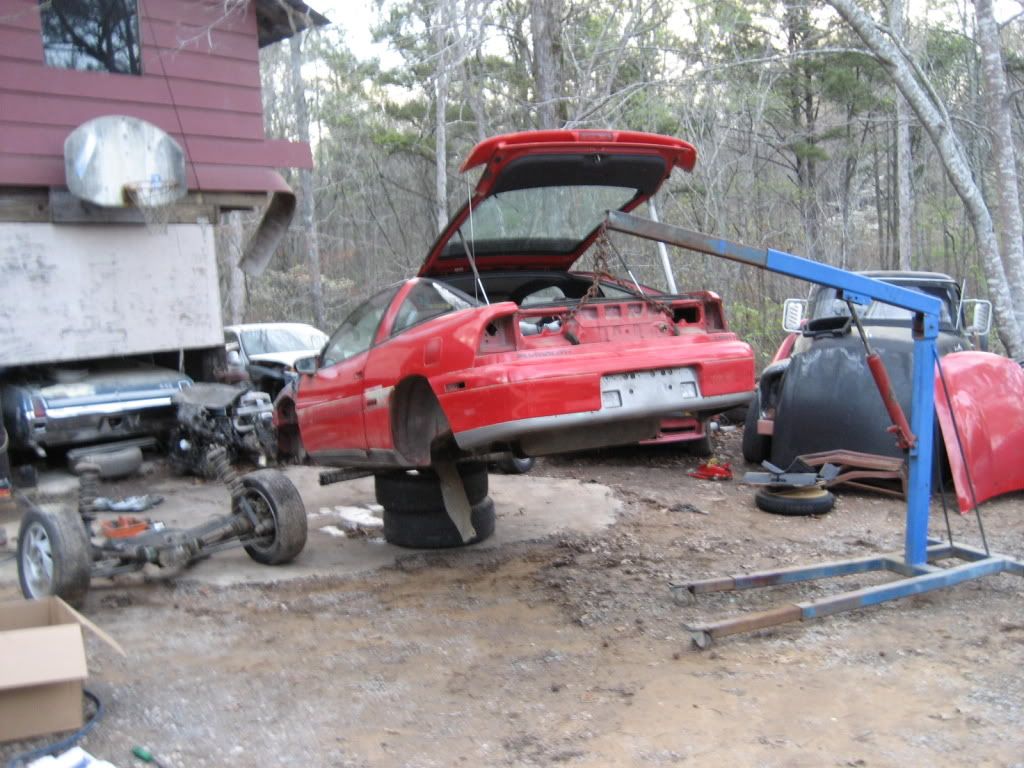
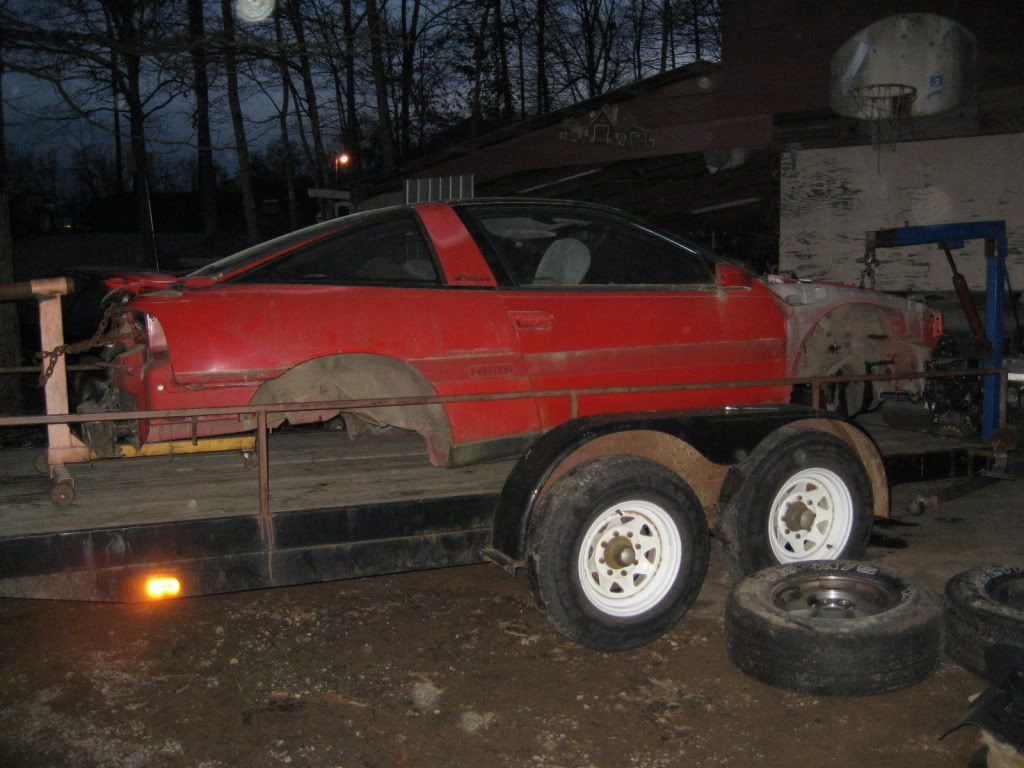
Now that they cycle of the build was over, it was time to get the hatch into a suitable spot to continue the build. It was good to actually have a slab of concrete under me on this one since the car had been sitting in the dirt for a couple years! Lol.
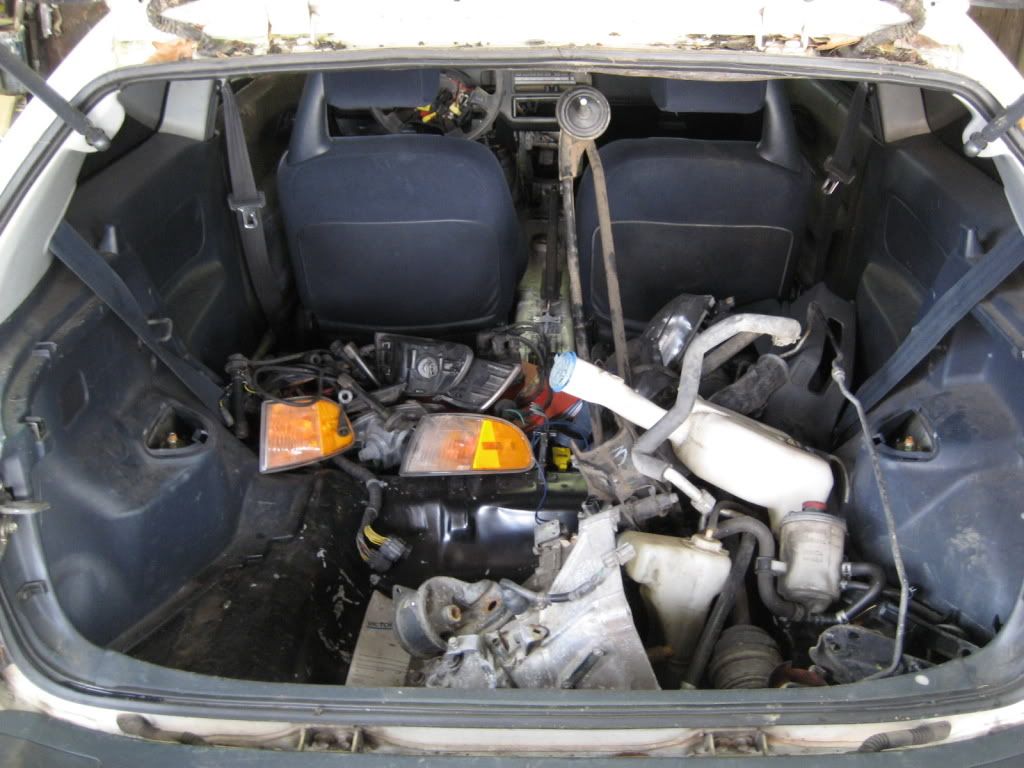
At some point, all of this junk managed to find it’s way back into the car, lol.
And the madness is about to begin.
Just getting a rough idea of how things are gonna fit. Like I said, I am reusing/modifying as much factory stuff as I can to save on cost. Plus, why make things harder than they need to be?
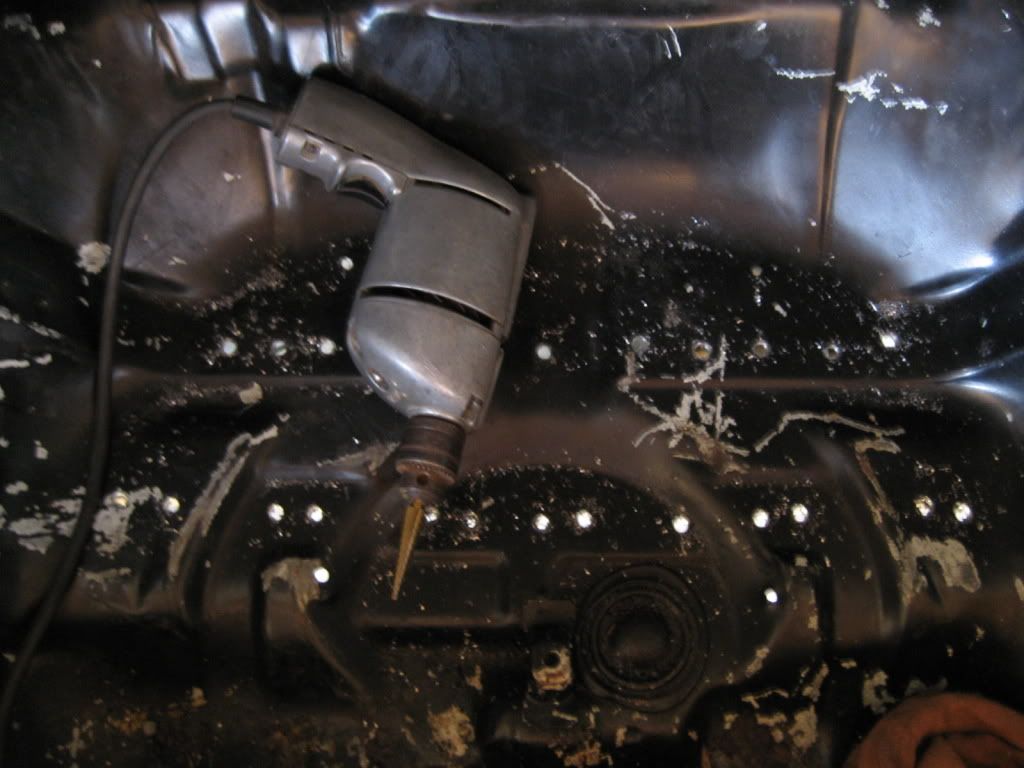
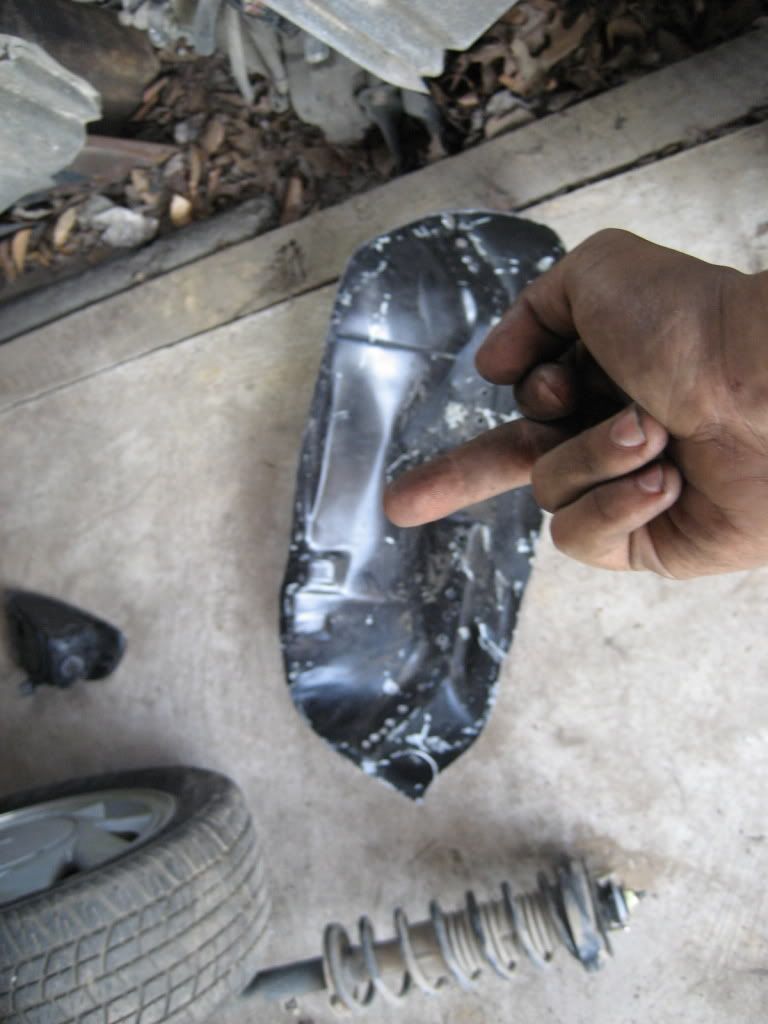
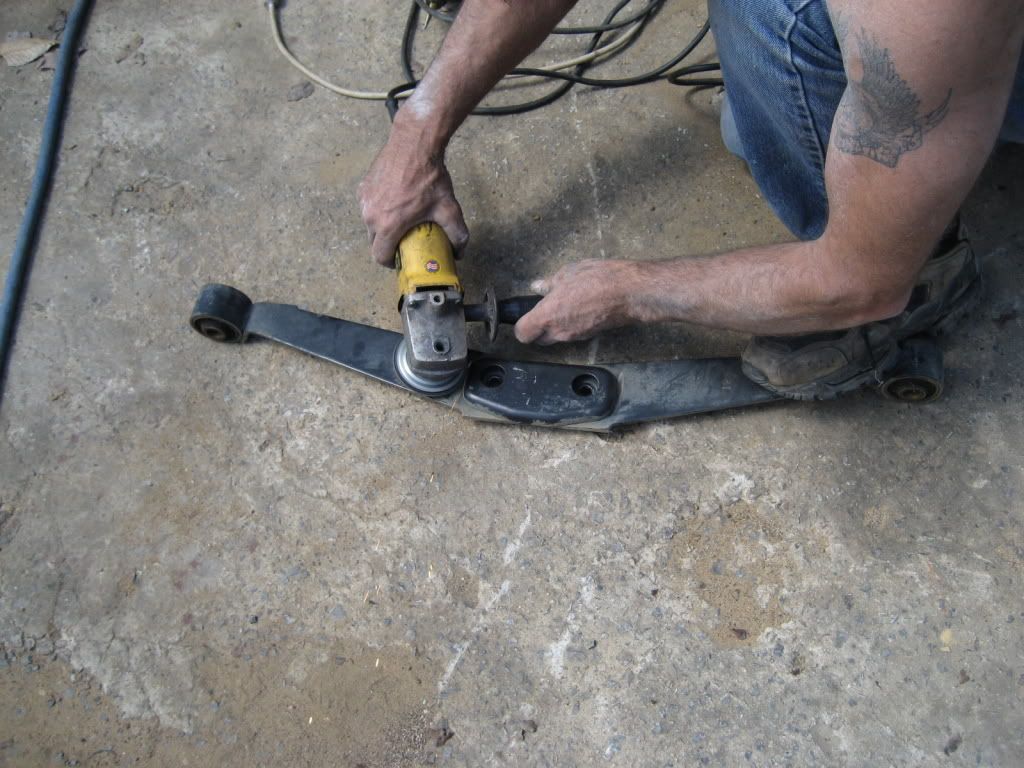
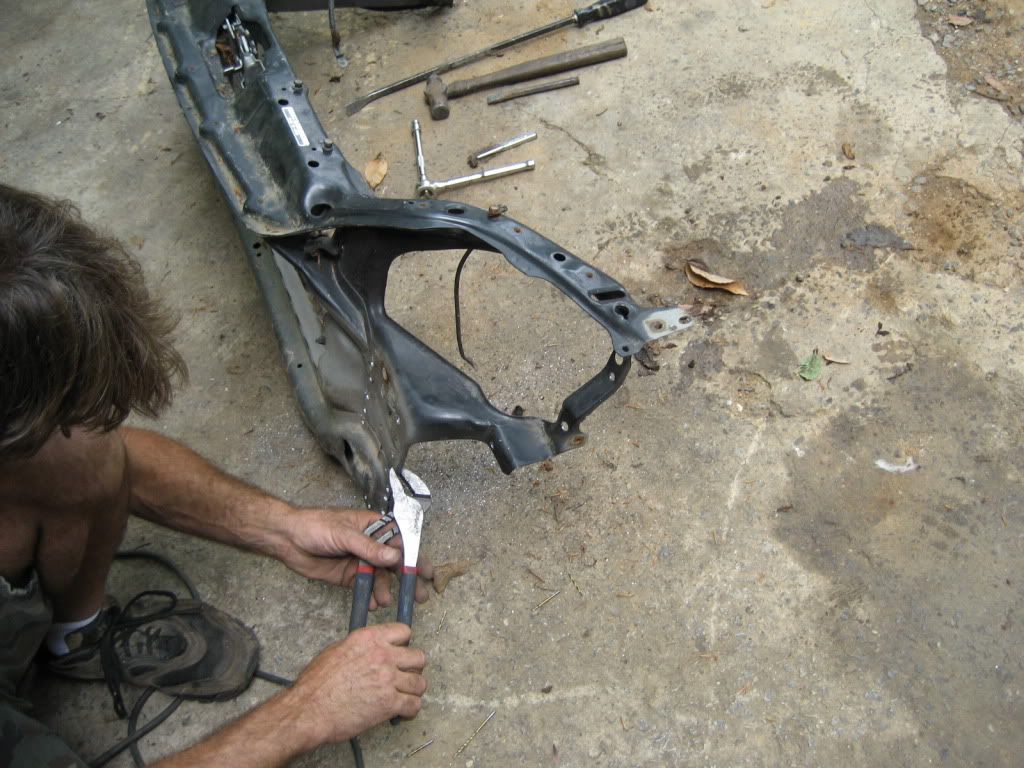
Well as you can see, the rear subframe piece is definitely going to have to go, otherwise the rearend is never going to tuck up properly. So I started the long process of locating all the spot welds and drilling the out. The ones at the very top beside the frame rails were a huge pain in the ****!
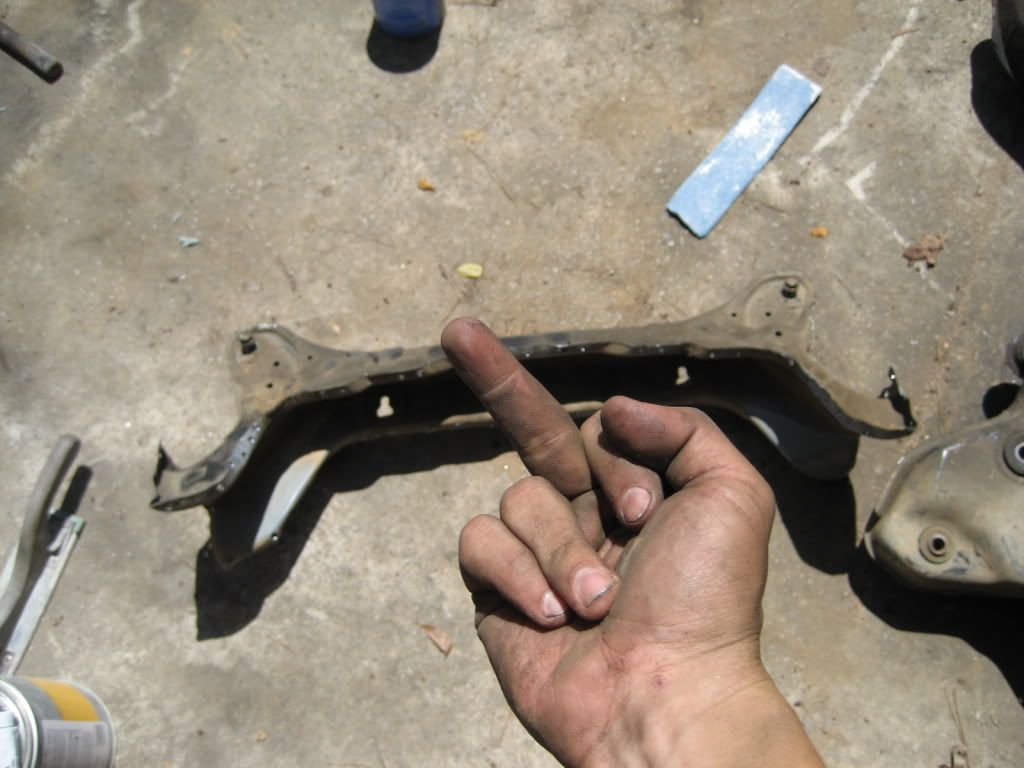
As it turns out, that still wasn’t going to give us enough room, so we cut most of the spare tire well out anyways! Pissed me off cause I had wasted all that time! Lol

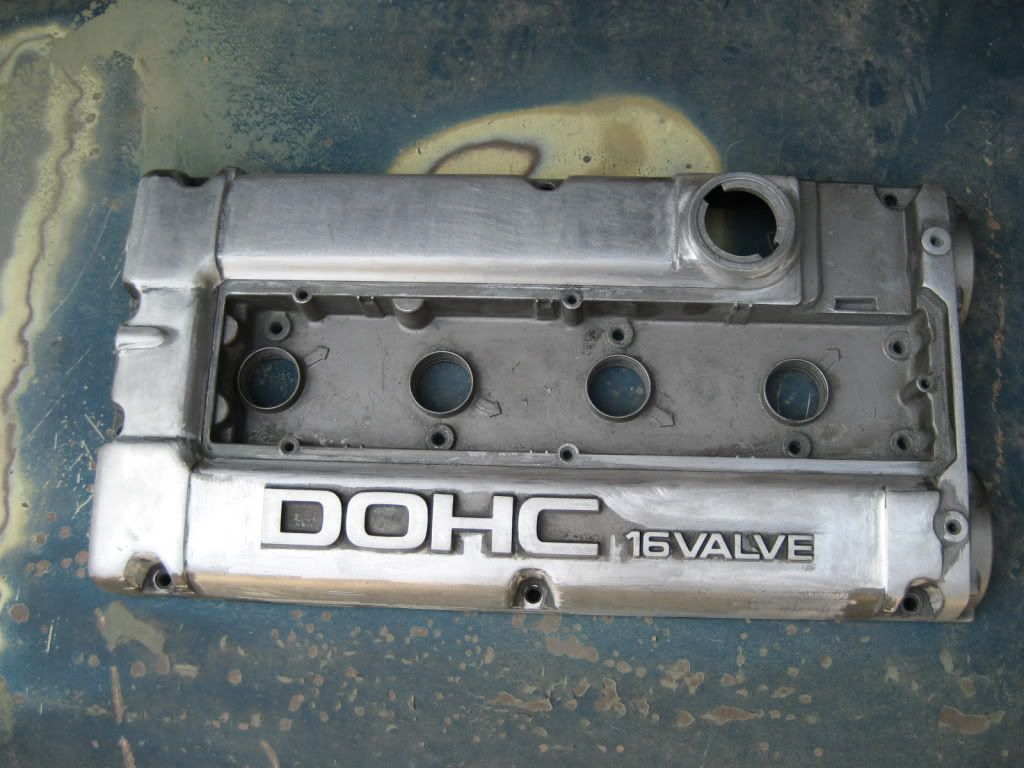
Took some time in between everything to start cleaning up and shaving a spare valvecover. This one was from a Hyundai Sonata so, I shaved where it said Hyundai off. So now I have 2 valvecover exactly the same. A black one and this one. I haven’t decided the final color or if I will polish this one yet.
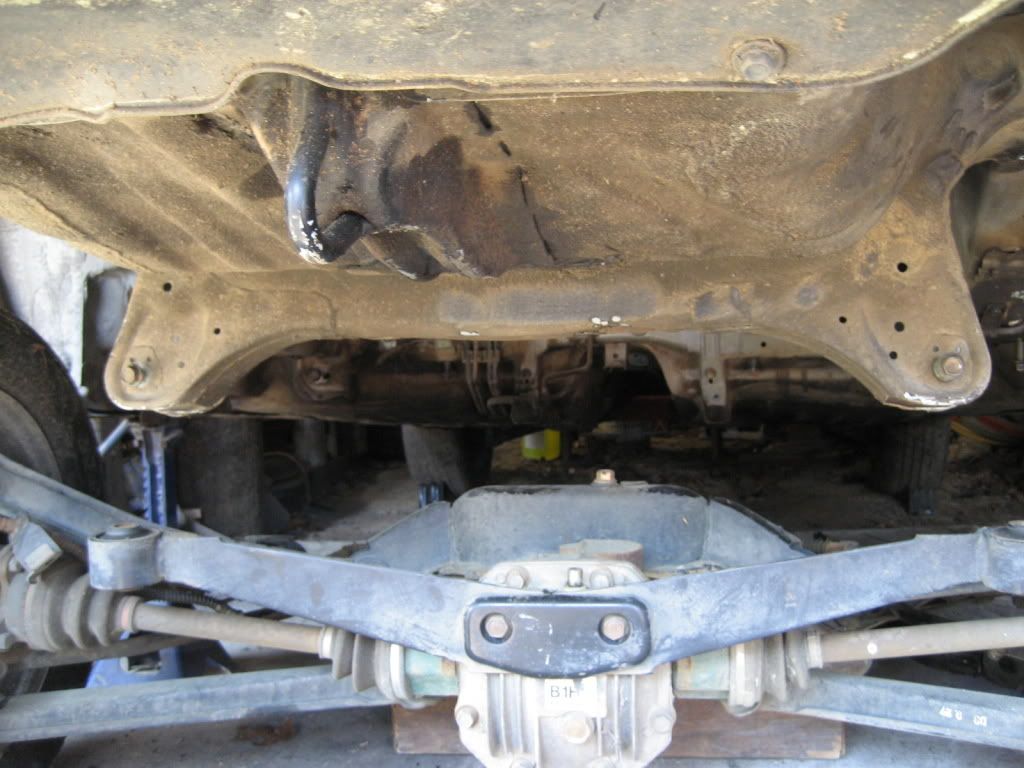
But anyways, back to the car. As you can see after cutting the floor, it put us right were we needed to be with the rearend.
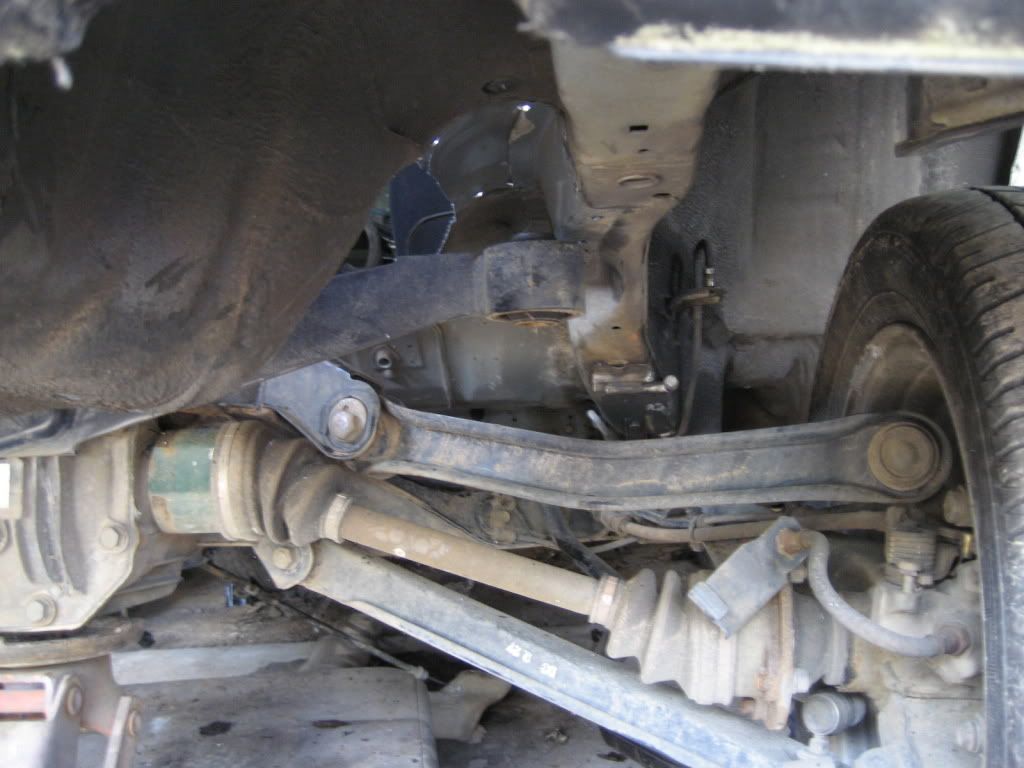
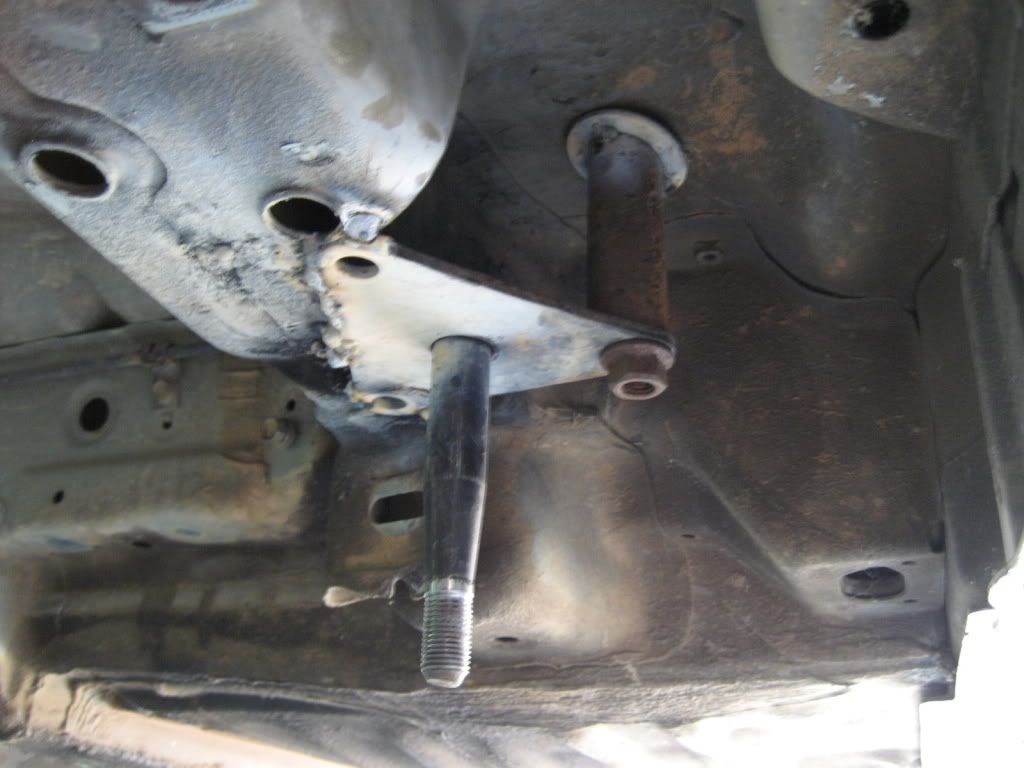
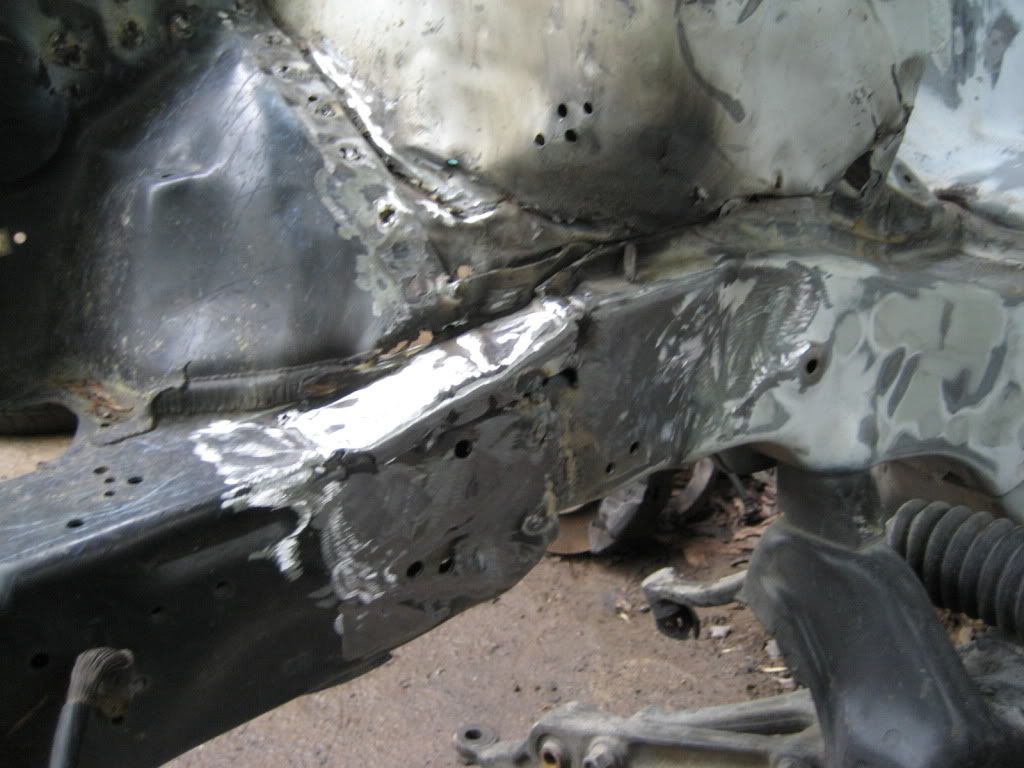
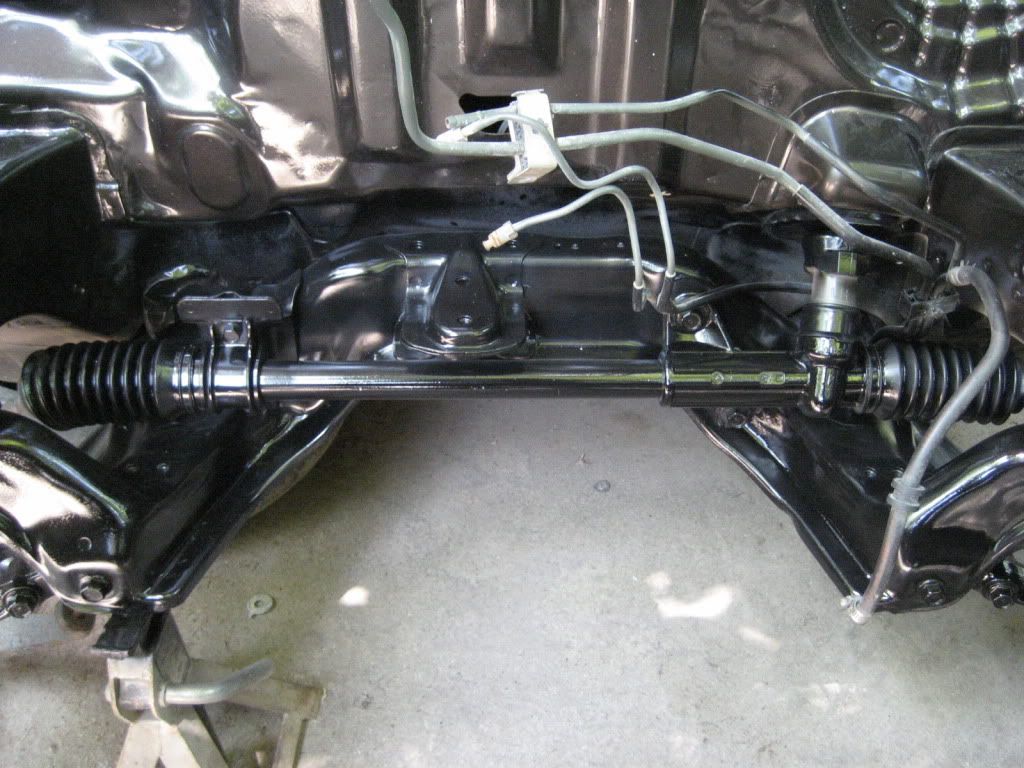
As you can see with this from this pic, the factory mounting on the rearend doesn’t quite reach under the frame rails like it needs to. So what do we do? Modify it! Super easy actually. Bascially just cut it in half, and welded in some meat in the middle to make it reach.
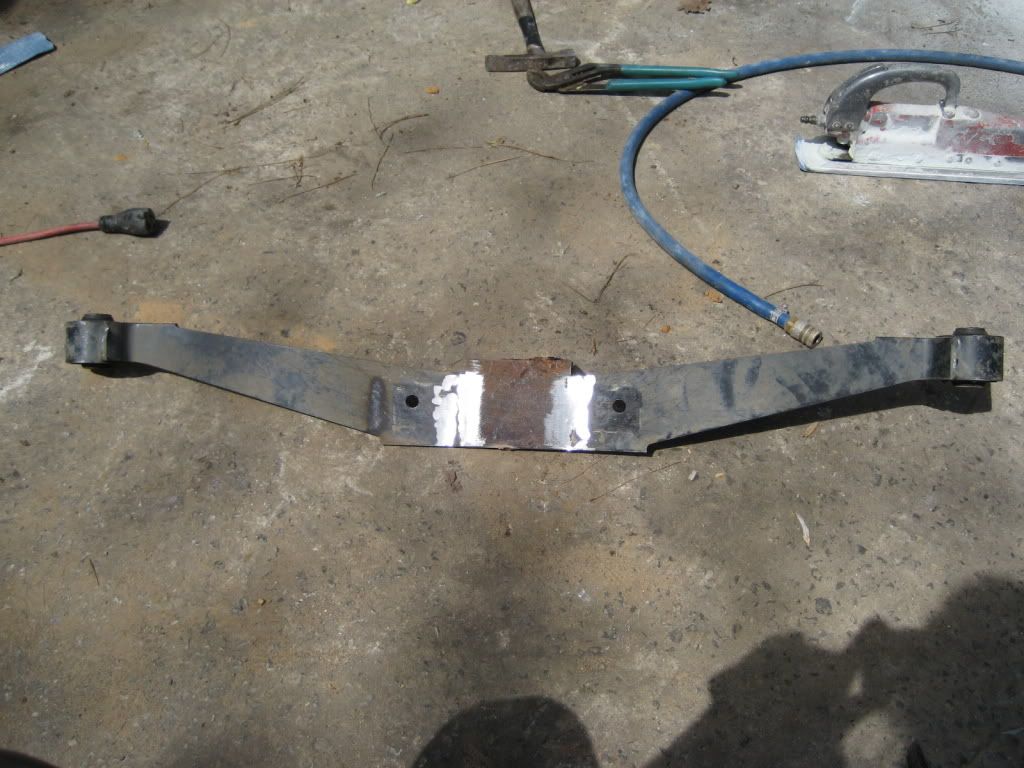
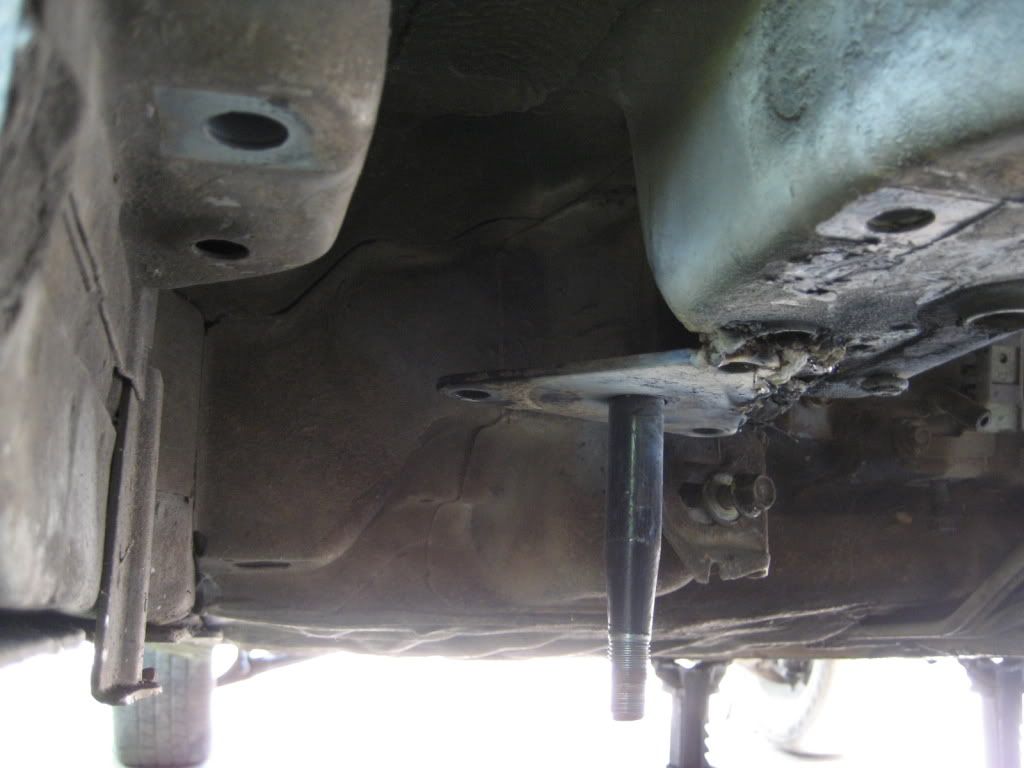
Lets see how it fits now. Ah perfect!
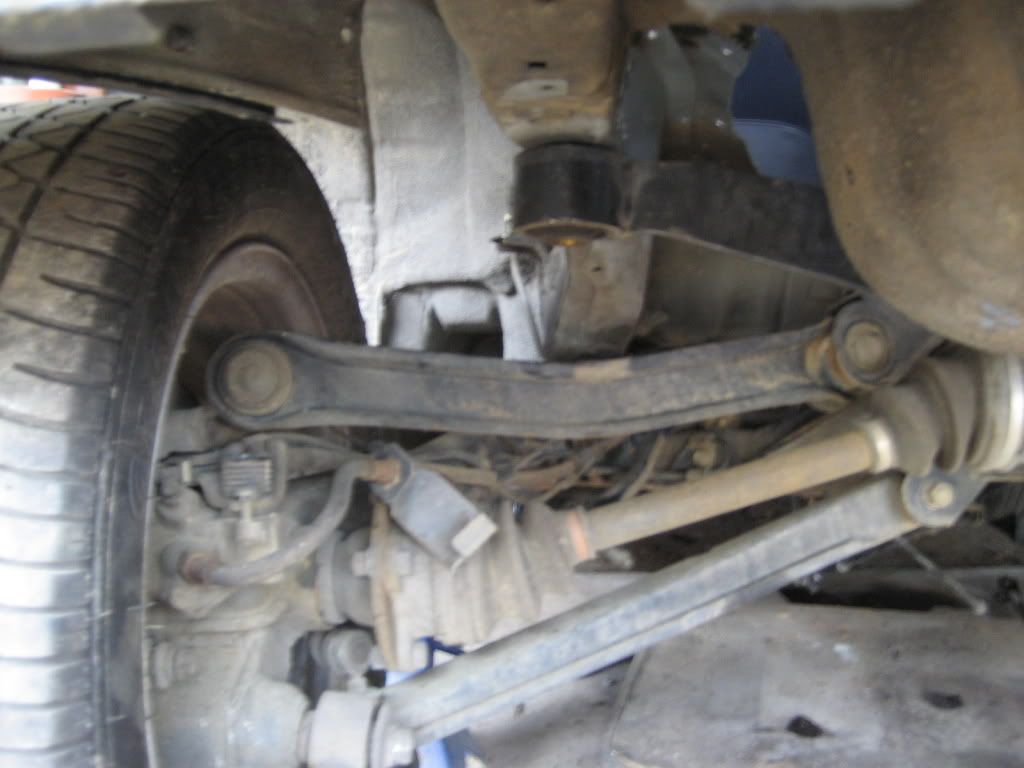
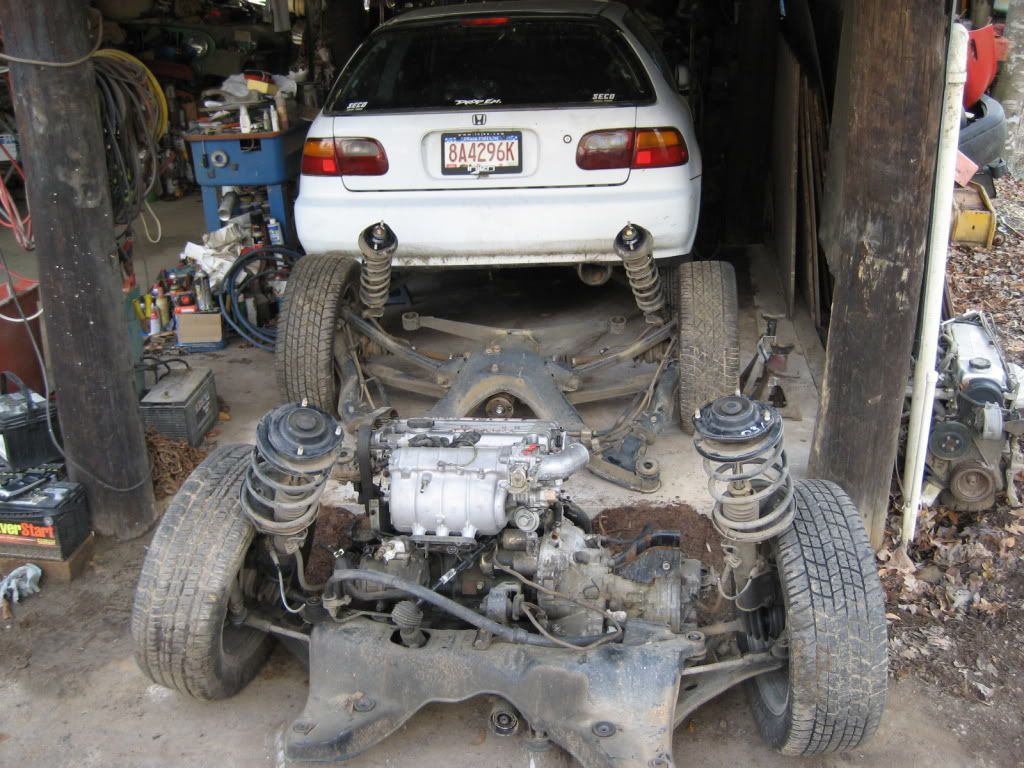
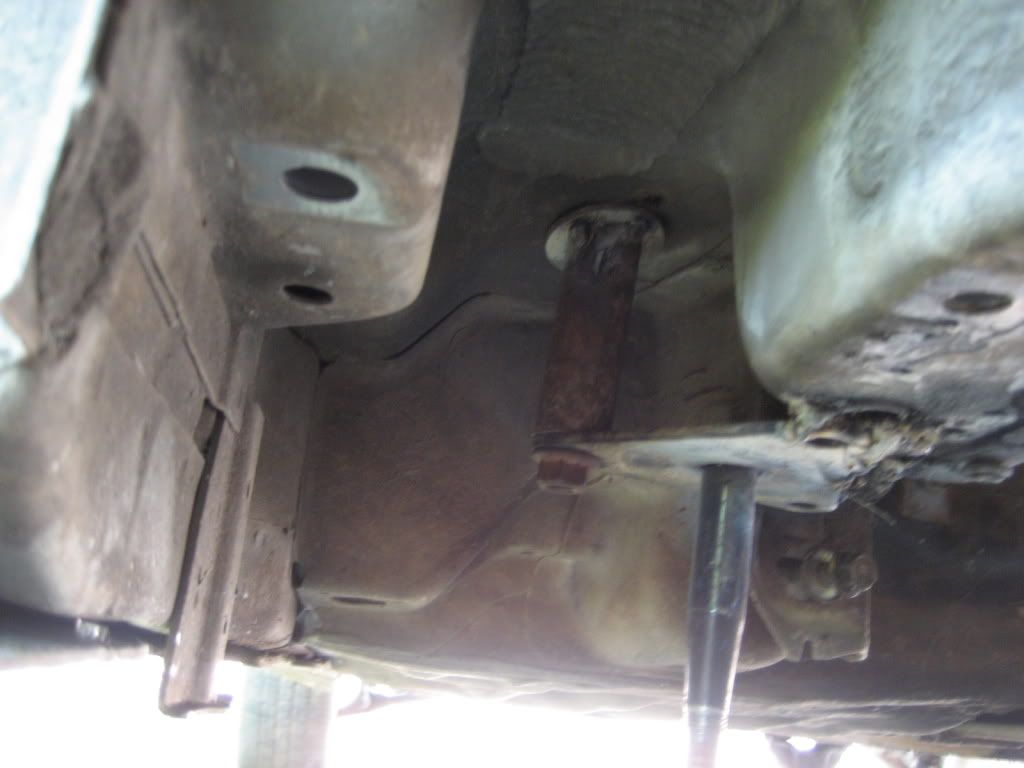
Here is a quick shot to show you how the driveshaft will go. Starting to seem like this build was meant to be! Keep in mind the front of the rearend is hanging down in this pick cause it isn’t mount yet, so it makes it look like the rear sway bar is in the way. But it’s gonna work out perfect!
Just a couple of pictures to show you some fitment. The width is nearly perfect between the two cars!
At this point I was toying with the suspension right now to get the car rollable again. I put the civic tophat onto the dsm shocks and springs and it fit perfectly. Unfortunately there was like a 6 inch fenderwell gap! Lmao. So I just took the shocks and springs back out for now. Then I drilled the holes and dropped the subframe mount bolts through the frame rails. Once again, worked out like it was meant for the car
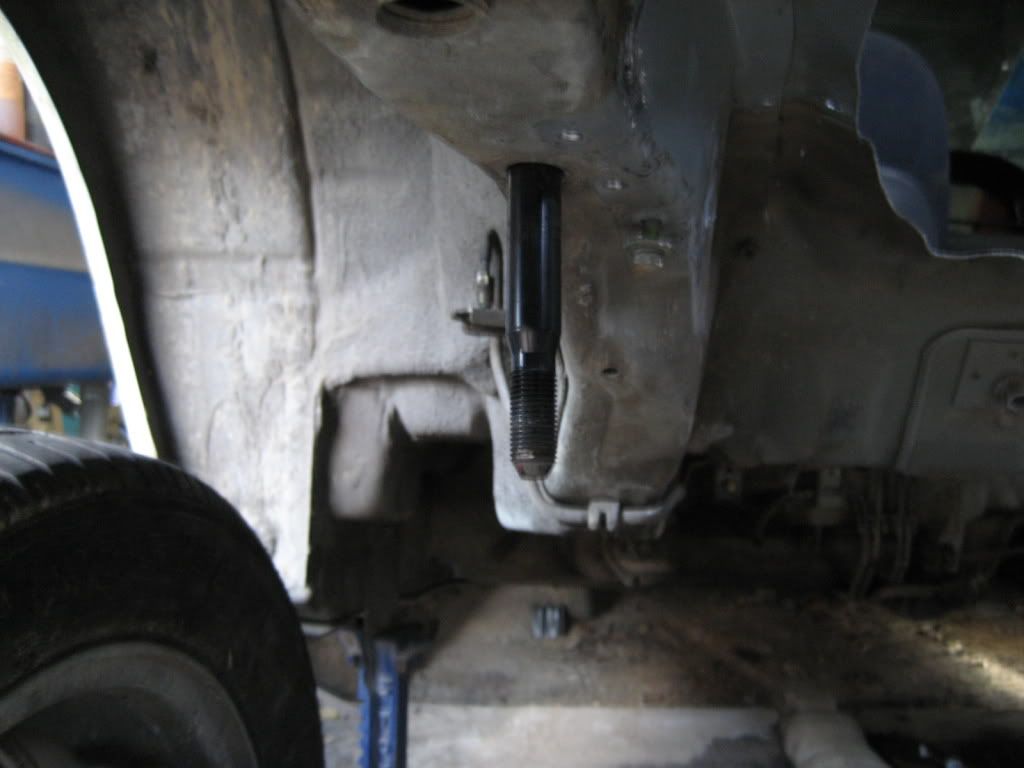
Here you can see how high the car sat with the dsm shocks and springs! LMAO!
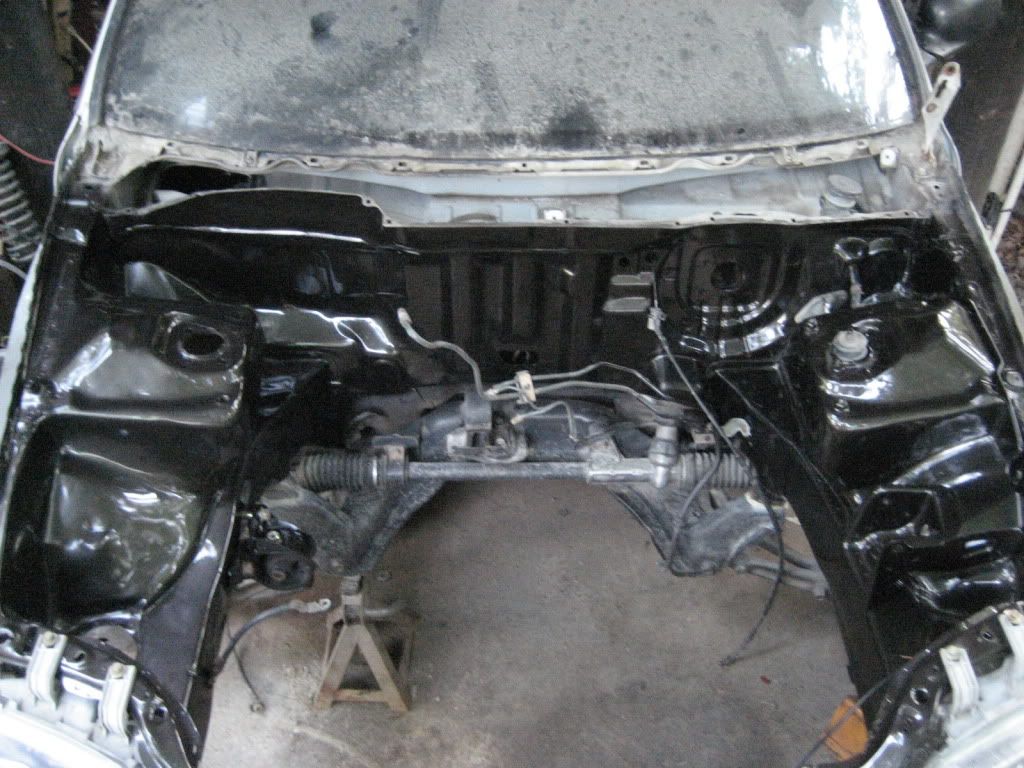
Well, now that a lot of the rear work had been done (which it wasn’t too terribly much to be honest), I decided to move to other stuff. Started stripping the inside of the car and the engine bay of everything.


Started mapping everything out
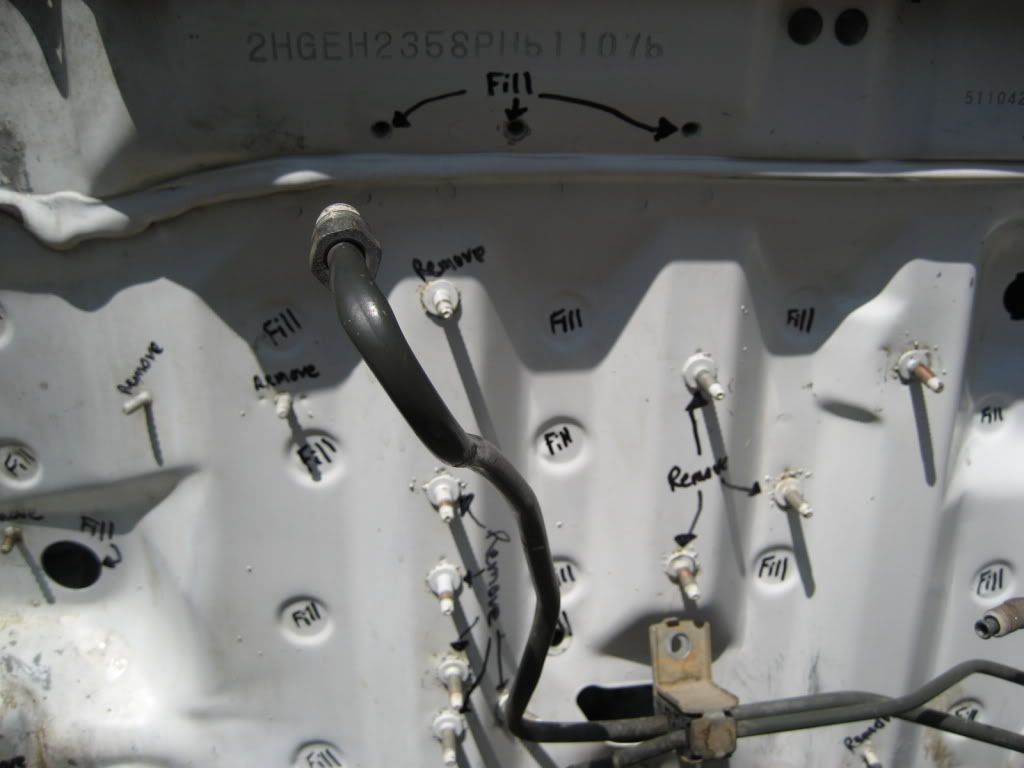
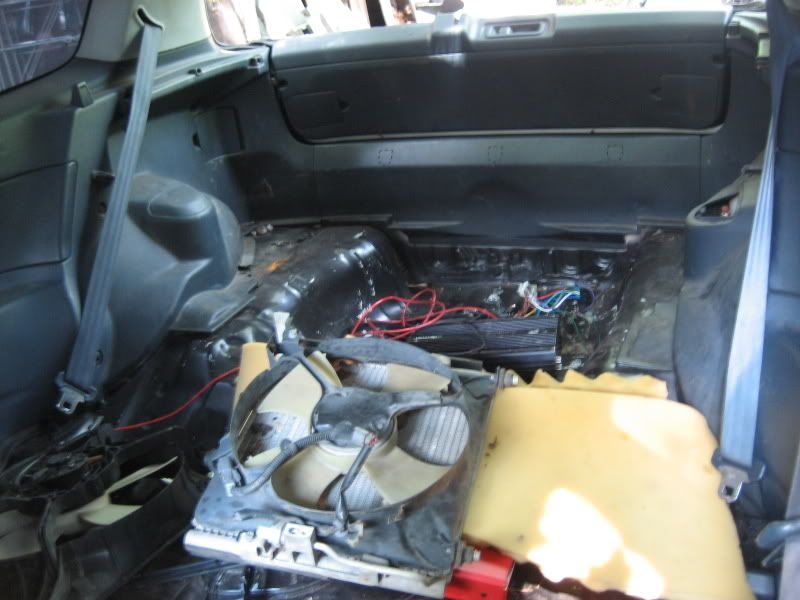
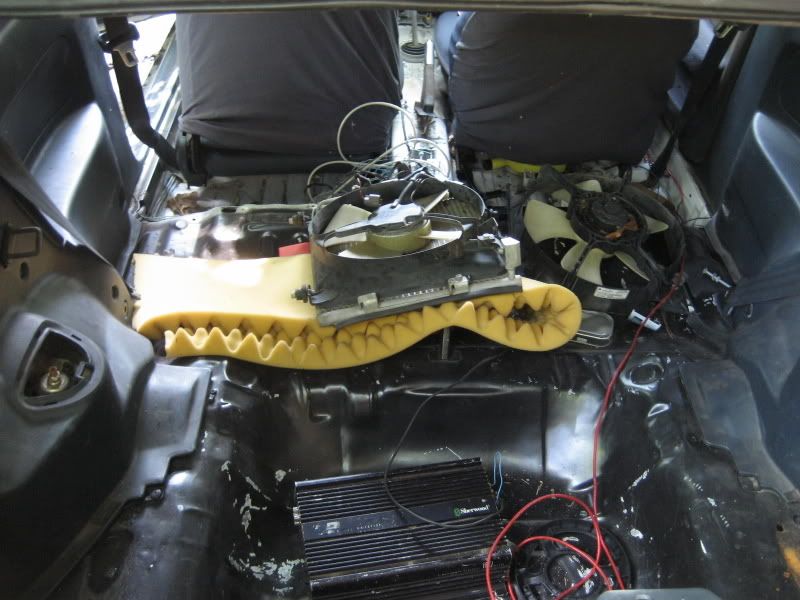
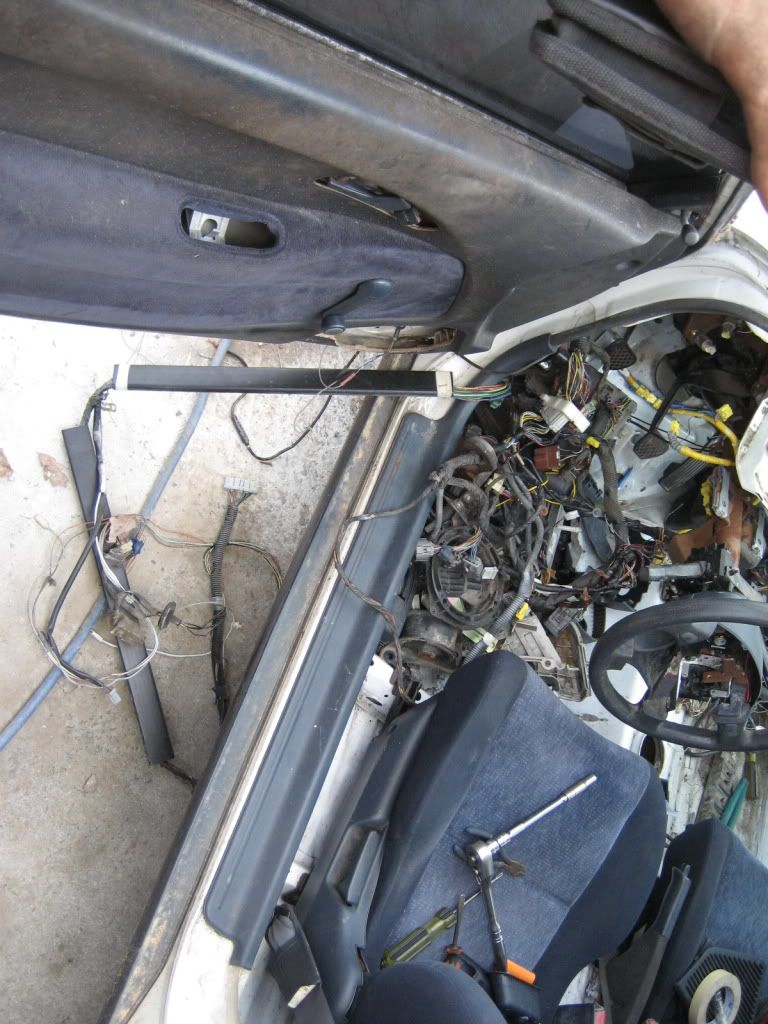
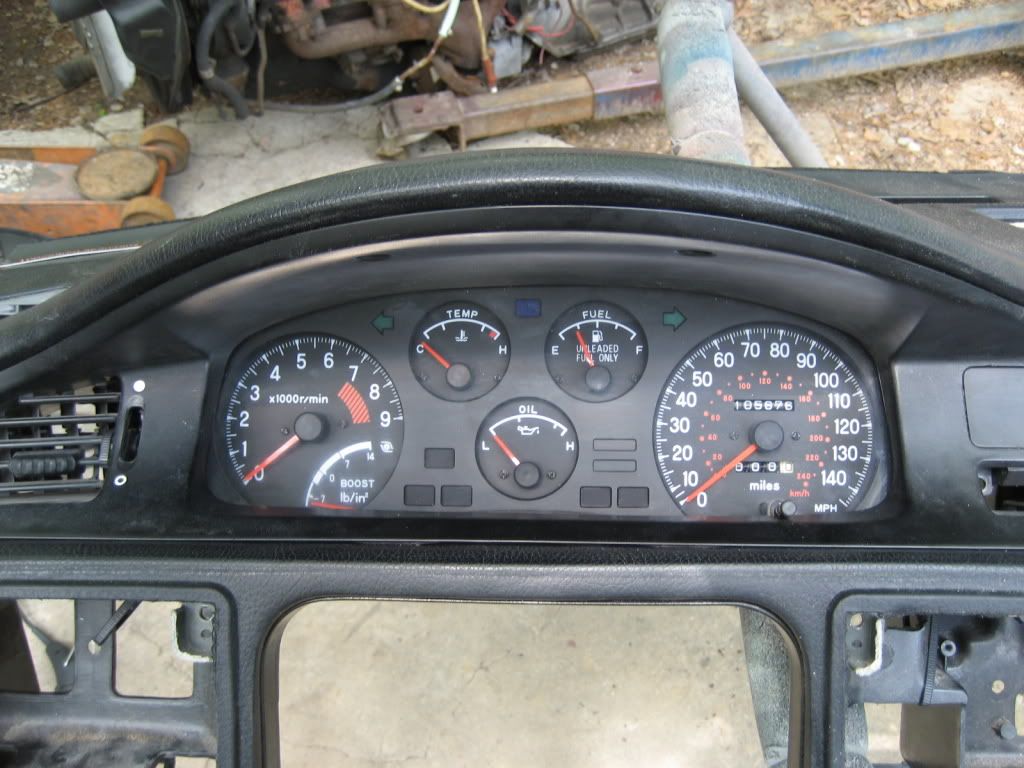
Here you can see I opted to go with the DSM chassis harness since I won’t have A/C or heat stuff, nor a radio. So I figured this was the easiest way to make things plug and play with the engine harness and the gauge cluster. Just gotta change some tail light plugs really. The rear section looks just like stock. Can’t even tell it’s not the OEM harness Got creative with the underdash stuff as well by using the blower motor mounts to hang and ground stuff.
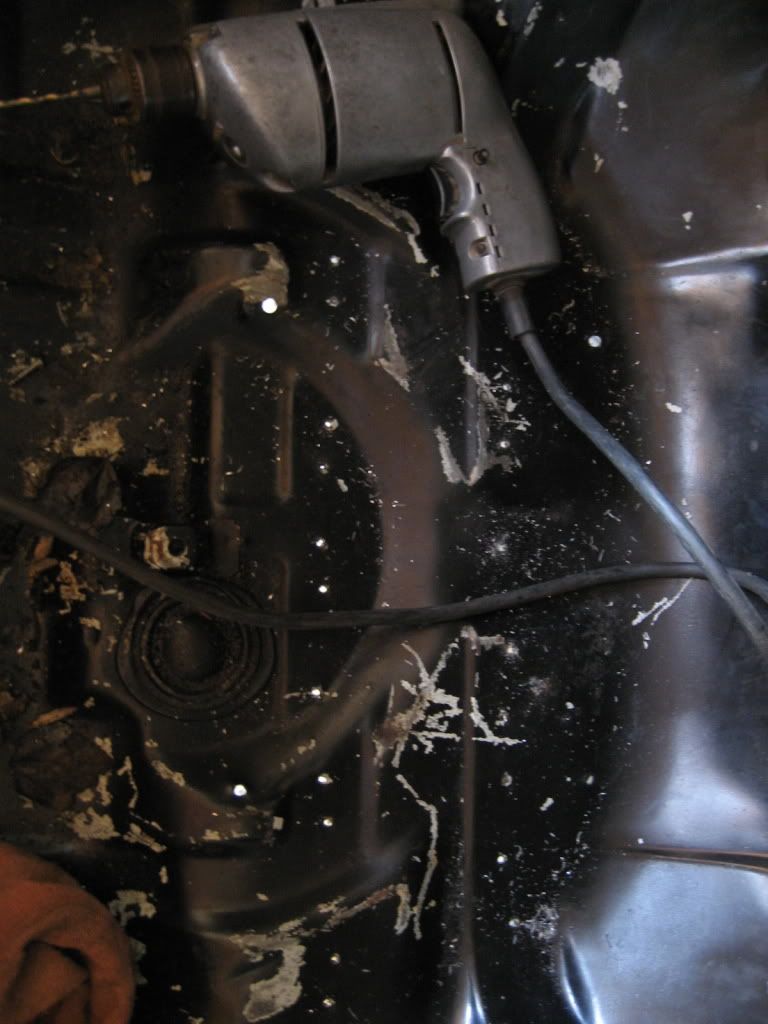
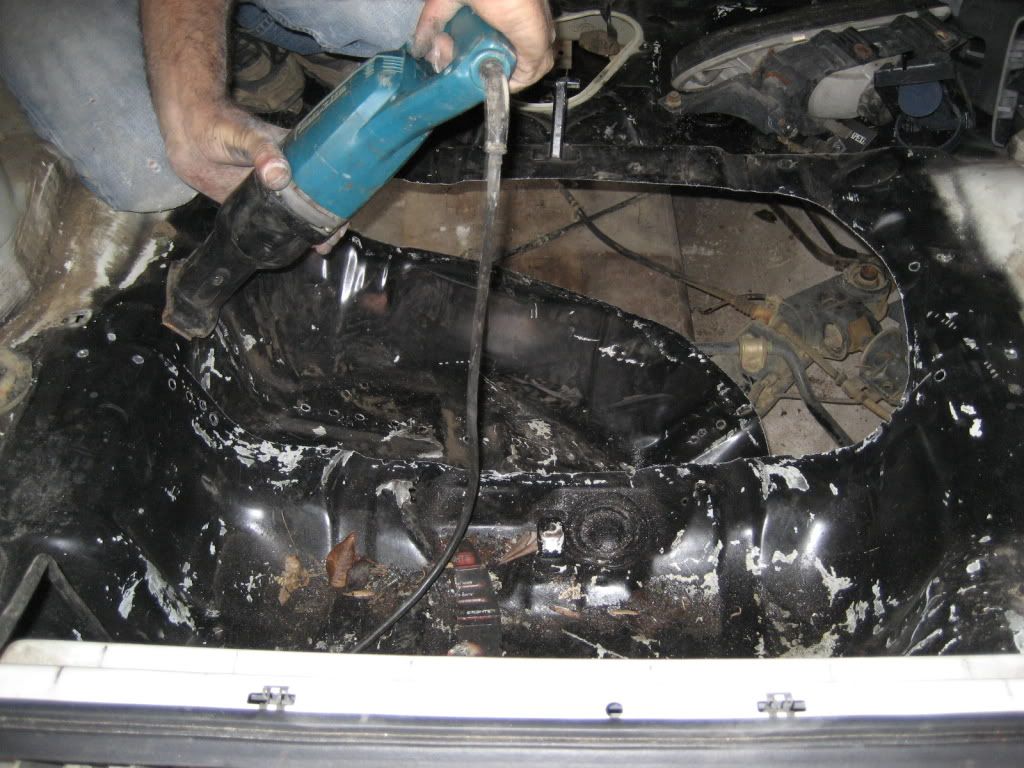
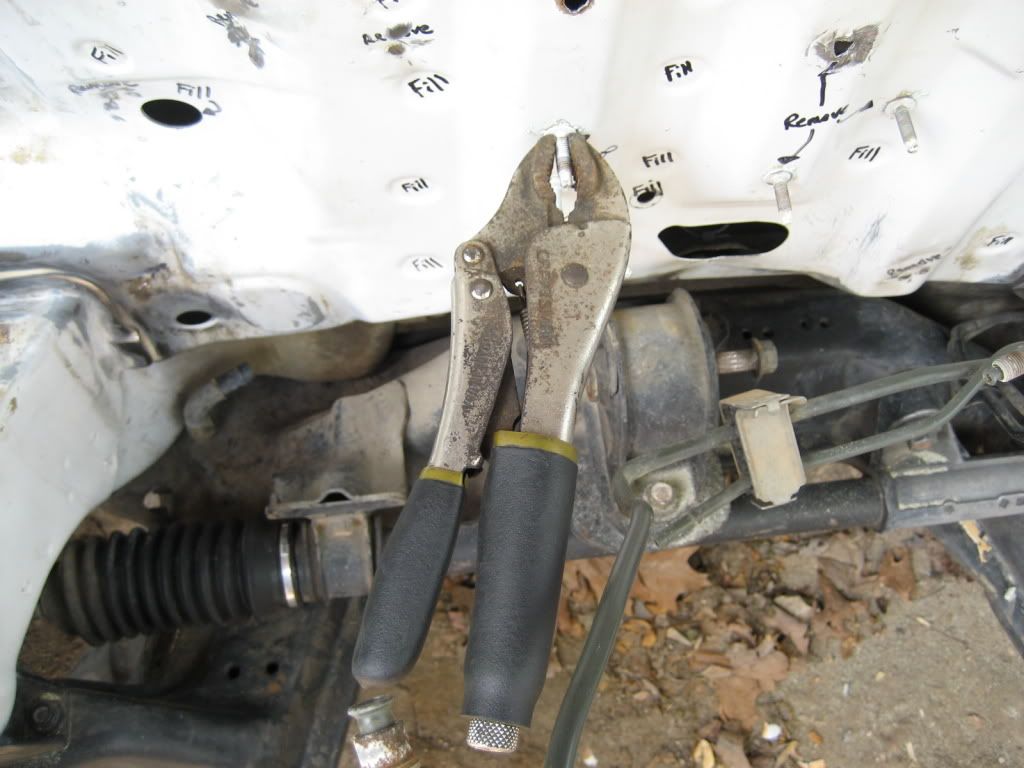
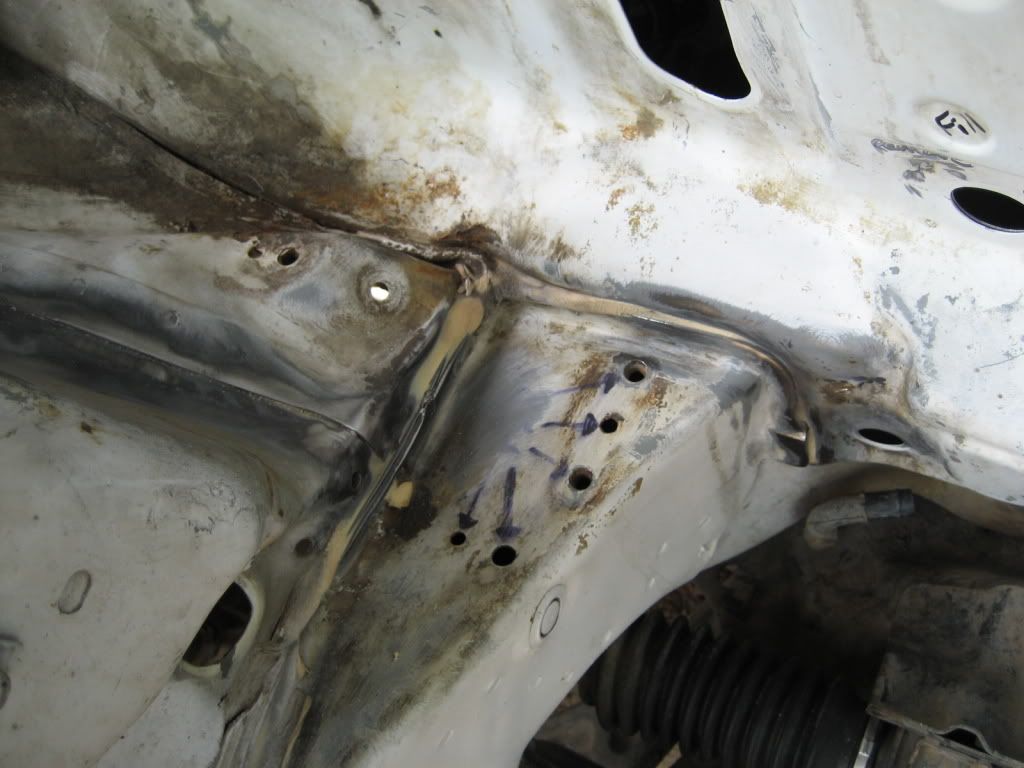
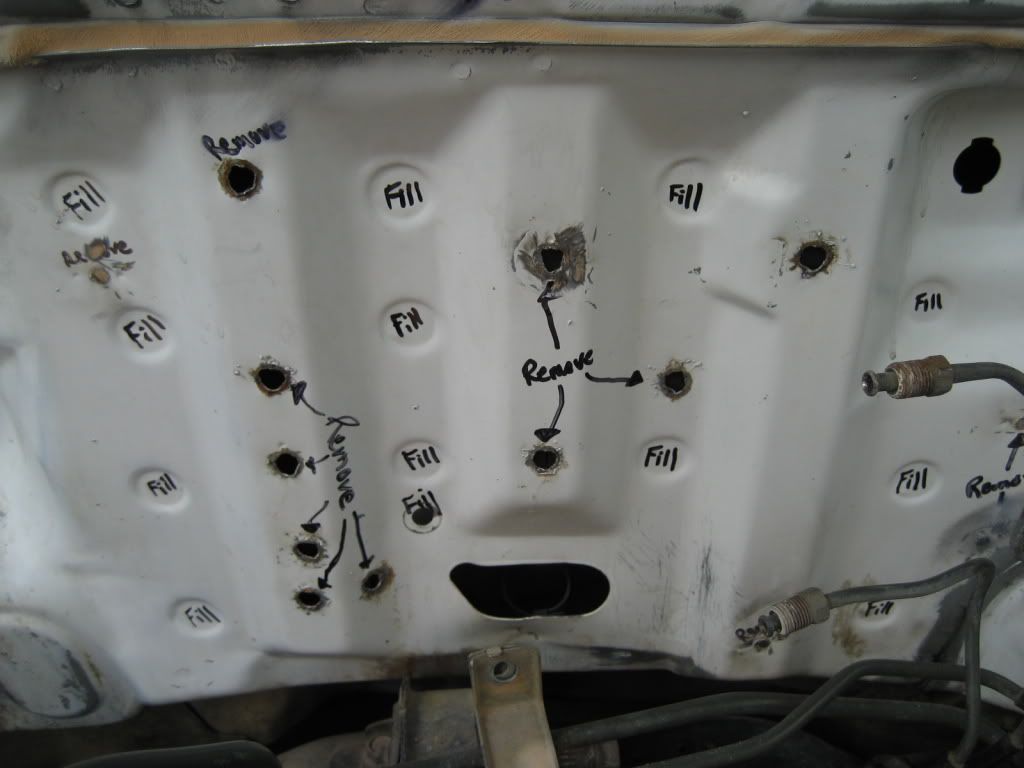
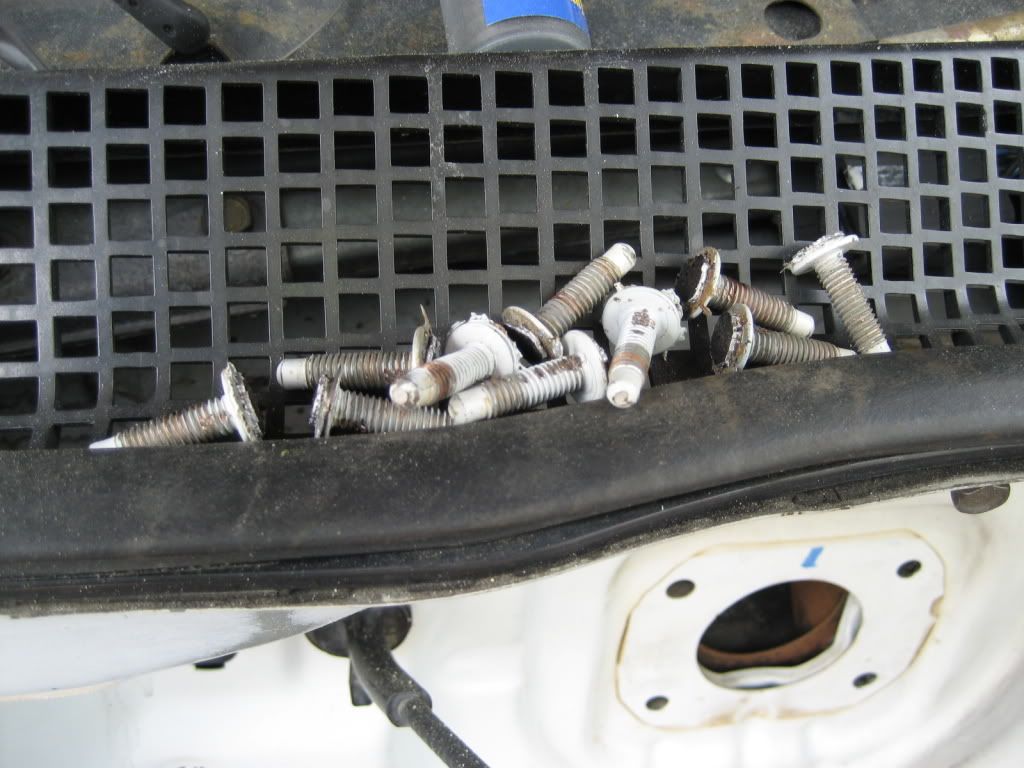
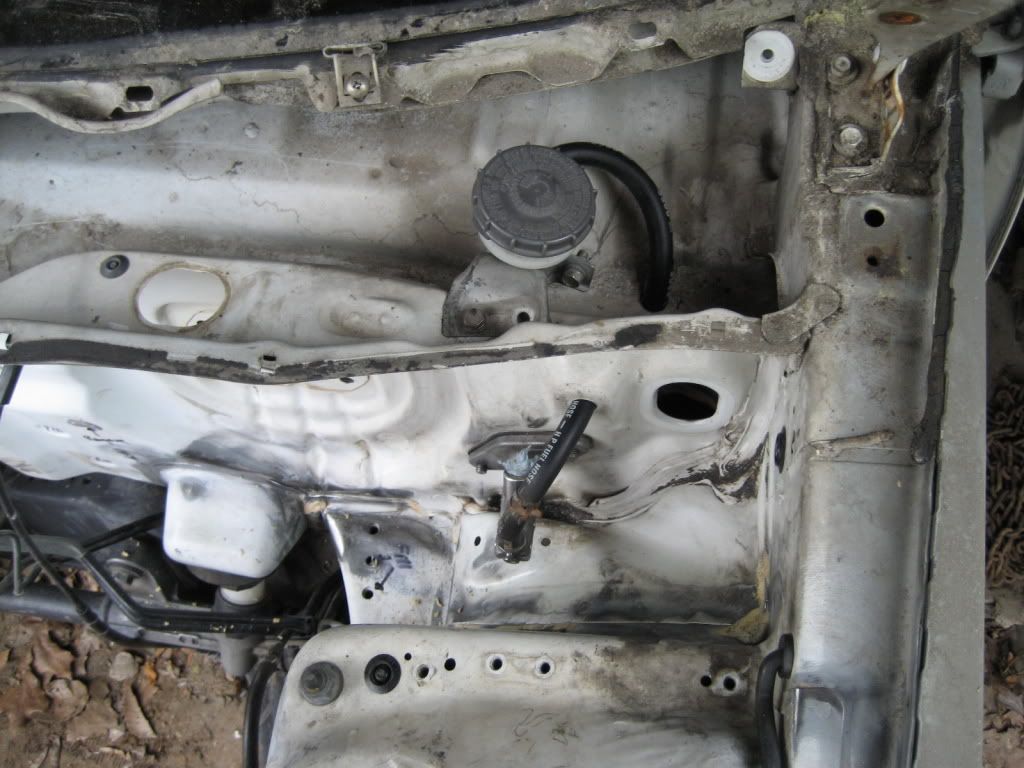
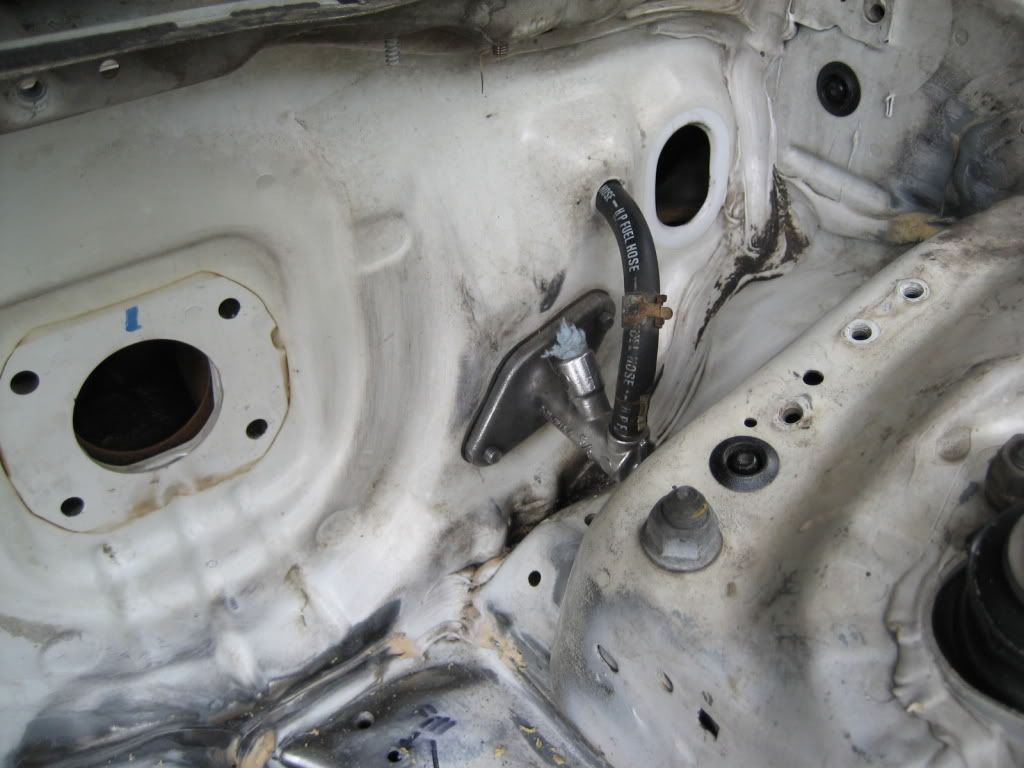
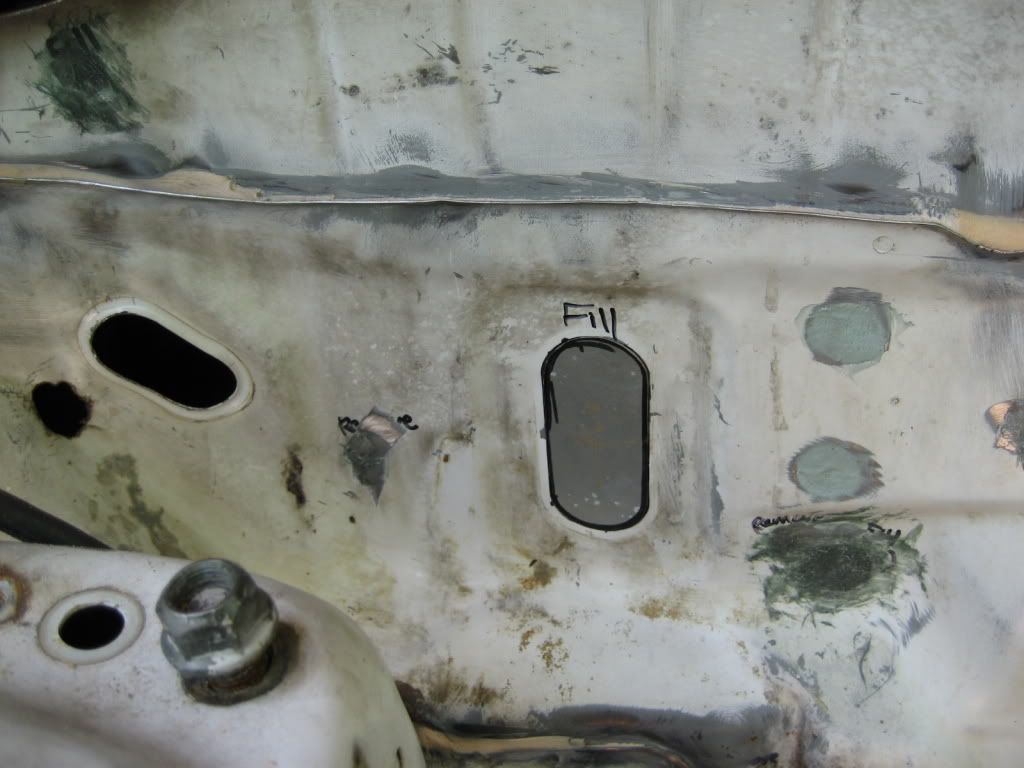
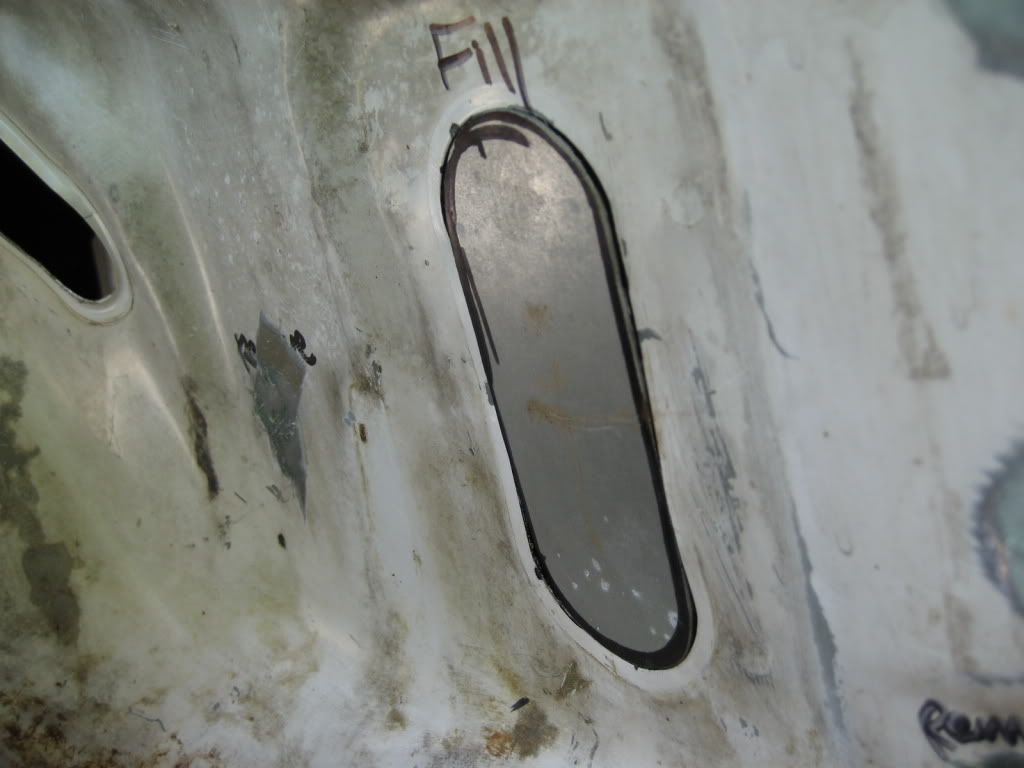
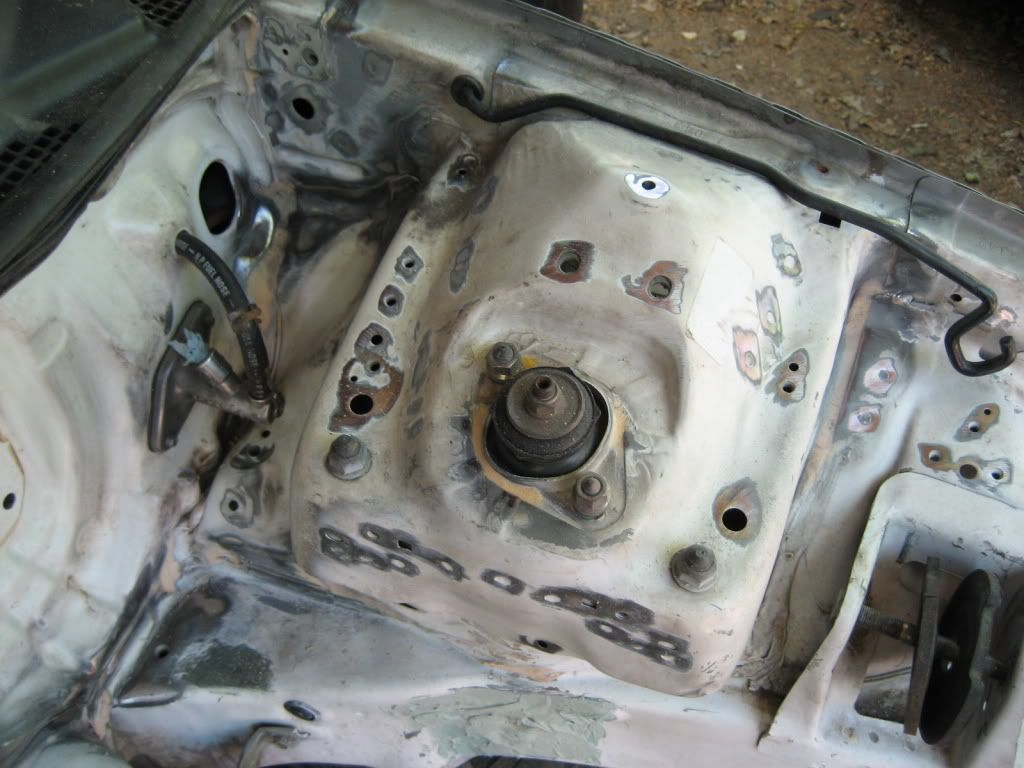
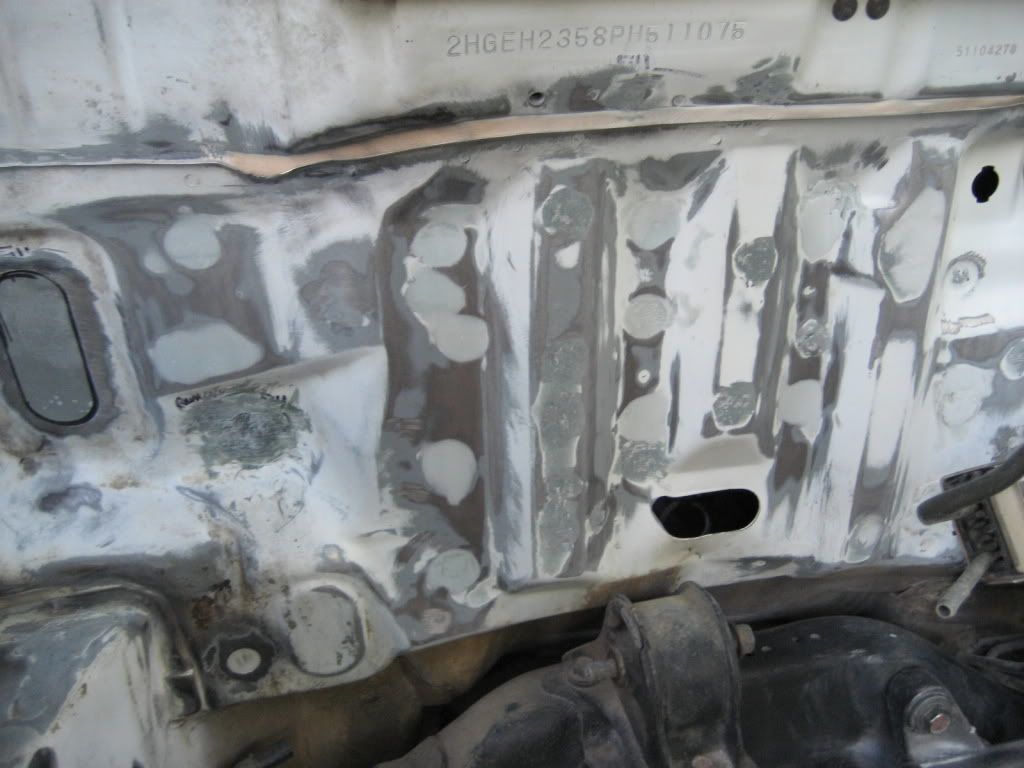
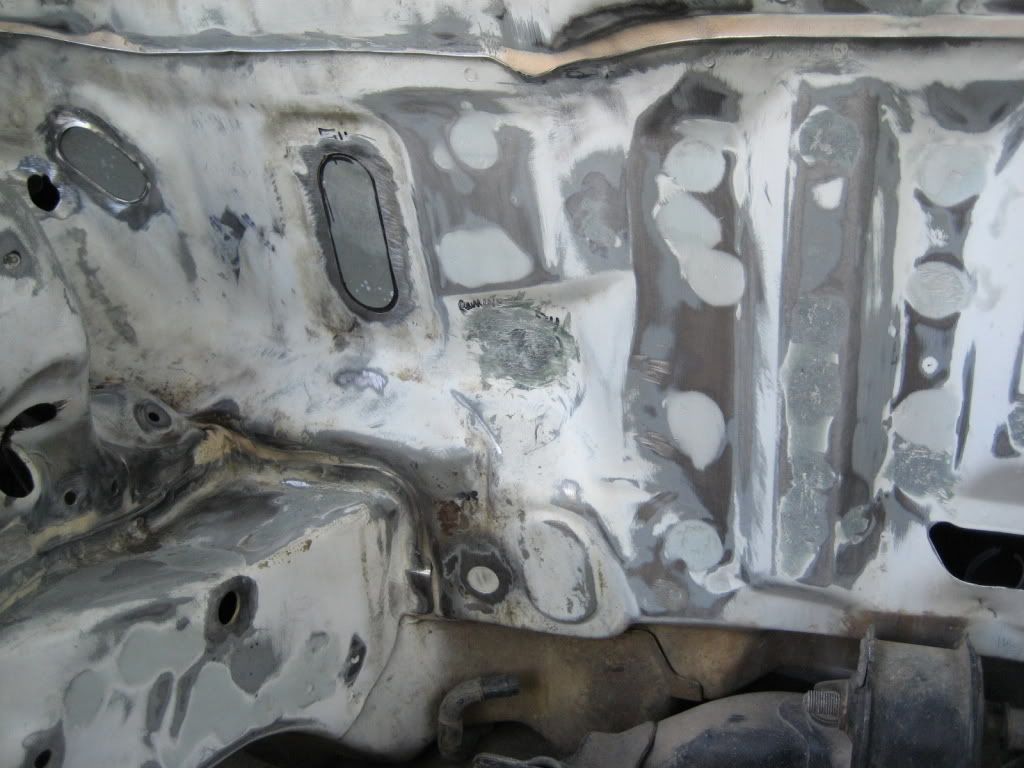
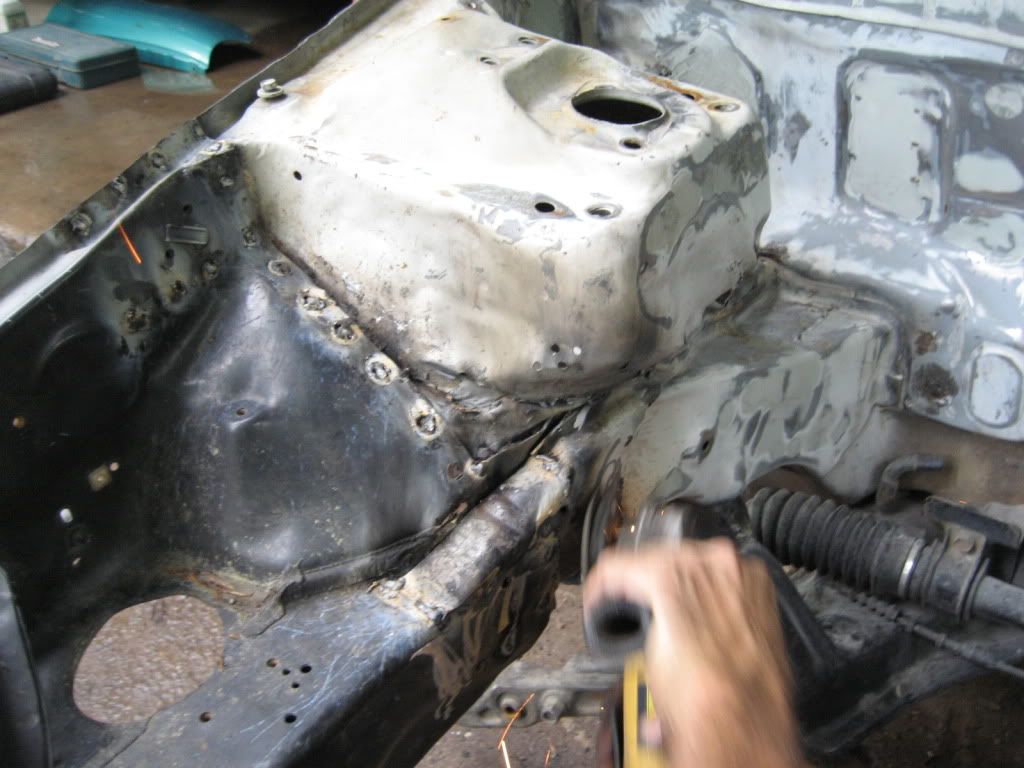
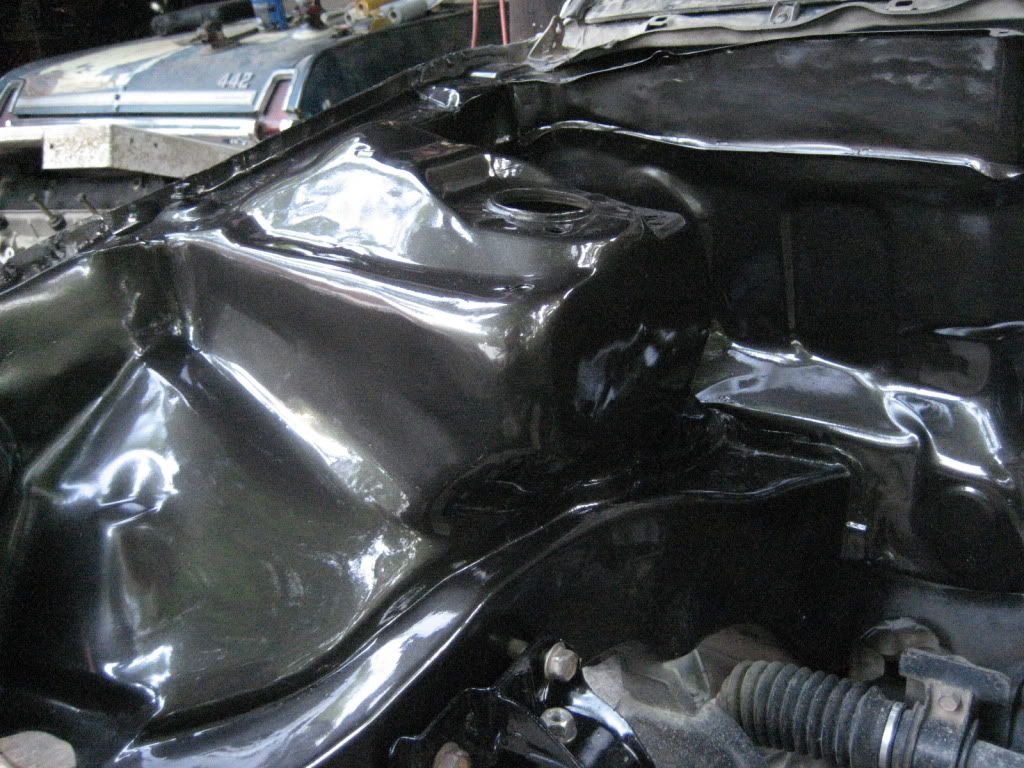
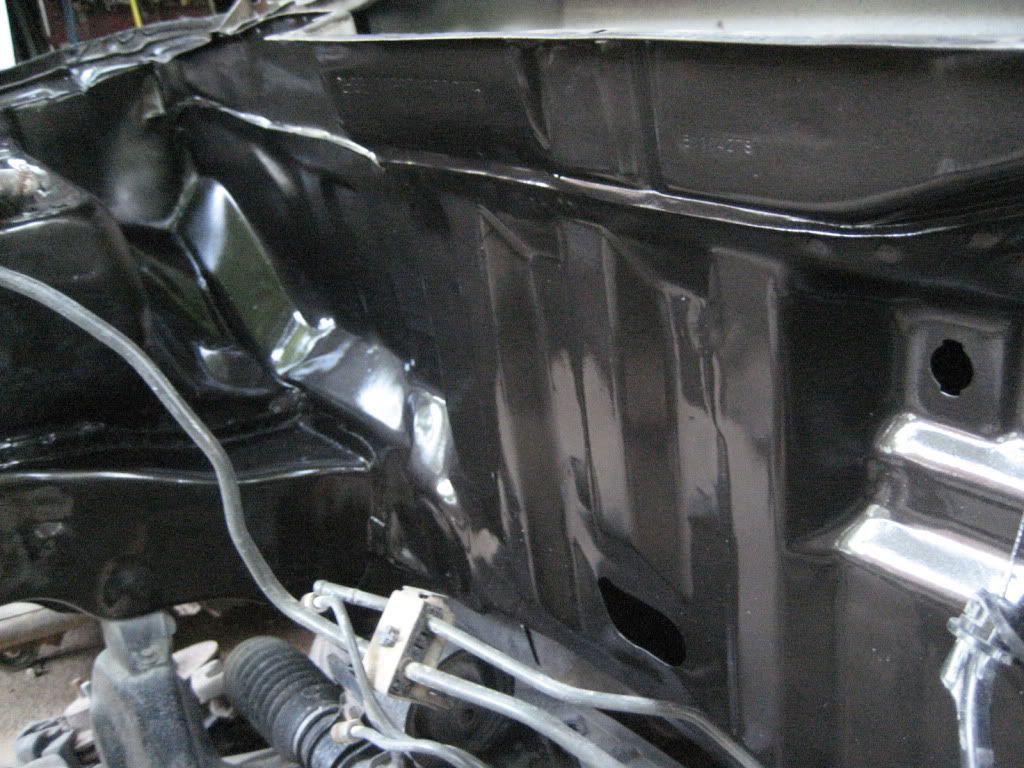
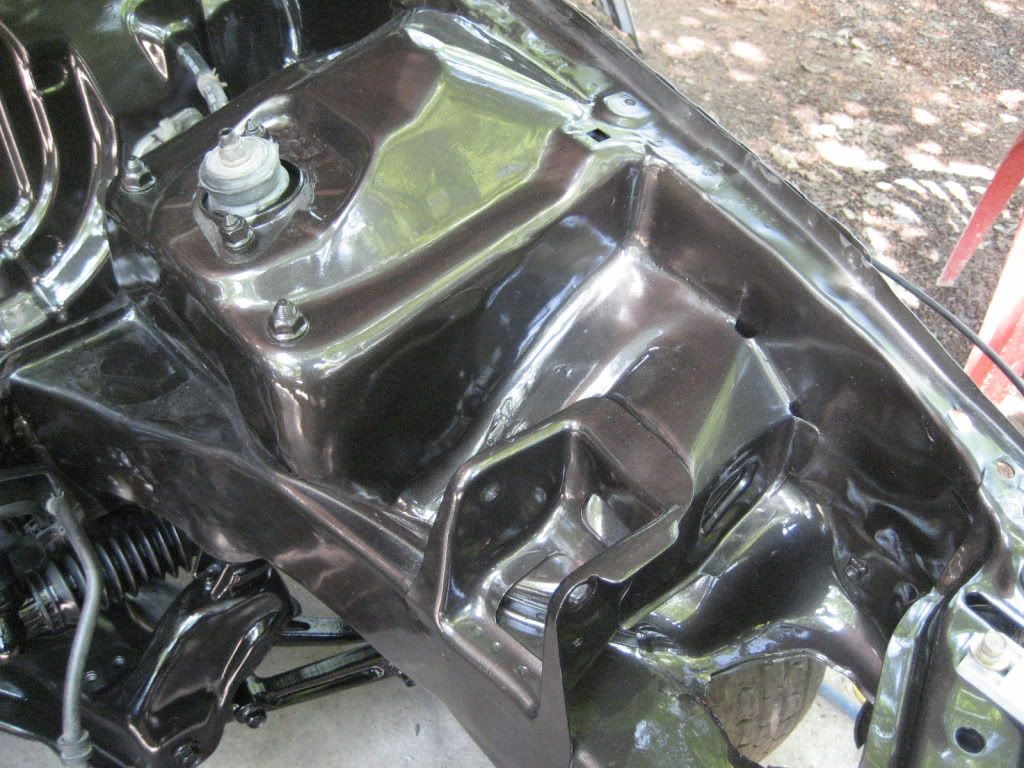
A lot of this next stuff is engine bay work. I spent a good while on this stuff cause I only got to work on it a couple of days if that at a time. I go to school an hour and 15 mins from where the parents house is which is also where the car is. So I tried to come home as much as possible, but it still took a while to get the engine bay done. Stripped sealer, filled holes, removed studs, relocated cluster master cylinder resovior, etc. etc. My method of removing the firewall studs is different than most. It was taking AGES to grind them off, so I snapped them all of in less than 2 minutes. I had a bunch of holes to fill already, what was a couple more?


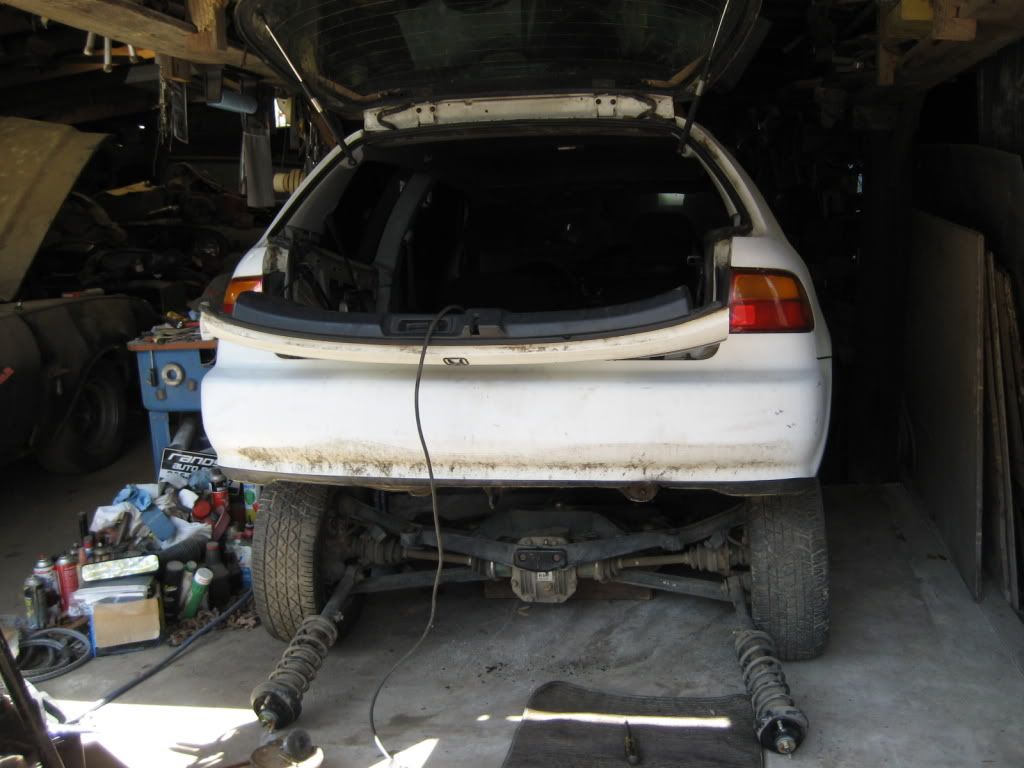
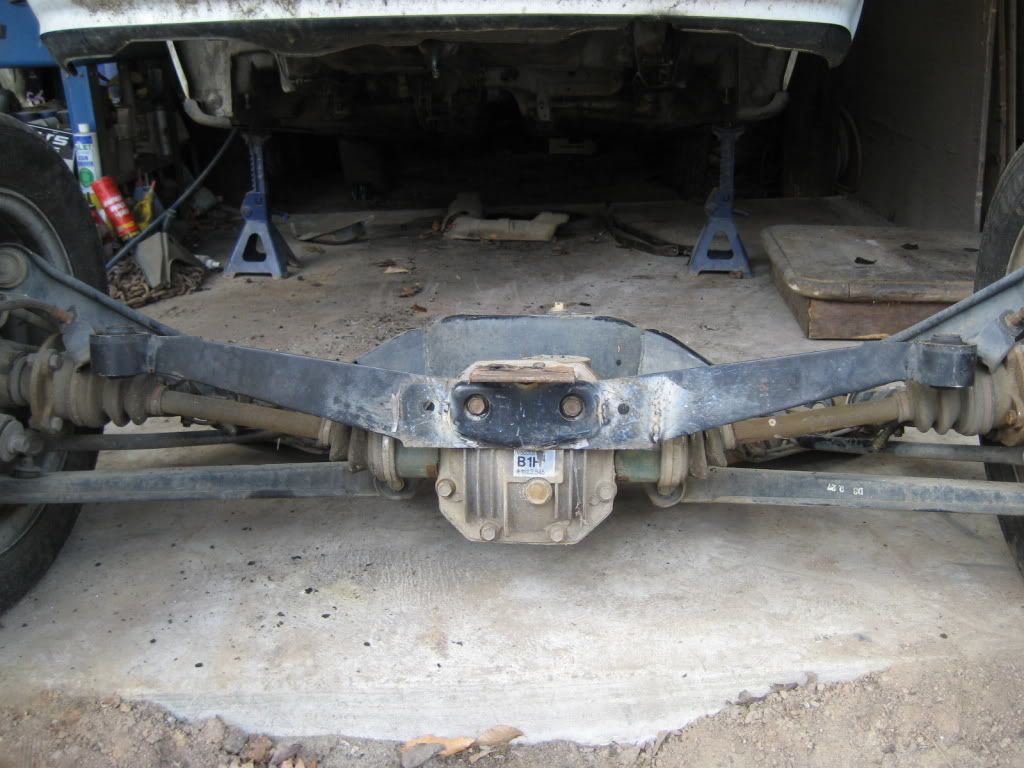
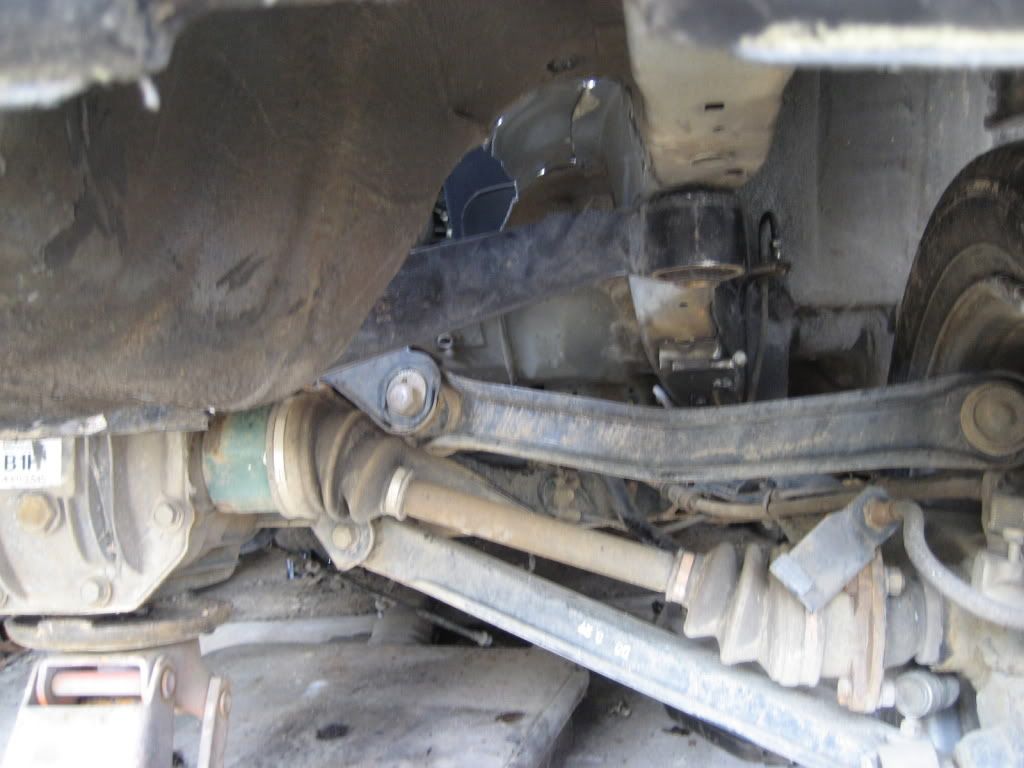
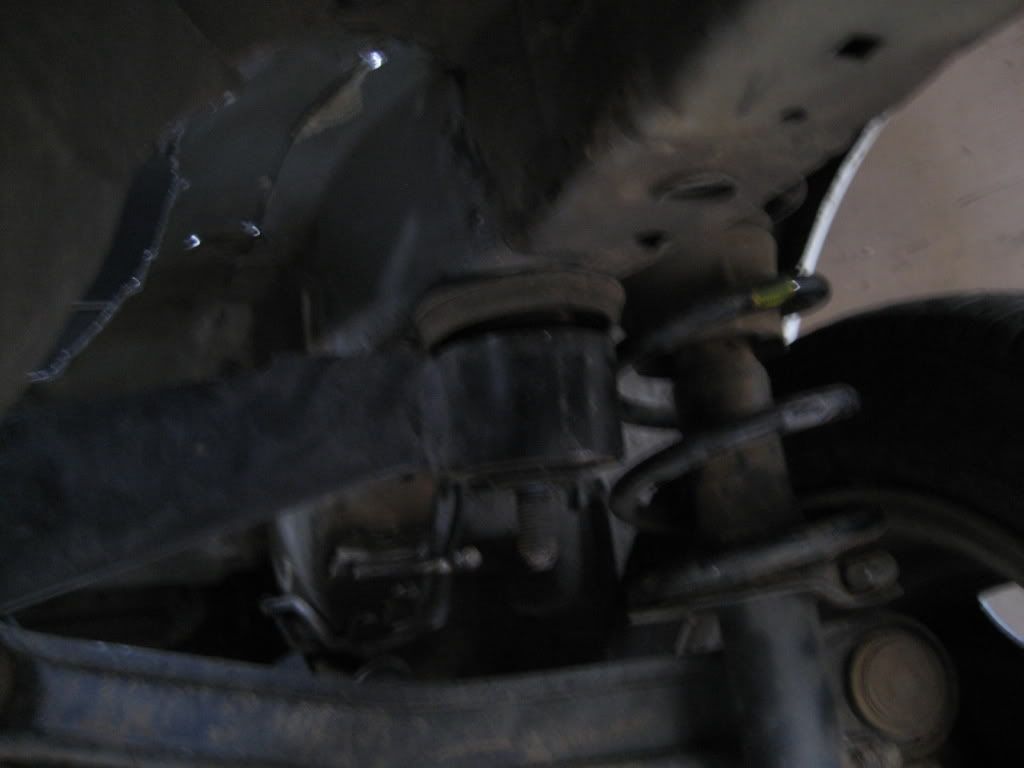
Well, after getting pooped out on that for a while, decided to finish up the front mounts on the rear subframe so we could call the rear done. I am gonna go back and take the whole rearend out and clean/paint everything once we are does, as well as add some re-enforcements to the mounts so they can handle some lauches, but for now we just wanna get it going and see what we got. Once again, using old crap we already got laying around the house, and coming up with ways to make it work FTW! Lol
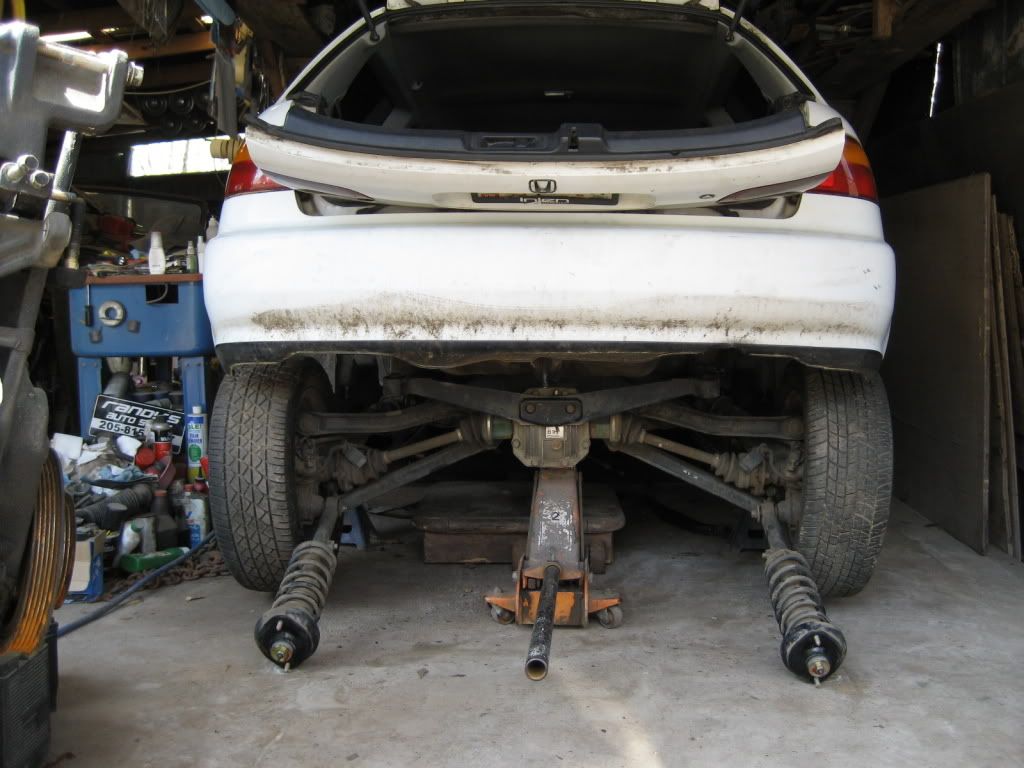
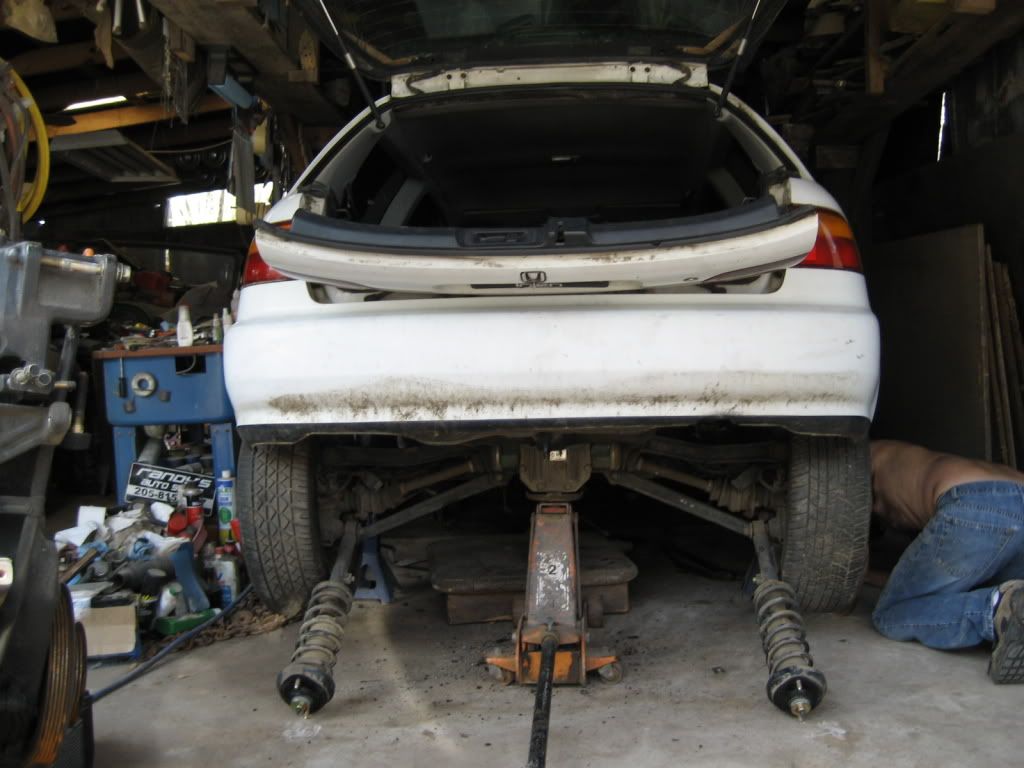
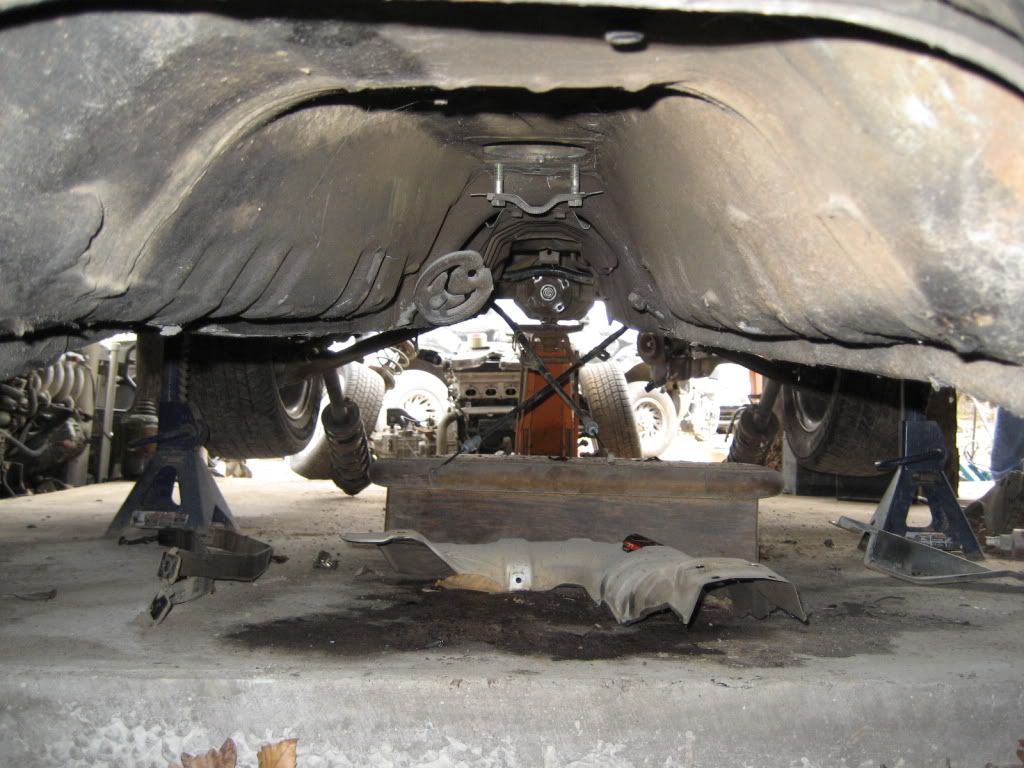
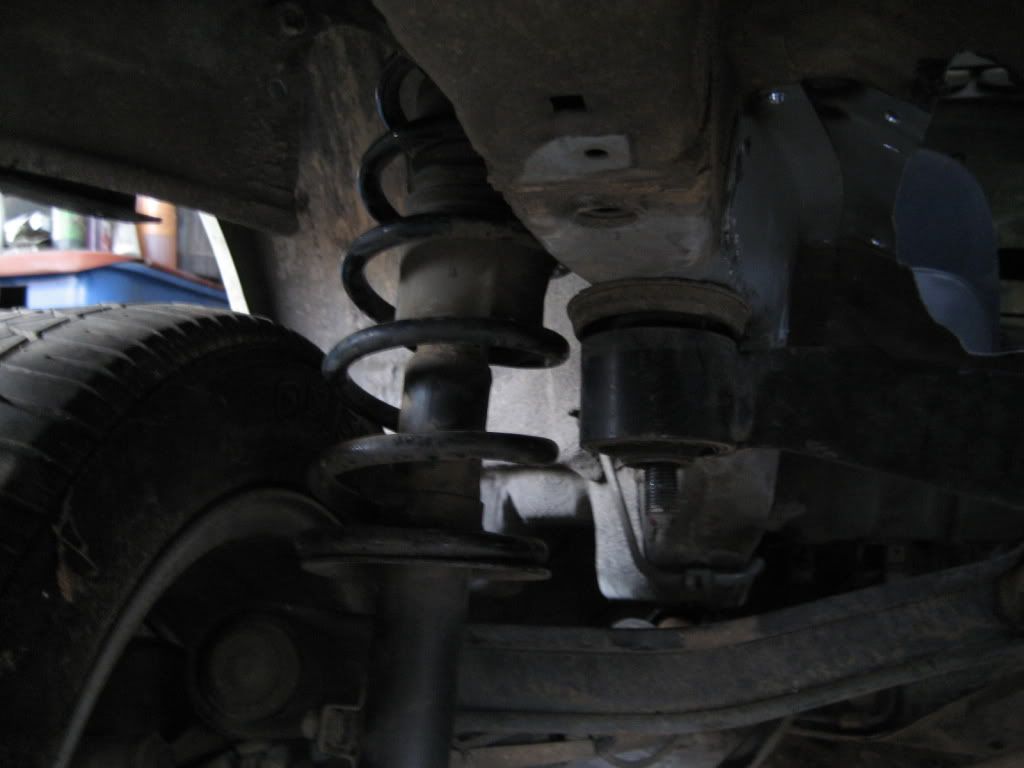
Here’s how the car sits without the rear suspension. Much better. Should be able to achieve the same stance one I decide how I am going to do the shocks. Then I can choose the appropriate coilover setup. Also, notice how good the rear tucks up. Still leaves pretty good ground clearance, and again the width of everything is perfect! So if I ever break anything in the rear, I can just order the OEM stuff since I didn’t have to make anything custom!
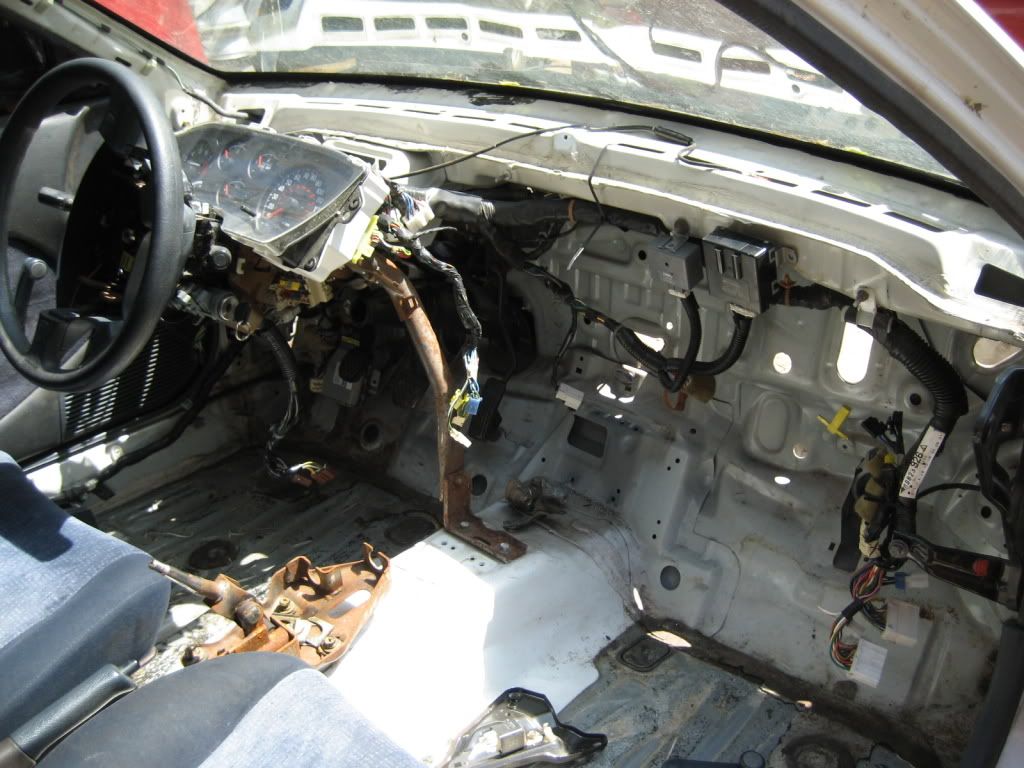
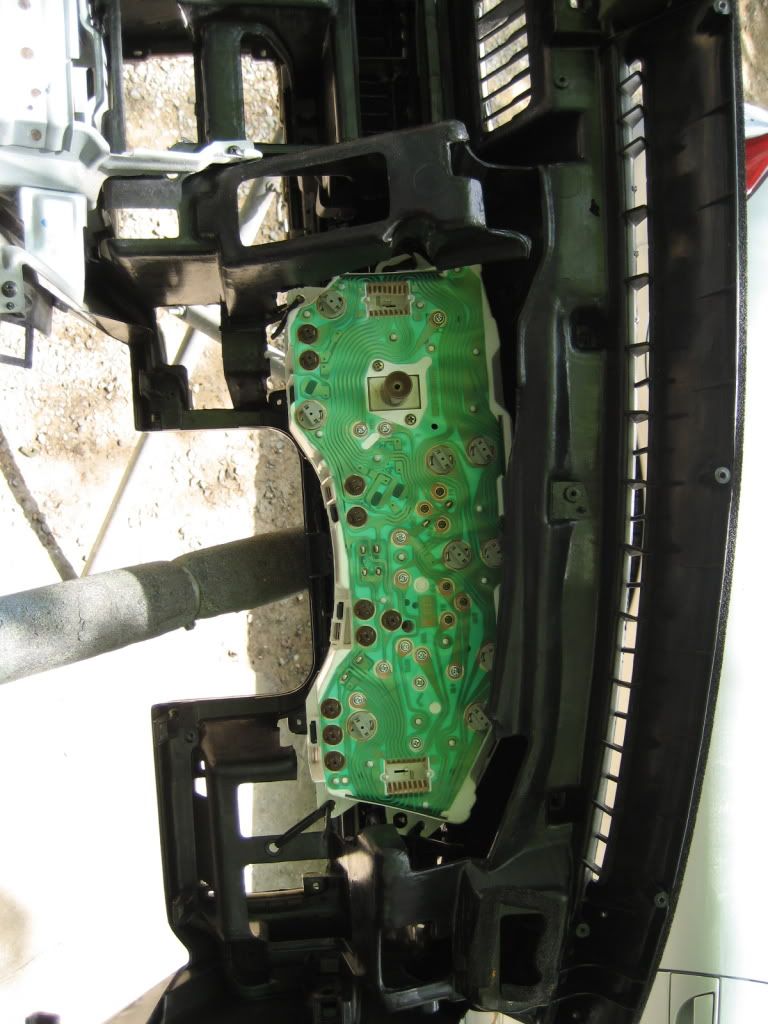
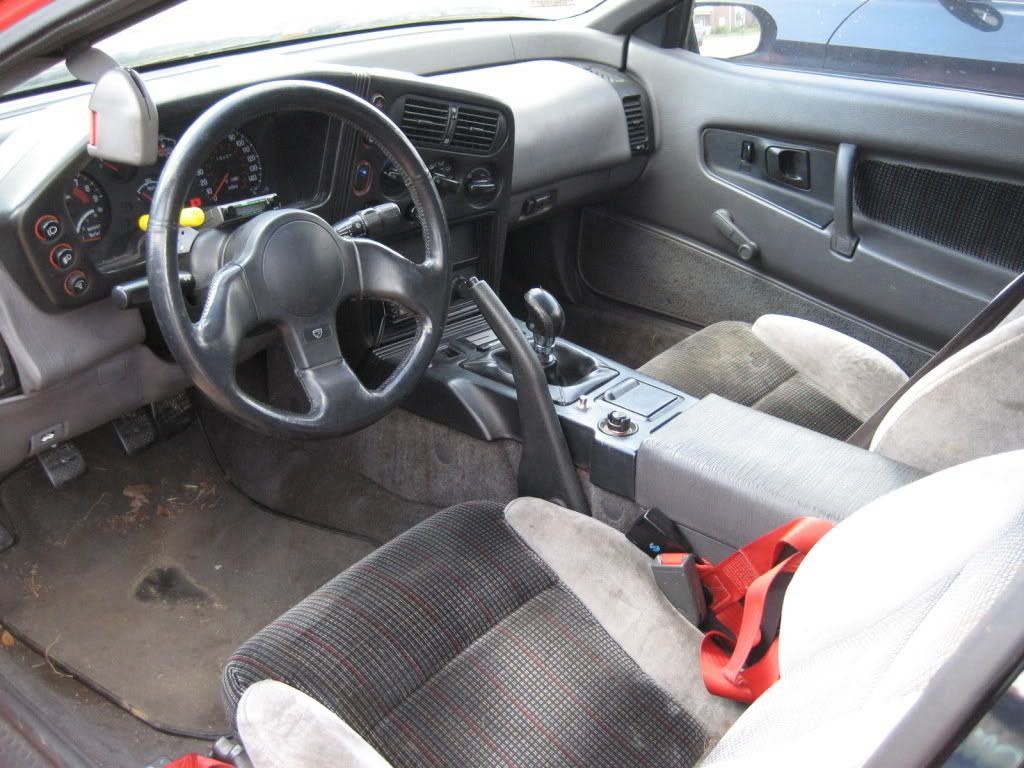
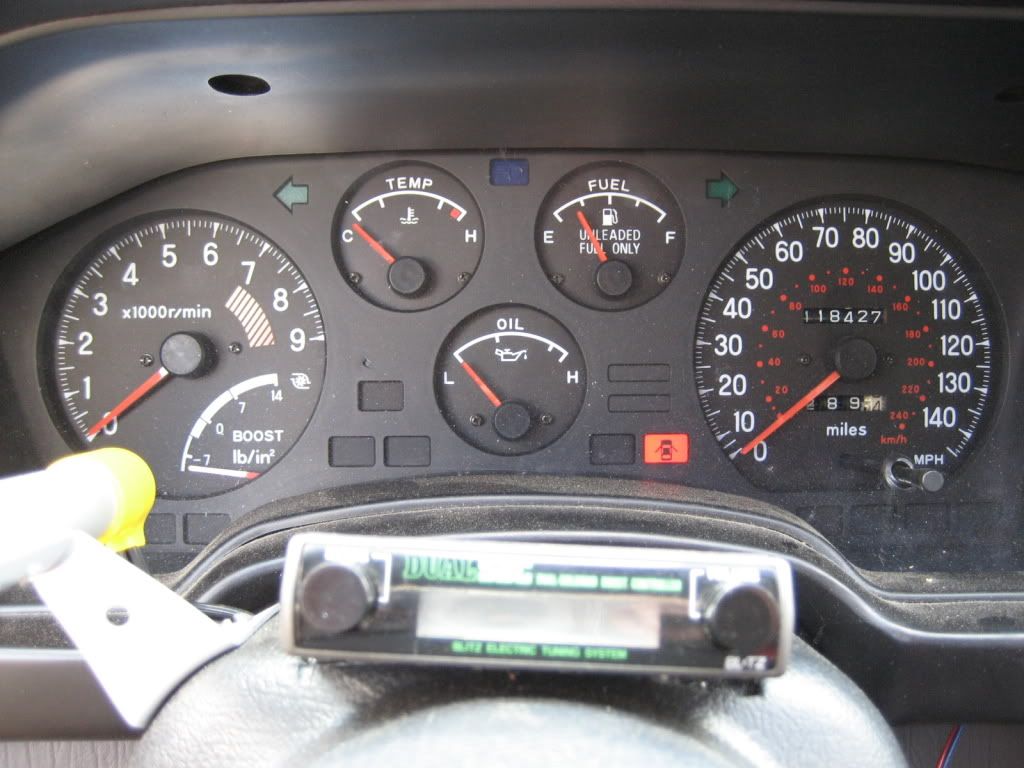
Decided to start figuring out how the gauge cluster was gonna work out. At this time I had picked up a great OEM black dash since all the original ISH was blue. All I got left to get in black now is the door panels. Anyways, after hacking most of the back of the dash up just to get the cluster to slide in, this is what I ended up with! And again, it’s like it was meant to be! Haha
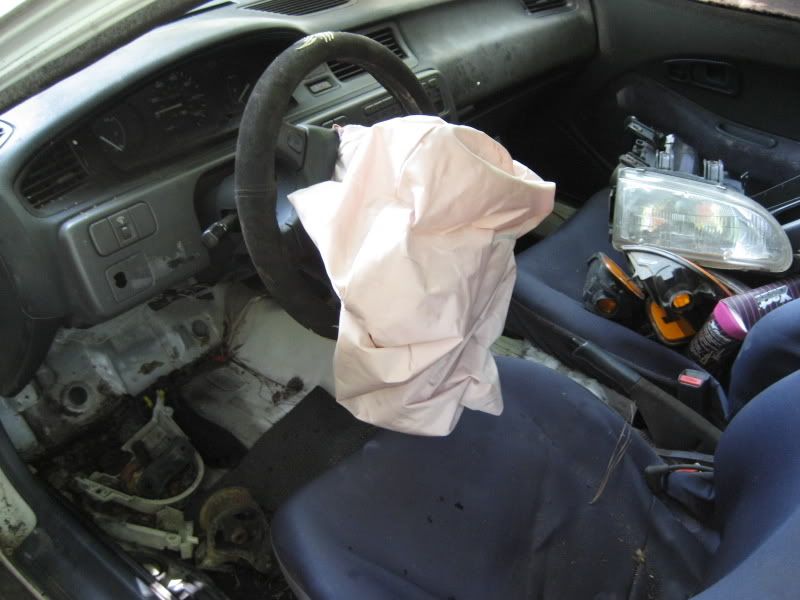
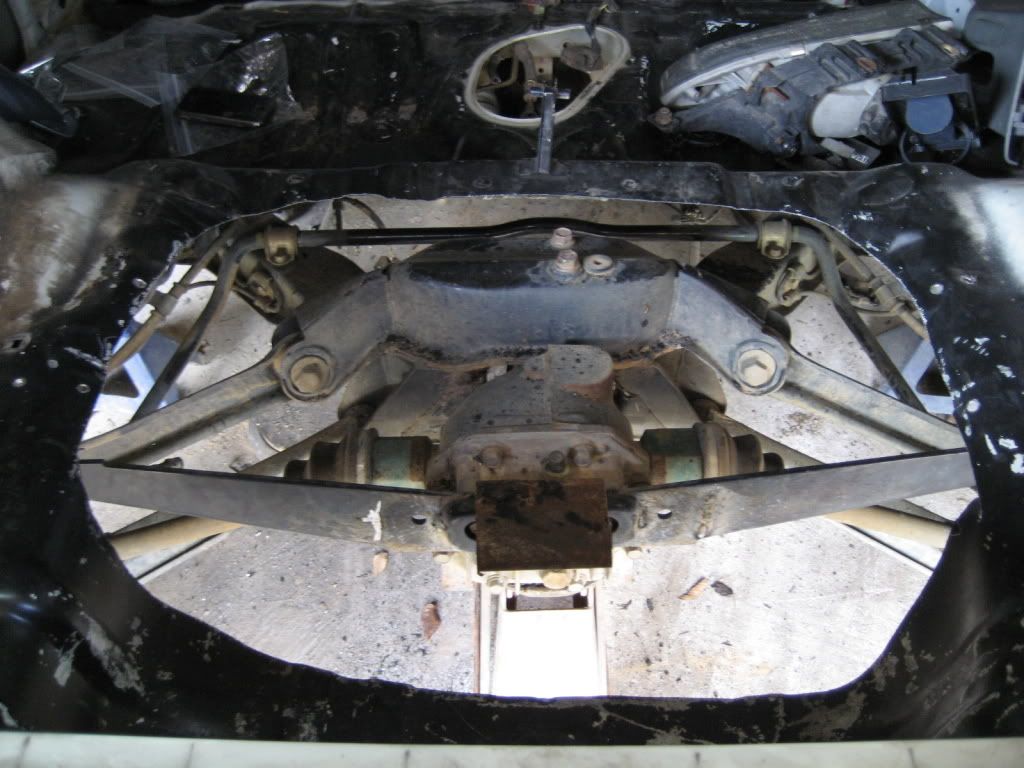
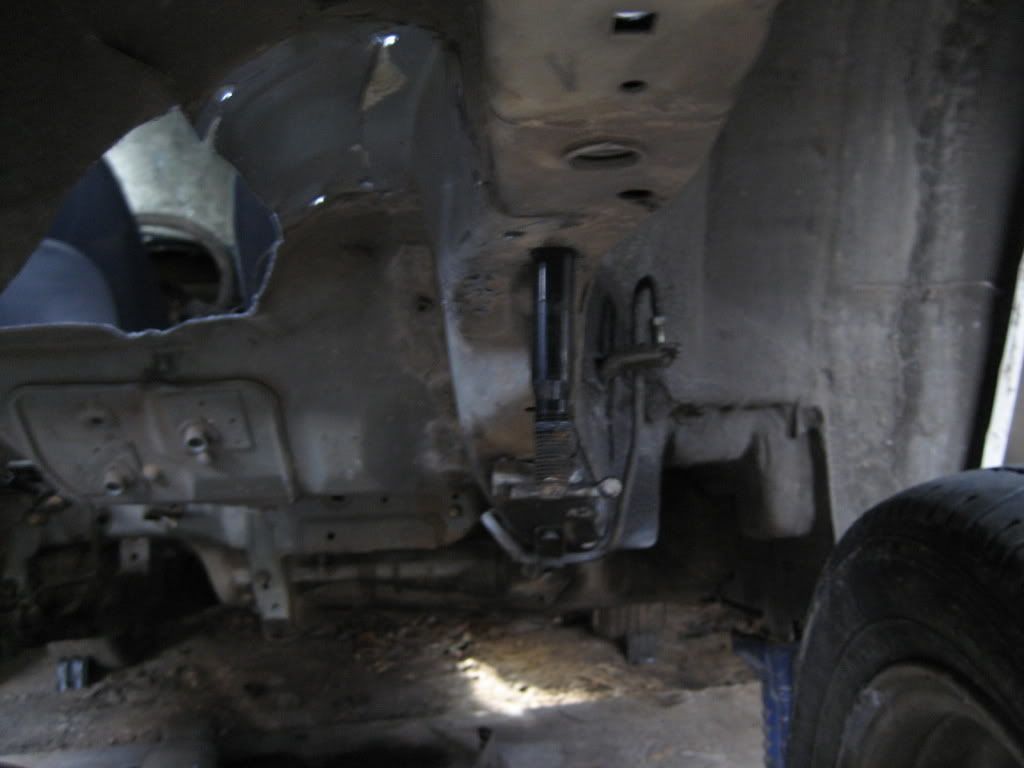
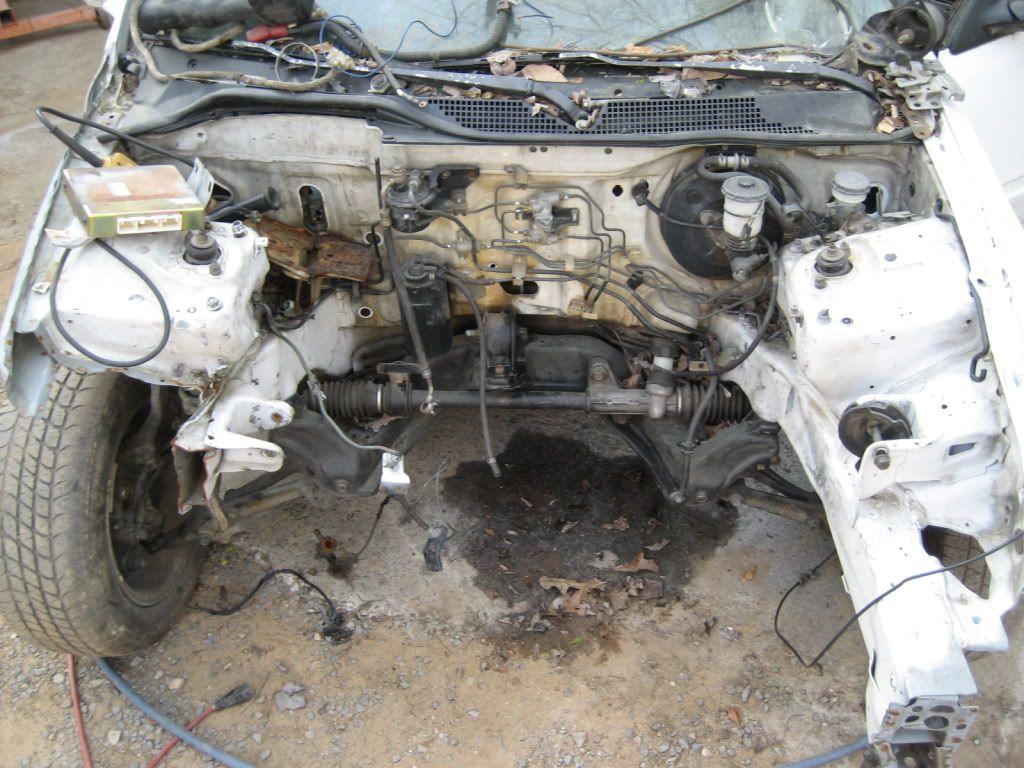
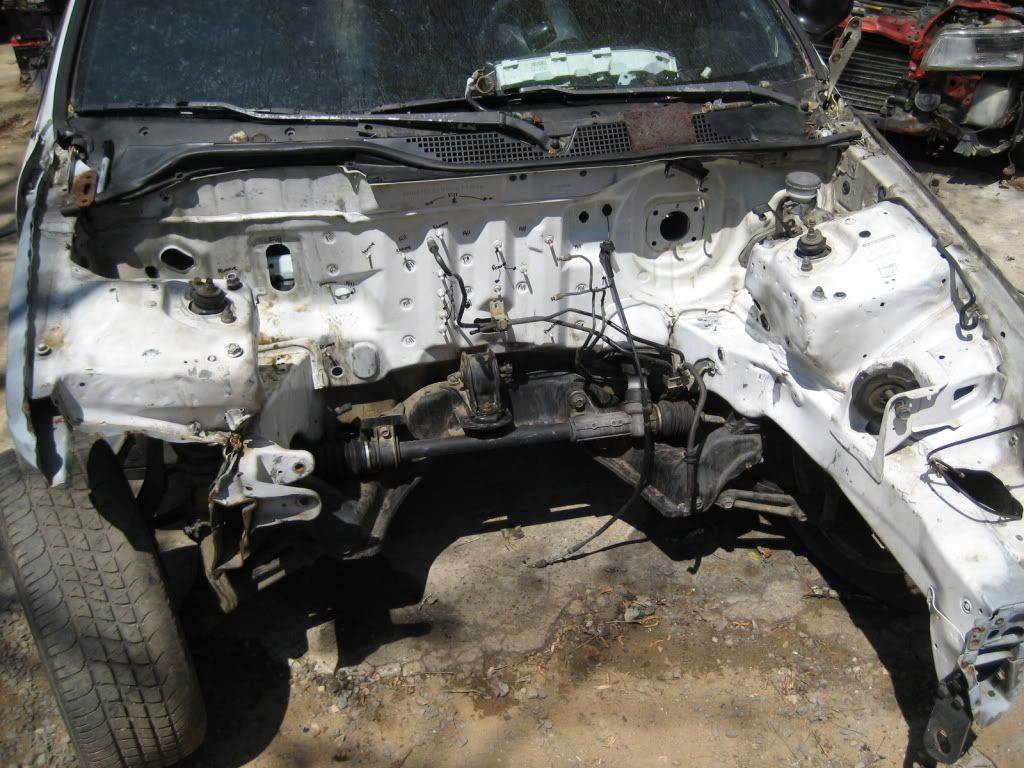
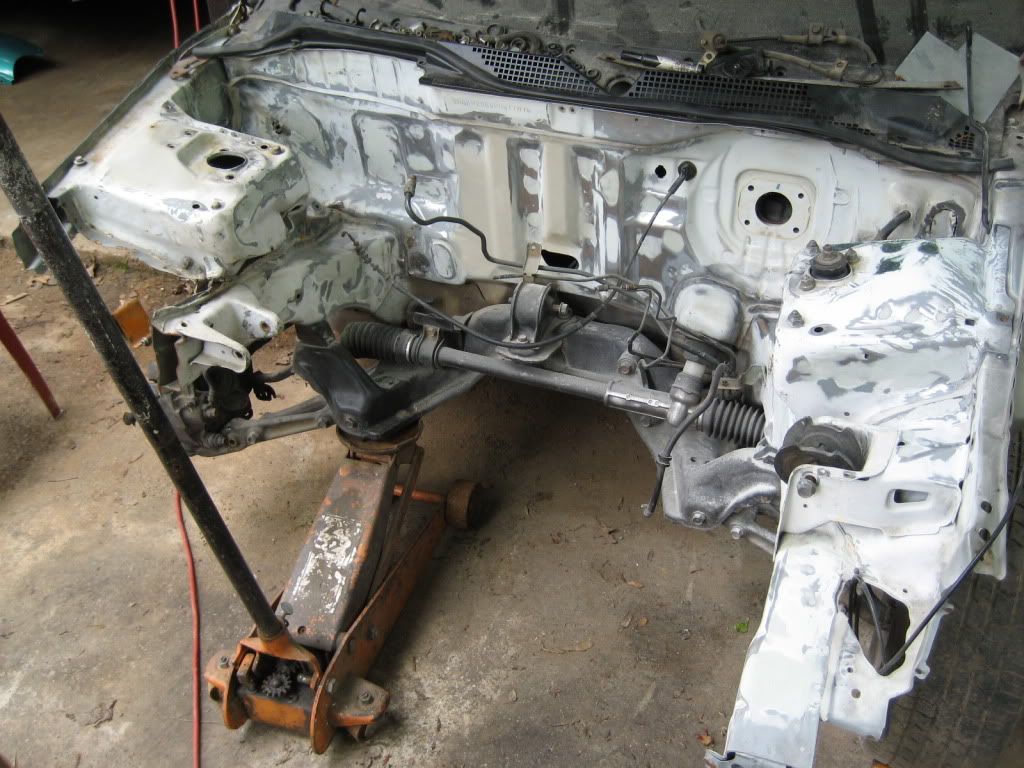
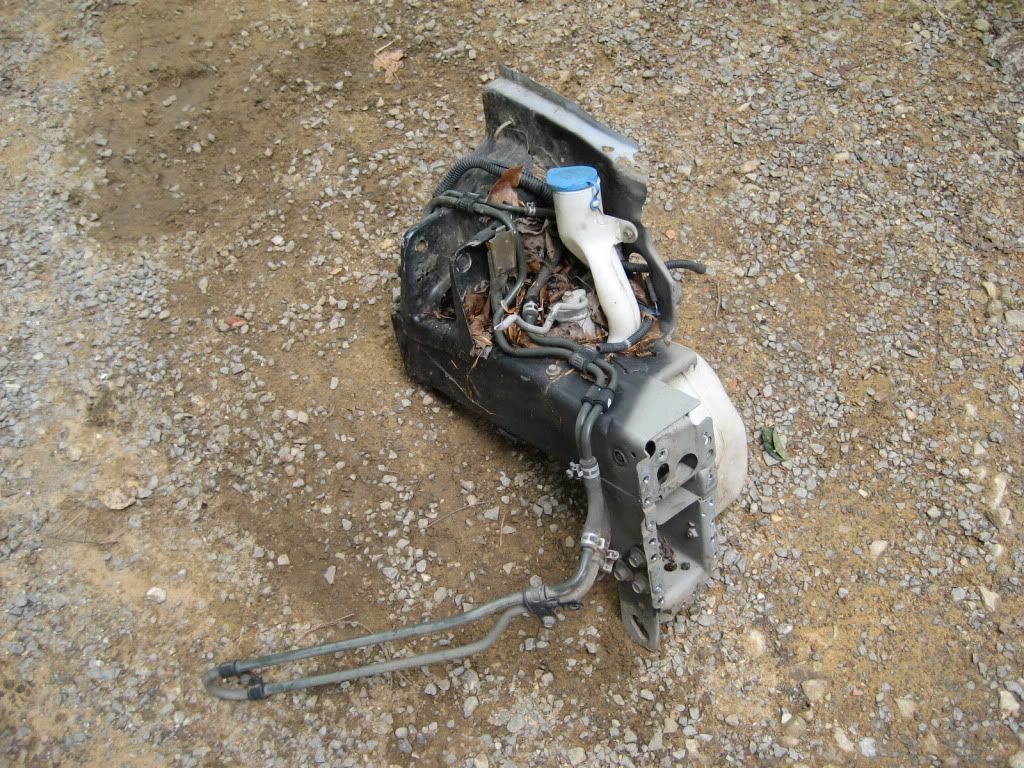
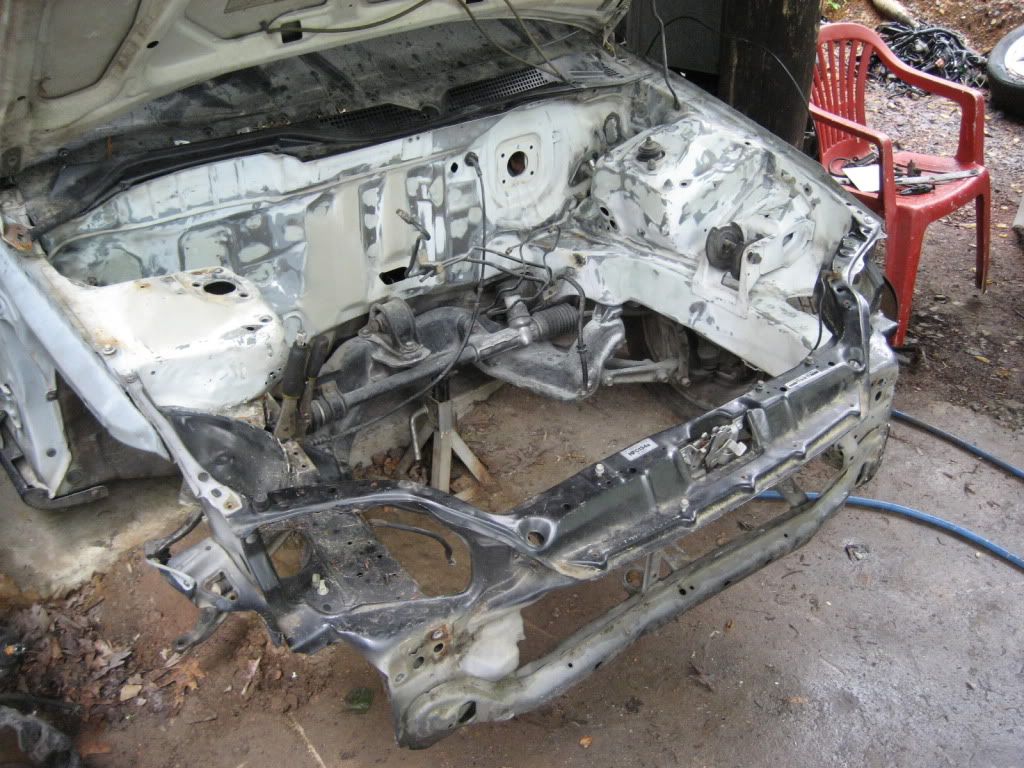
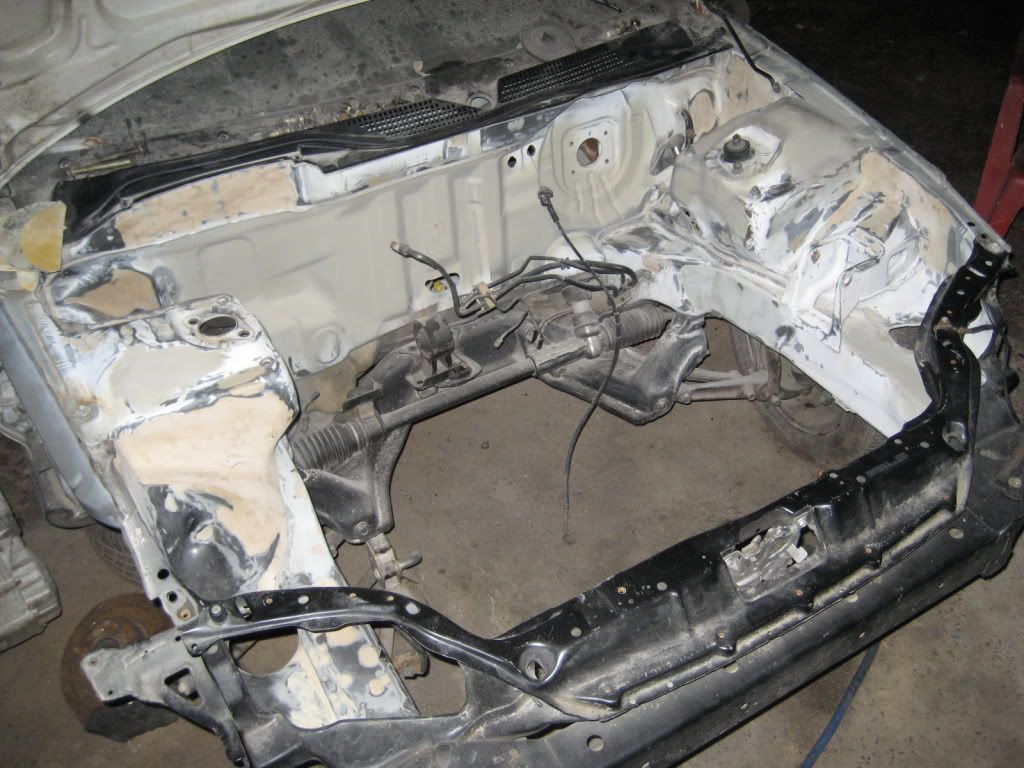
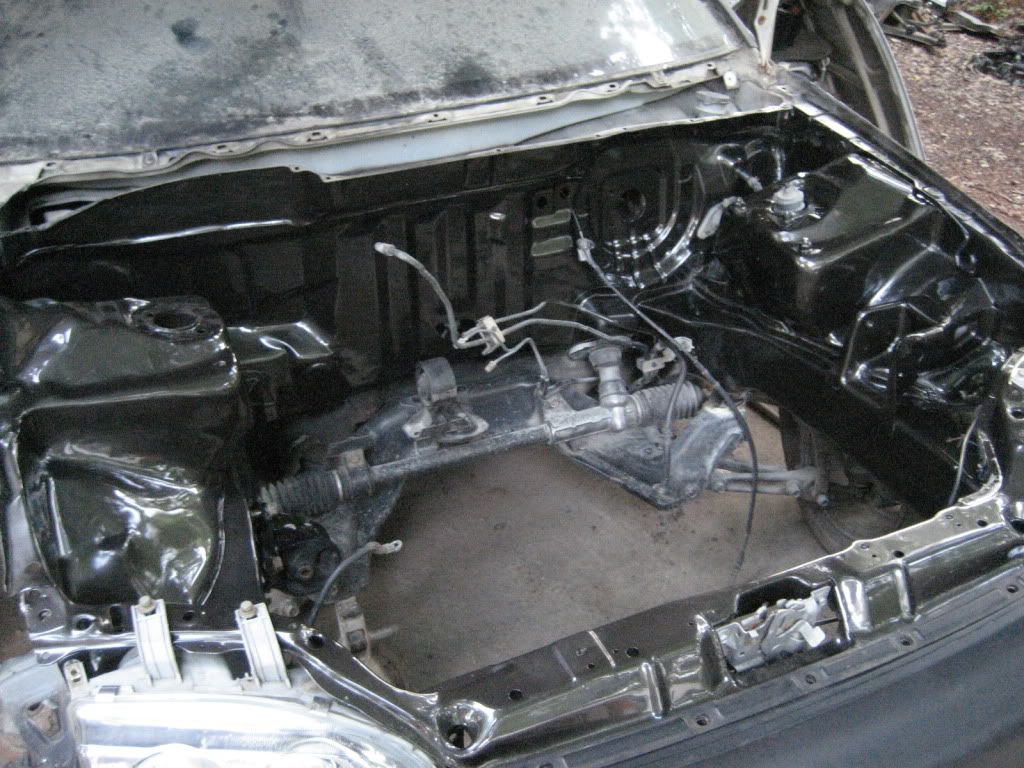
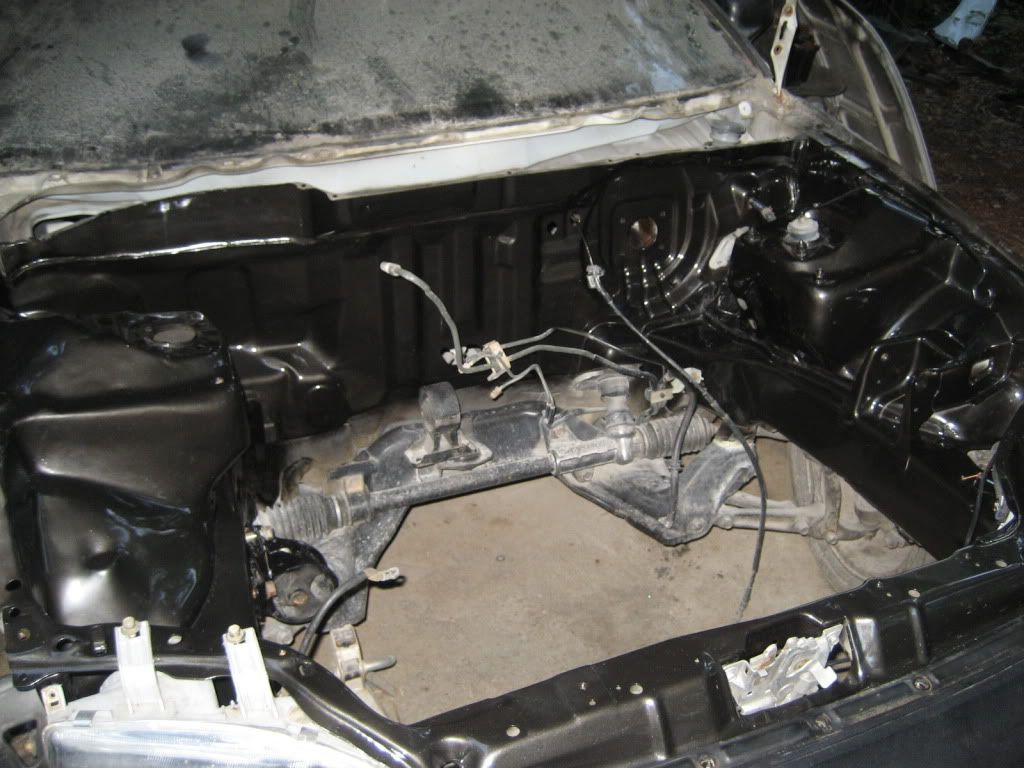
And with that stuff out of the way, it was time to move on to the front of the car again, and start fixing the damage. We have had this front piece for almost as long as the car has been sitting. It was nice to finally put the 2 together. Unfortunately we didn’t have the passenger side shock tower on the new front piece, so I had to live with the beat up one. I was able to make it look semi-decent for a first timer at body work in the end though
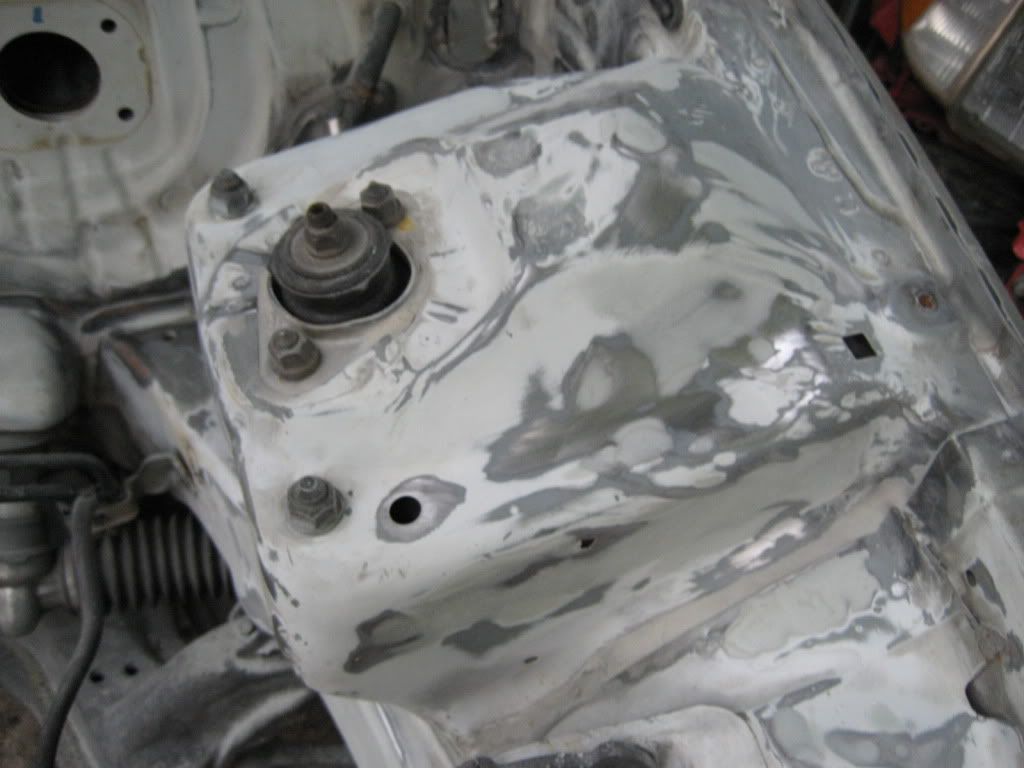
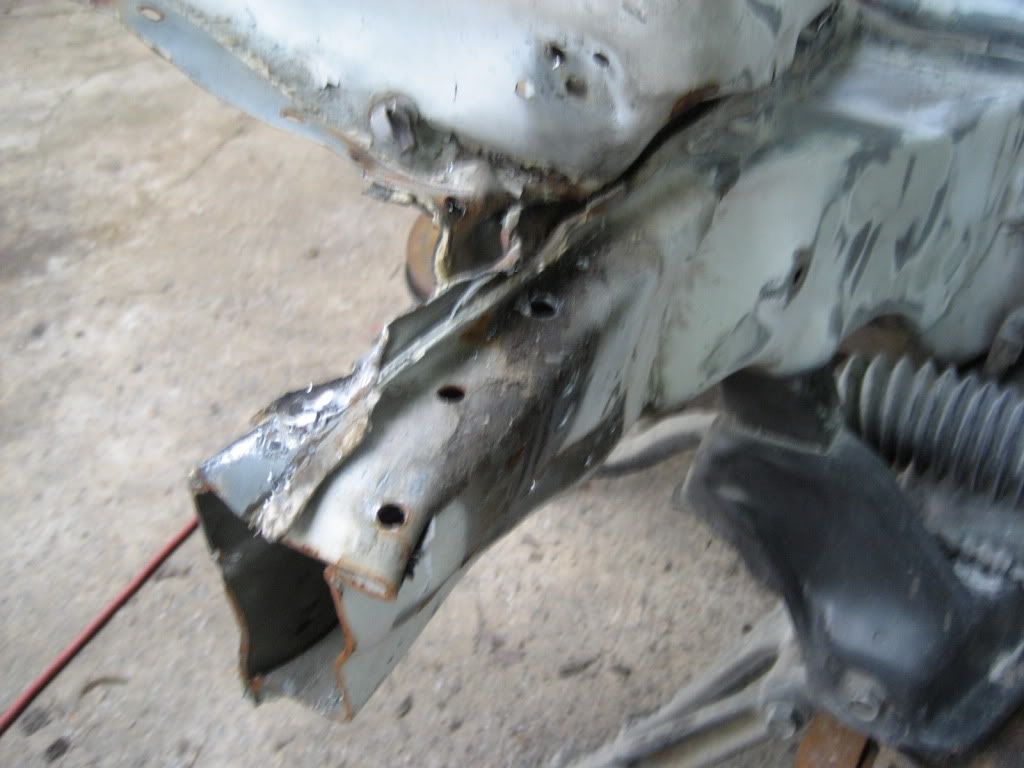
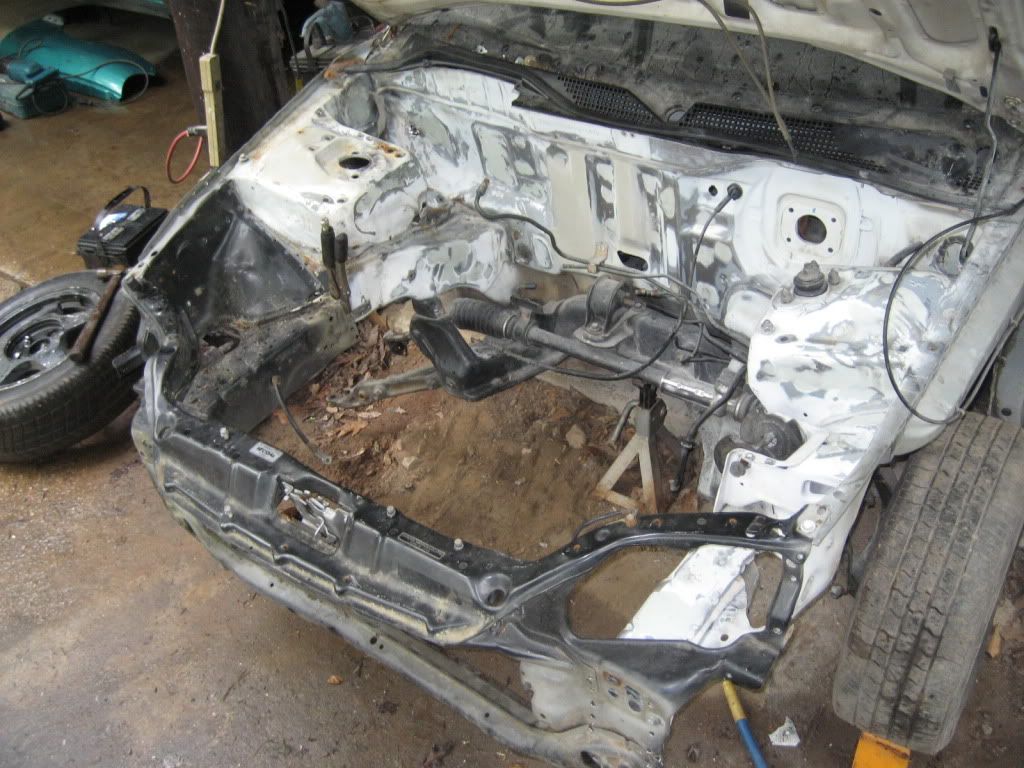
Unfortunately I got so caught up doing body work and stuff that I forgot to take some pictures. Luckily I got this one before I got too much further. You can see that shock tower started shaping up pretty well.
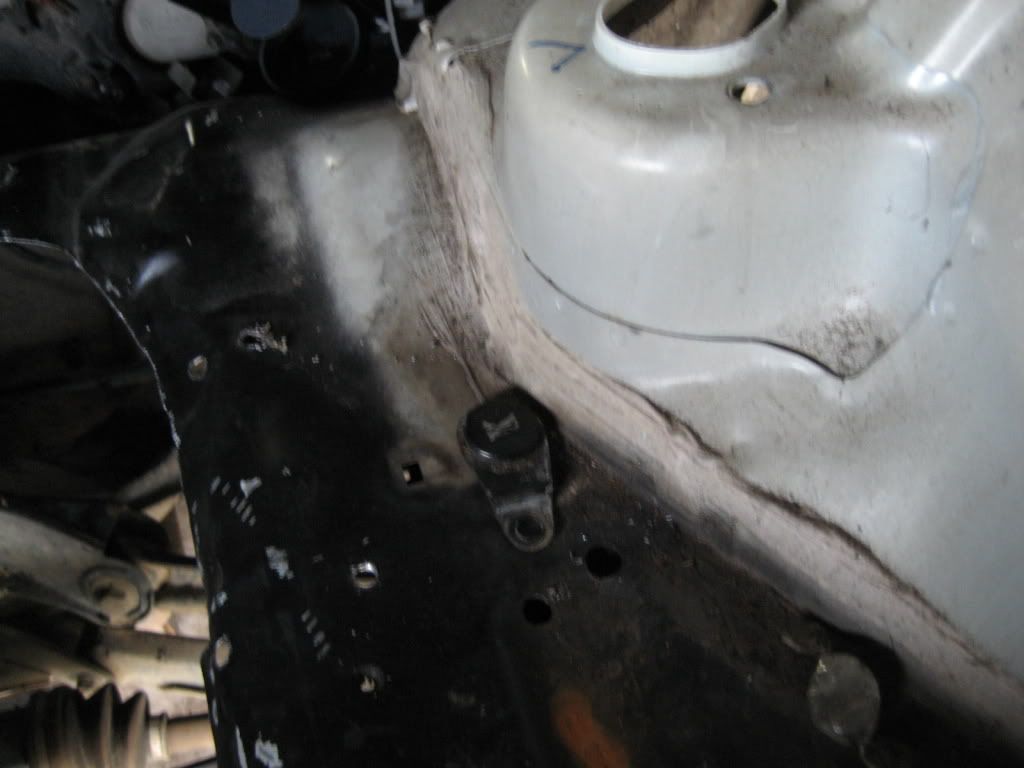
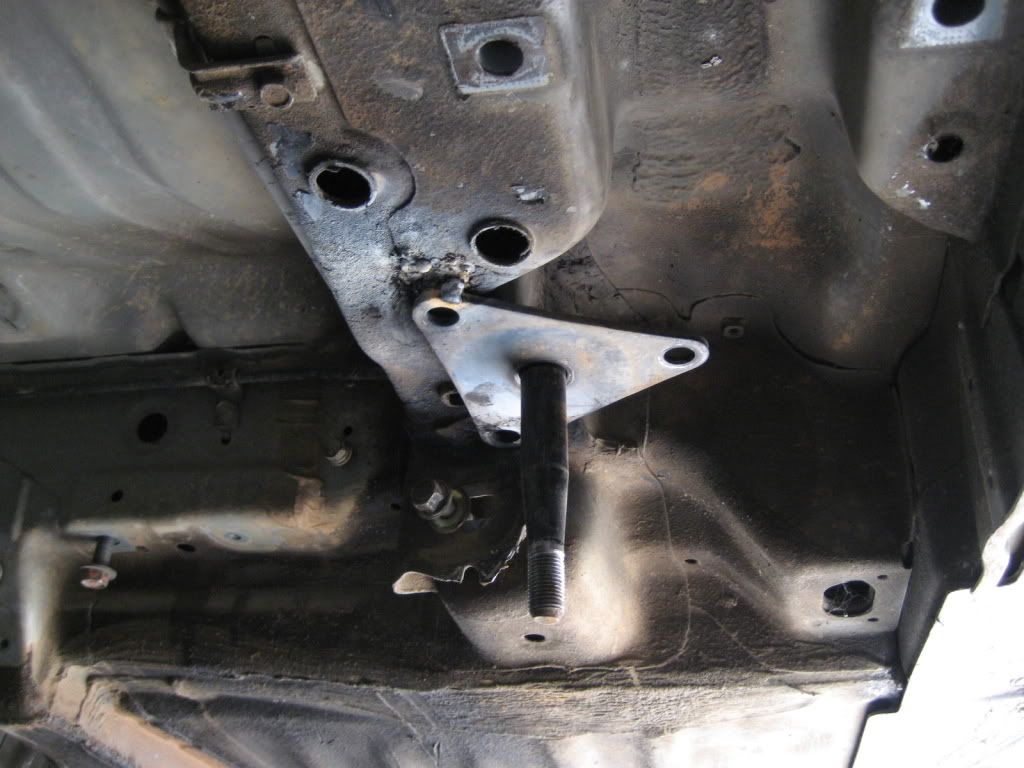
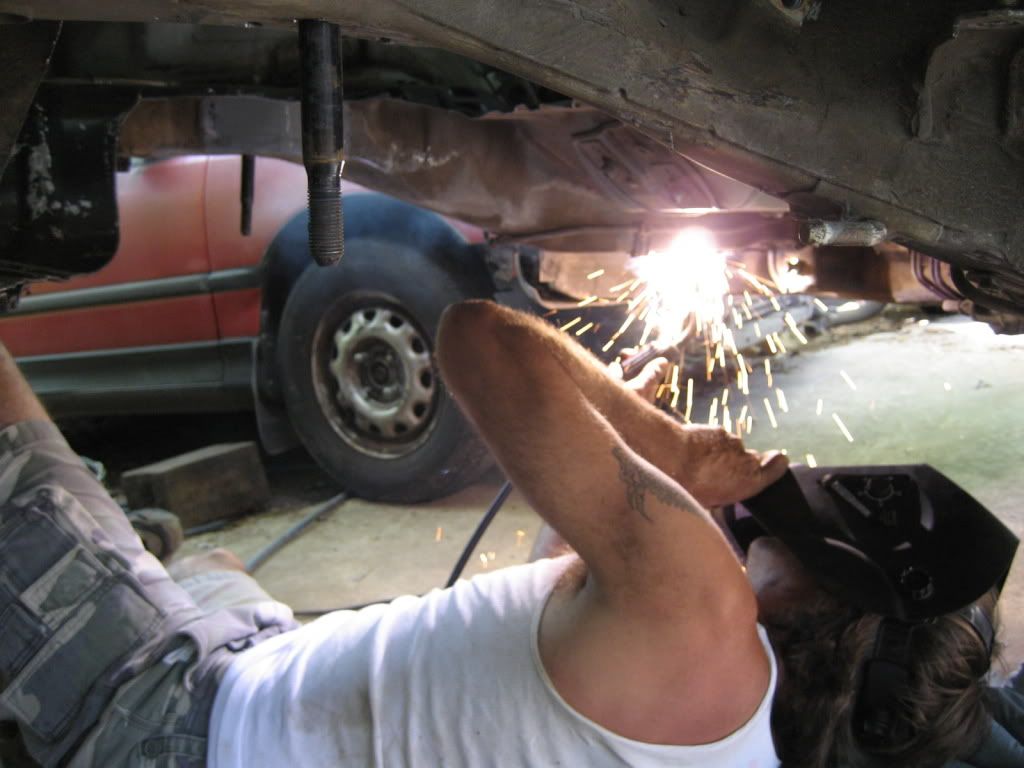
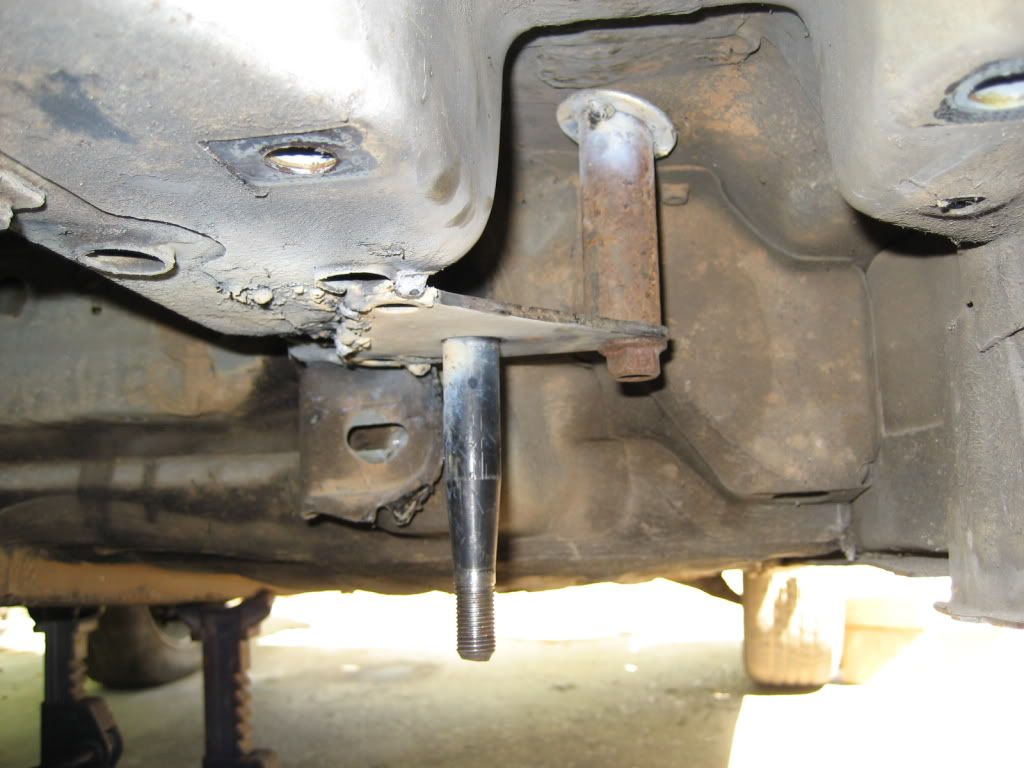
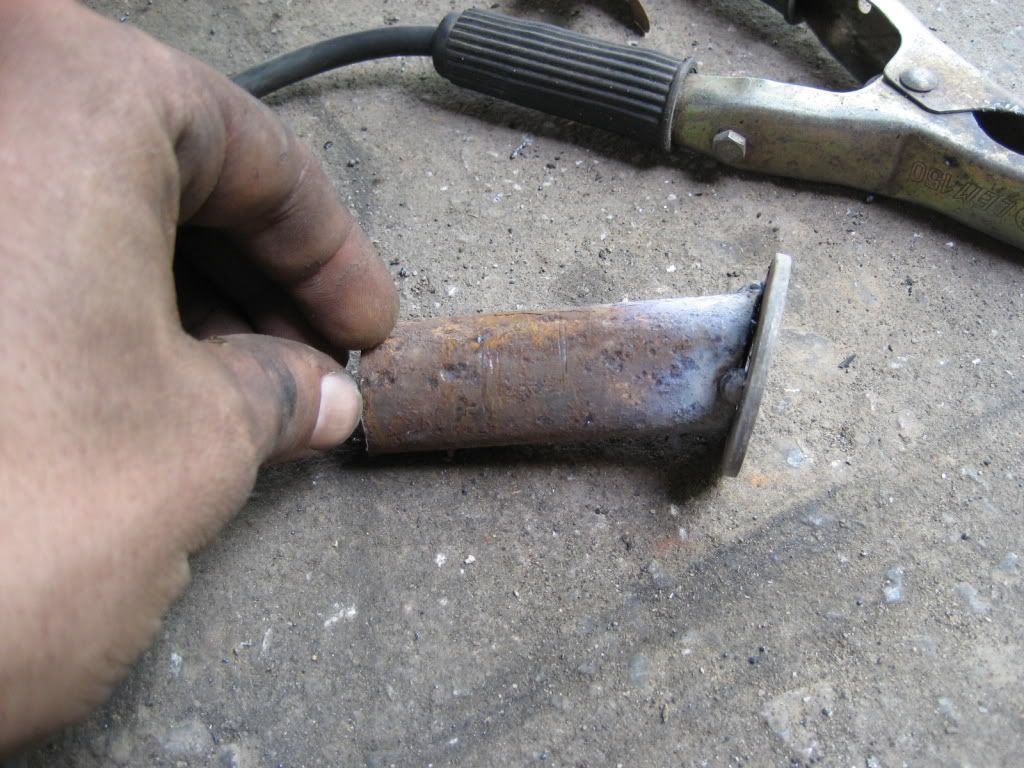
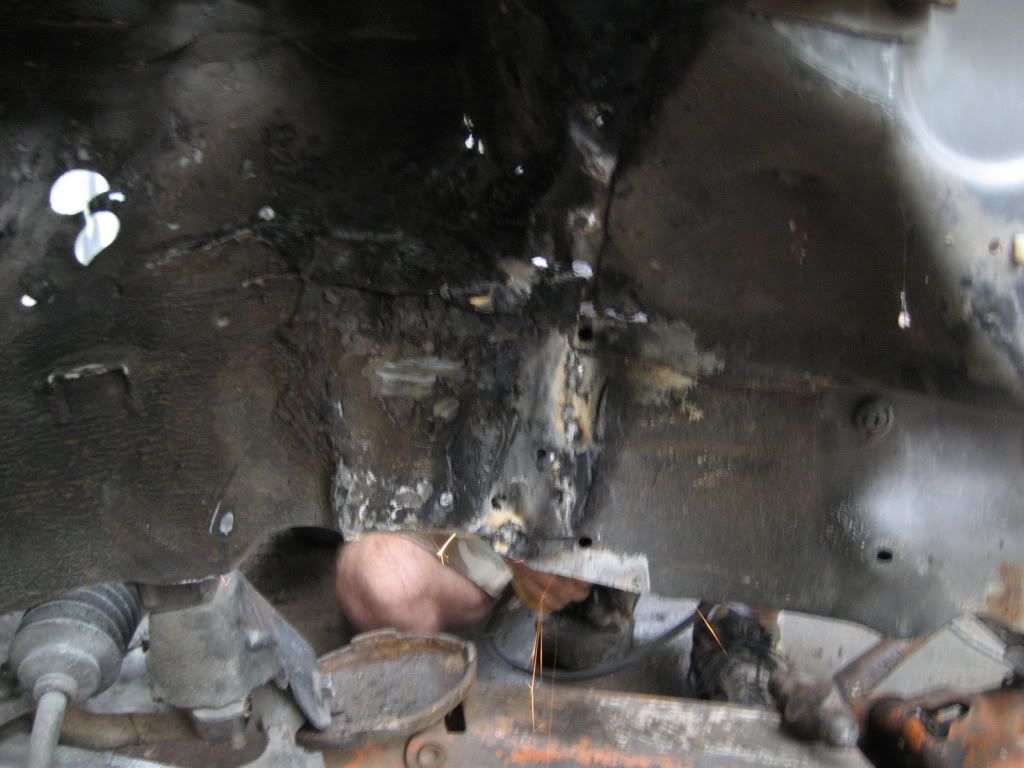
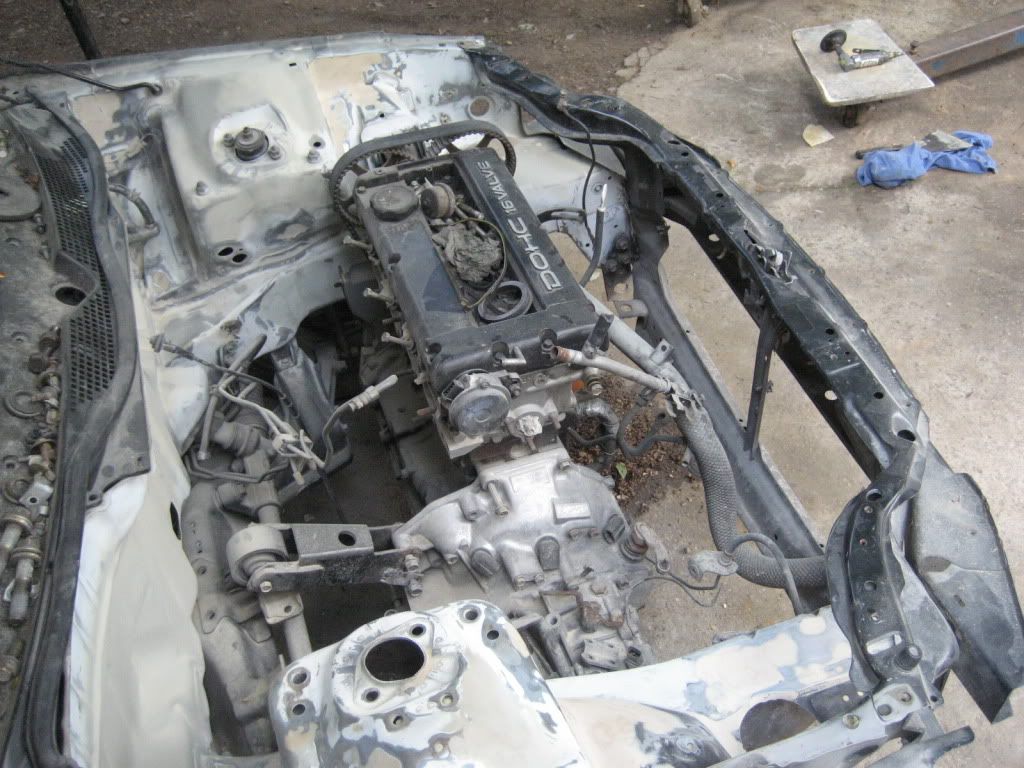
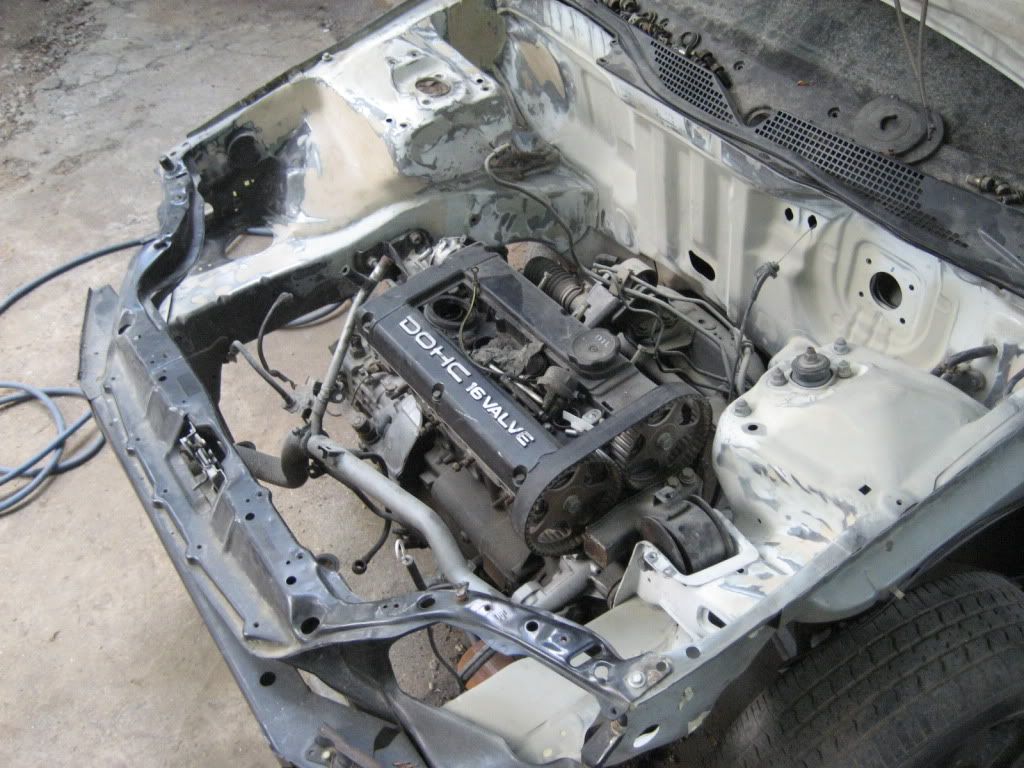
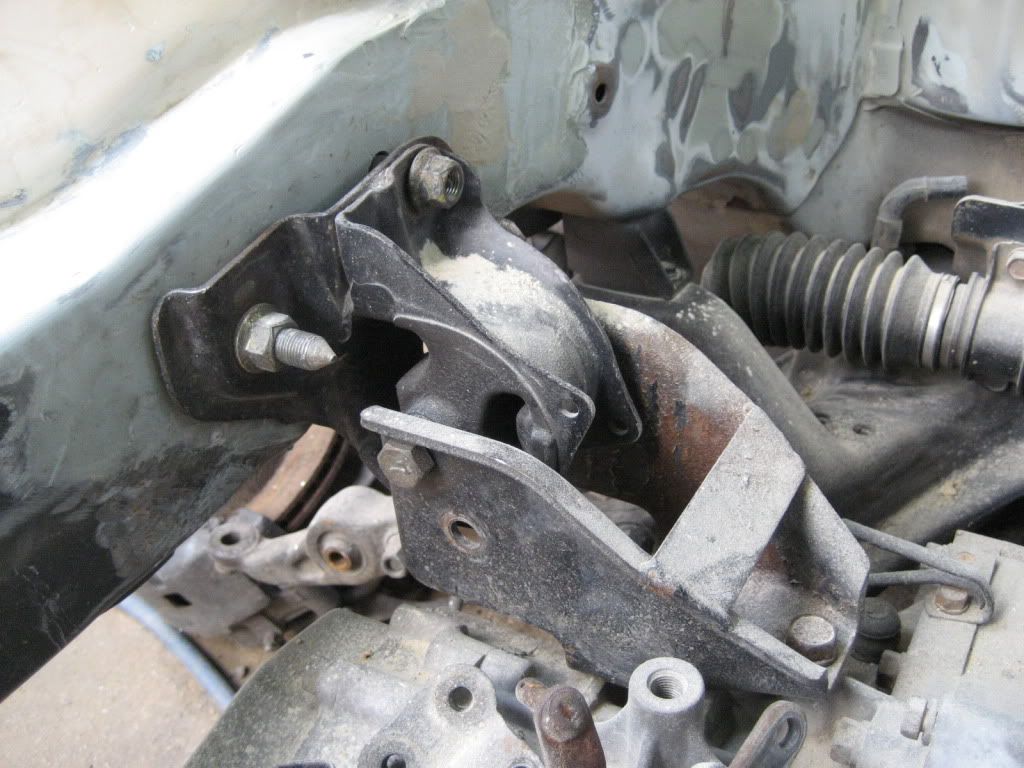
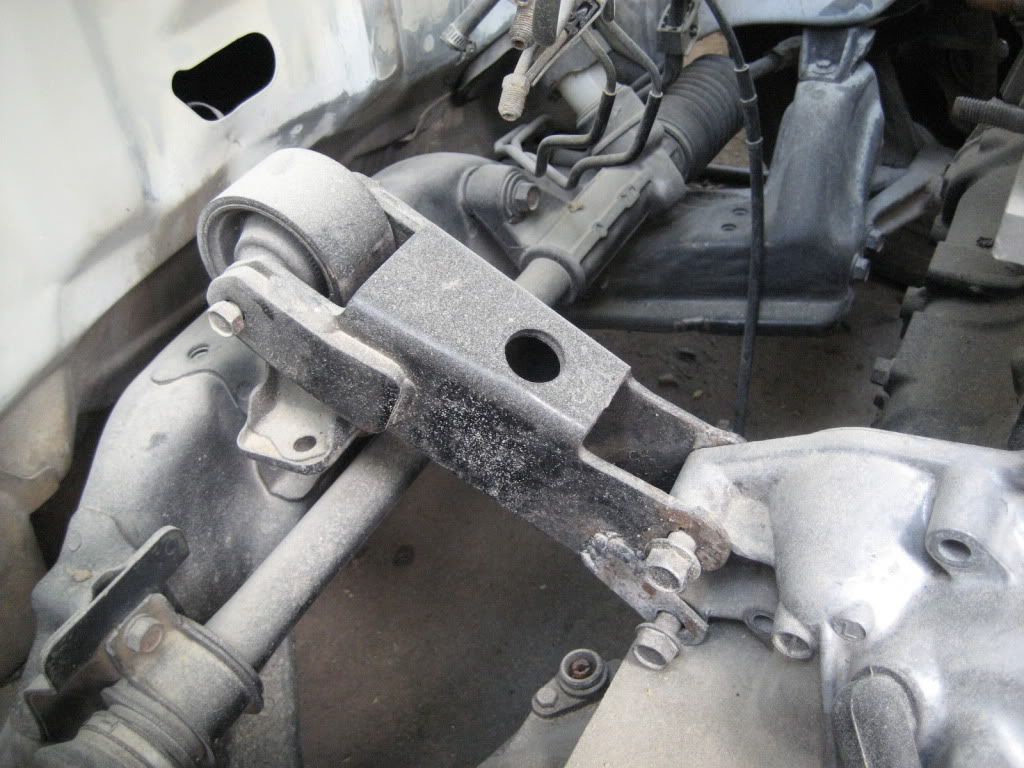
The next pictures are with the engine now in the car. Unfortunately my goob room mate had borrowed my camera without telling me, so I wasn’t able to get pics of modifying the mounts or the engine going in the car. But basically to sum it up, we didn’t have to do anything to the drivers side mount. The oem DSM found it’s home nicely in the factory civic mounting spot. 2 down, 1 to go. On the frame rail trans mount, we basically did it the same way as it was in the Laser. That is, there are 4 holes that are drilled through the frame rail that the mount bolts too. But unfortunately we didn’t get the mount off the laser, so we were forced to improvise with another mount. But as it turns out, I now have the OEM dsm mount, so when we go to raise the motor up, we are going to re-do that mount with the factory piece so it will be stronger. The one we used in the pics below uses 3 bolts, where as the dsm piece uses 4. But basically we just had the car on jackstands and hovered the motor where we thought it should be, marked the holes on the frame rail, and drilled em out Now the rear mount, we also just modified the DSM one. It originally bolted to the back of the engine block, but we modified it to where it would bolt to 2 empty holes on the trans case. I will try to let the pictures show you what I mean, but if you have any questions about them , just ask me. And excuse the filthiness of everything, I clean it all up here shortly. You can also see in the last pic why we are going to raise the motor. Trans is too bulky

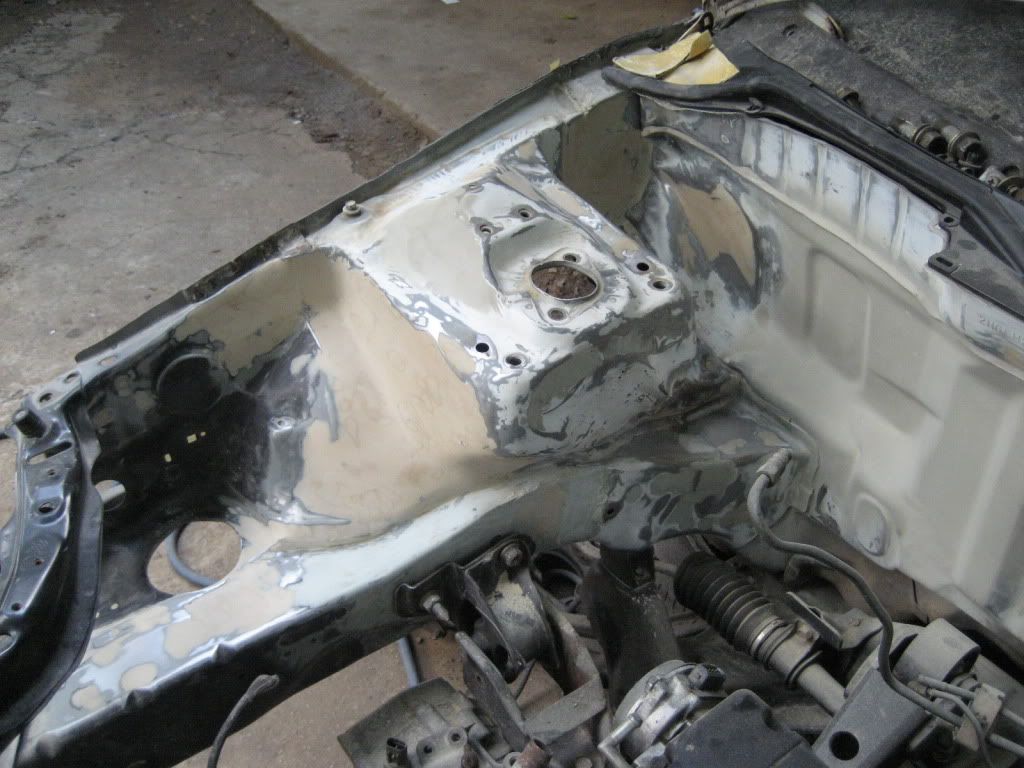

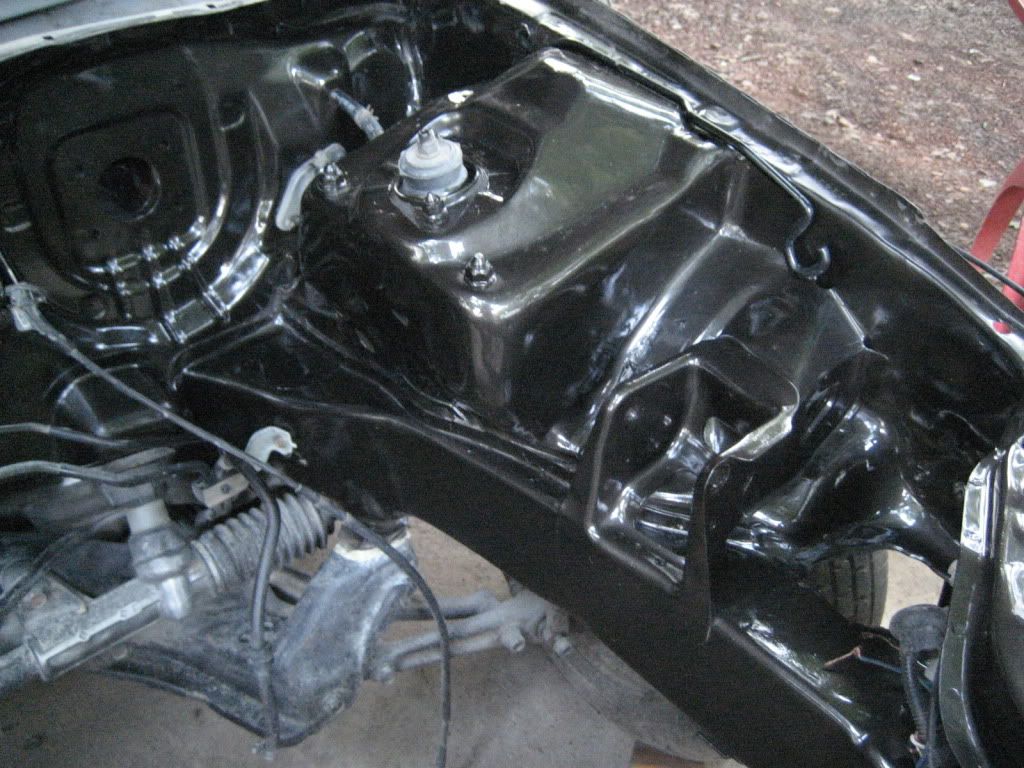
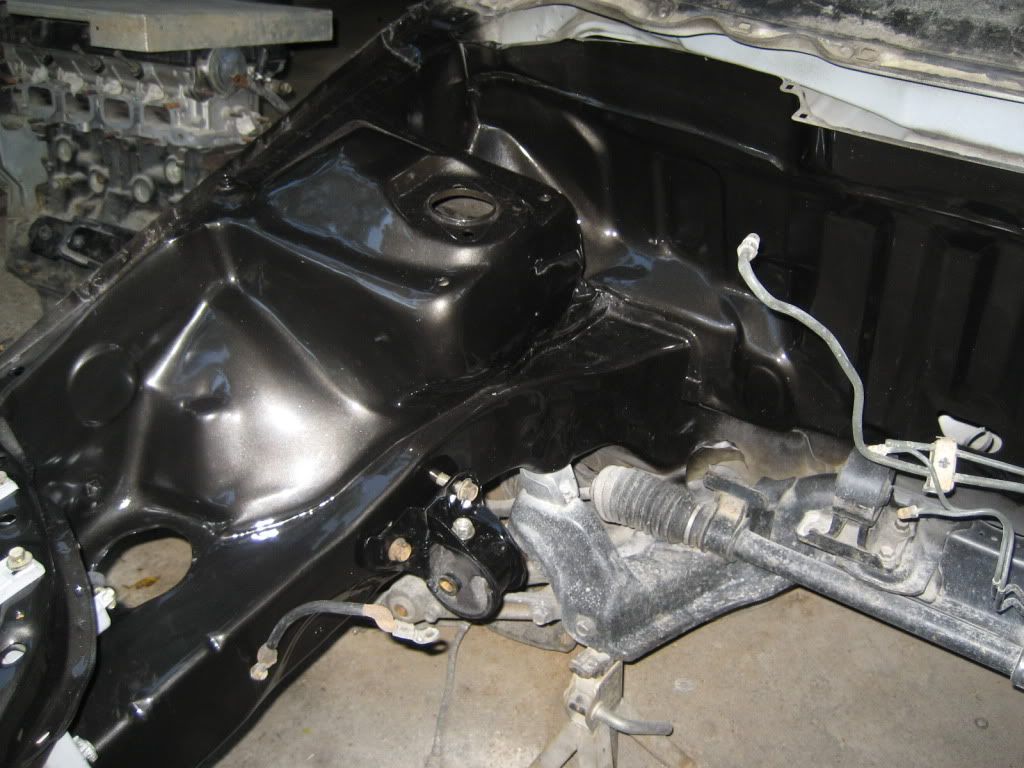
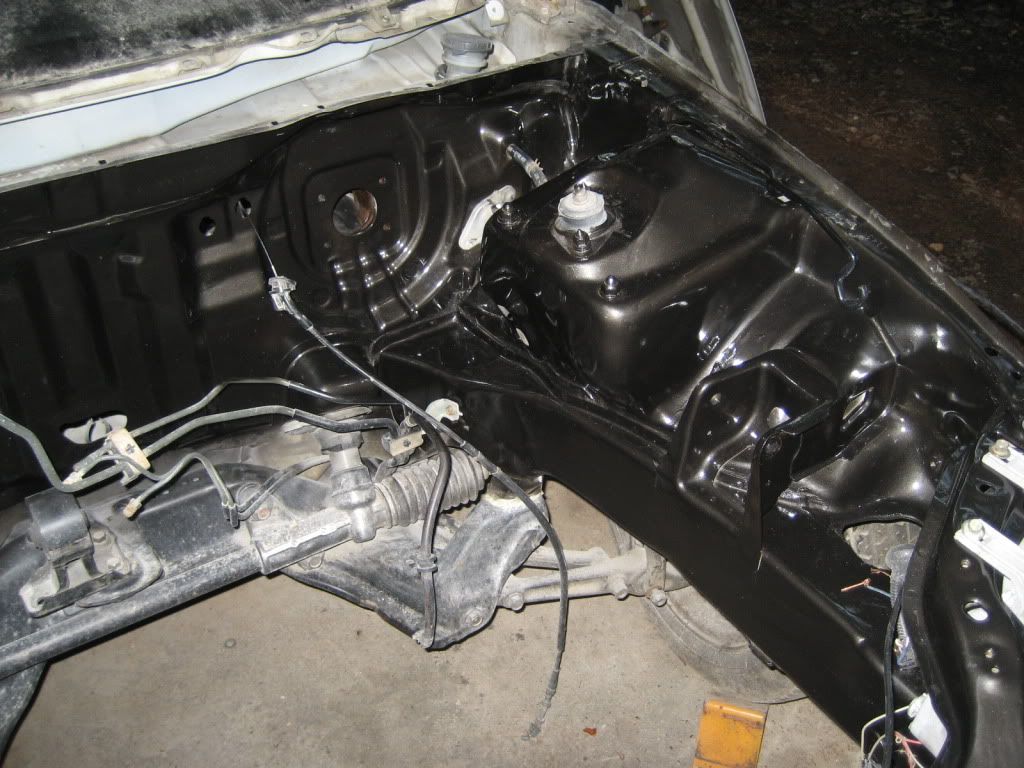
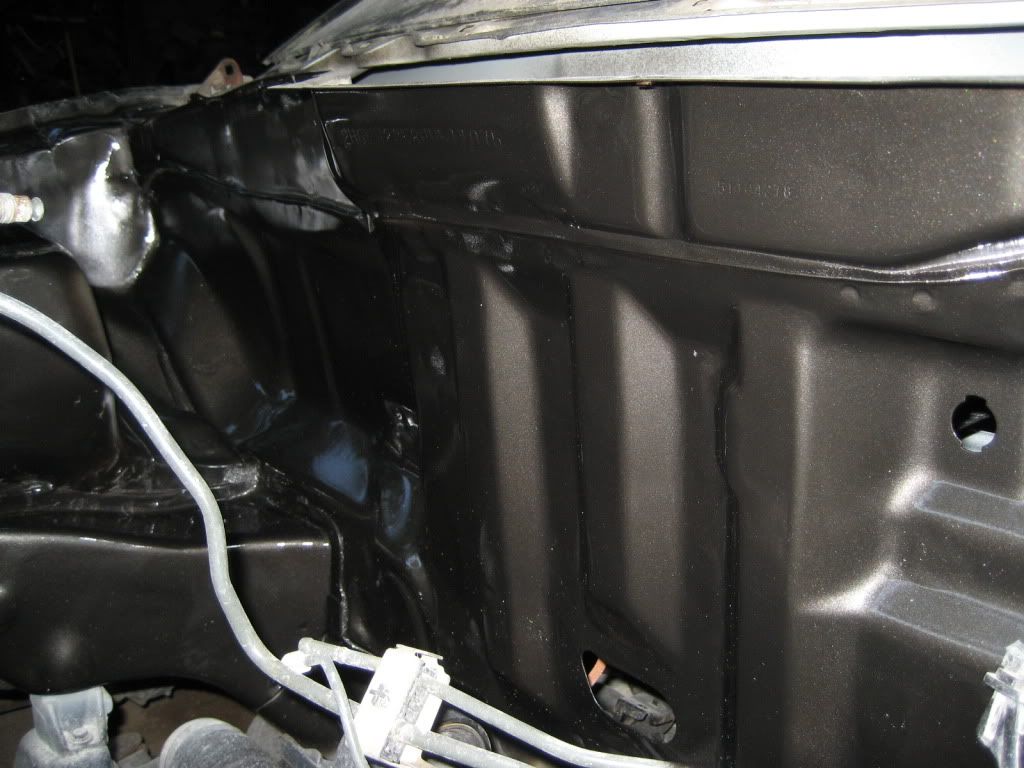
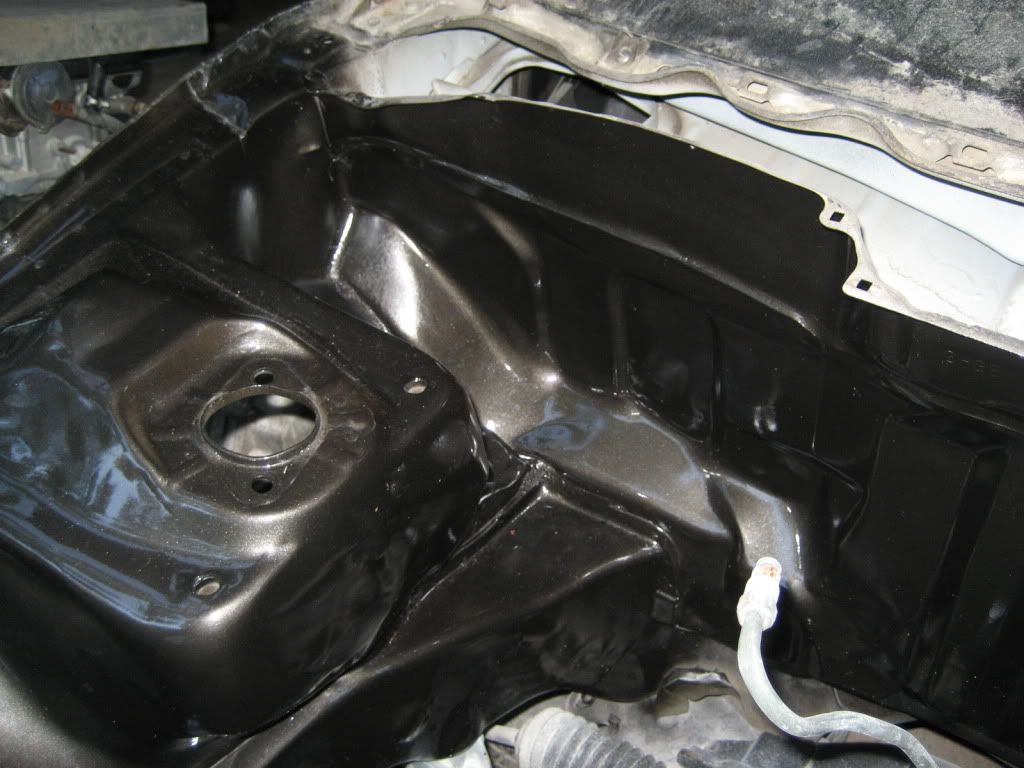
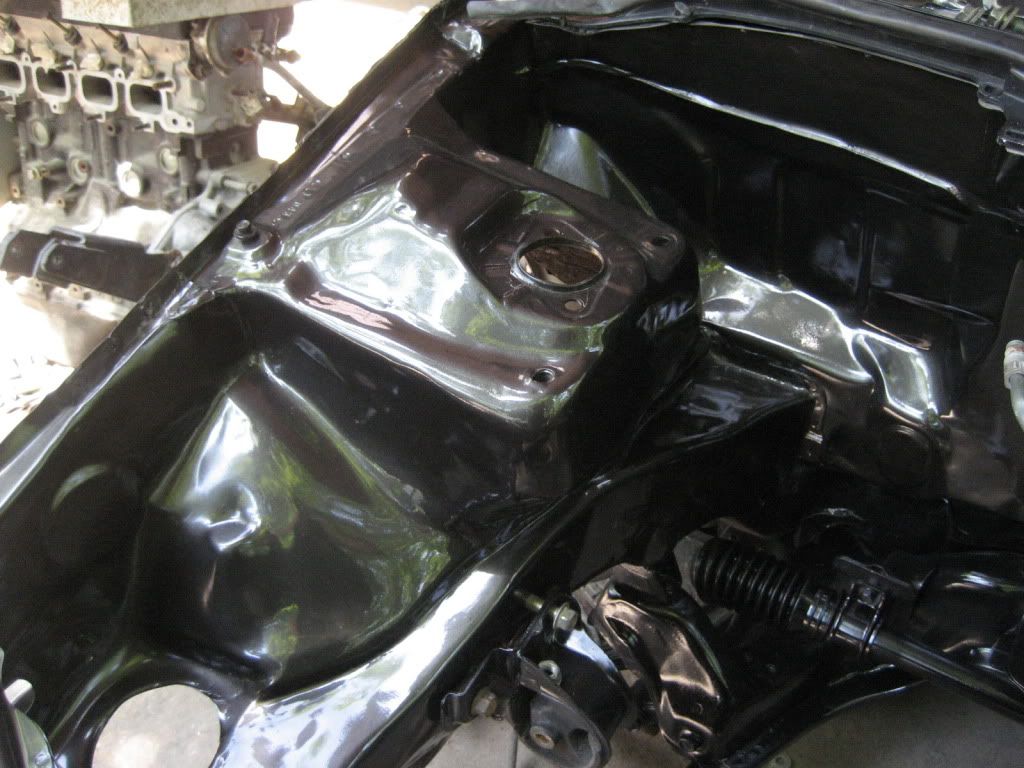
Well, while I was away at school, Dad had put the whole bay in primer and went ahead and painted it. Great news, cause when I got home I was able to see what all my hard work had got me. The only bad thing is that I never got to see the bay in primer, there for I wasn’t able to go back and fix any of the bad spots in the bodywork. Cause as you know, they all show up once in primer. But it turned out alright. I am just nit picky and can see all of the things that I could have went back and made look better had I gotten to see the bay when it was in primer. But like I said, it still turned out good, and A LOT better than what it once was. How does everyone like the color? I won’t say what it is right now, but I will eventually. The camera doesn’t really do the color justice. And in the first pics, the subframe is super nasty, but I took care of that as soon as I got back home to work on the car again as you can see farther down in the pics.


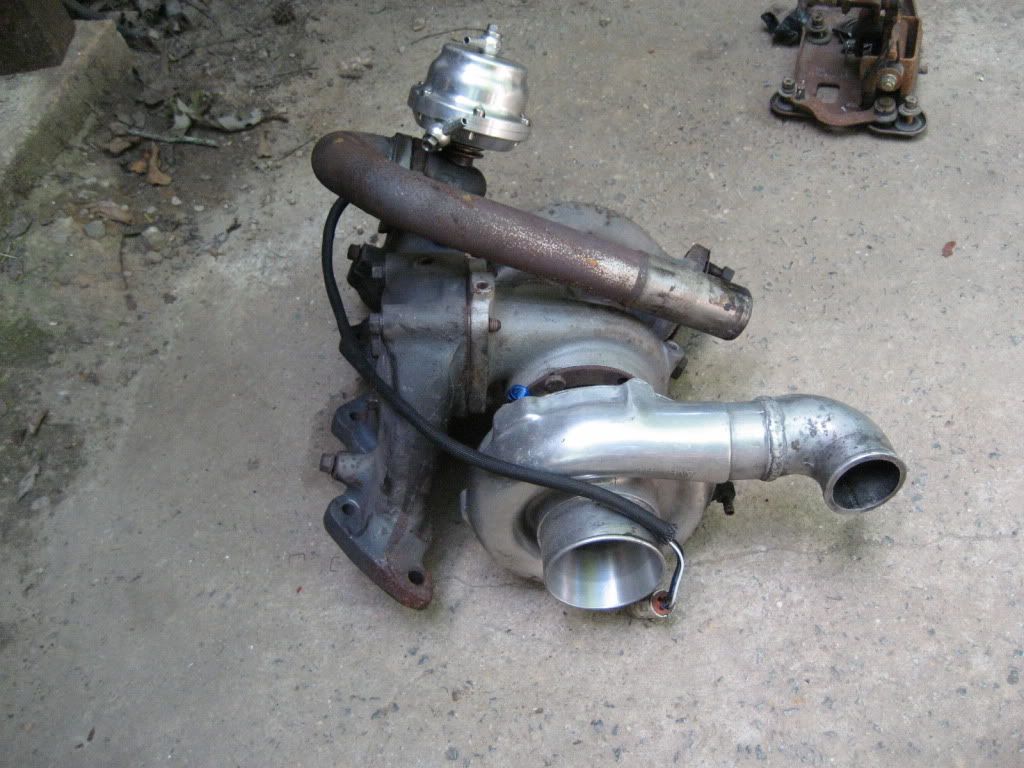
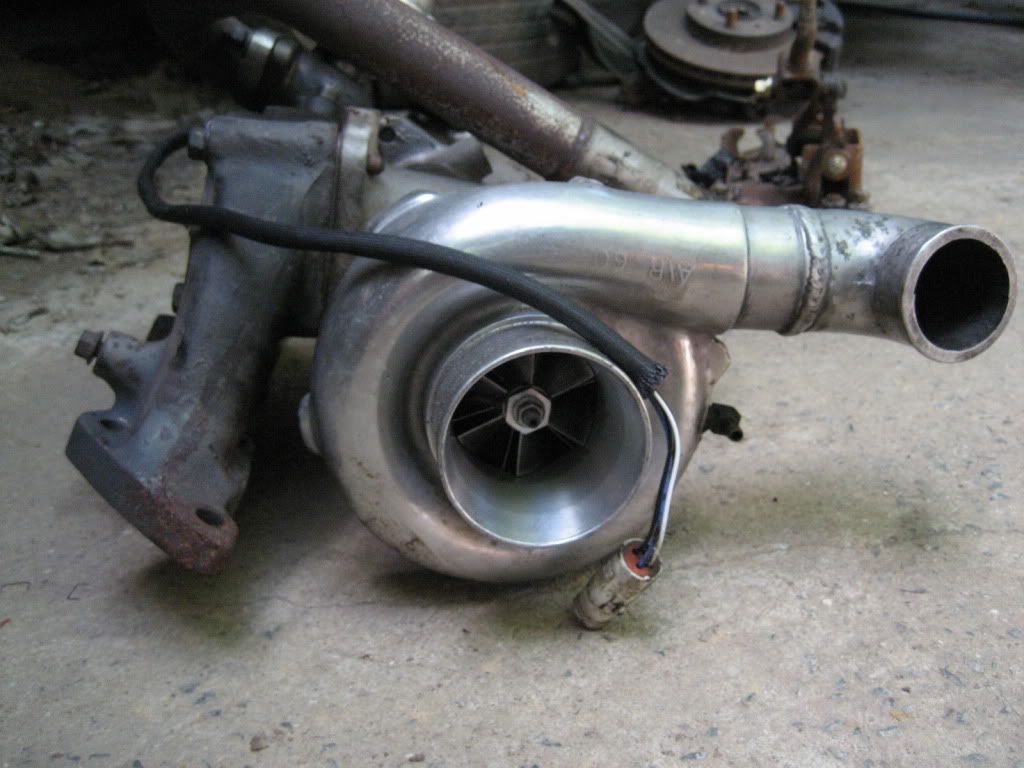
Somewhere during this whole build I had acquired another AWD DSM for a dumb price. It was a 1990 Eagle Talon TSI that had an SC61 turbo setup, Haltech Engine management, Rota Slipstreams, Built bottom end and head, aftermarket clutch, and a bunch of other goodies. The only thing wrong was the front axles were broke so it was only driving in RWD mode. The good part is, a buddy of mine had originally built the car, and he knows what he is doing, so I know it was built right. And I had also personally witnessed it making 420awhp on pump gas! So now I had a pretty awesome powerplant to drop in the hatch for now until I can build the other motor like I want it. Now the crackhead part. My bud who built the car had sold it to some other dude (who had broke the axles), and I traded that guy a CRX that I had bought for $400 and gave him $800 cash. So basically I just got this built talon for $1200. So far luck has been on my side during this build. I pray that it stays that way and that I can find some more ridiculous deals! So now, I have a spare motor, spare trans, and spare t-case in case I need them. Not to mention I got an SC61 turbo setup, Rota Slipstreams and a Haltech EMS out of it to go in the hatch! Plus I can sell the shell and some other parts off the talon to recuperate what I bought it for, and basically have it for free!
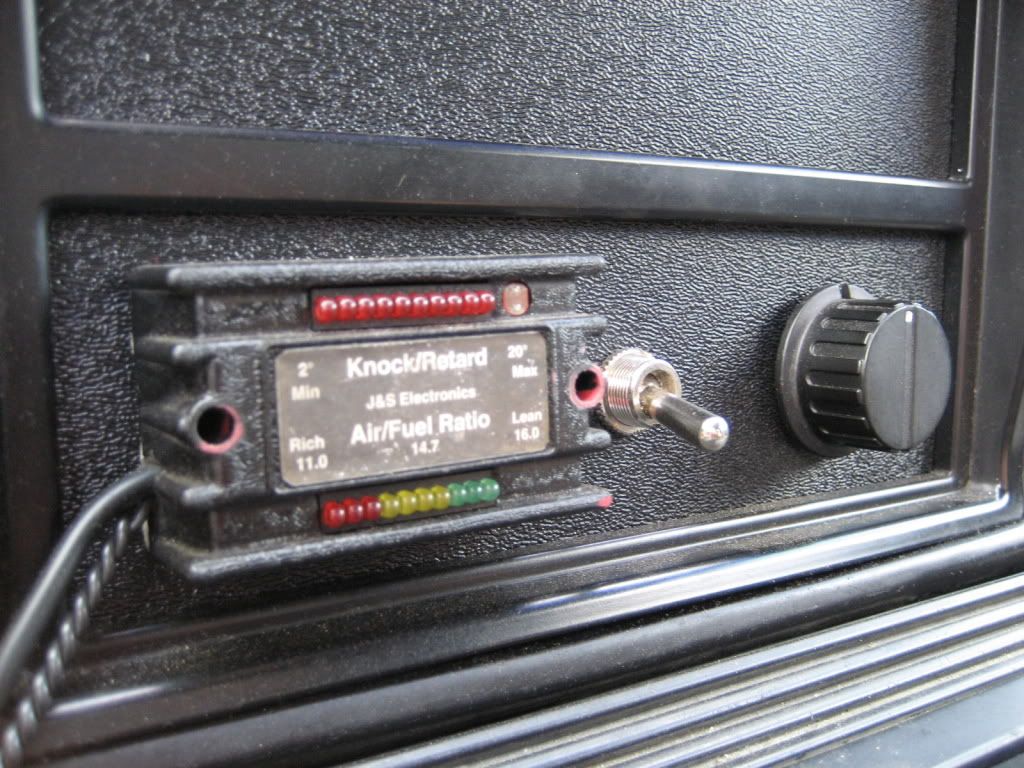
So, I pulled the motor, trans, tcase, haltech, shift light, boost controller, J&S Safegaurd, intercooler, bov, and turbo setup off the car. As well as the 3” turbo back exhaust. I recently re-did the exhaust though and put it on my Dad’s RX7 as a surprise since he has helped me so much. So now I had all of that stuff, I just decided to throw the turbo and manifold on my motor already in the car just to see what it was going to look like and how it was going to fit. Perfect again

In these next pics, you can see how well it fits. Also noticed that I put some tremendous cleaning on the transmission, and it turned out awesome! All clean, no silver paint on it to make it look super clean. I did paint all of the brackets on the trans black though. You can also see where I got the shift cables ran with the brass bushings. And I also got a little curious after putting some polish on the turbo’s compressor housing, that I hit the trans with it. Sure did surprise me
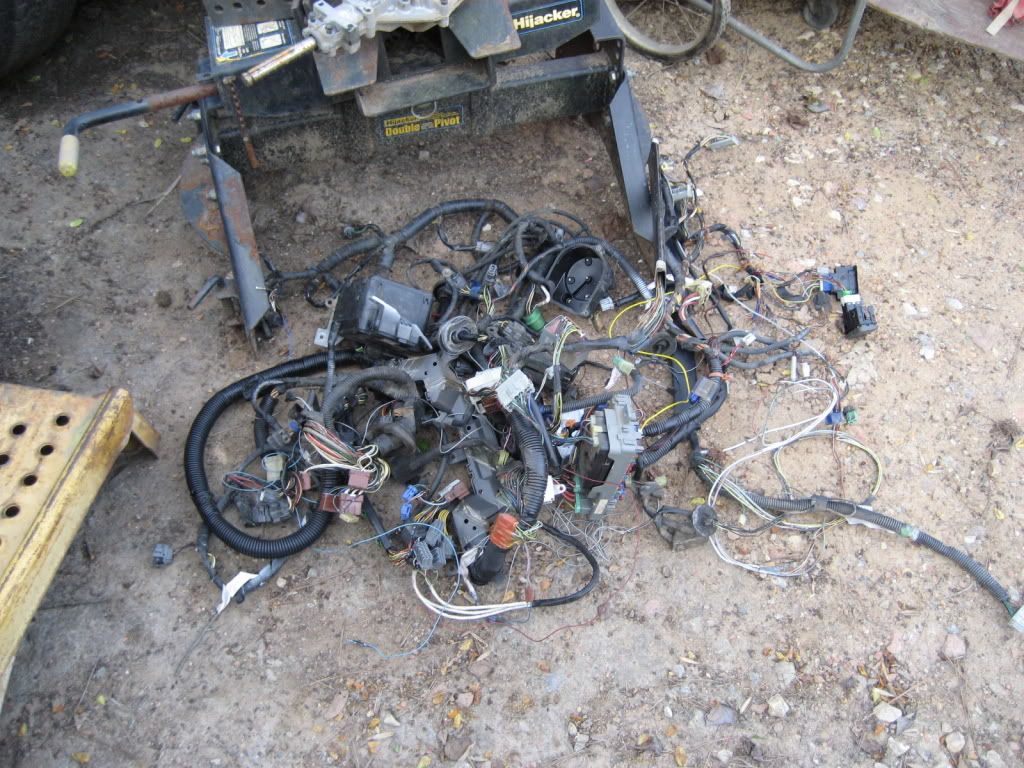
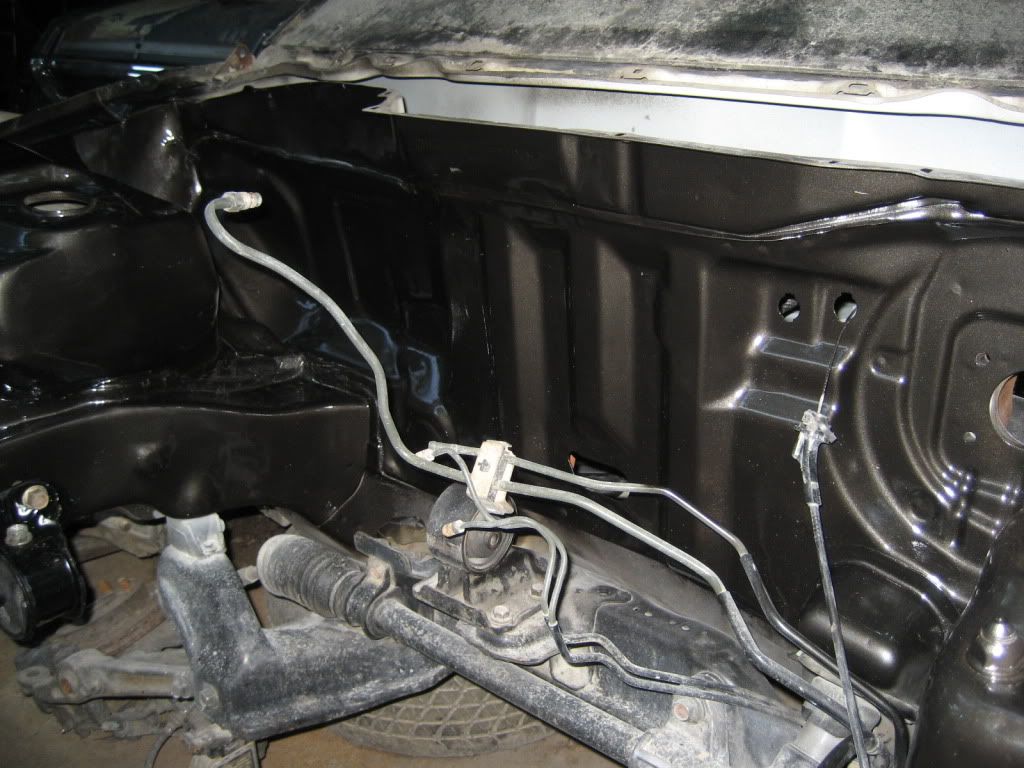
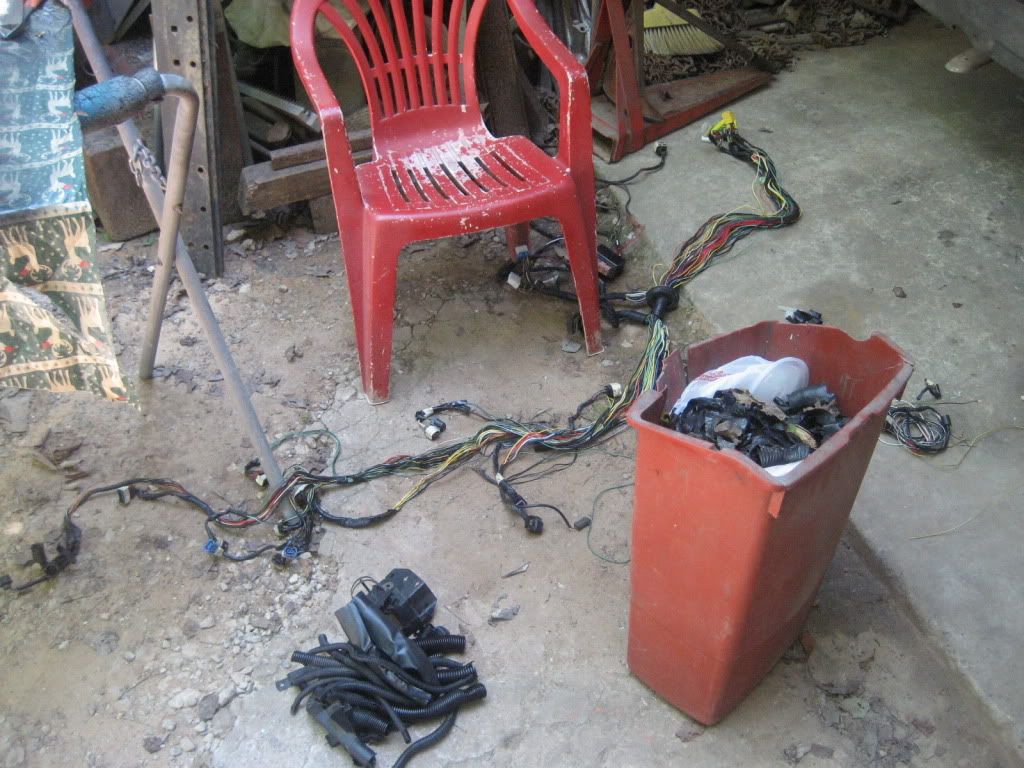
Enough fooling around with that, it was now time to conquer the engine harness. I didn’t take pics of when I was cutting the hole in the firewall or when I ran the harness through the firewall, but oh well. I just cut out a huge circle hole right behind the subframe like others have done before. Once again at the time, I couldn’t afford to go all baller and do it “MIL spec” with the fancy braided loom, so I just made due with what I had and it turned out pretty good. Just shortened it and re-loomed it with the factory loom and some new electrical tape. It’s a tucked harness anyways, it don’t gotta look pretty cause its “tucked” right? Lol. Anyways, this is the mess I started out with! Think it was long enough? Lol
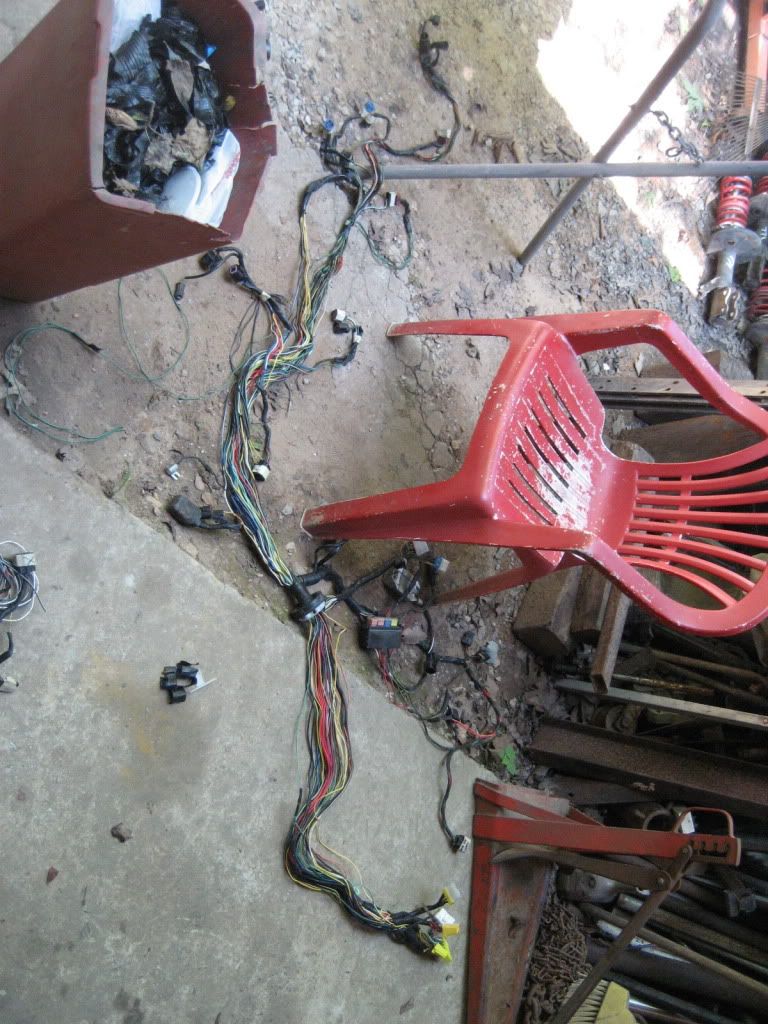
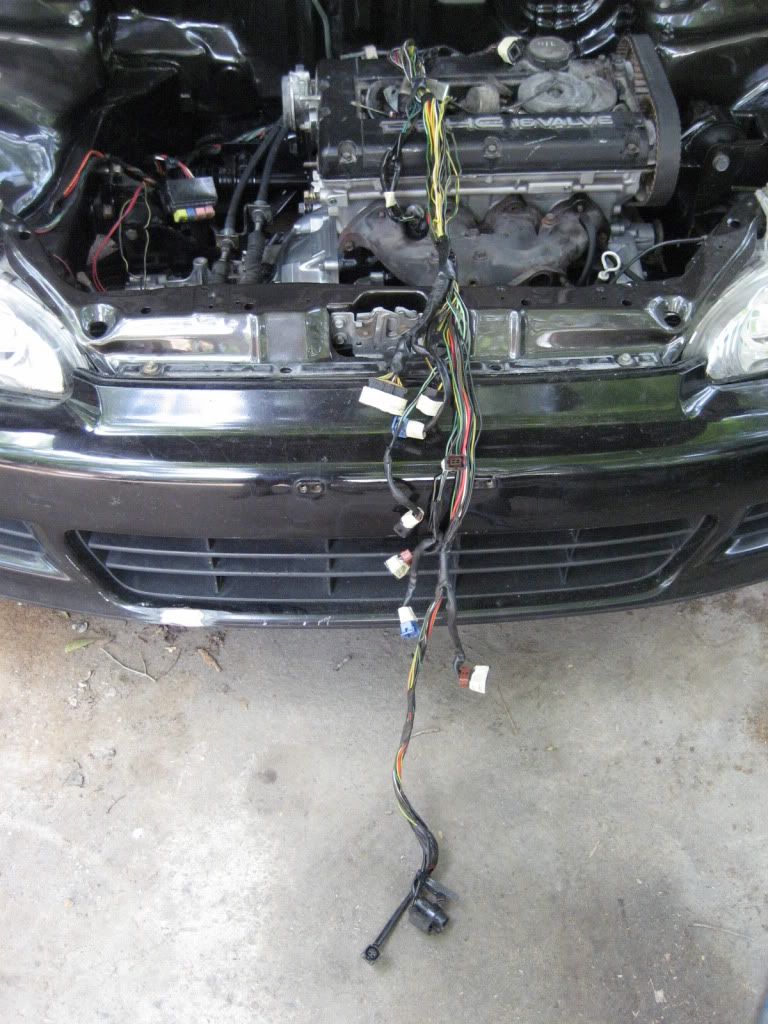

And this is what I ended up with.
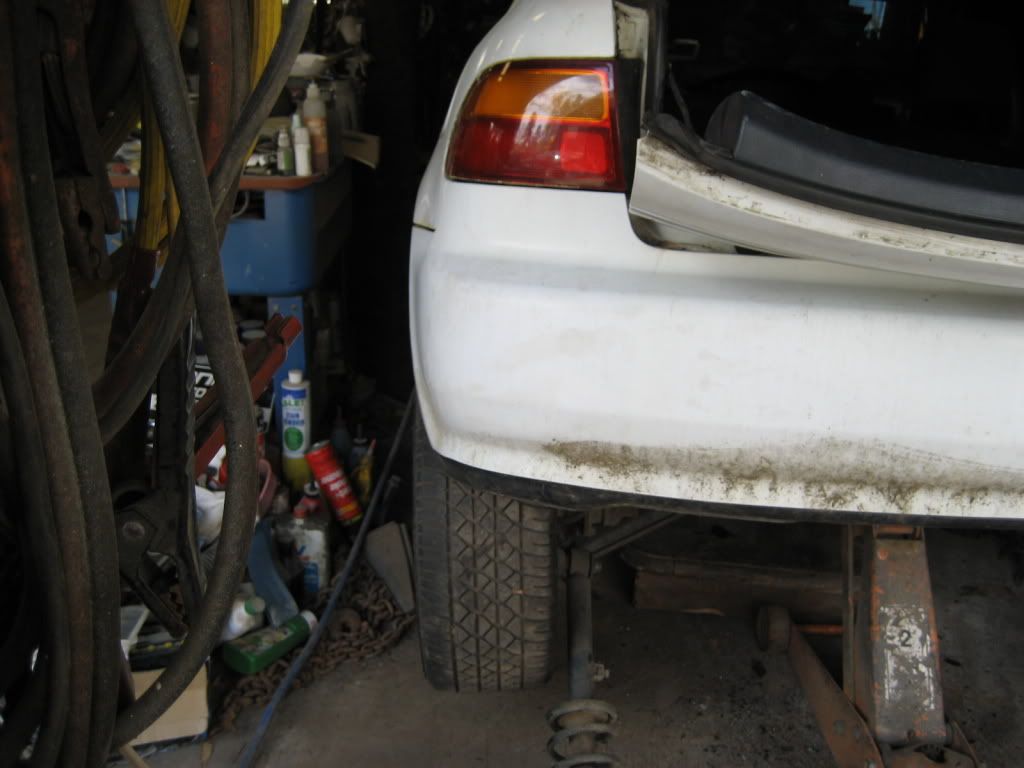
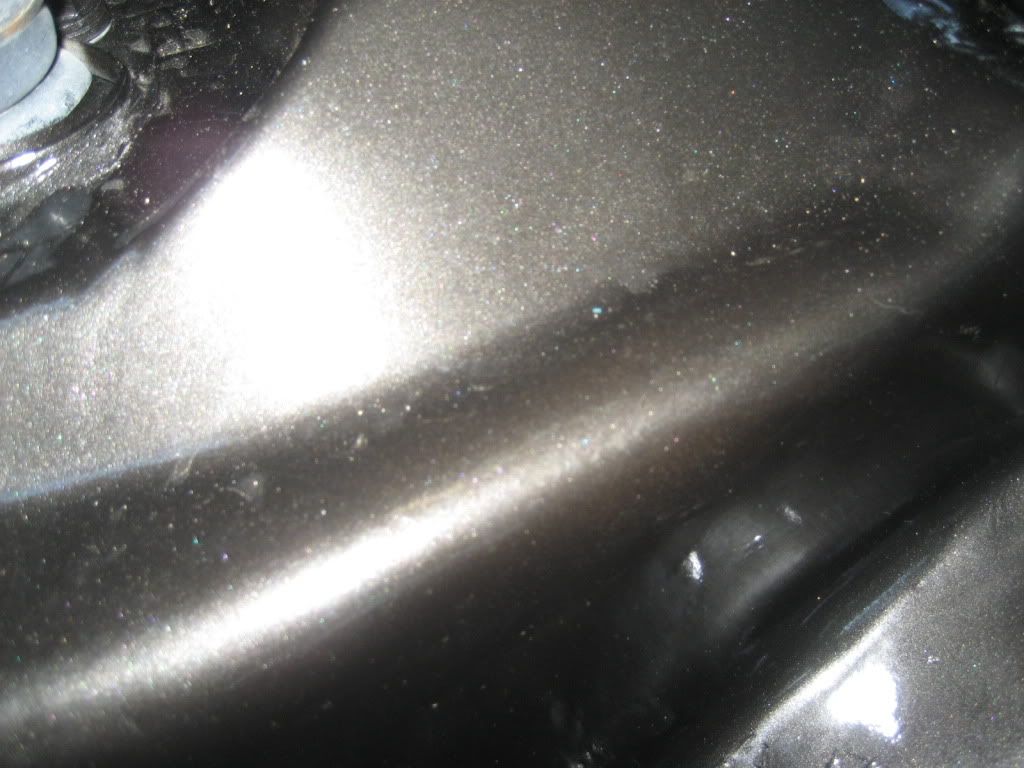
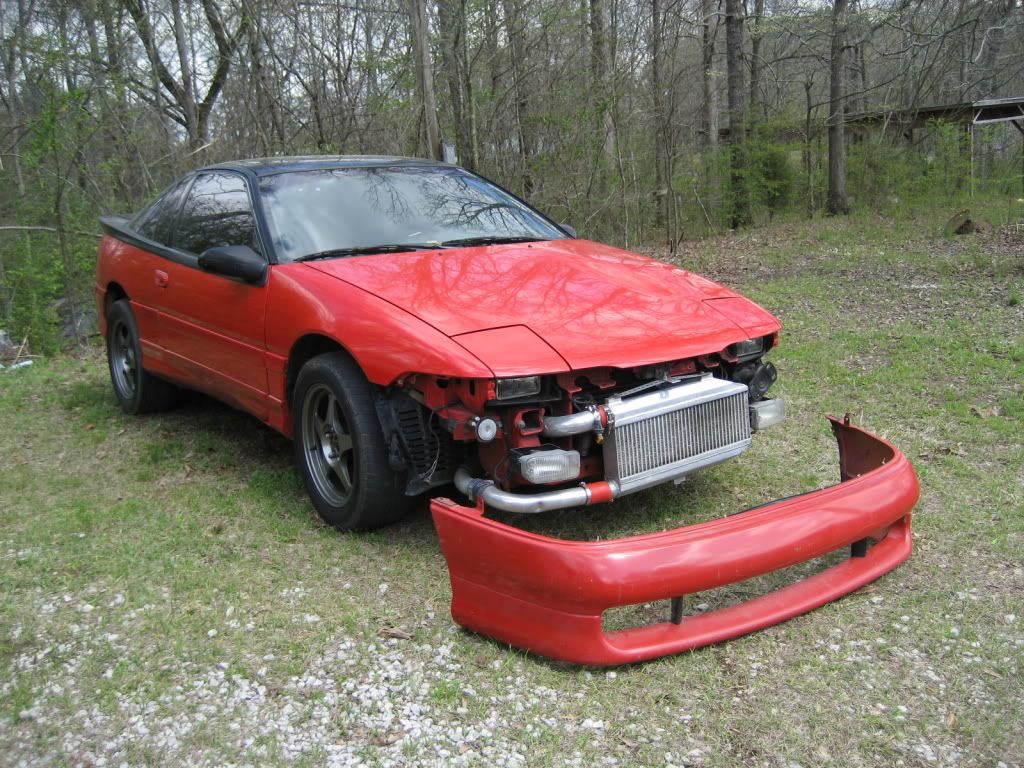
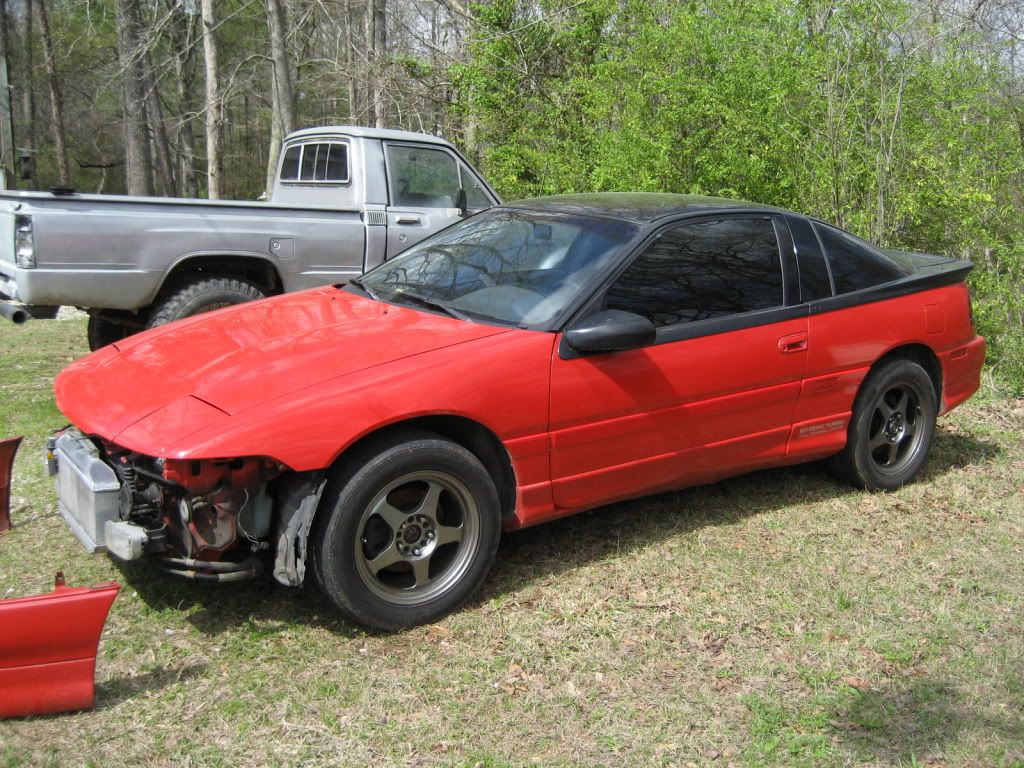
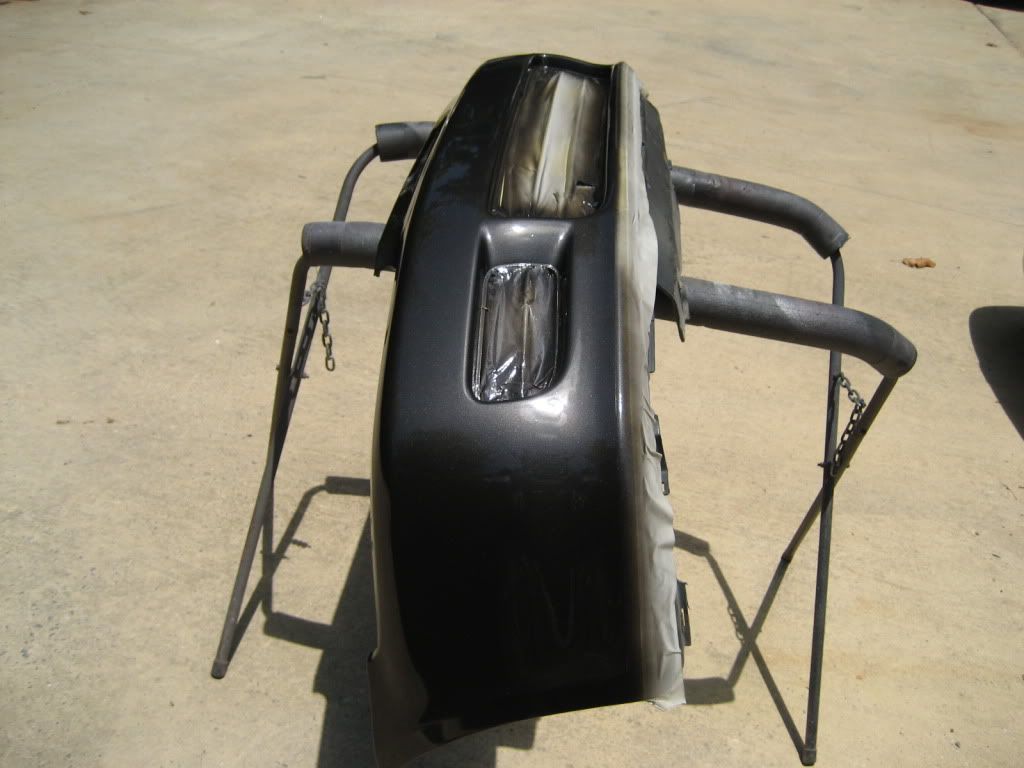
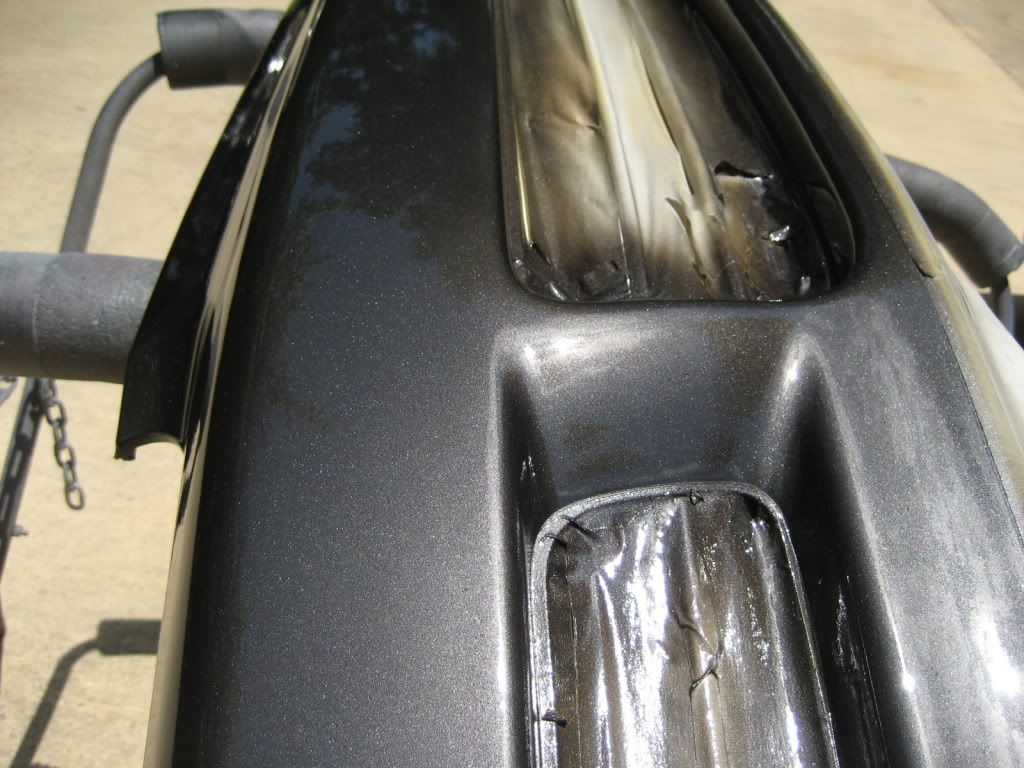
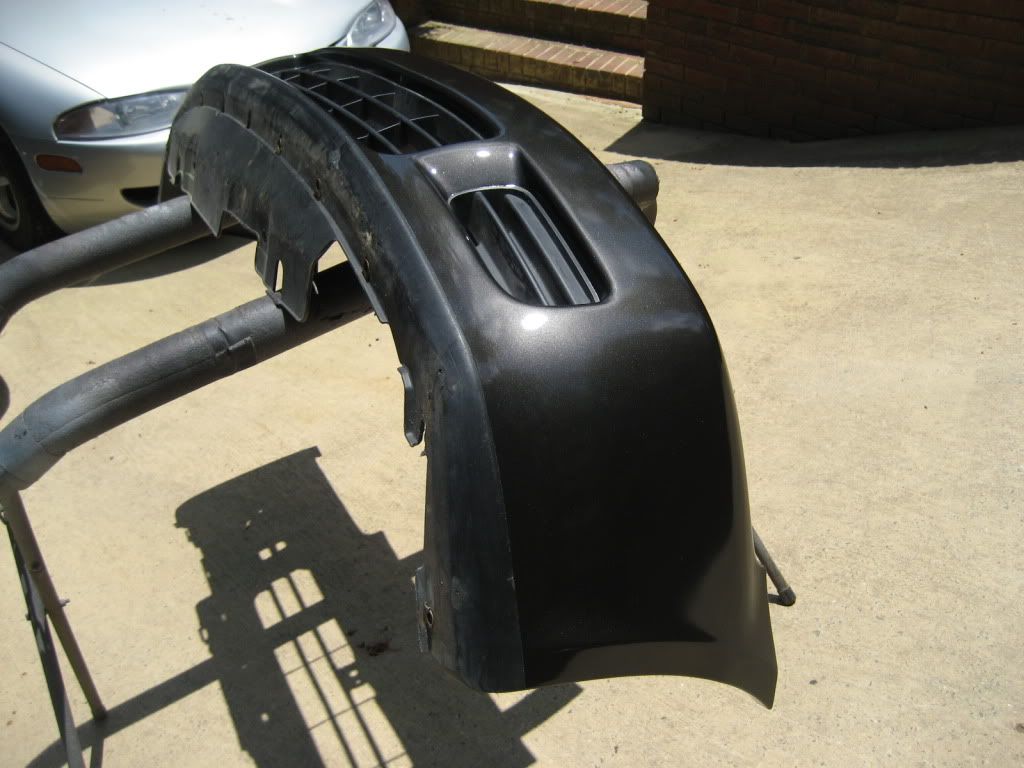
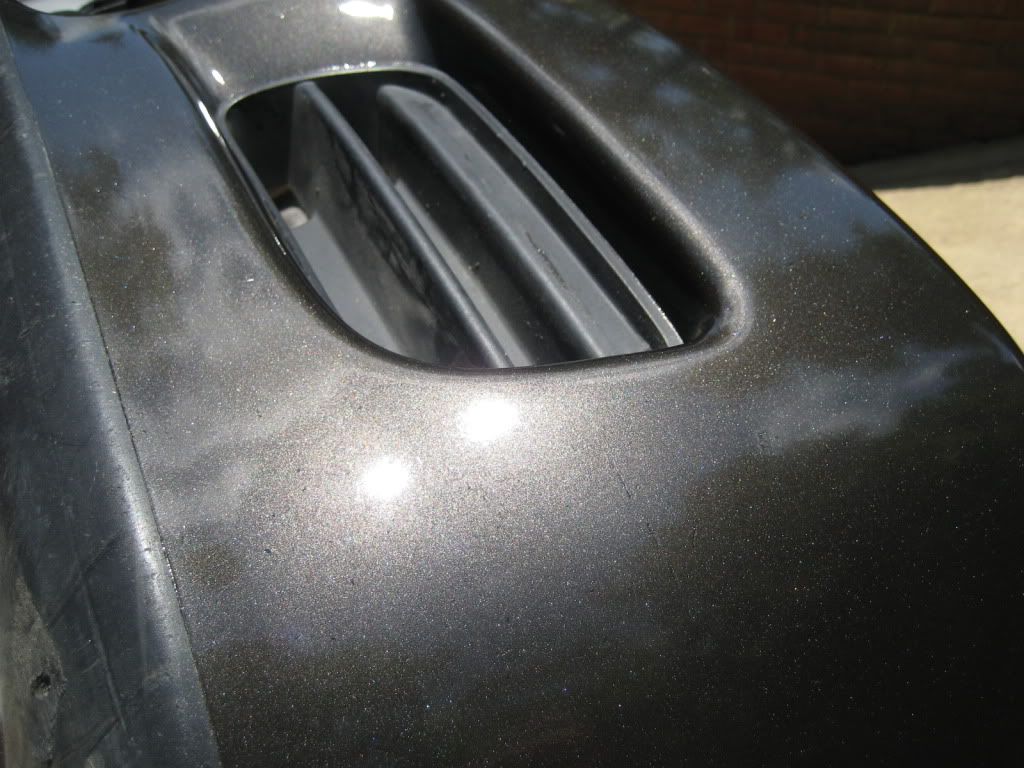
Also got the front bumper in paint. Tried to get some pics in the sun to show the color. Anybody know what color it is yet?

And that basically brings you up to date of where I am right now. I haven’t been able to do anything to it in a couple of weeks, because I finally got another job and have been working a lot and haven’t had the chance to go home. I will get to go home this Thursday though, so maybe I can get some more stuff done. We’ll see though. Gotta figure out what I am gonna do next. Really need to buy some TypeR hubs so I can convert the front to 5-lug and just figure out the axles from there. Other than that, the fuel system is the biggest hurdle left to jump. Obviously I am gonna have to run a fuel cell, but that isn’t no biggie. I just gotta get the money to buy all the fuel system setup first. Oh and I gotta do the brake line tuck, which shouldn’t be too hard either. So it’s getting there. Once those things are done, I can pretty much run the driveshaft and exhaust, and paint the car and she’ll be done. Then I can start re-doing a bunch of stuff like the turbo setup and intake and exhaust manifolds. Got some pretty big plans for the car once she’s going.
Another note: Me and my Pops did all the work on this car! I did the whole bay by myself, and it actually kind of shows since it was my first time doing any bodywork! Lol. Dad has done the paint, and helped with everything else.
ALSO, keep in mind that most of the project I was unemployed (finally got another job a couple of weeks ago), so money was tight and I had to work with materials we had at the house already to get stuff done. This is not a SUPER BALLER build or anything, and I am saving as much money as I can/trying to find the best deals/modifying stock stuff to make it work as I can to make the project as inexpensive as possible. So just keep that in mind if you see something that looks kind of ghetto
Anyways, I first acquired this car when I was 17 for $700. It’s a 1992 CX Hatchback. It was slammed on ebay coilovers, had a no name exhaust, and wheels, and the motor had a rod sticking out of the block. Oh, and by pure chance it had some authentic Denji headlights! Other than that, it was actually in great shape! I brought it home, and immediately dropped in a fresh d16z6 that we already had into it, and she was good as new. Couple of weeks later, I bought a carbon fiber hood for $200 and shortly after that sold the car to a kid for $3500! So, made $2600 off that one over a very short amount of time. Gotta love those! Plus I still had my other hatch at the time (93 Si), so I was very happy.
Well, as it turns out, dummy who I sold the car to, slams it into a tree MAYBE a month later! It did hurt me a little bit, cause I did kind of fall in love with the car the short time I had it, but then again the money in my pocket told me I didn’t care that much. And as luck would have it, the kid just gave me the car back! I didn’t buy it back, he just let me have it back! So that was good. At the time I was way too disheartened to do anything with the car, because everytime I looked at it, I cringed! You’ll see why in the pics below.
So, after a couple of years, a few projects, and just sitting, collecting dust, and looking down right pitiful, I decided to revive her. Also decided to go a little different route with her and make her semi one of a kind. I had had the plan in mind for quite some time at this point and everything just kind of fell into place for me to be able to do it. After doing some research, a couple of people had already done what I had in mind, so that kind of bummed me a little bit since I wanted to be the first. But that’s what being broke gets ya! Gotta have the money to get started, and at the time I didn’t! I had (still do) a 1997 Toyota Supra that needed reviving as well, and at the time it took every penny I had to get it done. But now, I have finally started on this project and so far it’s moving along quite good.
So lets get started………….
My plans are to do a 4g63 motor swap as well as the AWD conversion on the car. So far I have got the engine in, the rearend is done, as well as 90% of the wiring. I still need to convert the front suspension to 5-lug, figure out front axles, build the driveshaft, paint the rest of the car, run the exhaust, etc. etc. So a pretty good bit of work still to be done, but got the grunt out of the way. We are also gonna re-do the engine mounts, but not entirely. Basically just gonna modify what we got a little bit, because the engine is sitting to low. The trans actually. Plus, it’s every so slightly crooked and leaning in the bay. But a couple hours of work and that situation will be remedied. Sucks that we already had the bay painted and will have to repaint it after modifying the trans mount, but that’s no big deal since it’s all free to me anyways. Plus, just gonna try to get by with just repainting the passenger side to save paint, and if that don’t work out right, we’ll respray the whole thing.
Here we go. Unfortunately I don’t have any pics of the car the first time I had it, but this is what it looked like when I first dove into it again and after the kid wrecked it. So much for those Denji’s that I loved so much
In this pic you can see how “cool” this kid was!
And if you didn’t see it there, then how bout this?
Some interior shots. Gross!
Started doing a little bit of cleaning. Can you believe the kid had put seat covers on the seats? These babies were mint!
So as you can see, the car actually cleaned up really well. To be the front end still looked like a crushed beer can! Here’s a pic of the motor out of the car after some cleaning. Don’t even know what I bothered since it was never destined to go back in the car.
Then, the best part of the project happened! I stumbled upon a 1992 Plymouth Laser RS AWD that I snagged for $450!!!! It was a complete car minus the turbo/manifold, injectors, and ecu. And for those of you who don’t know, this is the exact year model that you want! It has the 6-bolt motor as well as the 4-bolt rearend! Both of which are stronger than their 7-bolt/3-bolt counterparts. It had everything I need to get going: the complete rearend, the complete motor (minus a few tiny tidbits), full trans, shift cables, mounts, wiring harnesses, etc. etc. Did I mention the car only had 103K original miles and that the motor was BRAND NEW 0miles! They had rebuilt it and never got to finish putting it back together once they got it in the car! Talk about a find!
Didn’t waste a second. Dove right in and started removing the chassis harness, the engine harness, the whole front subframe including the motor, as well as the entire rear subframe. How do you like our SUPER GHETTO and HIGHLY DANGEROUS lift? LMAO, I told you we worked with what we already had! Plus, it seemed the only logical way that we were going to load the shell onto the trailer after stripping it of everything. You can see my Dad and a buddy of mine in a couple of the pics.
Now that they cycle of the build was over, it was time to get the hatch into a suitable spot to continue the build. It was good to actually have a slab of concrete under me on this one since the car had been sitting in the dirt for a couple years! Lol.
At some point, all of this junk managed to find it’s way back into the car, lol.
And the madness is about to begin.
Just getting a rough idea of how things are gonna fit. Like I said, I am reusing/modifying as much factory stuff as I can to save on cost. Plus, why make things harder than they need to be?
Well as you can see, the rear subframe piece is definitely going to have to go, otherwise the rearend is never going to tuck up properly. So I started the long process of locating all the spot welds and drilling the out. The ones at the very top beside the frame rails were a huge pain in the ****!
As it turns out, that still wasn’t going to give us enough room, so we cut most of the spare tire well out anyways! Pissed me off cause I had wasted all that time! Lol
Took some time in between everything to start cleaning up and shaving a spare valvecover. This one was from a Hyundai Sonata so, I shaved where it said Hyundai off. So now I have 2 valvecover exactly the same. A black one and this one. I haven’t decided the final color or if I will polish this one yet.
But anyways, back to the car. As you can see after cutting the floor, it put us right were we needed to be with the rearend.
As you can see with this from this pic, the factory mounting on the rearend doesn’t quite reach under the frame rails like it needs to. So what do we do? Modify it! Super easy actually. Bascially just cut it in half, and welded in some meat in the middle to make it reach.
Lets see how it fits now. Ah perfect!
Here is a quick shot to show you how the driveshaft will go. Starting to seem like this build was meant to be! Keep in mind the front of the rearend is hanging down in this pick cause it isn’t mount yet, so it makes it look like the rear sway bar is in the way. But it’s gonna work out perfect!
Just a couple of pictures to show you some fitment. The width is nearly perfect between the two cars!
At this point I was toying with the suspension right now to get the car rollable again. I put the civic tophat onto the dsm shocks and springs and it fit perfectly. Unfortunately there was like a 6 inch fenderwell gap! Lmao. So I just took the shocks and springs back out for now. Then I drilled the holes and dropped the subframe mount bolts through the frame rails. Once again, worked out like it was meant for the car
Here you can see how high the car sat with the dsm shocks and springs! LMAO!
Well, now that a lot of the rear work had been done (which it wasn’t too terribly much to be honest), I decided to move to other stuff. Started stripping the inside of the car and the engine bay of everything.
Started mapping everything out
Here you can see I opted to go with the DSM chassis harness since I won’t have A/C or heat stuff, nor a radio. So I figured this was the easiest way to make things plug and play with the engine harness and the gauge cluster. Just gotta change some tail light plugs really. The rear section looks just like stock. Can’t even tell it’s not the OEM harness
Got creative with the underdash stuff as well by using the blower motor mounts to hang and ground stuff.A lot of this next stuff is engine bay work. I spent a good while on this stuff cause I only got to work on it a couple of days if that at a time. I go to school an hour and 15 mins from where the parents house is which is also where the car is. So I tried to come home as much as possible, but it still took a while to get the engine bay done. Stripped sealer, filled holes, removed studs, relocated cluster master cylinder resovior, etc. etc. My method of removing the firewall studs is different than most. It was taking AGES to grind them off, so I snapped them all of in less than 2 minutes. I had a bunch of holes to fill already, what was a couple more?
Well, after getting pooped out on that for a while, decided to finish up the front mounts on the rear subframe so we could call the rear done. I am gonna go back and take the whole rearend out and clean/paint everything once we are does, as well as add some re-enforcements to the mounts so they can handle some lauches, but for now we just wanna get it going and see what we got. Once again, using old crap we already got laying around the house, and coming up with ways to make it work FTW! Lol
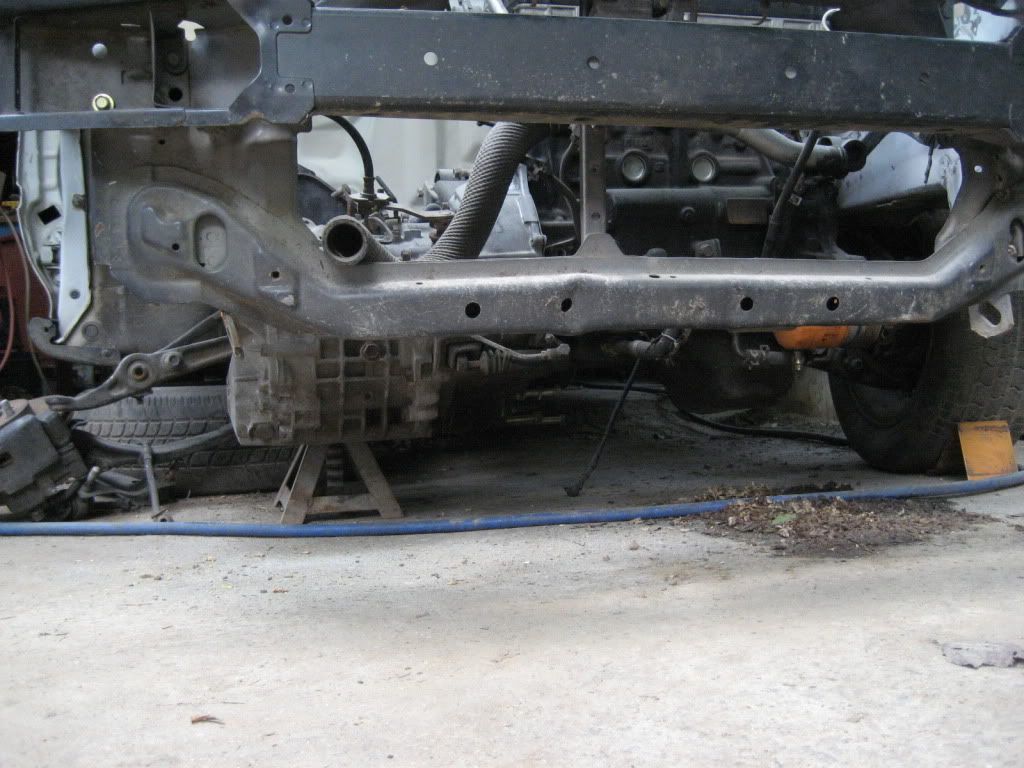
Here’s how the car sits without the rear suspension. Much better. Should be able to achieve the same stance one I decide how I am going to do the shocks. Then I can choose the appropriate coilover setup. Also, notice how good the rear tucks up. Still leaves pretty good ground clearance, and again the width of everything is perfect! So if I ever break anything in the rear, I can just order the OEM stuff since I didn’t have to make anything custom!
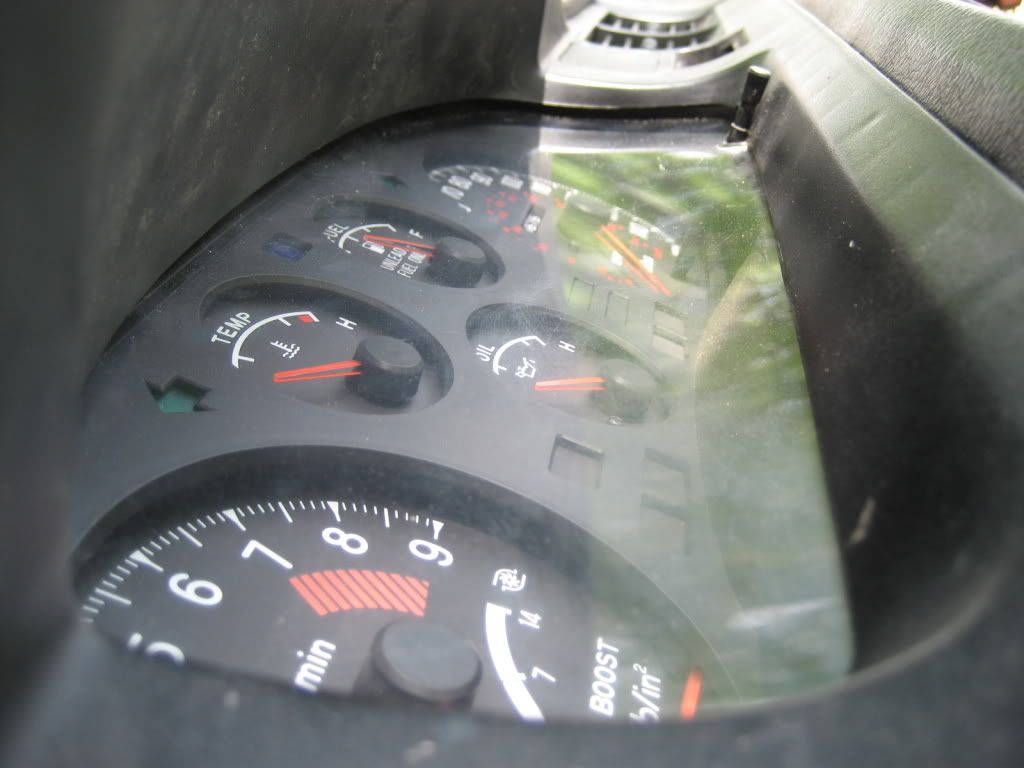
Decided to start figuring out how the gauge cluster was gonna work out. At this time I had picked up a great OEM black dash since all the original ISH was blue. All I got left to get in black now is the door panels. Anyways, after hacking most of the back of the dash up just to get the cluster to slide in, this is what I ended up with! And again, it’s like it was meant to be! Haha
And with that stuff out of the way, it was time to move on to the front of the car again, and start fixing the damage. We have had this front piece for almost as long as the car has been sitting. It was nice to finally put the 2 together. Unfortunately we didn’t have the passenger side shock tower on the new front piece, so I had to live with the beat up one. I was able to make it look semi-decent for a first timer at body work in the end though
Unfortunately I got so caught up doing body work and stuff that I forgot to take some pictures. Luckily I got this one before I got too much further. You can see that shock tower started shaping up pretty well.
The next pictures are with the engine now in the car. Unfortunately my goob room mate had borrowed my camera without telling me, so I wasn’t able to get pics of modifying the mounts or the engine going in the car. But basically to sum it up, we didn’t have to do anything to the drivers side mount. The oem DSM found it’s home nicely in the factory civic mounting spot. 2 down, 1 to go. On the frame rail trans mount, we basically did it the same way as it was in the Laser. That is, there are 4 holes that are drilled through the frame rail that the mount bolts too. But unfortunately we didn’t get the mount off the laser, so we were forced to improvise with another mount. But as it turns out, I now have the OEM dsm mount, so when we go to raise the motor up, we are going to re-do that mount with the factory piece so it will be stronger. The one we used in the pics below uses 3 bolts, where as the dsm piece uses 4. But basically we just had the car on jackstands and hovered the motor where we thought it should be, marked the holes on the frame rail, and drilled em out Now the rear mount, we also just modified the DSM one. It originally bolted to the back of the engine block, but we modified it to where it would bolt to 2 empty holes on the trans case. I will try to let the pictures show you what I mean, but if you have any questions about them , just ask me. And excuse the filthiness of everything, I clean it all up here shortly. You can also see in the last pic why we are going to raise the motor. Trans is too bulky
Well, while I was away at school, Dad had put the whole bay in primer and went ahead and painted it. Great news, cause when I got home I was able to see what all my hard work had got me. The only bad thing is that I never got to see the bay in primer, there for I wasn’t able to go back and fix any of the bad spots in the bodywork. Cause as you know, they all show up once in primer. But it turned out alright. I am just nit picky and can see all of the things that I could have went back and made look better had I gotten to see the bay when it was in primer. But like I said, it still turned out good, and A LOT better than what it once was. How does everyone like the color? I won’t say what it is right now, but I will eventually. The camera doesn’t really do the color justice. And in the first pics, the subframe is super nasty, but I took care of that as soon as I got back home to work on the car again as you can see farther down in the pics.
Somewhere during this whole build I had acquired another AWD DSM for a dumb price. It was a 1990 Eagle Talon TSI that had an SC61 turbo setup, Haltech Engine management, Rota Slipstreams, Built bottom end and head, aftermarket clutch, and a bunch of other goodies. The only thing wrong was the front axles were broke so it was only driving in RWD mode. The good part is, a buddy of mine had originally built the car, and he knows what he is doing, so I know it was built right. And I had also personally witnessed it making 420awhp on pump gas! So now I had a pretty awesome powerplant to drop in the hatch for now until I can build the other motor like I want it. Now the crackhead part. My bud who built the car had sold it to some other dude (who had broke the axles), and I traded that guy a CRX that I had bought for $400 and gave him $800 cash. So basically I just got this built talon for $1200. So far luck has been on my side during this build. I pray that it stays that way and that I can find some more ridiculous deals! So now, I have a spare motor, spare trans, and spare t-case in case I need them. Not to mention I got an SC61 turbo setup, Rota Slipstreams and a Haltech EMS out of it to go in the hatch! Plus I can sell the shell and some other parts off the talon to recuperate what I bought it for, and basically have it for free!
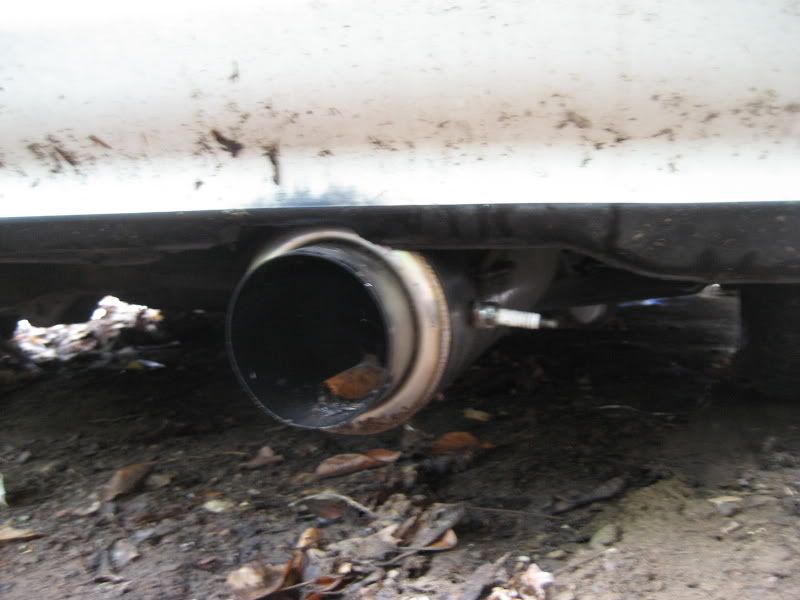
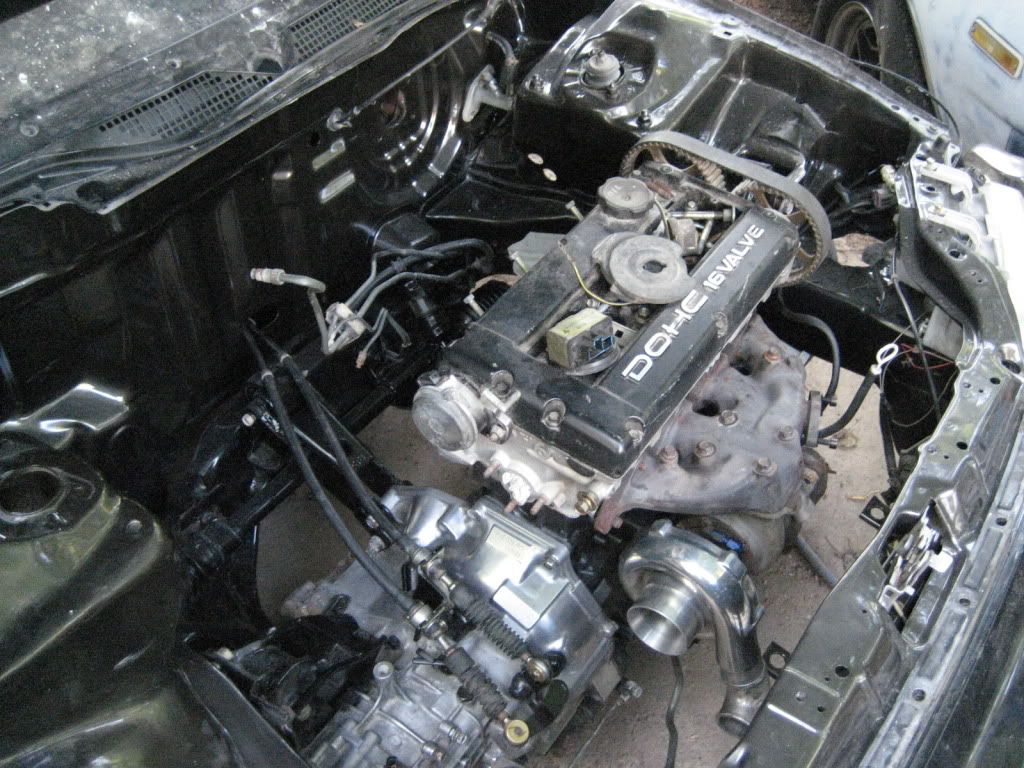
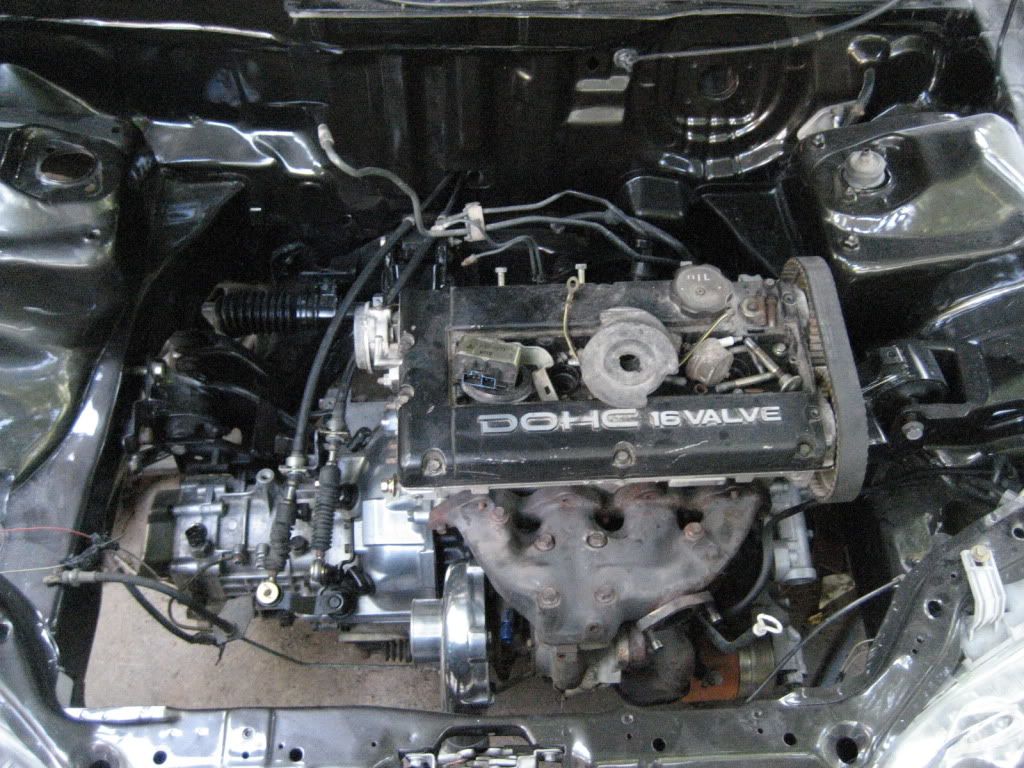
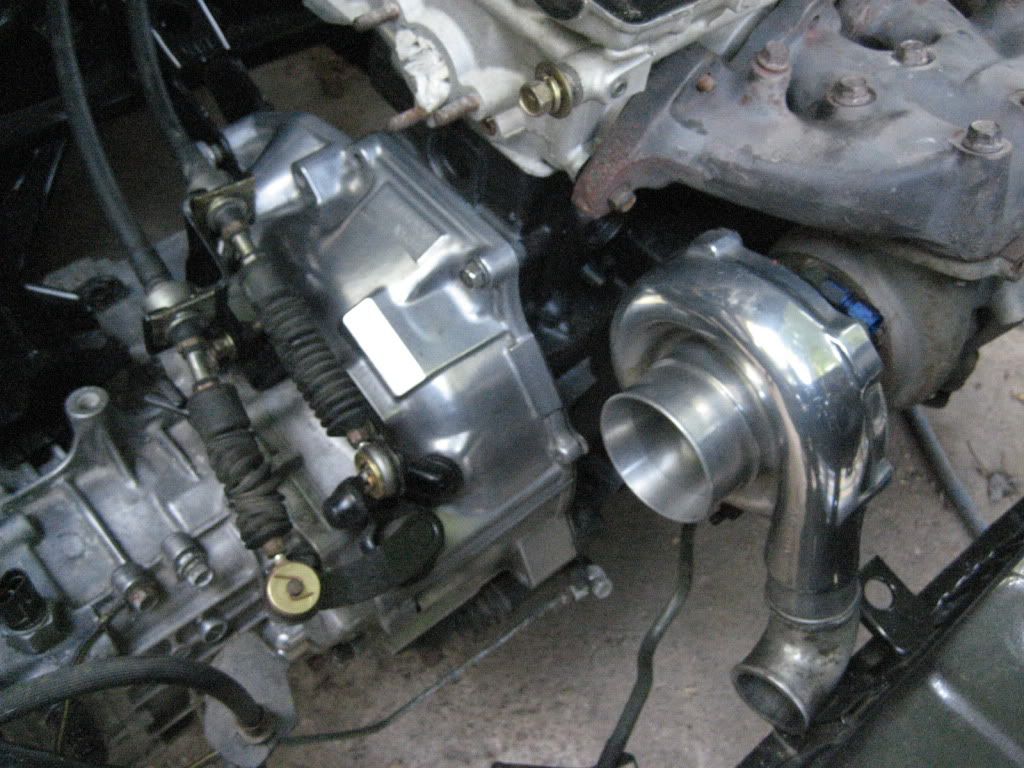
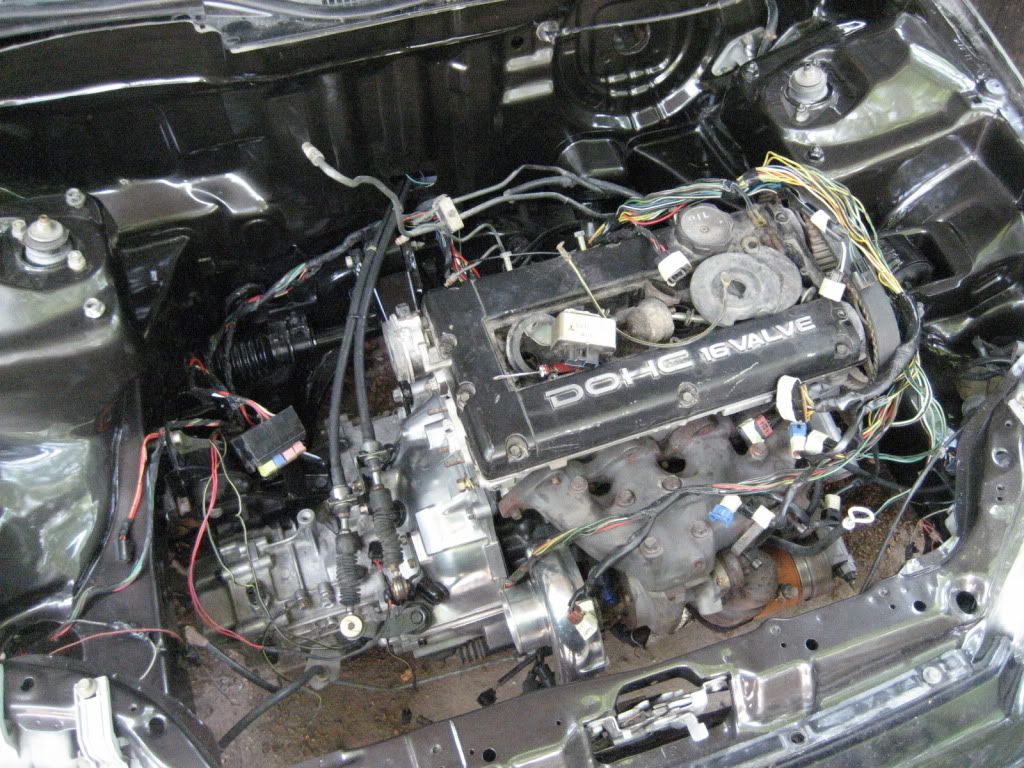
So, I pulled the motor, trans, tcase, haltech, shift light, boost controller, J&S Safegaurd, intercooler, bov, and turbo setup off the car. As well as the 3” turbo back exhaust. I recently re-did the exhaust though and put it on my Dad’s RX7 as a surprise since he has helped me so much. So now I had all of that stuff, I just decided to throw the turbo and manifold on my motor already in the car just to see what it was going to look like and how it was going to fit. Perfect again
In these next pics, you can see how well it fits. Also noticed that I put some tremendous cleaning on the transmission, and it turned out awesome! All clean, no silver paint on it to make it look super clean. I did paint all of the brackets on the trans black though. You can also see where I got the shift cables ran with the brass bushings. And I also got a little curious after putting some polish on the turbo’s compressor housing, that I hit the trans with it. Sure did surprise me
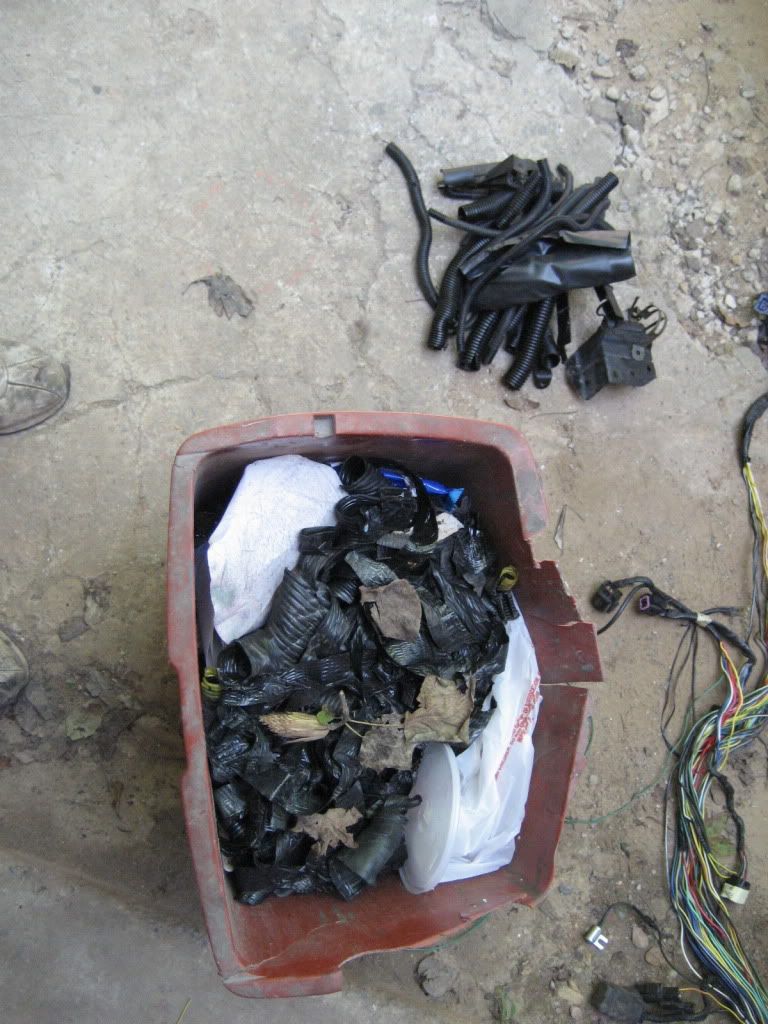
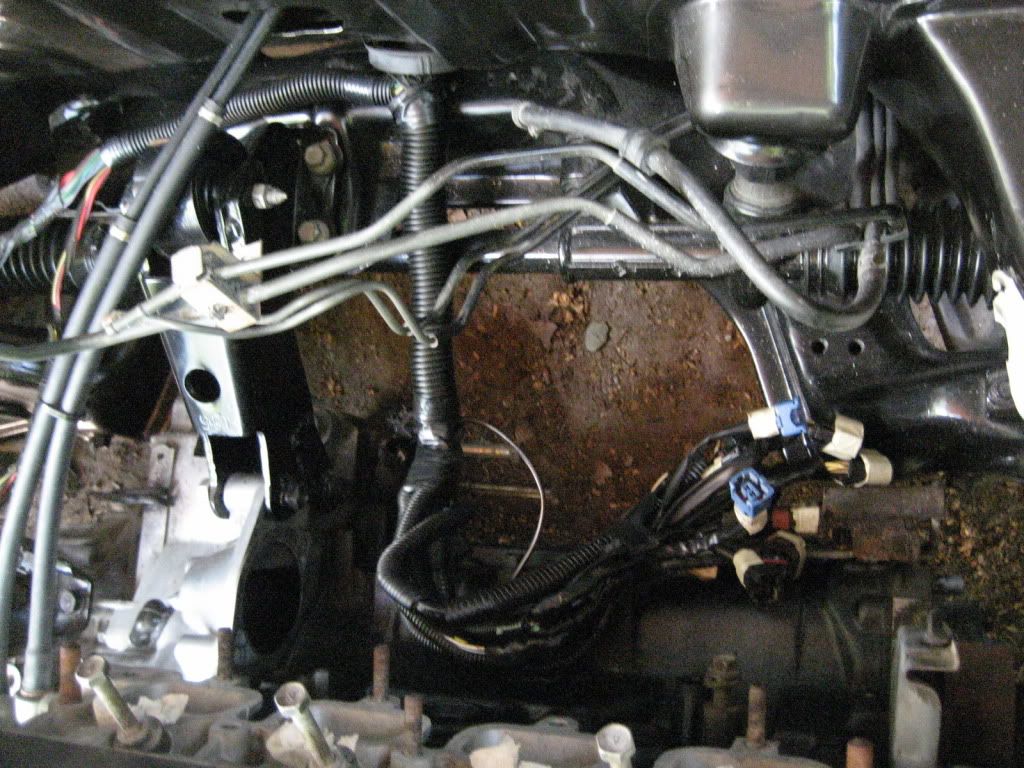
Enough fooling around with that, it was now time to conquer the engine harness. I didn’t take pics of when I was cutting the hole in the firewall or when I ran the harness through the firewall, but oh well. I just cut out a huge circle hole right behind the subframe like others have done before. Once again at the time, I couldn’t afford to go all baller and do it “MIL spec” with the fancy braided loom, so I just made due with what I had and it turned out pretty good. Just shortened it and re-loomed it with the factory loom and some new electrical tape. It’s a tucked harness anyways, it don’t gotta look pretty cause its “tucked” right? Lol. Anyways, this is the mess I started out with! Think it was long enough? Lol
And this is what I ended up with.
Also got the front bumper in paint. Tried to get some pics in the sun to show the color. Anybody know what color it is yet?
And that basically brings you up to date of where I am right now. I haven’t been able to do anything to it in a couple of weeks, because I finally got another job and have been working a lot and haven’t had the chance to go home. I will get to go home this Thursday though, so maybe I can get some more stuff done. We’ll see though. Gotta figure out what I am gonna do next. Really need to buy some TypeR hubs so I can convert the front to 5-lug and just figure out the axles from there. Other than that, the fuel system is the biggest hurdle left to jump. Obviously I am gonna have to run a fuel cell, but that isn’t no biggie. I just gotta get the money to buy all the fuel system setup first. Oh and I gotta do the brake line tuck, which shouldn’t be too hard either. So it’s getting there. Once those things are done, I can pretty much run the driveshaft and exhaust, and paint the car and she’ll be done. Then I can start re-doing a bunch of stuff like the turbo setup and intake and exhaust manifolds. Got some pretty big plans for the car once she’s going.
 07-10-2009, 04:31 PM
#3
Honda-Tech Member
Join Date: Jan 2009
Location: Fredericksburg,VA
Posts: 1,017
Likes: 0
Received 0 Likes
on
0 Posts
holy **** dude... thats alot of ****ing work, and i thought i had it bad with a new motor build/ swap...
curious on the color... my car is getting painted in the future, looking for options...
care to shed some info on that sick color?
curious on the color... my car is getting painted in the future, looking for options...
care to shed some info on that sick color?
07-10-2009, 04:55 PM
#5
Honda-Tech Member
Join Date: May 2004
Location: A racetrack near you, CA, USA
Posts: 3,024
Likes: 0
Received 0 Likes
on
0 Posts
lol not what i expected...my buddy used to have a 4g63 crx(fwd though)...its a pretty awesome swap..
subaru java pearl ?
subaru java pearl ?
07-10-2009, 04:59 PM
#6
Honda-Tech Member
Thread Starter
Join Date: Nov 2003
Location: Birmingham, AL
Posts: 294
Likes: 0
Received 0 Likes
on
0 Posts
Lol, thanks a lot for the positive comments so far guys! It has definitely been a fun adventure so far. Can't wait to actually drive the thing. Should be powerful enough to put around town in
Stefndogg- Not java pearl, though I do like that color. It is a factory color that comes on an import vehicle though.
Stefndogg- Not java pearl, though I do like that color. It is a factory color that comes on an import vehicle though.
Trending Topics
07-10-2009, 06:17 PM
#9
Honda-Tech Member
Thread Starter
Join Date: Nov 2003
Location: Birmingham, AL
Posts: 294
Likes: 0
Received 0 Likes
on
0 Posts
07-10-2009, 06:29 PM
#11
Honda-Tech Member
Join Date: Feb 2004
Location: Philly, PA, USA
Posts: 261
Likes: 0
Received 0 Likes
on
0 Posts
Lol, thanks a lot for the positive comments so far guys! It has definitely been a fun adventure so far. Can't wait to actually drive the thing. Should be powerful enough to put around town in
Stefndogg- Not java pearl, though I do like that color. It is a factory color that comes on an import vehicle though.
Stefndogg- Not java pearl, though I do like that color. It is a factory color that comes on an import vehicle though.
I think I know what color it is, my boy had a EVO9 that color or atleast similar....am I right????lol I figure since your using the Mitsubishi motor then you are probably using a color too....lol
07-10-2009, 06:31 PM
#12
Honda-Tech Member
Thread Starter
Join Date: Nov 2003
Location: Birmingham, AL
Posts: 294
Likes: 0
Received 0 Likes
on
0 Posts
Hahaha, nope. Kevin got it. You were close on the combine manufacturers though. I am combining all 3 of my loves in one. EG hatches, AWD DSM's, and Toyota Supra's. I have all three, and now I will have all 3 in 1 Figured since I won't use any supra parts, I would give it the liberty of being the color of the car! Not to mention, I just love the color! hahah
Figured since I won't use any supra parts, I would give it the liberty of being the color of the car! Not to mention, I just love the color! hahah
07-10-2009, 06:50 PM
#13
Honda-Tech Member
Join Date: Nov 2004
Location: College Park, MD
Posts: 130
Likes: 0
Received 0 Likes
on
0 Posts
This is Grade A DREAM BUILD........ I offer you nothing but positive reinforcement...... Your doing a great job!!!!!!!
07-10-2009, 07:03 PM
#14
Honda-Tech Member
Join Date: Nov 2005
Location: Orlando, FL, USA
Posts: 266
Likes: 0
Received 0 Likes
on
0 Posts
really really cool. i love the yard with all the cars seems like your dad knows his stuff and taught u alot. good luck with the build and id live in alabama if i had a yard full of boosted cars laying around with all the tools i could ever need.
07-10-2009, 07:13 PM
#15
Honda-Tech Member
I was a little skeptical of this at first, but ill be damned looks good bro. Keep it up and good luck! Would like to see some vids of it running when your finished with it.
 07-10-2009, 10:19 PM
#20
Honda-Tech Member
Join Date: Jul 2007
Location: In front of my computer on H-T
Posts: 293
Likes: 0
Received 0 Likes
on
0 Posts
this is one of the most awesome threads i have ever read ! great job!!!
07-10-2009, 11:36 PM
#22
HT's TOP CHEF
iTrader: (1)
Join Date: Apr 2006
Location: DICKIES & FLIP FLOPS, FL
Posts: 7,548
Likes: 0
Received 0 Likes
on
0 Posts
Great job man!!!!! After going through the thread I looked over at my girlfriend and went "this guys got so much talent". Subscribed man. I want to see this bad boy running.

