
Start up grind
 12-04-2009, 01:07 AM
#1
Junior Member
Thread Starter
Join Date: Oct 2008
Location: Colorado
Posts: 148
Likes: 0
Received 0 Likes
on
0 Posts
Its about -2 degrees at night and everytime i start up my car there is a nasty grind. from time to time, the grind is longer than others. i am not sure what is causing this and need some help asap before the problem becomes bigger then it already is. any help would be appreciated. thanx ahead of time.
 12-04-2009, 07:54 AM
#2
Honda-Tech Member
Join Date: Jan 2003
Location: East Peoria, IL, United States
Posts: 524
Likes: 0
Received 0 Likes
on
0 Posts
I am getting the same thing on my 03 type s. If it sounds like you try to start the car with it on I am guessing its the starter going bad.
12-04-2009, 10:38 AM
#5
Function > Form
HAHA, you're guy's cars SUCK!!!
j/k That's lame, I hope I didn't just jynx myself. Seems kind of like a trend, anyone contacted a shop of Honda about it??
j/k
That's lame, I hope I didn't just jynx myself. Seems kind of like a trend, anyone contacted a shop of Honda about it??
12-04-2009, 10:47 AM
#6
Honda-Tech Member
It's a common issue on ephatch.com, a lot of members have described having the exact same symptom. Can't say if I've ever heard of the cause or a fix for this noise though.

Trending Topics
 12-04-2009, 02:52 PM
#10
grammer nawzi
Join Date: Apr 2005
Location: Richmond, VA, usa
Posts: 3,289
Likes: 0
Received 0 Likes
on
0 Posts
12-05-2009, 04:31 PM
#12
Honda-Tech Member
im taking because of the cold weather? i herd mine do it for the first time last week when my car did work lol now it sit sit at the honda parking lot sleeping waiting for spring to come.
12-05-2009, 07:54 PM
#13
Honda-Tech Member
Join Date: Mar 2008
Location: Olympia, WA, USA
Posts: 2,573
Likes: 0
Received 0 Likes
on
0 Posts
From Alldata. A technical service bulletin straight from Honda.
06-025
May 18, 2006
Applies To:
2001-05 Civic 2-door - ALL except CVI
2001-05 Civic 4-door - ALL except Hybrid and GX
Starter Grinds While Cranking the Engine
SYMPTOM
The starter motor intermittently grinds while cranking the engine.
PROBABLE CAUSE
The female terminal at the starter solenoid may have spread apart, causing a loss of current to the solenoid.
CORRECTIVE ACTION
Replace the female terminal at the starter solenoid.
PARTS INFORMATION
Spade Receiver Terminal /N 07JAZ-001420A, H/C 8362675
TOOL INFORMATION
Terminal Crimping Tool: T/N 07JAZ-001020A
WARRANTY CLAIM INFORMATION
In warranty:
The normal warranty applies.
Operation Number: 7370C3
Flat Rate Time: 0.4 hour
Failed Part: P/N 31200-PLM-A51
H/C 6452429
Defect Code: 06601
Symptom Code: 09004
Template ID: 06-025A
Skill Level: Repair Technician
Out of warranty:
Any repair performed after warranty expiration may be eligible for goodwill consideration by the District Parts and Service Manager or your Zone Office. You must request consideration, and get a decision, before starting work.
DIAGNOSIS
1. If applicable, make sure you have the anti-theft code for the audio system. Write down the customer's audio unit presets.
2. Disconnect the negative cable from the battery, then disconnect the positive cable.
3. Remove the resonator:
^ Refer to page 11-199 of the 2001-2005 Civic Service Manual, or
^ Online, enter keyword RESONATOR, and select Resonator Removal/Replacement from the list.
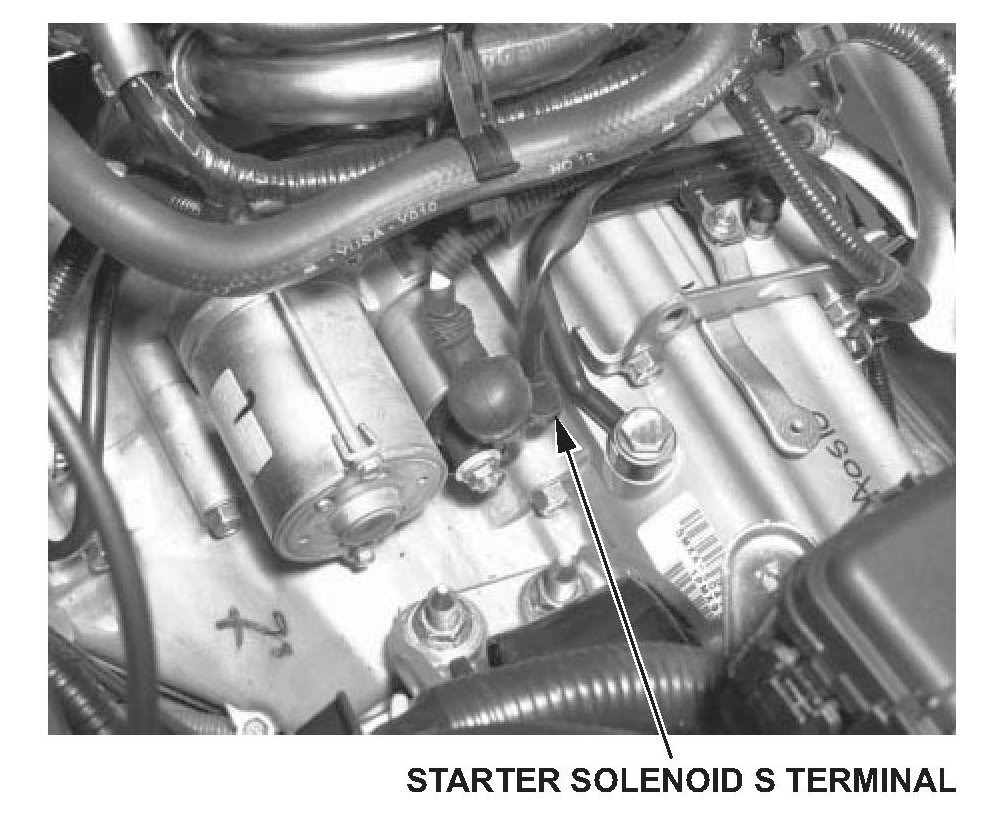
4. Disconnect the female terminal (BLK/WHT wire) from the S terminal of the starter solenoid.
NOTE : A/T is shown. M/T is similar
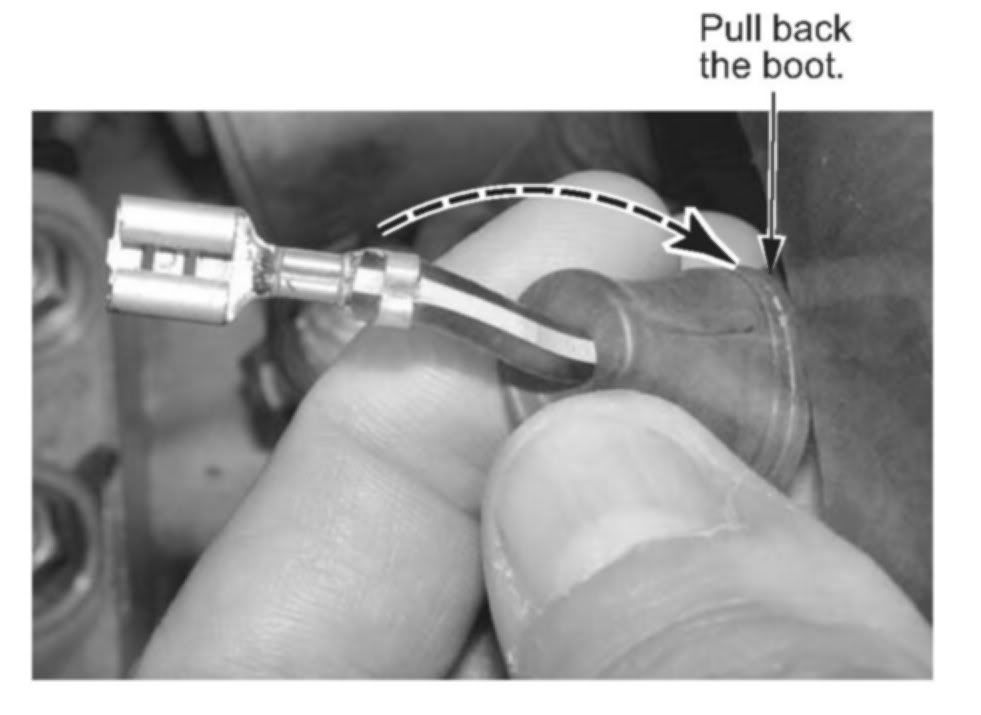
5. Pull the boot back from the female S terminal, and check the terminal for signs of arcing.
6. Check the male S terminal at the starter for signs of arcing.
7. If either terminal has signs of arcing, go to REPAIR PROCEDURE. If neither terminal has signs of arcing, continue your diagnosis using the appropriate service manual.
REPAIR PROCEDURE
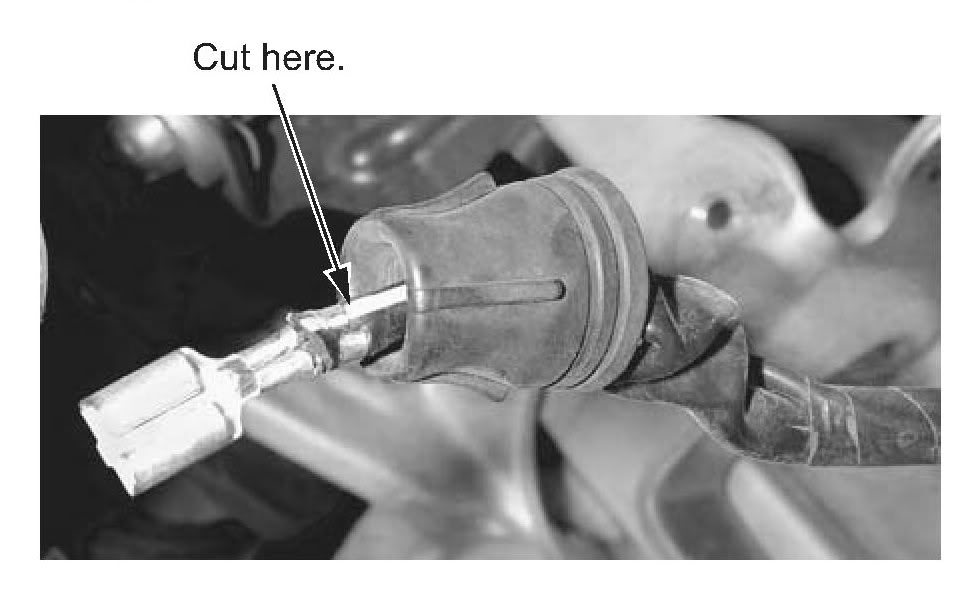
1. Cut off the female S terminal from the harness, making the cut as close to the terminal as possible.
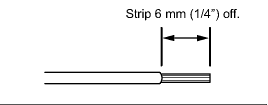
2. Strip 6 mm of insulation from the wire using the 2.0 slot on the crimping tool.
NOTE :Make sure no wire strands were removed when you stripped the insulation. If any were removed, cut the wire off even with the insulation, and strip it again.

3. Insert the wire into the new terminal so it fits as shown.
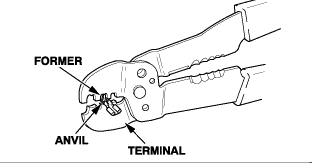
4. Using the 2.0 slot on the crimping tool, position the terminal in the tool slot with the solid portion of the terminal toward the anvil and the open section toward the former.

5. With the wire inserted in the new terminal as shown in step 3, crimp the wire by squeezing the tool with both hands until the stops make contact.
6. Crimp the insulation by positioning the 5.5 slot on the tool over the insulation crimp section of the terminal and squeezing the tool with both hands until the stops make contact.
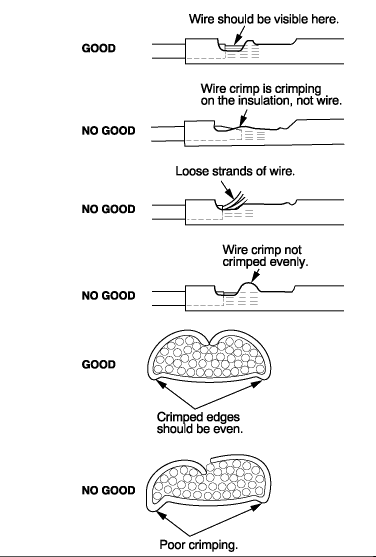
7. Inspect the quality of the wire crimp. If it has any of the following NO GOOD crimps, cut it off and start over.
8. Clean the starter side of the S terminal as needed using electric contact cleaner and an electrical connector cleaning brush (Snap-on P/N YA385A or equivalent). Blow out any debris remaining on or around the terminal with compressed air.
9. Apply silicone dielectric grease (3M silicone paste P/N 08946, Permatex Dielectric Tune-up grease P/N 67VR, or equivalent) to the female side of the S terminal, then carefully insert the terminal into the S terminal on the starter side.
10. Slide the boot completely over the S terminal.
11. Reconnect the positive battery cable, then reconnect the negative battery cable.
12. Enter the anti-theft code for the audio unit (if applicable), then enter the customer's audio presets. Set the clock.
13. Confirm that the starter engages properly by starting the engine several times.
14. Do the idle learn procedure:
^ Make sure all electrical items (A/C, audio unit, defogger, lights, etc.) are off.
^ Start the engine, and let it warm up to its normal operating temperature (the cooling fans cycle twice).
^ Let the engine idle (throttle closed and all electrical items off) for 10 minutes.
Disclaimer:

Just figured I would share the love.
06-025
May 18, 2006
Applies To:
2001-05 Civic 2-door - ALL except CVI
2001-05 Civic 4-door - ALL except Hybrid and GX
Starter Grinds While Cranking the Engine
SYMPTOM
The starter motor intermittently grinds while cranking the engine.
PROBABLE CAUSE
The female terminal at the starter solenoid may have spread apart, causing a loss of current to the solenoid.
CORRECTIVE ACTION
Replace the female terminal at the starter solenoid.
PARTS INFORMATION
Spade Receiver Terminal
/N 07JAZ-001420A, H/C 8362675TOOL INFORMATION
Terminal Crimping Tool: T/N 07JAZ-001020A
WARRANTY CLAIM INFORMATION
In warranty:
The normal warranty applies.
Operation Number: 7370C3
Flat Rate Time: 0.4 hour
Failed Part: P/N 31200-PLM-A51
H/C 6452429
Defect Code: 06601
Symptom Code: 09004
Template ID: 06-025A
Skill Level: Repair Technician
Out of warranty:
Any repair performed after warranty expiration may be eligible for goodwill consideration by the District Parts and Service Manager or your Zone Office. You must request consideration, and get a decision, before starting work.
DIAGNOSIS
1. If applicable, make sure you have the anti-theft code for the audio system. Write down the customer's audio unit presets.
2. Disconnect the negative cable from the battery, then disconnect the positive cable.
3. Remove the resonator:
^ Refer to page 11-199 of the 2001-2005 Civic Service Manual, or
^ Online, enter keyword RESONATOR, and select Resonator Removal/Replacement from the list.
4. Disconnect the female terminal (BLK/WHT wire) from the S terminal of the starter solenoid.
NOTE : A/T is shown. M/T is similar
5. Pull the boot back from the female S terminal, and check the terminal for signs of arcing.
6. Check the male S terminal at the starter for signs of arcing.
7. If either terminal has signs of arcing, go to REPAIR PROCEDURE. If neither terminal has signs of arcing, continue your diagnosis using the appropriate service manual.
REPAIR PROCEDURE
1. Cut off the female S terminal from the harness, making the cut as close to the terminal as possible.
2. Strip 6 mm of insulation from the wire using the 2.0 slot on the crimping tool.
NOTE :Make sure no wire strands were removed when you stripped the insulation. If any were removed, cut the wire off even with the insulation, and strip it again.
3. Insert the wire into the new terminal so it fits as shown.
4. Using the 2.0 slot on the crimping tool, position the terminal in the tool slot with the solid portion of the terminal toward the anvil and the open section toward the former.
5. With the wire inserted in the new terminal as shown in step 3, crimp the wire by squeezing the tool with both hands until the stops make contact.
6. Crimp the insulation by positioning the 5.5 slot on the tool over the insulation crimp section of the terminal and squeezing the tool with both hands until the stops make contact.
7. Inspect the quality of the wire crimp. If it has any of the following NO GOOD crimps, cut it off and start over.
8. Clean the starter side of the S terminal as needed using electric contact cleaner and an electrical connector cleaning brush (Snap-on P/N YA385A or equivalent). Blow out any debris remaining on or around the terminal with compressed air.
9. Apply silicone dielectric grease (3M silicone paste P/N 08946, Permatex Dielectric Tune-up grease P/N 67VR, or equivalent) to the female side of the S terminal, then carefully insert the terminal into the S terminal on the starter side.
10. Slide the boot completely over the S terminal.
11. Reconnect the positive battery cable, then reconnect the negative battery cable.
12. Enter the anti-theft code for the audio unit (if applicable), then enter the customer's audio presets. Set the clock.
13. Confirm that the starter engages properly by starting the engine several times.
14. Do the idle learn procedure:
^ Make sure all electrical items (A/C, audio unit, defogger, lights, etc.) are off.
^ Start the engine, and let it warm up to its normal operating temperature (the cooling fans cycle twice).
^ Let the engine idle (throttle closed and all electrical items off) for 10 minutes.
Disclaimer:
Just figured I would share the love.
Last edited by RasHondasDriver; 12-05-2009 at 08:02 PM.
 12-10-2009, 07:27 PM
#23
Honda-Tech Member
Join Date: May 2009
Location: Richmond CA
Posts: 953
Likes: 0
Received 0 Likes
on
0 Posts
12-10-2009, 07:29 PM
#24
Honda-Tech Member
Join Date: May 2009
Location: Richmond CA
Posts: 953
Likes: 0
Received 0 Likes
on
0 Posts
From Alldata. A technical service bulletin straight from Honda.
06-025
May 18, 2006
Applies To:
2001-05 Civic 2-door - ALL except CVI
2001-05 Civic 4-door - ALL except Hybrid and GX
Starter Grinds While Cranking the Engine
SYMPTOM
The starter motor intermittently grinds while cranking the engine.
PROBABLE CAUSE
The female terminal at the starter solenoid may have spread apart, causing a loss of current to the solenoid.
CORRECTIVE ACTION
Replace the female terminal at the starter solenoid.
PARTS INFORMATION
Spade Receiver Terminal/N 07JAZ-001420A, H/C 8362675
TOOL INFORMATION
Terminal Crimping Tool: T/N 07JAZ-001020A
WARRANTY CLAIM INFORMATION
In warranty:
The normal warranty applies.
Operation Number: 7370C3
Flat Rate Time: 0.4 hour
Failed Part: P/N 31200-PLM-A51
H/C 6452429
yada yada
Just figured I would share the love.
06-025
May 18, 2006
Applies To:
2001-05 Civic 2-door - ALL except CVI
2001-05 Civic 4-door - ALL except Hybrid and GX
Starter Grinds While Cranking the Engine
SYMPTOM
The starter motor intermittently grinds while cranking the engine.
PROBABLE CAUSE
The female terminal at the starter solenoid may have spread apart, causing a loss of current to the solenoid.
CORRECTIVE ACTION
Replace the female terminal at the starter solenoid.
PARTS INFORMATION
Spade Receiver Terminal
/N 07JAZ-001420A, H/C 8362675TOOL INFORMATION
Terminal Crimping Tool: T/N 07JAZ-001020A
WARRANTY CLAIM INFORMATION
In warranty:
The normal warranty applies.
Operation Number: 7370C3
Flat Rate Time: 0.4 hour
Failed Part: P/N 31200-PLM-A51
H/C 6452429
yada yada
Just figured I would share the love.
12-10-2009, 07:32 PM
#25
Honda-Tech Member
Join Date: May 2009
Location: Richmond CA
Posts: 953
Likes: 0
Received 0 Likes
on
0 Posts
