
How To: Install Spoon Monoblock Caliper DC2
 04-19-2008, 02:44 PM
#1
Honda-Tech Member
Thread Starter
Join Date: Jan 2003
Location: Chantilly, VA, United States
Posts: 1,447
Likes: 0
Received 0 Likes
on
0 Posts
I had a lot of PM's asking questions about the Spoon MONOBLOCK calipers install on DC2 so here is a short write up.
Since I had to take them off again to flip them.
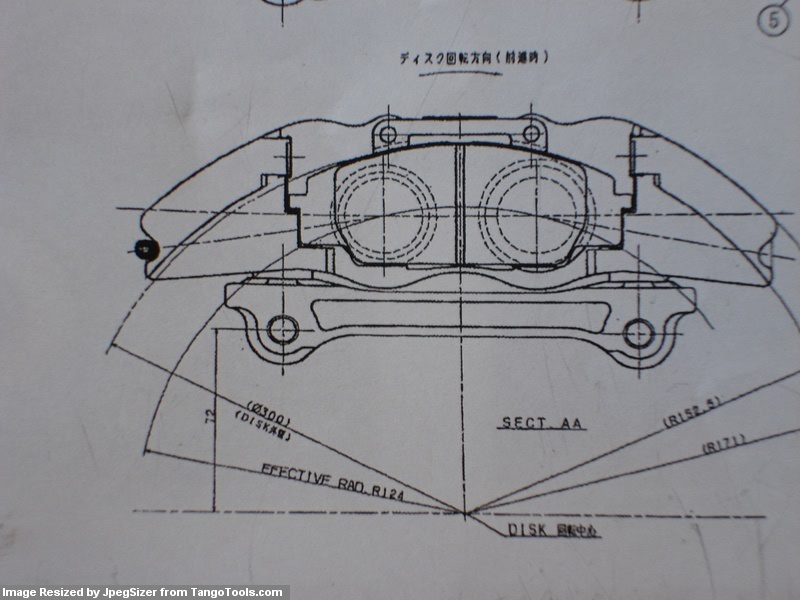
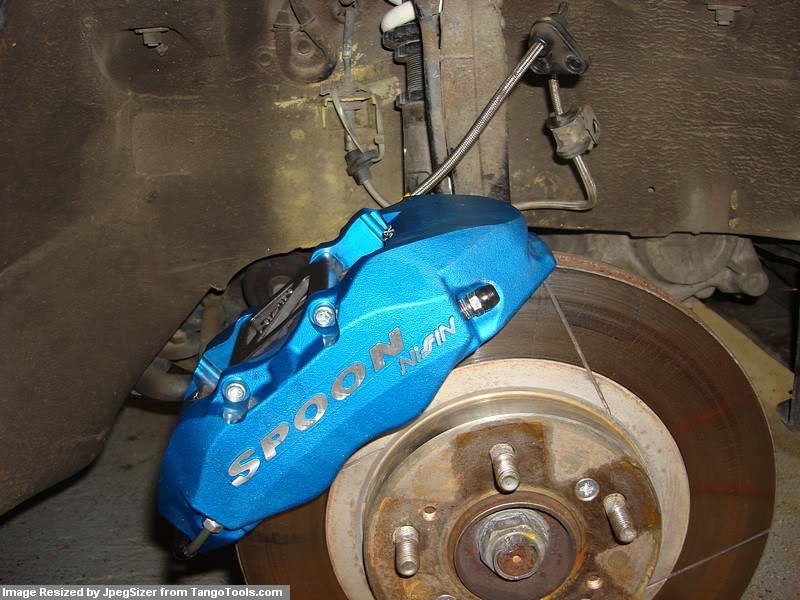
These brakes were designed for the S2000, they mount on the reverse side of the rotor. They are directional so there is
a smaller piston followed by a bigger piston to help maintain equal pad wear.
What this means for DC2? The brakes have to be mounted upside down on the forward side of the rotor with
the bleeders facing down. WHAT?!? How am I supposed to bleed them? Answers to follow!
Diagrams
<U>Equipment Needed</U>
Ratchet
17mm Socket
14mm Socket
10mm Socket
10mm Wrench
Rubber Mallet Hammer (5lbs. one is just fine)
Screw Breaker for rusted rotor screws
1 or 2 Drain Pans
Zip Ties
Thread Lock
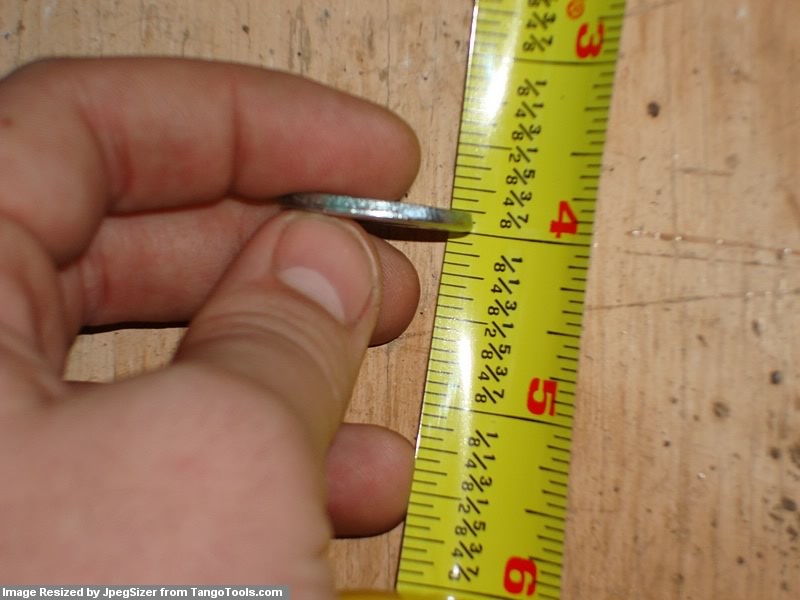
2 Thick half inch washers

New Brake Pads of your choice for S2000, I went with OEM AP1 version to give them a try
4 Rotor Screws (most are rusted and good to replace them to prevent problems), Mine happened to be semi stripped
Cutters (For Zip Ties)
Brake Fluid (Honda DOT3 street or Motul RBF600 for track)
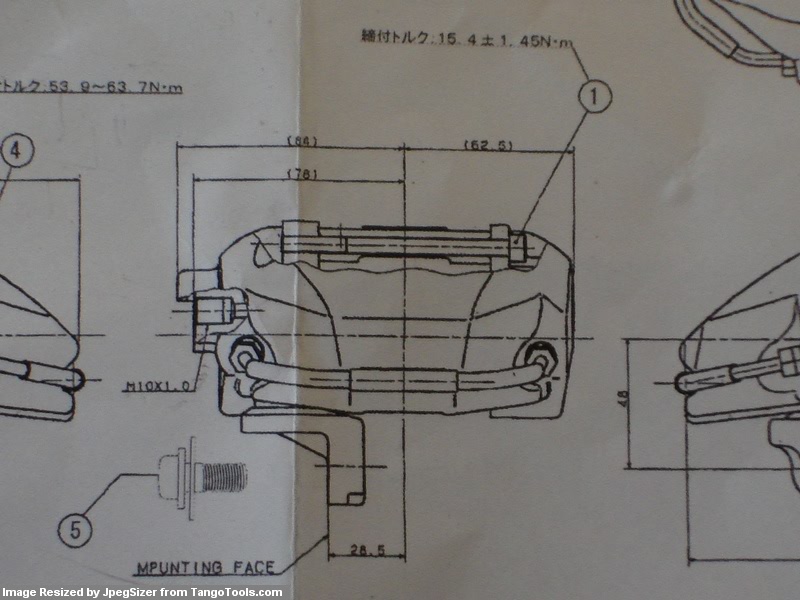
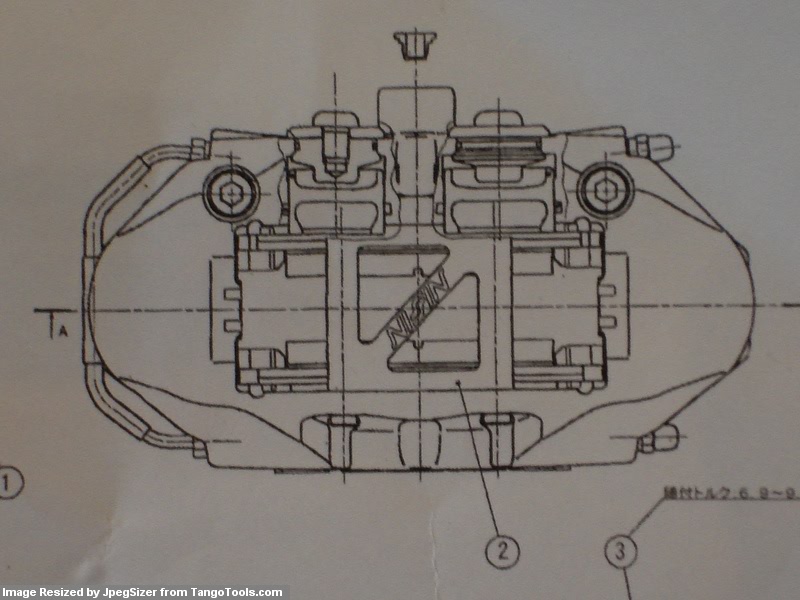
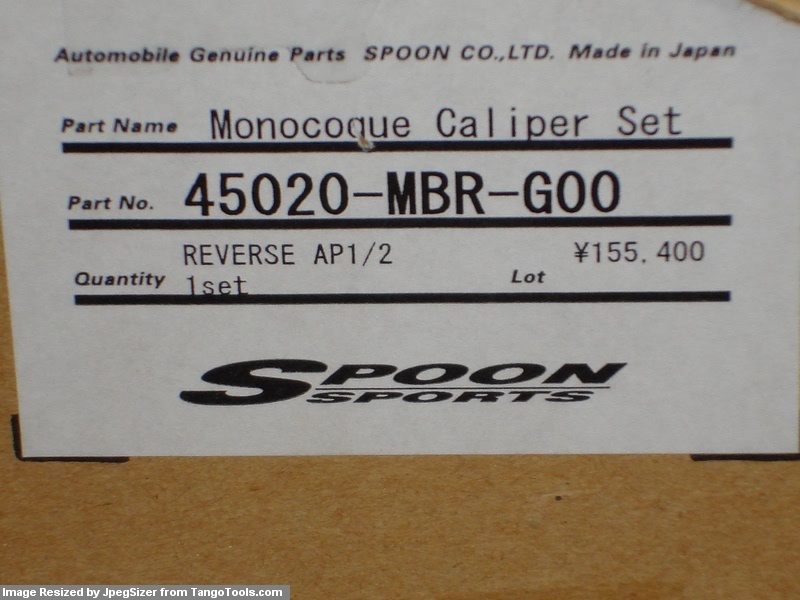
Spoon Monoblock Calipers - Part# 45020-MBR-G00 (Reverse AP1/2)
Thanks MooFx for the Calipers and cheap rotors!
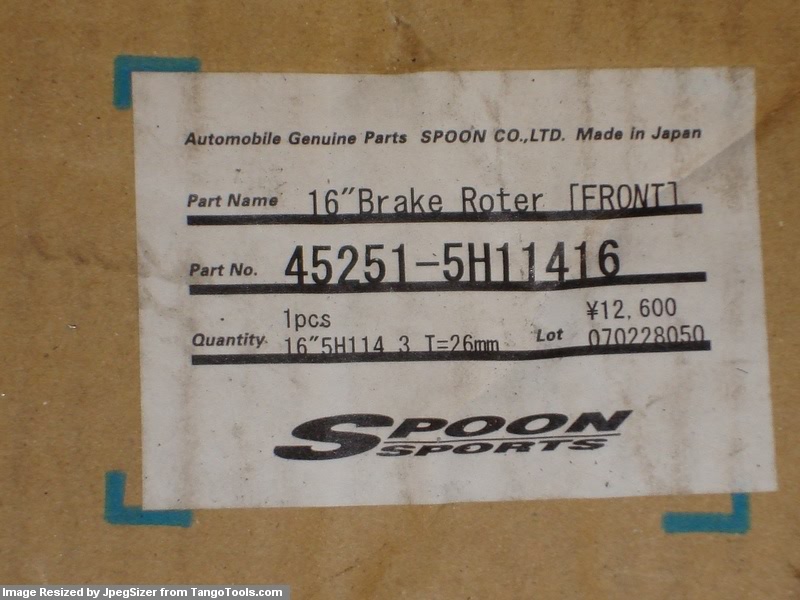
Spoon Rotors - Part# 45251-5H11416 (Per investigation, these are the exact same as RSX TypeS Rotors, so you can order a set of those ALOT cheaper)
1) Jack Car up
2) Put Jack Stands under Car
3) Remove Wheels
4) Remove The 10mm bolt holding the brake line to the caliper (have drain pan under for spillage)
5) Remove the 2 14mm Bolts holding the Caliper onto the Bracket, turn brake fluid hole into drain pan to spill the remaining brake fluid in the caliper out into the pan
6) Remove the 2 17mm Bolts holding the Caliper onto the Knuckle
7) Remove the two screws in the rotor, may require the breaker and hammer on the screws to break lose and prevent stripping if plan on using again
8) Take the Rubber hammer and lightly tap the backside of the rotor to break it lose and pull it off.
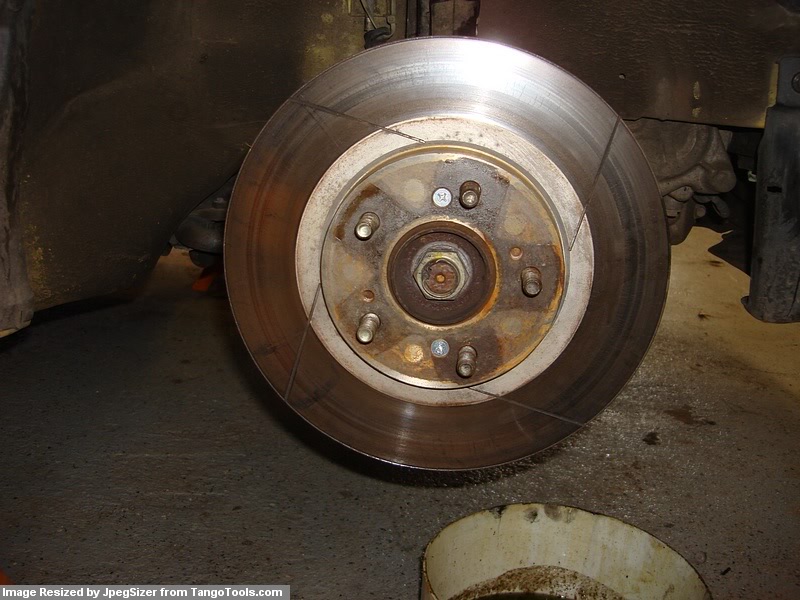
9) Put the new rotor on, put 2 new screws in rotor to help center it.
New Rotor mounted
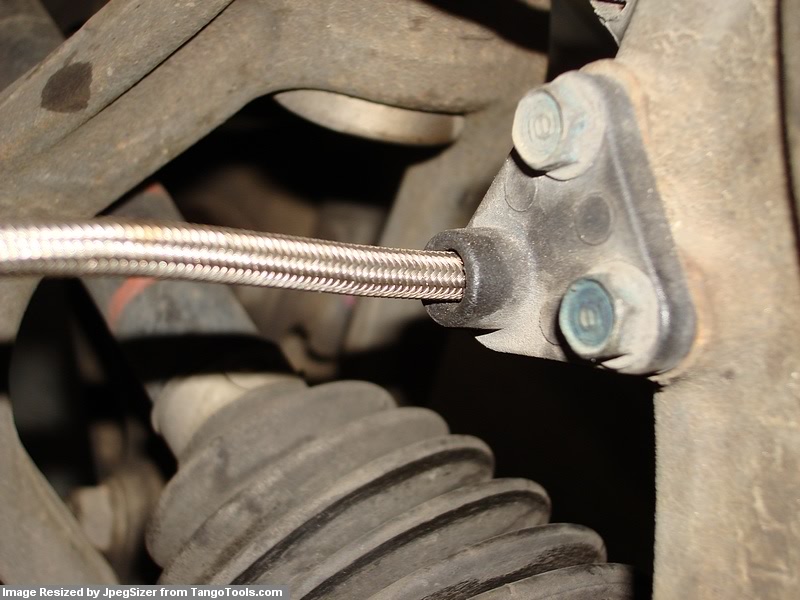
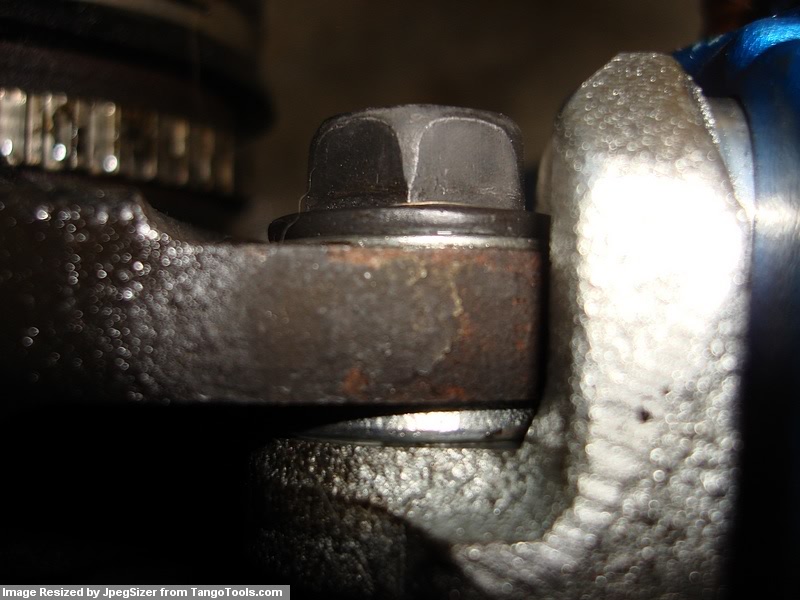
10) Remove the 2 10mm bolts holding brake line bracket to knuckle.
Pictured here
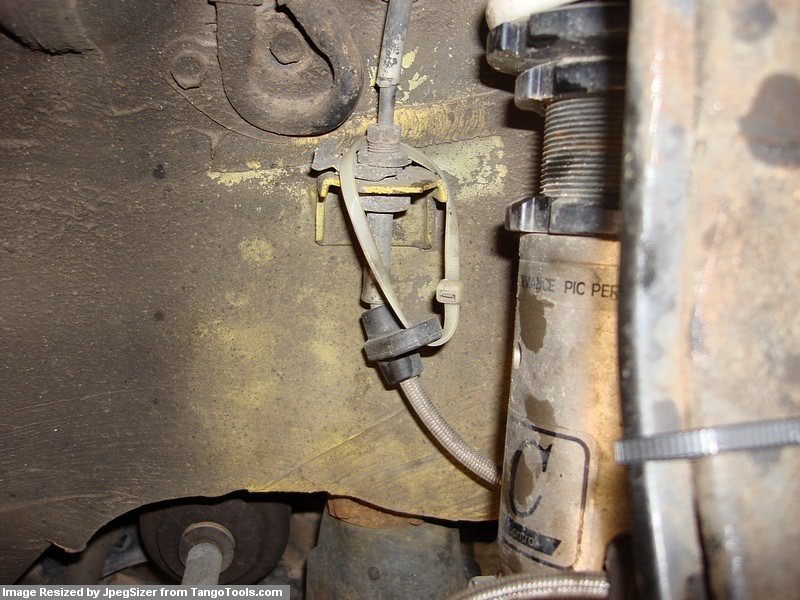
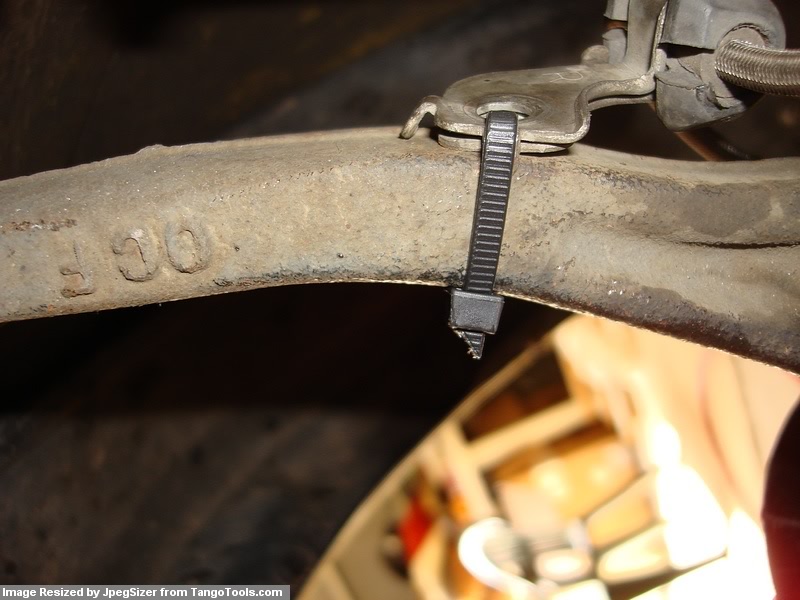
11) Remove other brackets if you have OEM suspension, I don't so they were already zip-tied. I just cut them loose.
You are doing this to give more play in the brake lines for the oh so fun bleeding.
Zipties I cut lose
12) Place caliper on top of rotor. Hook brake line to rotor.
Placing rotor on top so it has somewhere to sit.
Make sure you have the brakes lines routed correctly and positioned the way it should be when the caliper is mounted on forward side.
13) Bleed Brakes! Multiple people definately helped out for this, since we had unmounted calipers.
What we did here, was move the rotor back some so the bleeders were facing up and bled them "properly" against rotor on reverse side.
Once we were finished, we moved the caliper to forward side and mounted them. It's alittle difficult, so watch where you have them sitting or you'll hit hub coming to forward side.
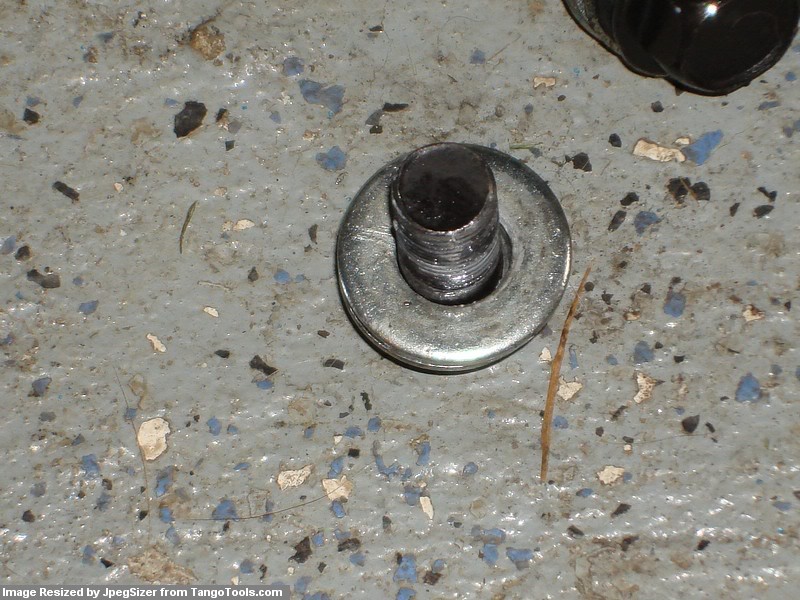
14) Use your spacers so the calipers mount center.
I left the small shim on outside that came with the new bolts in caliper box. Used washer between knuckle and caliper mounting bracket
15) Mounted!
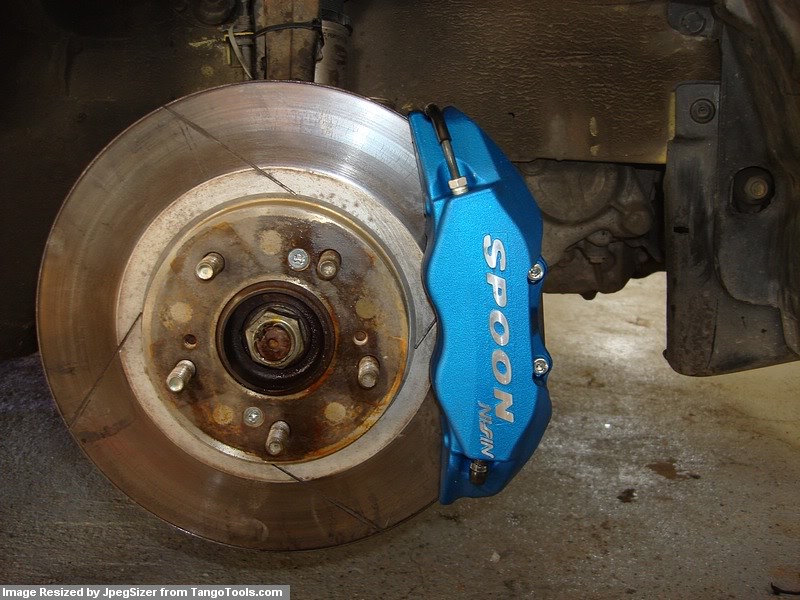
16) Mount the lines back properly with brackets and bolts/zipties. And waaaalaaaa!
Finished product

There may be some small corrections to be made on spelling or a step I missed, but this should provide you with enough information to complete the job right the first time rather than doing this 3x over the past week lol. First time, no washer, 2nd time, mounted "right" but "wrong" since direction and made for reverse side S2000 mounting location. 3rd time a charm =P
Since I had to take them off again to flip them.
These brakes were designed for the S2000, they mount on the reverse side of the rotor. They are directional so there is
a smaller piston followed by a bigger piston to help maintain equal pad wear.
What this means for DC2? The brakes have to be mounted upside down on the forward side of the rotor with
the bleeders facing down. WHAT?!? How am I supposed to bleed them? Answers to follow!
Diagrams
<U>Equipment Needed</U>
Ratchet
17mm Socket
14mm Socket
10mm Socket
10mm Wrench
Rubber Mallet Hammer (5lbs. one is just fine)
Screw Breaker for rusted rotor screws
1 or 2 Drain Pans
Zip Ties
Thread Lock
2 Thick half inch washers
New Brake Pads of your choice for S2000, I went with OEM AP1 version to give them a try
4 Rotor Screws (most are rusted and good to replace them to prevent problems), Mine happened to be semi stripped
Cutters (For Zip Ties)
Brake Fluid (Honda DOT3 street or Motul RBF600 for track)
Spoon Monoblock Calipers - Part# 45020-MBR-G00 (Reverse AP1/2)
Thanks MooFx for the Calipers and cheap rotors!
Spoon Rotors - Part# 45251-5H11416 (Per investigation, these are the exact same as RSX TypeS Rotors, so you can order a set of those ALOT cheaper)
1) Jack Car up
2) Put Jack Stands under Car
3) Remove Wheels
4) Remove The 10mm bolt holding the brake line to the caliper (have drain pan under for spillage)
5) Remove the 2 14mm Bolts holding the Caliper onto the Bracket, turn brake fluid hole into drain pan to spill the remaining brake fluid in the caliper out into the pan
6) Remove the 2 17mm Bolts holding the Caliper onto the Knuckle
7) Remove the two screws in the rotor, may require the breaker and hammer on the screws to break lose and prevent stripping if plan on using again
8) Take the Rubber hammer and lightly tap the backside of the rotor to break it lose and pull it off.
9) Put the new rotor on, put 2 new screws in rotor to help center it.
New Rotor mounted
10) Remove the 2 10mm bolts holding brake line bracket to knuckle.
Pictured here
11) Remove other brackets if you have OEM suspension, I don't so they were already zip-tied. I just cut them loose.
You are doing this to give more play in the brake lines for the oh so fun bleeding.
Zipties I cut lose
12) Place caliper on top of rotor. Hook brake line to rotor.
Placing rotor on top so it has somewhere to sit.
Make sure you have the brakes lines routed correctly and positioned the way it should be when the caliper is mounted on forward side.
13) Bleed Brakes! Multiple people definately helped out for this, since we had unmounted calipers.
What we did here, was move the rotor back some so the bleeders were facing up and bled them "properly" against rotor on reverse side.
Once we were finished, we moved the caliper to forward side and mounted them. It's alittle difficult, so watch where you have them sitting or you'll hit hub coming to forward side.
14) Use your spacers so the calipers mount center.
I left the small shim on outside that came with the new bolts in caliper box. Used washer between knuckle and caliper mounting bracket
15) Mounted!
16) Mount the lines back properly with brackets and bolts/zipties. And waaaalaaaa!
Finished product
There may be some small corrections to be made on spelling or a step I missed, but this should provide you with enough information to complete the job right the first time rather than doing this 3x over the past week lol. First time, no washer, 2nd time, mounted "right" but "wrong" since direction and made for reverse side S2000 mounting location. 3rd time a charm =P

 04-19-2008, 08:12 PM
#6
Honda-Tech Member
Join Date: Jun 2000
Location: Crazy Canuck, Everywhere
Posts: 1,637
Likes: 0
Received 0 Likes
on
0 Posts
Looks great! 
Just a thought... don't you think the bleader screws could be relocated to the other end of the caliper and the hard line moved to where the bleaders are now? If that was possible it would make the whole bleeding process that much easier.
Just a thought... don't you think the bleader screws could be relocated to the other end of the caliper and the hard line moved to where the bleaders are now? If that was possible it would make the whole bleeding process that much easier.
04-19-2008, 08:45 PM
#7
Honda-Tech Member
Thread Starter
Join Date: Jan 2003
Location: Chantilly, VA, United States
Posts: 1,447
Likes: 0
Received 0 Likes
on
0 Posts
<TABLE WIDTH="90%" CELLSPACING=0 CELLPADDING=0 ALIGN=CENTER><TR><TD>Quote, originally posted by get RIGHT »</TD></TR><TR><TD CLASS="quote">Nice write up. </TD></TR></TABLE>
Thanks
<TABLE WIDTH="90%" CELLSPACING=0 CELLPADDING=0 ALIGN=CENTER><TR><TD>Quote, originally posted by nautica_t »</TD></TR><TR><TD CLASS="quote">n00b question but what's the difference between the spoon monoblock (s2000) vs spoon twinblock (dc2)?
sorry too lazy to research at the moment.</TD></TR></TABLE>
Monoblock calipers were designed as a one-piece unit to improve rigidity.
I honestly would have gone with the twinblocks, but moofx was out of stock of those. He had the monoblock in stock.
<TABLE WIDTH="90%" CELLSPACING=0 CELLPADDING=0 ALIGN=CENTER><TR><TD>Quote, originally posted by jomama »</TD></TR><TR><TD CLASS="quote">very nice DIY</TD></TR></TABLE>
Thanks
<TABLE WIDTH="90%" CELLSPACING=0 CELLPADDING=0 ALIGN=CENTER><TR><TD>Quote, originally posted by Fat Chick Magnet »</TD></TR><TR><TD CLASS="quote">yummmyyyy</TD></TR></TABLE>
Yeah baby!
<TABLE WIDTH="90%" CELLSPACING=0 CELLPADDING=0 ALIGN=CENTER><TR><TD>Quote, originally posted by BABY NSX »</TD></TR><TR><TD CLASS="quote">Looks great!
Just a thought... don't you think the bleader screws could be relocated to the other end of the caliper and the hard line moved to where the bleaders are now? If that was possible it would make the whole bleeding process that much easier.</TD></TR></TABLE>
I'm honestly not sure if you can and I really didn't want to [freak] with $1500 dollar calipers. The 20 minutes extra of work is fine by me
Thanks
<TABLE WIDTH="90%" CELLSPACING=0 CELLPADDING=0 ALIGN=CENTER><TR><TD>Quote, originally posted by nautica_t »</TD></TR><TR><TD CLASS="quote">n00b question but what's the difference between the spoon monoblock (s2000) vs spoon twinblock (dc2)?
sorry too lazy to research at the moment.</TD></TR></TABLE>
Monoblock calipers were designed as a one-piece unit to improve rigidity.
I honestly would have gone with the twinblocks, but moofx was out of stock of those. He had the monoblock in stock.
<TABLE WIDTH="90%" CELLSPACING=0 CELLPADDING=0 ALIGN=CENTER><TR><TD>Quote, originally posted by jomama »</TD></TR><TR><TD CLASS="quote">very nice DIY</TD></TR></TABLE>
Thanks
<TABLE WIDTH="90%" CELLSPACING=0 CELLPADDING=0 ALIGN=CENTER><TR><TD>Quote, originally posted by Fat Chick Magnet »</TD></TR><TR><TD CLASS="quote">yummmyyyy</TD></TR></TABLE>
Yeah baby!
<TABLE WIDTH="90%" CELLSPACING=0 CELLPADDING=0 ALIGN=CENTER><TR><TD>Quote, originally posted by BABY NSX »</TD></TR><TR><TD CLASS="quote">Looks great!
Just a thought... don't you think the bleader screws could be relocated to the other end of the caliper and the hard line moved to where the bleaders are now? If that was possible it would make the whole bleeding process that much easier.</TD></TR></TABLE>
I'm honestly not sure if you can and I really didn't want to [freak] with $1500 dollar calipers. The 20 minutes extra of work is fine by me
Trending Topics
04-19-2008, 09:18 PM
#8
Honda-Tech Member
Join Date: Jun 2000
Location: Crazy Canuck, Everywhere
Posts: 1,637
Likes: 0
Received 0 Likes
on
0 Posts
<TABLE WIDTH="90%" CELLSPACING=0 CELLPADDING=0 ALIGN=CENTER><TR><TD>Quote, originally posted by godnf8 »</TD></TR><TR><TD CLASS="quote">
I'm honestly not sure if you can and I really didn't want to [freak] with $1500 dollar calipers. The 20 minutes extra of work is fine by me </TD></TR></TABLE>
Understood... but looking at the pictures it looks fairly likely that it is possible. I can see that bleeding your brakes (as they are right now) at the track would be a major pain otherwise.
I'm honestly not sure if you can and I really didn't want to [freak] with $1500 dollar calipers. The 20 minutes extra of work is fine by me
</TD></TR></TABLE>Understood... but looking at the pictures it looks fairly likely that it is possible. I can see that bleeding your brakes (as they are right now) at the track would be a major pain otherwise.
04-19-2008, 10:35 PM
#9
Honda-Tech Member
<TABLE WIDTH="90%" CELLSPACING=0 CELLPADDING=0 ALIGN=CENTER><TR><TD>Quote, originally posted by BABY NSX »</TD></TR><TR><TD CLASS="quote">
Understood... but looking at the pictures it looks fairly likely that it is possible. </TD></TR></TABLE>

That's actually what made me think of what you suggested, but as the OP posted up, I too, would be a little wary of messin up these calipers.
Moreover, the dangers are real, if they happen to fail because of this little "mod."
OTH, I've never been too responsible about my own personal safety... (Me thinks I'd test this right in my neighborhood at the end of a dead end street)
Understood... but looking at the pictures it looks fairly likely that it is possible. </TD></TR></TABLE>
That's actually what made me think of what you suggested, but as the OP posted up, I too, would be a little wary of messin up these calipers.
Moreover, the dangers are real, if they happen to fail because of this little "mod."
OTH, I've never been too responsible about my own personal safety...
(Me thinks I'd test this right in my neighborhood at the end of a dead end street)
04-19-2008, 11:03 PM
#10
Honda-Tech Member
Join Date: Jun 2000
Location: Crazy Canuck, Everywhere
Posts: 1,637
Likes: 0
Received 0 Likes
on
0 Posts
My bet is that the 2 bleeding can be installed were the coupling pipe is and that can be moved over to where the bleed screws are.
If so we are talking about 4 screws... two of which you tamper with everytime you bleed your brakes anyway... seriously I don't see what the added risk would be.
If so we are talking about 4 screws... two of which you tamper with everytime you bleed your brakes anyway... seriously I don't see what the added risk would be.
04-20-2008, 08:03 AM
#11
Honda-Tech Member
Thread Starter
Join Date: Jan 2003
Location: Chantilly, VA, United States
Posts: 1,447
Likes: 0
Received 0 Likes
on
0 Posts
<TABLE WIDTH="90%" CELLSPACING=0 CELLPADDING=0 ALIGN=CENTER><TR><TD>Quote, originally posted by BABY NSX »</TD></TR><TR><TD CLASS="quote">My bet is that the 2 bleeding can be installed were the coupling pipe is and that can be moved over to where the bleed screws are.
If so we are talking about 4 screws... two of which you tamper with everytime you bleed your brakes anyway... seriously I don't see what the added risk would be.</TD></TR></TABLE>
I'll contact spoon and find out, in theory it seems like there shouldn't be a problem.
I may do that the next time I mess with them, but 3x in one week is enough for me and my garage floor haha
<TABLE WIDTH="90%" CELLSPACING=0 CELLPADDING=0 ALIGN=CENTER><TR><TD>Quote, originally posted by KwokLau »</TD></TR><TR><TD CLASS="quote">how is the brakes on DC</TD></TR></TABLE>
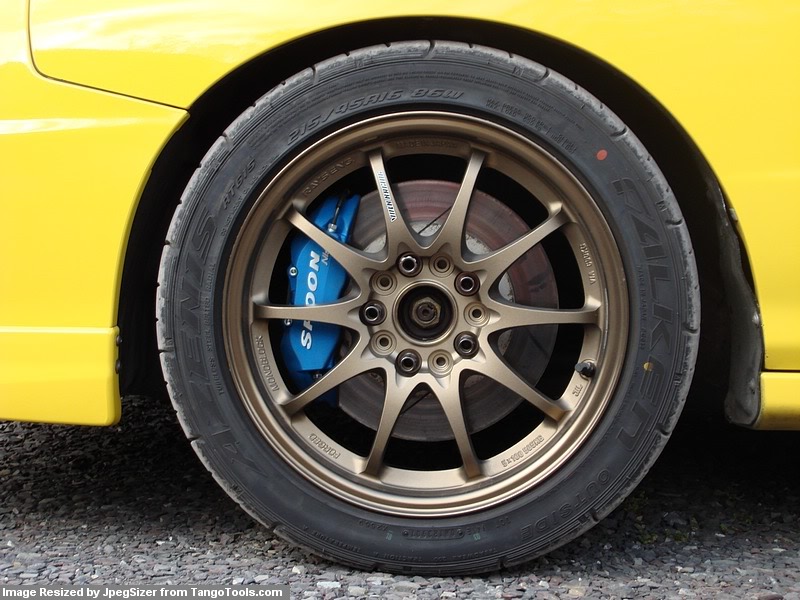
I'm loving them, they are much more responsive the the oem brakes, there is more travel in the pedal and it feels much more "controlled" the the factory brakes. We'll see how they do over time. Right now i'm using OEM AP1 brake pads, I'm sure it would be even better if I stepped up to a better pad.
If so we are talking about 4 screws... two of which you tamper with everytime you bleed your brakes anyway... seriously I don't see what the added risk would be.</TD></TR></TABLE>
I'll contact spoon and find out, in theory it seems like there shouldn't be a problem.
I may do that the next time I mess with them, but 3x in one week is enough for me and my garage floor haha
<TABLE WIDTH="90%" CELLSPACING=0 CELLPADDING=0 ALIGN=CENTER><TR><TD>Quote, originally posted by KwokLau »</TD></TR><TR><TD CLASS="quote">how is the brakes on DC</TD></TR></TABLE>
I'm loving them, they are much more responsive the the oem brakes, there is more travel in the pedal and it feels much more "controlled" the the factory brakes. We'll see how they do over time. Right now i'm using OEM AP1 brake pads, I'm sure it would be even better if I stepped up to a better pad.
04-21-2008, 03:33 AM
#15
Honda-Tech Member
Thread Starter
Join Date: Jan 2003
Location: Chantilly, VA, United States
Posts: 1,447
Likes: 0
Received 0 Likes
on
0 Posts
<TABLE WIDTH="90%" CELLSPACING=0 CELLPADDING=0 ALIGN=CENTER><TR><TD>Quote, originally posted by DiRT! »</TD></TR><TR><TD CLASS="quote">Good Stuff. caR looks great </TD></TR></TABLE>
Thanks
<TABLE WIDTH="90%" CELLSPACING=0 CELLPADDING=0 ALIGN=CENTER><TR><TD>Quote, originally posted by actionanh »</TD></TR><TR><TD CLASS="quote">dumb question, but why didn't you get the one's specifically for DC2's?</TD></TR></TABLE>
The monoblock uses a bigger rotor plus MooFx had the monoblock on hand. No crazy wait time =P
<TABLE WIDTH="90%" CELLSPACING=0 CELLPADDING=0 ALIGN=CENTER><TR><TD>Quote, originally posted by victorandolph »</TD></TR><TR><TD CLASS="quote">nice. easy to understand write up as well</TD></TR></TABLE>
Thanks
</TD></TR></TABLE>Thanks
<TABLE WIDTH="90%" CELLSPACING=0 CELLPADDING=0 ALIGN=CENTER><TR><TD>Quote, originally posted by actionanh »</TD></TR><TR><TD CLASS="quote">dumb question, but why didn't you get the one's specifically for DC2's?</TD></TR></TABLE>
The monoblock uses a bigger rotor plus MooFx had the monoblock on hand. No crazy wait time =P
<TABLE WIDTH="90%" CELLSPACING=0 CELLPADDING=0 ALIGN=CENTER><TR><TD>Quote, originally posted by victorandolph »</TD></TR><TR><TD CLASS="quote">nice. easy to understand write up as well</TD></TR></TABLE>
Thanks
04-21-2008, 06:09 AM
#16
Honda-Tech Member
Join Date: Jul 2005
Location: miami, fl, 33161
Posts: 995
Likes: 0
Received 0 Likes
on
0 Posts
Shouldnt the bleeder be on top. Having the bleeder on the bottom will have air stuck at the top of the caliper. Have you had any problems. Spongy pedal. Or it doesnt affect the spoon clappers.
04-21-2008, 06:34 AM
#17
Honda-Tech Member
<TABLE WIDTH="90%" CELLSPACING=0 CELLPADDING=0 ALIGN=CENTER><TR><TD>Quote, originally posted by typer_696 »</TD></TR><TR><TD CLASS="quote">Shouldnt the bleeder be on top. Having the bleeder on the bottom will have air stuck at the top of the caliper. Have you had any problems. Spongy pedal. Or it doesnt affect the spoon clappers. </TD></TR></TABLE>
reading > you
reading > you
04-21-2008, 07:58 AM
#20
Honda-Tech Member
Thread Starter
Join Date: Jan 2003
Location: Chantilly, VA, United States
Posts: 1,447
Likes: 0
Received 0 Likes
on
0 Posts
<TABLE WIDTH="90%" CELLSPACING=0 CELLPADDING=0 ALIGN=CENTER><TR><TD>Quote, originally posted by typer_696 »</TD></TR><TR><TD CLASS="quote">Shouldnt the bleeder be on top. Having the bleeder on the bottom will have air stuck at the top of the caliper. Have you had any problems. Spongy pedal. Or it doesnt affect the spoon clappers. </TD></TR></TABLE>
If you read the step by step directions, I bled the brakes with the bleeders facing up to avoid getting air in. I have no problems with a spongy pedal, I'm loving it so far.
<TABLE WIDTH="90%" CELLSPACING=0 CELLPADDING=0 ALIGN=CENTER><TR><TD>Quote, originally posted by legomytego »</TD></TR><TR><TD CLASS="quote">what rotor did you go with for this setup ? maybe i missed it </TD></TR></TABLE>
RSX Type S rotors (2002 Verified) are the same size rotors I used. They are 11.8" and 26mm Wide
<TABLE WIDTH="90%" CELLSPACING=0 CELLPADDING=0 ALIGN=CENTER><TR><TD>Quote, originally posted by RagingAngel »</TD></TR><TR><TD CLASS="quote">
reading > you </TD></TR></TABLE>
<TABLE WIDTH="90%" CELLSPACING=0 CELLPADDING=0 ALIGN=CENTER><TR><TD>Quote, originally posted by RagingAngel »</TD></TR><TR><TD CLASS="quote">reading > you
</TD></TR></TABLE>
LOL
If you read the step by step directions, I bled the brakes with the bleeders facing up to avoid getting air in. I have no problems with a spongy pedal, I'm loving it so far.
<TABLE WIDTH="90%" CELLSPACING=0 CELLPADDING=0 ALIGN=CENTER><TR><TD>Quote, originally posted by legomytego »</TD></TR><TR><TD CLASS="quote">what rotor did you go with for this setup ? maybe i missed it </TD></TR></TABLE>
RSX Type S rotors (2002 Verified) are the same size rotors I used. They are 11.8" and 26mm Wide
<TABLE WIDTH="90%" CELLSPACING=0 CELLPADDING=0 ALIGN=CENTER><TR><TD>Quote, originally posted by RagingAngel »</TD></TR><TR><TD CLASS="quote">
reading > you
</TD></TR></TABLE><TABLE WIDTH="90%" CELLSPACING=0 CELLPADDING=0 ALIGN=CENTER><TR><TD>Quote, originally posted by RagingAngel »</TD></TR><TR><TD CLASS="quote">reading > you
</TD></TR></TABLE>
LOL
 04-21-2008, 08:00 AM
#22
Honda-Tech Member
Join Date: Dec 2007
Location: Role Model Crew !
Posts: 1,159
Likes: 0
Received 0 Likes
on
0 Posts
<TABLE WIDTH="90%" CELLSPACING=0 CELLPADDING=0 ALIGN=CENTER><TR><TD>Quote, originally posted by RagingAngel »</TD></TR><TR><TD CLASS="quote">reading > you
</TD></TR></TABLE>
i said maybe i missed it its kinda hard to see everything on a motorola Q
you still dident give me a answer
</TD></TR></TABLE>
i said maybe i missed it its kinda hard to see everything on a motorola Q
you still dident give me a answer
04-21-2008, 08:59 AM
#23
Honda-Tech Member
Thread Starter
Join Date: Jan 2003
Location: Chantilly, VA, United States
Posts: 1,447
Likes: 0
Received 0 Likes
on
0 Posts
<TABLE WIDTH="90%" CELLSPACING=0 CELLPADDING=0 ALIGN=CENTER><TR><TD>Quote, originally posted by Numba1 B Series »</TD></TR><TR><TD CLASS="quote">THANKS!
Saved as favorites. </TD></TR></TABLE>
Awesome!
<TABLE WIDTH="90%" CELLSPACING=0 CELLPADDING=0 ALIGN=CENTER><TR><TD>Quote, originally posted by legomytego »</TD></TR><TR><TD CLASS="quote">
i said maybe i missed it its kinda hard to see everything on a motorola Q
you still dident give me a answer </TD></TR></TABLE>
I answered you twice, First in the required equipment list at the top of thread which included a picture of the part# for spoon rotor, then after that I said RSX TYPE S ROTOR IS SAME THING. Then I quoted you a couple posts back and answered you a 3rd time. Going with RagingAngel on this one. Hooked on phonics worked for me.
Saved as favorites. </TD></TR></TABLE>
Awesome!
<TABLE WIDTH="90%" CELLSPACING=0 CELLPADDING=0 ALIGN=CENTER><TR><TD>Quote, originally posted by legomytego »</TD></TR><TR><TD CLASS="quote">
i said maybe i missed it its kinda hard to see everything on a motorola Q
you still dident give me a answer
</TD></TR></TABLE>I answered you twice, First in the required equipment list at the top of thread which included a picture of the part# for spoon rotor, then after that I said RSX TYPE S ROTOR IS SAME THING. Then I quoted you a couple posts back and answered you a 3rd time. Going with RagingAngel on this one. Hooked on phonics worked for me.
04-21-2008, 09:14 AM
#24
Join Date: Mar 2008
Location: I hate, Va, USA
Posts: 79
Likes: 0
Received 0 Likes
on
0 Posts
This write up sucks and you suck...at life!
Just kidding, good stuff, Dave. I, personally, wouldn't have tried to "fabricate" brakes. I may drive like I want to die sometimes, but I really don't want my fate in "rigged" up brakes.
Nonetheless, good ****! They look bad *** behind those new, overpriced, wheels.
Viva la revolucion!
Just kidding, good stuff, Dave. I, personally, wouldn't have tried to "fabricate" brakes. I may drive like I want to die sometimes, but I really don't want my fate in "rigged" up brakes.
Nonetheless, good ****! They look bad *** behind those new, overpriced, wheels.
Viva la revolucion!
04-21-2008, 09:19 AM
#25
Honda-Tech Member
Thread Starter
Join Date: Jan 2003
Location: Chantilly, VA, United States
Posts: 1,447
Likes: 0
Received 0 Likes
on
0 Posts
<TABLE WIDTH="90%" CELLSPACING=0 CELLPADDING=0 ALIGN=CENTER><TR><TD>Quote, originally posted by 90DAB20 »</TD></TR><TR><TD CLASS="quote">This write up sucks and you suck...at life!
Just kidding, good stuff, Dave. I, personally, wouldn't have tried to "fabricate" brakes. I may drive like I want to die sometimes, but I really don't want my fate in "rigged" up brakes.
Nonetheless, good ****! They look bad *** behind those new, overpriced, wheels.
Viva la revolucion!
</TD></TR></TABLE>
I think it's time for some redrilled rotors and ITR front brake upgrade on yours =P