
Project 'Make Gagnar's Car Nice Again:' My Build Thread


 01-15-2010, 08:46 AM
#52
Honda-Tech Member
Join Date: Sep 2007
Location: Three1Oh, United States
Posts: 653
Likes: 0
Received 0 Likes
on
0 Posts
once you mount the ITR swaybar you will notice the difference immediately, the car responds so much differently its really amazing. I was actually able to take hard hairpins without understeering through them the whole way lol
01-15-2010, 08:54 AM
#53
I'm thinking I might mount the sway bar this winter, since it seems it's pretty independent of the other stuff I want to do (bushings and shocks), and because I'm tired of waiting! That, and my scientific mind sort of wants to see how each bit changes the handling independently.
01-15-2010, 09:01 AM
#54
Honda-Tech Member
Join Date: Sep 2007
Location: Three1Oh, United States
Posts: 653
Likes: 0
Received 0 Likes
on
0 Posts
its seriously amazing how much it does, i mounted mine with the ASR in tandem and i saw a huge change with the two parts changed. I reccomend driving with the old sway bar and take a few hard corners, then do the same with the new sway bar. you will be shocked
01-16-2010, 01:10 PM
#56
Honda-Tech Member
Join Date: Sep 2006
Location: South Texas
Posts: 2,912
Likes: 0
Received 0 Likes
on
0 Posts
I have the ES bushings and the shifter does vibrate a little but you only notice when you touch it. With an OEM shifter it does not rattle or make any noise.
01-16-2010, 01:19 PM
#57
Honda-Tech Member
this is the only area of my car that i did not use poly. i rarely miss a shift and feel the oem isn't really that bad of a design. it's the suspension arms that i changed all the bushings in. it makes a big difference in the feel of the car
01-16-2010, 01:29 PM
#58
Honda-Tech Member
Join Date: Sep 2006
Location: South Texas
Posts: 2,912
Likes: 0
Received 0 Likes
on
0 Posts
It's personal preference, I guess. I installed some stiffer mounts and poly shifter bushings at the same time and shifting definitely feels "tighter."
01-20-2010, 10:37 AM
#59
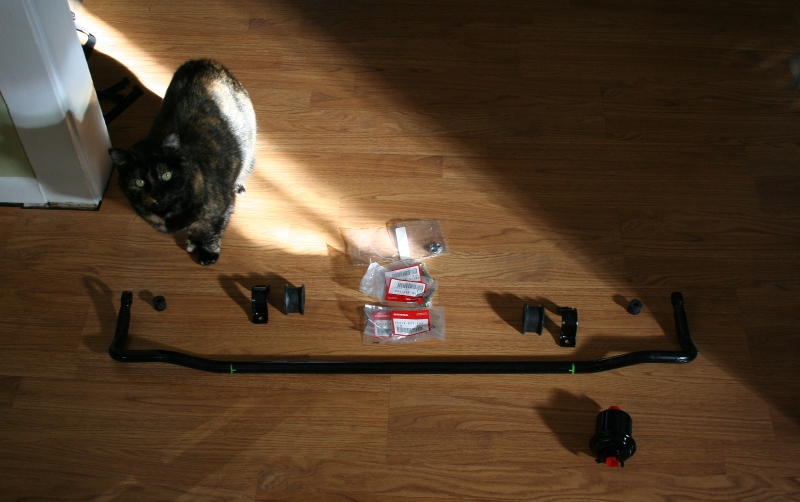
I got my ITR sway bar today! Silver ASR brace and prothane shift bushings are in the mail. I'm trying to order a PIC suspension bushing set, but can't seem to get ahold of anyone to get an H-T discount code for my order. Oh, well, there's always hardrace...
I'm having second thoughts on getting coilovers. I'm worried about running my BloxA cams for too long without a tune, even though I'm at high altitude and the stock header is still on, and getting coilovers will set me back quite some time on the rest of my build.
Edit: Also got a new fuel filter. Might go install that right now...
01-20-2010, 03:42 PM
#62
Fuel Filter Install
Warning: Use this guide at your own risk. I am not a professional mechanic and am not responsible for injury to you, your vehicle, or anyone else if you chose to follow this guide, or for any false information presented here.
Special Note: All DIY car work carries some risks, but because fuel is so flammable, fuel system work has special risks. Even though this is a simple job it's important to exercise due caution and to properly clean up any spilled fuel
Tools & supplies:
Torque wrench
10 mm socket
17 mm socket
14 mm open wrench
Larger open wrench to grab the filter (I used 3/4� & 7/8�)
New fuel filter (Acura part no. 16010-ST5-E02)
Two new crush washers (these come with the Acura filter)
Dirty old shirt or rag
My car hasn�t been starting well for quite some time, and as the service interval for fuel filters is 30k, and mine had never been replaced in 9 years, I figured it was about time to get a new one. Installing a new filter is pretty easy, requiring a minimum of tools and less than 30 min. of time. When I did it a second time it only took about 5 min. Even better, you can do it with all four wheels on the ground.
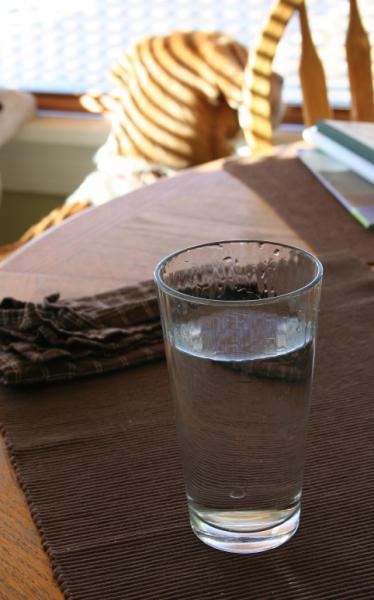
The first step in replacing the fuel filter is to have a nice, tall glass of water, because dehydration is your enemy when undertaking rigorous auto work such as this.
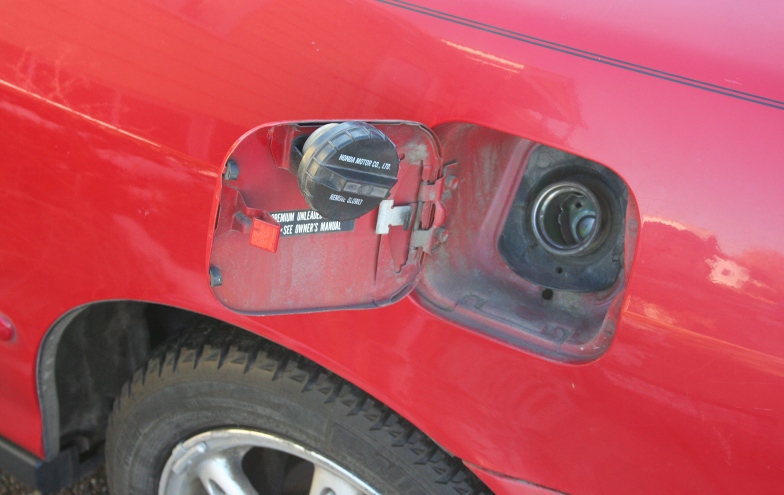
The next step is to depressurize the fuel system. To do that you unscrew the fuel filler cap and open the service bolt on top of the fuel filter �banjo bolt.� Of course, my banjo bolt didn�t have one, so I skipped that part. I also rolled my car into the driveway without turning the ignition on to prevent the fuel pump from kicking in before I got started.
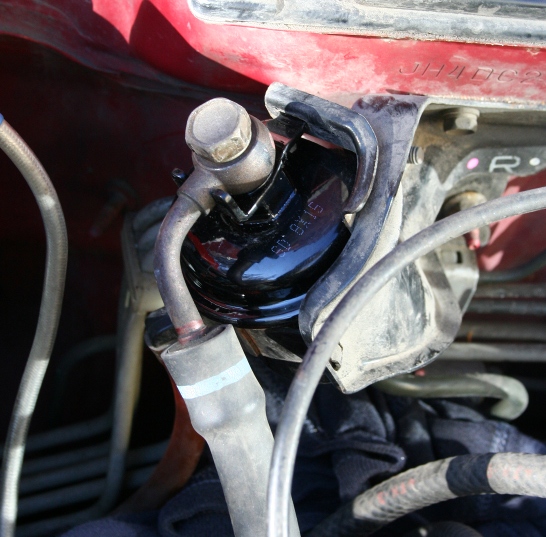
The fuel filter itself is held against the firewall, just to the right of the battery. It�s easy to see and to reach. To remove it you only need to remove two bolts (17 mm and 10 mm) and unscrew one hose (14 mm).
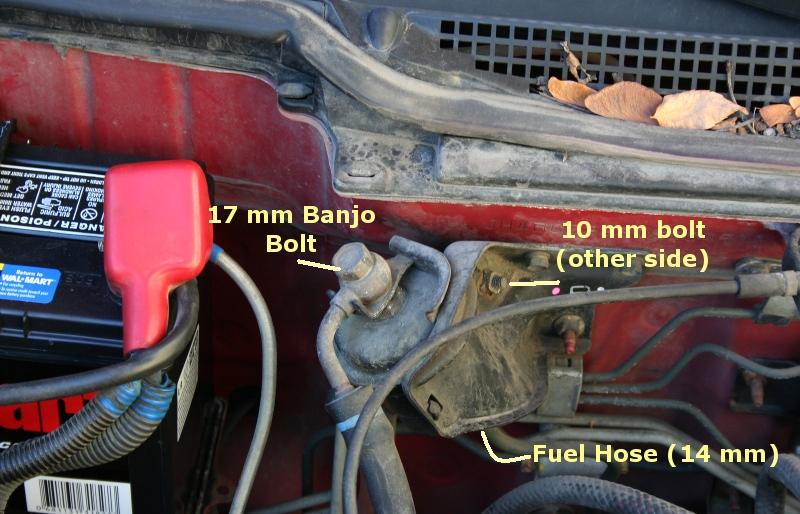
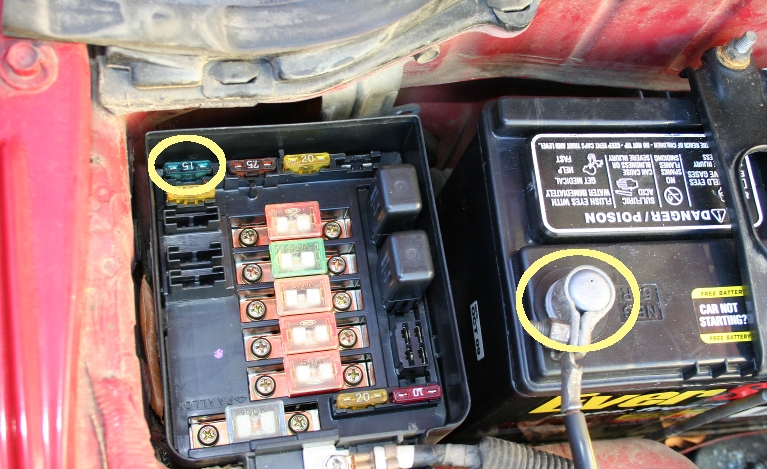
Before you get started, it�s very important that you disable the fuel injection system. You don�t want the fuel pump kicking in while you are working. There are several good ways to do this. You can remove the 15 A PGM/FI fuse in the engine compartment fuse box (pictured), or disconnect the negative battery terminal (also pictured). You can also open the fuel pump kill switch that you should have installed in a secret location. I recommend that you disconnect the battery, because you are going to be working very close to the positive terminal, and if you touch the positive terminal while you touch the body of the car, and the battery is grounded, your filter installation experience will be more memorable than you�d probably like. At absolutely no point should you ever put the keys in the ignition during this job.
Next, it�s time to disconnect the fuel lines running into and out of the fuel pump. Before you do this, place your rag under the fuel filter to catch the moderate amount of fuel that will come out. I disconnected the upper �banjo� bolt first, but the order doesn�t matter.
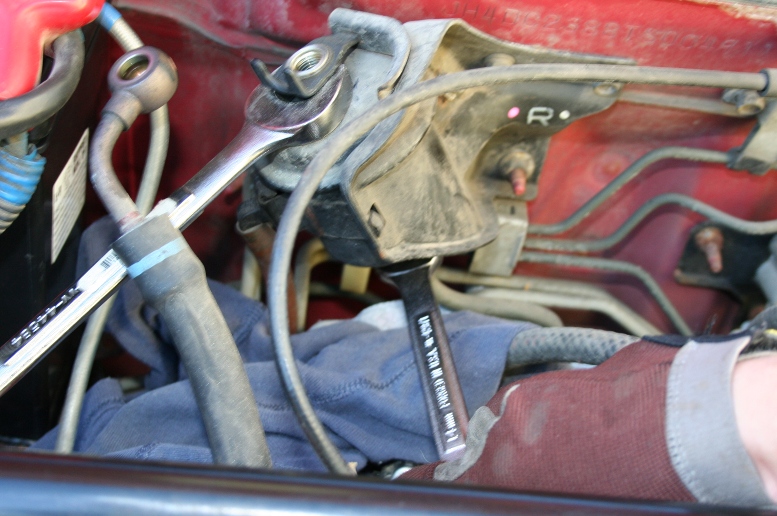
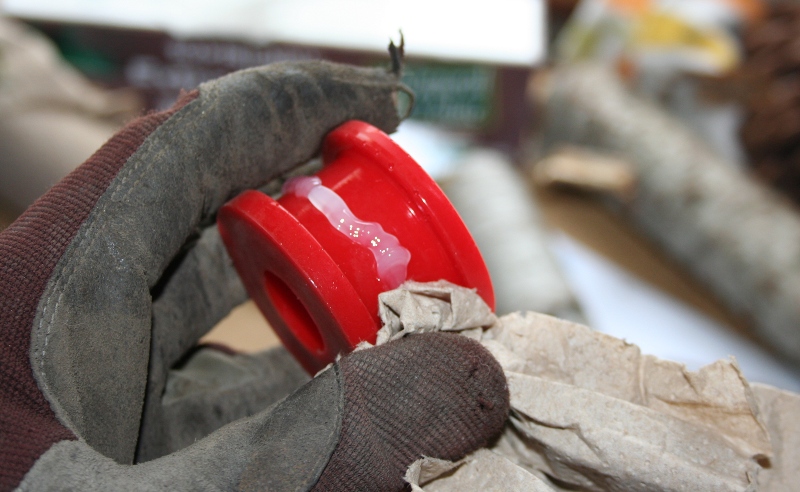
It may take a little bit of muscle to break these bolts loose. To protect the filter and the filter bracket it is important that you stabilize the filter with a wrench. The filter has nuts welded on to each end that you can hold with a wrench. I used a �� wrench because it seemed to fit, but I believe the size of the nut varies among filters made by different manufacturers.

When you loosen the banjo bolt, just remove it and place it somewhere safe. Discard the washers, because you need to replace them. When you loosen the fuel inlet, you�ll notice that it doesn�t come right out. The inlet has a tube that goes into the filter a bit. Don�t try to manhandle it to get it out � just let it stay loose inside of the filter.
The final removal step is to loosen the bolt that keeps the filter bracket together. It�s inconveniently located behind the filter, but I was able to reach it pretty easily with a 10 mm long socket.
Note: in these instructions I'm describing what I did, which was to swap the filters with the bracket still in the car. However, I've since been told that this can be done more easily if the bracket is removed. In that case it's easier to get the filter out and the new one in. The bracket is held to the firewall with a couple easy to access bolts.
After you remove the bolt that holds the bracket together (don�t lose it!), loosen the bracket and pull out the old fuel filter. Put the new filter in, with the tab on the top going through the hole in the bracket. Also make sure that the inlet line goes up through the bottom of the filter when you install it.
Reinstalling the bolt that holds the bracket together can be a pain if the bracket is still mounted to the car, but I got it on my first try. It helps if you look through the back end of the bolt hole to see that it�s threaded correctly.
If you ordered your pump from Acura, a small bag of washers will have come with it. I didn�t see them, and decided to reuse the old washers and replace them �later� after I�d gone to the hardware store. As soon as I got inside I found the new washers, and I�ll be putting them in tomorrow. Put on your new washers and tighten the inlet hose to 37 ft lbs (I had to guess on this) and the banjo bolt to 33 ft lbs, and you�re done! You may have noticed that the new filter is a lot lighter than the old filter � that�s due not to fuel in the old filter, but to all the gunk that it collected!
When it�s time to start the car, plug back in the fuse if you took it out and don�t forget to reconnect the battery and/or flip on your kill switch. Turn the ignition and give the fuel pump a little time to prime before you try to crank the car over, or it could stutter a bit (like mine did). Enjoy your new fuel filter, and may your starts be strong and frequent!
Warning: Use this guide at your own risk. I am not a professional mechanic and am not responsible for injury to you, your vehicle, or anyone else if you chose to follow this guide, or for any false information presented here.
Special Note: All DIY car work carries some risks, but because fuel is so flammable, fuel system work has special risks. Even though this is a simple job it's important to exercise due caution and to properly clean up any spilled fuel
Tools & supplies:
Torque wrench
10 mm socket
17 mm socket
14 mm open wrench
Larger open wrench to grab the filter (I used 3/4� & 7/8�)
New fuel filter (Acura part no. 16010-ST5-E02)
Two new crush washers (these come with the Acura filter)
Dirty old shirt or rag
My car hasn�t been starting well for quite some time, and as the service interval for fuel filters is 30k, and mine had never been replaced in 9 years, I figured it was about time to get a new one. Installing a new filter is pretty easy, requiring a minimum of tools and less than 30 min. of time. When I did it a second time it only took about 5 min. Even better, you can do it with all four wheels on the ground.
The first step in replacing the fuel filter is to have a nice, tall glass of water, because dehydration is your enemy when undertaking rigorous auto work such as this.
The next step is to depressurize the fuel system. To do that you unscrew the fuel filler cap and open the service bolt on top of the fuel filter �banjo bolt.� Of course, my banjo bolt didn�t have one, so I skipped that part. I also rolled my car into the driveway without turning the ignition on to prevent the fuel pump from kicking in before I got started.
The fuel filter itself is held against the firewall, just to the right of the battery. It�s easy to see and to reach. To remove it you only need to remove two bolts (17 mm and 10 mm) and unscrew one hose (14 mm).
Before you get started, it�s very important that you disable the fuel injection system. You don�t want the fuel pump kicking in while you are working. There are several good ways to do this. You can remove the 15 A PGM/FI fuse in the engine compartment fuse box (pictured), or disconnect the negative battery terminal (also pictured). You can also open the fuel pump kill switch that you should have installed in a secret location. I recommend that you disconnect the battery, because you are going to be working very close to the positive terminal, and if you touch the positive terminal while you touch the body of the car, and the battery is grounded, your filter installation experience will be more memorable than you�d probably like. At absolutely no point should you ever put the keys in the ignition during this job.
Next, it�s time to disconnect the fuel lines running into and out of the fuel pump. Before you do this, place your rag under the fuel filter to catch the moderate amount of fuel that will come out. I disconnected the upper �banjo� bolt first, but the order doesn�t matter.
It may take a little bit of muscle to break these bolts loose. To protect the filter and the filter bracket it is important that you stabilize the filter with a wrench. The filter has nuts welded on to each end that you can hold with a wrench. I used a �� wrench because it seemed to fit, but I believe the size of the nut varies among filters made by different manufacturers.
When you loosen the banjo bolt, just remove it and place it somewhere safe. Discard the washers, because you need to replace them. When you loosen the fuel inlet, you�ll notice that it doesn�t come right out. The inlet has a tube that goes into the filter a bit. Don�t try to manhandle it to get it out � just let it stay loose inside of the filter.
The final removal step is to loosen the bolt that keeps the filter bracket together. It�s inconveniently located behind the filter, but I was able to reach it pretty easily with a 10 mm long socket.
Note: in these instructions I'm describing what I did, which was to swap the filters with the bracket still in the car. However, I've since been told that this can be done more easily if the bracket is removed. In that case it's easier to get the filter out and the new one in. The bracket is held to the firewall with a couple easy to access bolts.
After you remove the bolt that holds the bracket together (don�t lose it!), loosen the bracket and pull out the old fuel filter. Put the new filter in, with the tab on the top going through the hole in the bracket. Also make sure that the inlet line goes up through the bottom of the filter when you install it.
Reinstalling the bolt that holds the bracket together can be a pain if the bracket is still mounted to the car, but I got it on my first try. It helps if you look through the back end of the bolt hole to see that it�s threaded correctly.
If you ordered your pump from Acura, a small bag of washers will have come with it. I didn�t see them, and decided to reuse the old washers and replace them �later� after I�d gone to the hardware store. As soon as I got inside I found the new washers, and I�ll be putting them in tomorrow. Put on your new washers and tighten the inlet hose to 37 ft lbs (I had to guess on this) and the banjo bolt to 33 ft lbs, and you�re done! You may have noticed that the new filter is a lot lighter than the old filter � that�s due not to fuel in the old filter, but to all the gunk that it collected!
When it�s time to start the car, plug back in the fuse if you took it out and don�t forget to reconnect the battery and/or flip on your kill switch. Turn the ignition and give the fuel pump a little time to prime before you try to crank the car over, or it could stutter a bit (like mine did). Enjoy your new fuel filter, and may your starts be strong and frequent!
Last edited by GagnarTheUnruly; 01-23-2010 at 02:56 PM.
01-21-2010, 12:58 PM
#63
I reinstalled the fuel filter to put those washers in. A word to the wise: look for the washers hiding in the honda bag before you install the fuel filter.
I also took it apart unnecessarily. The washer bag has three washers -- two big ones for the top and bottom of the banjo bolt and a little one for the service bolt (that I don't have) that's supposed to be on top of the banjo bolt. I thought the little washer was for the fuel line, so I took the whole thing out and found out the washer was too small to fit over the fuel nozzle. At least now I'm an expert at fuel filter installation.
To make sure there were no leaks I drove around the block a few times. I also took the opportunity to do a pre-ITR sway bar suspension evaluation. She's pretty spry in her old age, but I'm looking forward to getting my ITR bar on. Hopefully I'll have it on and have my endlink bushings screaming for mercy in a week or two.
Edit: another word for the wise -- re-tighten the fuel filler cap BEFORE you start your car and start to drive off
01-21-2010, 02:15 PM
#64
Honda-Tech Member

Join Date: Apr 2009
Location: San Diego, CA
Posts: 1,262
Likes: 0
Received 0 Likes
on
0 Posts
Hahaha ! make sure that filler cap is on tight! Good write up for people still coming into the game, nice details. waiting to see the suspension goodies on
01-22-2010, 03:02 PM
#65
Honda-Tech Member

Join Date: Nov 2009
Posts: 27
Likes: 0
Received 0 Likes
on
0 Posts
i just did the fuel filter replace and i effed up the bottom fuel out... the bolt is rounded off to the point where i cannot turn it even with the locking clamp thing. what should i do? is it possible to replace the screw? HELP!
01-22-2010, 03:12 PM
#66
Is the bolt still tight on the fuel filter? If so you really should be able to get a vice grip on tightly enough to grab it. Once you get the grips really tight, try knocking them with a hammer.
Those things can clamp really hard, esp. on soft metal. I'd try again. I have a feeling that that bit will slide off the hose once you have it loose. If you can get it out, I think an auto parts store will have a replacement.
Those things can clamp really hard, esp. on soft metal. I'd try again. I have a feeling that that bit will slide off the hose once you have it loose. If you can get it out, I think an auto parts store will have a replacement.
01-22-2010, 03:14 PM
#67
I had another thought, actually. Are you sure you're turning the correct direction. It's an odd angle so it's a bit counterintuitive. CCW is to your left if you're looking down on the filter from the front of the car. If you see in the picture my right hand is pushing it to the left.
01-23-2010, 07:53 AM
#68
Honda-Tech Member
iTrader: (1)
Join Date: Jan 2002
Location: Nowhere and Everywhere
Posts: 29,530
Likes: 0
Received 52 Likes
on
46 Posts
Dang man, you only put 65K on your car in 8 years? Jeez I bought my GS-R in 2001 also and I'm coming up on 200K since I bought it
Also please do not get those POS control arms with the sway bar end link hole in the incorrect location.
Oh yeah, fuel filter is much easier if you take both the filter AND bracket off the car together and replace the filter in the bracket on a work bench or sitting on the floor or something.
Also please do not get those POS control arms with the sway bar end link hole in the incorrect location.
Oh yeah, fuel filter is much easier if you take both the filter AND bracket off the car together and replace the filter in the bracket on a work bench or sitting on the floor or something.
01-23-2010, 12:29 PM
#69
Honda-Tech Member
Join Date: Nov 2009
Posts: 27
Likes: 0
Received 0 Likes
on
0 Posts
okay well my car has been sitting for a day now and i had already got the old filter off and the new one is in its just the bottom bolt is rounded badly and i have little to no room to vice grip it and turn so im sorta stuck with undoing all my hard work and getting a new bolt. or should i just vice grip it till its on tight enuf?
01-23-2010, 01:39 PM
#70
@PatrickGSR
Yeah, I walk or bike to work every day so the car is only used for grocery runs etc. I'd guess cince we got the CRV she only sees about 1000 city mi plus one or two cross country trips each year.
LOL don't worry, I skipped the LCAs. I'm definitely a function>form type and I saw no reason to spend $$ on bling, especially when I learned that the non-OE mounting point caused a lot of problems and that the lighter aftermarket LCAs are also more compliant than stock. I've got a SONEM bushing kit on order, and they'll be going into 100% stock suspension components.
I saw that the bracket is only mounted onto the firewall with a couple of nuts/bolts, and I thought about taking it off, but I just stuck with the game plan. I'll make a note in the install instructions, though
@ Taejyn -- no worries about stripping that connector -- car work is 85% about fixing the little things that go wrong. My advice to you is to spend the time taking the pump out one more time and replacing the connector. You can't have it in too tight if it's so stripped, and it'll be easier to get out now than it will be in a few months. The other thing is that that connector needs to be properly tightened; you really don't want a fuel leak inside your engine bay. A little fuel in the wrong place = fire, and the end of your 'Teggy. You might be surprised how easy it is to remove on the 2nd time around. If I had all my tools in front of me I bet I could do the job in <5 min. now, and it took ~30 min. the first time (with picture taking, tool-hunting, and manual consulting). I'd definitely get the pump out and find a replacement for that connector.
01-27-2010, 12:11 AM
#71
Honda-Tech Member
Join Date: Nov 2009
Posts: 27
Likes: 0
Received 0 Likes
on
0 Posts
i got it fixed. this was my first time doing this and when people really emphasized TIGHTEN THAT PLUG. i did. which wasnt wise advice to the noob. well even though the bolt is heavily stripped its in tight as can be. my first filters thread was hardcore stripped i mean the first few turns got tight cause it wasnt going straight in. and i was thinking dang i guess it should this tight right? lol well i ended taking all my hard work apart i was so close to getting it all the way in the wrong way. and checked the thread the brass thread was fine. it was just the filters thread that messed up. i felt retarded haha so just hand tighten it then tighten it
well even though the bolt is heavily stripped its in tight as can be. my first filters thread was hardcore stripped i mean the first few turns got tight cause it wasnt going straight in. and i was thinking dang i guess it should this tight right? lol well i ended taking all my hard work apart i was so close to getting it all the way in the wrong way. and checked the thread the brass thread was fine. it was just the filters thread that messed up. i felt retarded haha so just hand tighten it then tighten it
01-27-2010, 06:59 AM
#72
Glad you got it sorted out. The torque spec for that connector is 37 ft-lbs, so you can use the banjo bolt as a reference for about how much torque that is, provided you have a torque wrench.
01-27-2010, 01:01 PM
#73
Shifter Bushings Install: Day 1
Warning: Use this guide at your own risk. I am not a professional mechanic and am not responsible for injury to you, your vehicle, or anyone else if you chose to follow this guide, or for any false information presented here.
Tools & supplies:
Pliers
Vice grip
Floor jack and jackstands
10, 12, 14 mm socket
12 mm open wrench
Socket extender
New shifter bushings + heavy grease (if it doesn�t come in the kit)
Patience
So I got my shifter bushings and ASR brace a few days ago, and I thought I�d wait on the ASR/ITR install a little bit, but go ahead and put my polyurethane bushings in. Little did I know what a tough job it was going to be! I didn�t finish yesterday because I had some work that I wanted to do. I may try again tomorrow, but right now my poor car is sitting on jackstands with her shift stabilizer bar hanging out. What follows is not really a how to, but just an illustrated set of install notes.
Before I started I had my customary glass of water and I added chocolate chips to the menu. This was a good idea, as it kept my spirits up for a couple hours. I strongly recommend keeping sweets close at hand for this PITA job.
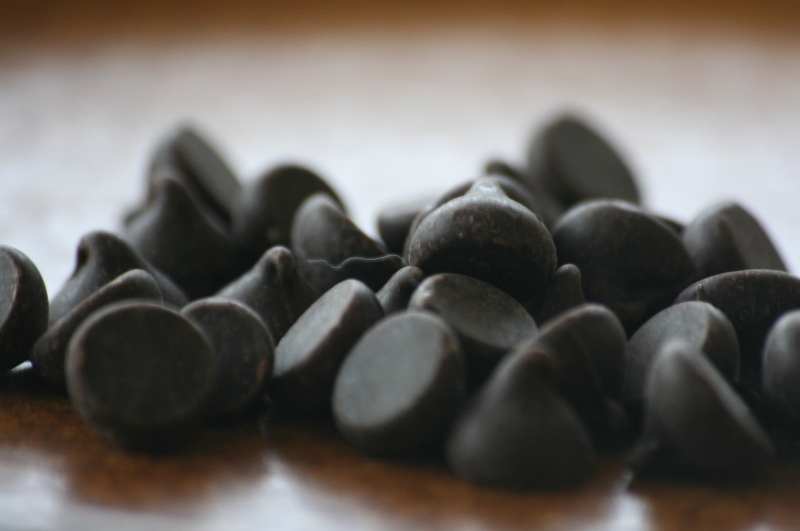
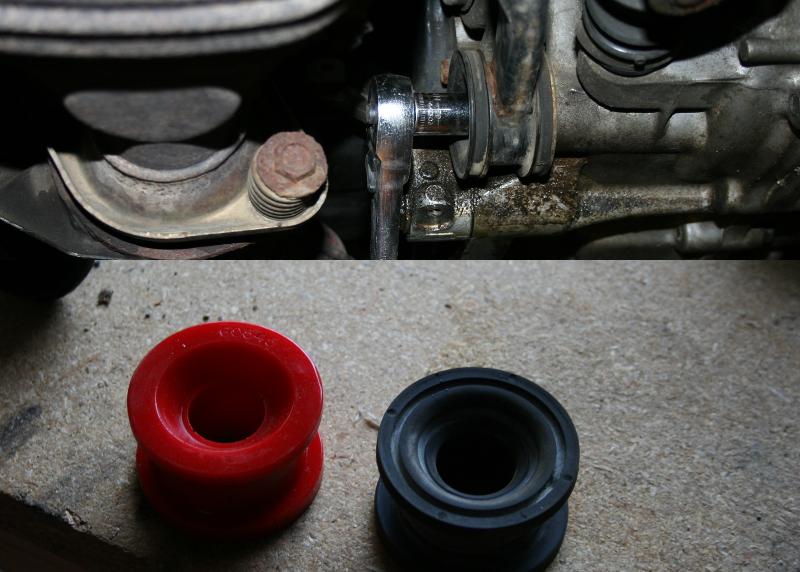
Here are the bushings. These are Prothane polyurethane bushings. It�s funny because they aren�t like what I thought poly would be like � I thought it was hard and plasticky, but these are like stiff artificial rubber. It kind of reminds me of the jello you get in schools and hospitals � not the normal kind, but the weird stuff that�s sort of weirdly firm and has little bubbles in the corner of it.

The next thing I did was to jack up my car, from the front. I had to jack it up pretty high, so I first jacked it with my floor jack and then I jacked it up some more with a bottle jack that I put on a concrete block. This job requires a lot of time spent fully under the car, so for protection I put a CRV wheel with a concrete block on it under the front jacking point, to catch the car should the jackstands fail. Safety comes first.
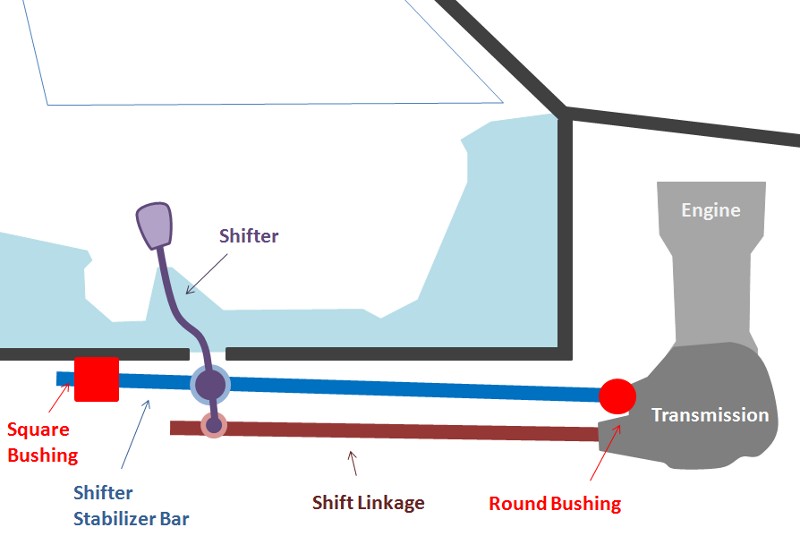
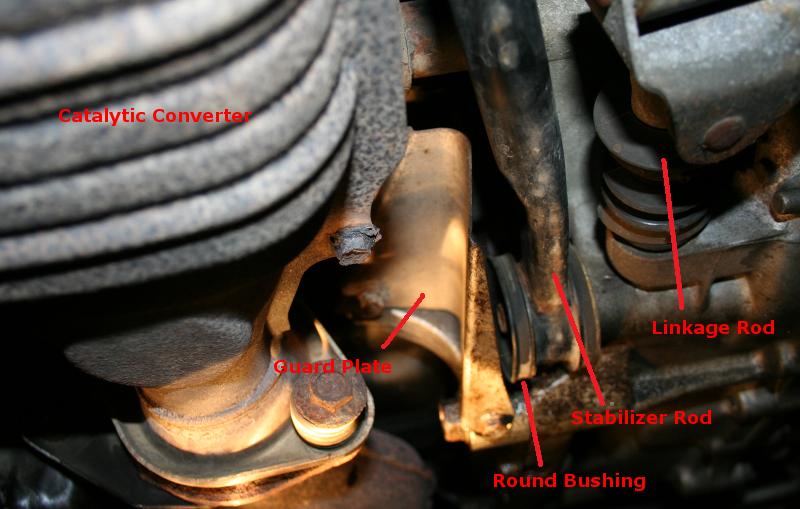
After that, I sized up my situation. The bushings I�m replacing are in two spots � one is right under the shifter, and the other is on the transmission. There are two bars that run across the bottom of the car that control the shifting. One is the linkage itself, which connects to the bottom of the shifter and goes into the transmission. The other is a stabilizer bar. This bar bolts to the body via a bushing on one end (by the shifter) and to the transmission on the other end (also via a bushing). It also has a carriage that holds the �ball� on the shifter, essentially holding the shifter in place above the shift linkage.
It�s an interesting system that lets the shifter connect to the transmission so there�s no strain on the linkage as the engine moves in its mounts, but that uses bushings to dampen the vibrations in the shifter. Stiffer bushings make the bar that holds the shifter more stable. That means that shifting is more precise, because the shifter is more tightly held to the body and transmission, hence more of the force on the shifter goes into shifting gears and less into deforming the bushings, making less play in the shifting (and more vibration in the shifter itself).
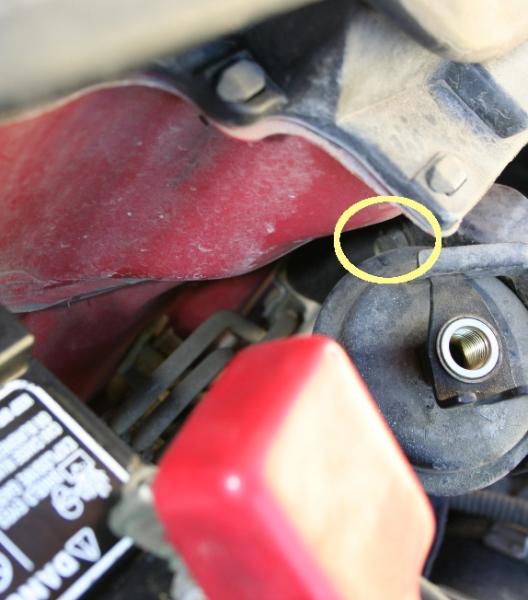
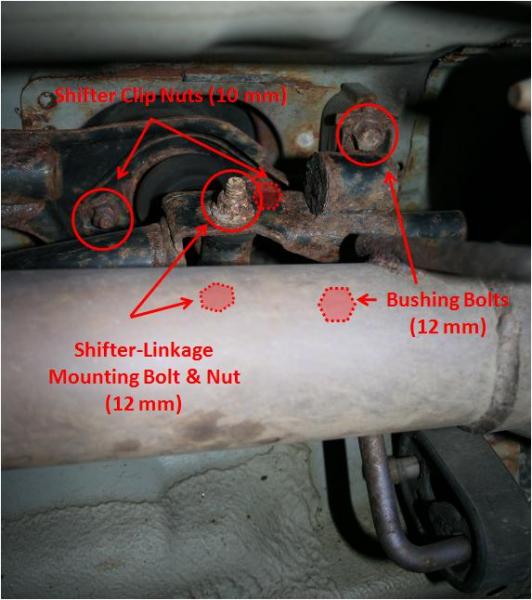
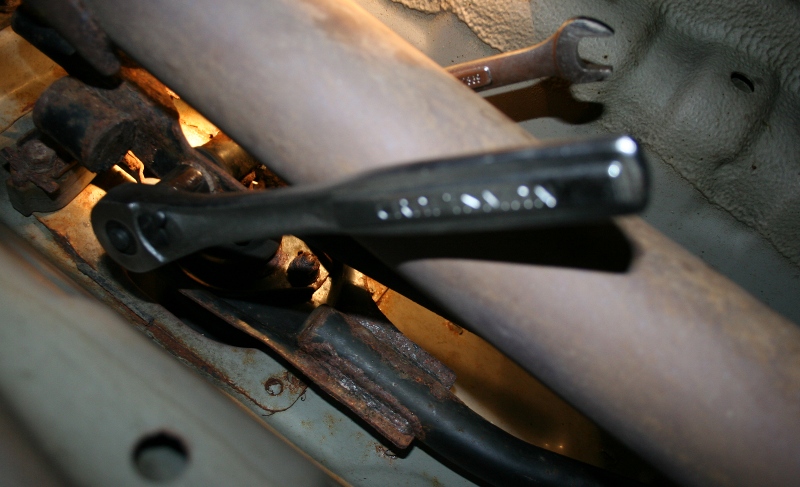
Here�s where the square bushing is located, by where the shifter extends through the floor of the car. It�s blocked somewhat by the exhaust pipe. Whether it�s worth removing the pipe is debatable. The bolts on my pipe were pretty snug, so I opted to work around it. In the picture below, the area where the square bushing sits is shown. The big pipe is the exhaust pipe. The black bar above it is the shift linkage, which holds the bottom of the shifter. Above that is the part of the stabilizer that holds the shifter. You can see the shifter is protected by a rubber boot. The �square� bushing is on the right in the picture, and you can see one side of it � it�s the rubber thing underneath the labeled bolt in the picture (it�s actually above the bolt � this picture is taken from the floor looking up). The �bushing bolts� hold the linkage to the bushing and the bushing to the body. There is a hole in the middle of the bushing that part of the stabilizer bar runs through (not pictured). The �shifter-linkage bolt� holds the shifter and linkage together, and the �shifter clip nuts� hold a plate that holds the shifter tight against the stabilizer rod. All of these bolts need to come out, but only the bushing bolts and shifter-linkage bolts are accessible at this time.
One thing you may notice is that these bolts are quite rusty � I plan to replace them all. Fortunately, they were still strong enough to be removed, and had not yet rusted at the threads.
I started by removing the shifter-linkage bolt, loosening the bolt with a socket wrench and holding the nut with an open-ended wrench�
� and then I removed the bushing bolts (leaving the bushing on the stabilizer, for now)�
At this point the linkage will hang loose. If you removed the exhaust pipe, you can just let it dangle. I didn�t, so I just pushed it out of the way. Since the shifter was no longer connected to anything, I just rotated it and pushed and pulled it enough to get it out of the way also.
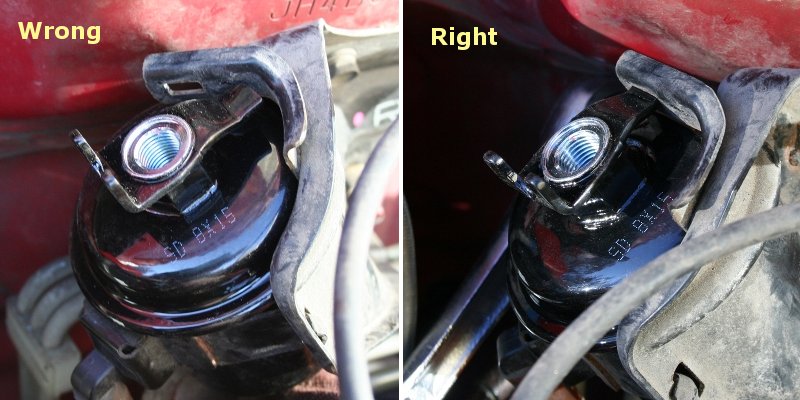
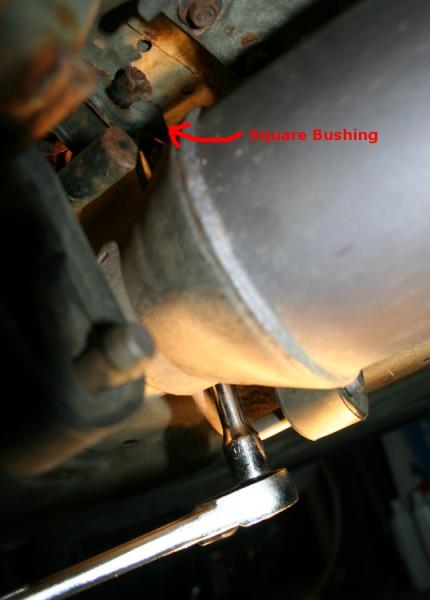
Next I moved to the transmission end of the linkage, where I removed a sheet metal shield that protects the bushing (two bolts). I then removed the bolt that holds the bushing (and hence the stabilizer bar) against the transmission, and the stabilizer dropped down (still being held to the shifter, however, at the other end):
Removing the OEM bushing was easy � I pressed it right out with my fingers. However, getting the new poly bushing back in was NOT easy. I lubed up the new bushing with the supplied grease and tried my Hercules impression for about an hour, getting nowhere.

It became clear to me that I wouldn�t be able to get the new bushing in without completely removing the stabilizer rod. The stabilizer was still connected to the shifter via those �shifter clip bolts,� which I hadn�t removed yet. I went back to work and got one of them out, but that is a story for another day, as is the conclusion of this ordeal�
Warning: Use this guide at your own risk. I am not a professional mechanic and am not responsible for injury to you, your vehicle, or anyone else if you chose to follow this guide, or for any false information presented here.
Tools & supplies:
Pliers
Vice grip
Floor jack and jackstands
10, 12, 14 mm socket
12 mm open wrench
Socket extender
New shifter bushings + heavy grease (if it doesn�t come in the kit)
Patience
So I got my shifter bushings and ASR brace a few days ago, and I thought I�d wait on the ASR/ITR install a little bit, but go ahead and put my polyurethane bushings in. Little did I know what a tough job it was going to be! I didn�t finish yesterday because I had some work that I wanted to do. I may try again tomorrow, but right now my poor car is sitting on jackstands with her shift stabilizer bar hanging out. What follows is not really a how to, but just an illustrated set of install notes.
Before I started I had my customary glass of water and I added chocolate chips to the menu. This was a good idea, as it kept my spirits up for a couple hours. I strongly recommend keeping sweets close at hand for this PITA job.
Here are the bushings. These are Prothane polyurethane bushings. It�s funny because they aren�t like what I thought poly would be like � I thought it was hard and plasticky, but these are like stiff artificial rubber. It kind of reminds me of the jello you get in schools and hospitals � not the normal kind, but the weird stuff that�s sort of weirdly firm and has little bubbles in the corner of it.
The next thing I did was to jack up my car, from the front. I had to jack it up pretty high, so I first jacked it with my floor jack and then I jacked it up some more with a bottle jack that I put on a concrete block. This job requires a lot of time spent fully under the car, so for protection I put a CRV wheel with a concrete block on it under the front jacking point, to catch the car should the jackstands fail. Safety comes first.
After that, I sized up my situation. The bushings I�m replacing are in two spots � one is right under the shifter, and the other is on the transmission. There are two bars that run across the bottom of the car that control the shifting. One is the linkage itself, which connects to the bottom of the shifter and goes into the transmission. The other is a stabilizer bar. This bar bolts to the body via a bushing on one end (by the shifter) and to the transmission on the other end (also via a bushing). It also has a carriage that holds the �ball� on the shifter, essentially holding the shifter in place above the shift linkage.
It�s an interesting system that lets the shifter connect to the transmission so there�s no strain on the linkage as the engine moves in its mounts, but that uses bushings to dampen the vibrations in the shifter. Stiffer bushings make the bar that holds the shifter more stable. That means that shifting is more precise, because the shifter is more tightly held to the body and transmission, hence more of the force on the shifter goes into shifting gears and less into deforming the bushings, making less play in the shifting (and more vibration in the shifter itself).
Here�s where the square bushing is located, by where the shifter extends through the floor of the car. It�s blocked somewhat by the exhaust pipe. Whether it�s worth removing the pipe is debatable. The bolts on my pipe were pretty snug, so I opted to work around it. In the picture below, the area where the square bushing sits is shown. The big pipe is the exhaust pipe. The black bar above it is the shift linkage, which holds the bottom of the shifter. Above that is the part of the stabilizer that holds the shifter. You can see the shifter is protected by a rubber boot. The �square� bushing is on the right in the picture, and you can see one side of it � it�s the rubber thing underneath the labeled bolt in the picture (it�s actually above the bolt � this picture is taken from the floor looking up). The �bushing bolts� hold the linkage to the bushing and the bushing to the body. There is a hole in the middle of the bushing that part of the stabilizer bar runs through (not pictured). The �shifter-linkage bolt� holds the shifter and linkage together, and the �shifter clip nuts� hold a plate that holds the shifter tight against the stabilizer rod. All of these bolts need to come out, but only the bushing bolts and shifter-linkage bolts are accessible at this time.
One thing you may notice is that these bolts are quite rusty � I plan to replace them all. Fortunately, they were still strong enough to be removed, and had not yet rusted at the threads.
I started by removing the shifter-linkage bolt, loosening the bolt with a socket wrench and holding the nut with an open-ended wrench�
� and then I removed the bushing bolts (leaving the bushing on the stabilizer, for now)�
At this point the linkage will hang loose. If you removed the exhaust pipe, you can just let it dangle. I didn�t, so I just pushed it out of the way. Since the shifter was no longer connected to anything, I just rotated it and pushed and pulled it enough to get it out of the way also.
Next I moved to the transmission end of the linkage, where I removed a sheet metal shield that protects the bushing (two bolts). I then removed the bolt that holds the bushing (and hence the stabilizer bar) against the transmission, and the stabilizer dropped down (still being held to the shifter, however, at the other end):
Removing the OEM bushing was easy � I pressed it right out with my fingers. However, getting the new poly bushing back in was NOT easy. I lubed up the new bushing with the supplied grease and tried my Hercules impression for about an hour, getting nowhere.
It became clear to me that I wouldn�t be able to get the new bushing in without completely removing the stabilizer rod. The stabilizer was still connected to the shifter via those �shifter clip bolts,� which I hadn�t removed yet. I went back to work and got one of them out, but that is a story for another day, as is the conclusion of this ordeal�
Last edited by GagnarTheUnruly; 01-27-2010 at 01:32 PM.
