
Front wheel bearings job with hub tool [PIC]
 08-14-2009, 05:11 AM
#26
Honda-Tech Member
Thread Starter
Join Date: Feb 2006
Location: 717
Posts: 700
Likes: 0
Received 0 Likes
on
0 Posts
Heh, just did it at 180K.
Long story short: Got the bearings out... eventually. The head of the long bolt on the puller popped clean off. Whoa. Good thing I have that extra nut. Wonder about that "limited lifetime warranty" on this kit... I'll have to try to put it to use.
I can see some deformities/depressions on the inner races that were removed. Very small & slight, but definitely there. Also, it looks like the passenger side released its grease to a certain extent. My CV is clean but the bearing-facing surface of the hub was pretty goopy when I got it off, as was the back of the knuckle. That might explain that roaring noise from that side. In any case, these are ready for replacement, no doubt about it.
I'm double-checking the installation instructions. Looks like discs 11 and 09 are the puppies for the bearing install. Dunno about hub just yet.
You know, this pic you posted http://i289.photobucket.com/albums/l...a/CIMG1512.jpg looks like the bearing install, and if that's right, it'd have the flat side of that disc against the bearing. I was actually going to use the same disc but flip it so the lip showing there is against the outer race. I think the inner race is raised a little on my bearings and you mentioned not putting load on them while pressing in.
It also looks like your long bolt is in the process of shearing it's head like mine did... that depression in the center is a telltale sign.
i was thinking about selling my hub tool kit now that i am done. you bring up a good point about the wear and tear on the bolt. i think i trashed my paperwork so maybe i should get rid of it and buy a new set if i need to pull the bearings again. i am currently trying to buy a second integra (i want a 4 door, too), so my thoughts are maybe ill need to do bearings again soon.
 08-17-2009, 07:53 AM
#27

Join Date: May 2009
Posts: 9
Likes: 0
Received 0 Likes
on
0 Posts
Now that I am done with follie's project, a few observations:
I find that in a one-man operation I cannot get enough jam on the brake pedal to prevent the wheels from turning if they are raised. Since I have steel wheels I just raise each side, remove the plastic hubcap, put the wheel back on the ground, raise the indent and break the spindle nut. Then, raise the front end onto jack stands and remove the nut and wheels.
I didn't have to disconnect the damper fork at all to get the transaxles out of the knuckles. Once the knuckle gets "we-todd-ed" it swings like a door on a hinge on the tie-rod & upper ball joints.
My impact didn't always get the job done. A breaker and pipe was required to get the removal started, as well as getting the final few mm's on the hub press-in.
Worked great for me: http://www.harborfreight.com/cpi/cta...emnumber=97406
I had a good deal of rust at the rear bearing stop, and also in the circlip groove, not to mention the circlip proper. After wirebrushing and sandpapering I was thinking these areas, might be good candidates for a little anti-rusting treatment. Since the bearing uses rubber seals, I settled on a little smear of Permatex all-purpose caliper grease on the circlip, in the groove, and just at that backstop. That's only because I had a monstrously difficult time breaking the bearings free, more so than follie I reckon.
If I had that option, I'd have done it. Settled for this: http://www.harborfreight.com/cpi/cta...temnumber=3979. Instructions say to get this on and use a puller. Ha ha. More like get it centered, tighten, beat with BFH, tighten, etc etc.
My inner race was raised so I used a disc that more or less covered it perfectly. There's a smaller one but I didn't want it walking off the race and applying uneven pressure.
If you're not 100% sure that you've got the hub in far enough, dry-fit the rotor and the brake caliper mount. The disc should be centered in the channel of the mount and shouldn't have any runout when you spin the hub.
Easy for you to say, you have friends... 
As for the cheap-*** HF tools, both the Bearing Kit and Bearing Separator munched it during the course of the job although I was able to limp across the finish line anyway. I'm looking into the limited warranty on them. If I get the busted parts swapped out, score, I can resell easily. As long as nobody reads this review.
Thanks for the great write-up and pics follie, hope my humble observations in applying your method helps the next person down the road...
PART 1: GET YOUR NUTS OFF
1. Set your emergency brake and block a rear wheel. Break the lug nuts on both your front wheels and put the car up on jack stands using the tabs behind the front wheels.
2. Remove the front wheels.
3. Use a chisel to bend the axle nuts out of the indentation on the axles. They will not spin free until you remove this indentation.
4. Apply the brake pedal, and use a 32mm impact socket to remove the axle nuts with an impact wrench.
My impact didn't always get the job done. A breaker and pipe was required to get the removal started, as well as getting the final few mm's on the hub press-in.
4. When the hub is removed, you will see the the retaining clip or "c clip" holding the bearing in the knuckle. Soak this in WD40. Tap it lightly with a hammer or punch the whole way around to break up some of the rust. Use retaining clip pliers to remove it from the knuckle.
PART 4: NEW PARTS GOING IN
1. Figure out which way your new bearings go in. If you have rubber on one side and steel on the other, the rubber stays out.
...
5. Clean the retaining clips and smooth their surfaces with sandpaper before reinserting them. Be sure they seat completely in their grooves.
1. Figure out which way your new bearings go in. If you have rubber on one side and steel on the other, the rubber stays out.
...
5. Clean the retaining clips and smooth their surfaces with sandpaper before reinserting them. Be sure they seat completely in their grooves.
If you're not 100% sure that you've got the hub in far enough, dry-fit the rotor and the brake caliper mount. The disc should be centered in the channel of the mount and shouldn't have any runout when you spin the hub.
As for the cheap-*** HF tools, both the Bearing Kit and Bearing Separator munched it during the course of the job although I was able to limp across the finish line anyway. I'm looking into the limited warranty on them. If I get the busted parts swapped out, score, I can resell easily. As long as nobody reads this review.
Thanks for the great write-up and pics follie, hope my humble observations in applying your method helps the next person down the road...
10-02-2009, 10:59 AM
#28
Who?
Join Date: Dec 2000
Location: NJ
Posts: 4,910
Likes: 0
Received 0 Likes
on
0 Posts
Ok i'm bringing this one back up for a quick question.
I'm 99.9% sure my passenger side wheel bearing is going south due to a very slight vibration / noise coming from that side on the highway, but it only has minimal play when i lightly move the wheel side to side, and none in an up and down motion. ( It is not rack play, ball joints, axles, wheel balance, warped rotors, bent wheels or tie rods as they all have been recently replaced and/or serviced ).
Anyone else ever experience play from a failing wheel bearing only when moving the wheel in a side to side motion?
Driver side has zero play side to side and up and down...
10-02-2009, 11:15 AM
#29
Honda-Tech Member
Thread Starter
Join Date: Feb 2006
Location: 717
Posts: 700
Likes: 0
Received 0 Likes
on
0 Posts
Ok i'm bringing this one back up for a quick question.
I'm 99.9% sure my passenger side wheel bearing is going south due to a very slight vibration / noise coming from that side on the highway, but it only has minimal play when i lightly move the wheel side to side, and none in an up and down motion. ( It is not rack play, ball joints, axles, wheel balance, warped rotors, bent wheels or tie rods as they all have been recently replaced and/or serviced ).
Anyone else ever experience play from a failing wheel bearing only when moving the wheel in a side to side motion?
Driver side has zero play side to side and up and down...
I'm 99.9% sure my passenger side wheel bearing is going south due to a very slight vibration / noise coming from that side on the highway, but it only has minimal play when i lightly move the wheel side to side, and none in an up and down motion. ( It is not rack play, ball joints, axles, wheel balance, warped rotors, bent wheels or tie rods as they all have been recently replaced and/or serviced ).
Anyone else ever experience play from a failing wheel bearing only when moving the wheel in a side to side motion?
Driver side has zero play side to side and up and down...
if you've replaced everything else, the bearings are a pretty inexpensive part to swap out at this point.
04-04-2010, 04:00 PM
#31
Honda-Tech Member
Join Date: Nov 2001
Location: Germantown, MD, USA
Posts: 2,004
Likes: 0
Received 0 Likes
on
0 Posts
Hey guys, I am in the process of doing this, I can't seem to hit the hub out though, I am using a 32 oz hammer and am making no progress, do you really think a 4 pound will do much before I go out and buy one? Thanks guys!
09-28-2011, 10:55 AM
#33
Bumping up an old thread for a small update:
I just went to Harbor Freight and found out something interesting. This tool kit has been updated! I opened up 2 kits at the store today, and found out they have changed the main forcing bolt. The older kit from 11/2010 had the 2 piece bolt where the hex-head has clearly been welded on (as shown in this write-up). This is obvious because if you inspect the bolt where the hex-head meets the threads, you can clearly see the threads are machined all the way up to, and continue underneath, the bolt head. The updated kit (with 08/2011 on the box) has a 1 piece bolt where you can clearly see the chamfer at the base of the bolt head leading to the shaft. In addition, the threads are not cut all the way up to the bolt head (they stop short). It looks as though US General may have gotten sick of replacing these bolts or at least listened to the complaints.
The updated kit can also be easily identified because it has a black-oxide coating on it, instead of the old shiny black-painted finish. Of course the black-oxide coating comes with considerable surface rust and crunch white grit. It was this nasty-ness that prompted me to open up the next kit below and find the differences.
I'm going to try out this kit this evening and I will post back on how well it works.
09-28-2011, 07:13 PM
#34
Well everything went very well. The new style bolt performed flawlessly on my nearly 18 year old junkyard knuckles. No sign of stretch or failure in the bolt head.
This picture shows everything I was using to make it work. The Harbor Freight kit, my ratchet, 36mm socket, jack-handle (cheater bar), and a can of extreme-pressure moly grease. In addition to these tools, I also used a pair of vice grips and a towel to protect the bolt head. In each segment, you can put the screw & bolt on either side to make it work. It's all up to you. Probably makes a big difference weather or not your knuckles are still on the car.
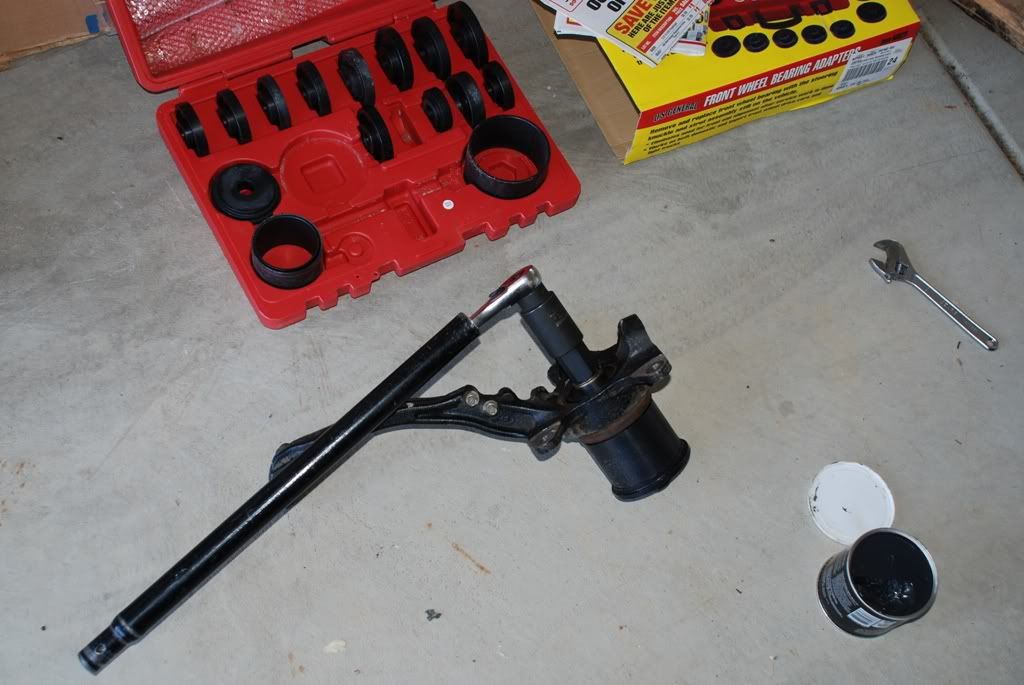
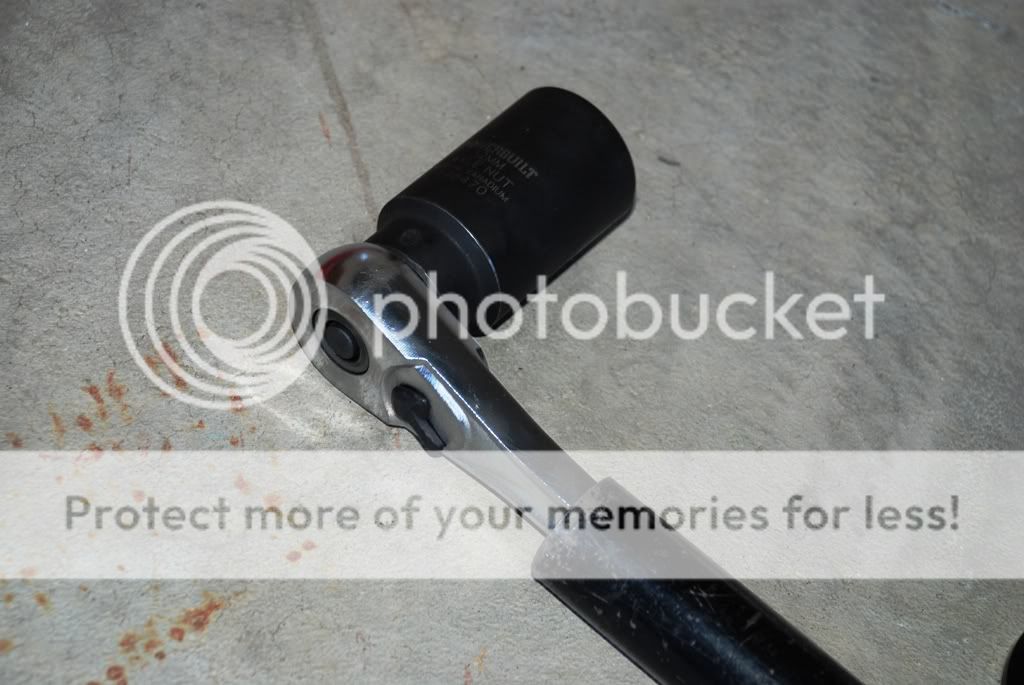
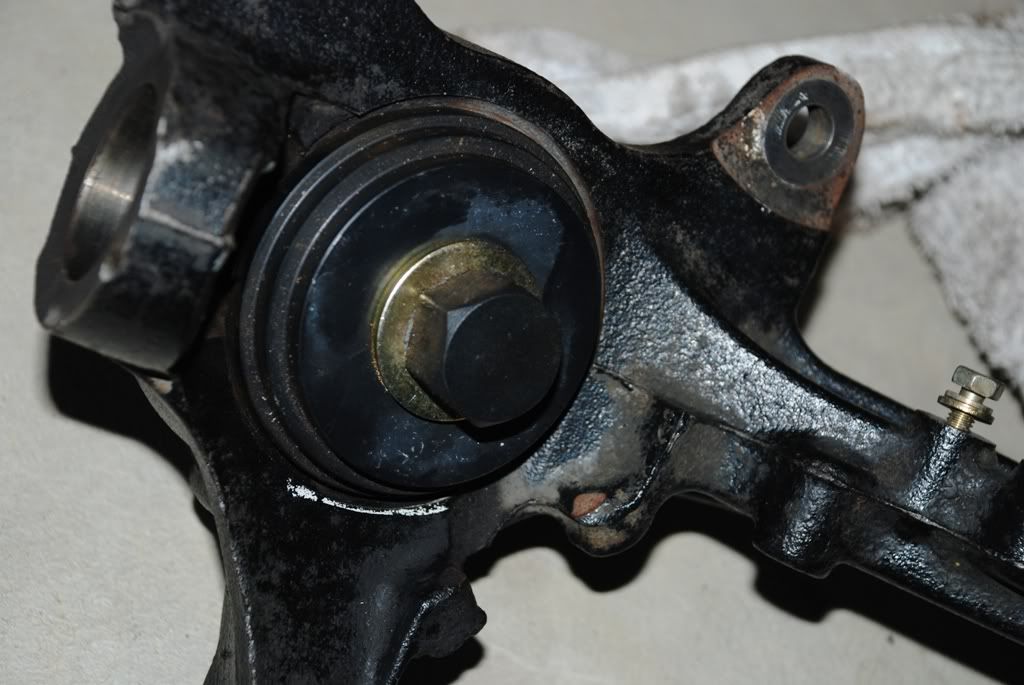
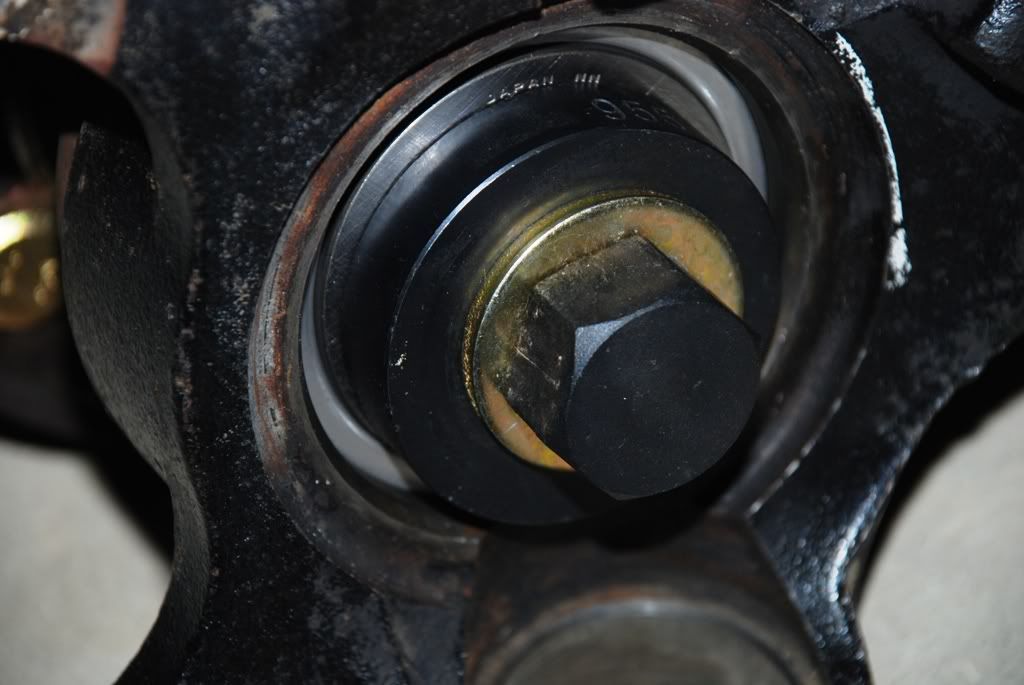
Here you can see How I've installed the bits for bearing removal. My hub had already been hammered out before I got the tool, but the OP pretty much covered a way to use this tool (even though a socket and hammer work equally well. I followed the Helm manual and just used the largest size disk that won't hang up on the knuckle pressing out the bearing. I took these pictures after the bearing started moving out, so the disk won't be as deep when you first install it. I didn't have a socket big enough to fit the head of the bolt, but my 32mm hub socket did fit onto the kits provided nut (yay!).
Surprisingly, the bolt never even tried to turn on it's own as I pressed out the bearing. Therefore I didn't have to put another wrench on it to hold it steady.
Grease up your screw, nut and the washer that the nut will press against.
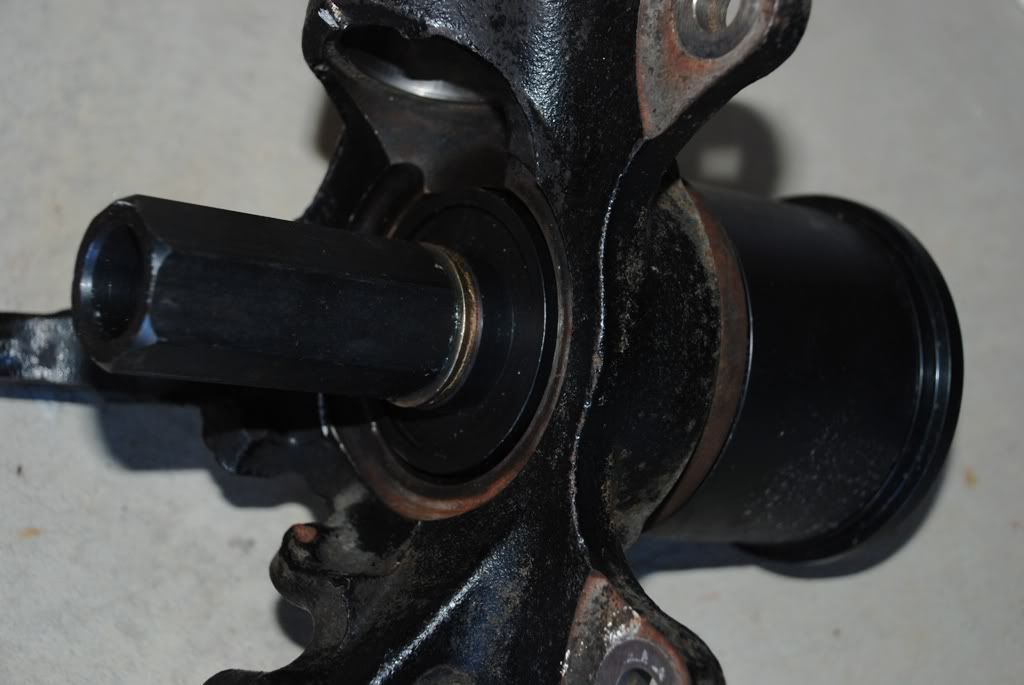
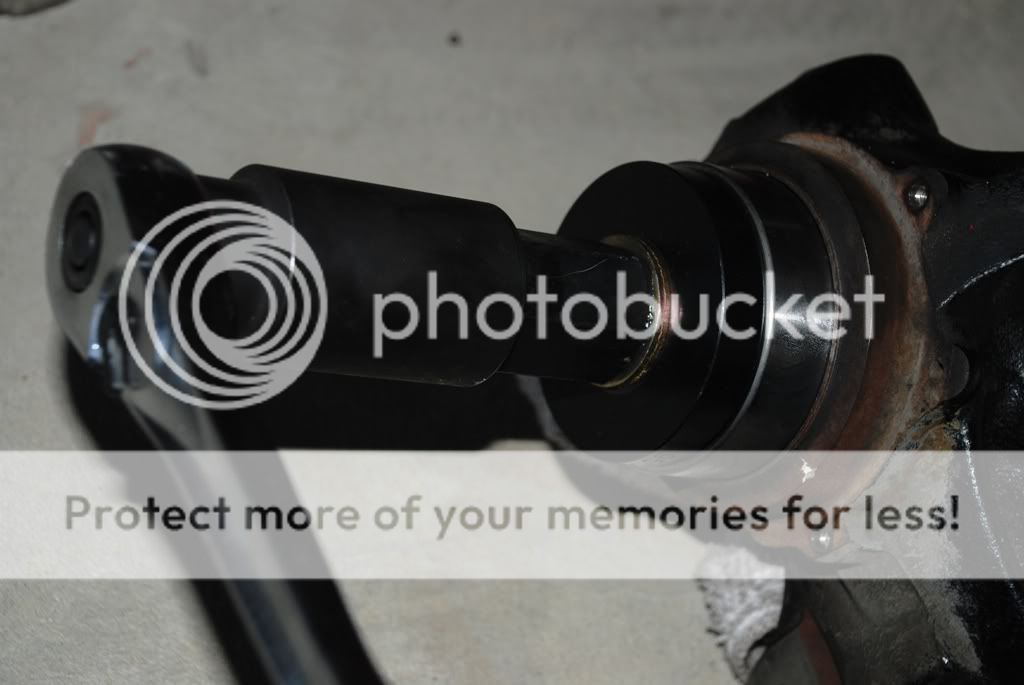
Now this is pictures of how I set it up to press the new bearing in. You definitely want the discs facing as I've shown so you are ONLY pressing on the outer race of the bearing. The inner race of the bearing DEFINITELY DOES stick out further than the outer race, and you DO NOT WANT TO PRESS THE INNER RACE!
This time the bolt did want to spin as I turned the nut. Since I don't have a socket big enough, I just put the vice grips on the head of the bolt (which I covered with a rag), and started wrenching. Worked perfectly.
Grease up the Inside of the knuckle (very thin layer), the outside of the bearing (very thin layer), the screw, the nut and the washer that the nut is pressing against.
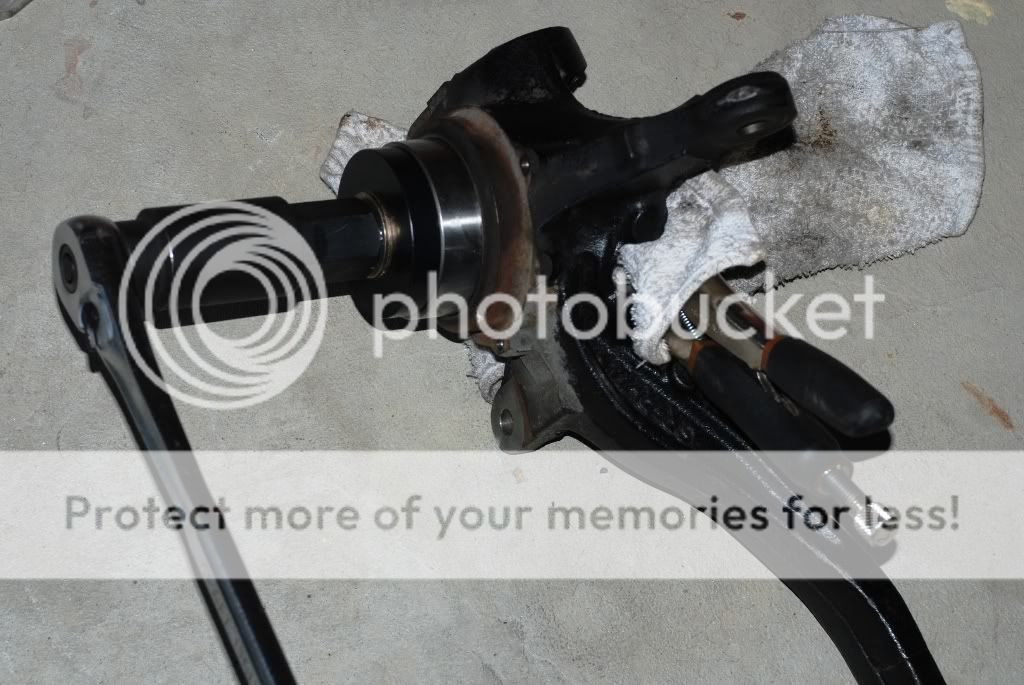
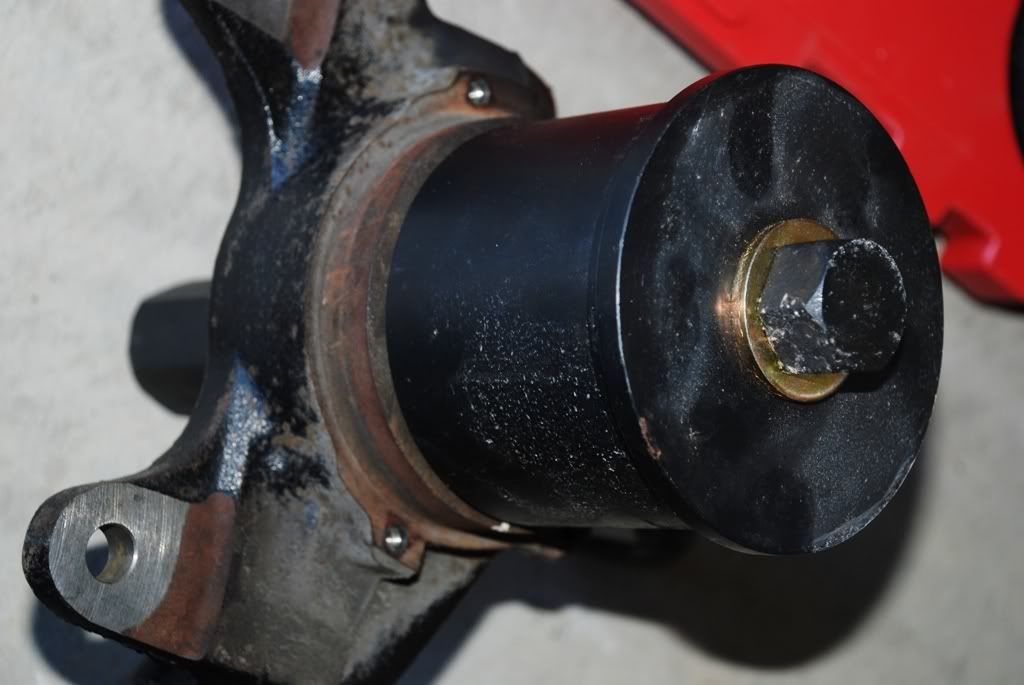
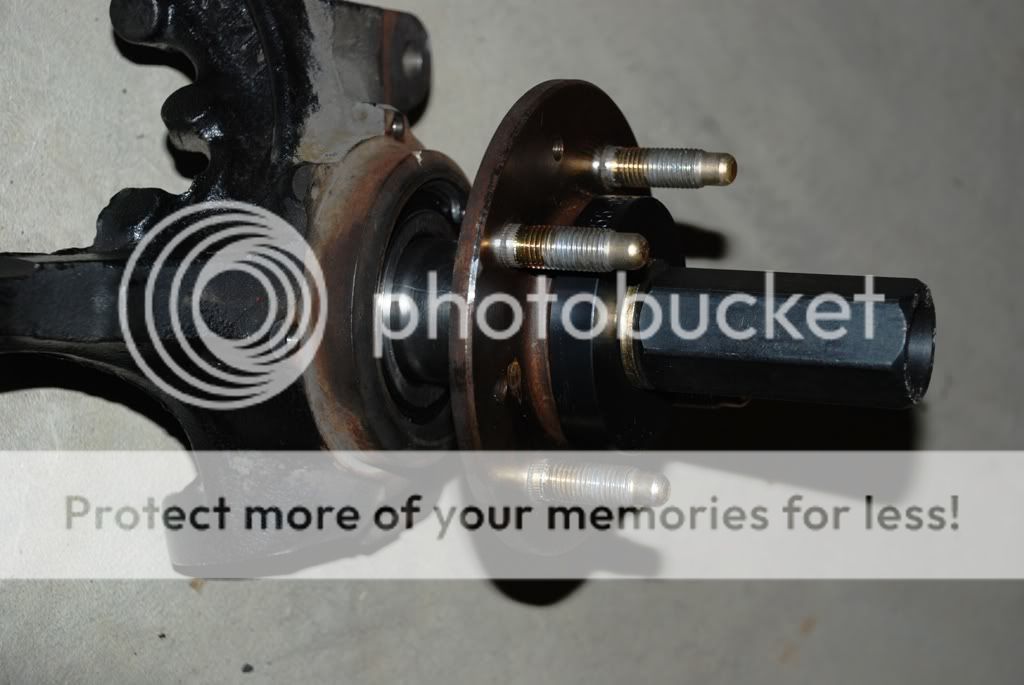
This set shows how I would use the tools to press the hub (I didn't actually do this yet as I'm going to replace the dust sheild). Make sure your only pulling against the inner race of the bearing for this one. Otherwise you know what will happen. I also found it very helpful to orient the discs as I've shown to help center them on the hub and bearing. Probably doesn't matter. Don't forget to install your cir-clip and dust shield before this step. Otherwise you'll be buying another bearing.
Grease your parts and go to town!
This picture shows everything I was using to make it work. The Harbor Freight kit, my ratchet, 36mm socket, jack-handle (cheater bar), and a can of extreme-pressure moly grease. In addition to these tools, I also used a pair of vice grips and a towel to protect the bolt head. In each segment, you can put the screw & bolt on either side to make it work. It's all up to you. Probably makes a big difference weather or not your knuckles are still on the car.
Here you can see How I've installed the bits for bearing removal. My hub had already been hammered out before I got the tool, but the OP pretty much covered a way to use this tool (even though a socket and hammer work equally well. I followed the Helm manual and just used the largest size disk that won't hang up on the knuckle pressing out the bearing. I took these pictures after the bearing started moving out, so the disk won't be as deep when you first install it. I didn't have a socket big enough to fit the head of the bolt, but my 32mm hub socket did fit onto the kits provided nut (yay!).
Surprisingly, the bolt never even tried to turn on it's own as I pressed out the bearing. Therefore I didn't have to put another wrench on it to hold it steady.
Grease up your screw, nut and the washer that the nut will press against.
Now this is pictures of how I set it up to press the new bearing in. You definitely want the discs facing as I've shown so you are ONLY pressing on the outer race of the bearing. The inner race of the bearing DEFINITELY DOES stick out further than the outer race, and you DO NOT WANT TO PRESS THE INNER RACE!
This time the bolt did want to spin as I turned the nut. Since I don't have a socket big enough, I just put the vice grips on the head of the bolt (which I covered with a rag), and started wrenching. Worked perfectly.
Grease up the Inside of the knuckle (very thin layer), the outside of the bearing (very thin layer), the screw, the nut and the washer that the nut is pressing against.
This set shows how I would use the tools to press the hub (I didn't actually do this yet as I'm going to replace the dust sheild). Make sure your only pulling against the inner race of the bearing for this one. Otherwise you know what will happen. I also found it very helpful to orient the discs as I've shown to help center them on the hub and bearing. Probably doesn't matter. Don't forget to install your cir-clip and dust shield before this step. Otherwise you'll be buying another bearing.
Grease your parts and go to town!
09-29-2011, 11:37 AM
#36
I cut a deep V-shaped groove across the race with a dremel kinda at a 45* angle. Once your almost through, hit it with a chisel and hammer and it will crack all the way across (I actually managed this with a flat-blade screwdriver). Then it will slide right off with a little help from a screwdriver and the head of a hammer. This video is where I learned the technique. Skip to 4:28 in the video to see:
http://www.youtube.com/watch?v=FEDrioMDe1k
A little PB blaster will help loosen up rust between the two parts. That stuff really does get in there.
It took me a while to get all the way through the race with a little dremel. I probably wasted about 45minutes taking going slow and steady. Also, I didn't want to pay a shop anything to have them pull it.
06-11-2012, 09:39 AM
#38
Honda-Tech Member
Join Date: Jul 2007
Location: San Diego, CA
Posts: 22
Likes: 0
Received 0 Likes
on
0 Posts
I know this is an old thread, but I wanted to let you guys know that instead of going out and buying the bearing removal kit you can go to carquest and rent it for free (just put down a down payment). I believe it is Kit 27. If they don't have it in the store they can order it from a place that does have it. The kit is actually this http://www.amazon.com/Alltrade-64874.../dp/B0028QGT5Y . All you need to do now is figure out the inner race thing.
07-30-2018, 08:27 AM
#39
Premium Member
Well everything went very well. The new style bolt performed flawlessly on my nearly 18 year old junkyard knuckles. No sign of stretch or failure in the bolt head.
This picture shows everything I was using to make it work. The Harbor Freight kit, my ratchet, 36mm socket, jack-handle (cheater bar), and a can of extreme-pressure moly grease. In addition to these tools, I also used a pair of vice grips and a towel to protect the bolt head. In each segment, you can put the screw & bolt on either side to make it work. It's all up to you. Probably makes a big difference weather or not your knuckles are still on the car.


Here you can see How I've installed the bits for bearing removal. My hub had already been hammered out before I got the tool, but the OP pretty much covered a way to use this tool (even though a socket and hammer work equally well. I followed the Helm manual and just used the largest size disk that won't hang up on the knuckle pressing out the bearing. I took these pictures after the bearing started moving out, so the disk won't be as deep when you first install it. I didn't have a socket big enough to fit the head of the bolt, but my 32mm hub socket did fit onto the kits provided nut (yay!).
Surprisingly, the bolt never even tried to turn on it's own as I pressed out the bearing. Therefore I didn't have to put another wrench on it to hold it steady.
Grease up your screw, nut and the washer that the nut will press against.


Now this is pictures of how I set it up to press the new bearing in. You definitely want the discs facing as I've shown so you are ONLY pressing on the outer race of the bearing. The inner race of the bearing DEFINITELY DOES stick out further than the outer race, and you DO NOT WANT TO PRESS THE INNER RACE!
This time the bolt did want to spin as I turned the nut. Since I don't have a socket big enough, I just put the vice grips on the head of the bolt (which I covered with a rag), and started wrenching. Worked perfectly.
Grease up the Inside of the knuckle (very thin layer), the outside of the bearing (very thin layer), the screw, the nut and the washer that the nut is pressing against.


This set shows how I would use the tools to press the hub (I didn't actually do this yet as I'm going to replace the dust sheild). Make sure your only pulling against the inner race of the bearing for this one. Otherwise you know what will happen. I also found it very helpful to orient the discs as I've shown to help center them on the hub and bearing. Probably doesn't matter. Don't forget to install your cir-clip and dust shield before this step. Otherwise you'll be buying another bearing.
Grease your parts and go to town!


This picture shows everything I was using to make it work. The Harbor Freight kit, my ratchet, 36mm socket, jack-handle (cheater bar), and a can of extreme-pressure moly grease. In addition to these tools, I also used a pair of vice grips and a towel to protect the bolt head. In each segment, you can put the screw & bolt on either side to make it work. It's all up to you. Probably makes a big difference weather or not your knuckles are still on the car.
Here you can see How I've installed the bits for bearing removal. My hub had already been hammered out before I got the tool, but the OP pretty much covered a way to use this tool (even though a socket and hammer work equally well. I followed the Helm manual and just used the largest size disk that won't hang up on the knuckle pressing out the bearing. I took these pictures after the bearing started moving out, so the disk won't be as deep when you first install it. I didn't have a socket big enough to fit the head of the bolt, but my 32mm hub socket did fit onto the kits provided nut (yay!).
Surprisingly, the bolt never even tried to turn on it's own as I pressed out the bearing. Therefore I didn't have to put another wrench on it to hold it steady.
Grease up your screw, nut and the washer that the nut will press against.
Now this is pictures of how I set it up to press the new bearing in. You definitely want the discs facing as I've shown so you are ONLY pressing on the outer race of the bearing. The inner race of the bearing DEFINITELY DOES stick out further than the outer race, and you DO NOT WANT TO PRESS THE INNER RACE!
This time the bolt did want to spin as I turned the nut. Since I don't have a socket big enough, I just put the vice grips on the head of the bolt (which I covered with a rag), and started wrenching. Worked perfectly.
Grease up the Inside of the knuckle (very thin layer), the outside of the bearing (very thin layer), the screw, the nut and the washer that the nut is pressing against.
This set shows how I would use the tools to press the hub (I didn't actually do this yet as I'm going to replace the dust sheild). Make sure your only pulling against the inner race of the bearing for this one. Otherwise you know what will happen. I also found it very helpful to orient the discs as I've shown to help center them on the hub and bearing. Probably doesn't matter. Don't forget to install your cir-clip and dust shield before this step. Otherwise you'll be buying another bearing.
Grease your parts and go to town!
07-31-2018, 04:11 PM
#40
Fish Twig
Join Date: Nov 2005
Location: Still hunting that foo up there
Posts: 15,555
Received 309 Likes
on
285 Posts
Shouldn't be too bad. Just make sure you line everything up before cranking away when installing the bearing. You can def mess something up.
08-01-2018, 01:52 AM
#41

just two things to add
1) always slab anti seize all over the threads of the bolt before using it so it doesn't bind up and break or the threads getting damaged from use
2) use this tool to pull the hub off, you'll pull the axle and put the knuckle back on and then use this to pull the hub off, then use a dremel to slice a sideways line into the race that stays attached to the hub without damaging anything else, then use a chisel to tap into the hole to crack it and freeing it from the hub....using this method will prevent damage to the hub, just go sideways with the slicing so you don't slice into the hub but you get maximum area with which to get the race to break when you tap into it with the chisel
you can rent this tool from most parts stores

Thread
Thread Starter
Forum
Replies
Last Post
MadVladCivic
Honda Civic / Del Sol (1992 - 2000)
6
12-03-2015 06:50 AM
ALLMOTOR CRX
Honda CRX / EF Civic (1988 - 1991)
6
03-14-2007 10:08 PM
performula
Honda CRX / EF Civic (1988 - 1991)
5
02-19-2003 03:08 PM