
DIY: Build your own pressure bleeder for brake bleeding
 06-21-2014, 10:31 PM
#1
Honda-Tech Member
Thread Starter
Short story goes:
I found a great deal on stoptech stainless steel lines, so it was time to install the lines and bleed the brakes. I haven't bled the brakes in about 6 years, so it was about time. I installed speedbleeders about 8 years ago, which worked fine, and my pedal was always fairly firm. So, I installed the brake lines, bled the brakes twice over with the speedbleeders, but the pedal was still a bit soft. I then decided to research and build my own pressure bleeder (motive-esque). I sourced this DIY idea from two places:
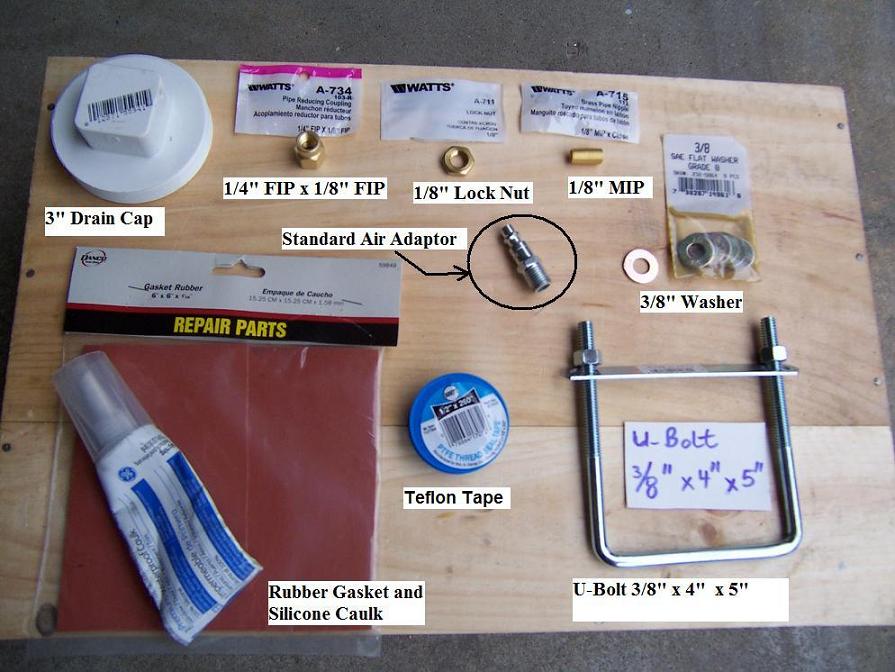
Parts you'll need (the parts with * are for step 2):
1 - RL FlowMaster 1 Gallon Sprayer Model 1401HD - $8.00
1 - 10' section of Watts 3/8" vinyl clear tubing - $2.50
1 - Bolt-on style chrome tire valve stem.
2 - Hose clamps that'll fit the tubing <1/2 inch
*1 - Plumbing PVC Drain Cap 3”: $1.50
*1 - Watts A-192 1/4"x1/4" MIP Hose Barb Adapter $1.50
*1 - Watts A-778 3/8" MIP x 1/4" FIP Pipe Bushing - $1.50
*1 - Rubber gasket (Fel-Pro 3060 Gasket Material. I used the one that was cork with a blue stripe)
*1 - U-bolt 3/8" x 4" x 7"
*2 - Small washers (the crush washers for the oil pan drain bolt are perfect)
*2 - Small "O" Rings
*2 - 3/8 wing nuts for the U bolt (makes loosening and tightening the DIY cap easier)
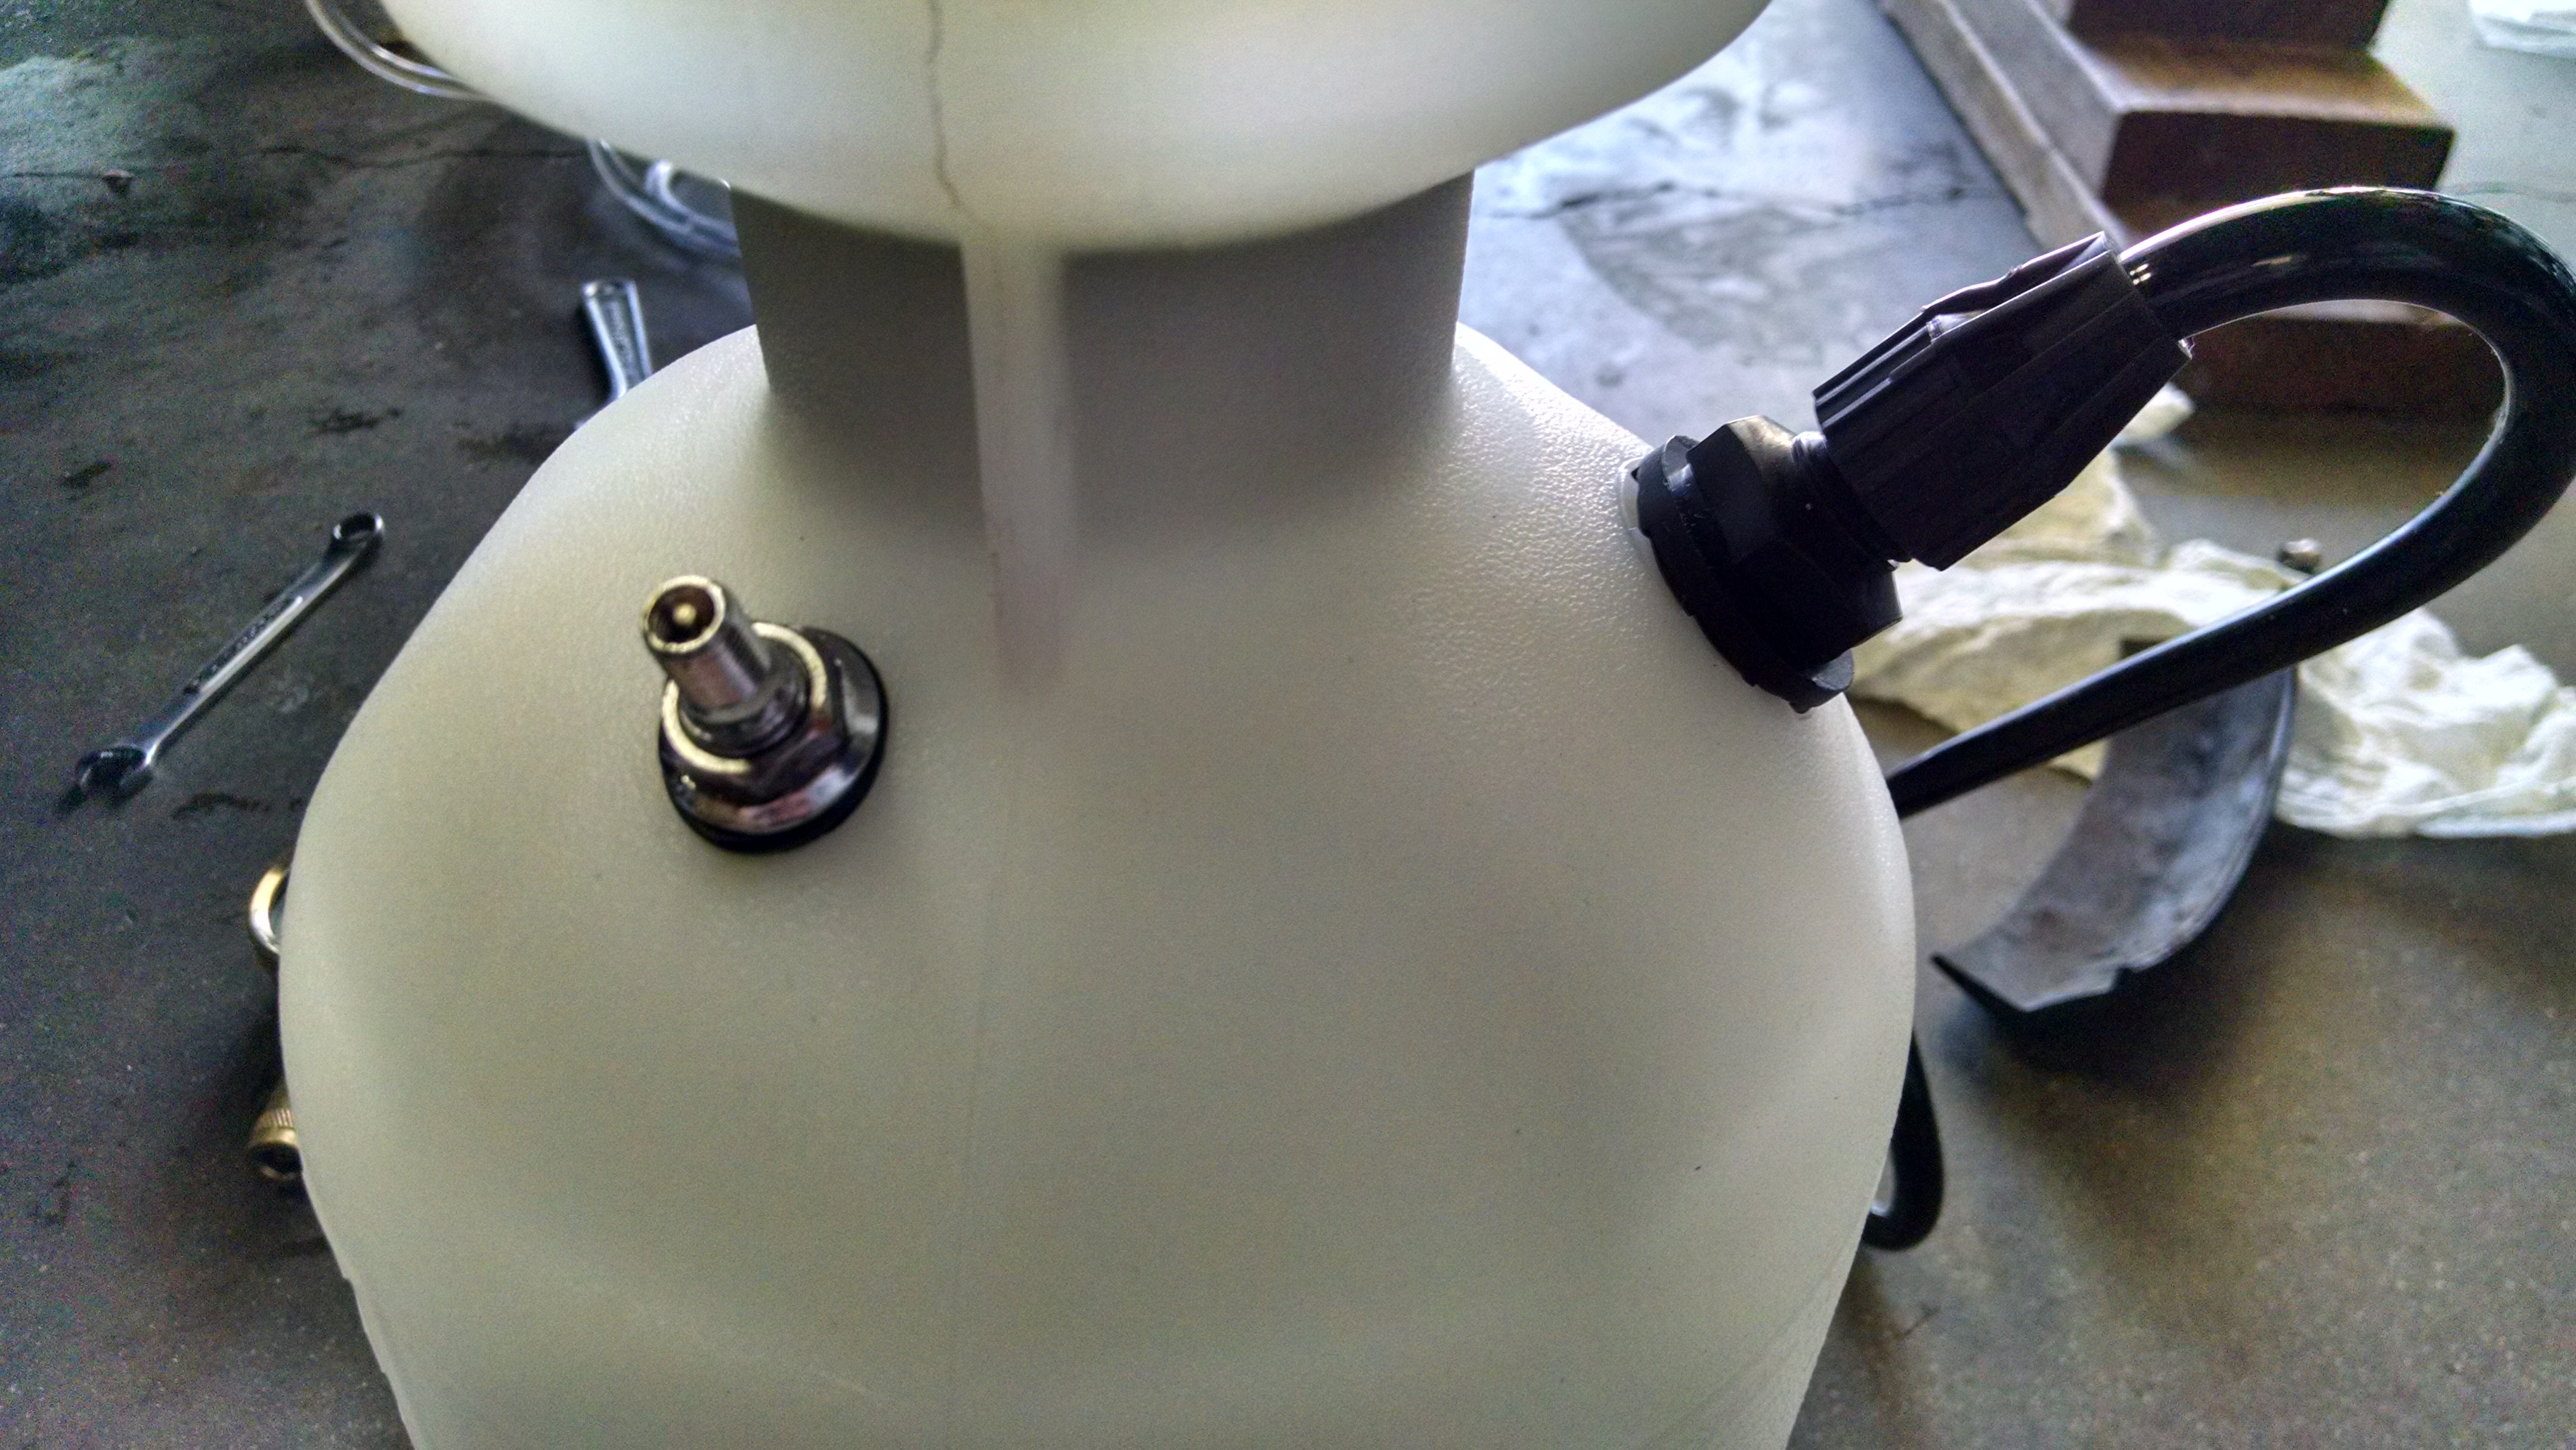
(1) Build the bottle aparatus:
http://faculty.ccp.edu/faculty/dreed...eder/index.htm
I followed the guide above, with the exception of the reservoir cap mod. That specific mod doesn't work on Hondas because our reservoir cap screws on, but not in the same airtight fashion as German cars.
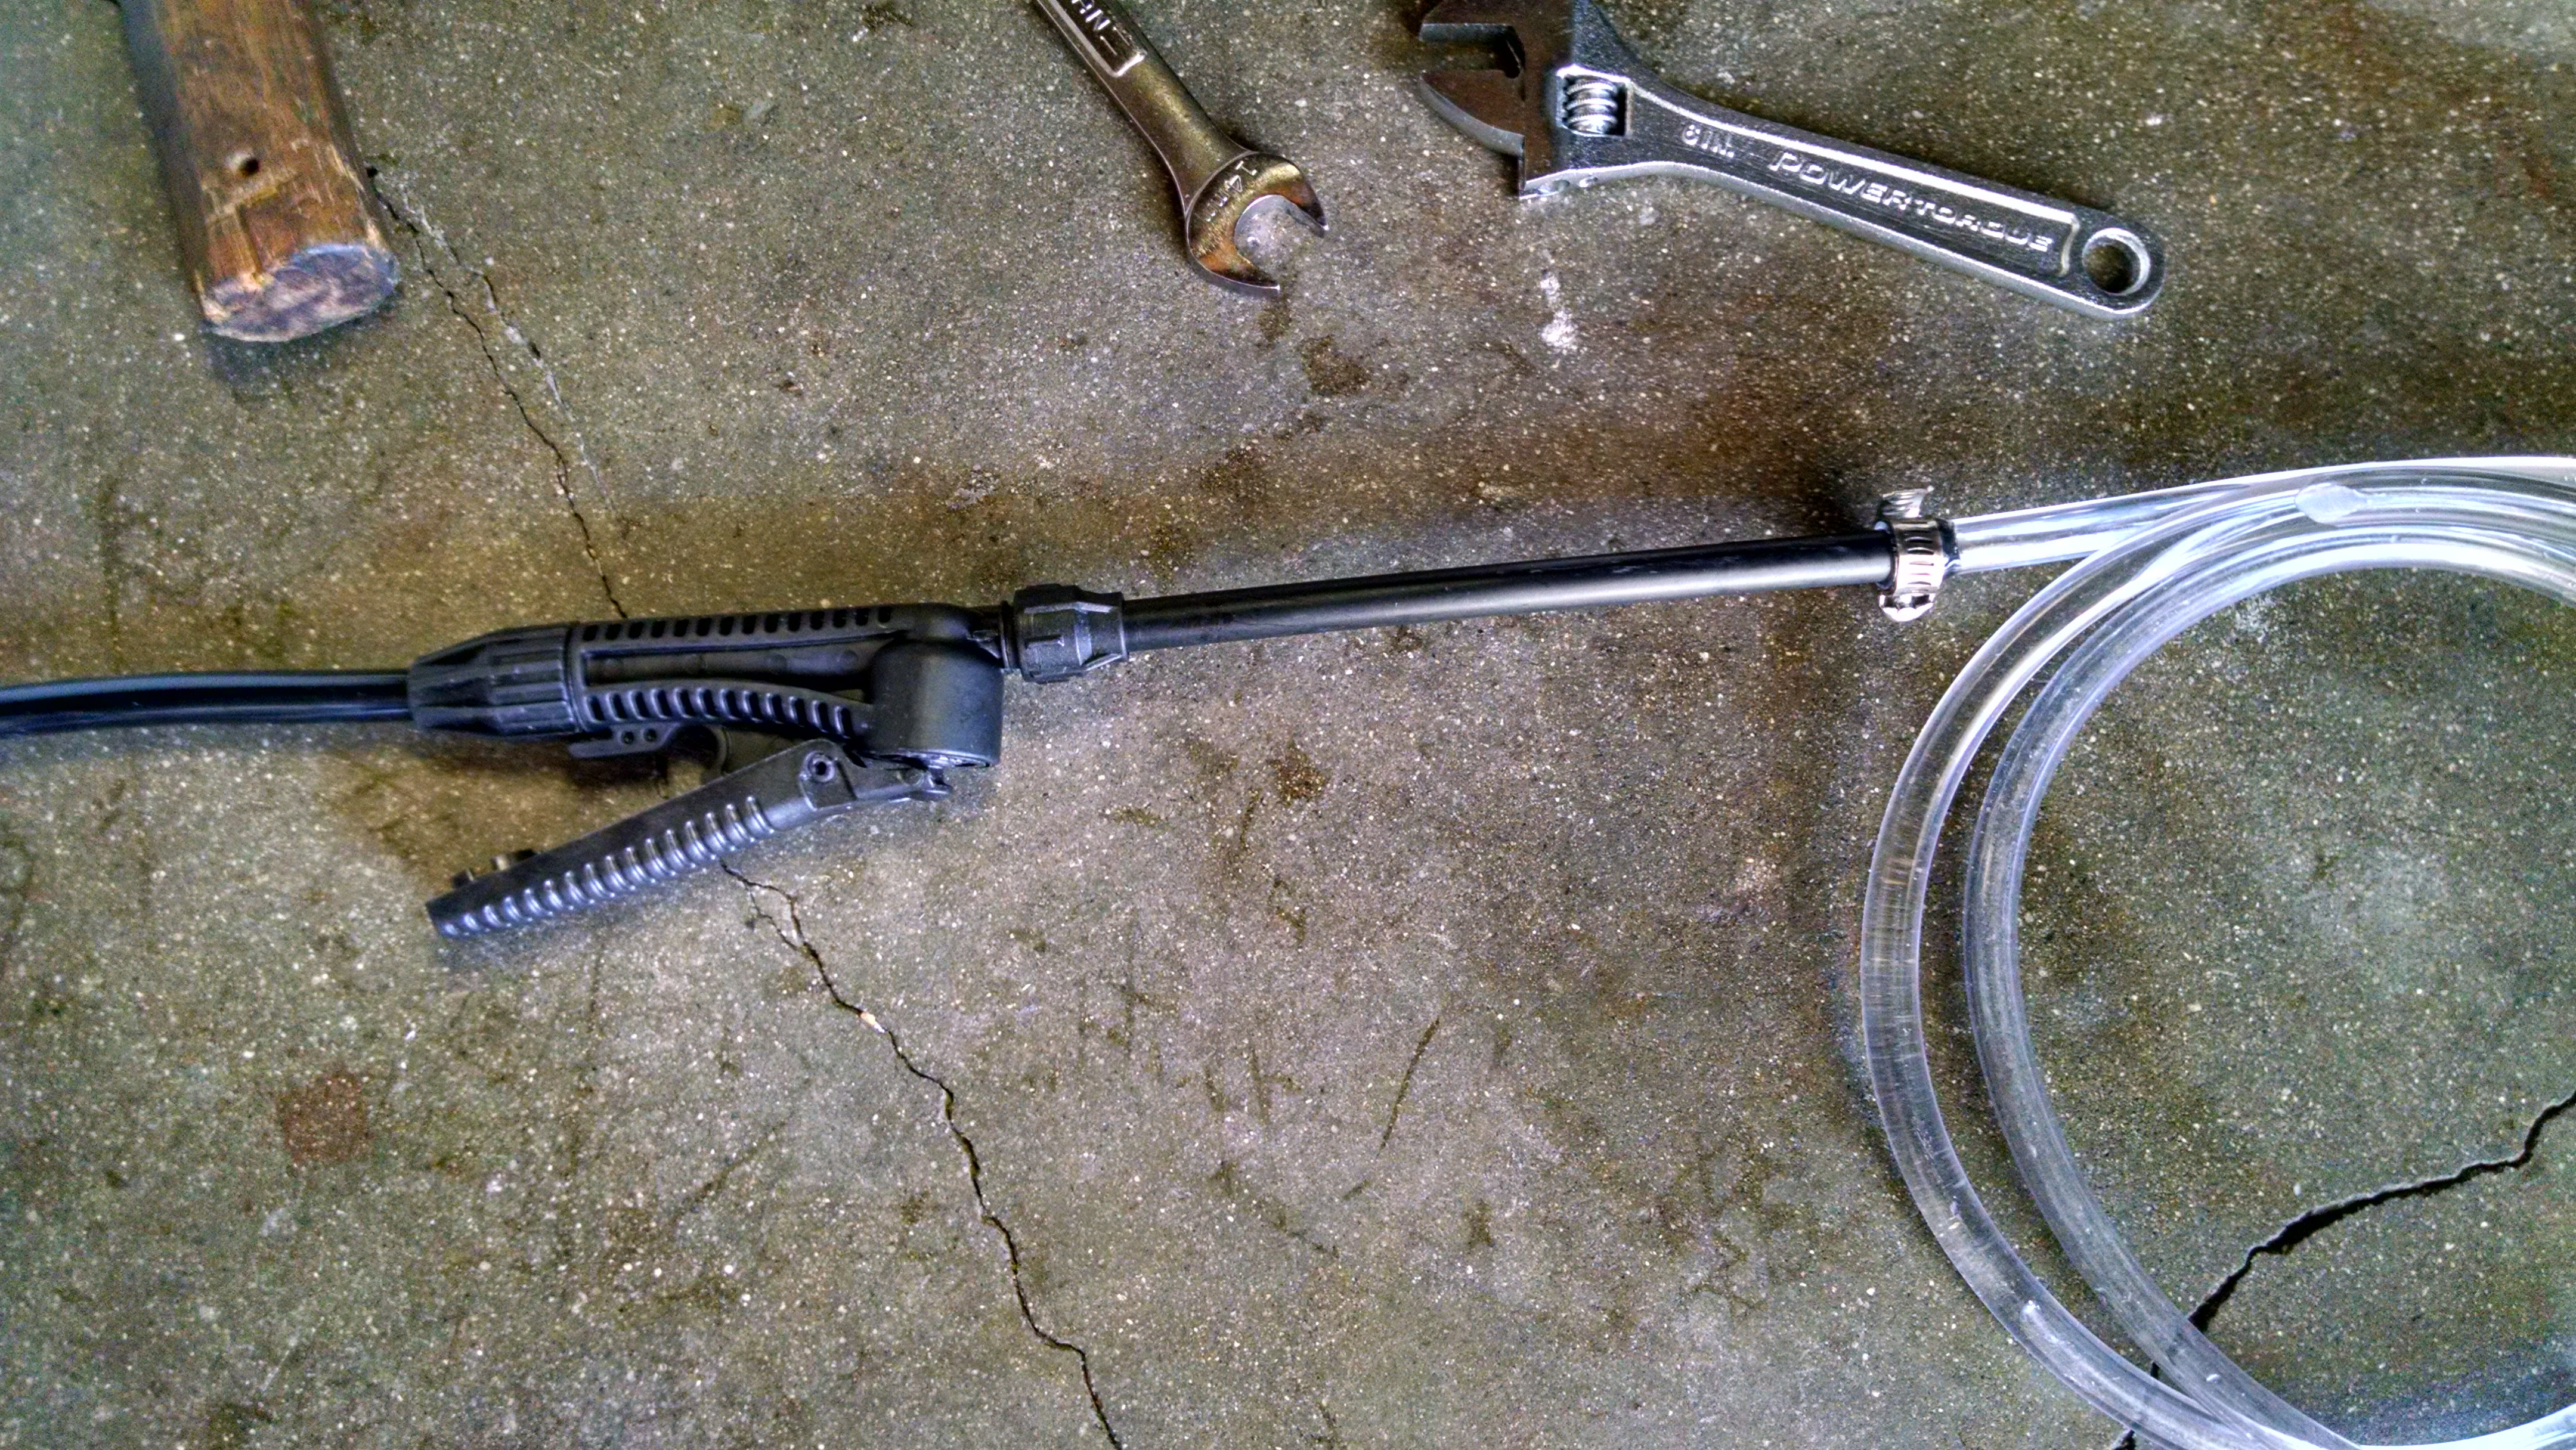
At this point you'll have the bottle with the tire valve stem installed and the squeeze handle with the 10foot tube attached.
(2) Build the air-tight reservoir cap:
Take a look at the pictures here for what we'll be doing for the reservoir cap.
http://www.odyclub.com/forums/52-200...tml#post529084
http://www.odyclub.com/forums/52-200...tml#post529086
http://www.odyclub.com/forums/52-200...tml#post529088
http://www.odyclub.com/forums/52-200...tml#post529089
This is the end game:
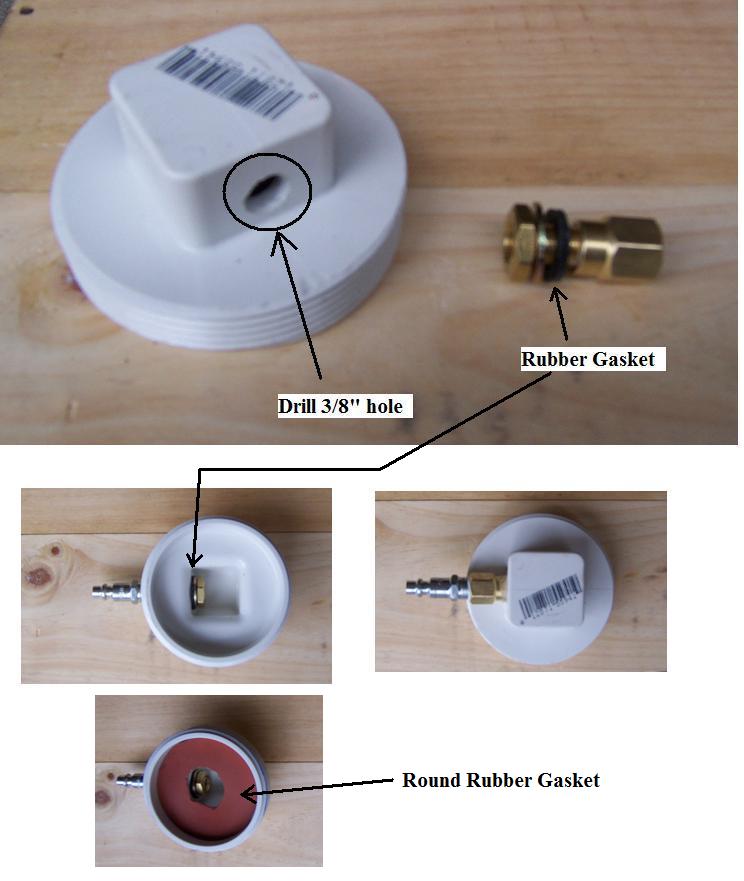
I sort of eye-balled most things since I only had a dremel on me. With the 3" PVC cap in hand, drill out a hole on one of the walls of the protruding cube. Make sure this hole is centered so that the barb adapter can be secured from the inside with the pipe bushing. Make sure the hole is very snug, otherwise you might have leakage issues. At this point you go back to the first tutorial, and start with the steps about 1/3 of the way down:
http://faculty.ccp.edu/faculty/dreed...eder/index.htm
So at this point you'll have a cap with the barb adapter installed and sandwiched between washers and orings to create an airtight seal. It should look like this (except with a barb adapter instead of that air compressor adapter): I'm not sure if the measurements make sense, as I said, I just eyeballed it, hah
 [
[
Now all you have to do is connect the other end of the 10ft of tube to the barb adapter. Connect them, secure them with a hose clamp, and you're set.
Lastly, you'll position your newly built DIY cap over your master cylinder reservoir. It should sit squarely over the center of the reservoir. Then hook the U-bolt underneath the master cylinder so that the exposed threading on the bolts face upwards. In order for the U-bolt to sit completely level, I had to have it sit slightly diagonal across the MC. I had to slightly push the power steering high pressure line out of the way for this.
Once the U bolt is positioned, set the U bolt horizontal bar thing onto the bolts, and tighten them with over the DIY reservoir cap with the wing nuts. Don't overtighten!
Again, the same pic for reference. You could see the angle that was required to keep everything square.
*I originally purchased the 4 x 5 inch U-bolt, but later found out that we need about 6.5 inches of clearance over cnn's recommendations for his Odyssey. This is why I've got the collar with the random bolts to lengthen my U-bolt.
Now you've got everything hooked up, time to check for any leaks! Pump up the sprayer bottle to roughly 10psi (use your tire guage to check the pressure!), and then hold down the handle of the sprayer to allow the pressure to equalize between the bottle and the MC. Given the extra volume of the 10ft of tubing and in the space above the fluid in the MC, you might need to recheck the pressure of the sytem.
Connect a brake-fluid capturing device with a bit of the tube up and above the bleeder screw so you could see bubbles:

Then break open the bleeder screw 1/4-1/2 turn. Press down on the sprayer handle again, and hope to hell that you see fluid draining out of the bleed screw in the absence of any hissing/leaking of break fluid from your DIY setup. If you do, find the source, tighten it up, and try it again. From the looks of my garage floor, you know that my excellent workmanship totally didn't leak
BUT, remember, we're only testing for leaks. You CAN bleed your system in this manner (this is the clean method, if you get a leak, you'll hear air, but there won't be any spilled fluid since your DIY bottle doesn't have any brake fluid in it), but you HAVE TO make sure the reservoir is topped up at all times. With every five-seven secs of squeezing the handle, I'd recommend disconnecting the U-bolt setup and check the MC reservoir to make sure it's full.
If you don't want to have to constantly check the reservoir fluid levels, you'll have to flush with the "dirty" method. After you've made sure your system can hold 8-10psi, you release pressure through the tire valve, equalize it by holding down the handle, then open the DIY bottle. Fill up the bottle with brake fluid, seal it up, and pressurize it back to 10psi, then repeat the steps above.
Once you're all bubble or old-fluid free, tighten the bleed screw, release the pressure in the bottle, hold down the handle to equalize it to draw any excess fluid back towards the bottle.
And you're done!
Huge thanks to cnn in the odyssey forums and to the OP of the ccp.edu post.
More pics for reference, in case the links go down:
End of story:
No more sponginess in my brakes, although the stoptech SS lines don't provide EXTRA firm pressure over stock rubber. Even with the Cusco brace, the SS lines give a more linear pedal feeling. With stock rubber, it felt like you had the majority of your stopping power at one specific point of the pedal stroke. With these, that same amount of stopping power is spread out over 1.5 inches. Would I do it again? Probably not, I'd buy new OEM rubber lines.
I found a great deal on stoptech stainless steel lines, so it was time to install the lines and bleed the brakes. I haven't bled the brakes in about 6 years, so it was about time. I installed speedbleeders about 8 years ago, which worked fine, and my pedal was always fairly firm. So, I installed the brake lines, bled the brakes twice over with the speedbleeders, but the pedal was still a bit soft. I then decided to research and build my own pressure bleeder (motive-esque). I sourced this DIY idea from two places:
Parts you'll need (the parts with * are for step 2):
1 - RL FlowMaster 1 Gallon Sprayer Model 1401HD - $8.00
1 - 10' section of Watts 3/8" vinyl clear tubing - $2.50
1 - Bolt-on style chrome tire valve stem.
2 - Hose clamps that'll fit the tubing <1/2 inch
*1 - Plumbing PVC Drain Cap 3”: $1.50
*1 - Watts A-192 1/4"x1/4" MIP Hose Barb Adapter $1.50
*1 - Watts A-778 3/8" MIP x 1/4" FIP Pipe Bushing - $1.50
*1 - Rubber gasket (Fel-Pro 3060 Gasket Material. I used the one that was cork with a blue stripe)
*1 - U-bolt 3/8" x 4" x 7"
*2 - Small washers (the crush washers for the oil pan drain bolt are perfect)
*2 - Small "O" Rings
*2 - 3/8 wing nuts for the U bolt (makes loosening and tightening the DIY cap easier)
(1) Build the bottle aparatus:
http://faculty.ccp.edu/faculty/dreed...eder/index.htm
I followed the guide above, with the exception of the reservoir cap mod. That specific mod doesn't work on Hondas because our reservoir cap screws on, but not in the same airtight fashion as German cars.
At this point you'll have the bottle with the tire valve stem installed and the squeeze handle with the 10foot tube attached.
(2) Build the air-tight reservoir cap:
Take a look at the pictures here for what we'll be doing for the reservoir cap.
http://www.odyclub.com/forums/52-200...tml#post529084
http://www.odyclub.com/forums/52-200...tml#post529086
http://www.odyclub.com/forums/52-200...tml#post529088
http://www.odyclub.com/forums/52-200...tml#post529089
This is the end game:
I sort of eye-balled most things since I only had a dremel on me. With the 3" PVC cap in hand, drill out a hole on one of the walls of the protruding cube. Make sure this hole is centered so that the barb adapter can be secured from the inside with the pipe bushing. Make sure the hole is very snug, otherwise you might have leakage issues. At this point you go back to the first tutorial, and start with the steps about 1/3 of the way down:
http://faculty.ccp.edu/faculty/dreed...eder/index.htm
So at this point you'll have a cap with the barb adapter installed and sandwiched between washers and orings to create an airtight seal. It should look like this (except with a barb adapter instead of that air compressor adapter): I'm not sure if the measurements make sense, as I said, I just eyeballed it, hah
[Now all you have to do is connect the other end of the 10ft of tube to the barb adapter. Connect them, secure them with a hose clamp, and you're set.
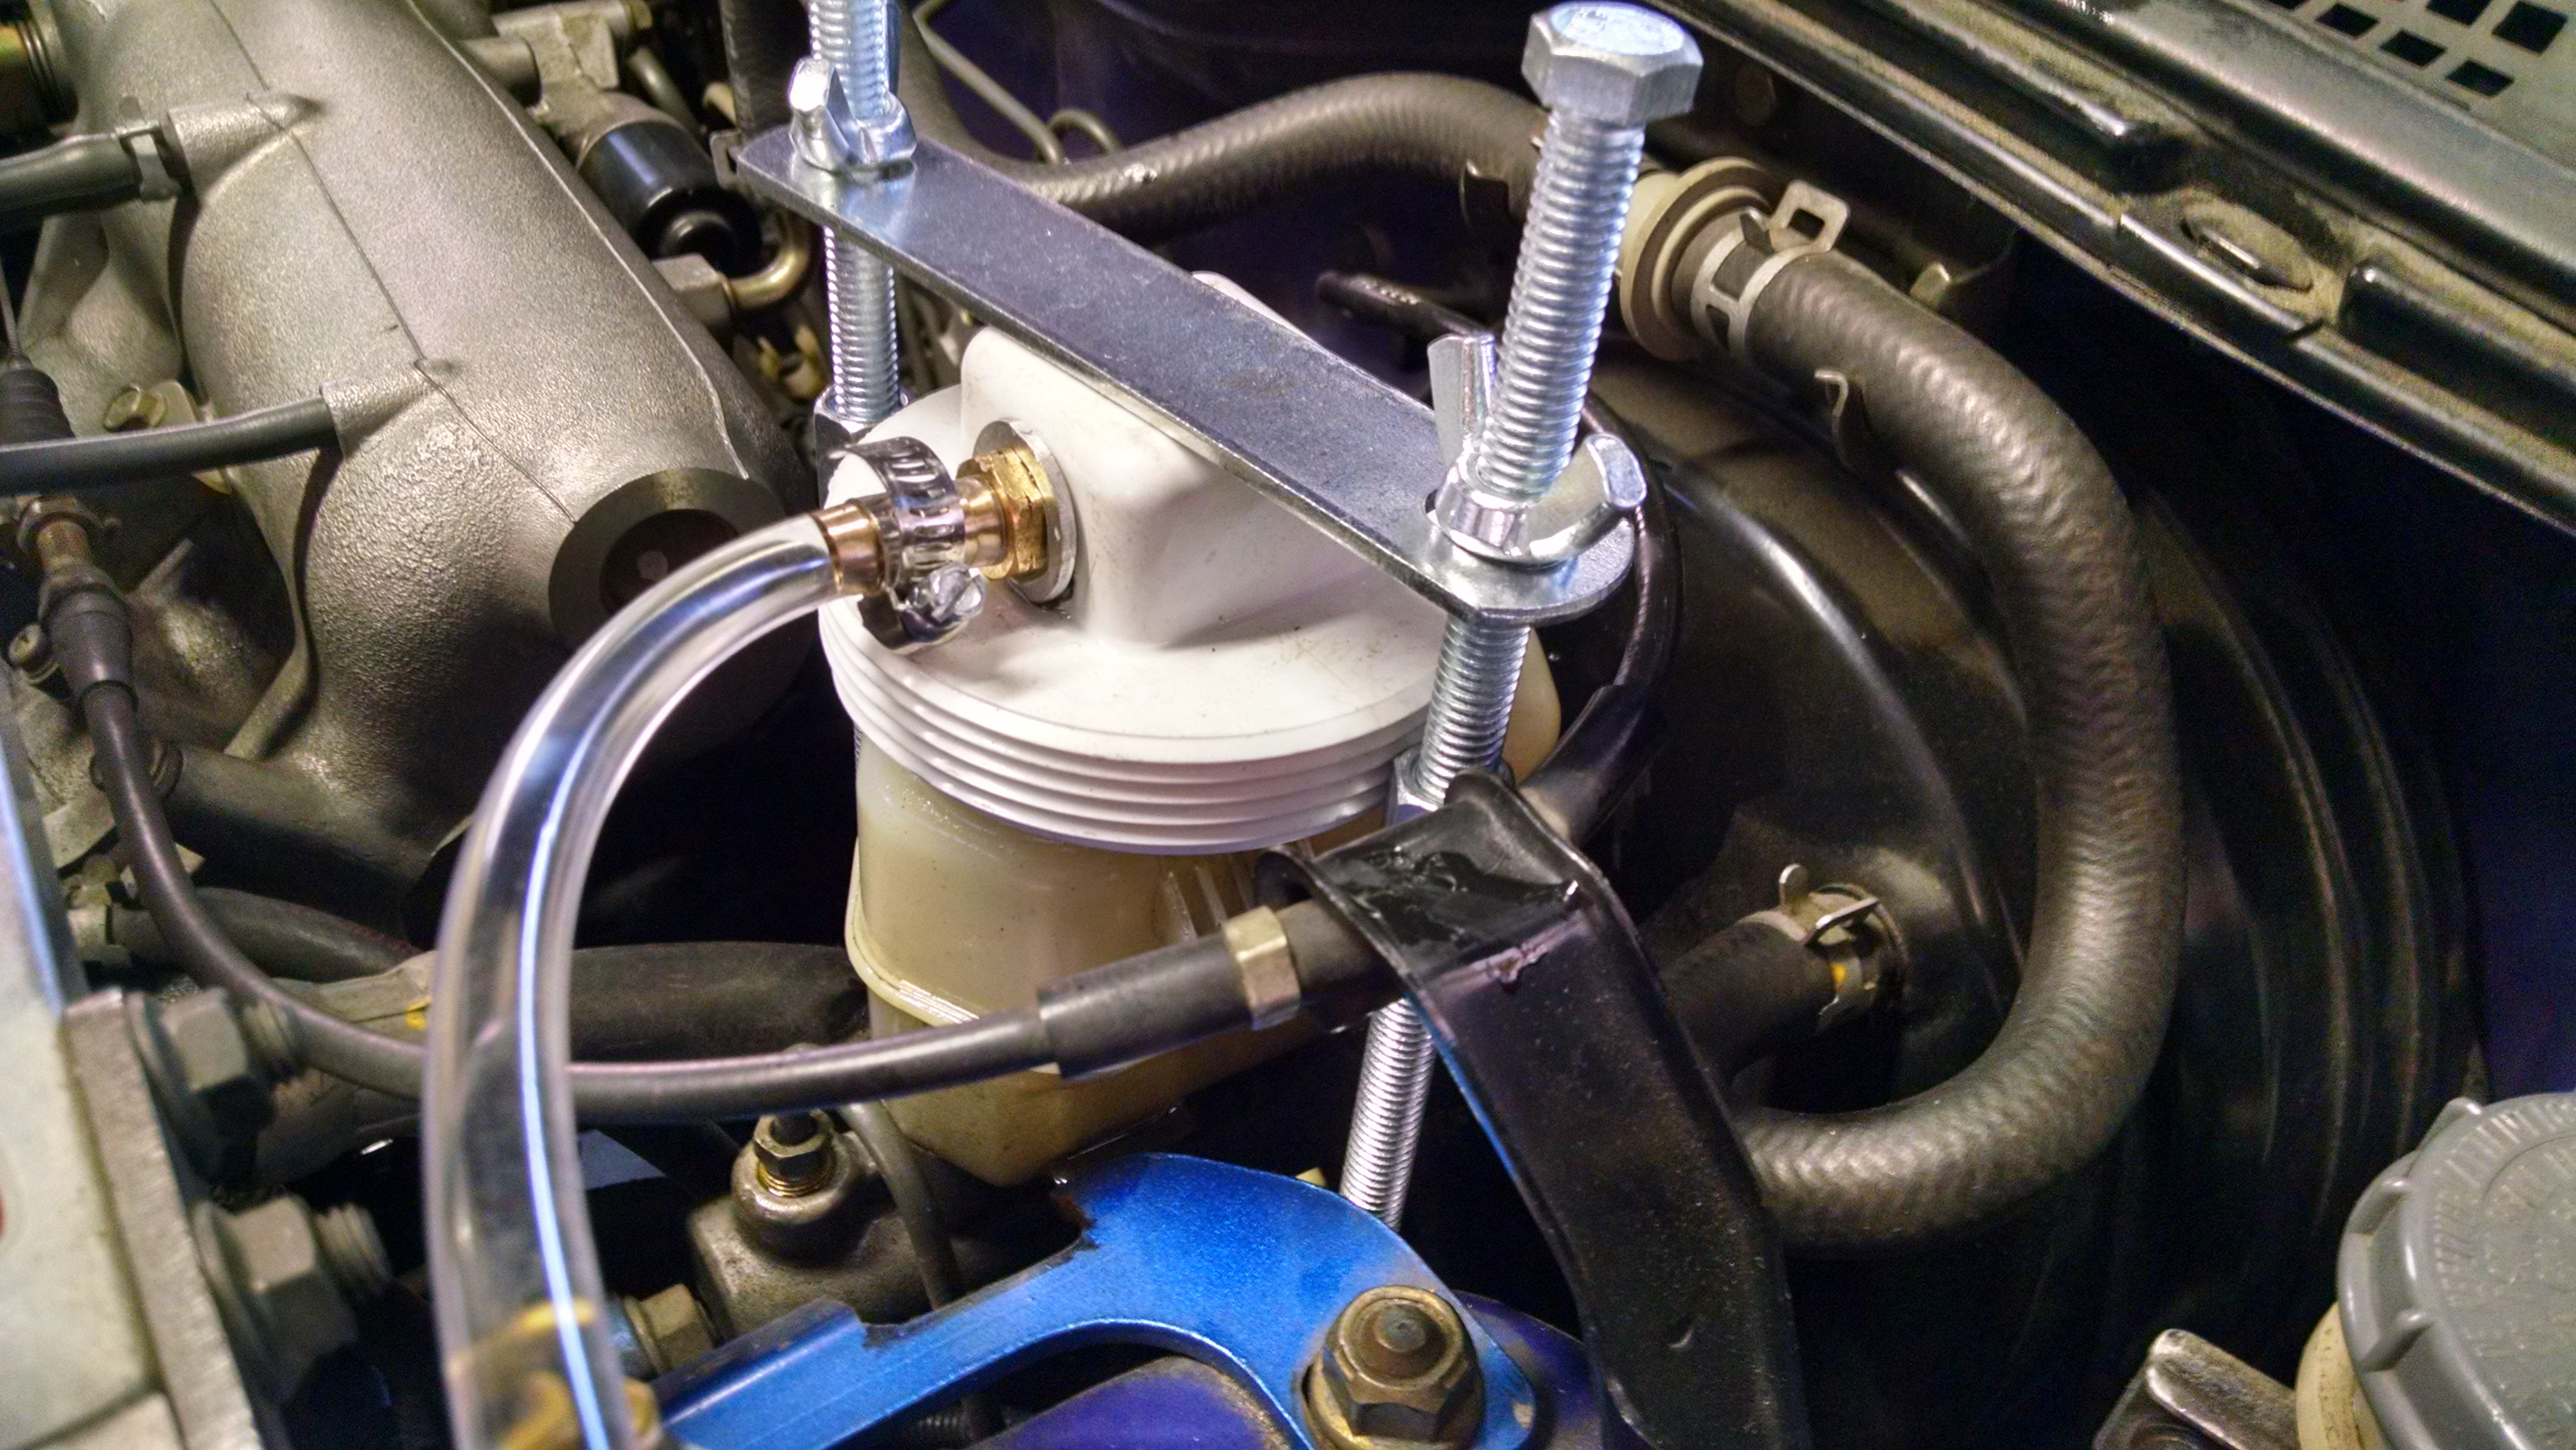
Lastly, you'll position your newly built DIY cap over your master cylinder reservoir. It should sit squarely over the center of the reservoir. Then hook the U-bolt underneath the master cylinder so that the exposed threading on the bolts face upwards. In order for the U-bolt to sit completely level, I had to have it sit slightly diagonal across the MC. I had to slightly push the power steering high pressure line out of the way for this.
Once the U bolt is positioned, set the U bolt horizontal bar thing onto the bolts, and tighten them with over the DIY reservoir cap with the wing nuts. Don't overtighten!
Again, the same pic for reference. You could see the angle that was required to keep everything square.
*I originally purchased the 4 x 5 inch U-bolt, but later found out that we need about 6.5 inches of clearance over cnn's recommendations for his Odyssey. This is why I've got the collar with the random bolts to lengthen my U-bolt.
Now you've got everything hooked up, time to check for any leaks! Pump up the sprayer bottle to roughly 10psi (use your tire guage to check the pressure!), and then hold down the handle of the sprayer to allow the pressure to equalize between the bottle and the MC. Given the extra volume of the 10ft of tubing and in the space above the fluid in the MC, you might need to recheck the pressure of the sytem.
Connect a brake-fluid capturing device with a bit of the tube up and above the bleeder screw so you could see bubbles:
Then break open the bleeder screw 1/4-1/2 turn. Press down on the sprayer handle again, and hope to hell that you see fluid draining out of the bleed screw in the absence of any hissing/leaking of break fluid from your DIY setup. If you do, find the source, tighten it up, and try it again. From the looks of my garage floor, you know that my excellent workmanship totally didn't leak
BUT, remember, we're only testing for leaks. You CAN bleed your system in this manner (this is the clean method, if you get a leak, you'll hear air, but there won't be any spilled fluid since your DIY bottle doesn't have any brake fluid in it), but you HAVE TO make sure the reservoir is topped up at all times. With every five-seven secs of squeezing the handle, I'd recommend disconnecting the U-bolt setup and check the MC reservoir to make sure it's full.
If you don't want to have to constantly check the reservoir fluid levels, you'll have to flush with the "dirty" method. After you've made sure your system can hold 8-10psi, you release pressure through the tire valve, equalize it by holding down the handle, then open the DIY bottle. Fill up the bottle with brake fluid, seal it up, and pressurize it back to 10psi, then repeat the steps above.
Once you're all bubble or old-fluid free, tighten the bleed screw, release the pressure in the bottle, hold down the handle to equalize it to draw any excess fluid back towards the bottle.
And you're done!
Huge thanks to cnn in the odyssey forums and to the OP of the ccp.edu post.
More pics for reference, in case the links go down:
End of story:
No more sponginess in my brakes, although the stoptech SS lines don't provide EXTRA firm pressure over stock rubber. Even with the Cusco brace, the SS lines give a more linear pedal feeling. With stock rubber, it felt like you had the majority of your stopping power at one specific point of the pedal stroke. With these, that same amount of stopping power is spread out over 1.5 inches. Would I do it again? Probably not, I'd buy new OEM rubber lines.
 09-13-2015, 09:19 PM
#2
Trial User

Join Date: Sep 2015
Posts: 2
Likes: 0
Received 0 Likes
on
0 Posts
I know this is an old thread, and I apologize for this newb question:
When you pressurize the tank, and the fluid starts moving to the MC reservoir, doesn't the air in the tube go into the reservoir as well? Won't that introduce the air into the brake system?
TIA!
When you pressurize the tank, and the fluid starts moving to the MC reservoir, doesn't the air in the tube go into the reservoir as well? Won't that introduce the air into the brake system?
TIA!
09-14-2015, 04:30 PM
#3
Honda-Tech Member
Thread Starter
Anyways, I primarily do the "clean" method where you just use the air pressure to force the rest of the brake fluid through the lines. The increased pressure just acts on the surface of the brake fluid in the reservoir.
09-14-2015, 06:27 PM
#4
Trial User
Join Date: Sep 2015
Posts: 2
Likes: 0
Received 0 Likes
on
0 Posts
Funny that I stumbled on this. I don't get notifications but I had to check my for sale thread so I saw this.
Anyways, I primarily do the "clean" method where you just use the air pressure to force the rest of the brake fluid through the lines. The increased pressure just acts on the surface of the brake fluid in the reservoir.
Anyways, I primarily do the "clean" method where you just use the air pressure to force the rest of the brake fluid through the lines. The increased pressure just acts on the surface of the brake fluid in the reservoir.

Edit: Seems you already provided that tidbit of info in your original post that I had somehow missed... Cheers
"You CAN bleed your system in this manner (this is the clean method, if you get a leak, you'll hear air, but there won't be any spilled fluid since your DIY bottle doesn't have any brake fluid in it), but you HAVE TO make sure the reservoir is topped up at all times. With every five-seven secs of squeezing the handle, I'd recommend disconnecting the U-bolt setup and check the MC reservoir to make sure it's full."
Last edited by DIY_Newb; 09-14-2015 at 06:31 PM. Reason: updating

Thread
Thread Starter
Forum
Replies
Last Post
greenEFhatch
Honda CRX / EF Civic (1988 - 1991)
21
10-17-2019 05:00 AM
CobraCanuk
Honda Accord (1990 - 2002)
4
11-30-2004 08:05 AM