When you click on links to various merchants on this site and make a purchase, this can result in this site earning a commission. Affiliate programs and affiliations include, but are not limited to, the eBay Partner Network.
Did you have those electrical issues before you started repinning or after repinning? Were they present when you picked up the db8?
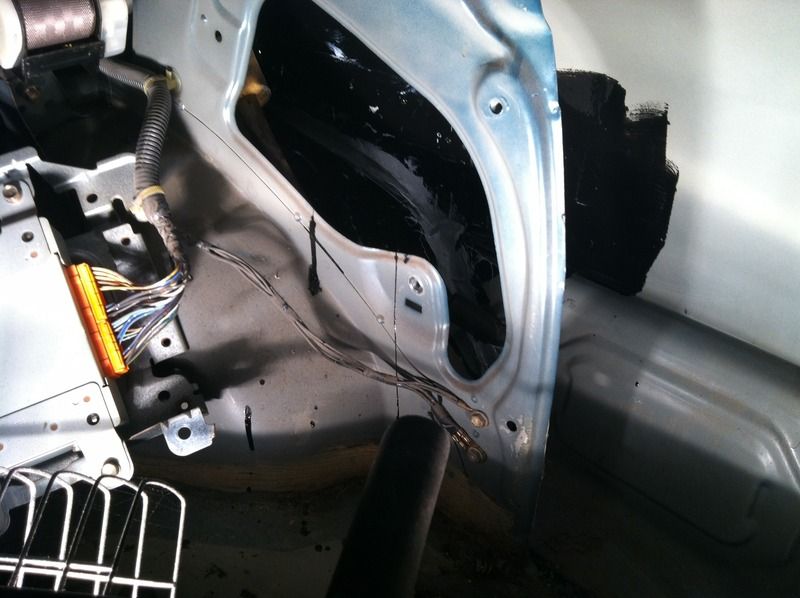
Not sure how i missed this. There were no electrical issues before i had my repinning episode. The whole thing started when i unbolted the ecu from its spot on the passenger floor so i could coat the floor with a rust proofer. Once i removed the computer, i saw the crappy wire work from the vafc install and as i moved the ecu out of the way a couple of the vafc wires came undone. So i thought i would attempt fix those, but when i started digging into the harness you could see a couple of the other wires were corroded and that was when the first one actually came free of the ecu plug. Thats what brought on the whole depinniing and repinning. It worked before i messed with it, but i'm not sure how much longer it would have held on. So it has to be something i did. I'm going to dig into it deeper this weekend hopefully, its hard finding a good "base line" to go from though.
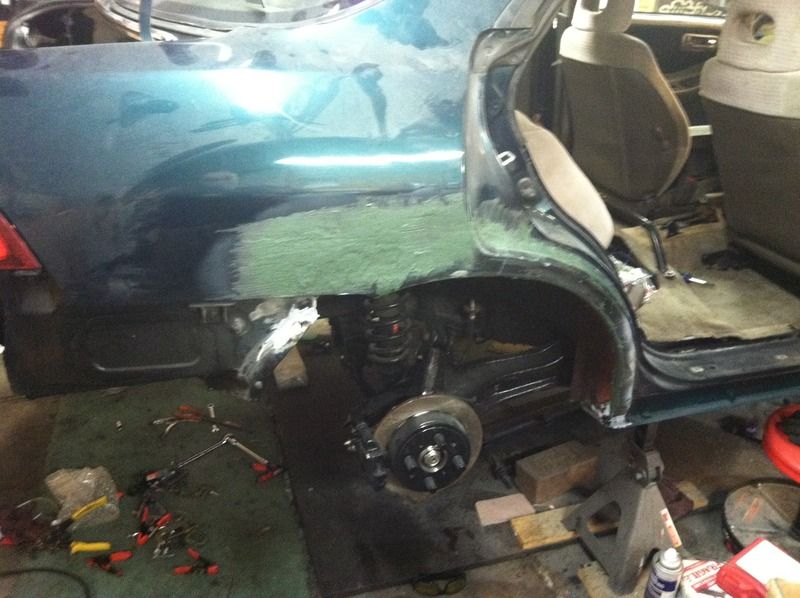
the electrics in this car is making me really lose steam at this point. i'm trying to get everything else done, but i'm really just procrastinating and putting off the difficult stuff lol. also annoying... i went to finish up the fuel tank install over the weekend only to find that i am missing some oem clips and such for the fuel connectors. so, placing another order to acura today. ugh..i feel like every week for the last month i have been placing $20 orders here and $15 orders there for oem stuff i didnt realize i needed. the last 2 times i went to install parts on the car and i was held up by not having some clip or bracket or something lol. oh well. i went over everything i need to put back on the car so i can combine stuff i know that i need into one order, hopefully. thats the plan at this point anyways. i also seam sealed the replacement arch and started the fiberglassing to smooth out the patch panel. this looks a lot thicker than what it is, but me and my DA sander will still have some work knocking this down before i move to standard body filler. this is short strand bondo-glass.
i looked at getting another harness, they are stupid expensive lol. i found a used one for $315. i think i'll retrace my steps before i drop money on another harness. i have an interesting video from working on the car last night to load up, it shows my electrical monsters for sure. i'll post it up here in a bit.
the trick is finding one around here. I've come across 3 integras in the only you-pull yard that i know of around here and they were either OBD1 or automatics. here is the video. I took a crappy video because i dont think just explaining what is happening would do it justice...
I would scrap the VAFC completely. Take out the old spliced wires are replace with new. Go a step further. Go get a wire harness at a you-pull, pick n pull etc and just take a big section of it and cut it out. The reason why is to get wires that all have matching wire colours identical to your cars harness. Splice those in to your current harness so in the future you don't have 10 black wires and can't tell where each wire goes. Wiring gremlins are easily solved. It just means reversing all steps and starting back at square one. Then if you want to use the VAFC again wire it in from square one so you know what you are doing correct or wrong.
One one of my old preludes I had to trade 3 splits in my firewall harness. It sucked but wasn't to difficult. I had to purchase a helms manual and follow step by step what it said to do for each split. From what you've described it is the vafc that is causing the issue. Start by removing it, replacing damaged wires and go from there.
all of the vafc splices are removed now, its plugged in now only via the boomslang harness. next time i get out to the you pull-it i'll see what they have, its usually slim pickings around here. i should have updated this thread like i did my other one. the car is doing the weird CEL thing with or without the vafc connected, so something is wrong with me ecu re-wiring.
You don't need an integra for the wires. Any Honda will do. Go to your car with a pen and note pad. Look at each wire that had a wire spliced into it and write the colour, line colour, etc and make a list of what you would need to clean up your current harness. Buy shrink wrap and solder. Go to the junk yard and start cutting up random harnesses looking for those wire colours. Install them neatly into your harness. Check all your pin out's to make sure your proper wire colours are going to the proper places. If the issue continues get a new ecu or crack open the current and check all the solder points to make sure none are damaged. Also, download a Helms manual for your year, model etc. Pull the codes you are getting and go to the wiring section and start following the instructions step by step on how to remove those codes. Trust me on this one, it takes some patience but it is really easy. Just a little time consuming.
I would scrap the VAFC completely. Take out the old spliced wires are replace with new. Go a step further. Go get a wire harness at a you-pull, pick n pull etc and just take a big section of it and cut it out. The reason why is to get wires that all have matching wire colours identical to your cars harness. Splice those in to your current harness so in the future you don't have 10 black wires and can't tell where each wire goes. Wiring gremlins are easily solved. It just means reversing all steps and starting back at square one. Then if you want to use the VAFC again wire it in from square one so you know what you are doing correct or wrong.
One one of my old preludes I had to trade 3 splits in my firewall harness. It sucked but wasn't to difficult. I had to purchase a helms manual and follow step by step what it said to do for each split. From what you've described it is the vafc that is causing the issue. Start by removing it, replacing damaged wires and go from there.
removing the vafc is one thing, removing old spliced wires is another. Thats why I stated to just replace the shock tower harness, it leads to the ecu.
I'm on board with the idea that it's a ground or power problem.
With the ECU plugged in and the key in the on position, carefully measure the voltage on the following pins and make sure it is consistent with whats in the manual pages below. This is so we know how the voltages are under load, if there is a large resistance in the supply or ground lines that should become apparent here.
Then turn the key to off, unplug the ECU, turn the key back to on, and measure the voltages again. This is to make sure that the supply/ground lines are all working independently, if you only measure with the ECU plugged in you might see voltage "bleeding" through the internal circuitry of the ECU depending on how it's built.
Now turn the key to off and disconnect the battery. Measure the resistance between the ground pins (don't worry about the power source pins here) and the chassis, it should be zero or a small fraction of an ohm.
Then inspect all the wires connected to these pins for any signs of damage.
On connector A, look at 9, 10, 11, 22, 23, 24.
On connector C, look at 10.
On connector D, look at 10, 11, 12.
Also do you know if the ECU itself might be bad? Do you have access to another one you could try? (I don't remember if you mentioned this or not already, if so, sorry to beat on a dead horse. :-) )
Dang that quarterpanel seems to be coming along quite nicely! When the time comes though, I'd stay away from the pink Bondo brand filler and go with something finer that won't have pinholes and will sand down better. There's a reason that the pros don't use Bondo, and I didn't learn it until too late.
Also, the Eastwood brand 2k epoxy primer in a spray can is a great finish to use if you aren't going to paint it immediately. It's impervious to moisture and pretty much anything else, and it doesn't react with any other paint once it's cured, unlike regular primer. You can spray it on top of body filler and bare metal and you don't risk having solvents from etching primer trapped in the filler this way. You just need to make sure to sand it with 600-800 grit before you spray anything else on top of it.
Last edited by MotorMouth93; 11-04-2016 at 08:58 AM.
unless something happened to the ecu since its been parked, i'm thinking the ecu is fine. once the quarter is ready for primer, i do plan on using the 2k primer and then hitting it with the same duplicolor paint that i used on the engine bay and from where i shaved the door panel moulding. its not a perfect match, but its close enough for now.
looks like the photobucket is down again. i got some diagnosing to do this weekend! i'll check the voltage first and if i have to, i will de-pin each connection one by one again, thorough clean the connection, double and triple check the wire placement, and re-pin each plug. it will take some time, but i think its my best option at this point.


 10-26-2016, 04:14 AM