
97-01 Prelude Cluster Installation.
 09-12-2007, 05:07 PM
#1
Member
Thread Starter
Join Date: Apr 2007
Location: Driving Slow, Through Your City
Posts: 1,260
Likes: 0
Received 0 Likes
on
0 Posts

Alright HT, this is what i'm working with. i've got this (the hardware) and 18 pages of step by step detailed instructions for each specific wire (the software). however, i found it hard to find detailed pics of this kind of job. so that is what i intend to bring to yall tonight..detailed pics of my installation/swap. i will be back and forth from my garage to the computer to post pics. so here goes nothin.
-oem
 09-12-2007, 05:56 PM
#3
Member
Thread Starter
Join Date: Apr 2007
Location: Driving Slow, Through Your City
Posts: 1,260
Likes: 0
Received 0 Likes
on
0 Posts

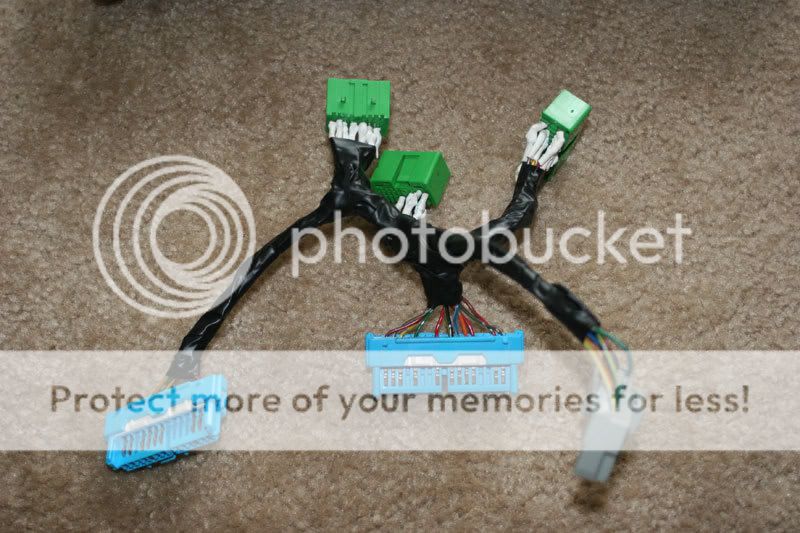
plugs inserted....

this is where i need help at now.

where do i cut the harness at?
Edit: yes i do plan on removing, just not now because it seems if i try to remove them i will end up breaking the needles so i will just cut them off with baby scissors.
09-12-2007, 07:53 PM
#4
Member
Thread Starter
Join Date: Apr 2007
Location: Driving Slow, Through Your City
Posts: 1,260
Likes: 0
Received 0 Likes
on
0 Posts
rolling along..

Didn't know what i needed so i hooked a variety of tools

cutting the wires loose from the monster harness

stripping the wires

fully stripped and naked

goodbye & ....

goodbye rice-er-riffic gauges
..now i'll start wiring
Didn't know what i needed so i hooked a variety of tools
cutting the wires loose from the monster harness
stripping the wires
fully stripped and naked
goodbye & ....
goodbye rice-er-riffic gauges
..now i'll start wiring
09-12-2007, 08:50 PM
#7
Honda-Tech Member
Join Date: Aug 2005
Location: Pompano Beach, FL, USA
Posts: 3,495
Likes: 0
Received 5 Likes
on
4 Posts
<TABLE WIDTH="90%" CELLSPACING=0 CELLPADDING=0 ALIGN=CENTER><TR><TD>Quote, originally posted by oem_certified_accord »</TD></TR><TR><TD CLASS="quote">i'm optimistic but i like challanges. "cd chassis, my anti-drug."  </TD></TR></TABLE>
Oh yeah... my anti-drug too!!!... but CD chassis can make you adicted to it!
</TD></TR></TABLE>Oh yeah... my anti-drug too!!!... but CD chassis can make you adicted to it!
Trending Topics
 09-12-2007, 09:59 PM
#9
Member
Thread Starter
Join Date: Apr 2007
Location: Driving Slow, Through Your City
Posts: 1,260
Likes: 0
Received 0 Likes
on
0 Posts

this is where i started to confuse myself, i didnt know whether to cut these off to work with them or not. but i did and later on down in the thread i'll see if i was right for doing this.


i used garbage ties to seperate the a,b, and c wires.

about this time i'm hoping what i'm doing is right, i don't feel like starting over. but i have no gauges if i mess up. so if needed, i will start over.

making sense of the match for match instructions...

time to check and double check
09-13-2007, 04:05 AM
#10
H-T Order of Merit
umm.... I sorta confused...
Why are you wiring the green plugs into the blue and gray plugs of the prelude cluster? Don't the green plugs plug into the Accord cluster? So shouldn't you be wiring the blue and gray plugs for the prelude cluster into the dash harness in the Accord? Maybe I'm missing something...
Why are you wiring the green plugs into the blue and gray plugs of the prelude cluster? Don't the green plugs plug into the Accord cluster? So shouldn't you be wiring the blue and gray plugs for the prelude cluster into the dash harness in the Accord? Maybe I'm missing something...
09-13-2007, 04:28 AM
#11
Honda-Tech Member
I'm with TA, you lost me on splicing the accord female connectors to the Prelude female connectors. The way you have it sitting now the two clusters plug together. Are you planning on cutting out the male pins from the back of Accord cluster and soldering them to the wires in your dash?
Easy way to do it now would be to disconnect the prelude connectors from the cluster. Splice the lude connector wires to the corresponding wires that are hanging in your Accord dash.
Modified by GhostAccord at 12:10 PM 9/13/2007
Easy way to do it now would be to disconnect the prelude connectors from the cluster. Splice the lude connector wires to the corresponding wires that are hanging in your Accord dash.
Modified by GhostAccord at 12:10 PM 9/13/2007
09-13-2007, 06:46 AM
#12

looks like when you are done, you will have successfully created a jumper harness to plug two clusters together 
now go ahead and connect teh predlue connectors to the pig tails hanging in the dash.
waht other's have done is remove the green connectors from the accord guage cluster itself, adn then solder the lude connectors to there, this way its a plug and play install.
now go ahead and connect teh predlue connectors to the pig tails hanging in the dash.
waht other's have done is remove the green connectors from the accord guage cluster itself, adn then solder the lude connectors to there, this way its a plug and play install.
09-13-2007, 07:01 AM
#13
whoa. you're doing that the hard way. I would have pulled the pins out of both of the plugs and then put the accord harness pins into the prelude plugs. oh well.
good luck with the project
good luck with the project
09-13-2007, 07:35 AM
#15
Member
Thread Starter
Join Date: Apr 2007
Location: Driving Slow, Through Your City
Posts: 1,260
Likes: 0
Received 0 Likes
on
0 Posts
i'm done, yes i did it the hard way.i was wired, i hit it as soon as i got home from work and by the time i finished my alarm clock was buzzing to wake me up to go to the shop. the instructions from hondasociety we're leading me off a deep end though.. i have to go back and disconnect abs, and find a way to make srs light go away.
i'm using butt connectors, maybe TA will rename this thread "DIY No No 97-01 Prelude Cluster Installation"
i'm using butt connectors, maybe TA will rename this thread "DIY No No 97-01 Prelude Cluster Installation"
 09-13-2007, 10:07 AM
#19
Honda-Tech Member
I wouldn't bother trying to get the female connector/male pins off the back of the Accord cluster.
If I were you I would cut the wire harness that you have created as close as you can to the green connectors. Then splice/solder the harness wires to the corresponding wires hanging in your accord. Shouldn't be that hard, you should have the corresponding colours on both sides now. Hard part is done now it's the repetitive connecting part.
If you try and do it with the male pins from the accord cluster your just making more splicing/soldering work for yourself.
Good luck
EDIT/
I know how you feel.....I had to redo a nest of wire for my project as well. Frustrating as He!! and I'm still not 100% that it's going to work.
From this;

to this;

If I were you I would cut the wire harness that you have created as close as you can to the green connectors. Then splice/solder the harness wires to the corresponding wires hanging in your accord. Shouldn't be that hard, you should have the corresponding colours on both sides now. Hard part is done now it's the repetitive connecting part.
If you try and do it with the male pins from the accord cluster your just making more splicing/soldering work for yourself.
Good luck
EDIT/
I know how you feel.....I had to redo a nest of wire for my project as well. Frustrating as He!! and I'm still not 100% that it's going to work.
From this;
to this;
Last edited by GhostAccord; 02-03-2012 at 07:07 AM.
09-13-2007, 10:08 AM
#20
Honda-Tech Member
<TABLE WIDTH="90%" CELLSPACING=0 CELLPADDING=0 ALIGN=CENTER><TR><TD>Quote, originally posted by Eddiebx »</TD></TR><TR><TD CLASS="quote">looks like when you are done, you will have successfully created a jumper harness to plug two clusters together </TD></TR></TABLE>
LOL... I feel sorry for you oem.. since you took the time to post this up as you go for the benefit of others, but then I just look at that last picture and say "wtf??."
</TD></TR></TABLE>LOL... I feel sorry for you oem.. since you took the time to post this up as you go for the benefit of others, but then I just look at that last picture and say "wtf??."
09-13-2007, 10:15 AM
#21
Member
Thread Starter
Join Date: Apr 2007
Location: Driving Slow, Through Your City
Posts: 1,260
Likes: 0
Received 0 Likes
on
0 Posts
<TABLE WIDTH="90%" CELLSPACING=0 CELLPADDING=0 ALIGN=CENTER><TR><TD>Quote, originally posted by AFAccord »</TD></TR><TR><TD CLASS="quote">
LOL... I feel sorry for you oem.. since you took the time to post this up as you go for the benefit of others, but then I just look at that last picture and say "wtf??." </TD></TR></TABLE>
lol that pic aint mine brah-man, thats from hondasociety...i was using it to my advantage
LOL... I feel sorry for you oem.. since you took the time to post this up as you go for the benefit of others, but then I just look at that last picture and say "wtf??."
</TD></TR></TABLE>lol that pic aint mine brah-man, thats from hondasociety...i was using it to my advantage
09-13-2007, 10:23 AM
#22
Honda-Tech Member
OK well if that pic isn't yours then just undo the green connectors from your prelude harness. Splice the blue connectors right to the wires hanging in your accord.
09-13-2007, 02:32 PM
#24
Member
Thread Starter
Join Date: Apr 2007
Location: Driving Slow, Through Your City
Posts: 1,260
Likes: 0
Received 0 Likes
on
0 Posts
rewired, but this time have no illumination, right or left turning signals or hazard lights. -sighs- 
guidance desired if any, i've been using the mistertwister420 guide:
"Well, I got bored last night and sat down to finalize the actual chart I made when I did my swap. First, you must know what a "pin location" is on your cluster harnesses. The Accord has three harness plugs that go into it's cluster......harness A, B, and C. Now, if you look at harness plug A with the clip facing up and the wires facing you.....the wire slot at the upper left of the plug is location A1. the next slot to the right would be A2.......and so forth. When you go to the next row down, the order still goes left to right with the numbers. I'm sure you guys already know all this, but there are still some noobs out there and I'm trying to avoid a billion questions. Plus I labeled each wire with it's pin location and function both from the Accord wires to the Prelude cluster. You can thank me later, lol.
Here it is, fellas:
Accord .......................Function .......................Prelude
A1 BLU/RED...........................NOT USED
A2 ORN/WHT.........................HIGH BEAM (DIMMER)..............B2 ORN/WHT
A3 RED/YEL...........................HIGH BEAM............................B1 RED/YEL
A4 LT GRN/RED......................CEL...................... ................B16 GRY/RED
A5 YEL.................................POWER......... ........................SEE NOTE
A7 GRN/BLU...........................LT TURN SIGN........................A6 GRN/BLU
A8 GRN/RED...........................BRAKE............... ...................A5 GRN/ RED
A9 BLK..................................GROUND....... ........................SEE NOTE
A10 RED/BLU..........................SEAT BELT............................A13 RED/BLU
A11 GRN/YEL..........................RT TURN SIGN.......................A7 GRN/YEL
A12 BLU.................................SRS........... .........................C5 BLU
B1 BLK/WHT...........................DOME LIGHT..........................SEE NOTE
B2 GRN/WHT...........................DOOR................ ...................SEE NOTE
B3 GRN/RED.............................DOOR.............. .....................SEE NOTE
B4 ORN...................................TRUNK IND............................B12 ORN
B5 GRN/ORN.............................DOOR.............. .....................SEE NOTE
B6 YEL....................................POWER...... ...........................SEE NOTE
B7 RED....................................BRIGHTNESS. .........................B10 RED
B8 RED/BLK..............................ILLUMINATION..... ...................B11 RED/BLK
B9 YEL/GRN.............................TEMP. GAUGE.........................C10 YEL/GRN
B10 BLK..................................GROUND....... ..........................SEE NOTE
B12 BLU..................................TACH......... ............................B5 BLU
B13 WHT/GRN...........................NOT USED
B14 GRN/YEL.............................DOOR.............. ......................SEE NOTE
B18 YEL...................................POWER....... ............................SEE NOTE
B19 YEL/RED.............................OIL LIGHT..............................C7 YEL/RED
B20 WHT/BLU............................CHARGING SYS......................C1 WHT/BLU
B21 BLU/WHT............................NOT USED
B22 BLK/YEL.............................CHARGING SYS.......................B9 BLK/YEL
C1 YEL/BLU...............................FUEL GAUGE.........................A12 YEL/BLU
C2 LT GRN/RED.......................LOW FUEL LIGHT.................C11 LT GRN/RED
C9 BLU/WHT.............................ABS............... ......................C6 BLU/WHT
C11 BLU/BLK.............................CRUISE............ ....................A11 BLU/BLK
C12 ORN...................................SPEEDOMETER. .....................B3 BLU/WHT
WOW....I'm glad I finally got that done, lol. Anyways, you might notice some of the match-ups have "SEE NOTE" after them. First, with the YEL wires....there are three YEL wires on the Accord side and three YEL wires on the Prelude side, just splice all YEL wires together. Same goes for all the BLK wires.........YEL is POWER and BLK is GROUND. Now this next part might be a little confusing to some, so pay close attention.
Accord........................Function............ ...........Prelude
B1 BLK/WHT.....................DOME LIGHT
B2 GRN/WHT
B3 GRN/RED
B5 GRN/ORN
B14 GRN/YEL...........ALL FOR DOOR INDICATORS................B15 GRN/ORN
Since there is only one DOOR AJAR light on the Prelude cluster and not individual door indicators like the Accord......I took all the individual door wires and the dome light wire and spliced them together into the two door wires from the Prelude side. Now when you open any of the doors, the DOOR AJAR light will come on....along with all the door/dome lights. I hope that makes sense.
Now some side notes:
1. Please notice that some of the harnesses have the same colored wires, so don't get them mixed up and pay attention to the pin locations.
2. Not all the wires are going to be used...don't panic.
3. This write-up is for a MANUAL trans SEDAN......if you need one for an AUTO trans......hit me up and I'll work on it.
THAT'S IT!! THANK ME WITH SOME POSTED PICS OF YOUR SWAPS. LATER GUYS AND LADIES."
09-13-2007, 05:21 PM
#25
not sure what part u are up to now, but at this point since u cut off the stock plugs, i would jsut wire the lude plugs straight to the cut wires on ur dash harness, easiest and cleanest way to do it now.