
[FAQ] 96-00 Auto to Manual Swap in full detail!! (44pics)
 08-11-2005, 11:29 PM
#1
Honda-Tech Member
Thread Starter
**********READ BEFORE YOU READ THE THREAD!!!! IF YOU HAVE A QUESTION FOR ME DIRECTLY PLEASE PM ME. IF YOU ARE GOING TO PM ME MAKE SURE YOUR INBOX TAKES MESSAGES BACK, I WILL ONLY TRY ONE TIME IF ITS FULL I WILL NOT RESPOND!!*********
Update: Clutch line route Thanks to CRX378
Recently i have been seeing alot of Auto to Manual swap related questions. And lately i have been having alot of people come to me with questions. And this last weekend i did this swap for someone from Las Vegas (SRCivic97 on here). This is in full detail and if you want me to go into more detail let me know and ill be more then happy to answer. I have 146 pics that i took but i had to cut them down to 44 so i could fit them on one thread. But if you want me to post a specific pic let me know. And now, lets begin.
First off the parts list. I could give an rats *** what you heard this is the parts that are needed and what were used and what was not used.
We had:
Car: 1997 Honda Civic EX (Auto)
Tranny: Y8 tranny. Actually you could use any D series Hydro tranny on your D series motor (B series is different obviously but use a Hydro B series tranny)
Clutch Flywheel: Resurfaced stock Flywheel from a 93 DX (was to lazy to send his flywheel off and we had one already resurfaced laying around, totally cool with owner.) But any 92-00 flywheel will work. Clutch we used an Autozone with resurfaced Pressure plate. With an used throw out bearing (just put some oil on it first)
Flywheel/Clutch bolts: Damn im kicking myself for not taking a pic of these. Anyway you need manual flywheel bolts along with clutch bolts. Part #: Flywheel: 90011-PM0-000 Clutch/PP: 90034-P10-A01
Mounts: This is alot of hear say for what to use. This is what you need and why. First off you need an upper tranny BRACKET (not mount) from a 96-00 manual tranny because the auto one doesnt even fit on the tranny, go figure (Part #: 50825-S04-000
Next youll need the lower tranny mount off of a manual 96-00 car. Also you will need 3 bolts to go into the tranny as well as 2 that go into the chassis (Part #s: Tranny bolts: 90190-SR3-000 Chassis: 90166-SR3-000
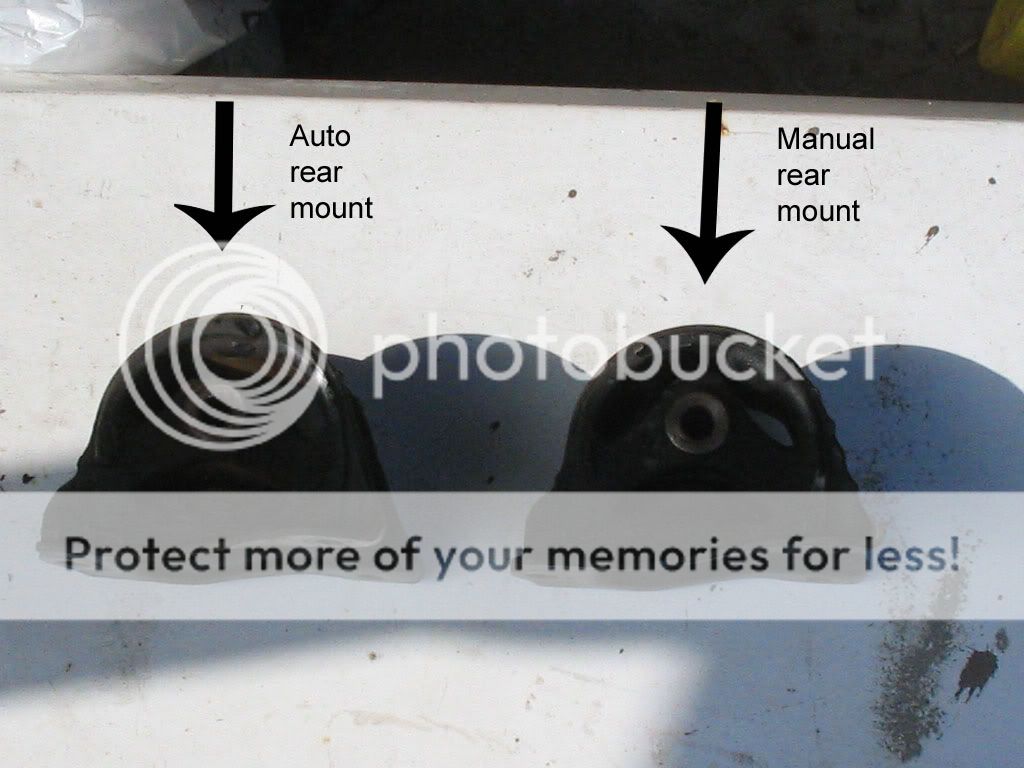
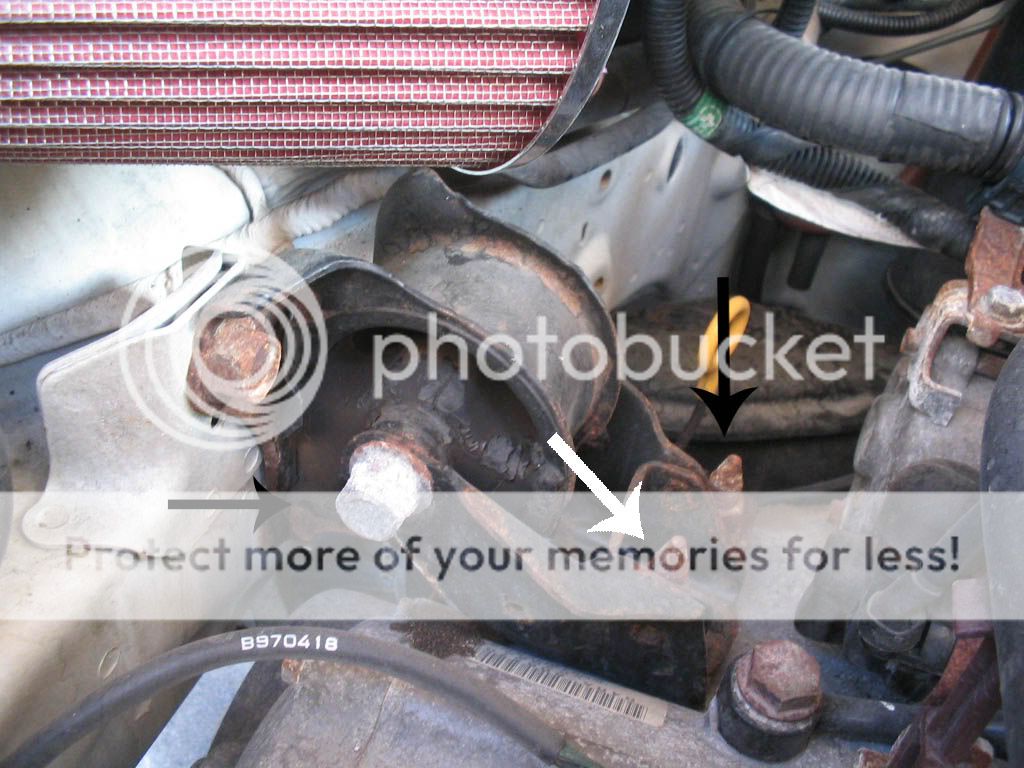
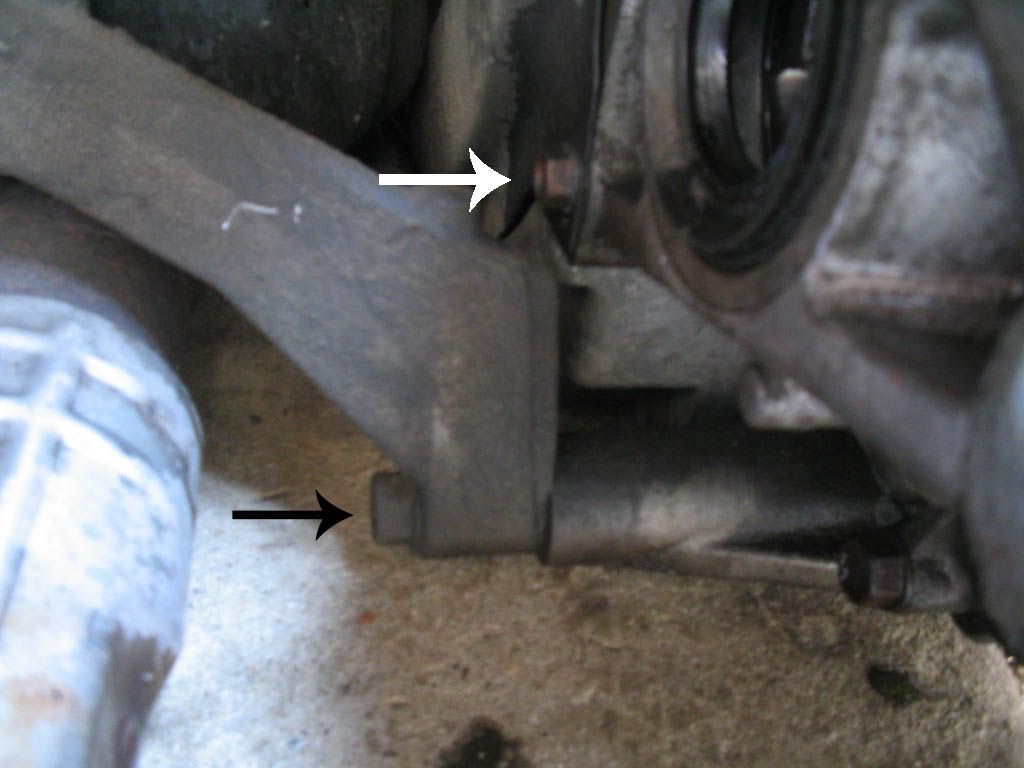
And finally a REAR TRANNY MOUNT Because the auto and manual are totally different. Here is a pic to tell the different. If you use an auto one it wont sit right, although you can use the AUTO bracket on the manual tranny. Part#: 50810-SR3-030
http://www.gamester.net/wudini...y.jpg
Pedal Assembly: We used a manual pedal (gas to clutch) from a 96-00 manual. But actually all you really need is the clutch one. You could actually keep your auto pedals and just add a clutch one and your set. That way you dont have to worry about pulling the pedals out, which by the way is the hardest part of the swap. You are going to need to get a pin to hold the clutch to the peddle. Part #: 46912-SD4-000
Intake Manifold and Throttle body: You need a y8 manual intake and for throttle body we used an LS throttle body. You could use any manual throttle body, i suggest y8 so you dont have to play with the map. Make sure you get a 2 wire IACV with the intake because if you dont have that you will throw a code and run like ***. We also got a new intake manifold (Y8, use that even if your using a y7 head Part #: 17105-P2F-A02
ECU: Unless your doing something else that involves boost or different setup other then stock you will use a manual y8 ecu (P2P) You could also get a jumper and get a chipped ECU. Most chipped ECU's (if not all) use 2 wire IACV so youll be fine.
Shift Linkage: You need a Dseries manual shift Linkage from 92-00
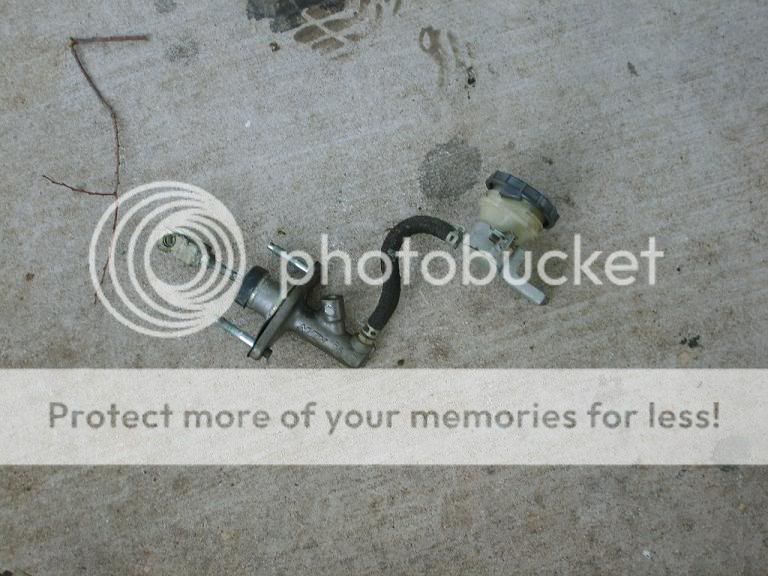
Clutch Master/Slave Cylinder: Here you absolutly need one from a 96-00 Because the lines are completely different. Now you could probably use these from a 92-95 and just get a SS line and run it straight from the MC to the SC. But if you want the stock look with the hard lines and soft you need 96-00.
VSS: Incase if your tranny doesnt come with one you need a manual one because the auto will not work.
Starter: You need a manual starter along with this one bolt because its longer. Part#: 95701-10100-08
Axles: Use the Auto Axles.
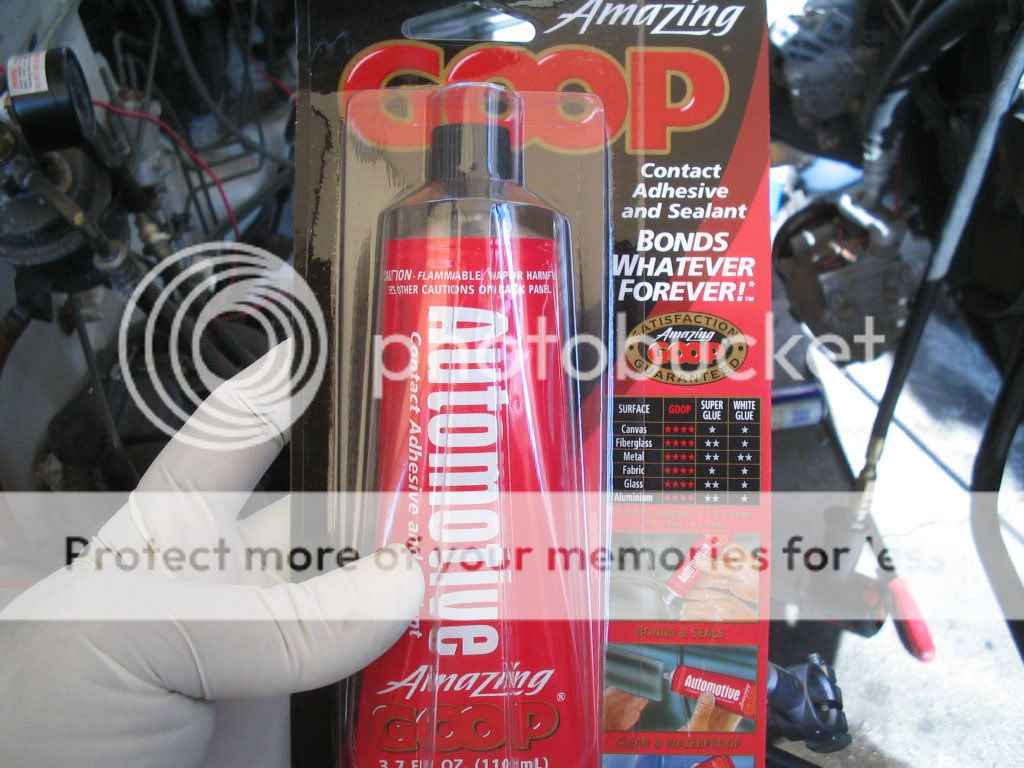
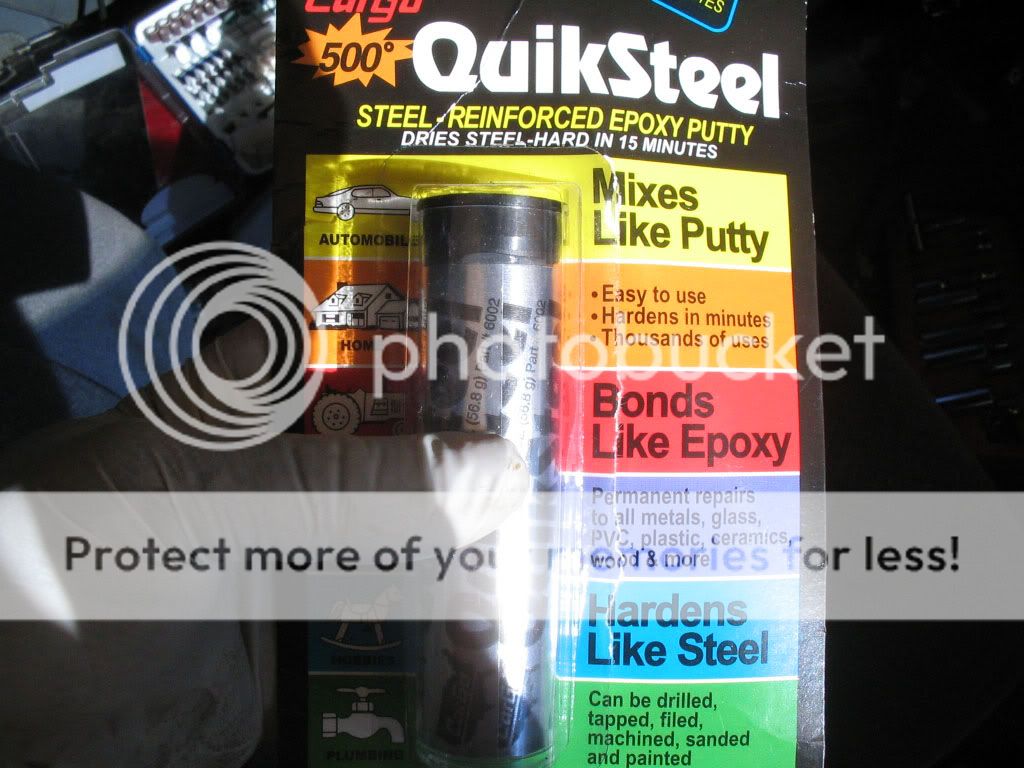
Tools: Basic socket set (Craftsman 256 piece set is great ), a hoist (its ALOT Easier with the motor out), Air if you can (oh man what i wouldnt do without air tools), Prybars (atleast 3 ft to seperate the tranny and motor), Needle Nose plyers, WD-40/PB Blaster, Goop, Quick Steel, and a Dremel. Thats the majority that we used.
Ok Lets begin
<FONT SIZE="3">Pedals!</FONT>
We got the car kind of late friday night (10/10:30pm, or atleast thats about the time we started) and first thing we did was the interior and pedals. I highly recommend getting this out of the way because the rest is a breeze. So sorry for the pics.
I had the lovely job of taking off the pedals and putting new ones in. Sucks *** i tell you right now. First you want to take off the lower cover of the steering wheel which is held on by 3 or 4 screws. Along with the steering column cover as well which is held on by 2 screws (sorry no pics for this). After that your going to want to drop the steering column. To do that theres 4 bolts (12mm) that you need to take off to do so. I highly suggest having someone help you so it doesnt scare you when it falls. Sorry forgot to take pic, to find these screws look under the steering column and follow until you see a bracket holding it up, take off the 2 screws and itll drop. Once this is dropped its time to strip the pedals.
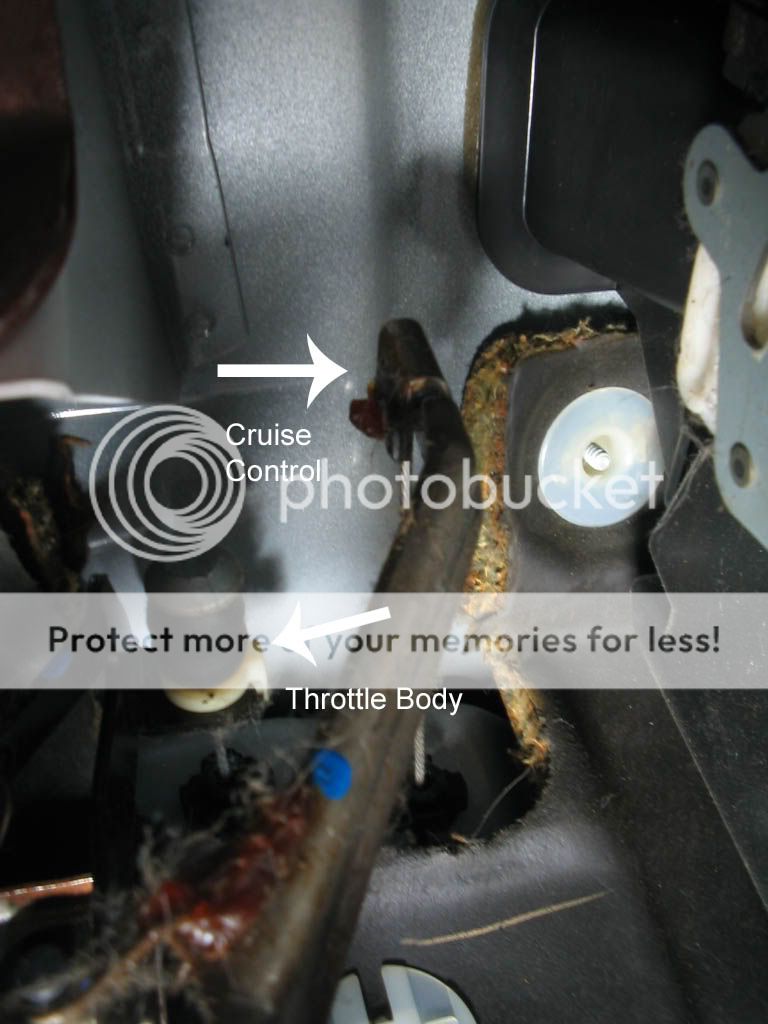
First lets start off with the Gas pedal and whats attached. In this case we have a throttle cable and Cruise Control Cable.
http://www.gamester.net/wudini...y.jpg
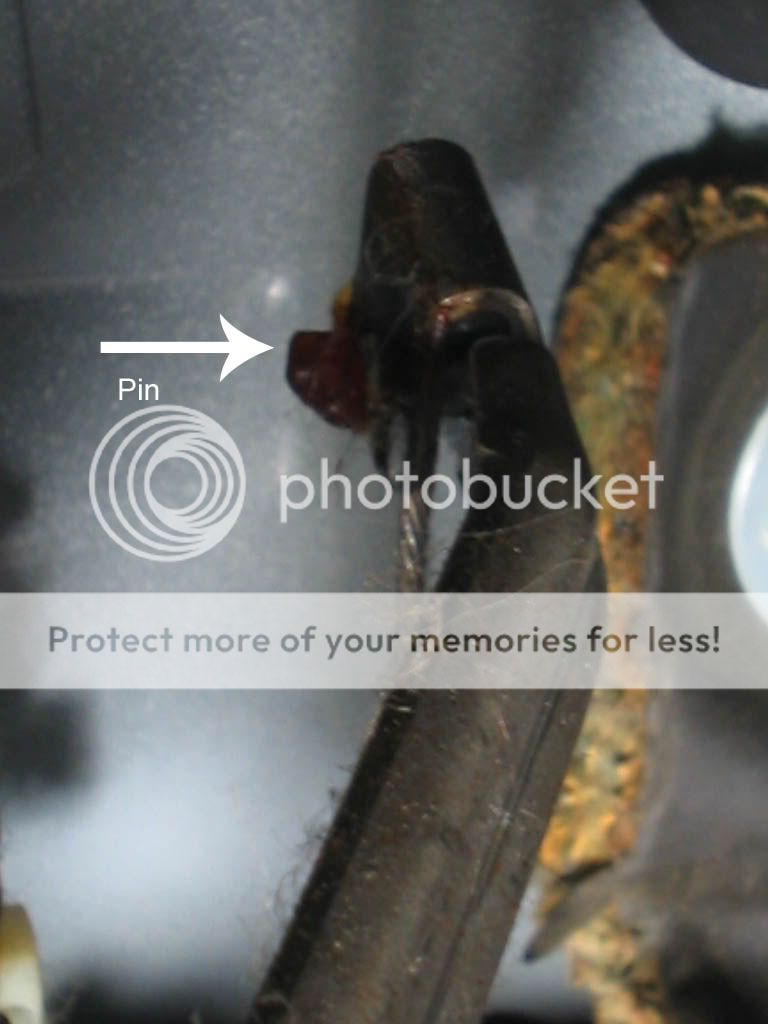
Well take off the cruise control because its pretty damn easy. Just flip the cable over and push out the pin.
http://www.gamester.net/wudini...y.jpg
 http://img.photobucket.com/albums/v38/Luserkid/IMG_3382.jpg
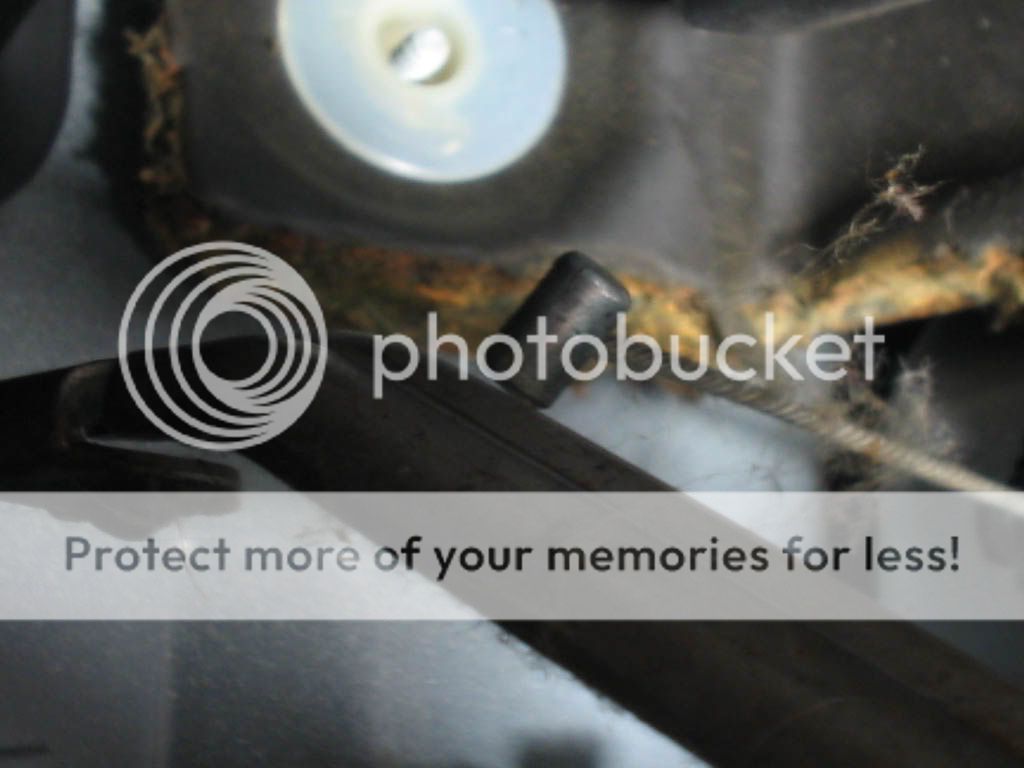
Now for the throttle your going to have to pull towards you then push it out. Theres a small holder for it once you get past the tab its good to go out. (It helps if you have someone holding the throttle body open for you)
http://www.gamester.net/wudini...y.jpg
http://www.gamester.net/wudini...y.jpg
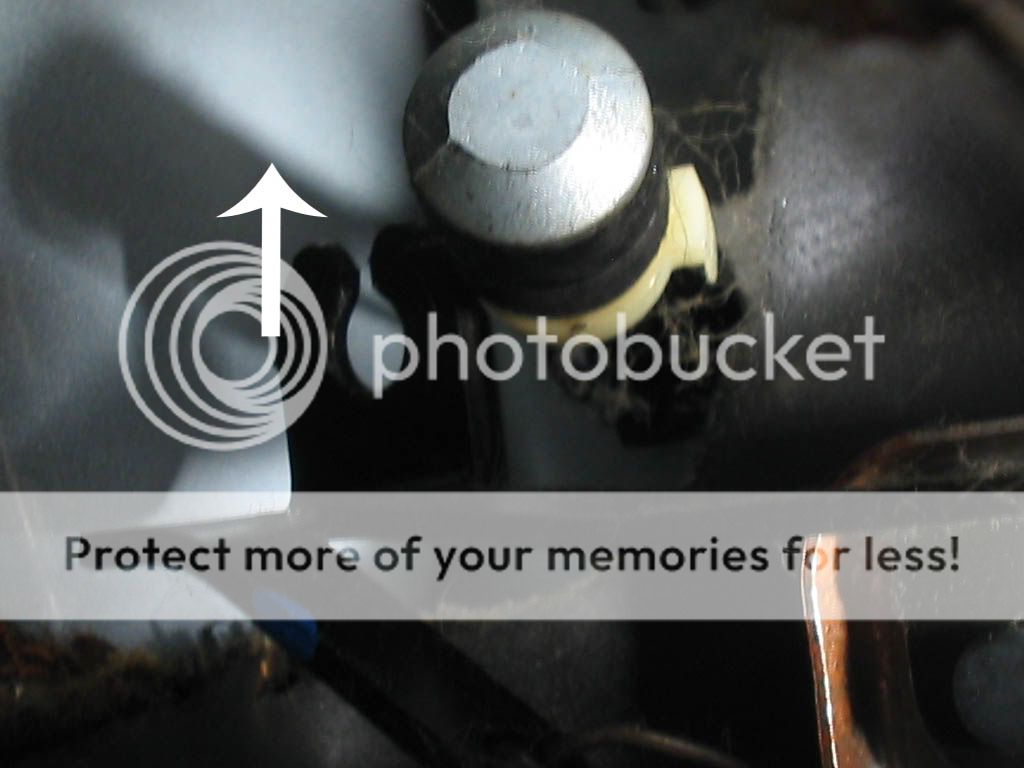
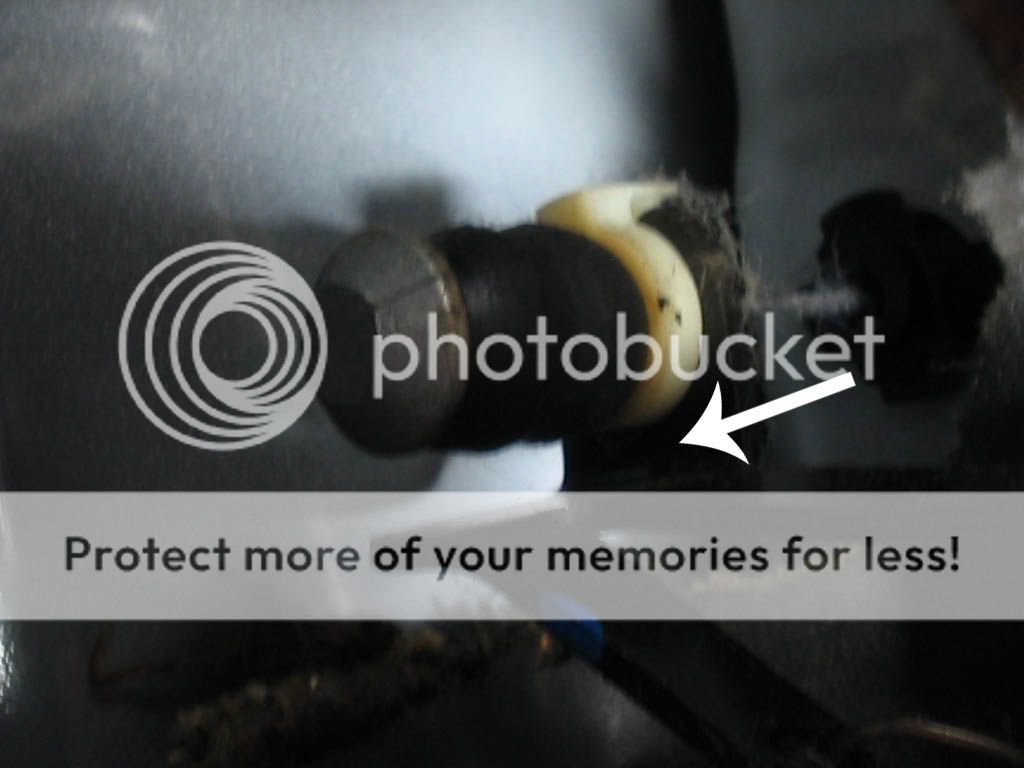
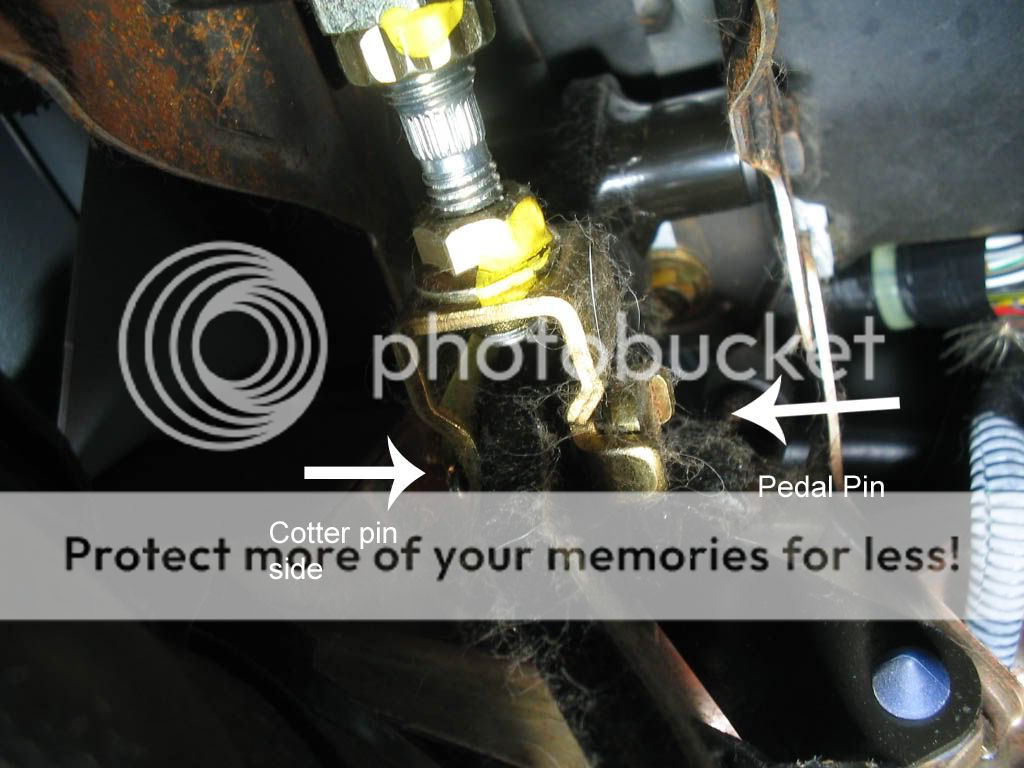
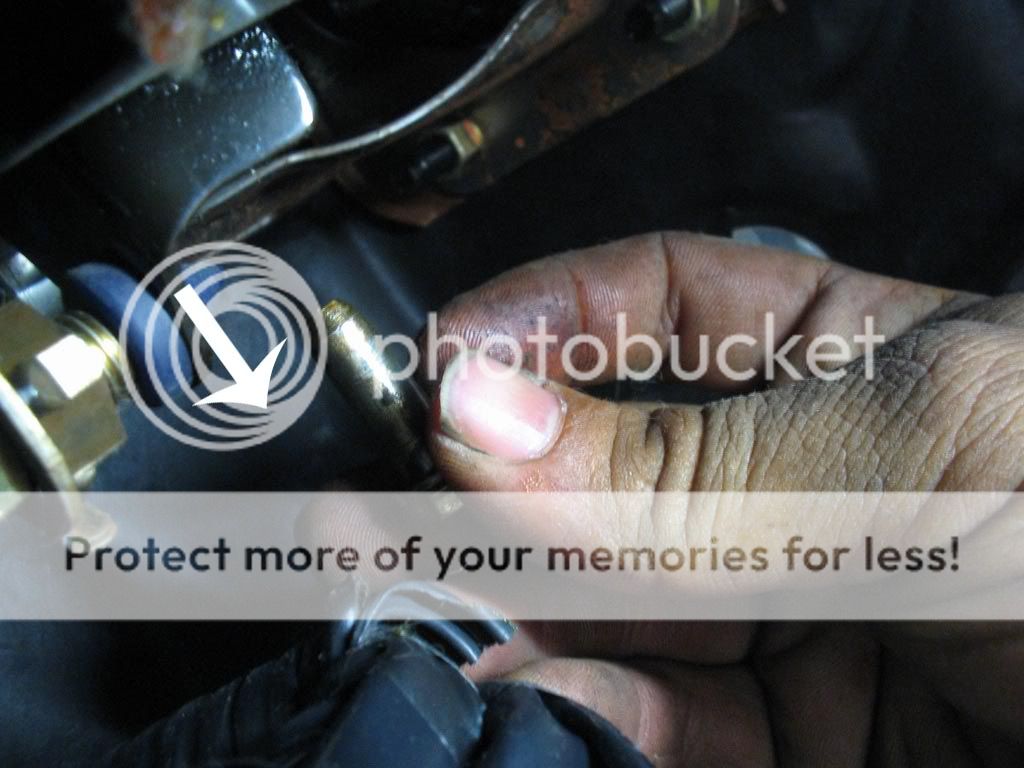
Lets move over to the brake pedal. Now the brakes are like the gas. This takes a little bit of cursing to get out because your dealing with a cotter pin. Not a problem except for the fact that your kind of blind while your doing it. Pop off the cotter pin then pull out the connecting pin for the Master Cylinder to the pedal.
 http://img.photobucket.com/albums/v38/Luserkid/IMG_3372.jpg
http://www.gamester.net/wudini...y.jpg
 http://img.photobucket.com/albums/v38/Luserkid/IMG_3390copy.jpg
 http://img.photobucket.com/albums/v38/Luserkid/IMG_3393copy.jpg
 http://img.photobucket.com/albums/v38/Luserkid/IMG_3396.jpg
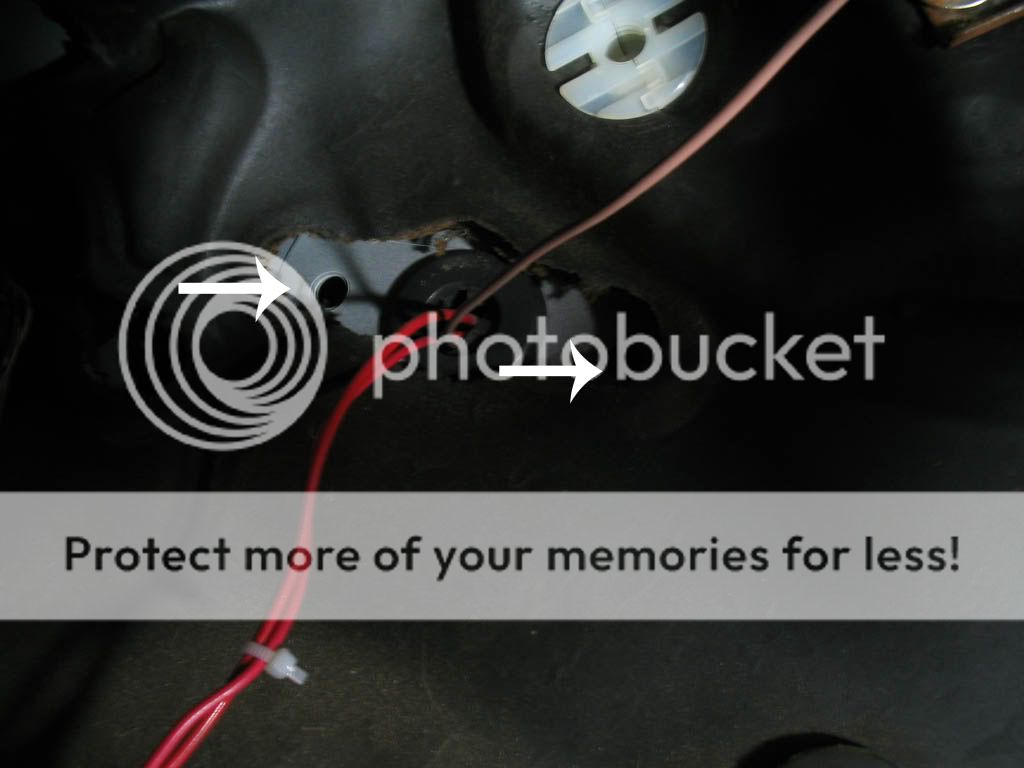
Now lets move over to where the clutch pedal should be. You should see a big hole with a small hole on each side. Theyll all be plugged. In this case the owner of the car ran wires through his which i had to redo for him. But when you pop those out your ready to put the clutch master through there and put the clutch pedal in. It wont get in the way of the brake and gas while your taking them out and putting them in because you send them the other way.
http://www.gamester.net/wudini...y.jpg
(no pics of the assembly in, but when you have it in theres 2 bolts that attach to the Clutch Cylinder and 1 up in the top.) Now get your pin and cotter pin and put them in and connect them, but dont twist the cotter pin. You dont know if youll need to adjust the clutch pedal yet so incase if you do then its easy to take off.
Now for the brake and gas to take off. For the brake there is 4 bolts that hold on to the master cylinder and 1 up top (kind of like the clutch). When you get those out move over to the gas which is held by 2 bolts (no pics). All the bolts are 12mm. There is also a brake sensor attacted. I suggest taking that off now. The problem with this is that the push is on the top side. What you could do is get a 12mm wrench and twist it so the push is in easy access.
 http://img.photobucket.com/albums/v38/Luserkid/IMG_3395copy.jpg
 http://img.photobucket.com/albums/v38/Luserkid/IMG_3375copy.jpg
 http://img.photobucket.com/albums/v38/Luserkid/IMG_3376copy.jpg
Once you get it all stripped off and ready to be pulled have a friend under the hood pulling the master cylinder so you could get the pedals off easier. If your like normal people this is where youll curse alot. Dont worry about it take your time and just tell your friend to pull and pull because more then likely they dont have enough room to bend the lines. Dont rush this cause youll end up with cuts from stupid ****. And put the new in reverse order.
<FONT SIZE="3">Center Console</FONT>
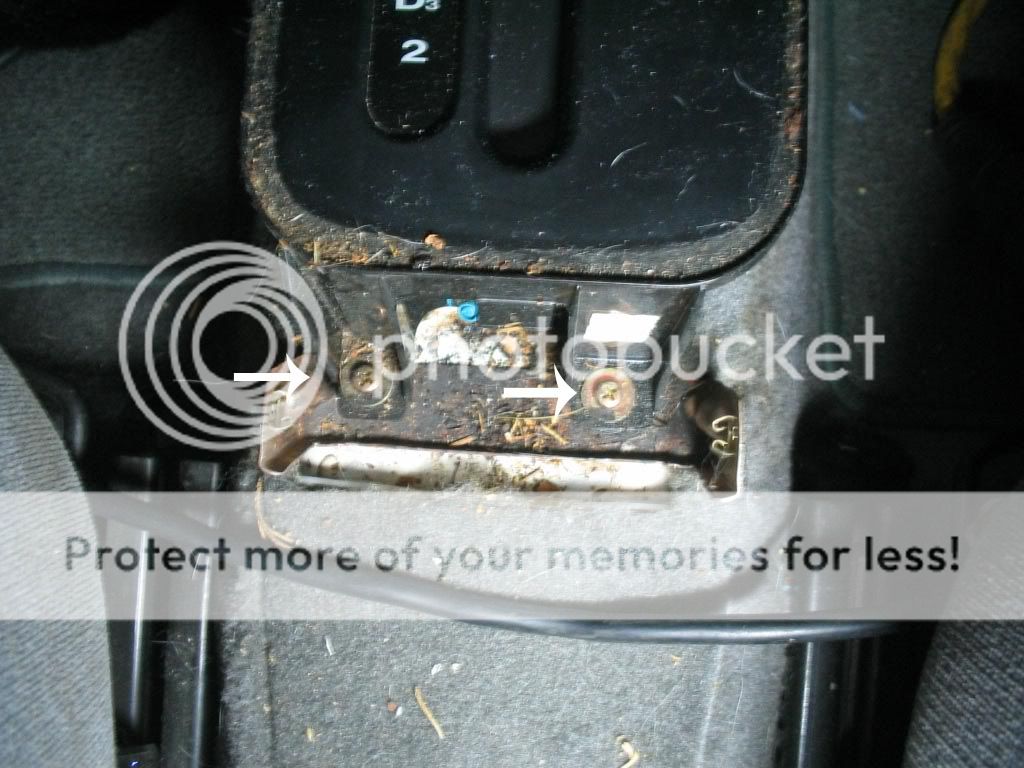
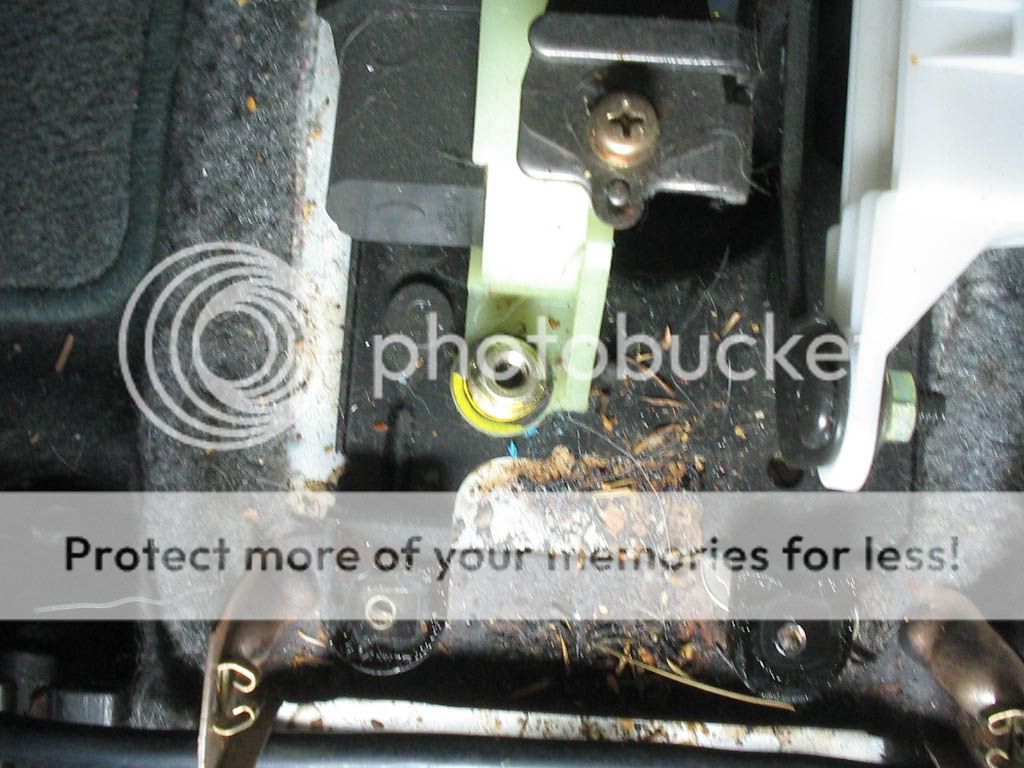
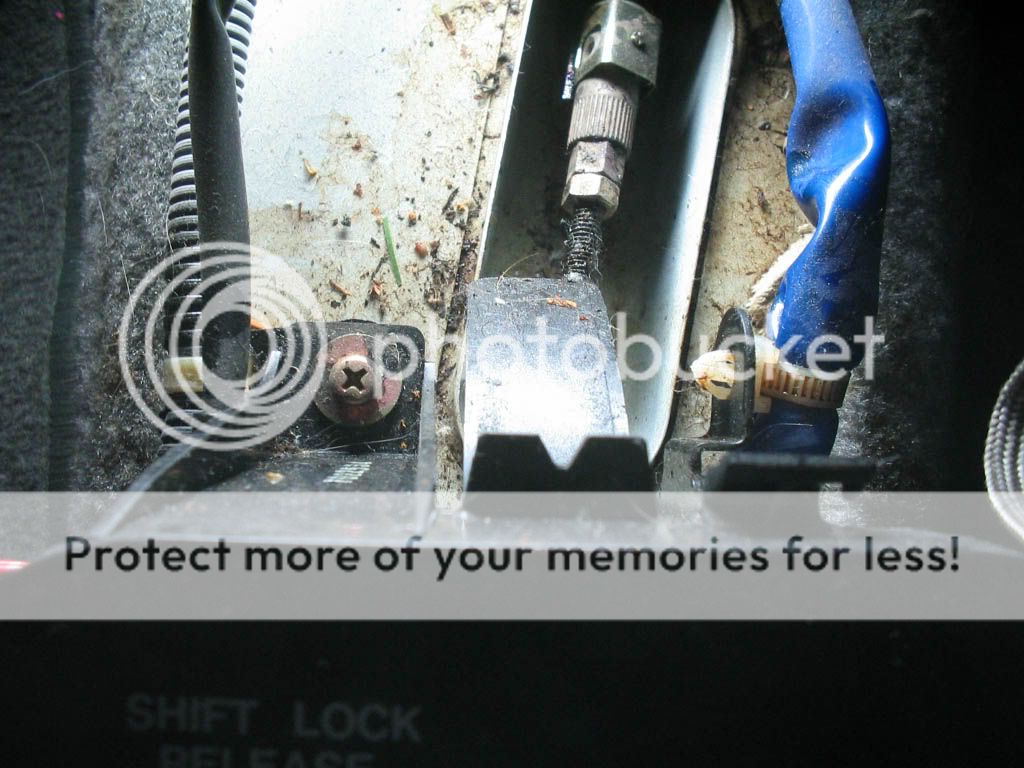
I didnt do the center console, SOHC4Life did it, so any questions about this you could ask him. Honestly when i looked at the pics i didnt understand what the hell i was looking at. But my guess is take off every screw/bolt you see there is a time you have to go under the car to take out 4 nuts so the auto shifter comes out. I know that because i did it. Disconnect all the plugs and have some one under the car and send the shifter wires to them
 http://img.photobucket.com/albums/v38/Luserkid/IMG_3394copy.jpg
 http://img.photobucket.com/albums/v38/Luserkid/IMG_3399copy.jpg
 http://img.photobucket.com/albums/v38/Luserkid/IMG_3404.jpg
 http://img.photobucket.com/albums/v38/Luserkid/IMG_3403.jpg
 http://img.photobucket.com/albums/v38/Luserkid/IMG_3400.jpg
When all that is done you could move out to the motor.
<FONT SIZE="3">Motor!</FONT>
Most of the regular guys already know how to pull a motor out but for you non knowers todays your lucky day. Here is a quick rundown on how to pull a motor.
First drain all the oil and the coolant. While the coolant and oil is being drained pull the battery and start disconnecting the major connectors on the shock towers and disconnect the starter. I mark and take off the dist because its in the way of the hoist but its not a must. Also there are some coolant lines attached to the transmission. You could take those off with a 17mm socket.
Once everything is drained you could pull the radiator. Becareful because the coolant will still spill a litte. Take off all the heater hoses, fuel hoses, throttle cable, and cruise control vacuum line (if there is one).
Next take off the power steering and AC compressor. Those dont need to be connected. On the PS its 2 12mm bolts holding it on, when thats taken off move it to the side and out of the way. For the AC theres 4 bolts holding it to the mount. Take off those 4 bolts and just let it hang there. Dont worry about it because it wont be in the way and those lines are ment to move.
Now that thats done take off the wheels and start taking off the suspension. You will need a 17mm socket, needle nose, 17mm wrench, and a 1/2 ratchet. Take off the suspension fork with the 17 socket and wrench. When thats off take the needle nose and take off the cotter pin thats under the LCA and then take off the castle nut. Now with that 1/2 inch wrench lift the hub and make room to put the ratchet in there. When its nice a snug kick down on top of the rotor and that ball joint should pop right out. When thats done get the prybar and pull the axle out.
Now move over to the header and disconnect it from the exhaust. While your doing this your buddy should be setting up the hoist. When the hoist is safe take off the 2 19mm bolts from the rear tranny mount, and then get out of there. Go up top and take off the other 19mm bolt and the rear mount is set.
Go to the driver side and on the AC bracket is a mount. Take off the 19mm nut at the end then put a 17mm deep socket and take off the shaft.
Take off the rest of the mounts and the motor should pull out with ease. If for some reason it doesnt thats because your attached to something hold the hoist where its at and disconnect what your stuck on. Sorry not to many pics for pulling the motor.
 http://img.photobucket.com/albums/v38/Luserkid/IMG_3432copy.jpg
 http://img.photobucket.com/albums/v38/Luserkid/IMG_3444copy.jpg
 http://img.photobucket.com/albums/v38/Luserkid/IMG_3435copy.jpg
<FONT SIZE="3">Transmission removal</FONT>
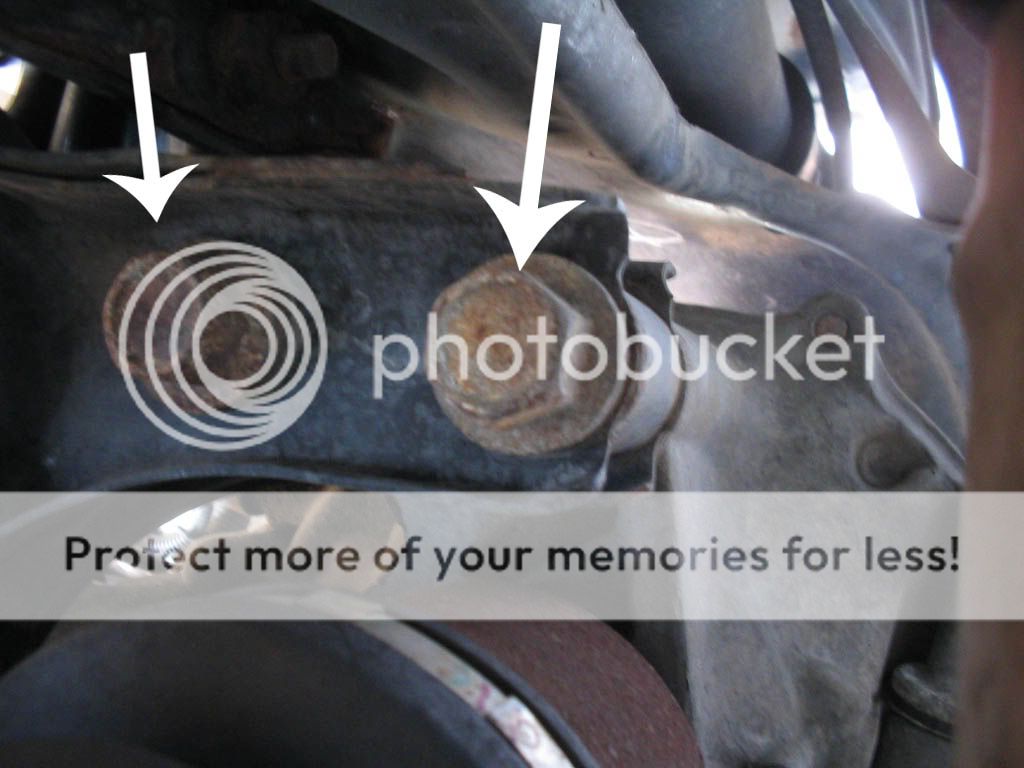
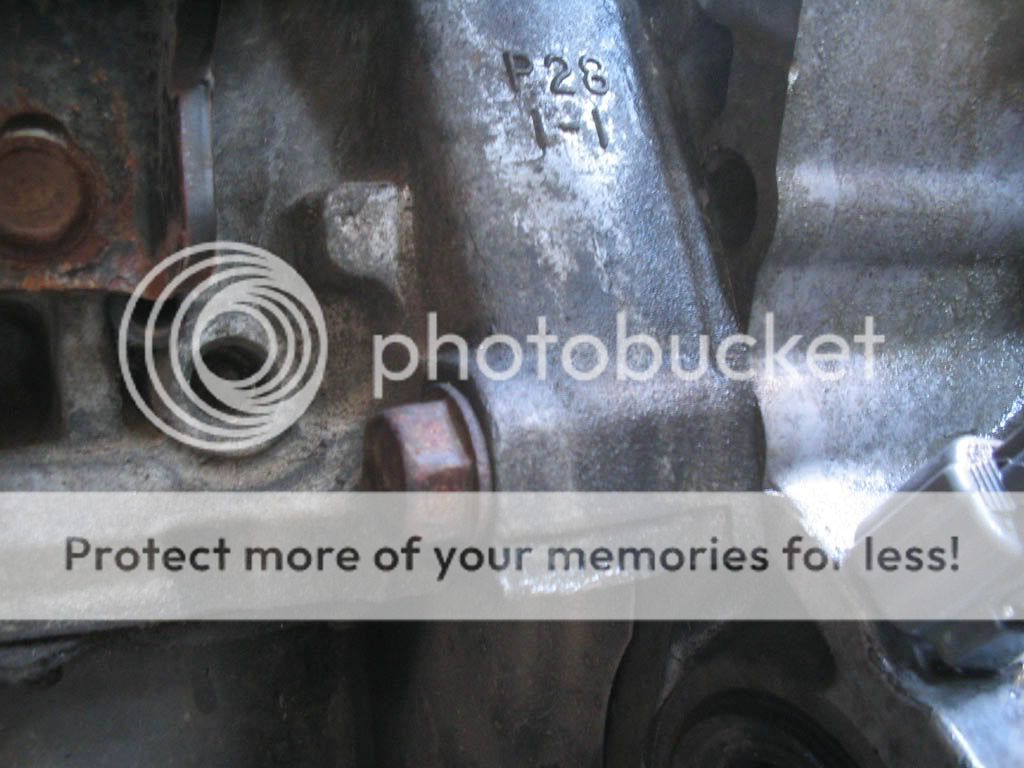
Now that the motor is out its time to take off the tranny. First however you want to take off the starter. 2 14mm bolts. and you want to disconnect all the wires and sensors attached to the transmission. Honestly you could cut them all except for the VSS if you wanted. Now that the transmission is stripped and ready to go you have about 6 17mm bolts, 2 14mm, and 2 10mm bolts holding the tranny to the block. The 17mms are the big obvious ones (2 up top, 2 on the front (one on each side), 2 on the back). The 2 12mms are next to the oil pan on the stabalizer. And the 2 10s are on the dust cover. When those are off take your prybar and pry the tranny off the block. WARNING! Note that the Torque Converter holds ALOT of tranny fluid in there so be ready. Once that tranny come off tranny fluid will spill. I suggest getting a bucket ready and drain it before you deside to go on.
 http://img.photobucket.com/albums/v38/Luserkid/IMG_3454.jpg
 http://img.photobucket.com/albums/v38/Luserkid/IMG_3455copy.jpg
 http://img.photobucket.com/albums/v38/Luserkid/IMG_3458.jpg
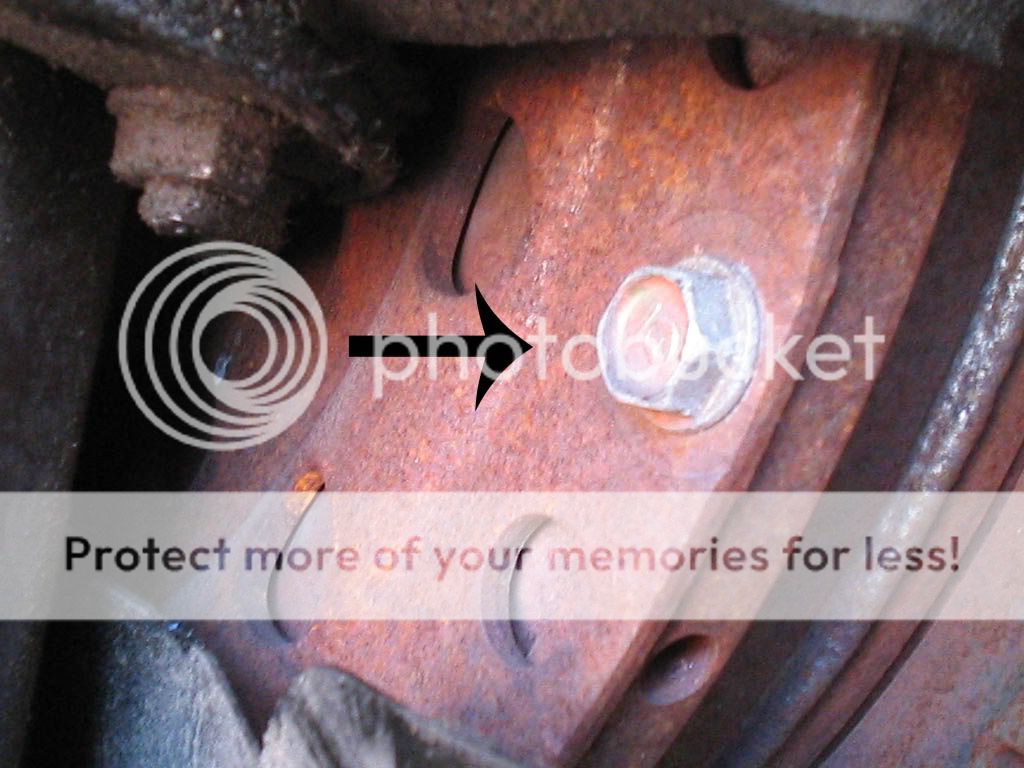
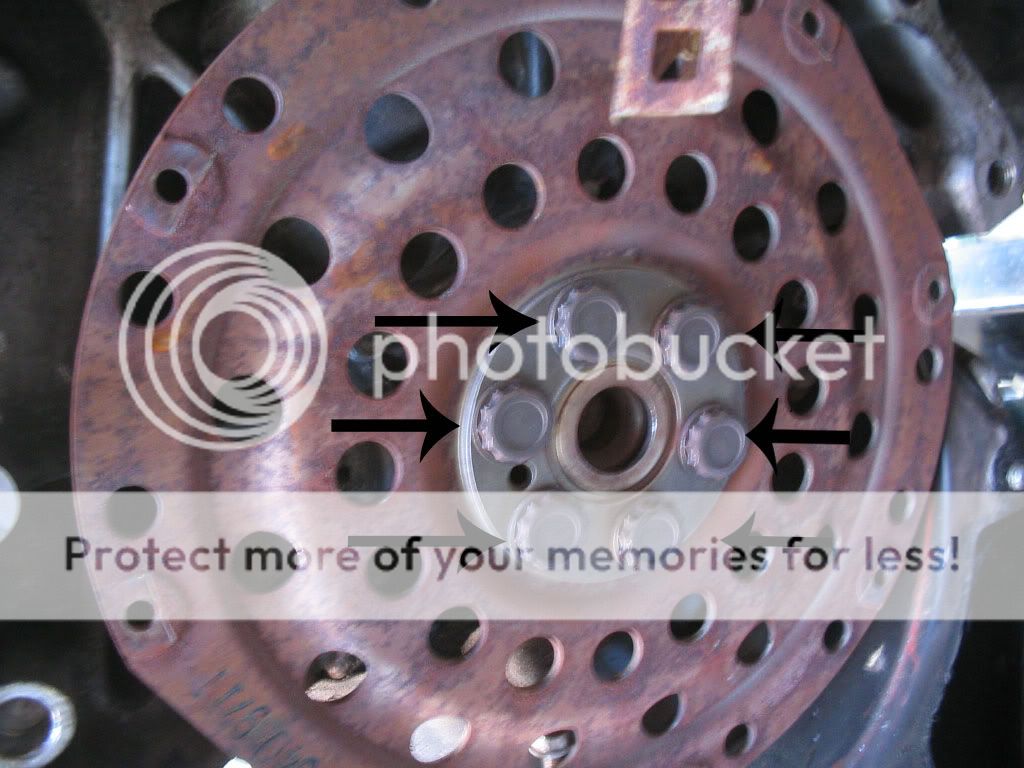
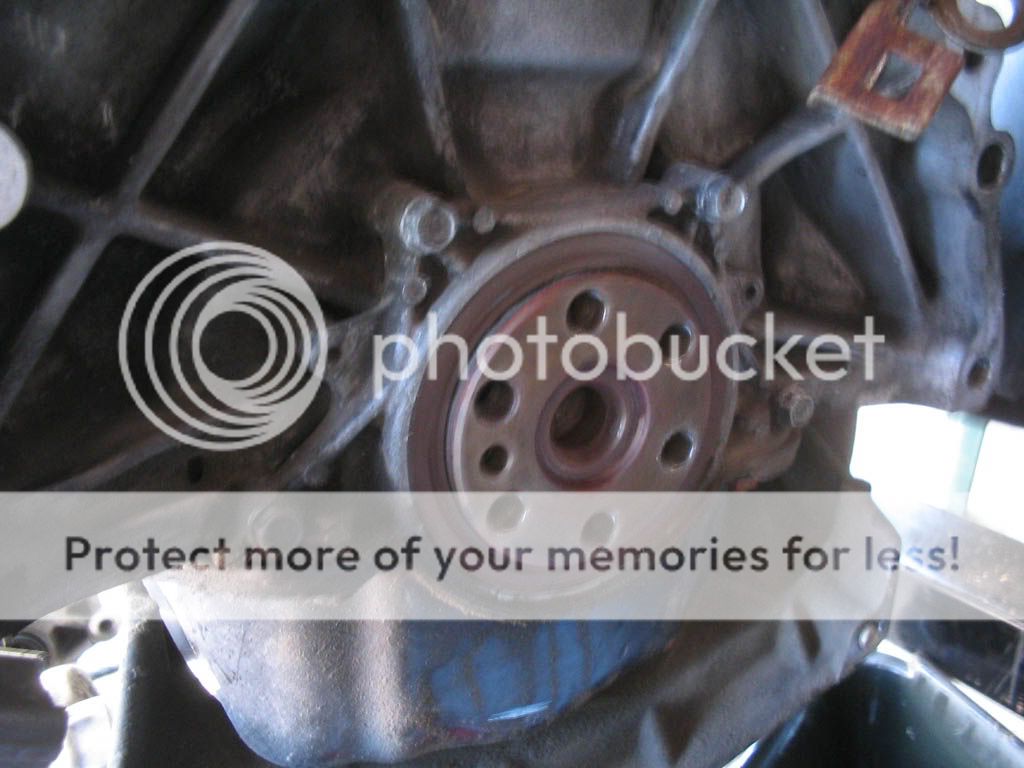
<FONT SIZE="3">Torque Converter</FONT>
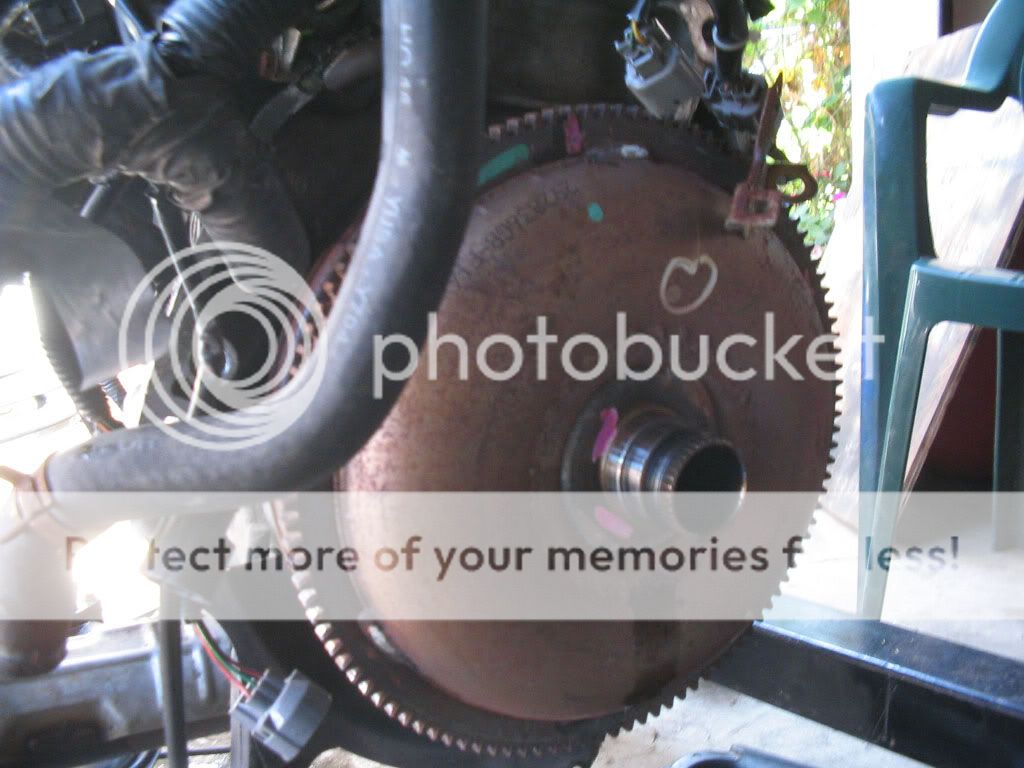
Now its time to pull this torque converter off. Note that this thing is pretty damn heavy. It has 8 or 10 (cant remember) 10mm bolts on the back of it and you need to rotate the crank to get to each bolts. When all the bolts are off it will just drop, no warning. When the converter is off youll see the flywheel with 6 17mm 12point bolts on it. Take those off and then your ready to put the manual stuff on.
No pics for the manual flywheel. But put on the flywheel bolts like this:
.......1........
....3.....5....
....6.....4....
.......2........
And the torque for these are 87lbs. Do the same with the pressure plate but the torque for those is 18lbs.
 http://img.photobucket.com/albums/v38/Luserkid/IMG_3459.jpg
 http://img.photobucket.com/albums/v38/Luserkid/IMG_3460copy.jpg
 http://img.photobucket.com/albums/v38/Luserkid/IMG_3461copy.jpg
 http://img.photobucket.com/albums/v38/Luserkid/IMG_3462.jpg
Putting the transmission on. Take off the dowel pins from the auto tranny and put them on the manual one. Line it all up and put the new tranny on. 1/2 there now.
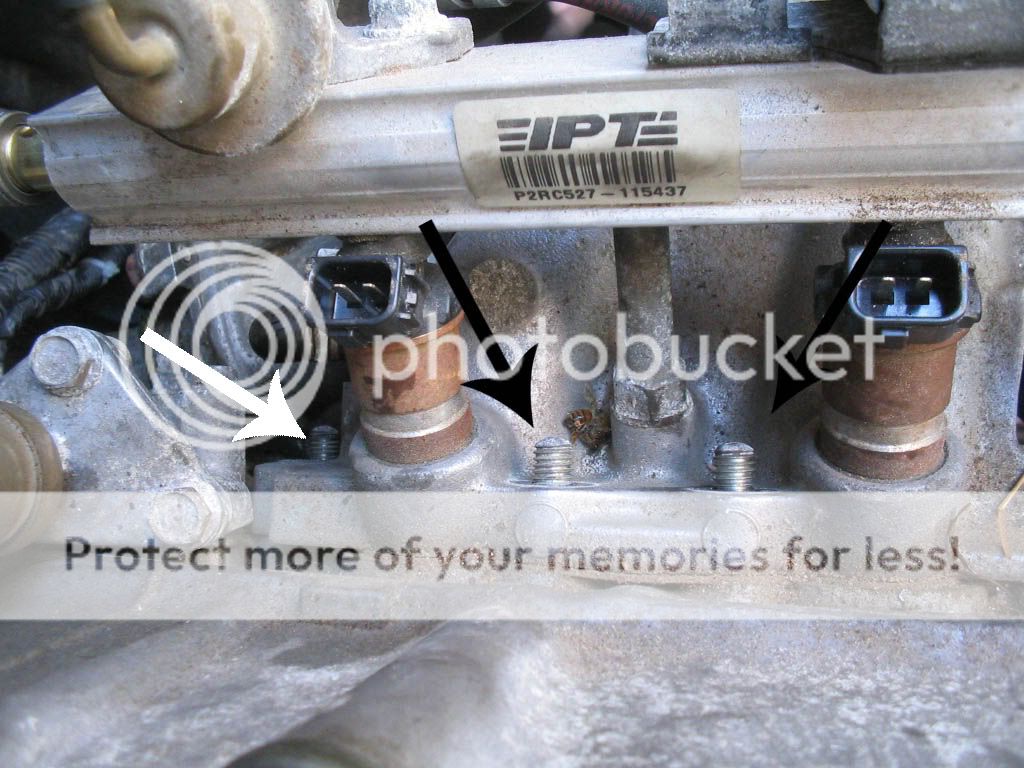
<FONT SIZE="3">Intake Manifold</FONT>
This is the man reason you want the motor out. You could move around the motor no problem and get to whatever you want. So the intake manifold is the easiest part. Take off all the wiring harness plugs that are attached to the injectors, sensors and all the coolant hoses. If this is your first time i suggest marking everything down so you dont forget where they go. There is 7 12mm bolts and a bracket holding the intake manifold on. Take those off and the intake is ready go come off. When its off make sure there is NO gasket on the head so you could have a good seal. If you think you might pull the intake manifold off again and want that gasket off with ease spray some WD 40 on it and next time its easy to take off.
When you put the new intake on make sure you go in this order:
.....4...2.....3....5....
..6..........1...........7
For the rewire follow the picture i have below that i took from jdmlyfestyle's thread.
 http://img.photobucket.com/albums/v38/Luserkid/IMG_3464copy.jpg
IACV Rewire:
96-98: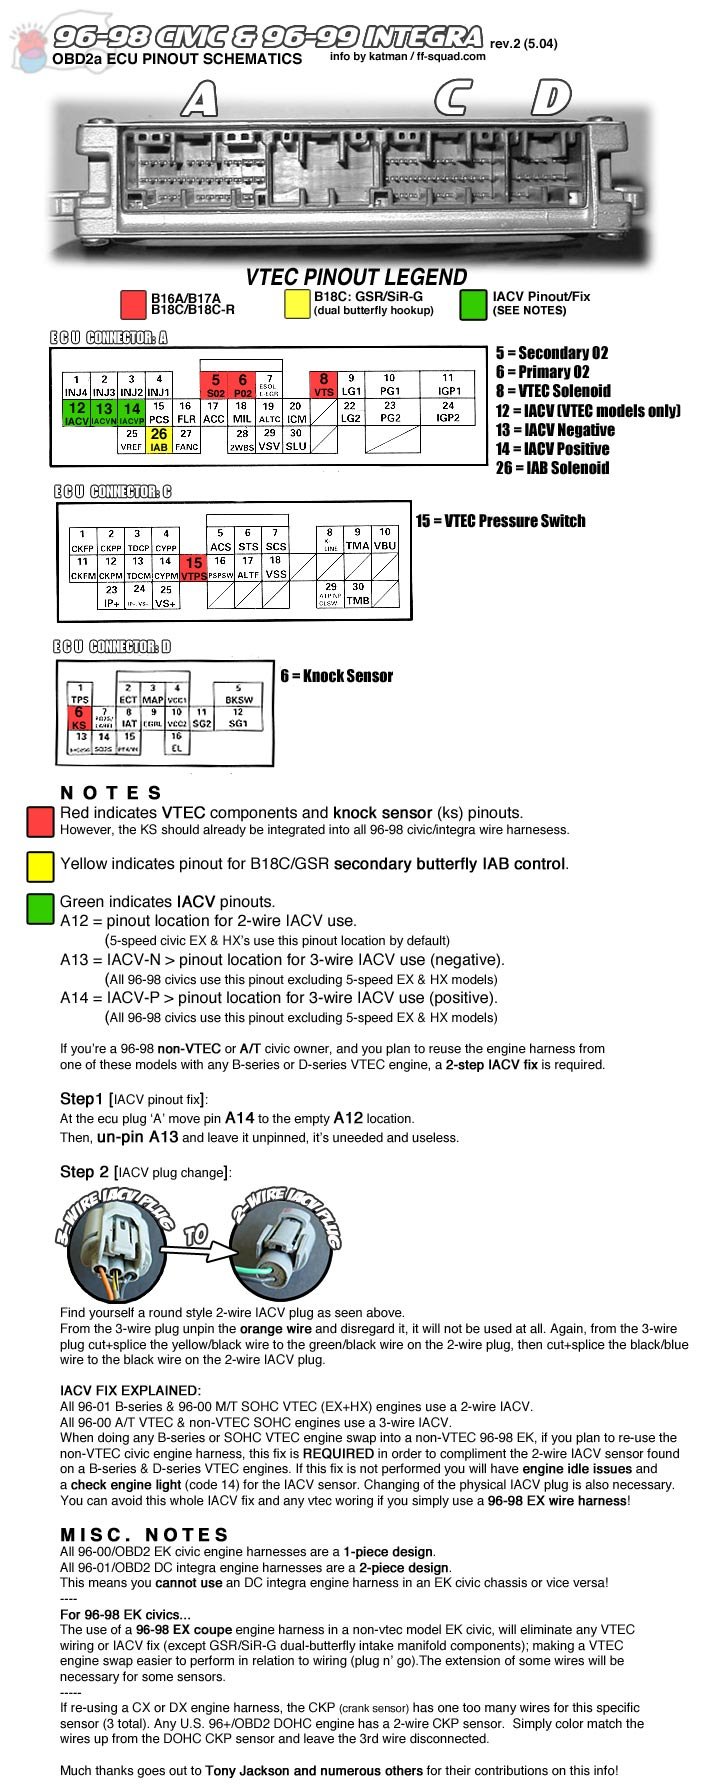
http://www.ff-squad.com/tech/wiring/wiring.96-98.jpg
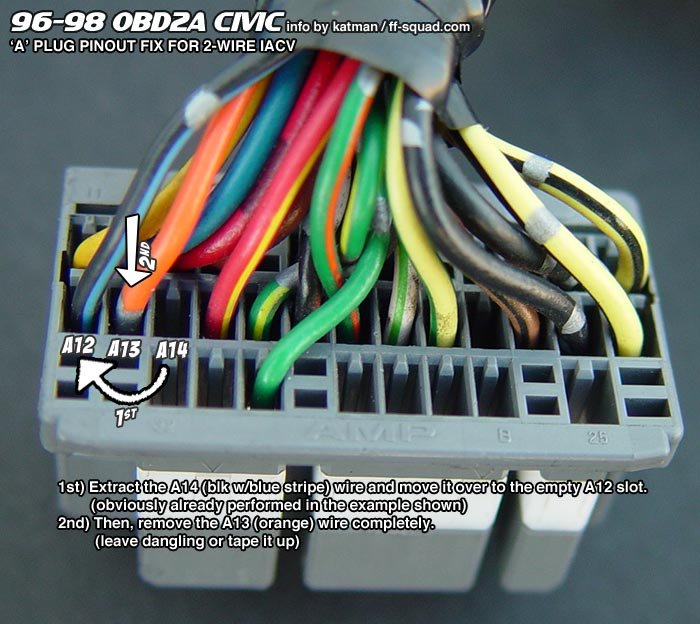
[/url]http://www.ff-squad.com/tech/wiring/wiring.96-98_a-plug.jpg[/url]
99-00:
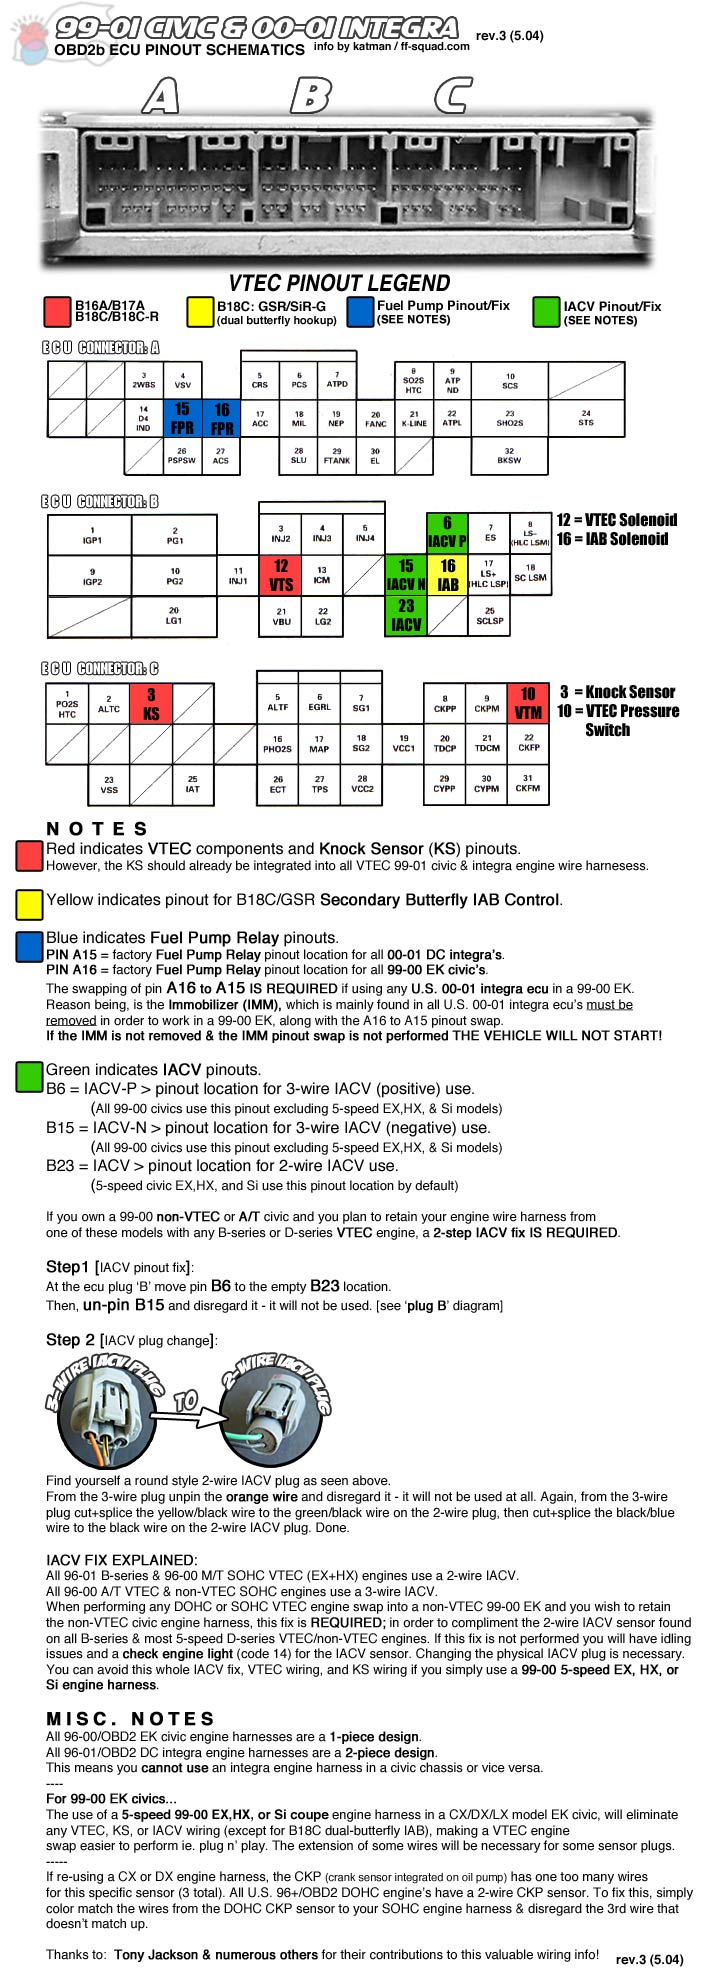
http://www.ff-squad.com/tech/w...1.jpg
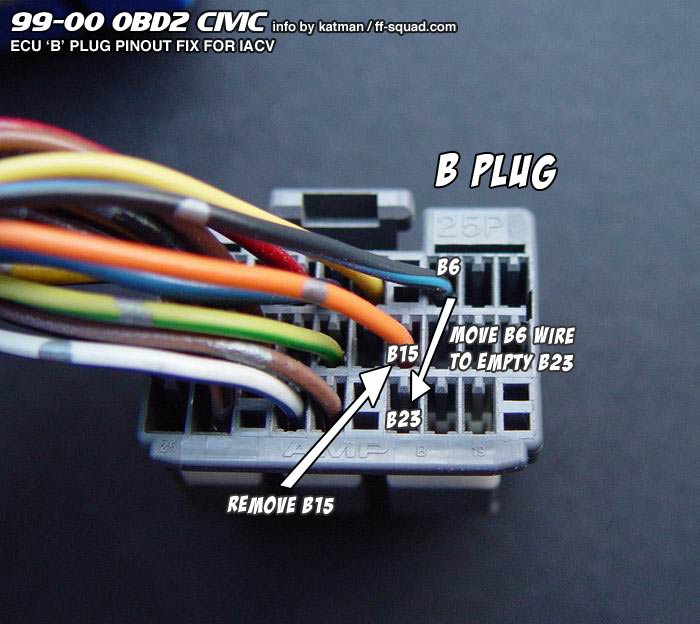
http://www.ff-squad.com/tech/w...g.jpg
Run the coolant lines the same way back and your set.
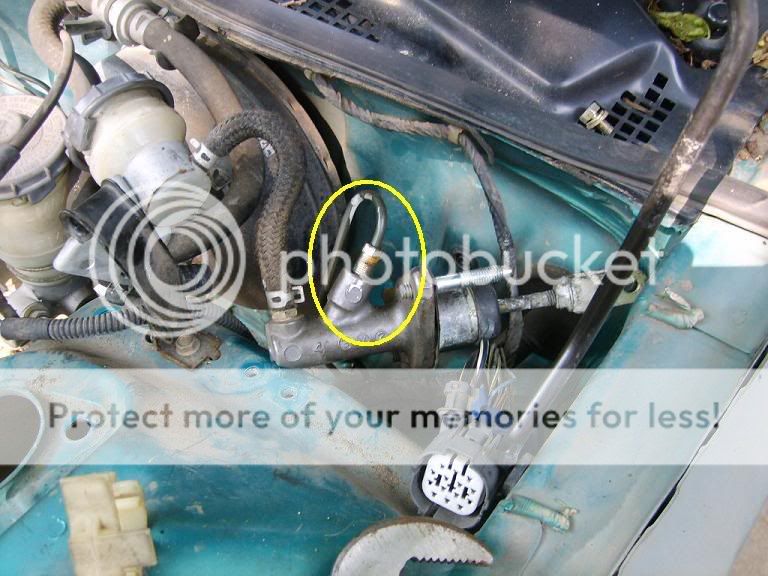
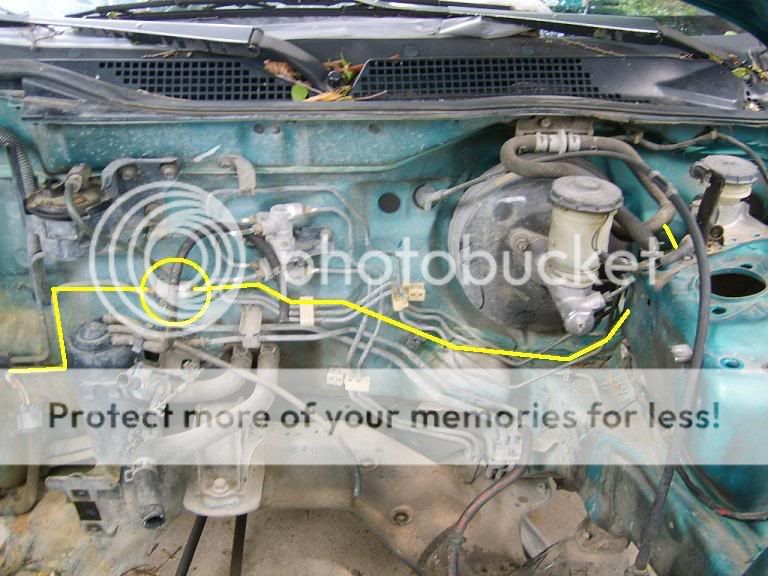
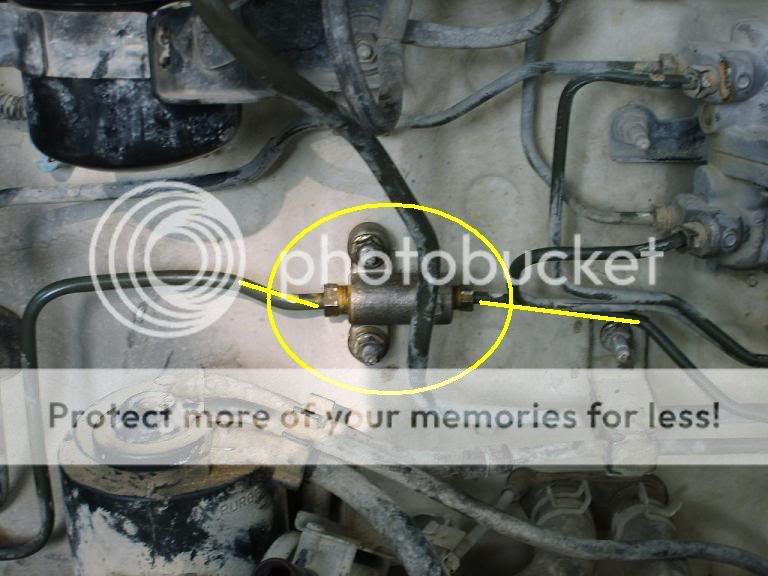
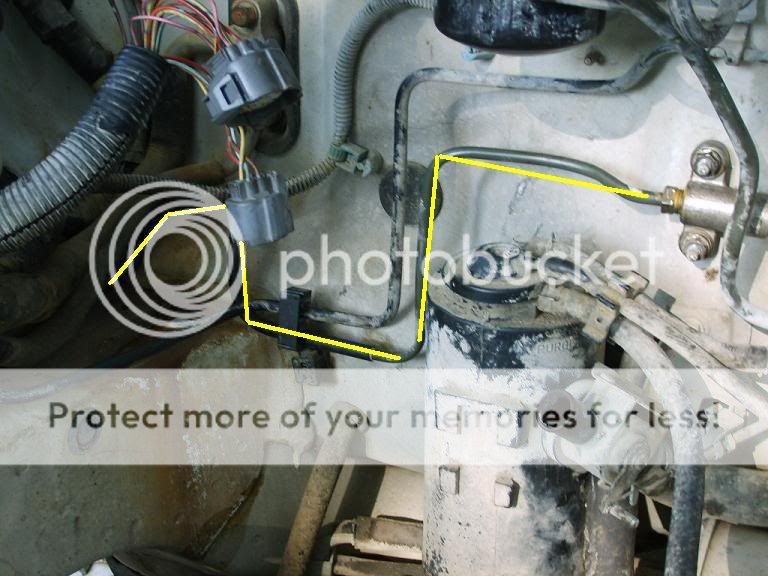
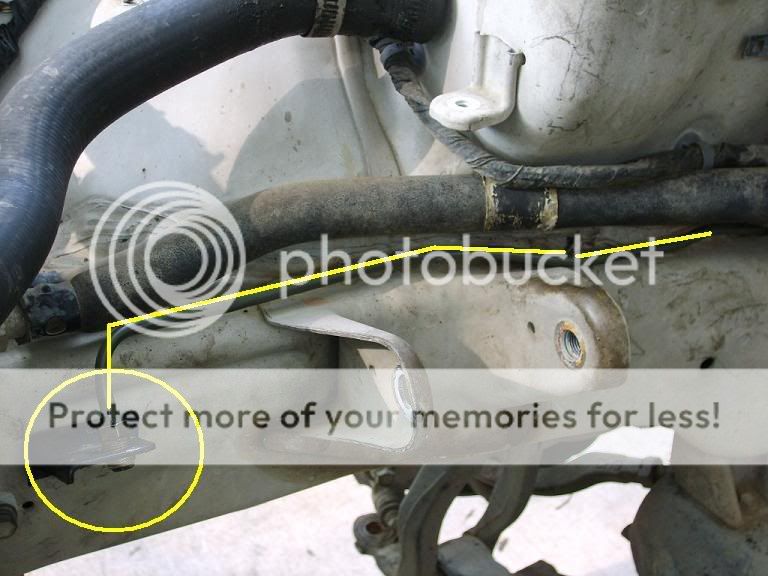
<FONT SIZE="3">Clutch lines</FONT> This is pretty easy run the lines. Theres hard and soft but they only go one way. (Pictures are for 92-95 but is the same principle for 96-00)
Clutch Master Cylinder
http://i5.photobucket.com/albu...0.jpg
http://i5.photobucket.com/albu...2.jpg
http://i5.photobucket.com/albu...6.jpg

http://i5.photobucket.com/albu...9.jpg
http://i5.photobucket.com/albu...7.jpg
http://i5.photobucket.com/albu...2.jpg
http://i5.photobucket.com/albu...7.jpg
http://i5.photobucket.com/albu...8.jpg
http://i5.photobucket.com/albu...9.jpg
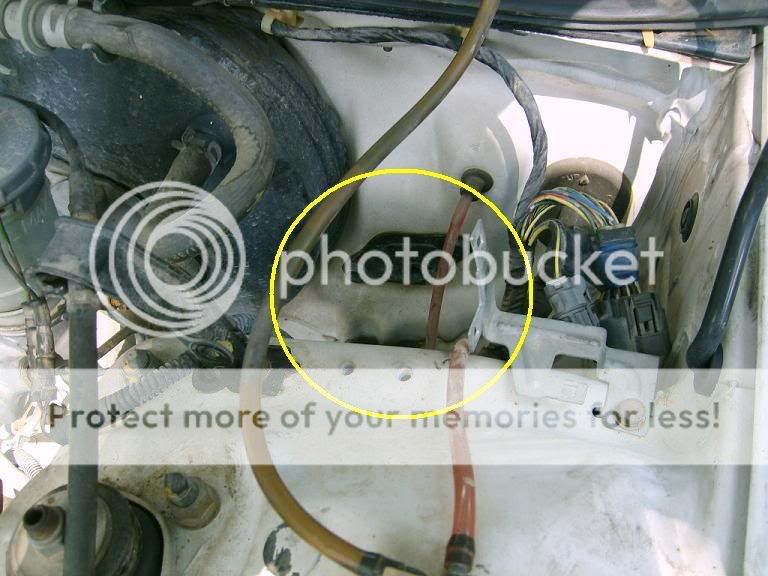
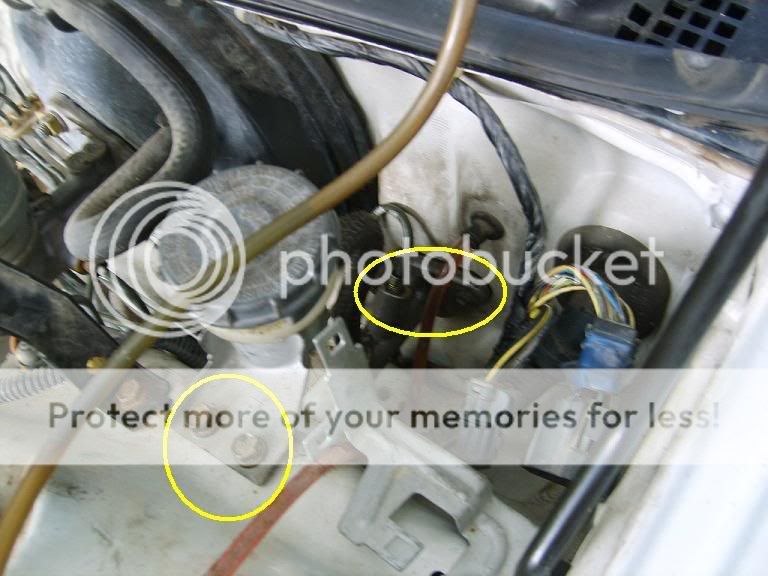
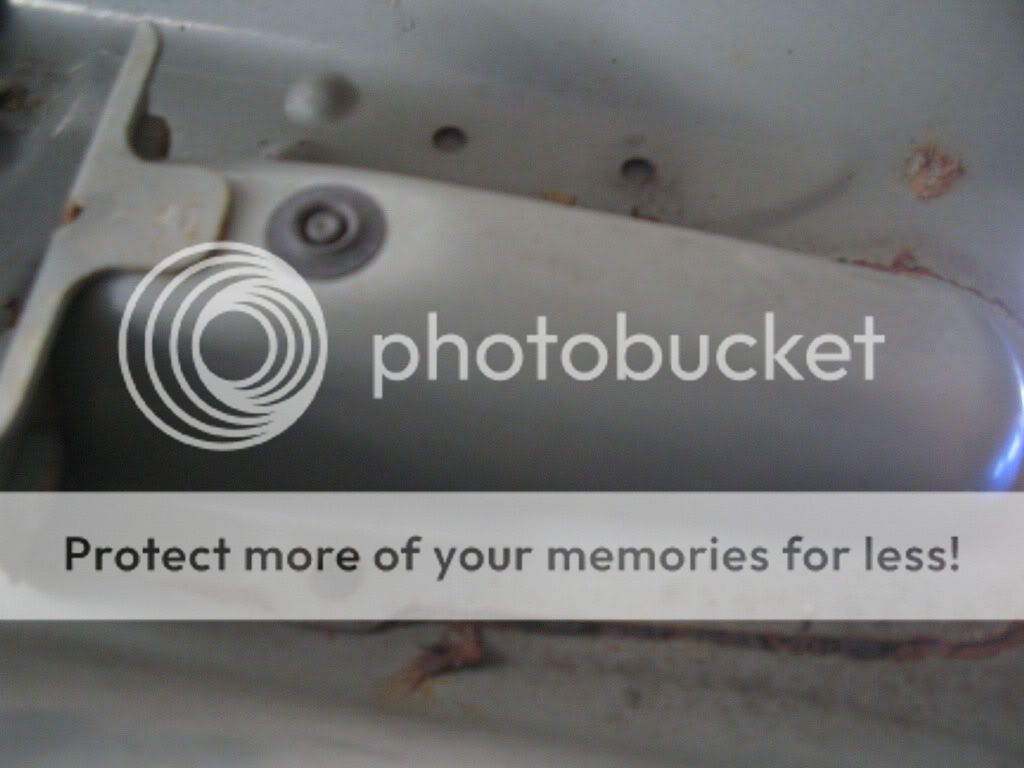
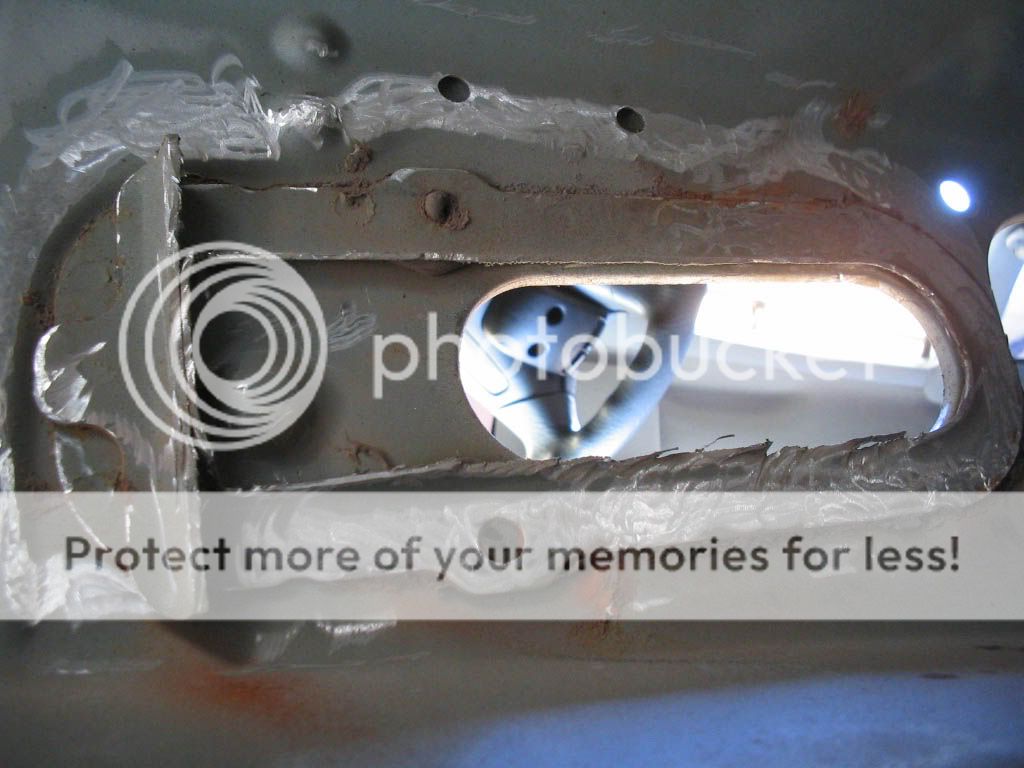
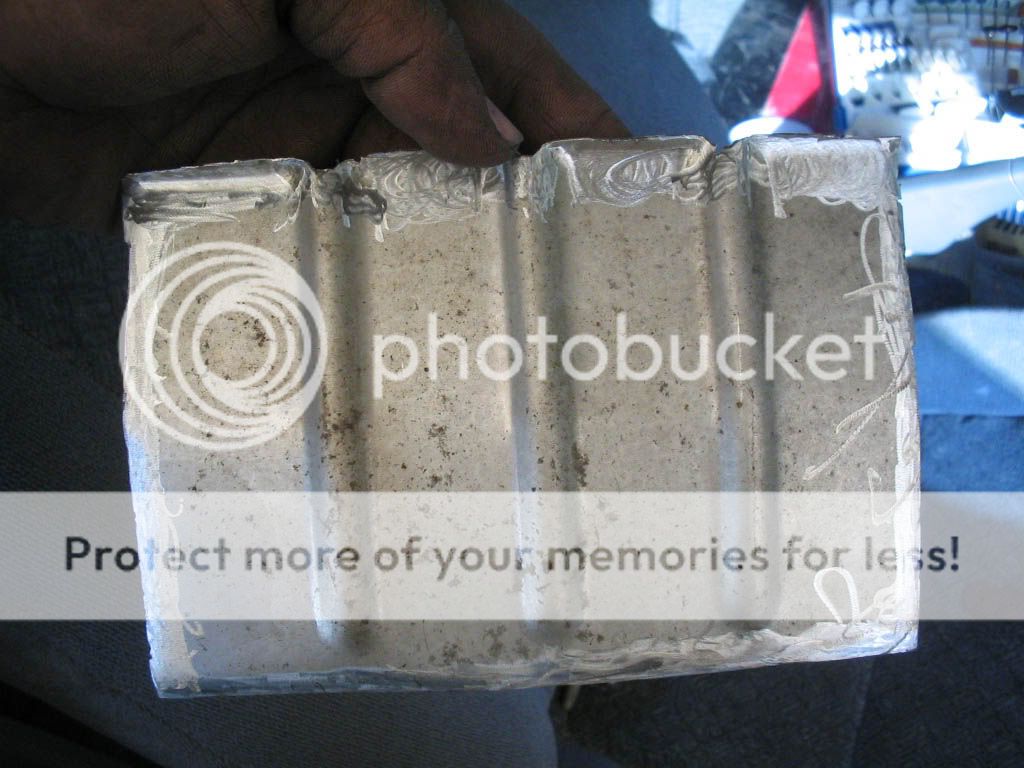
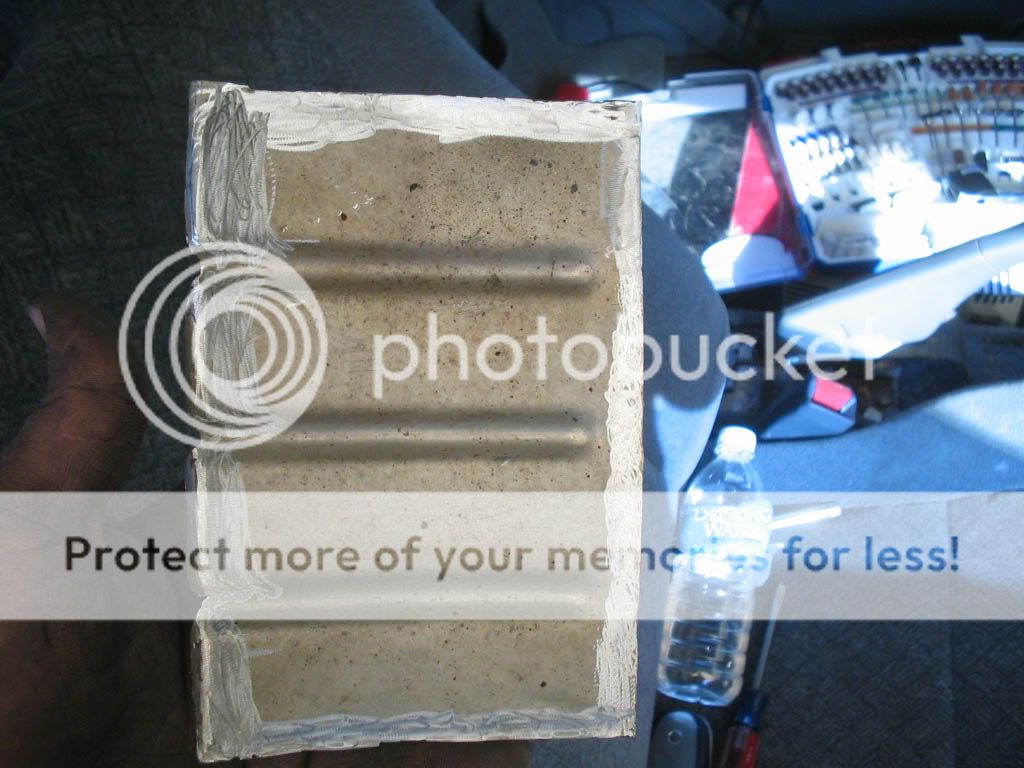
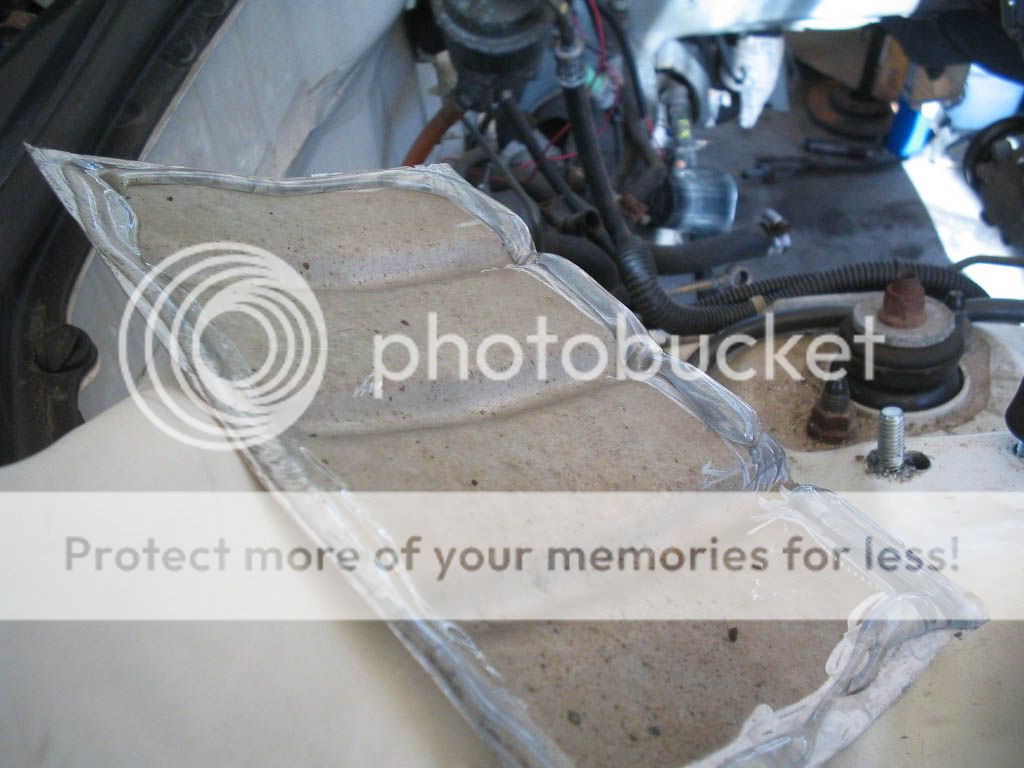
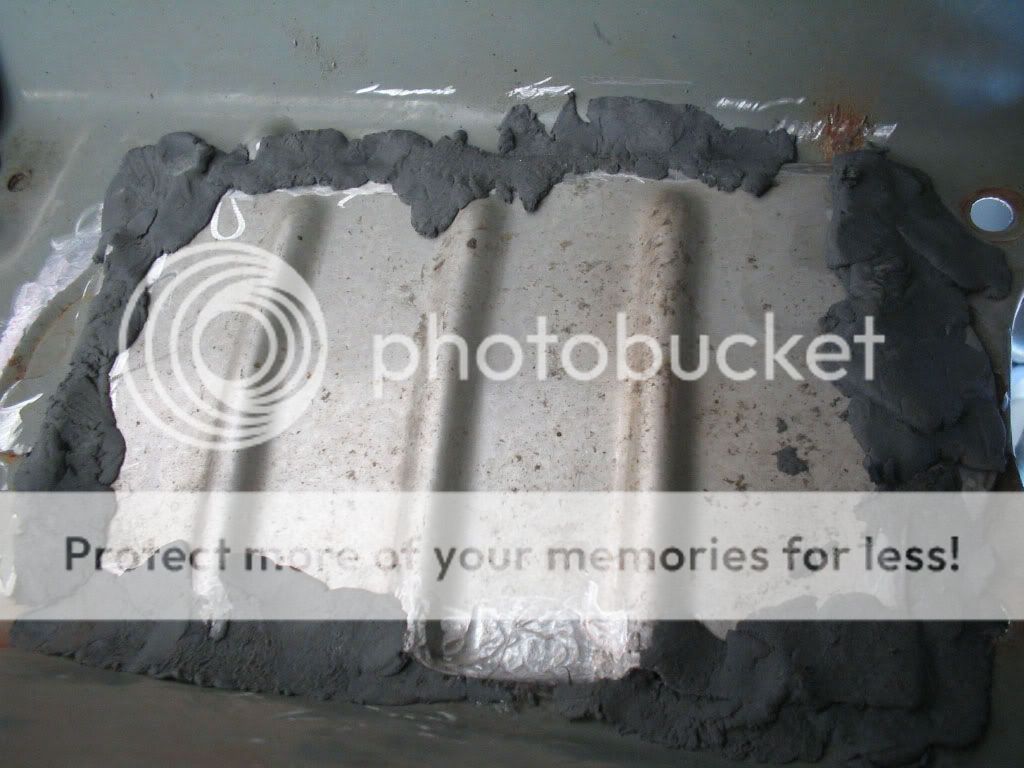
<FONT SIZE="3">Wind Plate!</FONT>
Now you have the path that the auto cables go through and you probably test fitted your shift linkage up to it and was like "what the hell this thing is in the way" well thats correct it is. What to do is cut it out with your dremmel. You have 2 choices, 1. make a plate or 2 drive with a big hole, and lost of road nose and exhaust heat.
There is going to be a heat shield in the way, take off that heat shield and if you want to do what i did your going to cut a piece of that for your plate. Cut your hole as close to the chassis as you can. The smoother the better. Grind down the paint a little so the harden stuff can stick better. Also grind down the plate so it sticks good, but do both sides of it. Now when you got it nice and clean put your Goop on the bottom and press it up to the chassis until it settles. When it settles take your Quick Steel and spread it all around and get all the gaps. and let it harden and then your set, no road heat
 http://img.photobucket.com/albums/v38/Luserkid/IMG_3470.jpg
 http://img.photobucket.com/albums/v38/Luserkid/IMG_3473.jpg
 http://img.photobucket.com/albums/v38/Luserkid/IMG_3475.jpg
 http://img.photobucket.com/albums/v38/Luserkid/IMG_3474.jpg
 http://img.photobucket.com/albums/v38/Luserkid/IMG_3476.jpg
 http://img.photobucket.com/albums/v38/Luserkid/IMG_3477.jpg
 http://img.photobucket.com/albums/v38/Luserkid/IMG_3478.jpg
 http://img.photobucket.com/albums/v38/Luserkid/IMG_3480.jpg
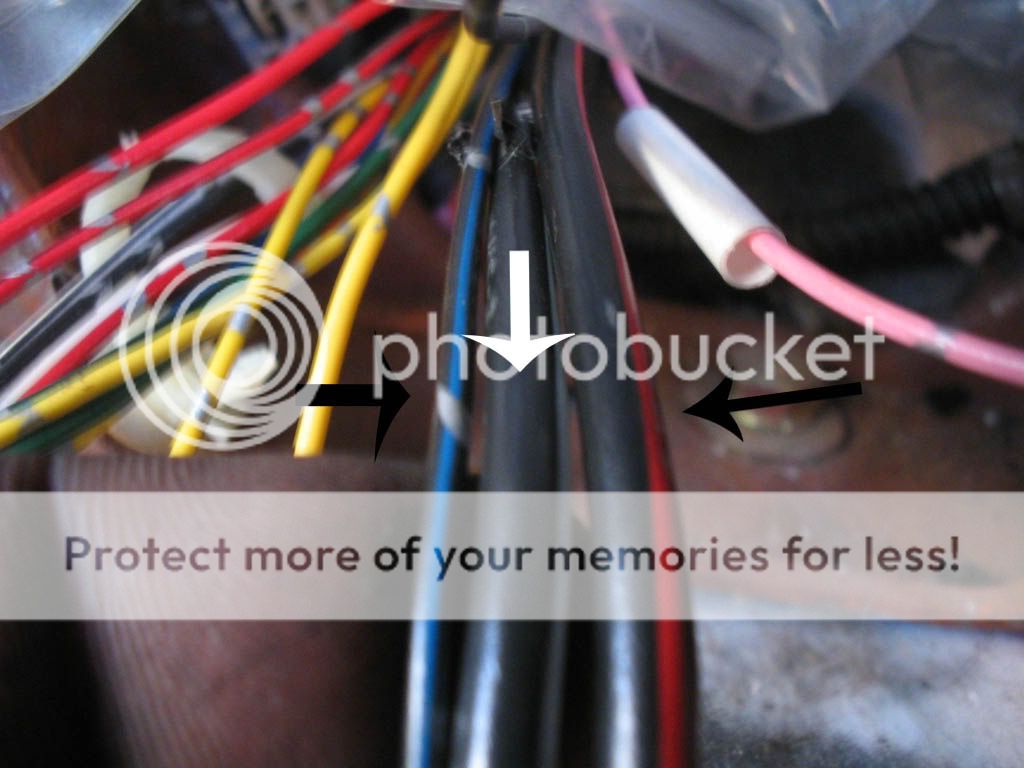
<FONT SIZE="3">Wiring!</FONT>
Now this is pretty easy, but then again i love electrical. But all you need to do is connect 5 wires total. One of the plugs that you disconnected from the auto shifter is a 14P plug. Cut the plug off. Your going to have a 2 thick blk wires and 1 blk/blu wire, Solder those 3 together. Those together lets your car think its in park and releases the key and starts your car. Important
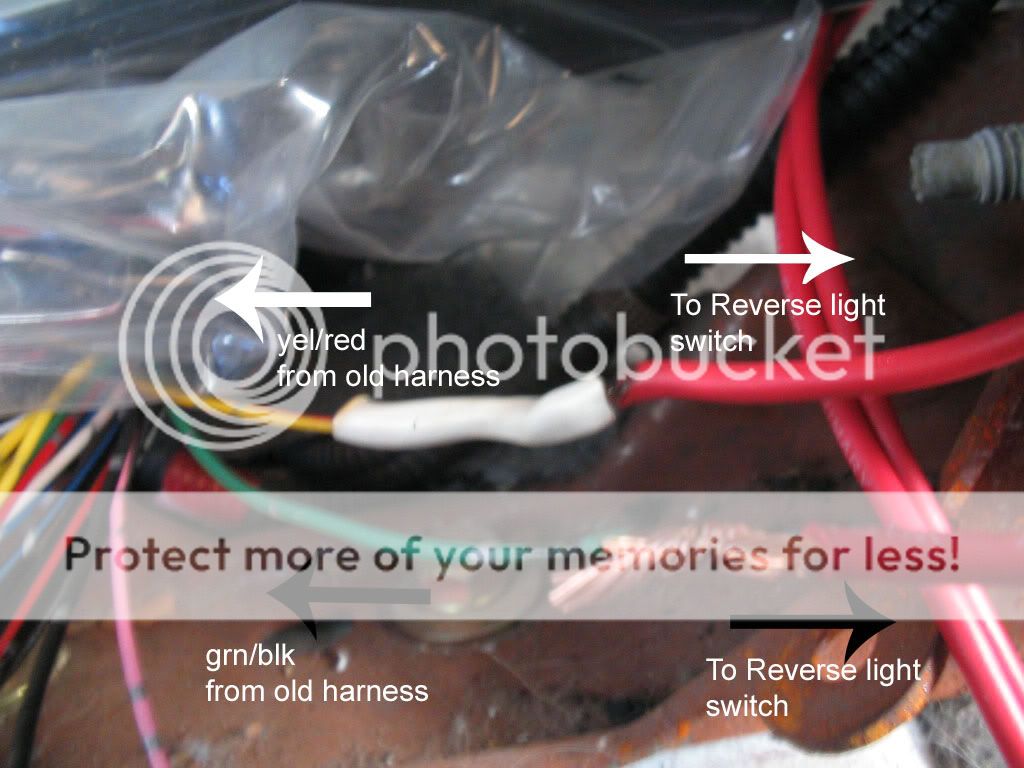
Next there is a yel/red wire and a grn/blk wire. Doesnt matter what way they go they do the same. These are for your reverse lights. Connect some line to them and run it through the firewall to your reverse light switch. And your set.
<FONT SIZE="3">Cruise Control Update</FONT>
This was given by Nomac5 on here and according to him it works. What he did was take the pink wire and grounded it with the blk (ground) wire. Now i havent tried this personally but he says it works. Some feedback would be great from others as well.
Sadly i couldnt figure out the Cruise control but i believe because the car thinks its in park to get the key and start it wont allow you cruise control. But if you want to know your Cruise control wire its a pink wire. To wire in the clutch safty switch run the 2 black wires to your safty switch and with the clutch pressed it should make a complete circuit and allow you to start your car.
 http://img.photobucket.com/albums/v38/Luserkid/IMG_3486copy.jpg
 http://img.photobucket.com/albums/v38/Luserkid/IMG_3497copy.jpg
http://img.photobucket.com/albums/v38/Luserkid/IMG_3497copy.jpg
Hope this how to helps alot of you guys. Sorry theres not more pics but like i said i thought these were the most important. If you need more let me know.
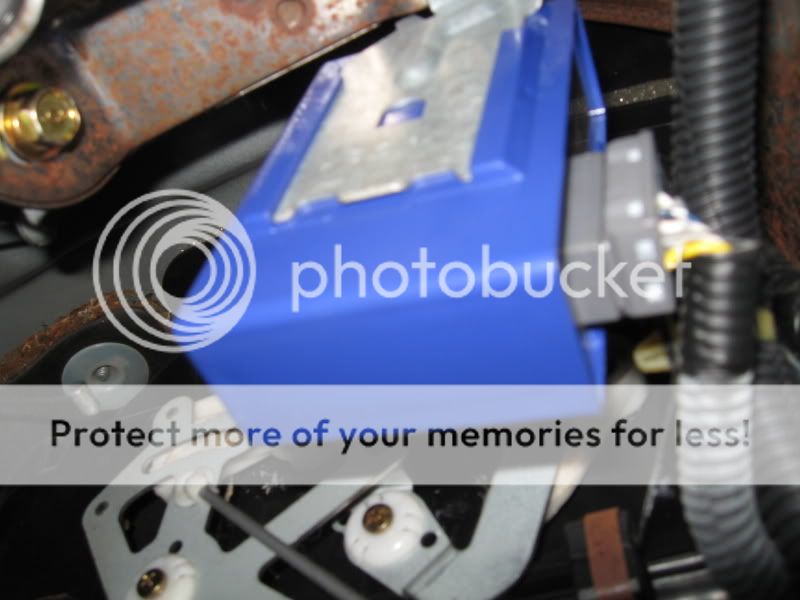
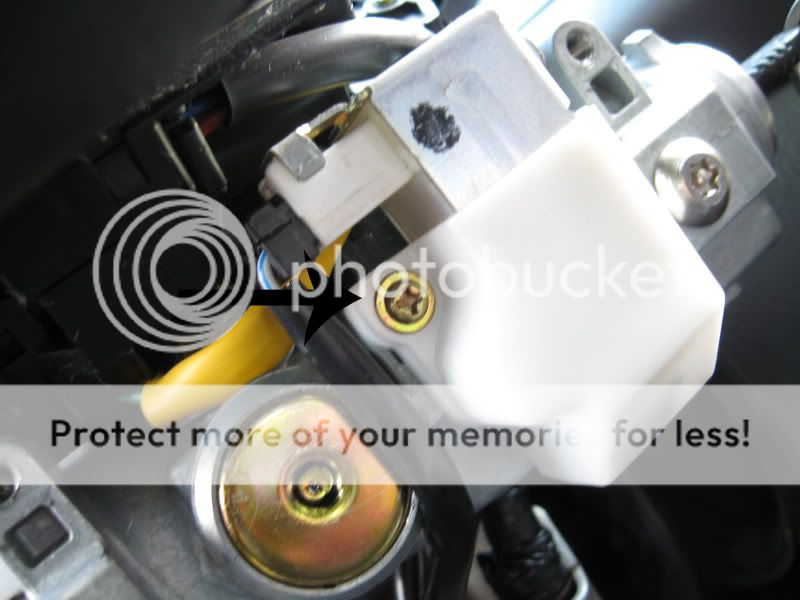
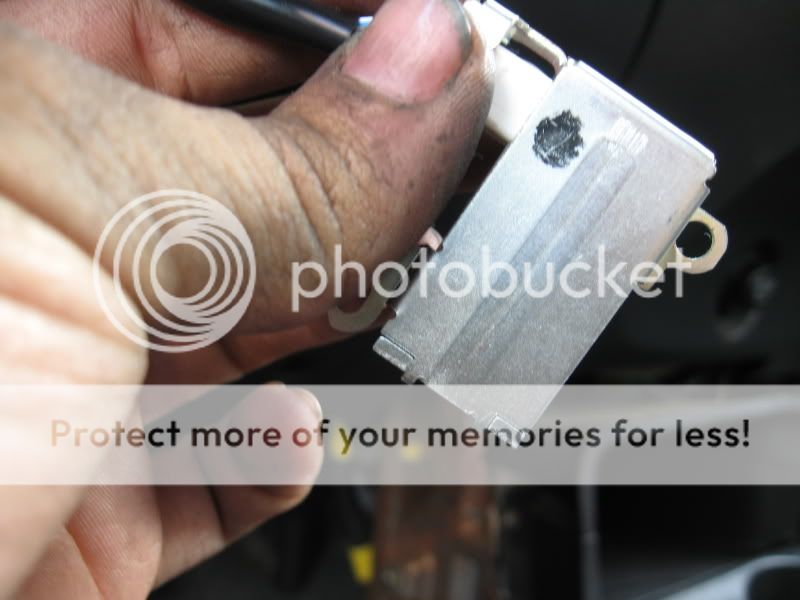
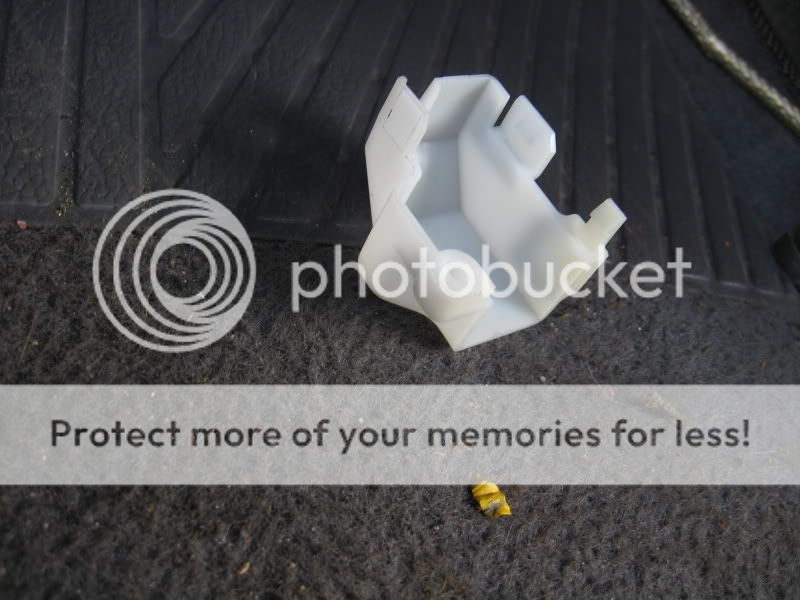
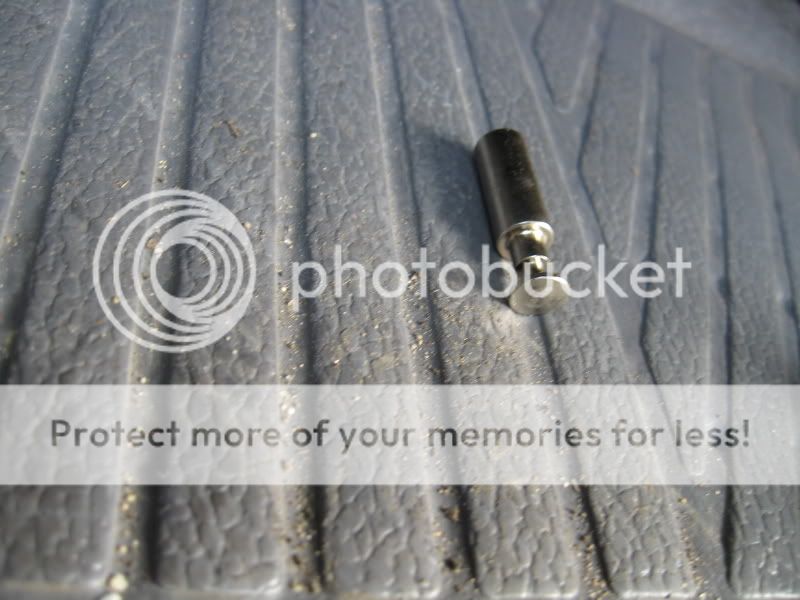
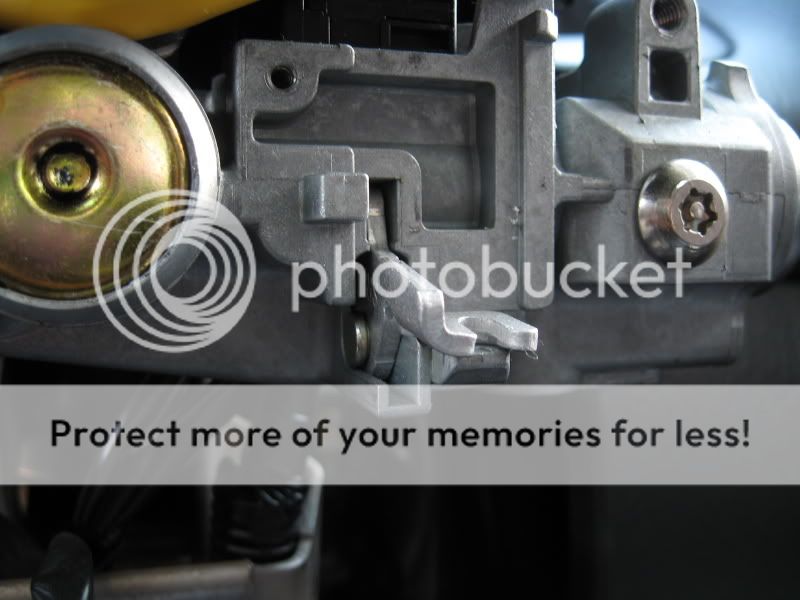
<FONT SIZE="3">Interlock System</FONT>
Sorry for lagging on these pics some cars have it and others dont. It just took a while for me to get one that did. Anyway this little box makes sure that your in park so you could get your key back by using this mech. that you will just take out. Very simple job. Weither or not you could leave the box in. For this car i left the box in because i didnt feel like getting to it once i put everything back. If you want to get the box out do it while the lower dash cover is off. This is all on the driver side under the steering wheel. 92-95 have it where the clutch pedal is suppose to go if they have it. Anyway open up the lower steering cover to access the key cylinder. Next youll see this little mech. on the cylinder. Pop off the 1 screw that holds it on and pry it off. You could take the white cover off and it would be a little easier. Once you pop it off youll see that little piston come off. Disconnect it from the wire and your good to go. Enjoy.
Total Work Time: about 8 to 10 hours.
Modified by Luserkid at 11:59 AM 3/2/2006
Modified by Luserkid at 11:33 AM 3/3/2006
Modified by Luserkid at 11:08 PM 7/27/2006
Modified by Luserkid at 11:10 PM 7/27/2006
Modified by Luserkid at 9:23 AM 8/2/2006
Modified by Luserkid at 4:37 PM 10/4/2006
Modified by Luserkid at 9:02 AM 10/26/2006
Modified by Luserkid at 9:04 PM 1/12/2007
Modified by Luserkid at 2:55 PM 1/23/2007
Modified by Luserkid at 8:17 AM 2/24/2007
Modified by Luserkid at 8:41 PM 5/14/2007
Modified by Luserkid at 8:50 PM 5/14/2007
Modified by Luserkid at 8:05 AM 5/16/2007
Modified by Luserkid at 7:56 PM 7/31/2007
Modified by Luserkid at 4:02 PM 1/1/2008
Modified by Luserkid at 4:03 PM 1/1/2008
Modified by Luserkid at 8:24 AM 1/17/2008
Modified by Luserkid at 7:43 PM 2/11/2008
Update: Clutch line route Thanks to CRX378
Recently i have been seeing alot of Auto to Manual swap related questions. And lately i have been having alot of people come to me with questions. And this last weekend i did this swap for someone from Las Vegas (SRCivic97 on here). This is in full detail and if you want me to go into more detail let me know and ill be more then happy to answer. I have 146 pics that i took but i had to cut them down to 44 so i could fit them on one thread. But if you want me to post a specific pic let me know. And now, lets begin.
First off the parts list. I could give an rats *** what you heard this is the parts that are needed and what were used and what was not used.
We had:
Car: 1997 Honda Civic EX (Auto)
Tranny: Y8 tranny. Actually you could use any D series Hydro tranny on your D series motor (B series is different obviously but use a Hydro B series tranny)
Clutch Flywheel: Resurfaced stock Flywheel from a 93 DX (was to lazy to send his flywheel off and we had one already resurfaced laying around, totally cool with owner.) But any 92-00 flywheel will work. Clutch we used an Autozone with resurfaced Pressure plate. With an used throw out bearing (just put some oil on it first)
Flywheel/Clutch bolts: Damn im kicking myself for not taking a pic of these. Anyway you need manual flywheel bolts along with clutch bolts. Part #: Flywheel: 90011-PM0-000 Clutch/PP: 90034-P10-A01
Mounts: This is alot of hear say for what to use. This is what you need and why. First off you need an upper tranny BRACKET (not mount) from a 96-00 manual tranny because the auto one doesnt even fit on the tranny, go figure
(Part #: 50825-S04-000 Next youll need the lower tranny mount off of a manual 96-00 car. Also you will need 3 bolts to go into the tranny as well as 2 that go into the chassis (Part #s: Tranny bolts: 90190-SR3-000 Chassis: 90166-SR3-000
And finally a REAR TRANNY MOUNT Because the auto and manual are totally different. Here is a pic to tell the different. If you use an auto one it wont sit right, although you can use the AUTO bracket on the manual tranny. Part#: 50810-SR3-030
http://www.gamester.net/wudini...y.jpg
Pedal Assembly: We used a manual pedal (gas to clutch) from a 96-00 manual. But actually all you really need is the clutch one. You could actually keep your auto pedals and just add a clutch one and your set. That way you dont have to worry about pulling the pedals out, which by the way is the hardest part of the swap. You are going to need to get a pin to hold the clutch to the peddle. Part #: 46912-SD4-000
Intake Manifold and Throttle body: You need a y8 manual intake and for throttle body we used an LS throttle body. You could use any manual throttle body, i suggest y8 so you dont have to play with the map. Make sure you get a 2 wire IACV with the intake because if you dont have that you will throw a code and run like ***. We also got a new intake manifold (Y8, use that even if your using a y7 head Part #: 17105-P2F-A02
ECU: Unless your doing something else that involves boost or different setup other then stock you will use a manual y8 ecu (P2P) You could also get a jumper and get a chipped ECU. Most chipped ECU's (if not all) use 2 wire IACV so youll be fine.
Shift Linkage: You need a Dseries manual shift Linkage from 92-00
Clutch Master/Slave Cylinder: Here you absolutly need one from a 96-00 Because the lines are completely different. Now you could probably use these from a 92-95 and just get a SS line and run it straight from the MC to the SC. But if you want the stock look with the hard lines and soft you need 96-00.
VSS: Incase if your tranny doesnt come with one you need a manual one because the auto will not work.
Starter: You need a manual starter along with this one bolt because its longer. Part#: 95701-10100-08
Axles: Use the Auto Axles.
Tools: Basic socket set (Craftsman 256 piece set is great ), a hoist (its ALOT Easier with the motor out), Air if you can (oh man what i wouldnt do without air tools), Prybars (atleast 3 ft to seperate the tranny and motor), Needle Nose plyers, WD-40/PB Blaster, Goop, Quick Steel, and a Dremel. Thats the majority that we used.
Ok Lets begin
<FONT SIZE="3">Pedals!</FONT>
We got the car kind of late friday night (10/10:30pm, or atleast thats about the time we started) and first thing we did was the interior and pedals. I highly recommend getting this out of the way because the rest is a breeze. So sorry for the pics.
I had the lovely job of taking off the pedals and putting new ones in. Sucks *** i tell you right now. First you want to take off the lower cover of the steering wheel which is held on by 3 or 4 screws. Along with the steering column cover as well which is held on by 2 screws (sorry no pics for this). After that your going to want to drop the steering column. To do that theres 4 bolts (12mm) that you need to take off to do so. I highly suggest having someone help you so it doesnt scare you when it falls. Sorry forgot to take pic, to find these screws look under the steering column and follow until you see a bracket holding it up, take off the 2 screws and itll drop. Once this is dropped its time to strip the pedals.
First lets start off with the Gas pedal and whats attached. In this case we have a throttle cable and Cruise Control Cable.
http://www.gamester.net/wudini...y.jpg
Well take off the cruise control because its pretty damn easy. Just flip the cable over and push out the pin.
http://www.gamester.net/wudini...y.jpg
http://img.photobucket.com/albums/v38/Luserkid/IMG_3382.jpgNow for the throttle your going to have to pull towards you then push it out. Theres a small holder for it once you get past the tab its good to go out. (It helps if you have someone holding the throttle body open for you)
http://www.gamester.net/wudini...y.jpg
http://www.gamester.net/wudini...y.jpg
Lets move over to the brake pedal. Now the brakes are like the gas. This takes a little bit of cursing to get out because your dealing with a cotter pin. Not a problem except for the fact that your kind of blind while your doing it. Pop off the cotter pin then pull out the connecting pin for the Master Cylinder to the pedal.
http://img.photobucket.com/albums/v38/Luserkid/IMG_3372.jpghttp://www.gamester.net/wudini...y.jpg
http://img.photobucket.com/albums/v38/Luserkid/IMG_3390copy.jpghttp://img.photobucket.com/albums/v38/Luserkid/IMG_3393copy.jpghttp://img.photobucket.com/albums/v38/Luserkid/IMG_3396.jpgNow lets move over to where the clutch pedal should be. You should see a big hole with a small hole on each side. Theyll all be plugged. In this case the owner of the car ran wires through his which i had to redo for him. But when you pop those out your ready to put the clutch master through there and put the clutch pedal in. It wont get in the way of the brake and gas while your taking them out and putting them in because you send them the other way.
http://www.gamester.net/wudini...y.jpg
(no pics of the assembly in, but when you have it in theres 2 bolts that attach to the Clutch Cylinder and 1 up in the top.) Now get your pin and cotter pin and put them in and connect them, but dont twist the cotter pin. You dont know if youll need to adjust the clutch pedal yet so incase if you do then its easy to take off.
Now for the brake and gas to take off. For the brake there is 4 bolts that hold on to the master cylinder and 1 up top (kind of like the clutch). When you get those out move over to the gas which is held by 2 bolts (no pics). All the bolts are 12mm. There is also a brake sensor attacted. I suggest taking that off now. The problem with this is that the push is on the top side. What you could do is get a 12mm wrench and twist it so the push is in easy access.
http://img.photobucket.com/albums/v38/Luserkid/IMG_3395copy.jpghttp://img.photobucket.com/albums/v38/Luserkid/IMG_3375copy.jpghttp://img.photobucket.com/albums/v38/Luserkid/IMG_3376copy.jpgOnce you get it all stripped off and ready to be pulled have a friend under the hood pulling the master cylinder so you could get the pedals off easier. If your like normal people this is where youll curse alot. Dont worry about it take your time and just tell your friend to pull and pull because more then likely they dont have enough room to bend the lines. Dont rush this cause youll end up with cuts from stupid ****. And put the new in reverse order.
<FONT SIZE="3">Center Console</FONT>
I didnt do the center console, SOHC4Life did it, so any questions about this you could ask him. Honestly when i looked at the pics i didnt understand what the hell i was looking at. But my guess is take off every screw/bolt you see
there is a time you have to go under the car to take out 4 nuts so the auto shifter comes out. I know that because i did it. Disconnect all the plugs and have some one under the car and send the shifter wires to themhttp://img.photobucket.com/albums/v38/Luserkid/IMG_3394copy.jpghttp://img.photobucket.com/albums/v38/Luserkid/IMG_3399copy.jpghttp://img.photobucket.com/albums/v38/Luserkid/IMG_3404.jpghttp://img.photobucket.com/albums/v38/Luserkid/IMG_3403.jpghttp://img.photobucket.com/albums/v38/Luserkid/IMG_3400.jpgWhen all that is done you could move out to the motor.
<FONT SIZE="3">Motor!</FONT>
Most of the regular guys already know how to pull a motor out but for you non knowers todays your lucky day. Here is a quick rundown on how to pull a motor.
First drain all the oil and the coolant. While the coolant and oil is being drained pull the battery and start disconnecting the major connectors on the shock towers and disconnect the starter. I mark and take off the dist because its in the way of the hoist but its not a must. Also there are some coolant lines attached to the transmission. You could take those off with a 17mm socket.
Once everything is drained you could pull the radiator. Becareful because the coolant will still spill a litte. Take off all the heater hoses, fuel hoses, throttle cable, and cruise control vacuum line (if there is one).
Next take off the power steering and AC compressor. Those dont need to be connected. On the PS its 2 12mm bolts holding it on, when thats taken off move it to the side and out of the way. For the AC theres 4 bolts holding it to the mount. Take off those 4 bolts and just let it hang there. Dont worry about it because it wont be in the way and those lines are ment to move.
Now that thats done take off the wheels and start taking off the suspension. You will need a 17mm socket, needle nose, 17mm wrench, and a 1/2 ratchet. Take off the suspension fork with the 17 socket and wrench. When thats off take the needle nose and take off the cotter pin thats under the LCA and then take off the castle nut. Now with that 1/2 inch wrench lift the hub and make room to put the ratchet in there. When its nice a snug kick down on top of the rotor and that ball joint should pop right out. When thats done get the prybar and pull the axle out.
Now move over to the header and disconnect it from the exhaust. While your doing this your buddy should be setting up the hoist. When the hoist is safe take off the 2 19mm bolts from the rear tranny mount, and then get out of there. Go up top and take off the other 19mm bolt and the rear mount is set.
Go to the driver side and on the AC bracket is a mount. Take off the 19mm nut at the end then put a 17mm deep socket and take off the shaft.
Take off the rest of the mounts and the motor should pull out with ease. If for some reason it doesnt thats because your attached to something hold the hoist where its at and disconnect what your stuck on. Sorry not to many pics for pulling the motor.
http://img.photobucket.com/albums/v38/Luserkid/IMG_3432copy.jpghttp://img.photobucket.com/albums/v38/Luserkid/IMG_3444copy.jpghttp://img.photobucket.com/albums/v38/Luserkid/IMG_3435copy.jpg<FONT SIZE="3">Transmission removal</FONT>
Now that the motor is out its time to take off the tranny. First however you want to take off the starter. 2 14mm bolts. and you want to disconnect all the wires and sensors attached to the transmission. Honestly you could cut them all except for the VSS if you wanted. Now that the transmission is stripped and ready to go you have about 6 17mm bolts, 2 14mm, and 2 10mm bolts holding the tranny to the block. The 17mms are the big obvious ones (2 up top, 2 on the front (one on each side), 2 on the back). The 2 12mms are next to the oil pan on the stabalizer. And the 2 10s are on the dust cover. When those are off take your prybar and pry the tranny off the block. WARNING! Note that the Torque Converter holds ALOT of tranny fluid in there so be ready. Once that tranny come off tranny fluid will spill. I suggest getting a bucket ready and drain it before you deside to go on.
http://img.photobucket.com/albums/v38/Luserkid/IMG_3454.jpghttp://img.photobucket.com/albums/v38/Luserkid/IMG_3455copy.jpghttp://img.photobucket.com/albums/v38/Luserkid/IMG_3458.jpg<FONT SIZE="3">Torque Converter</FONT>
Now its time to pull this torque converter off. Note that this thing is pretty damn heavy. It has 8 or 10 (cant remember) 10mm bolts on the back of it and you need to rotate the crank to get to each bolts. When all the bolts are off it will just drop, no warning. When the converter is off youll see the flywheel with 6 17mm 12point bolts on it. Take those off and then your ready to put the manual stuff on.
No pics for the manual flywheel. But put on the flywheel bolts like this:
.......1........
....3.....5....
....6.....4....
.......2........
And the torque for these are 87lbs. Do the same with the pressure plate but the torque for those is 18lbs.
http://img.photobucket.com/albums/v38/Luserkid/IMG_3459.jpghttp://img.photobucket.com/albums/v38/Luserkid/IMG_3460copy.jpghttp://img.photobucket.com/albums/v38/Luserkid/IMG_3461copy.jpghttp://img.photobucket.com/albums/v38/Luserkid/IMG_3462.jpgPutting the transmission on. Take off the dowel pins from the auto tranny and put them on the manual one. Line it all up and put the new tranny on. 1/2 there now.
<FONT SIZE="3">Intake Manifold</FONT>
This is the man reason you want the motor out. You could move around the motor no problem and get to whatever you want. So the intake manifold is the easiest part. Take off all the wiring harness plugs that are attached to the injectors, sensors and all the coolant hoses. If this is your first time i suggest marking everything down so you dont forget where they go. There is 7 12mm bolts and a bracket holding the intake manifold on. Take those off and the intake is ready go come off. When its off make sure there is NO gasket on the head so you could have a good seal. If you think you might pull the intake manifold off again and want that gasket off with ease spray some WD 40 on it and next time its easy to take off.
When you put the new intake on make sure you go in this order:
.....4...2.....3....5....
..6..........1...........7
For the rewire follow the picture i have below that i took from jdmlyfestyle's thread.
http://img.photobucket.com/albums/v38/Luserkid/IMG_3464copy.jpgIACV Rewire:
96-98:
http://www.ff-squad.com/tech/wiring/wiring.96-98.jpg
[/url]http://www.ff-squad.com/tech/wiring/wiring.96-98_a-plug.jpg[/url]
99-00:
http://www.ff-squad.com/tech/w...1.jpg
http://www.ff-squad.com/tech/w...g.jpg
Run the coolant lines the same way back and your set.
<FONT SIZE="3">Clutch lines</FONT> This is pretty easy run the lines. Theres hard and soft but they only go one way. (Pictures are for 92-95 but is the same principle for 96-00)
Clutch Master Cylinder
http://i5.photobucket.com/albu...0.jpg
http://i5.photobucket.com/albu...2.jpg
http://i5.photobucket.com/albu...6.jpg
http://i5.photobucket.com/albu...9.jpg
http://i5.photobucket.com/albu...7.jpg
http://i5.photobucket.com/albu...2.jpg
http://i5.photobucket.com/albu...7.jpg
http://i5.photobucket.com/albu...8.jpg
http://i5.photobucket.com/albu...9.jpg
<FONT SIZE="3">Wind Plate!</FONT>
Now you have the path that the auto cables go through and you probably test fitted your shift linkage up to it and was like "what the hell this thing is in the way" well thats correct it is. What to do is cut it out with your dremmel. You have 2 choices, 1. make a plate or 2 drive with a big hole, and lost of road nose and exhaust heat.
There is going to be a heat shield in the way, take off that heat shield and if you want to do what i did your going to cut a piece of that for your plate. Cut your hole as close to the chassis as you can. The smoother the better. Grind down the paint a little so the harden stuff can stick better. Also grind down the plate so it sticks good, but do both sides of it. Now when you got it nice and clean put your Goop on the bottom and press it up to the chassis until it settles. When it settles take your Quick Steel and spread it all around and get all the gaps. and let it harden and then your set, no road heat
http://img.photobucket.com/albums/v38/Luserkid/IMG_3470.jpghttp://img.photobucket.com/albums/v38/Luserkid/IMG_3473.jpghttp://img.photobucket.com/albums/v38/Luserkid/IMG_3475.jpghttp://img.photobucket.com/albums/v38/Luserkid/IMG_3474.jpghttp://img.photobucket.com/albums/v38/Luserkid/IMG_3476.jpghttp://img.photobucket.com/albums/v38/Luserkid/IMG_3477.jpghttp://img.photobucket.com/albums/v38/Luserkid/IMG_3478.jpghttp://img.photobucket.com/albums/v38/Luserkid/IMG_3480.jpg<FONT SIZE="3">Wiring!</FONT>
Now this is pretty easy, but then again i love electrical. But all you need to do is connect 5 wires total. One of the plugs that you disconnected from the auto shifter is a 14P plug. Cut the plug off. Your going to have a 2 thick blk wires and 1 blk/blu wire, Solder those 3 together. Those together lets your car think its in park and releases the key and starts your car. Important
Next there is a yel/red wire and a grn/blk wire. Doesnt matter what way they go they do the same. These are for your reverse lights. Connect some line to them and run it through the firewall to your reverse light switch. And your set.
<FONT SIZE="3">Cruise Control Update</FONT>
This was given by Nomac5 on here and according to him it works. What he did was take the pink wire and grounded it with the blk (ground) wire. Now i havent tried this personally but he says it works. Some feedback would be great from others as well.
Sadly i couldnt figure out the Cruise control but i believe because the car thinks its in park to get the key and start it wont allow you cruise control. But if you want to know your Cruise control wire its a pink wire. To wire in the clutch safty switch run the 2 black wires to your safty switch and with the clutch pressed it should make a complete circuit and allow you to start your car.
http://img.photobucket.com/albums/v38/Luserkid/IMG_3486copy.jpghttp://img.photobucket.com/albums/v38/Luserkid/IMG_3497copy.jpghttp://img.photobucket.com/albums/v38/Luserkid/IMG_3497copy.jpgHope this how to helps alot of you guys. Sorry theres not more pics but like i said i thought these were the most important. If you need more let me know.
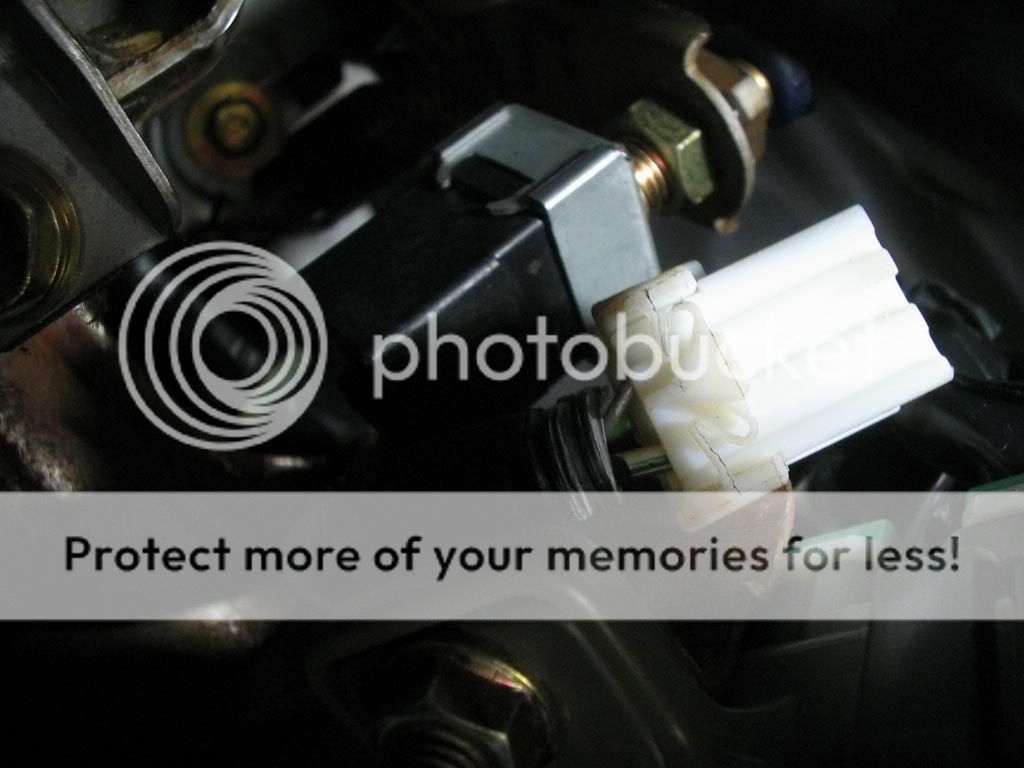
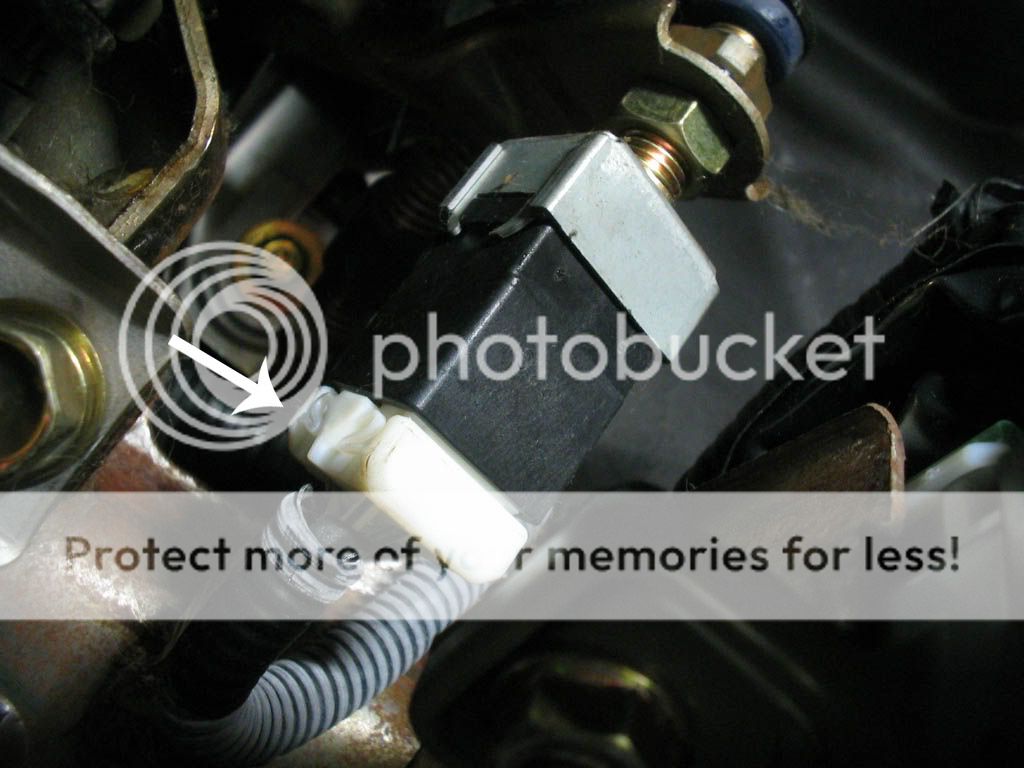
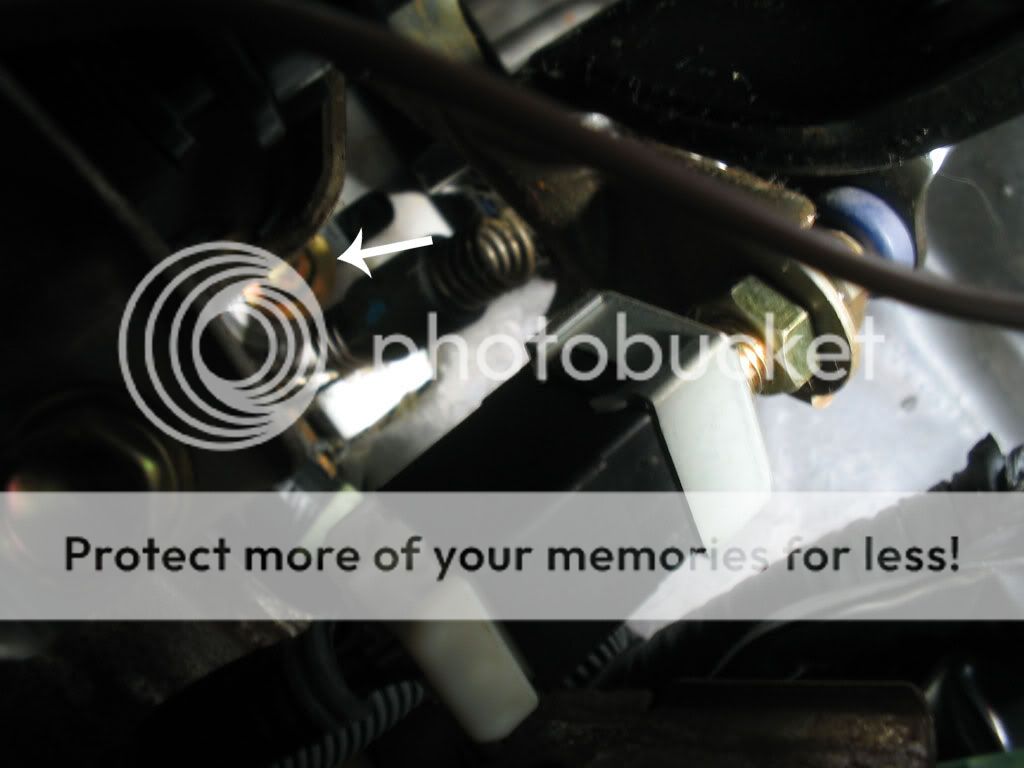
<FONT SIZE="3">Interlock System</FONT>
Sorry for lagging on these pics some cars have it and others dont. It just took a while for me to get one that did. Anyway this little box makes sure that your in park so you could get your key back by using this mech. that you will just take out. Very simple job. Weither or not you could leave the box in. For this car i left the box in because i didnt feel like getting to it once i put everything back. If you want to get the box out do it while the lower dash cover is off. This is all on the driver side under the steering wheel. 92-95 have it where the clutch pedal is suppose to go if they have it. Anyway open up the lower steering cover to access the key cylinder. Next youll see this little mech. on the cylinder. Pop off the 1 screw that holds it on and pry it off. You could take the white cover off and it would be a little easier. Once you pop it off youll see that little piston come off. Disconnect it from the wire and your good to go. Enjoy.
Total Work Time: about 8 to 10 hours.
Modified by Luserkid at 11:59 AM 3/2/2006
Modified by Luserkid at 11:33 AM 3/3/2006
Modified by Luserkid at 11:08 PM 7/27/2006
Modified by Luserkid at 11:10 PM 7/27/2006
Modified by Luserkid at 9:23 AM 8/2/2006
Modified by Luserkid at 4:37 PM 10/4/2006
Modified by Luserkid at 9:02 AM 10/26/2006
Modified by Luserkid at 9:04 PM 1/12/2007
Modified by Luserkid at 2:55 PM 1/23/2007
Modified by Luserkid at 8:17 AM 2/24/2007
Modified by Luserkid at 8:41 PM 5/14/2007
Modified by Luserkid at 8:50 PM 5/14/2007
Modified by Luserkid at 8:05 AM 5/16/2007
Modified by Luserkid at 7:56 PM 7/31/2007
Modified by Luserkid at 4:02 PM 1/1/2008
Modified by Luserkid at 4:03 PM 1/1/2008
Modified by Luserkid at 8:24 AM 1/17/2008
Modified by Luserkid at 7:43 PM 2/11/2008
Last edited by Luserkid; 12-06-2011 at 05:10 PM.

The following users liked this post:
08-11-2005, 11:32 PM
#2
Member
Join Date: Mar 2004
Location: Somewhere to anywhere, Ca
Posts: 4,982
Likes: 0
Received 6 Likes
on
3 Posts
Good ****....about damn time we see one of these. I hope we don't have to see ANYMORE "auto to manual help, what parts for auto to manual?" bullshit now.
And yes, the pedals are by far the hardest part of the whole thing.
And yes, the pedals are by far the hardest part of the whole thing.
The following users liked this post:
08-11-2005, 11:34 PM
#3
Member
Join Date: Aug 2004
Location: Milwaukee, WI, USA
Posts: 1,419
Likes: 0
Received 0 Likes
on
0 Posts
This should definitely be in the FAQ's. Thanks to both of you guys. Awesome write up, it's going to eliminate a lot of auto to manual questions. 
I thought driving it to Vegas was the most time consuming
I thought driving it to Vegas was the most time consuming
 08-12-2005, 08:09 AM
#7
Honda-Tech Member
Join Date: Jun 2004
Location: USA
Posts: 108
Likes: 0
Received 0 Likes
on
0 Posts
great write up!!! i cant wait to do mine...juss gotta piece the parts now....
btw...luserkid, wanna do my swap too??? pm me with a price quote!!! i talked to srcivic97, and he suggested you!!! lmk...thanks!!!
btw...luserkid, wanna do my swap too??? pm me with a price quote!!! i talked to srcivic97, and he suggested you!!! lmk...thanks!!!
Trending Topics
08-12-2005, 10:18 AM
#9
B*a*n*n*e*d

Join Date: Aug 2004
Location: Sanger, California, United States
Posts: 697
Likes: 0
Received 0 Likes
on
0 Posts
Thank you so damn much!! This is what a lot of people have been needing lately. And I know I have. I hope this helps a lot of people I know it's helped me. Thanks Luserkid!
This is what a lot of people have been needing lately. And I know I have. I hope this helps a lot of people I know it's helped me. Thanks Luserkid!
08-12-2005, 11:05 AM
#10
oh my god. i love you in a very non homosexual way.
thanks for the pictures...
by the way, how hard do you think this is? ive never taken out my tranny before on a scale from 1 - 10?
and for those who have done this, where did you guys get your parts? do you think i can get it from 1 vehicle at a junk yard?
Modified by ekcivic9 at 12:19 PM 8/12/2005
thanks for the pictures...
by the way, how hard do you think this is? ive never taken out my tranny before
on a scale from 1 - 10?and for those who have done this, where did you guys get your parts? do you think i can get it from 1 vehicle at a junk yard?
Modified by ekcivic9 at 12:19 PM 8/12/2005
The following users liked this post:
08-12-2005, 11:09 AM
#11
Honda-Tech Member
Thread Starter
on a scale of 1 to 10 ill give this a 7 maybe 8 because of the pedals. This is a real easy swap if you know what your looking for and what to do.
SOHC4life got all his parts from junkyards or junk cars. The tranny he found on Honda-tech. I know another guy who got everything from a junkyard. Junkyard is your cheapest bet.
SOHC4life got all his parts from junkyards or junk cars. The tranny he found on Honda-tech. I know another guy who got everything from a junkyard. Junkyard is your cheapest bet.
08-12-2005, 11:22 AM
#13
Honda-Tech Member
Thread Starter
From what i saw on shops the cheapest was 1200 with a homie hook up (LA area) My friend in Seattle had his done at a shop and they said 600 start then the price went up and up. I dont remember his final price.
Youll have to search around, some people are cool others arent. So far that i know my price is the cheapest in LA.
For parts, i have no idea sorry. My guess would be around 500 max.
Youll have to search around, some people are cool others arent. So far that i know my price is the cheapest in LA.
For parts, i have no idea sorry. My guess would be around 500 max.
08-12-2005, 01:12 PM
#14
Member
Join Date: Aug 2004
Location: Milwaukee, WI, USA
Posts: 1,419
Likes: 0
Received 0 Likes
on
0 Posts
I can definitely answer the parts question. Had all the parts I received been in working order the grand total in parts is roughly $600. I recommend buying all new OEM bolts for the clutch assembly and also a new OEM clutch. Because I had to buy a new slave cylinder and a new mount from Honda my price was a little higher than it should be. A junk yard is truely your best friend. Since i didn't have that availability I purchased all my parts through Honda Tech over a period of 2 months. What also drove my cost up was the S2000 shift **** and JDM shift boot. Those are definitely not requirements, but damn I like them a lot If you can find a wrecked 5-speed you're golden.
If you can find a wrecked 5-speed you're golden.
08-14-2005, 08:36 AM
#19
Honda-Tech Member
Join Date: Apr 2005
Location: CO
Posts: 792
Likes: 0
Received 0 Likes
on
0 Posts
Great write up. Finally one with detail.
On the rear motor mount I just used some washers so the mount worked right(manual Avid mount) Also though this was on a 92 hatch so I don't know if the newer hatches have a bigger difference, or I just done see it.
On the rear motor mount I just used some washers so the mount worked right(manual Avid mount) Also though this was on a 92 hatch so I don't know if the newer hatches have a bigger difference, or I just done see it.
08-14-2005, 10:51 AM
#22
I just did this swap last week on my car and I did not change that rear rubber mount and the L shaped bracket bolted up perfectly fine, I don't see any difference in the picture, I�m also going to do this swap on another car next week.
and about the cruise control, it only works in D4, D3 and 2, just ground the pink wire and it will always work, or connect it to the clutch switch, then switch to ground.
and about the 99-00 civics the O2 sensor in the cat needs to be relocated to either the top of the cat or to the bottom, I chose the top, just get a bung and someone who can weld. the O2 sensor on the 96-98 is in the rear top of the cat.
08-14-2005, 11:55 AM
#23
Trial User
Join Date: Feb 2004
Location: Long Beach, CA
Posts: 1,242
Likes: 0
Received 0 Likes
on
0 Posts
<TABLE WIDTH="90%" CELLSPACING=0 CELLPADDING=0 ALIGN=CENTER><TR><TD>Quote, originally posted by mRek9R »</TD></TR><TR><TD CLASS="quote">excellent write up!! </TD></TR></TABLE>
Good **** mang!!
</TD></TR></TABLE>Good **** mang!!
08-14-2005, 07:56 PM
#25
Honda-Tech Member
<TABLE WIDTH="90%" CELLSPACING=0 CELLPADDING=0 ALIGN=CENTER><TR><TD>Quote, originally posted by mRek9R »</TD></TR><TR><TD CLASS="quote">excellent write up!! </TD></TR></TABLE>

</TD></TR></TABLE>