
How to Change Rear Rotors and Brake Pads on 5th Gen Accord!
 04-06-2007, 10:11 PM
#1
Junior Member
Thread Starter
Join Date: Apr 2006
Location: Gray, TN, US
Posts: 696
Likes: 0
Received 0 Likes
on
0 Posts
Ok so this is my first write up so if you find any mistakes or whatever let me know and I will fix them! So here we go!
Total Jobtime Span-45 minutes to a Half an hour using the right tools!
This is a really easy DIY job!
Here are the tools you will need for the job:
1)Impact Driver-you can get them at sears or napa for about 22.99
2)2 New Rotors
3)Set of New Brake Pads
4)Can of All purpose grease
5)Can of WD-40
6)Can of Brakleen
7)A good 3/8 socket wrench
8)14mm socket, 17mm socket, 12mm socket, and a 10mm wrench
9)Good Jack and Jack Stands(Safety First)
10)Socket to screw your piston back in
11)Rubber Mallet

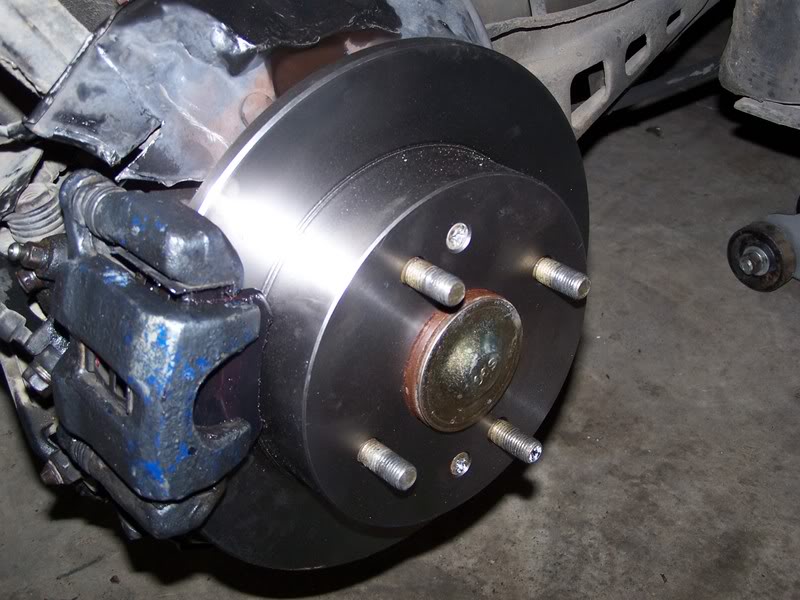
Step #1
Loosen your lugnuts while your car is still on the ground. Jack the car up on the side jack point and I myself like to put a jack stand under the rear toe hook for safety! Next take off the lugnuts with your hand and pull the tire off.
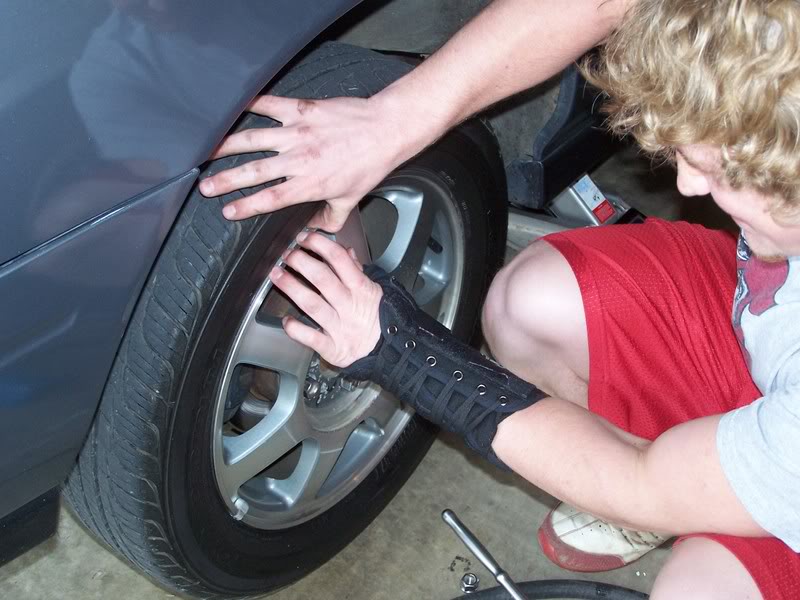
Step#2
In this step you will be taking the caliper apart. The first thing you want to do is take out the two caliper bolts out. These bolts are 12mm and they are on fairly tight but shouldnt be a hassle to get off. Once you've taken these bolts out take the caliper off and the pads off. If you have something to tie the caliper up with please do so, so there is no stress on the brake line! The only thing left should be the bracket. (make sure you keep these bolts in a safe place so you dont have to replace them, I like to use ziploc bags and a sharpie marker to label them) Ok there are two bolts holding the caliper braket on. The top one is a 14mm and the bottom one is a 17mm. I have no idea why they are different sizes but they are. Once you remove these two bolts remove the caliper braket and set it aside. Make sure not to lose the washers that are on these because they keep the bolt nice and snug in there!
Step #3
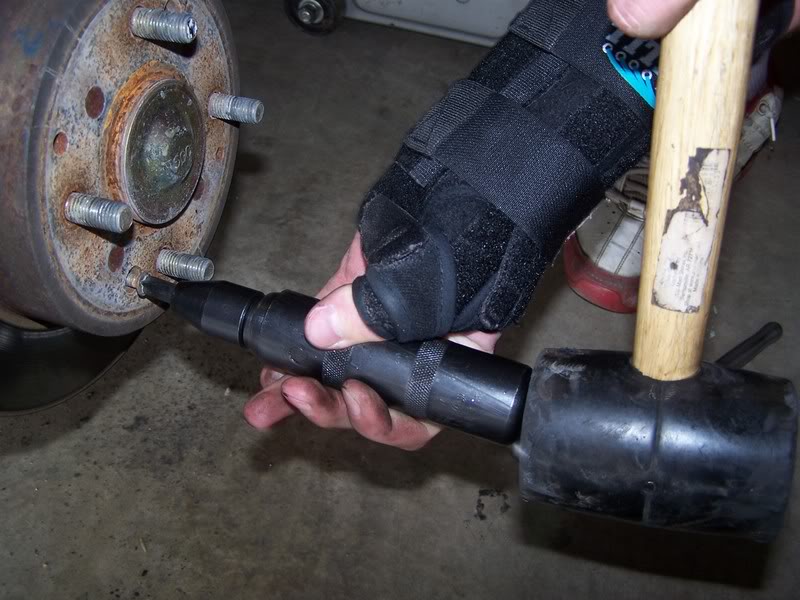
Take your can of WD-40 and spray it on both screws a little bit and around the center of the rotor. Also take the red straw that comes with the WD-40 and spray it all around behind the rotor where it slids on and let the WD-40 Sit for a little bit and eat the rust away. Then once youve done this take the impact driver you bought or rented and put the right bit on it. Next take the rubber mallet you have and hit the end of the impact driver. (Make sure you have it set to turn to the left and not to the right!) Dont be afraid to beat the crap out of this bolt..Trust me its on there damn good! Make sure you have the right bit on so you wont strip it! Mine came right out though after a few wacks..saved me a ton of hassle!
Step #4
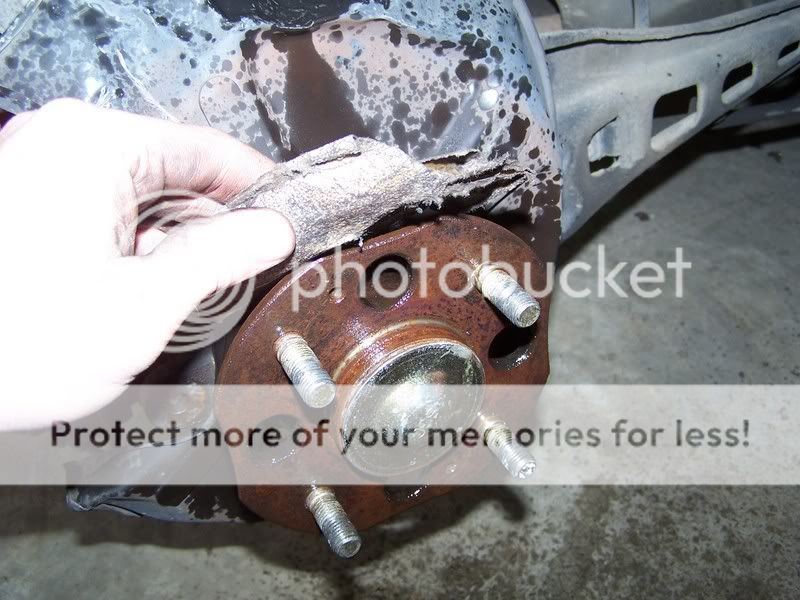
After you've taken both of the screws out Take the Rubber mallet once again and hit the back of the rotor with it while someone or yourself turns it. Dont be afraid to hit the rotor hard as it usually is rusted on there pretty good!...Do Not use a metal hammer unless you just really want to shatter your rotor..Trust me I've seen this happen!..The rotor should come off with a few hits with the rubber mallet.
Step #5
Once you have the rotor off its a good idea to spray some brakleen and clean up as much rust as you can!
Step #6
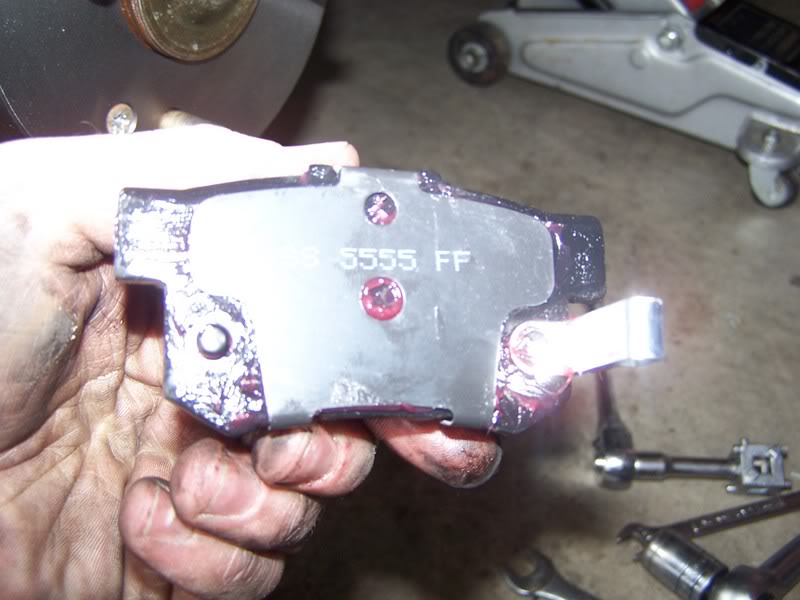
Once you have everyting off and everything cleaned up very well get your new brake pads. Take the shims off and use the grease you bought to grease up the pad really good. Once youve done that on both pads put the shim back on the brake pad. Make sure you grease up a few other things to such as the piston, and I like to grease up the caliper bolts also.
Step #7
Grab your new rotor and slide it on..make sure the screw holes line up with the ones on the hub. I used my old ones because I didnt strip them at all but if you do you can buy them at the honda dealership for pretty cheap. Make sure you have the rotor on all the way before inserting the screws. Also I didnt tighten my screws really tight just for future brake work.
Step #7
Now you want to take the brake piston tool you bought or own and screw the piston back in all the way. I myself had to loosen the bleeder screw thats why in the parts list I included a 10mm Wrench. So loosen the bleeder screw and turn the piston in all the way. The first couple of turns are probably gonna be really tight but after that its easy. Make sure that you have the piston lined up right so that your pad fits on right! Once you have that comleted re-tighten the bleeder screw all the way.

Now take your caliper braket and bolt it back up. Remember the 14mm goes on top and 17mm on the bottom!
Make sure you have the washers that came off of them.

Once youve done this slide the brake pads onto the braket. Take the caliper and slide it over the brake pads. This can kind of be a hassle due to the tight fight but just wiggle it on there a little bit, should slid right on. Put the 2 12mm bolts back into the caliper and tighten them down.
Step #8
Step back and look at the work that youve accomplished! Easy DIY job eh? I thought so anyways took me a total of about 45 minutes
Cameron AKA Camshaft

Thats me lol

Thanks to Cameron Jarrett, and Tyler Edwards!
Parts supplied from Napa Auto Parts
Enjoy your ride!
Modified by lowered94accord at 2:25 AM 4/7/2007
Total Jobtime Span-45 minutes to a Half an hour using the right tools!
This is a really easy DIY job!
Here are the tools you will need for the job:
1)Impact Driver-you can get them at sears or napa for about 22.99
2)2 New Rotors
3)Set of New Brake Pads
4)Can of All purpose grease
5)Can of WD-40
6)Can of Brakleen
7)A good 3/8 socket wrench
8)14mm socket, 17mm socket, 12mm socket, and a 10mm wrench
9)Good Jack and Jack Stands(Safety First)
10)Socket to screw your piston back in
11)Rubber Mallet
Step #1
Loosen your lugnuts while your car is still on the ground. Jack the car up on the side jack point and I myself like to put a jack stand under the rear toe hook for safety! Next take off the lugnuts with your hand and pull the tire off.
Step#2
In this step you will be taking the caliper apart. The first thing you want to do is take out the two caliper bolts out. These bolts are 12mm and they are on fairly tight but shouldnt be a hassle to get off. Once you've taken these bolts out take the caliper off and the pads off. If you have something to tie the caliper up with please do so, so there is no stress on the brake line! The only thing left should be the bracket. (make sure you keep these bolts in a safe place so you dont have to replace them, I like to use ziploc bags and a sharpie marker to label them) Ok there are two bolts holding the caliper braket on. The top one is a 14mm and the bottom one is a 17mm. I have no idea why they are different sizes but they are. Once you remove these two bolts remove the caliper braket and set it aside. Make sure not to lose the washers that are on these because they keep the bolt nice and snug in there!
Step #3
Take your can of WD-40 and spray it on both screws a little bit and around the center of the rotor. Also take the red straw that comes with the WD-40 and spray it all around behind the rotor where it slids on and let the WD-40 Sit for a little bit and eat the rust away. Then once youve done this take the impact driver you bought or rented and put the right bit on it. Next take the rubber mallet you have and hit the end of the impact driver. (Make sure you have it set to turn to the left and not to the right!) Dont be afraid to beat the crap out of this bolt..Trust me its on there damn good! Make sure you have the right bit on so you wont strip it! Mine came right out though after a few wacks..saved me a ton of hassle!
Step #4
After you've taken both of the screws out Take the Rubber mallet once again and hit the back of the rotor with it while someone or yourself turns it. Dont be afraid to hit the rotor hard as it usually is rusted on there pretty good!...Do Not use a metal hammer unless you just really want to shatter your rotor..Trust me I've seen this happen!..The rotor should come off with a few hits with the rubber mallet.
Step #5
Once you have the rotor off its a good idea to spray some brakleen and clean up as much rust as you can!
Step #6
Once you have everyting off and everything cleaned up very well get your new brake pads. Take the shims off and use the grease you bought to grease up the pad really good. Once youve done that on both pads put the shim back on the brake pad. Make sure you grease up a few other things to such as the piston, and I like to grease up the caliper bolts also.
Step #7
Grab your new rotor and slide it on..make sure the screw holes line up with the ones on the hub. I used my old ones because I didnt strip them at all but if you do you can buy them at the honda dealership for pretty cheap. Make sure you have the rotor on all the way before inserting the screws. Also I didnt tighten my screws really tight just for future brake work.
Step #7
Now you want to take the brake piston tool you bought or own and screw the piston back in all the way. I myself had to loosen the bleeder screw thats why in the parts list I included a 10mm Wrench. So loosen the bleeder screw and turn the piston in all the way. The first couple of turns are probably gonna be really tight but after that its easy. Make sure that you have the piston lined up right so that your pad fits on right! Once you have that comleted re-tighten the bleeder screw all the way.
Now take your caliper braket and bolt it back up. Remember the 14mm goes on top and 17mm on the bottom!
Make sure you have the washers that came off of them.
Once youve done this slide the brake pads onto the braket. Take the caliper and slide it over the brake pads. This can kind of be a hassle due to the tight fight but just wiggle it on there a little bit, should slid right on. Put the 2 12mm bolts back into the caliper and tighten them down.
Step #8
Step back and look at the work that youve accomplished! Easy DIY job eh? I thought so anyways took me a total of about 45 minutes
Cameron AKA Camshaft
Thats me lol
Thanks to Cameron Jarrett, and Tyler Edwards!
Parts supplied from Napa Auto Parts
Enjoy your ride!
Modified by lowered94accord at 2:25 AM 4/7/2007
 04-07-2007, 04:44 PM
#4
Honda-Tech Member
Join Date: Oct 2006
Location: Milwaukee Area, WI, USA
Posts: 115
Likes: 0
Received 0 Likes
on
0 Posts
Good write up. Is the grease necessary? I've done brakes on all my cars and have never greased them. Just wondering if I have been missing something wrong? Also, if the rotor is really rusted on the hub, don't be afraid to get out the propane torch and heat the up the area between the rotor and the hub. Just don't get the flame near the wheel bearing cover or brake line. I've had to do that due to my accord being parked for so long outdoors.
04-07-2007, 07:58 PM
#5
Junior Member
Thread Starter
Join Date: Apr 2006
Location: Gray, TN, US
Posts: 696
Likes: 0
Received 0 Likes
on
0 Posts
Ive always used it because if you dont it can cause squeaking noises and such...its just a good idea to do it
04-10-2007, 09:57 AM
#6
Join Date: Apr 2007
Location: San Diego, California
Posts: 7
Likes: 0
Received 0 Likes
on
0 Posts
Thanks for the pics and tips.
Noted the Lisle rear piston retract tool worked.
Will order one for future use.
Noted the Lisle rear piston retract tool worked.
Will order one for future use.
04-10-2007, 08:30 PM
#7
Junior Member
Thread Starter
Join Date: Apr 2006
Location: Gray, TN, US
Posts: 696
Likes: 0
Received 0 Likes
on
0 Posts
anytime man...and yes the piston tool works..only thing you have to do is loosen the bleeder screw a bit to let all the pressure off of it...then you may want to consider bleeding the rear brake calipers!
Trending Topics
04-15-2007, 07:49 PM
#8
Member
Join Date: Jan 2003
Location: Wichita, Kansas
Posts: 1,546
Likes: 0
Received 0 Likes
on
0 Posts
Thanks for the good write up
Was wondering what kinda flathead screw-driver is that big enough to screw the rear disc piston back in since we can't compress it
Didn't know that brake piston tool exists haha
Was wondering what kinda flathead screw-driver is that big enough to screw the rear disc piston back in since we can't compress it
Didn't know that brake piston tool exists haha
04-15-2007, 08:15 PM
#9
Junior Member
Thread Starter
Join Date: Apr 2006
Location: Gray, TN, US
Posts: 696
Likes: 0
Received 0 Likes
on
0 Posts
yes the brake piston tool is awesome..the first time I did rear brake pads I tried a pair of needle nose pliers..didnt work at all haha 
04-16-2007, 05:01 AM
#10
H-T Order of Merit
instead of loosening the bleeder screw to relieve pressure and make it easier to turn, just take the cap off the brake fluid reservoir. It'll make turning the rear caliper piston much easier and you won't have to worry about bleeding the rear brakes because of loosening the bleeder screw.
04-16-2007, 06:09 AM
#12
H-T Order of Merit
you mean the brake piston tool to turn the caliper piston back in?
you can get it at most parts stores for about $8-12 IIRC.
I was about to buy one years ago at AutoZone I believe but then a friend gave me one they didn't need anymore.
you can get it at most parts stores for about $8-12 IIRC.
I was about to buy one years ago at AutoZone I believe but then a friend gave me one they didn't need anymore.
04-16-2007, 06:52 AM
#13
Honda-Tech Member
Join Date: Mar 2007
Location: New Hampshire
Posts: 325
Likes: 0
Received 0 Likes
on
0 Posts
I want to get some aftermarket brakes but don't want to spend all that money for the labor of a mechanic to put them on. I just recently had to get all new brakes put on. The cost came to $2,000 and most of that went to the labor.
So this write up should help me in the future when i get some nice brakes.
04-16-2007, 07:55 AM
#14
Join Date: Apr 2005
Location: SOUTH BAY, CA
Posts: 608
Likes: 0
Received 0 Likes
on
0 Posts
Good steps. I'm sure it will help the people that need the information. Well explained. BTW your car looks clean! Got any more plans for it?
04-16-2007, 08:16 PM
#15
Junior Member
Thread Starter
Join Date: Apr 2006
Location: Gray, TN, US
Posts: 696
Likes: 0
Received 0 Likes
on
0 Posts
Thanks for all the input guys..and yes you can remove the cap to relieve pressure..I Just didnt think of that for some reason..thanks touring accord..and yes you can get the brake piston tool at any parts store..i think mine was 4.99 at advance..I cant remember Ive had it forever...and yes I have a ton of plans for my car..first off I want to tint the windows just a smidge..get some better springs, lip kit painted the same as my car, JDM stanley yellow fog lights(very rare), Shave the side moldings off( I ment to do this when I painted my car  ...), Upgraded brake system..iim not sure what I want yet, its an auto so this summer IM planning on doing the 5 speed conversion and then I want to buy an h22 and set it in my basement for a while so I can rebuild it and then drop it in and turbo it..nothing to fancy and im not lookin for outragious HP numbers just something to give a good kick..im getting my interior redone also..im thinking black and red maybe? like the ITRs....I think thats about it im not sure..im sure as I go along things will change and I will come up with new ideas..ill try to keep everyone posted!
BTW this is what my car used to look like with ebay coilovers on it and gay chrome ****...altezzas andeverything..I dont know what I was thinking..I guess you live and you learn lol

...), Upgraded brake system..iim not sure what I want yet, its an auto so this summer IM planning on doing the 5 speed conversion and then I want to buy an h22 and set it in my basement for a while so I can rebuild it and then drop it in and turbo it..nothing to fancy and im not lookin for outragious HP numbers just something to give a good kick..im getting my interior redone also..im thinking black and red maybe? like the ITRs....I think thats about it im not sure..im sure as I go along things will change and I will come up with new ideas..ill try to keep everyone posted! BTW this is what my car used to look like with ebay coilovers on it
and gay chrome ****...altezzas andeverything..I dont know what I was thinking..I guess you live and you learn lol
07-16-2010, 09:07 AM
#16
Honda-Tech Member

Join Date: Jun 2009
Posts: 6
Likes: 0
Received 0 Likes
on
0 Posts
Can't say thanks enough for this thread, and this site. I just did a complete brake replacement on my 01 Accord V6, thanks to what I learned here. I would consider myself a novice on most car repairs, but this was fairly straighforward with the info and encouragement found here.
My right rear pad indicator was driving me nuts, and my dealer said my pads were worn down and my rotors were rusty and beyond repair. (My front rotors were also either warped or uneven, causing a bad pulsation when stopping). They quoted me $1,100.00 for the complete replacement job. That's 1,100 I just didnt have right now - but I did need brakes.
After checking this site thoroughly and finding this thread, i decided to give it a go. I installed new rotors/pads all around, using Akebono ceramic pads (Advance Auto Parts) and "Wearever" rotors. The front rotors were $28 ea, rears $21 ea, and pads were like $50-60 an axle. So right around $200.00 for the parts. I also got an impact driver ($20), disc brake compressor tool ($9)and a giant-*** C-clamp (I think it was the 10" size - get the big one!) from Home Depot ($10) to compress the front calipers. I already had a good set of metric box-end ratchet wrenches.
I went slow, and had my laptop and Haynes manual. Just took one step at a time - if youre following the steps there's really not a wrong way to do it. I never opened a bleeder valve or a brake line, but did made sure my brake reservoir lid was off so the fluid would have someplace to go when pistons were compressed (I wasn't sure of my ability to bleed the system).
Hardest part was getting old rotors off. I couldn't have budged the retainer screws w/o that impact driver, some liquid wrench, and some good hard whacks with a hammer. I also needed to thread bolts into the rotors to force them off (rusty).
The first wheel took me about an hour, just reading and going slow, and it was downhill from there. Front procedures ARE different from rears (but equally doable) - so get that Haynes manual and follow the different steps for front and rear. Biggest difference is, front piston is compressed with a C clamp (where the rear is screwed in with that little tool) and front calipers flip up for pad removal. Caliper bracket bolts were pretty tough to unbolt - DO NOT strip the head - use a box end wrench. I didn't use any grease on or around the pads as indicated here, just didn't see what it would do. I did use the anti-squeak compound on the rears, but not the fronts (honestly forgot) but I don't see that it made any difference either.
I was thoroughly impressed - took a few pedal pumps to have the system self-adjust, but after that they were perfect. Those ceramic Akebonos are the way to go, too - I've driven the car about 2-300 miles since - and never one squeak.
I frankly am amazed that dealers charge so much for brakes. I can see if the rotors are pressed on and you CAN'T do it yourself - but for this, where the rotors are screwed on, come on - seems like gouging to me, and for something that's a real safety issue.
I would like to say I saved $900 from what the dealer would charge, but frankly, I just didn't have the spare $$$ laying around right now. So how many people out there are in my boat? Bottom line, I would have just kept driving around on shitty brakes!
Theres not a lot of magic to it. Just a little wrench knowledge, some courage, and a need to fix your brakes for cheap. Amazing sense of accomplishment, a new skill learned, and TONS of money saved.
 07-16-2010, 10:16 AM
#19
Honda-Tech Member
Join Date: Jun 2009
Posts: 6
Likes: 0
Received 0 Likes
on
0 Posts
07-17-2010, 05:45 AM
#20
Honda-Tech Member
Join Date: Sep 2006
Location: Rochester, NY
Posts: 348
Likes: 0
Received 0 Likes
on
0 Posts
Not sure why you never removed the impact screws from the rotor after you reinstalled everything. They strip out easily even with an impact, save yourself the hassle the next time around. They really only are helpful when reinstalling the caliper bracket IMO.
07-17-2010, 01:24 PM
#21

I want to get some aftermarket brakes but don't want to spend all that money for the labor of a mechanic to put them on. I just recently had to get all new brakes put on. The cost came to $2,000 and most of that went to the labor.
So this write up should help me in the future when i get some nice brakes.
08-12-2010, 09:20 PM
#22
Trial User

Join Date: Aug 2010
Posts: 1
Likes: 0
Received 0 Likes
on
0 Posts
Good write-up, I like it. But now I got a question about a 95 Honda Accord, I am doing the front brakes on it, and was told when I got the parts that the Rotors had to be pressed on to the axle plate. Do you know anything about this, any help would be greatly appericated?
08-12-2010, 10:19 PM
#23
Honda-Tech Member

Join Date: Nov 2009
Location: wv
Posts: 152
Likes: 0
Received 0 Likes
on
0 Posts
08-13-2010, 09:53 AM
#24
Axle plate? Never heard of an "axle plate". Do you mean hub? Because the wheel bearing is pressed onto the hub then the rotor is bolted to the hub on your year Accord.
08-13-2010, 11:40 AM
#25
Honda-Tech Member

Join Date: Dec 2009
Location: Mississippi
Posts: 435
Likes: 0
Received 0 Likes
on
0 Posts
instead of loosening the bleeder screw to relieve pressure and make it easier to turn, just take the cap off the brake fluid reservoir. It'll make turning the rear caliper piston much easier and you won't have to worry about bleeding the rear brakes because of loosening the bleeder screw.