
Beginners blog: fabrication life progression
 03-16-2015, 12:00 PM
#76

Two quick things: I tig with an old school transformer welder and have learned a few things due to the way they work.
I had black spots on my al welds for a while even after I addressed the cleaning process. They were due to:
1) Long arcing. Al is MUCH more picky about long arcing than stainless. Keep the arc short! At the end, lighten up the heat, circle the torch, and apply filler to eliminate cratering
2) Poor gas shielding. This applies especially when using heavy amps. What I found was that the puddle and end of the filler rod was getting oxides due to inadequate gas coverage. If your filler rod looks black/clouded after welding, then you have oxides building up...try increasing the gas
3) Keep the filler rod angle LOW. Keep it out of the reflected heat of the torch
4) As mentioned, clean both sides of the material to be welded at the ends to prevent bleed through of oxides at the end of the welds.
I use 2% La tungsten. It is better than 2% thoriated. Not way better, but better.
How do the insides of the ss pipes look?? the outsides can look nice and be all sugared up on the inside. Do you back purge? If not, and you're building headers with 100% penetration welds, look up a product called solar flux B. It prevents sugaring on the backside, which you don't want when the turbo is all about flow! You just have to remove it as you go. This can be tricky/impossible for long pipe sections, but it's way easier than purging most times.
Chay
 03-16-2015, 12:22 PM
#77
moderator emeritus
Thread Starter

Two quick things: I tig with an old school transformer welder and have learned a few things due to the way they work.
I had black spots on my al welds for a while even after I addressed the cleaning process. They were due to:
1) Long arcing. Al is MUCH more picky about long arcing than stainless. Keep the arc short! At the end, lighten up the heat, circle the torch, and apply filler to eliminate cratering
2) Poor gas shielding. This applies especially when using heavy amps. What I found was that the puddle and end of the filler rod was getting oxides due to inadequate gas coverage. If your filler rod looks black/clouded after welding, then you have oxides building up...try increasing the gas
3) Keep the filler rod angle LOW. Keep it out of the reflected heat of the torch
4) As mentioned, clean both sides of the material to be welded at the ends to prevent bleed through of oxides at the end of the welds.
I use 2% La tungsten. It is better than 2% thoriated. Not way better, but better.
How do the insides of the ss pipes look?? the outsides can look nice and be all sugared up on the inside. Do you back purge? If not, and you're building headers with 100% penetration welds, look up a product called solar flux B. It prevents sugaring on the backside, which you don't want when the turbo is all about flow! You just have to remove it as you go. This can be tricky/impossible for long pipe sections, but it's way easier than purging most times.
Chay
I had black spots on my al welds for a while even after I addressed the cleaning process. They were due to:
1) Long arcing. Al is MUCH more picky about long arcing than stainless. Keep the arc short! At the end, lighten up the heat, circle the torch, and apply filler to eliminate cratering
2) Poor gas shielding. This applies especially when using heavy amps. What I found was that the puddle and end of the filler rod was getting oxides due to inadequate gas coverage. If your filler rod looks black/clouded after welding, then you have oxides building up...try increasing the gas
3) Keep the filler rod angle LOW. Keep it out of the reflected heat of the torch
4) As mentioned, clean both sides of the material to be welded at the ends to prevent bleed through of oxides at the end of the welds.
I use 2% La tungsten. It is better than 2% thoriated. Not way better, but better.
How do the insides of the ss pipes look?? the outsides can look nice and be all sugared up on the inside. Do you back purge? If not, and you're building headers with 100% penetration welds, look up a product called solar flux B. It prevents sugaring on the backside, which you don't want when the turbo is all about flow! You just have to remove it as you go. This can be tricky/impossible for long pipe sections, but it's way easier than purging most times.
Chay
2) good advice on the gas coverage, i will keep an eye on that in the future.
3) the angle played a huge part. you will notice if you add filler at a really steep angle, the torch will want to melt it before you even get it to the puddle and you stand a higher chance of hitting the tungsten.
4) cleaning BOTH side of the material was something I did not learn until recently. really glad i figured that out because it was making me angry lol
I have been sticking with 2% lanthanted and I have really enjoyed it. seems to work really well and on DC it keeps a sharp point for a fair amount of time. And AC, as long as you ball the tip, i have noticed it works out better instead of letting it ball up while you are working.
I definitely back purge with stainless. I am even doing it with carbon steel although i have read you dont have to with carbon steel. On the millerwelds forum, there is a wide mix of useage and no use of members back purging with carbon. I do it anyway. It seems to have a better look on the inside.
03-16-2015, 12:25 PM
#78
moderator emeritus
Thread Starter
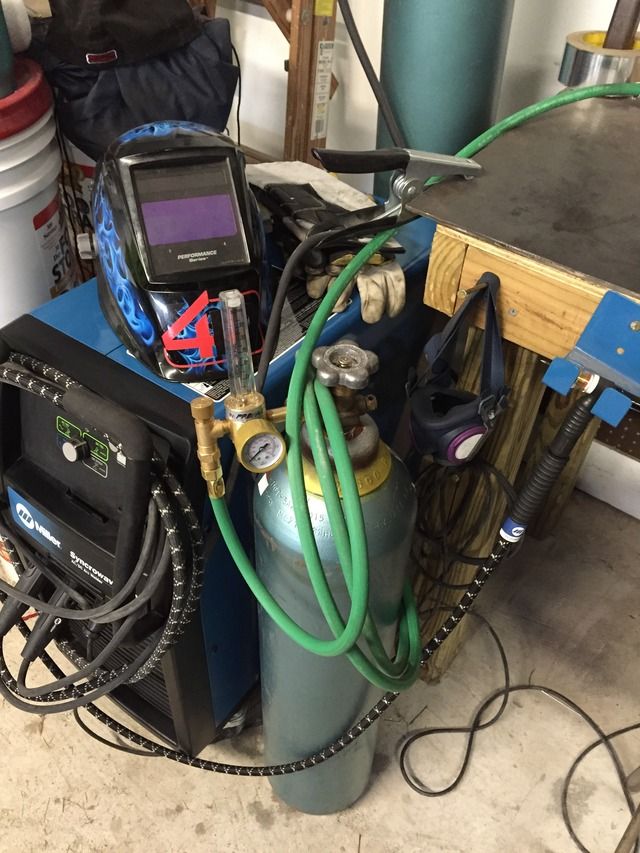
speaking of back purging, least week i got a dedicated bottle and regulator for it. I was using one bottle and splitting the pressure and that just didnt seem to work very well and it felt like i was blowing through argon so quickly. So i am going to try this and see how it works out.
 03-17-2015, 07:35 AM
#79
DO IT ON ALL FOURS
Do you mean splitting the pressure before or after the regulator? You know you can't do it after the regulator right? They make dual out regulators or tees for using the same bottle for feed and purge.
03-17-2015, 07:54 AM
#80
moderator emeritus
Thread Starter
after. and you "can" split it with a Y with control valves on each split. it just wasnt near as effective and I couldnt control the pressure as well.
03-17-2015, 06:17 PM
#81
DO IT ON ALL FOURS
Exactly my point, it just doesn't work and you waste gas on top of it. Look up flow vs pressure and why regulation with ball valves won't work in this application. Oh well, at least you have it figured out now.
03-22-2015, 06:47 AM
#82
moderator emeritus
Thread Starter
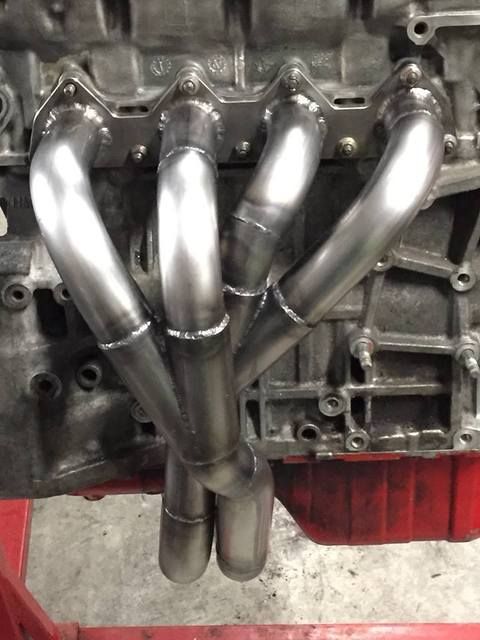
JRSC header is done and ready to be shipped out!
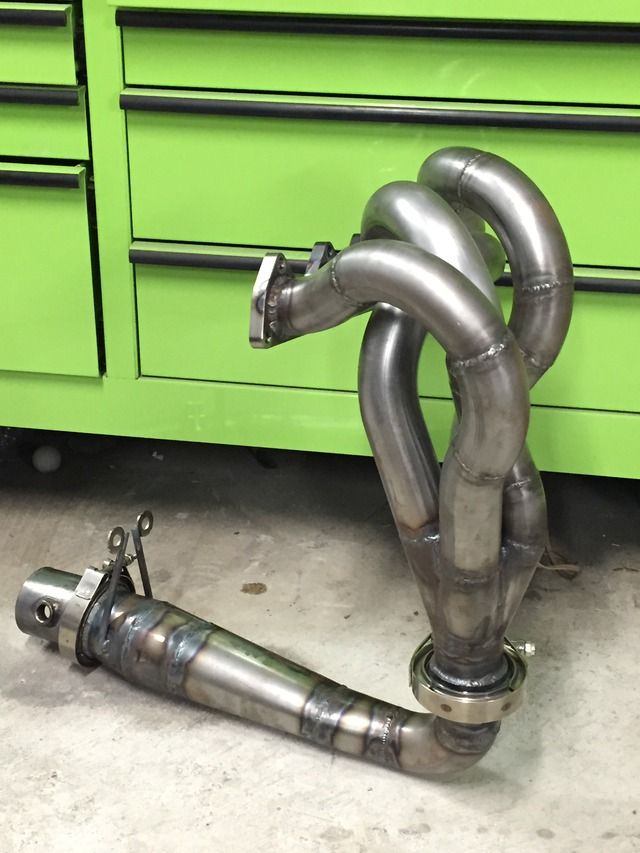
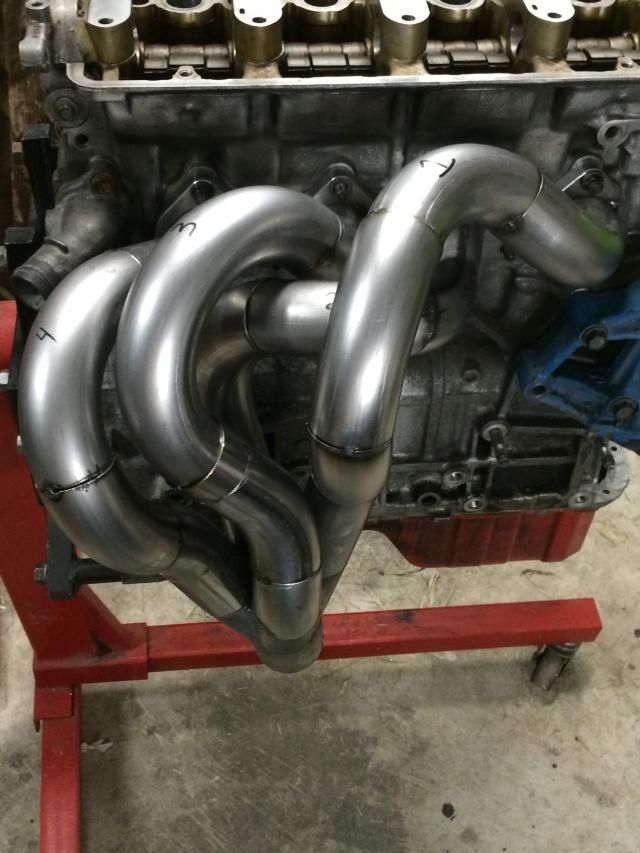
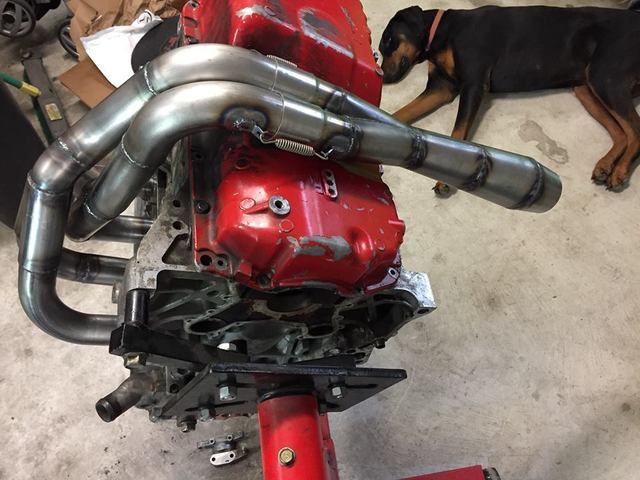
Tri-y design is mostly done other than the exit. Learned some valuable lessons from the jrsc header which I used in this one.
A) do as little cuts as possible
B) remember the tubes shrink in the direction of the cut after welding
C) weld tight spots before putting together
D) weld all collectors fully
E) don't back purge carbon steel LOL
F) fitment and torch angle (gas coverage) will make a night and day difference in how that section welds
I'm sure I have many many more valuable lessons to come buy here is the tri-y so far
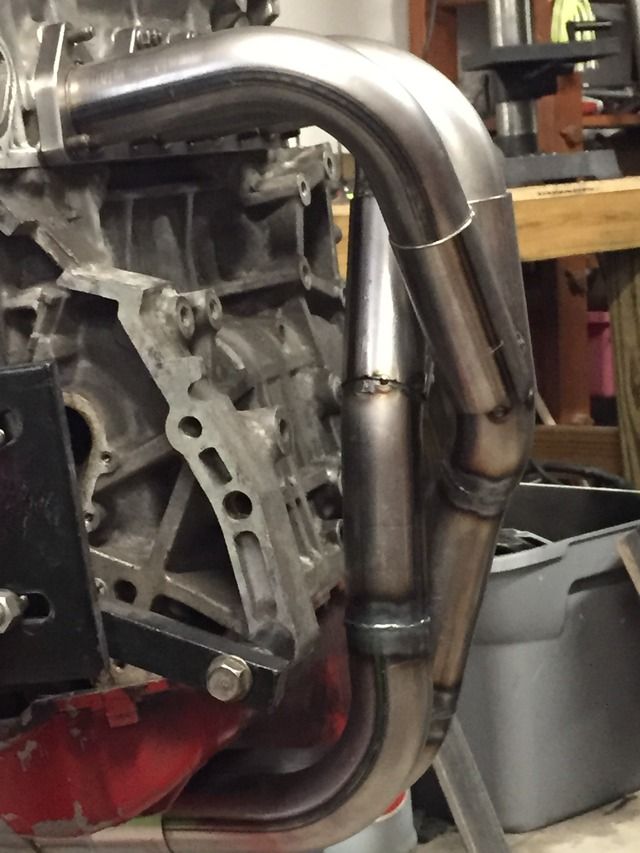
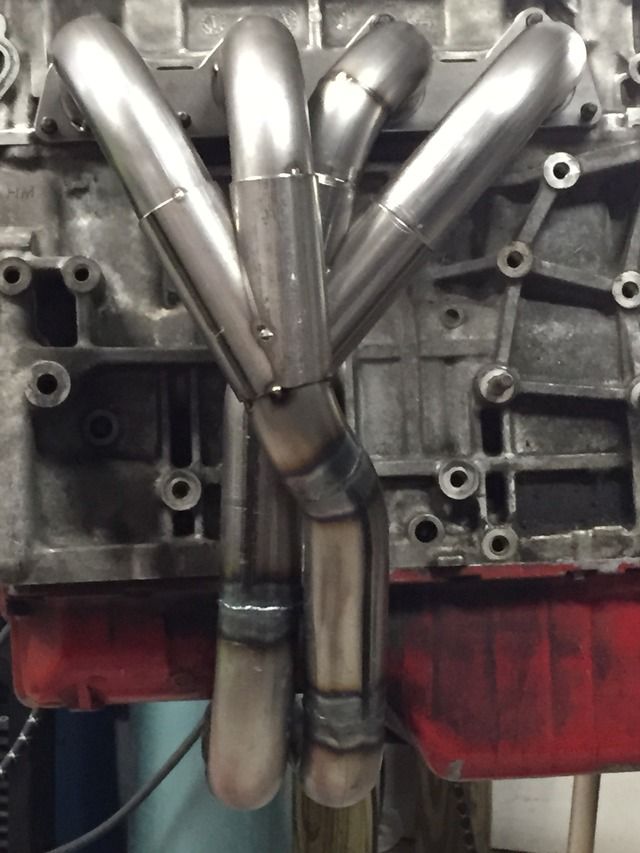
As always, thanks for watching!
03-22-2015, 10:15 AM
#83
DO IT ON ALL FOURS
Why are you saying "not to back purge carbon steel"? It's a must if you have a carbon steel with a high chromium content. Also, for carbon steel most use a Argon + CO2 mixture say 80/20 rather than straight Argon. Just curious what issue you were having with it is all and what gas you are using.
03-24-2015, 07:08 PM
#85
moderator emeritus
Thread Starter
Why are you saying "not to back purge carbon steel"? It's a must if you have a carbon steel with a high chromium content. Also, for carbon steel most use a Argon + CO2 mixture say 80/20 rather than straight Argon. Just curious what issue you were having with it is all and what gas you are using.
After speaking with a number of well known fabricators, wasting gas on the back side of a mild steel header tube is just that. A waste. After really looking into it and putting a purged mild steel weld next to a non purge there is nearly no difference. The problem I have been running into is heat control and I did some testing with that tonight which brings me to answering the next question
03-24-2015, 07:13 PM
#86
moderator emeritus
Thread Starter
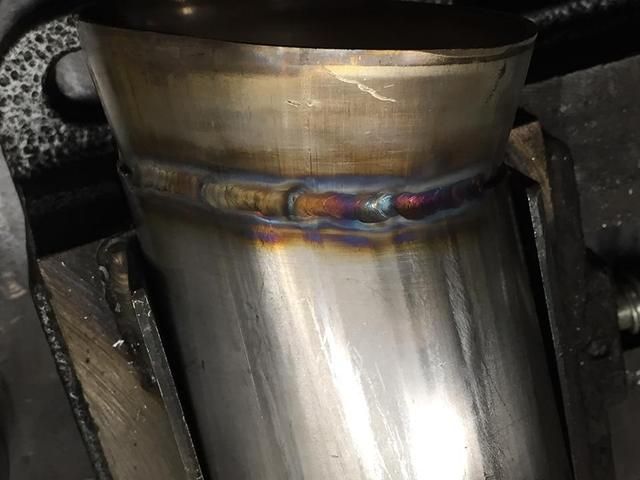
I did. The welds on the header above are with .045. I think my technique leads me to add too much filler into the puddle and in order to keep the puddle moving, I add heat and that just messes everything up.
I did a test, as well as some reading, and did welds back to back on scrap tube. One with my standard technique and another with the same basics but adding less rod the puddle and the weld has the convex look you seek. I'm still getting full penetration and I believe the bigger is too much for my style. I ordered some .035 to try and test this out. I think it will be the right combination to get the penetration and look I want without having to change how i weld.
I did a test, as well as some reading, and did welds back to back on scrap tube. One with my standard technique and another with the same basics but adding less rod the puddle and the weld has the convex look you seek. I'm still getting full penetration and I believe the bigger is too much for my style. I ordered some .035 to try and test this out. I think it will be the right combination to get the penetration and look I want without having to change how i weld.
03-25-2015, 11:37 AM
#87
Honda-Tech Member
Join Date: Jun 2005
Location: BAY AREA
Posts: 2,642
Likes: 0
Received 0 Likes
on
0 Posts
i would love to get to that point but its all baby steps and making sure each step is taken seriously. I still get uncomfortable really easy so ive been trying to work in uncomfortable positions to make the so so positions a lot easier.
thanks for reading!
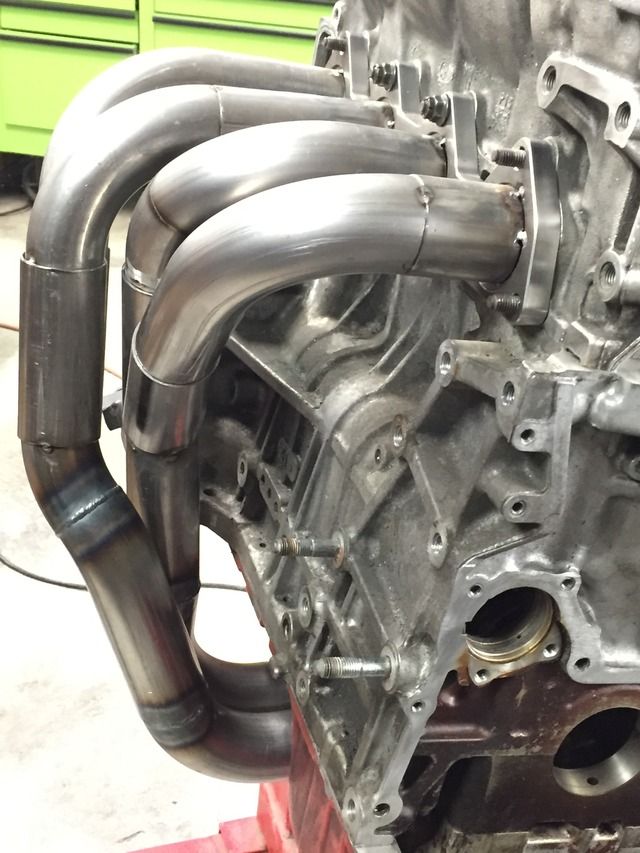
finalized design of this particular big tube JRSC header
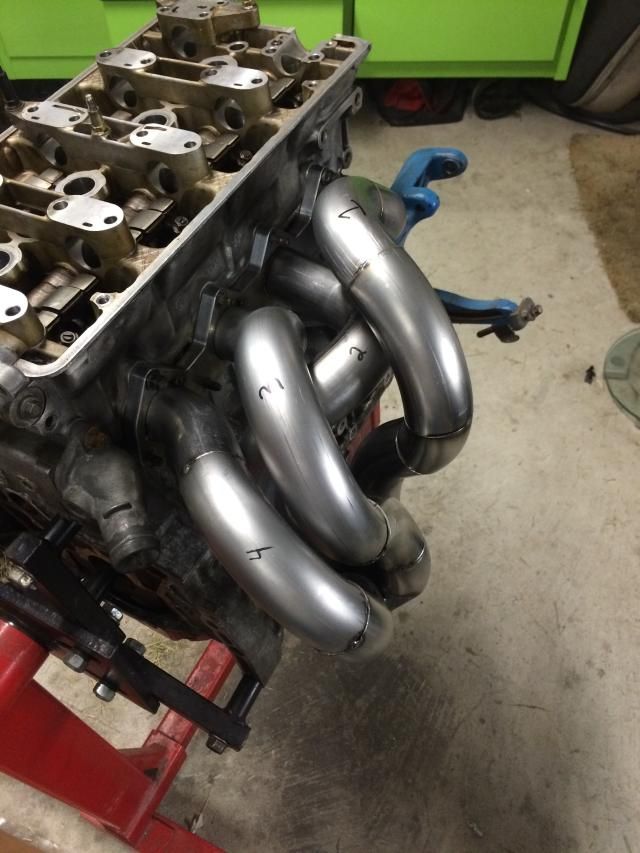
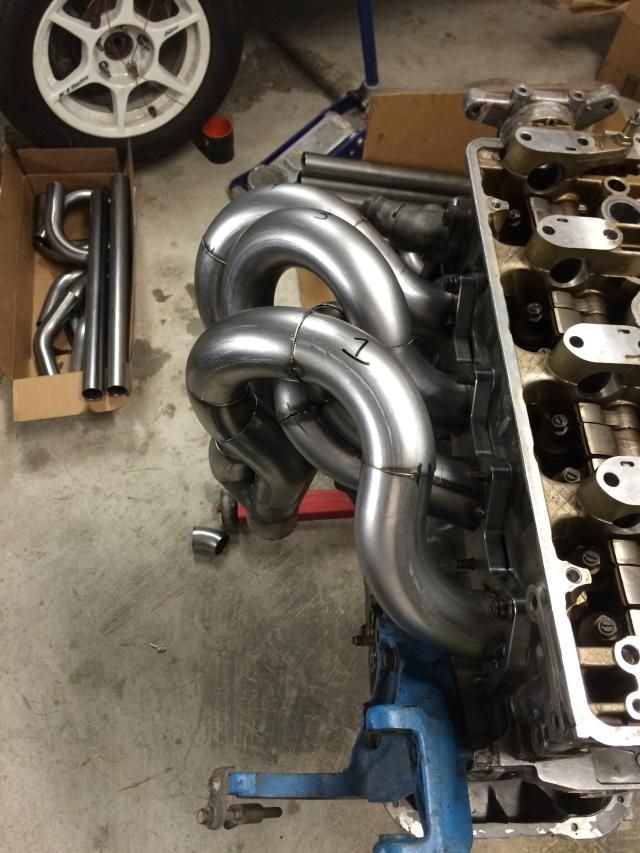
that belt sander came in real handy with a couple of the cuts. i put a zirconium belt on it and man that belt eats through this tube like butter. if anyone starts getting into fabrication, i would highly recommend getting one. I picked up mine at lowes for a little over 100 plus the extra belt i bought.
thanks for reading!
finalized design of this particular big tube JRSC header


that belt sander came in real handy with a couple of the cuts. i put a zirconium belt on it and man that belt eats through this tube like butter. if anyone starts getting into fabrication, i would highly recommend getting one. I picked up mine at lowes for a little over 100 plus the extra belt i bought.
03-26-2015, 01:44 AM
#89
Honda-Tech Member

Join Date: Mar 2015
Posts: 4
Likes: 0
Received 0 Likes
on
0 Posts
Why are you saying "not to back purge carbon steel"? It's a must if you have a carbon steel with a high chromium content. Also, for carbon steel most use a Argon + CO2 mixture say 80/20 rather than straight Argon. Just curious what issue you were having with it is all and what gas you are using.
instant contamination.
03-26-2015, 04:57 AM
#90
DO IT ON ALL FOURS
Yes sir, you are correct. Said it without even thinking of which welding process was being utilized (looking at pictures), thanks for correcting me. It will definitely cause issues and most likely melt the tungsten. I apologize to anyone who might have been steered in the wrong direction. You can use a Argon / Helium mix depending on application.
03-29-2015, 06:42 PM
#92
Anti-GDD White Knight Simp
Just a wealth of knowledge in here. I just got my Miller 210 a couple weeks ago, but unfortunately haven't been able to work with it since I was called back to work 
Headers look great, and thanks for sharing the tips
Headers look great, and thanks for sharing the tips
04-22-2015, 01:31 PM
#93
moderator emeritus
Thread Starter
i recently found out that a feature i wanted (frequency) can be adjusted if you buy the expansion pack for it. its 180 dollars but allows changes from 60-160hz. base setting is 100hz.
04-22-2015, 01:46 PM
#94
moderator emeritus
Thread Starter
and i have some updates:
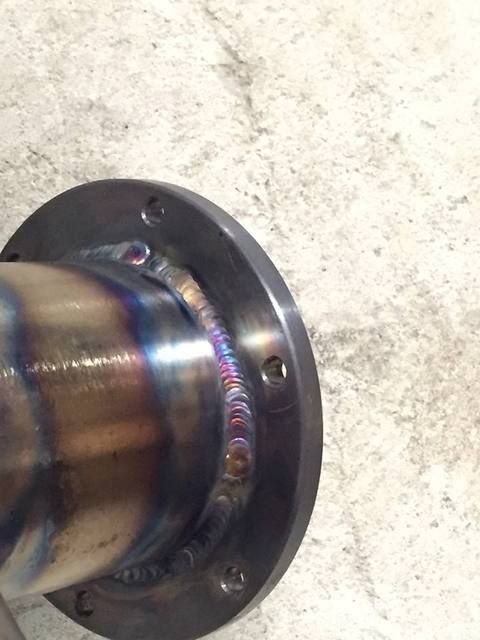
was asked to put together the intake piping for a big power Procharged LS Truck build and add some mounting flanges to the intercooler.
It is a universal kit from Procharger and all the piping was supposed to be stainless but apparently not lol. the middle section is nice 304, not magnetic, and the bends on the end are definitely not stainless, magnetic. Given that notion, i used 309L filler to put them together. I have yet to really do anything other than carbon steel (other than my turbo manifold) and this thin gauge stuff is nice to weld! the puddle flows so nice. I tried to get the carbon steel tubing as clean as I could in the weld areas but its was some pretty dirty stuff as you can see in the bead. My bead profile is definitely starting to come along and that makes me happy!
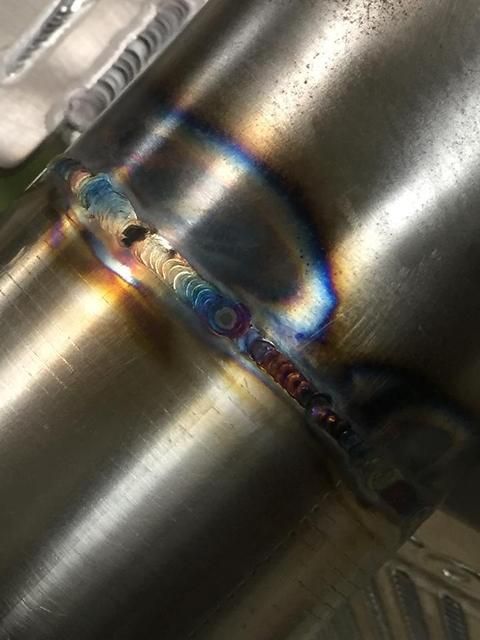
doing this stainless prompted a post flow test i wanted to do to see how much flow I really needed to achieve certain colors as well as a perfect gold tint without discoloration
in the top picture from left to right is 20 sec, 12 sec, 8 sec then 4 seconds.
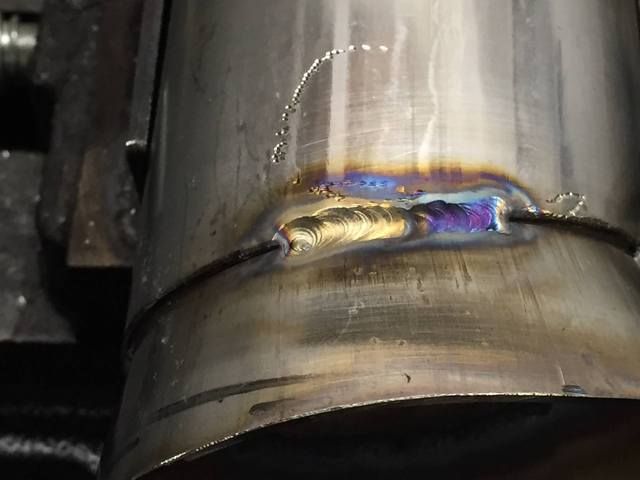
in this picture is 15 sec on the left and 2 sec on the right. I like the gold and its a proper coverage. its just nice to know how much time you really need to set the post flow at to get the good shield while its cooling. but also you can obviously see how the color is effected completely by post flow shielding.
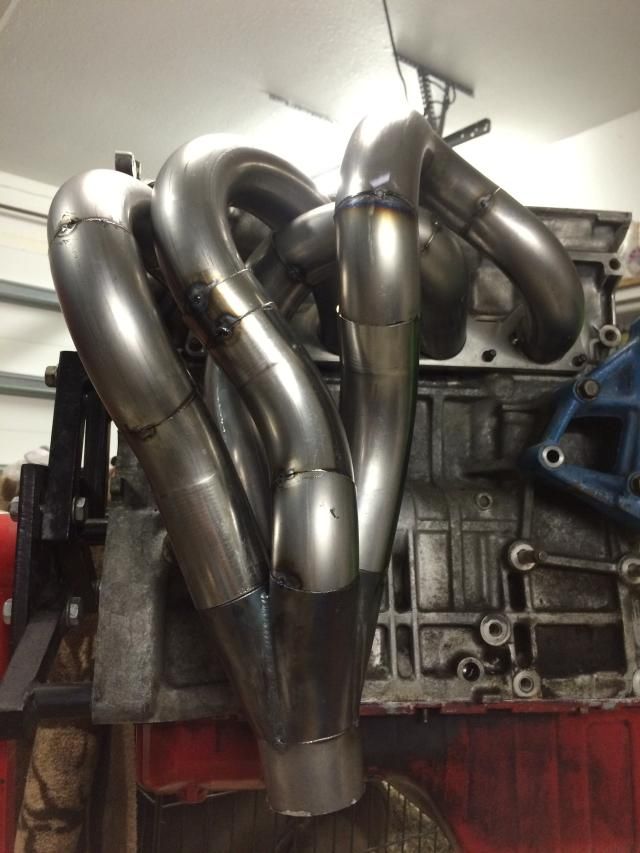
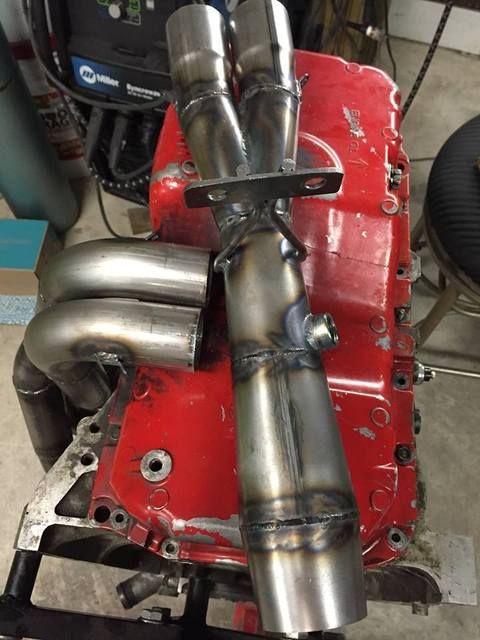
Next is my completed Tri-y. you might say to yourself, why did you pair the cylinders like that instead of traditional ways. well i am glad you ask! I entered the header in a header shootout which Jorge @ H-Car is doing to find out. He offered to do the testing for free so it was a no brainer. I did not enter it to win, only to collect data. I have some changes I would like to make but wanted to find out what it would do in its current configuration so when i send it back, i know exactly how the changes effected it. I have my doubts, but i think the change i want to make will fix it. I chose not to do something traditional because that is boring and i have never seen what i am looking to do before in a header. That will stay proprietary for now though
was asked to put together the intake piping for a big power Procharged LS Truck build and add some mounting flanges to the intercooler.
It is a universal kit from Procharger and all the piping was supposed to be stainless but apparently not lol. the middle section is nice 304, not magnetic, and the bends on the end are definitely not stainless, magnetic. Given that notion, i used 309L filler to put them together. I have yet to really do anything other than carbon steel (other than my turbo manifold) and this thin gauge stuff is nice to weld! the puddle flows so nice. I tried to get the carbon steel tubing as clean as I could in the weld areas but its was some pretty dirty stuff as you can see in the bead. My bead profile is definitely starting to come along and that makes me happy!


doing this stainless prompted a post flow test i wanted to do to see how much flow I really needed to achieve certain colors as well as a perfect gold tint without discoloration

in the top picture from left to right is 20 sec, 12 sec, 8 sec then 4 seconds.

in this picture is 15 sec on the left and 2 sec on the right. I like the gold and its a proper coverage. its just nice to know how much time you really need to set the post flow at to get the good shield while its cooling. but also you can obviously see how the color is effected completely by post flow shielding.
Next is my completed Tri-y. you might say to yourself, why did you pair the cylinders like that instead of traditional ways. well i am glad you ask! I entered the header in a header shootout which Jorge @ H-Car is doing to find out. He offered to do the testing for free so it was a no brainer. I did not enter it to win, only to collect data. I have some changes I would like to make but wanted to find out what it would do in its current configuration so when i send it back, i know exactly how the changes effected it. I have my doubts, but i think the change i want to make will fix it. I chose not to do something traditional because that is boring and i have never seen what i am looking to do before in a header. That will stay proprietary for now though


 04-22-2015, 02:55 PM
#95
Honda-Tech Member
Join Date: Jul 2010
Posts: 140
Likes: 0
Received 0 Likes
on
0 Posts
ok odd question. I just built a large wooded workbench. It looks like from your pictures that you just put a piece of 1/8 steel on top of a wooden workbench. If this is the case, have you experience any problems with it? I was think of doing the same thing with my bench. I was going to use half inch I found on craigslist.
04-22-2015, 03:52 PM
#96
moderator emeritus
Thread Starter
ok odd question. I just built a large wooded workbench. It looks like from your pictures that you just put a piece of 1/8 steel on top of a wooden workbench. If this is the case, have you experience any problems with it? I was think of doing the same thing with my bench. I was going to use half inch I found on craigslist.
I went to a local sheet metal place and they had this piece from an old project and had no use for it. They just gave it to me. One day I will have a nice table. I've been eyeing the strong hand table. That sell it as a starter kit with different clamps but it's out of my budget and not realistic at the moment.
04-23-2015, 10:48 AM
#97
Honda-Tech Member
Join Date: Jul 2010
Posts: 140
Likes: 0
Received 0 Likes
on
0 Posts
I have a small table with wheels that is made of 2x2 square tubing and 3/8 top that I use for grinding. Work with keeping my shop clean because I just wheel it to the door and the grinding dust goes outside. I want to keep my bench area for final tig welding of smaller pieces. the piece I found was actually Inconel! It was 4x4 1/2 think for a steal on craigslist! what I really want is a strong hand style table but they are wayyyyyy toooo expensive.
04-27-2015, 05:41 AM
#98
moderator emeritus
Thread Starter
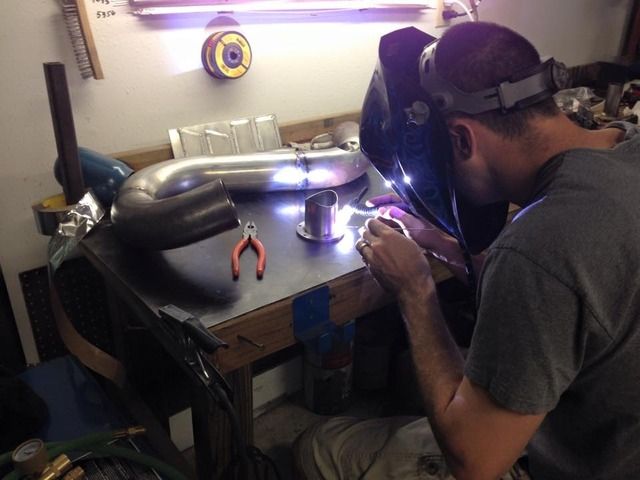
Here's a little that I did on sunday. I cant show any pictures of the car right now but its a mean little sucker haha.
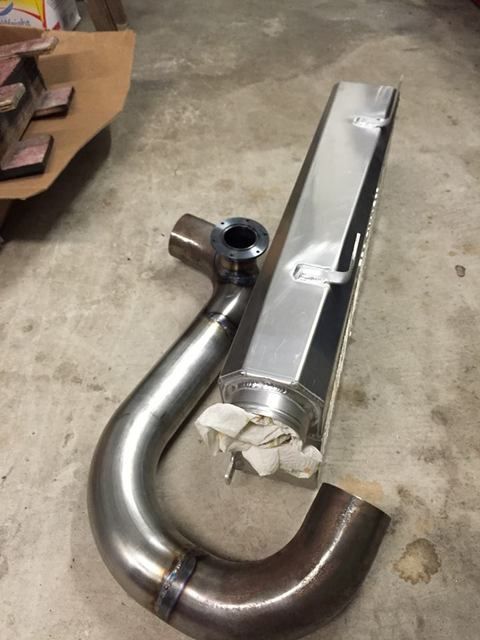
I've been asked to build a 4" aluminum down pipe as well as a new intercooler to compliment the new, bigger turbo.
this 4" tubing was putting a hurting on my bandsaw. My little motor just needs a tad bit more torque. Maybe I'll upgrade to a bigger motor when this one lets go. I think smaller tubing would be ok but getting through the first initial layer and cutting through the last layer was not easy for it. Just took time and easing it through.
started off with some pie to get under the frame. pretty tight turn so the CLR had to be small which is a little tough for a 4" tube.
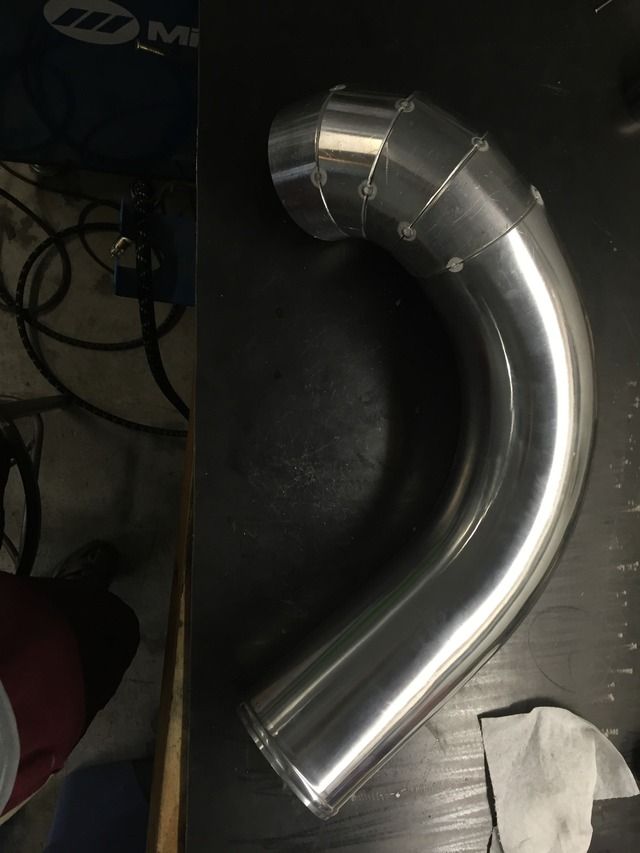
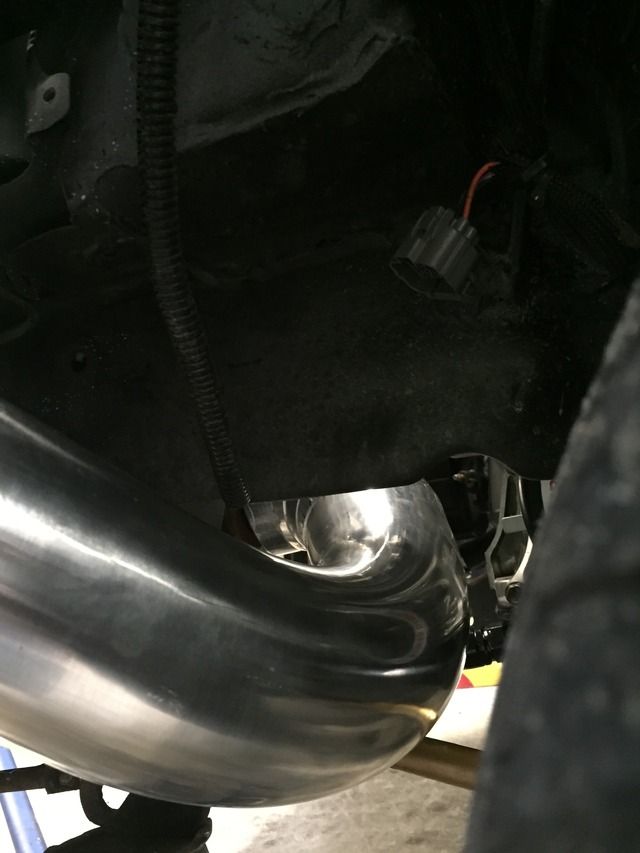
and of course, the end of the day picture:

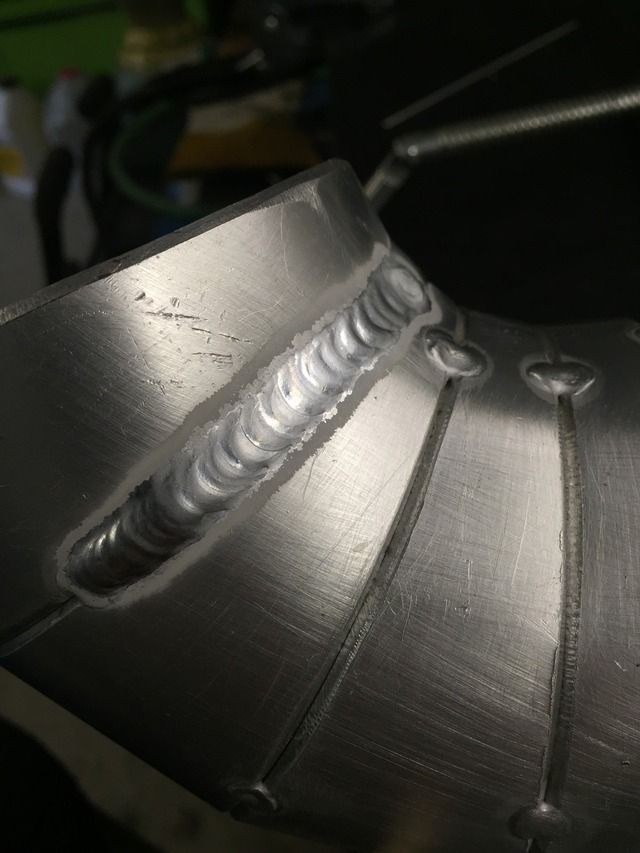
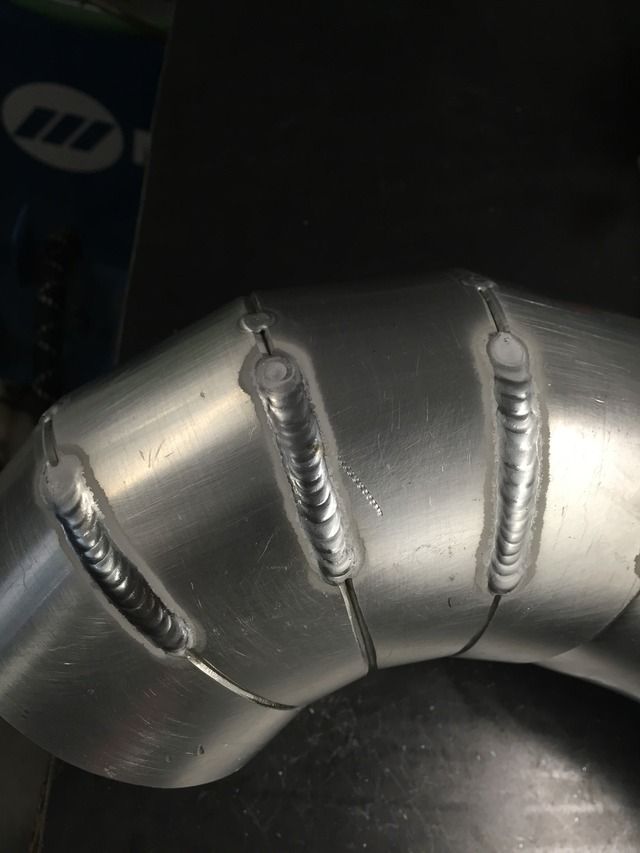
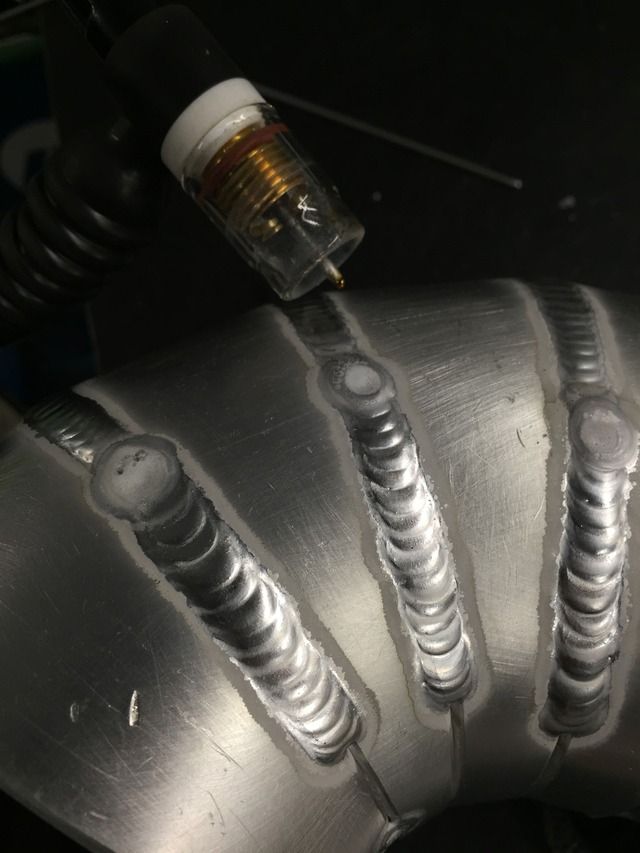
I had never done AL tubing before but it was much simpler than I thought. the material thickness was .125" 6061. I put a nice bevel on the ends to have something to fill and it appears to have worked out pretty good. this took about 125A to start off and then tapered down as the material started to heat up. biggest thing was clean clean clean. everything welds so much nicer if you spend the time to clean the material and the filler.
Overall I was very happy with the outcome. my stops need to get a little better. Adding a bit extra filler while tapering off the heat will keep the craters away and make a restart cleaner.
I've been asked to build a 4" aluminum down pipe as well as a new intercooler to compliment the new, bigger turbo.
this 4" tubing was putting a hurting on my bandsaw. My little motor just needs a tad bit more torque. Maybe I'll upgrade to a bigger motor when this one lets go. I think smaller tubing would be ok but getting through the first initial layer and cutting through the last layer was not easy for it. Just took time and easing it through.
started off with some pie to get under the frame. pretty tight turn so the CLR had to be small which is a little tough for a 4" tube.


and of course, the end of the day picture:
I had never done AL tubing before but it was much simpler than I thought. the material thickness was .125" 6061. I put a nice bevel on the ends to have something to fill and it appears to have worked out pretty good. this took about 125A to start off and then tapered down as the material started to heat up. biggest thing was clean clean clean. everything welds so much nicer if you spend the time to clean the material and the filler.
Overall I was very happy with the outcome. my stops need to get a little better. Adding a bit extra filler while tapering off the heat will keep the craters away and make a restart cleaner.
04-27-2015, 08:48 PM
#99
Anti-GDD White Knight Simp
Oh, it's YOUR header that Jorge just recieved? He told me about the shootout when he tuned my car, and then I saw recently on Facebook that he recieved a header, looks like yours.
I like that gold color as well, thanks for sharing how to achieve it. And those Al welds are nice!
Oh, and PM'd
I like that gold color as well, thanks for sharing how to achieve it. And those Al welds are nice!
Oh, and PM'd
04-27-2015, 10:00 PM
#100
Steve at Heart
98- progress is looking good. Why must Yuengling lager only be on the east coast. That is some good beer right there.