
Audi A4 carbon fiber overlay (How To) over 65 pics!
 12-03-2006, 01:56 AM
#1
Thread Starter

Join Date: Oct 2002
Location: Eagle Mountain, UT, USA
Posts: 1,708
Likes: 0
Received 0 Likes
on
0 Posts
For todays project I will show you how to overlay several trim pieces for a 2000 Audi A4. Overlays are used where you want the look of a given material and no attention is paid to weight reduction or an increase in performance of a given part. An overlay only makes sense from a customer point of view if no other company builds a certain replacement component for a given car/vehicle. If a replacemt part can be found it makes much more sense to go that route. An overlay will always cost more and take more time than something available off the shelf. In many cases an overlay will take almost as much time as building a mold and a replacement part. If you have an odd or one off vehicle and you need to match a dash to your carbon hood then an overlay might make sense. As you are about to see there are many steps to do this right and sometimes a little creativity is involved. Here we go:
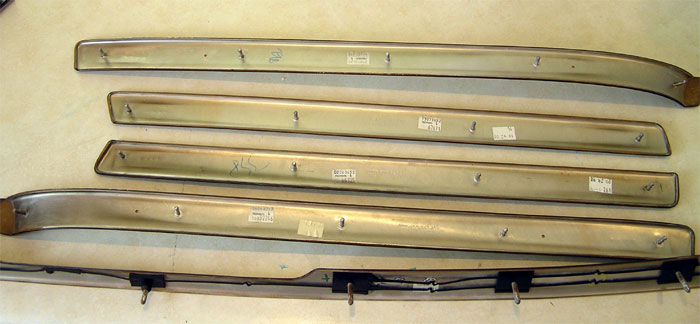
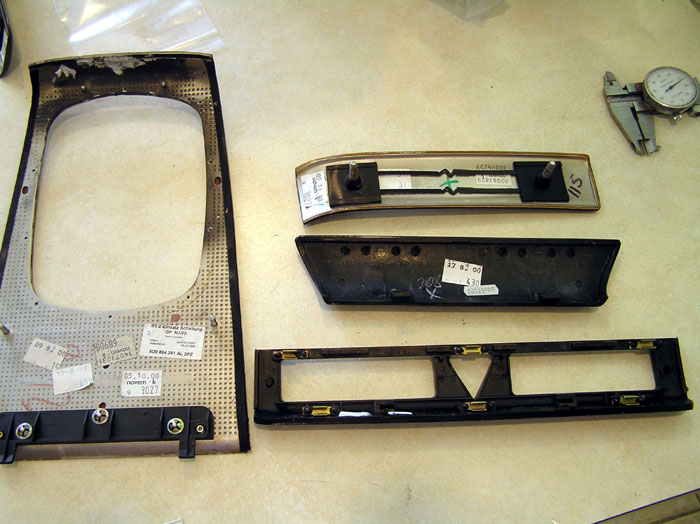
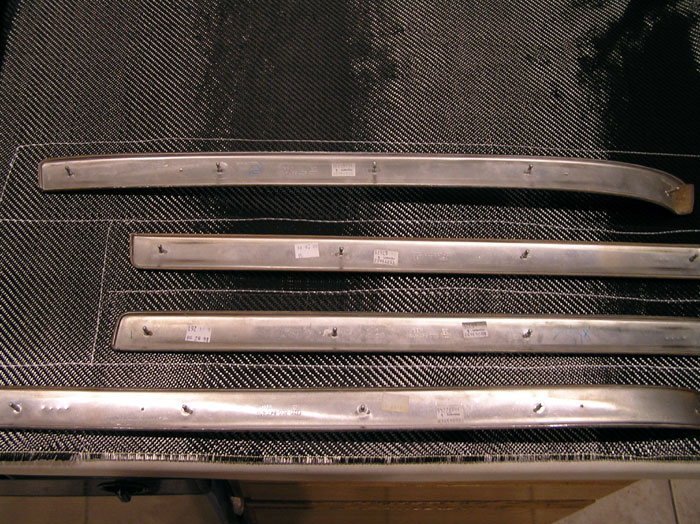
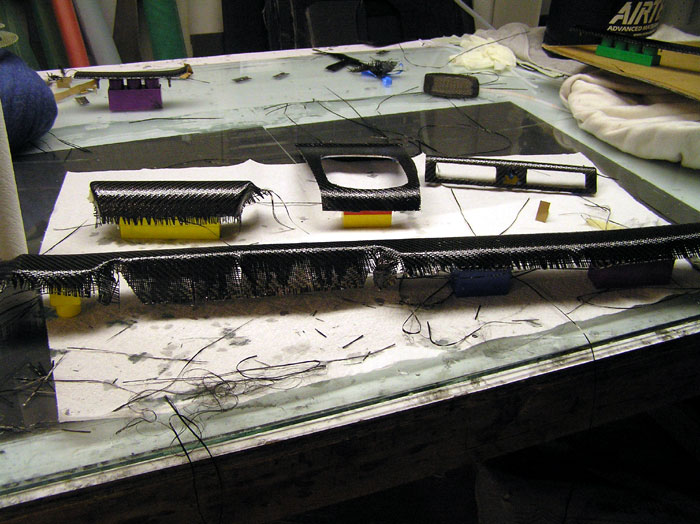
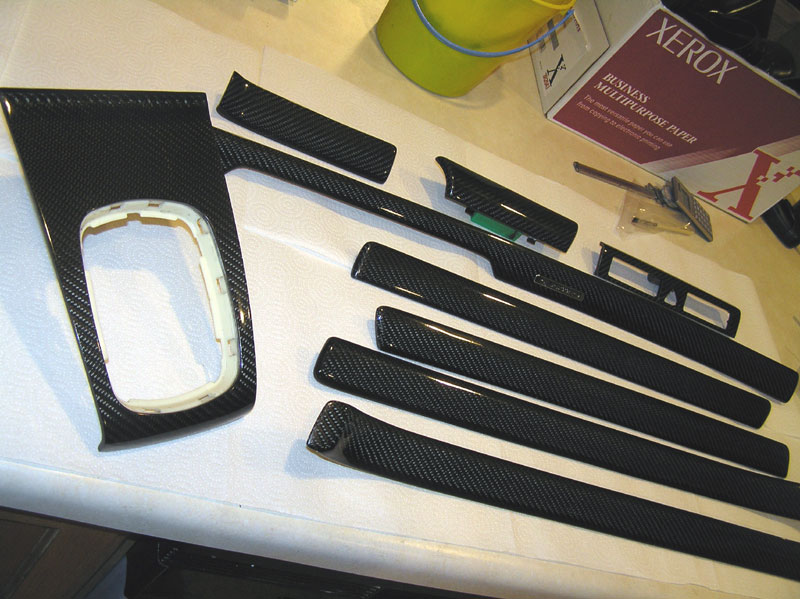
The pic below shows our starting point. There are 9 different pieces involved in this project. Below you see the drivers and passenger side door trim for the front and rear doors plus the center dash trim. All of these parts were extremely well made by Audi. They are aluminum/or plastic backed parts with a glossy wood veneer. We're about to make them dull!
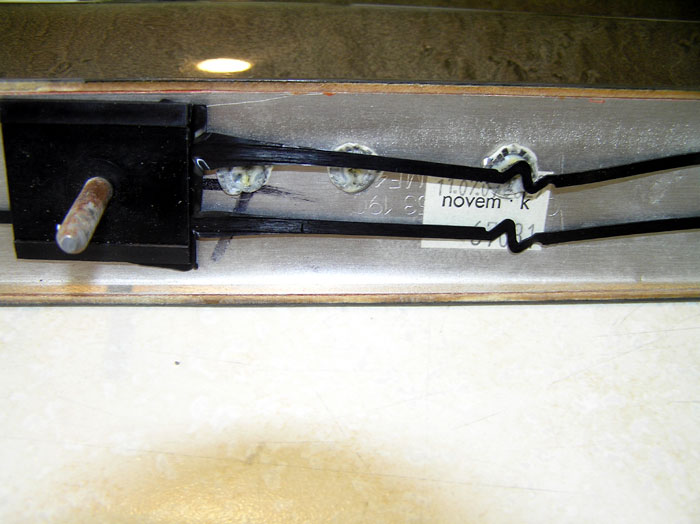
Here are the same parts on the backside. You can see the mounting pins will be used to install the trim again so we must not get any resin on the backside of the parts or at least minimize what resin finds its way to the backside. I'll explain how to do that later.
Here is the shifter trim as shown from the front.
You can see in this pic we must take special care to keep resin off the white plastic piece. If it's not a big deal to pull of extra parts that will not be overlayed do it for sure. If any resin gets on this plastic the shifter boot is going to have trouble slipping back on the shifter trim. One side note is I did not have the car in my shop so I had to take extra care so nothing is altered as far as mounting surfaces go.
Here you can see the tiny screws have been removed so we can separate the two pieces. All hardware was removed and labeled in a small ziplock. These pictures were also used as a reference in case I needed to go back and look at something pre-overlay.
The other three parts are shown below. You can see the ashtray, hazard button surround, and small front dash trim. At this time you should start studying where you can place fiber and how each part will be fixtured as it is painted with resin during the overlay. We'll get to that shortly.
This is a pic of a small plastic chrome button that is front and center in the car so it will be very noticeable if it gets screwed up. This piece must be removed to make everything look factory in the end. This is one of the tricky parts of this overlay but don't worry these type of curve ***** come up and its your job to deal with them.
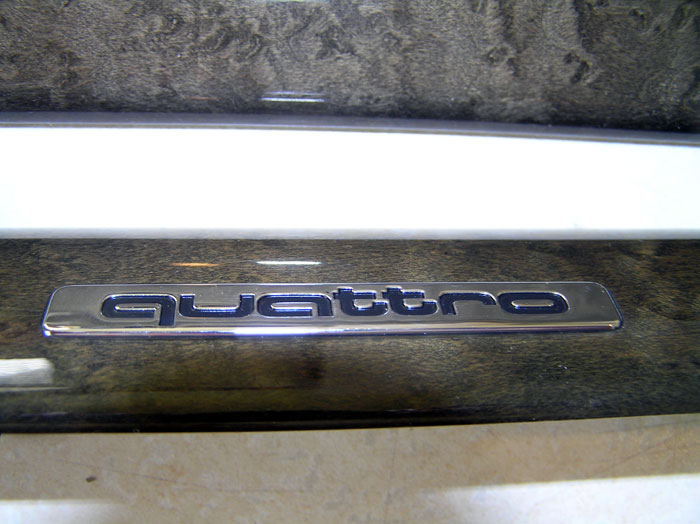
This is the backside of the Quattro button. You can see it has been attached by melting some through posts on the back of the part. These must be ground off and the button must be removed before we move on.
You can see here these buttons have been ground off by way of a sanding drum in a drill press but you could use any powere abrasive tool such as a Dremel. You must be careful not to damage the backside of the part. Just grind until the tops of the buttons are gone.
Here is has been removed. Just popped right out.
No big deal ... at least to remove. You should have some idea of how this will go back in before you are looking at this on your workbench.
Before we go any further down the road on thsi project we need to take some time and verify that our resin system is compatible with the parts we are working with. I chose to run my test on the smallest part since it would be the least expensive to replace assuming my resin melted the part or something strange happened. You never know until you test in some cases. This is especially important since these aren't my parts and someone has given me the responsibility of taking care of their parts. I don;t take the responsibility lightly for sure. What you are looking at here is a section of the parts that has been well abraded with 150 grit paper and then cleaned with acetone. Warning acetone will melt plastic so take that into account. If you can't use acetone just wash well with soap and water. Make sure it's rinsed well and dried before you start. On the left hand side of the pic I just dripped a spot of resin on the part. Just right of that you can see some resin has been brushed onto the abraded area. On the far right side I dripped some resin on an un-abraded area. The results are as expected. I took a razor blade and tried to chip the resin off. The piece on the right popped off completely which just shows how important iot is to prep correctly. Then I switched to the far left side. I could chip this one off in small bits but couldn;t get all of it off. The piece in the center did not come up at all. This means later on down the road the resin will most likely stay put.
I also left these in an oven for an hour at 140F. This will tell me what sort of response the part might have if it was sittinng in a hot car under summer conditions. Of course an hour is not going to tell you everything but sometimes you will learn something here. This test didn't change anything on this part. So now we can move on to abrading and cleaning all of the parts to prepare for the overlay. All of the resin was sanded off this part before any work started.
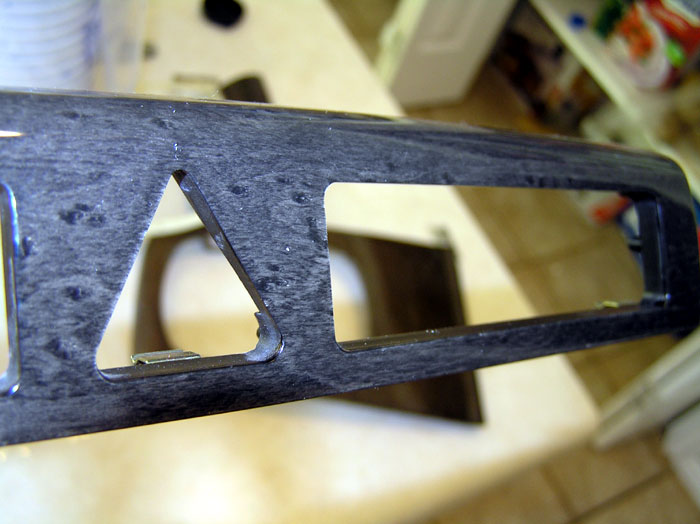
Before we move on to prepping I wanted to show you this part. This is a side view close-up shot of the hazard button trim. You do not want to get any resin inside the button positions or the part won't fit. I wold say this was the most difficult part of the entire job but it came out in the end.
Here is one of the first parts to be scuffed. My method of abrading is to start with 150 grit sandpaper. Everything was scuffed until there was no gloss left on any part. In general I just worked the sandpaper in one direction with this sandpaper. Remember each part starts with this step. At this point you shoudl be careful not to change the shape of the part. Only sand to a matte finish. The edges of the part are very prone to changing shape if you're not careful.
Next I move on to using 80 grit sandpaper. As you know this is a much more agressive sandpaper. I had to be extremely careful with this to avoid any shape change. If you change the shape it might look funny when it goes back in the car. First I worked the 80 grit in the same direction as the 150 grit.
Next I sanded in a criss-cross pattern. My thinking behind this is with 150 grit sandpaper you can gets lots of little scratches or valleys per inch but not so deep. With 80 grit you get fewer scratches per square inch but the valleys are much deeper. I chose a mix of both the get the resin to fill in these valleys and really hook the fabric to the part. This has always worked well for me. Next part please. I probably have 30 mins a piece of scuffing prep work at this point.
This pic shows the front of the ashtray. It has small raised areas that must be ground away. This will ensure the fiber lays down without lumps. Carbon fabric won't look nice trying to conform to these bumps. They must be ground off. BTW you are at the point of no return now, LOL

Just grind them down enough so they are flat. Go easy here.
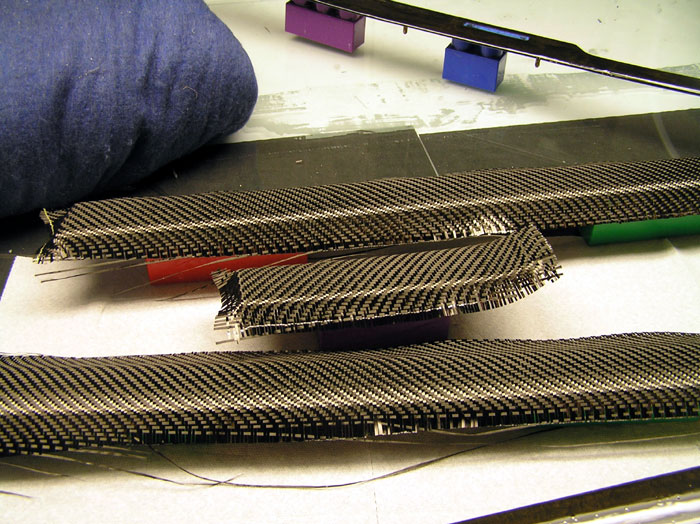
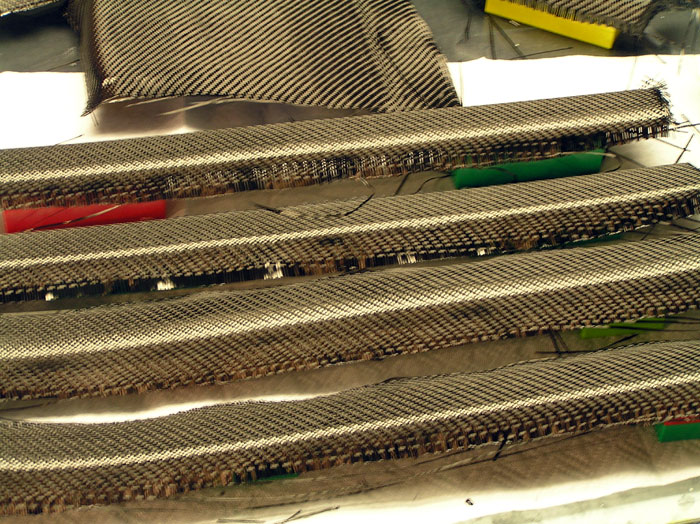
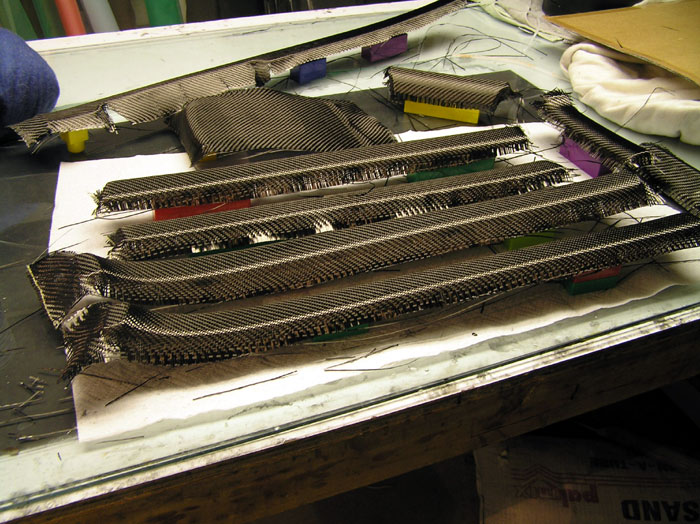
Now all of the parts are scuffed and soap and water scrubbed, dried, and then wiped with acetone a few times to make sure they are degreased and dirt free. Make sure they are very clean. Now I roll out some 2x2 twill carbon fabric and lay my parts smooth side down onto the fabric. I used a silver Sharpie to trace out a shape just slightly larger than the part itself. Make sure the part is oriented with the direction of the fabric that you desire. When installed the fabric can appear to move at an angle like this / or this \ If you have a set of parts sometimes you want the angle direction to look the same. To some these type of details don't matter but I always think about it. Now remove the parts and cut out a piece of fabric to fit the part. Be careful not to snag any of the fabric with a part corner or anything, it will look bad.
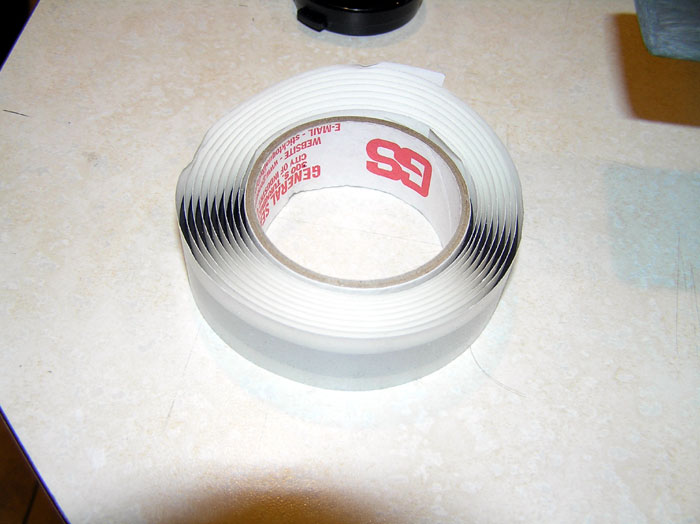
This is tacky tape used for vacuum bagging typically but we are going to use it for something else today. If you haven;t seen it think of tough taffy that is very sticky. It is available at most composite material supplier outlets.
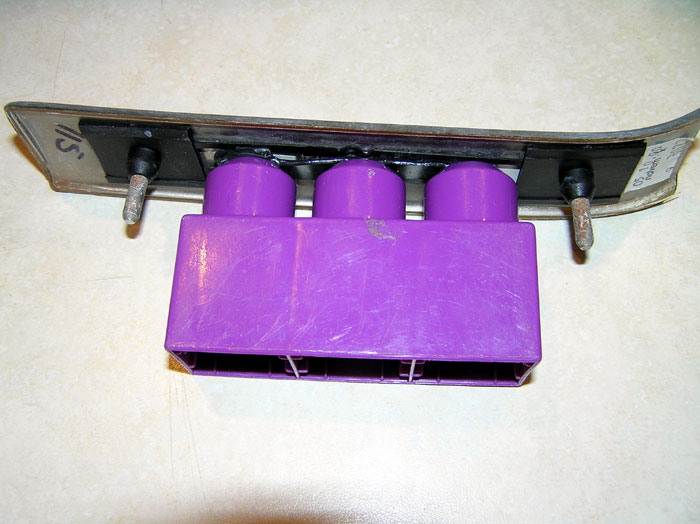
Don't laugh... You grew to love Legos as a kid and now they are your friend again. Cut a piece of tacky tape and stick it to the top of the Lego.

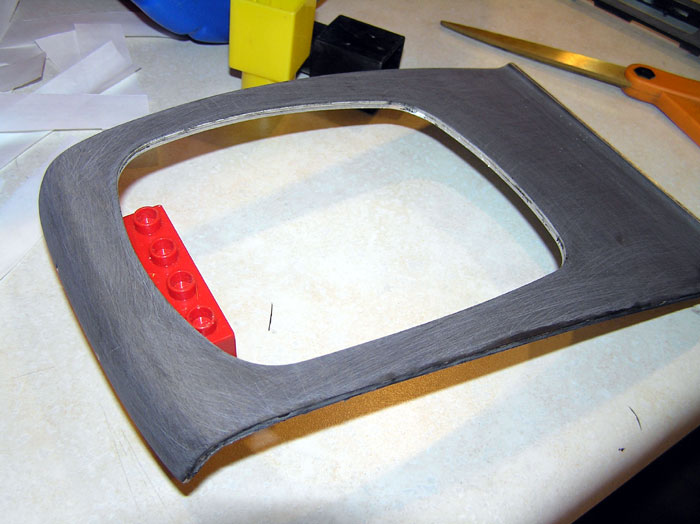
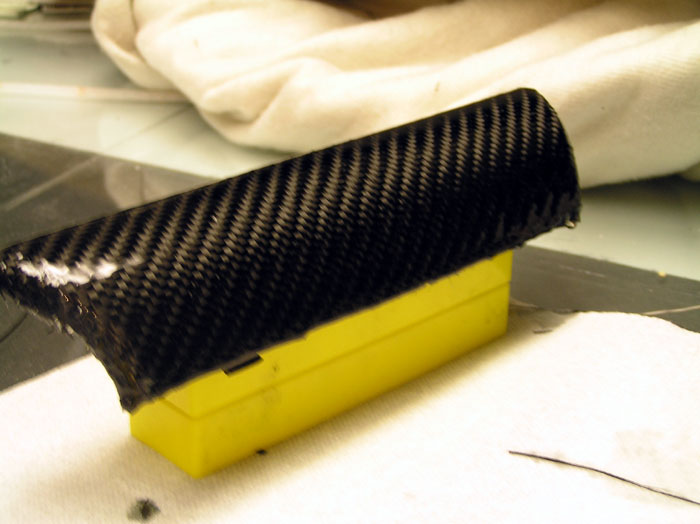
We are going to use various large Lego blocks, these are the kind toddlers like, these happen to belong to my 2 year old. He said I could use them. These Legos will serve double duty as a way to keep our part off the work table surface and out of any dripping resin. They also offer us a unique way to fiture each part into any position we want. If you have a weird shaped part like our ashtray or shifter trim the resin will run off cirved surfaces and sometime it is helpful to position the part in a compromise position to ensure that each coat of resin will cover up the fabric as much as possible. Imagine pouring resin onto a flat surface. The resin will tend to just pool out. Now picture dumping resin on a sphere. The top will have less resin than the bottom. When you are trying to cover up fabric gravity can be tough to deal with. Sometimes you have to overlay a part in one position and then change position and paint the rest of it. It takes several coats of resin to cover fabric. This small part was straight ahead.
What a great little fixture
Here is the ashtray all fixtured up.
You can see this is one of the parts that needs to be mounted in a compromise position to facilitate good resin flow.
Here's a large part that needed a few legos.
You can see the shifter trim is going to be a little tricky from a resin point of view as well. The resin will flow right off the front of this part or pool towards its backside. The rear of this parts has a plastic bracket to hold it up off the table top so we don't need a Lego on the rear. Fixturing the front higher than the back helps even things out anyway. The front curve is pretty extreme so any way we fixture it is going to cause issues somewhere on the part.
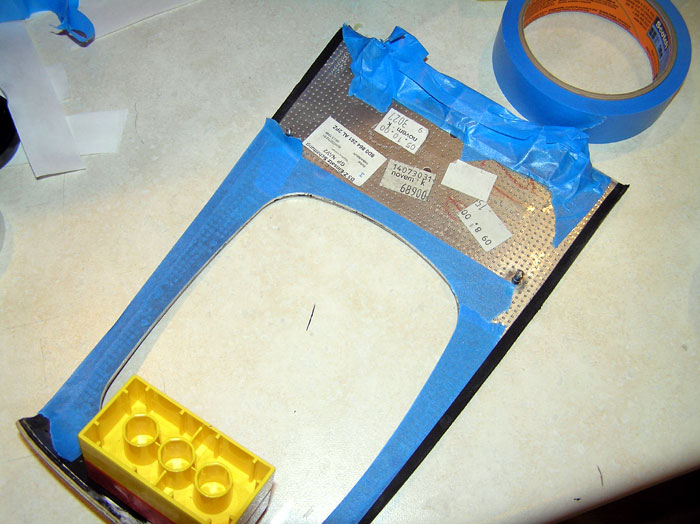
Before we end this chapter we need to tape some parts off. We don't want to get any resin on the rear plastic clip on the shifter trim.
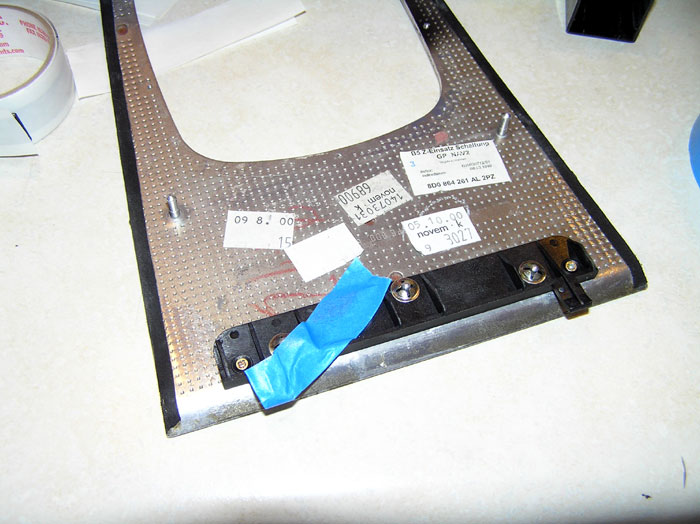
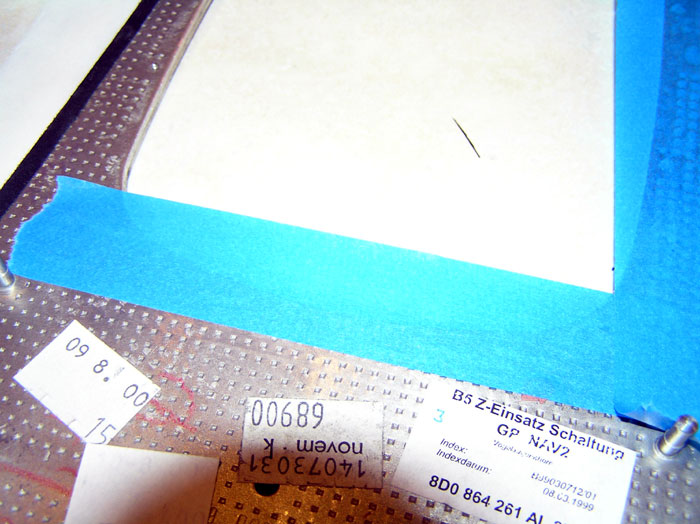
Now we're taping off the center hole to keep any extra resin off the backside of the part. As we overlay Iprefer to use very thin conservative coats rather than drowning (flooding) the part.
I went ahead and trimmed the extra tape out with a razor blade. Blue tape is noce because it comes off really easy. This part is ready to go.
Here you can see where I taped off the inside of the hazard console so little to no resin will hti this area. Clearances are important here.
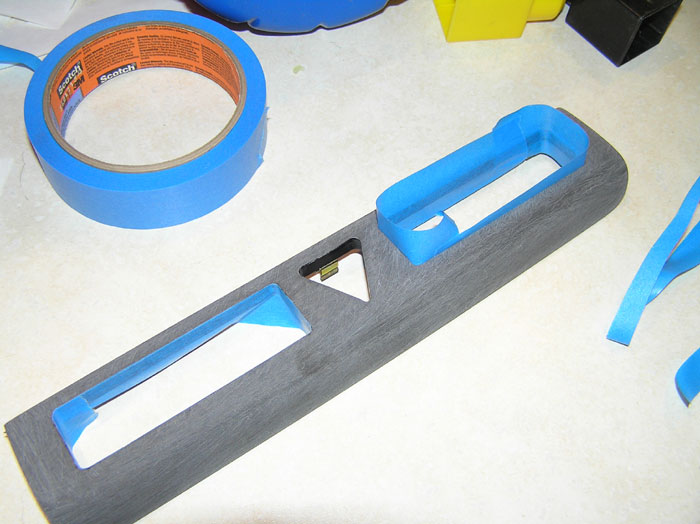
Here are a few more shots of detailed taping. Micro hint...Use a new razor blade.
While we're looking at part the area facing us needs to stay factory as well but we can sand this later if needed.

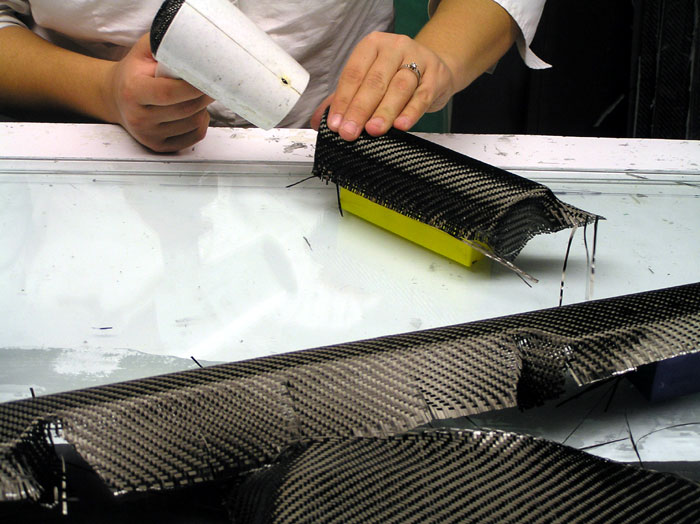
Now that we have all the parts fixtured and taped off I hit them with acetone again to get any grease that may have come off my fingers fixturing the parts. You can't wear latex gloves working wth tacky tape so I'm sure some oils came off my fingers. What you are looking at here is the first part painted with resin. This is where the magic happens so pay attention. I used S249A polyester laminating resin from http://www.fiberglasssupply.com/ with no surfacing agent aka wax additive. I pigmented the resin black. With these parts being dark in color anyway it was probably overkill but easy to mix in. On light colored surfaces you have two choices, use black pigmented resin or multiple layers of fabric. If you have a white part you will see the color through a single layer overlay even if you have a tight fabric weave. All of these parts used a single layer of carbon. It's just a waste of time to have to lay on a second layer of fabric because you didn't paint them black first. In any case you have to paint the parts with resin anyway before any material goes down so you might as well tint the resin dark. The reason you paint the parts with resin come into crystal clear focus when you consider overlaying complex shapes. Here's the deal... You want to paint the part with a very very thin coat of resin, go as thin as possible here. Now wait until the resin hits "B" stage" or just slightly before. Just make sure if you press your finger to the resin that no black comes back or very little. Thsi will depend on how much catalyst you used and the shop temp. If it's too wet the resin will seep through the fabric and you will see black come though. Even on black carbon fiber it can be seen. So now that you are at this point grab your matched piece of material and make sure the weave is all straight and just how you want it. Now pick it up and drop it down on your part. You get one shot here pretty much. With the resin being tacky your fabric will hug curves and conform very well. Thsi is really cool and its the reason you don't need a vacuum bag to overlay odd shapes. The resin is not yet fully cured.
Here I have draped the fabric on the parts here. Make sure and rub them pretty good over edges but don't mess up the weave. Make sure your hands are washed before you do this to minimize the oils transfer from your fingers. Again, no gloves allowed here it doesn't exactly make your hand glide over the part.
Now take a regular hair dryer or heat gun and start warming the parts. A regular blow dryer works well because you won't cook the resin as easily. Some heat guns get pretty hot and you can easily hurt something with too much heat. Just warm each part in rotation and make sure no fabric pops up on cirves and such. I have to admit my partner and wife helped a little here Keep the acetone and your resin on the other side of the room sealed up and make sure there is good ventilation as well. Wear a respirator around polyester resin. When you're done all fabric should be stuck to the part exactly where you want it. You can leave the parts overnight at this point to cure a bit more. Since we didn't use any wax additive in our resin we can keep adding resin as needed at any time even a year from the time you layup. As you may know polyester resin will never fully sure in open air so wax is used on the last resin layer to seal it off from the air. If we used a wax additive we would have to sand the wax off first before moving on. Of course in this situation you can't do that so no wax right now.
As an aside I chose this resin because it is easy to work with and familiar to me plus it has UV additives to keep it from yellowing which is important even inside a car. An epoxy would need a clear coat for UV protection but you can use epoxy on overlays as shown in the sideskirt overlay project I posted a while back.
Flash forward to the next day. This picture shows the very first coat of resin I laid down on the fabric. This resin coat and all to follow have no pigment and is very clear when painted on. Thsi first coat of resin much be approached with care. When you paint the resin on you can see some lifting around tight corners. If you do see some fabric lifting just press it back down and watch it until the resin starts to gel which is usually only 15 minutes or so with polyester resins. If the resin lifts anywhere at this point it will be pretty much impossible to fix without removing all the fabric. I chose to only paint 2 parts at a time and watch them until I was confident they didnlt have any fabric lifting. I especially needed to watch the edges but the previous day tacking and blow drying solved 90% of the lifting issues I might have seen had a just tried to drop fabric and paint resin. I've done it both ways and this is the best way to go. This is the reason I painted resin down first.
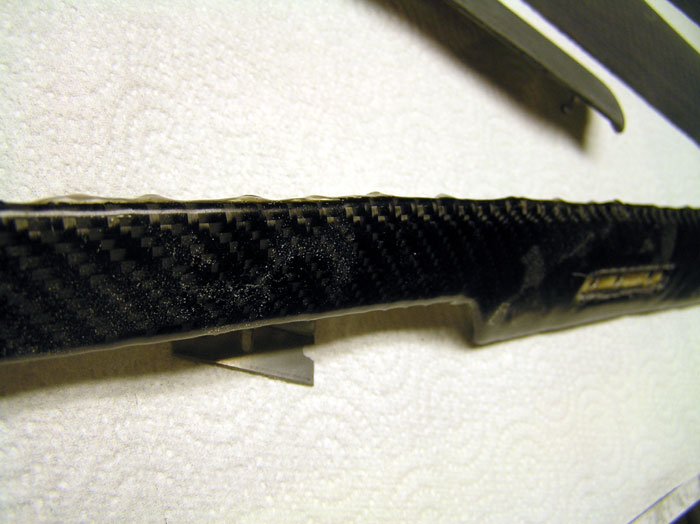
Here you can see I have trimmed all the hanging fabric off the parts. I used probably one new razor blade per part trimming them. DO NOT USE OLD BLADES! What you want to do is start anywhere at the edge of the part and stick the razor blade in anywhere you need to trim. If you have watied for the resin the "B" stage the extra fabric will just slice right off use a slight sawing motion. If the blade gets gummed up just get another one. If the razor blade sticks just start in from the other side and come towards your original cut. It takes some practice to get the technique down but this is much easier and more accurate than using a dremel after cure. Don't worry about getting it perfect, a few hanging fibers isn't a big deal. Error on the side of cutting too little material off rather than too much. On these parts I wanted to make sure the fabric wrapped around the edge so you would look nice so I left the front edge alone and trimmed the parts so they looked nice and kept the fabric rounded edge intact. If you will remember back to the Quattro badge I covered right over this area with fabric so I had to trim this area out. I could see where the badge should have been and didn;t get too much resin in the area. To get a good cut through the fabric you must have resin in the area to be cut. Dry fibers don;t cut too well but when the resin in included it comes off like cutting a fruit roll-up.
Here's a rough trim on the ashtray. Now I roatated the parts through coating. I coated each part 4-5 times with thin coats before the resin was deep enough. It is not a good idea to dump resin, be neat about it. Some parts such as this ashtray needed a few more coats in some areas due to the shape. I could recoat the parts about every 15 minutes and I just coated until I saw no fiber peaks (texture). After the fabric was covered I coat once more to give me more sanding room. If your resin coverage layers are too thin you will risk sanding through to the fabric which will ruin the look of the part.
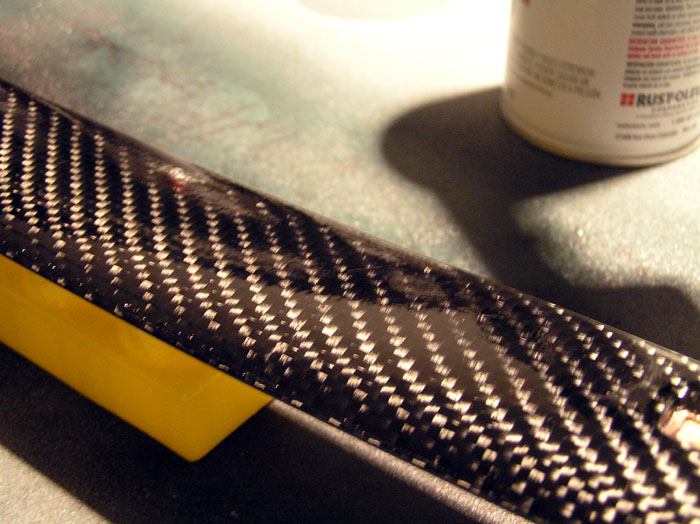
Here is a picture of a fully coated and cured part. BTW, on the last resin layer I did add some wax additive to the part to fully cure the resin. You can see it's a bit lumpy despite the car I took coating the part. I have done this a few times as well. Here is the real labor part of the job, you have to sand all of this down.
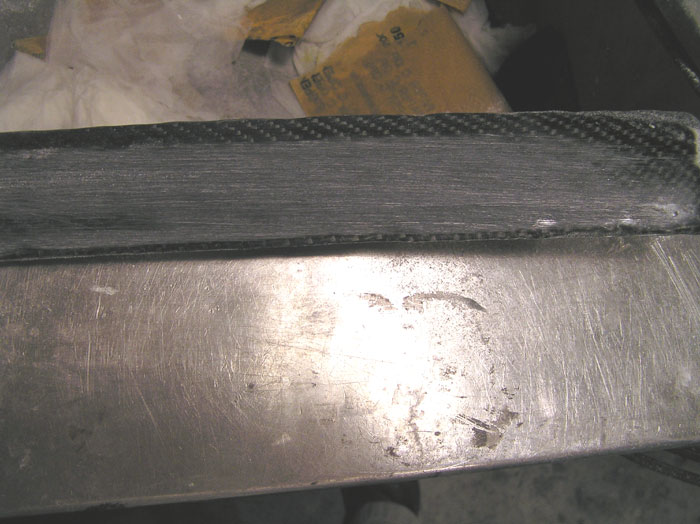
This picture shows the first demon I had to face. I told you earlier that you would get some resin on the backside of your part, here it is. You need to sand or grind all of it off.
Here's a good tool for the job. This is a drill press with a 60 grit sanding drum all ready to grind. This thing takes off resin very quickly even at it's low RPM. This really cut my labor time on each part down. Each part got this treatment beofre it came to hand sanding.

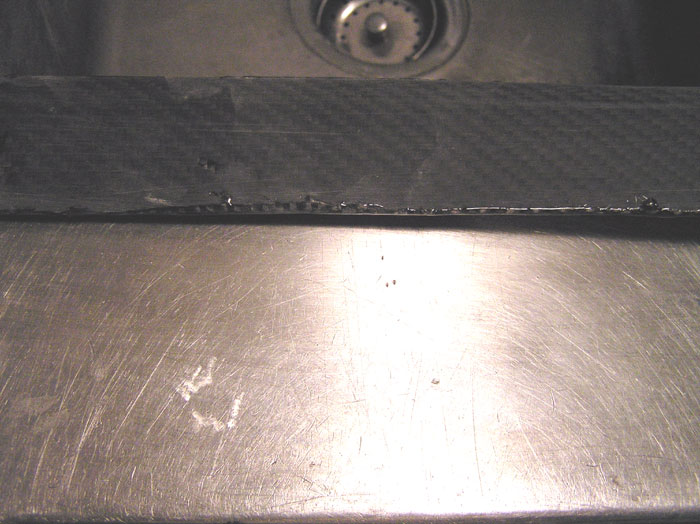
Here you can see I have taken the resin down just to the aluminum backing and no more. At this point you just rough it down to a point that is easy to finish by hand. Now its time to get out the sanding block to rough everything down semi smooth.
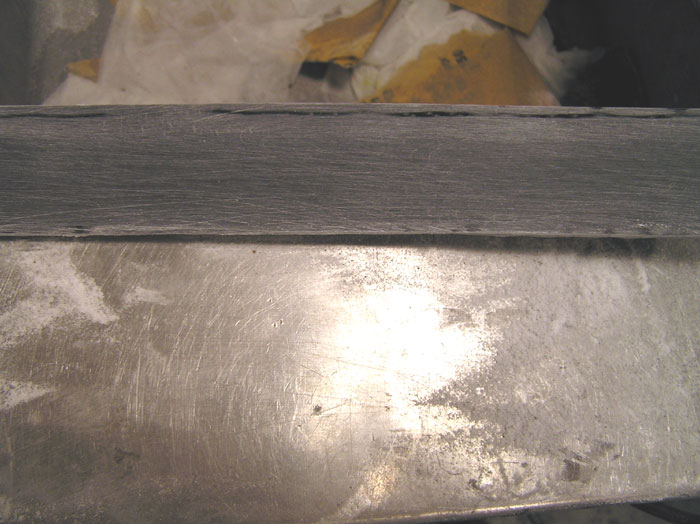
You can see I did not damage the factory part to any great extent. Factory fit is what I'm going for here.
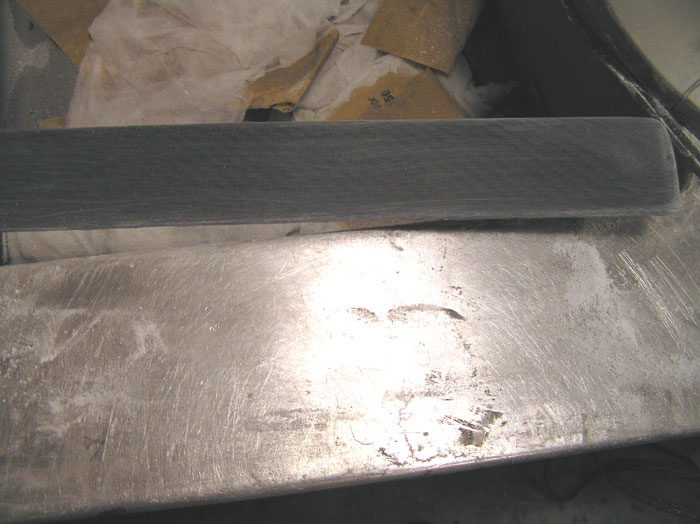
Ughhh here is where we start...again go through all the parts in this manner.
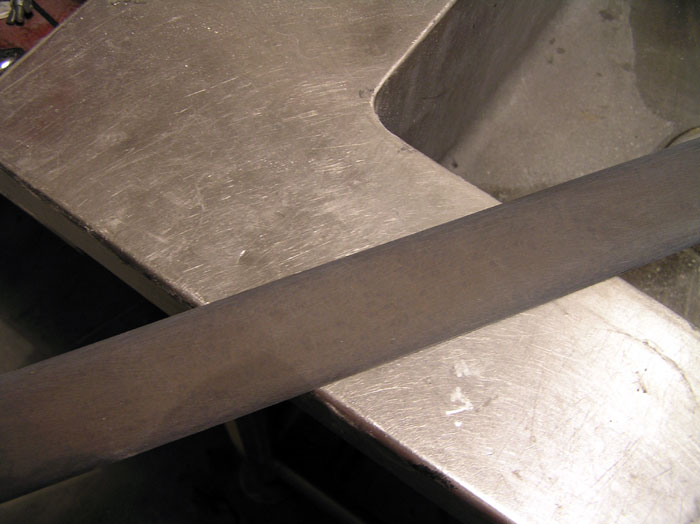
I started with 150 grit and sanded everything down smooth. I only used a sanding block on the very edge to make sure it was straight. You can over do it with the sanding block so be careful. You want to hit these edges right to the bare minimum so they will fit like factory or as close to it as possible. The parts will grow no matter what but you can minimize it. If you oversand the edges you could go through the fiber and end up with a spot of wood coming through. I also used 80 grit very carefuly in some big lumpy spots of resin.
More sanding
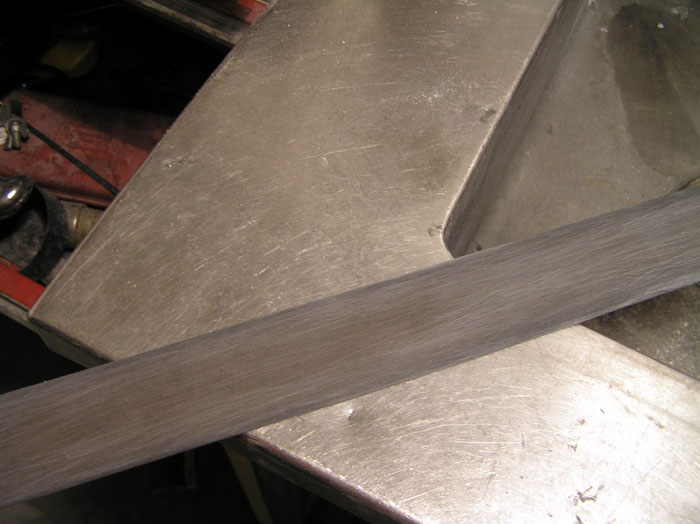
Now sand the entire part with 220 grit sandpaper until it looks uniform. It's a good idea to wash the part in between each grit so you;r not mixing grit sizes. This goes for sanding in general, it's a good rule to follow.
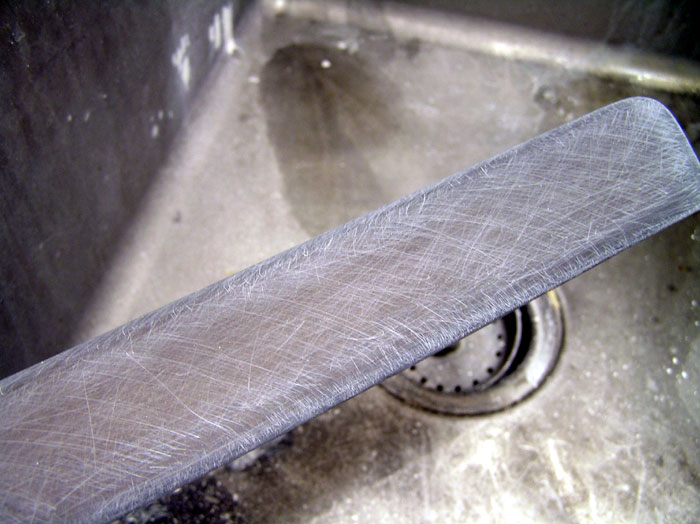
Now move up to 320 grit and run through all the parts again. This is as far as I;m going to go here. I could keep sanding up to 2500 grit and then buff them to a shine but I'm going to skip some sanding steps and give us a little more UV protection by clear coating. Typically here is where I would go with this. I would wet sand each part in the following order:
P400
P500
P600
P800
P1000
1200
1500
2000
2500
Buff
By painting the parts I can skip 400,500,600,800 sanding steps and when you;re dealing with 9 parts like this that means time.
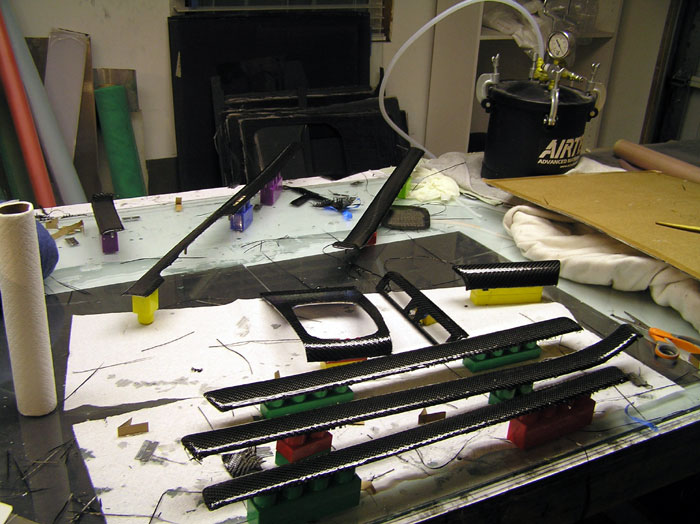
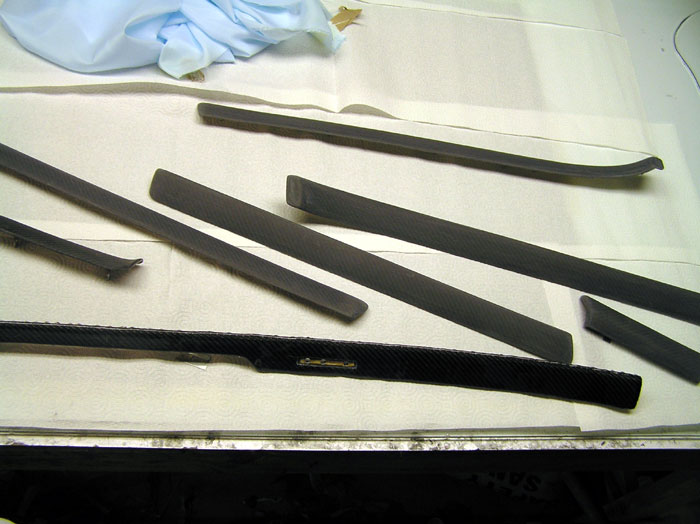
Here are most of the parts with the first sanding done, saving the long center trim for last.
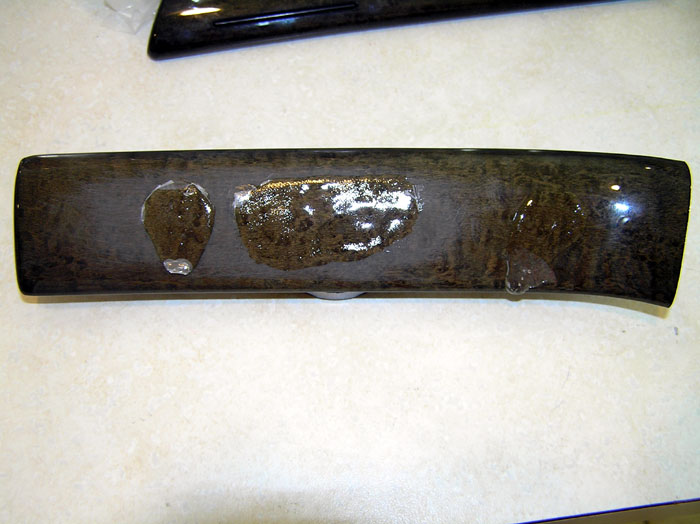
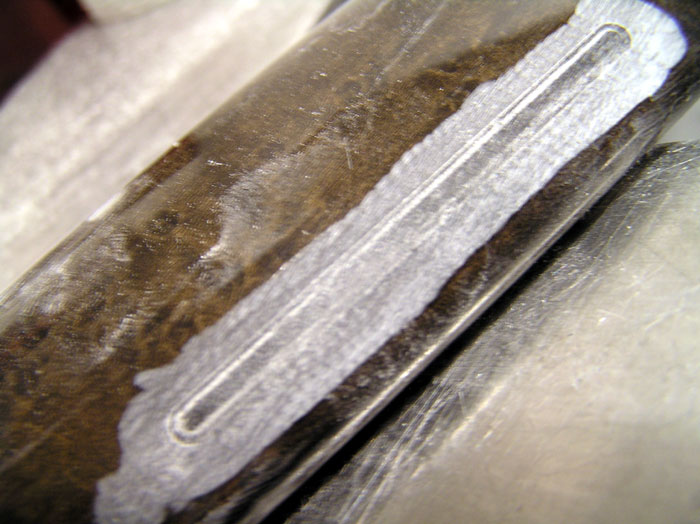
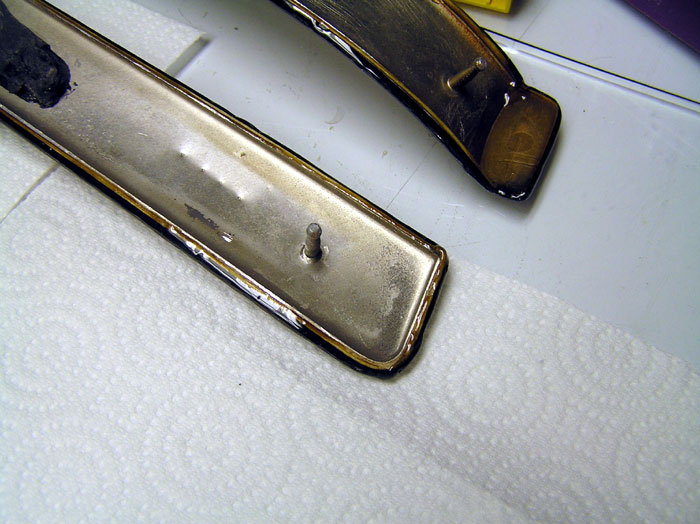
This shot shows some touch up resin work on the edges of the part. Sometimes on the edges you can get little pinholes show up or there may be a small void caused by the way the resin runs off the part. I simply dressed the edges with wax additive resin to fill in the spots that had trouble. The parts I fixed were small and you might think it's nothing to worry about but it drives me crazy to put out anything I know is flawed which I could have fixed. Anyway since the parts were sanded down there was nothing left of the last wax additive layer of resin I used. This means this coat of resin wil stick well. Also I cleaned the parts again before I dressed the edges. After this resin dressing cured all the parts were sadned to proper shape again. We're ready for clear coat... maybe not
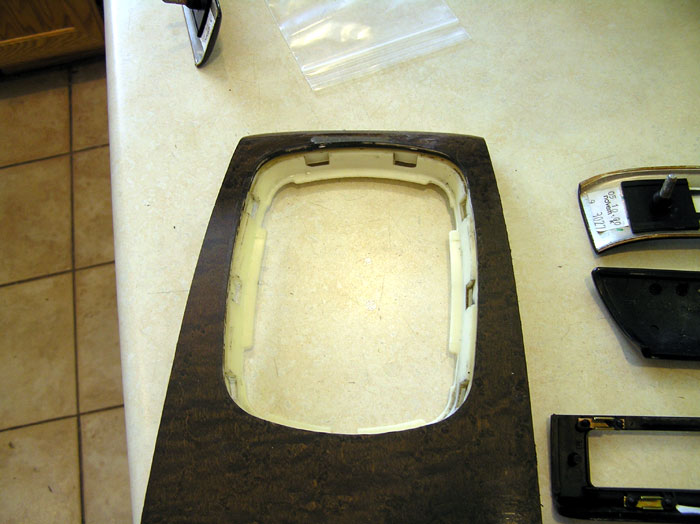
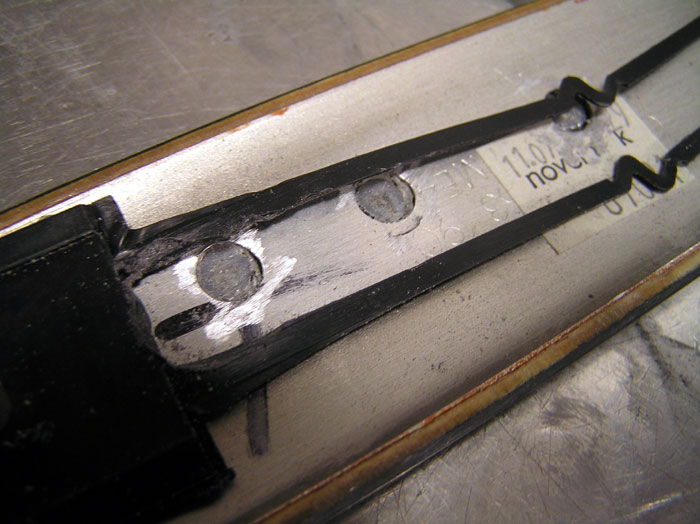
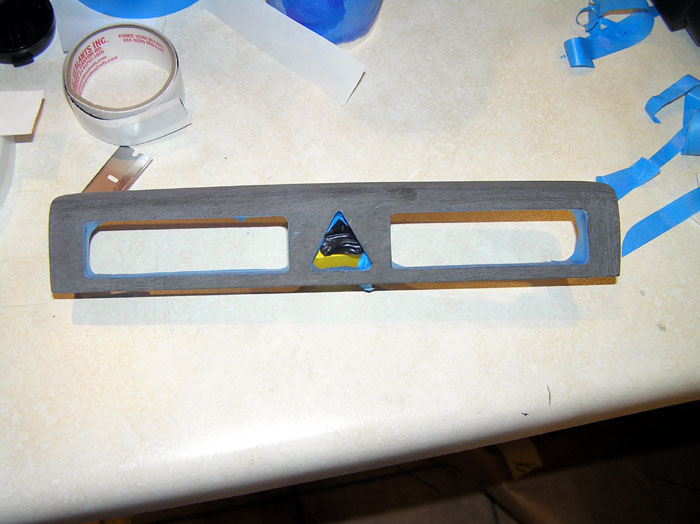
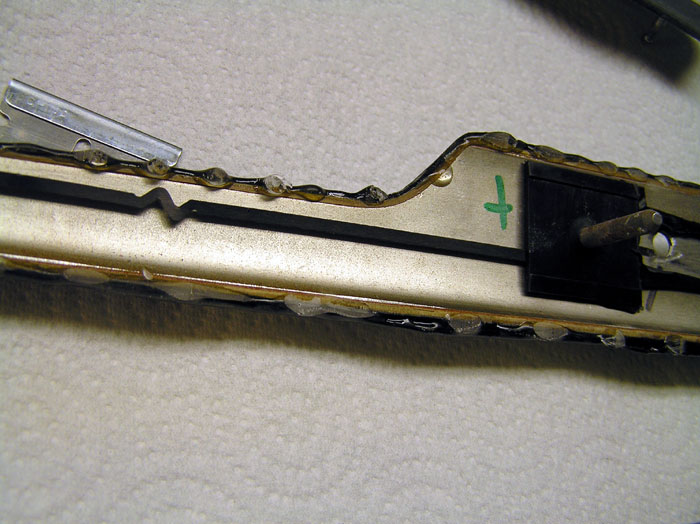
Well I might as well face it I guess. Here is the center trim that holds the silver Quattro badge. What you see here is the cut out as it was left after I trimmed the fabric at "B" stage. I left some extra and it does look rough here. Let's clean it up shall we?
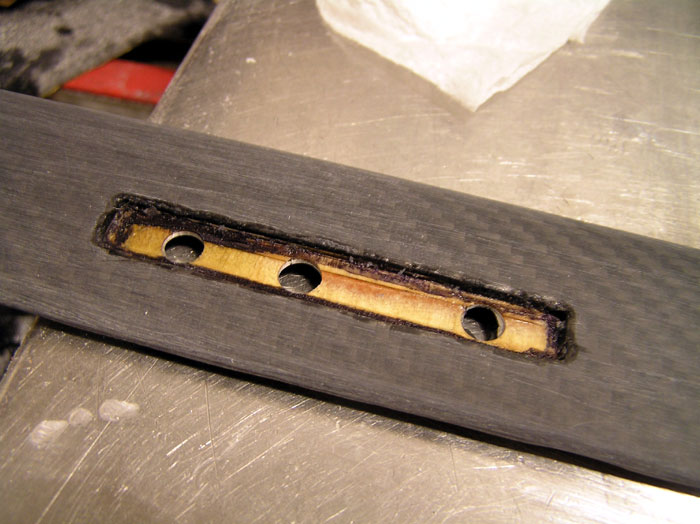
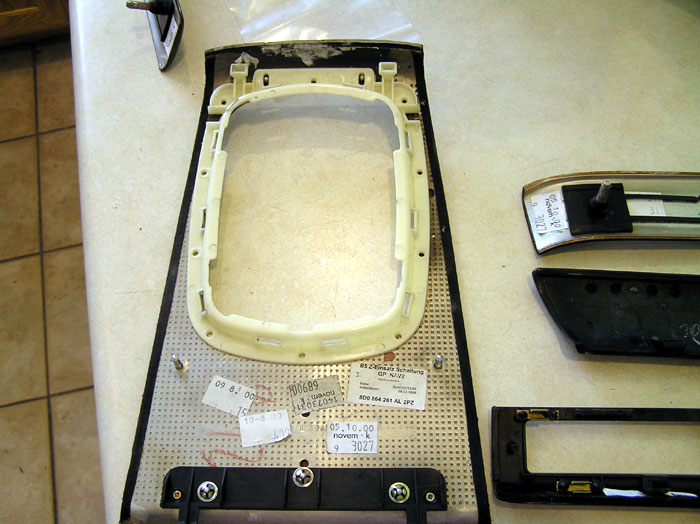
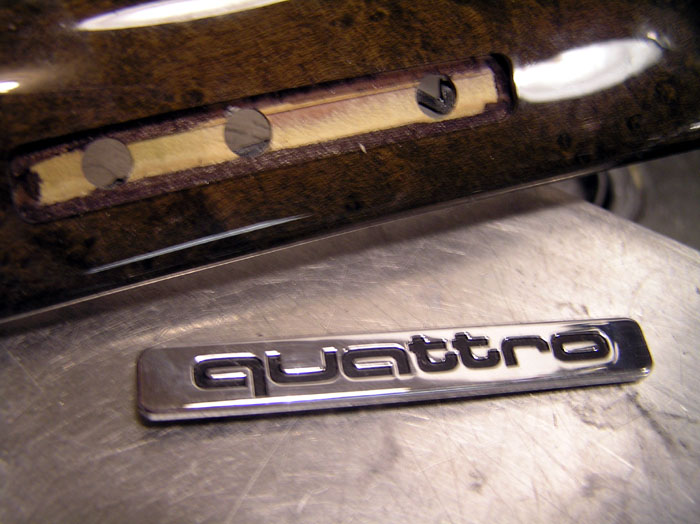
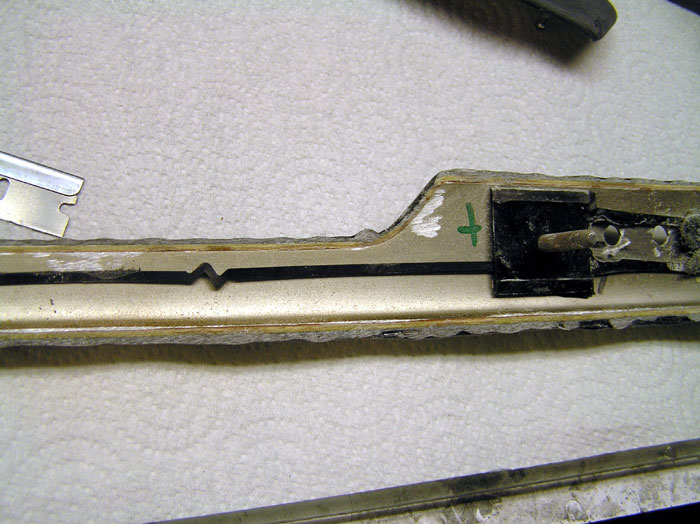
It's a little hard to see here but I cleaned the edges of this coutout until the Quattro button fit snugly in place. I will admit this took some patience but I nailed it. Do not move on until you have the badge fitting exactly as you want it. Time for one last clean up with acetone and paint.
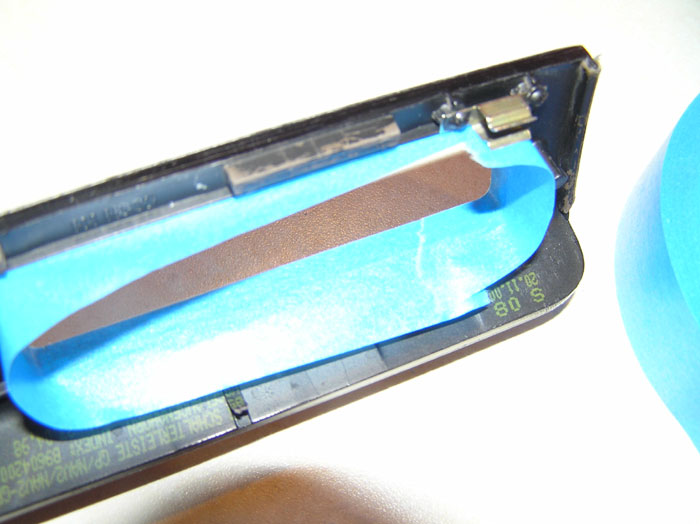
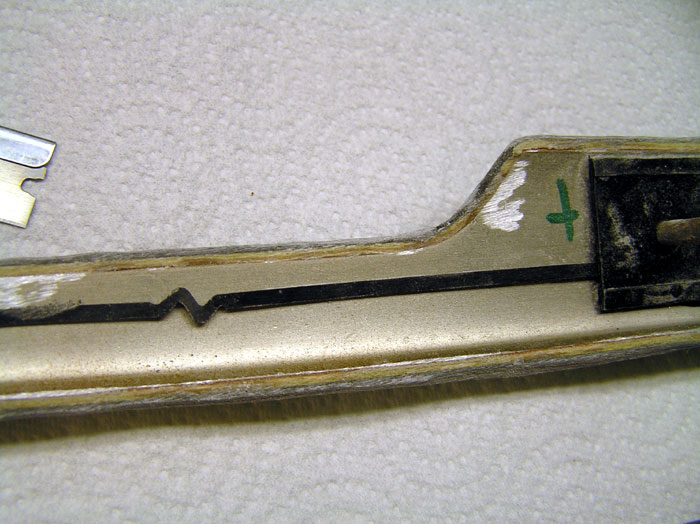
This shifter trim needed some special attention on its edge. This didn't need to be painted since this is hidden when the part is installed but I did it anyway. I taped the part off and left the edge to be painted black.
I also left the back portion free of tape since this was black when I got the part. From here I can let the black dry and shoot my clear.
Here's my first coat clear coat paint shot in my mini spray booth.
More paint
2nd coat
3rd coat
The parts actually look pretty good right now right out of paint but we;re going to the next level with them. From here each part was wet sanded from 800 up through 2500 grit paper. Then each part was buffed with a wool pad and cutting compound. I won't go into this part of the project since it's a pretty large topic all by itself. The best advice I have on wet sanding is sand only in one direction not swirls. Then follow the exact instructions with the cutting compound you are using and use a real wool pad. I use a 3" air powered buffer and I love it for parts like this. Here is what I use to buff: http://www.racingcomposites.net/unt?id=90

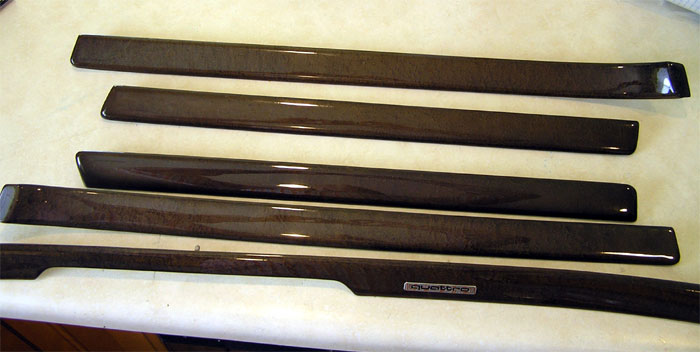
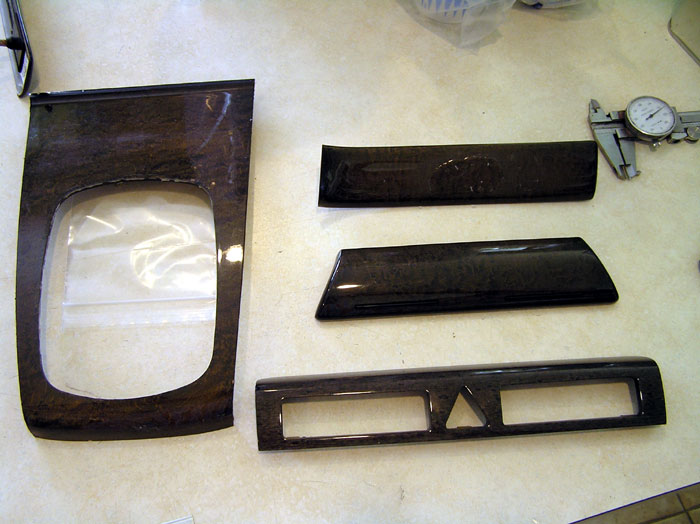
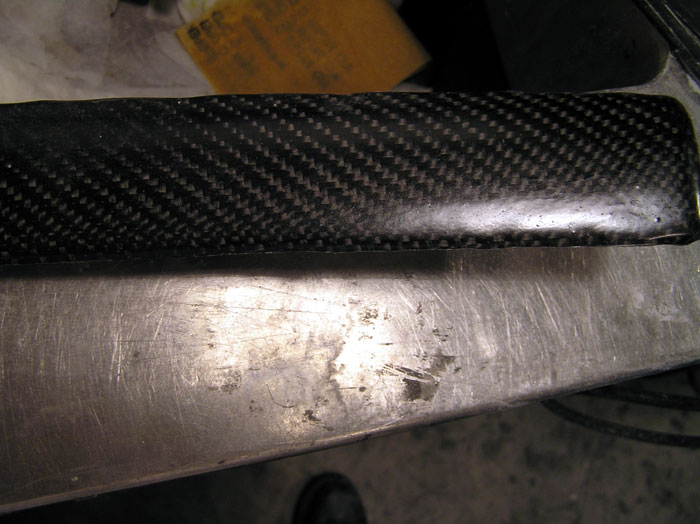
Last step call the customer and give him the good news. Here is a shot of the finished parts.
For the rest of the finished parts plus installed images go here:
http://www.lighterfaster.com/audioverlay.html
Just to give you an idea this project took me over 30 hours to complete. I'd be happy to answer any questions you may have. I hope you liked the write-up
The pic below shows our starting point. There are 9 different pieces involved in this project. Below you see the drivers and passenger side door trim for the front and rear doors plus the center dash trim. All of these parts were extremely well made by Audi. They are aluminum/or plastic backed parts with a glossy wood veneer. We're about to make them dull!
Here are the same parts on the backside. You can see the mounting pins will be used to install the trim again so we must not get any resin on the backside of the parts or at least minimize what resin finds its way to the backside. I'll explain how to do that later.
Here is the shifter trim as shown from the front.
You can see in this pic we must take special care to keep resin off the white plastic piece. If it's not a big deal to pull of extra parts that will not be overlayed do it for sure. If any resin gets on this plastic the shifter boot is going to have trouble slipping back on the shifter trim. One side note is I did not have the car in my shop so I had to take extra care so nothing is altered as far as mounting surfaces go.
Here you can see the tiny screws have been removed so we can separate the two pieces. All hardware was removed and labeled in a small ziplock. These pictures were also used as a reference in case I needed to go back and look at something pre-overlay.
The other three parts are shown below. You can see the ashtray, hazard button surround, and small front dash trim. At this time you should start studying where you can place fiber and how each part will be fixtured as it is painted with resin during the overlay. We'll get to that shortly.
This is a pic of a small plastic chrome button that is front and center in the car so it will be very noticeable if it gets screwed up. This piece must be removed to make everything look factory in the end. This is one of the tricky parts of this overlay but don't worry these type of curve ***** come up and its your job to deal with them.
This is the backside of the Quattro button. You can see it has been attached by melting some through posts on the back of the part. These must be ground off and the button must be removed before we move on.
You can see here these buttons have been ground off by way of a sanding drum in a drill press but you could use any powere abrasive tool such as a Dremel. You must be careful not to damage the backside of the part. Just grind until the tops of the buttons are gone.
Here is has been removed. Just popped right out.
No big deal
... at least to remove. You should have some idea of how this will go back in before you are looking at this on your workbench.Before we go any further down the road on thsi project we need to take some time and verify that our resin system is compatible with the parts we are working with. I chose to run my test on the smallest part since it would be the least expensive to replace assuming my resin melted the part or something strange happened. You never know until you test in some cases. This is especially important since these aren't my parts and someone has given me the responsibility of taking care of their parts. I don;t take the responsibility lightly for sure. What you are looking at here is a section of the parts that has been well abraded with 150 grit paper and then cleaned with acetone. Warning acetone will melt plastic so take that into account. If you can't use acetone just wash well with soap and water. Make sure it's rinsed well and dried before you start. On the left hand side of the pic I just dripped a spot of resin on the part. Just right of that you can see some resin has been brushed onto the abraded area. On the far right side I dripped some resin on an un-abraded area. The results are as expected. I took a razor blade and tried to chip the resin off. The piece on the right popped off completely which just shows how important iot is to prep correctly. Then I switched to the far left side. I could chip this one off in small bits but couldn;t get all of it off. The piece in the center did not come up at all. This means later on down the road the resin will most likely stay put.
I also left these in an oven for an hour at 140F. This will tell me what sort of response the part might have if it was sittinng in a hot car under summer conditions. Of course an hour is not going to tell you everything but sometimes you will learn something here. This test didn't change anything on this part. So now we can move on to abrading and cleaning all of the parts to prepare for the overlay. All of the resin was sanded off this part before any work started.
Before we move on to prepping I wanted to show you this part. This is a side view close-up shot of the hazard button trim. You do not want to get any resin inside the button positions or the part won't fit. I wold say this was the most difficult part of the entire job but it came out in the end.
Here is one of the first parts to be scuffed. My method of abrading is to start with 150 grit sandpaper. Everything was scuffed until there was no gloss left on any part. In general I just worked the sandpaper in one direction with this sandpaper. Remember each part starts with this step. At this point you shoudl be careful not to change the shape of the part. Only sand to a matte finish. The edges of the part are very prone to changing shape if you're not careful.
Next I move on to using 80 grit sandpaper. As you know this is a much more agressive sandpaper. I had to be extremely careful with this to avoid any shape change. If you change the shape it might look funny when it goes back in the car. First I worked the 80 grit in the same direction as the 150 grit.
Next I sanded in a criss-cross pattern. My thinking behind this is with 150 grit sandpaper you can gets lots of little scratches or valleys per inch but not so deep. With 80 grit you get fewer scratches per square inch but the valleys are much deeper. I chose a mix of both the get the resin to fill in these valleys and really hook the fabric to the part. This has always worked well for me. Next part please. I probably have 30 mins a piece of scuffing prep work at this point.
This pic shows the front of the ashtray. It has small raised areas that must be ground away. This will ensure the fiber lays down without lumps. Carbon fabric won't look nice trying to conform to these bumps. They must be ground off. BTW you are at the point of no return now, LOL
Just grind them down enough so they are flat. Go easy here.
Now all of the parts are scuffed and soap and water scrubbed, dried, and then wiped with acetone a few times to make sure they are degreased and dirt free. Make sure they are very clean. Now I roll out some 2x2 twill carbon fabric and lay my parts smooth side down onto the fabric. I used a silver Sharpie to trace out a shape just slightly larger than the part itself. Make sure the part is oriented with the direction of the fabric that you desire. When installed the fabric can appear to move at an angle like this / or this \ If you have a set of parts sometimes you want the angle direction to look the same. To some these type of details don't matter but I always think about it. Now remove the parts and cut out a piece of fabric to fit the part. Be careful not to snag any of the fabric with a part corner or anything, it will look bad.
This is tacky tape used for vacuum bagging typically but we are going to use it for something else today. If you haven;t seen it think of tough taffy that is very sticky. It is available at most composite material supplier outlets.
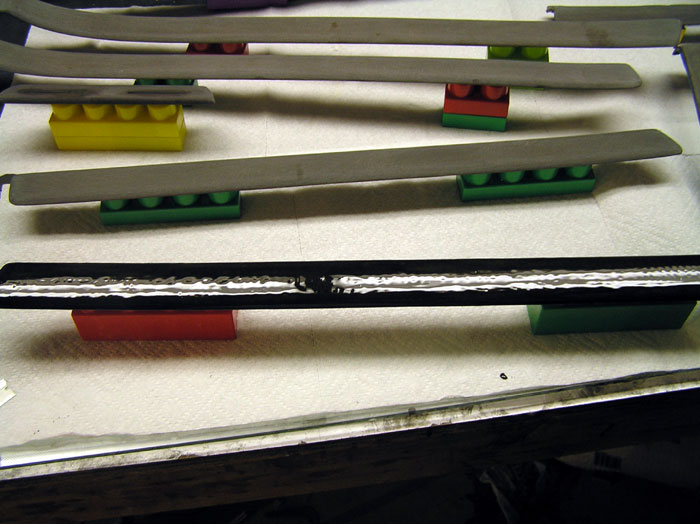
Don't laugh... You grew to love Legos as a kid and now they are your friend again. Cut a piece of tacky tape and stick it to the top of the Lego.
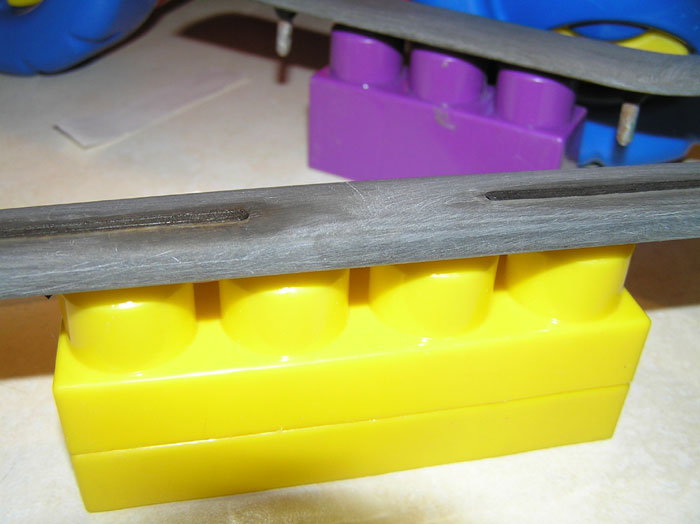
We are going to use various large Lego blocks, these are the kind toddlers like, these happen to belong to my 2 year old. He said I could use them. These Legos will serve double duty as a way to keep our part off the work table surface and out of any dripping resin. They also offer us a unique way to fiture each part into any position we want. If you have a weird shaped part like our ashtray or shifter trim the resin will run off cirved surfaces and sometime it is helpful to position the part in a compromise position to ensure that each coat of resin will cover up the fabric as much as possible. Imagine pouring resin onto a flat surface. The resin will tend to just pool out. Now picture dumping resin on a sphere. The top will have less resin than the bottom. When you are trying to cover up fabric gravity can be tough to deal with. Sometimes you have to overlay a part in one position and then change position and paint the rest of it. It takes several coats of resin to cover fabric. This small part was straight ahead.
What a great little fixture
Here is the ashtray all fixtured up.
You can see this is one of the parts that needs to be mounted in a compromise position to facilitate good resin flow.
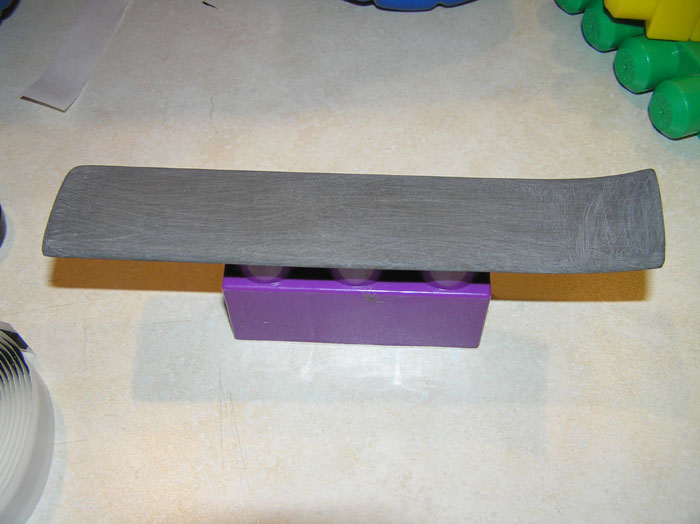
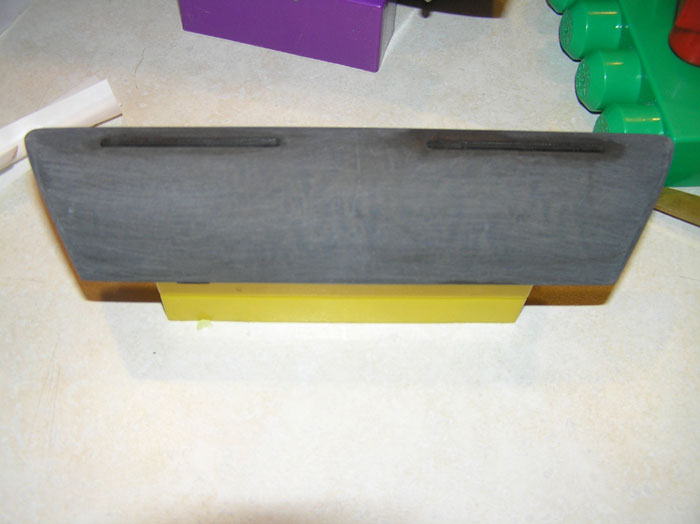
Here's a large part that needed a few legos.
You can see the shifter trim is going to be a little tricky from a resin point of view as well. The resin will flow right off the front of this part or pool towards its backside. The rear of this parts has a plastic bracket to hold it up off the table top so we don't need a Lego on the rear. Fixturing the front higher than the back helps even things out anyway. The front curve is pretty extreme so any way we fixture it is going to cause issues somewhere on the part.
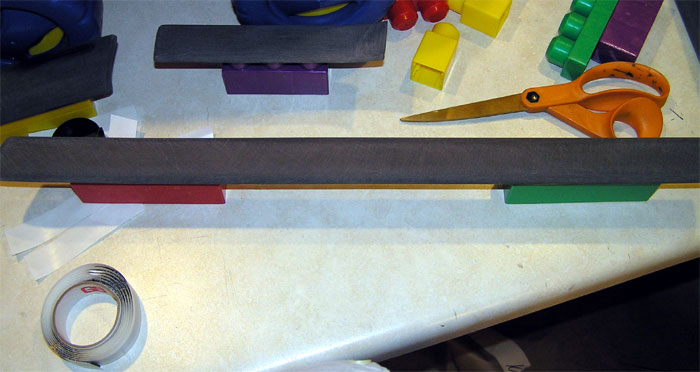
Before we end this chapter we need to tape some parts off. We don't want to get any resin on the rear plastic clip on the shifter trim.
Now we're taping off the center hole to keep any extra resin off the backside of the part. As we overlay Iprefer to use very thin conservative coats rather than drowning (flooding) the part.
I went ahead and trimmed the extra tape out with a razor blade. Blue tape is noce because it comes off really easy. This part is ready to go.
Here you can see where I taped off the inside of the hazard console so little to no resin will hti this area. Clearances are important here.
Here are a few more shots of detailed taping. Micro hint...Use a new razor blade.
While we're looking at part the area facing us needs to stay factory as well but we can sand this later if needed.
Now that we have all the parts fixtured and taped off I hit them with acetone again to get any grease that may have come off my fingers fixturing the parts. You can't wear latex gloves working wth tacky tape so I'm sure some oils came off my fingers. What you are looking at here is the first part painted with resin. This is where the magic happens so pay attention. I used S249A polyester laminating resin from http://www.fiberglasssupply.com/ with no surfacing agent aka wax additive. I pigmented the resin black. With these parts being dark in color anyway it was probably overkill but easy to mix in. On light colored surfaces you have two choices, use black pigmented resin or multiple layers of fabric. If you have a white part you will see the color through a single layer overlay even if you have a tight fabric weave. All of these parts used a single layer of carbon. It's just a waste of time to have to lay on a second layer of fabric because you didn't paint them black first. In any case you have to paint the parts with resin anyway before any material goes down so you might as well tint the resin dark. The reason you paint the parts with resin come into crystal clear focus when you consider overlaying complex shapes. Here's the deal... You want to paint the part with a very very thin coat of resin, go as thin as possible here. Now wait until the resin hits "B" stage" or just slightly before. Just make sure if you press your finger to the resin that no black comes back or very little. Thsi will depend on how much catalyst you used and the shop temp. If it's too wet the resin will seep through the fabric and you will see black come though. Even on black carbon fiber it can be seen. So now that you are at this point grab your matched piece of material and make sure the weave is all straight and just how you want it. Now pick it up and drop it down on your part. You get one shot here pretty much. With the resin being tacky your fabric will hug curves and conform very well. Thsi is really cool and its the reason you don't need a vacuum bag to overlay odd shapes. The resin is not yet fully cured.
Here I have draped the fabric on the parts here. Make sure and rub them pretty good over edges but don't mess up the weave. Make sure your hands are washed before you do this to minimize the oils transfer from your fingers. Again, no gloves allowed here it doesn't exactly make your hand glide over the part.
Now take a regular hair dryer or heat gun and start warming the parts. A regular blow dryer works well because you won't cook the resin as easily. Some heat guns get pretty hot and you can easily hurt something with too much heat. Just warm each part in rotation and make sure no fabric pops up on cirves and such. I have to admit my partner and wife helped a little here
Keep the acetone and your resin on the other side of the room sealed up and make sure there is good ventilation as well. Wear a respirator around polyester resin. When you're done all fabric should be stuck to the part exactly where you want it. You can leave the parts overnight at this point to cure a bit more. Since we didn't use any wax additive in our resin we can keep adding resin as needed at any time even a year from the time you layup. As you may know polyester resin will never fully sure in open air so wax is used on the last resin layer to seal it off from the air. If we used a wax additive we would have to sand the wax off first before moving on. Of course in this situation you can't do that so no wax right now. As an aside I chose this resin because it is easy to work with and familiar to me plus it has UV additives to keep it from yellowing which is important even inside a car. An epoxy would need a clear coat for UV protection but you can use epoxy on overlays as shown in the sideskirt overlay project I posted a while back.
Flash forward to the next day. This picture shows the very first coat of resin I laid down on the fabric. This resin coat and all to follow have no pigment and is very clear when painted on. Thsi first coat of resin much be approached with care. When you paint the resin on you can see some lifting around tight corners. If you do see some fabric lifting just press it back down and watch it until the resin starts to gel which is usually only 15 minutes or so with polyester resins. If the resin lifts anywhere at this point it will be pretty much impossible to fix without removing all the fabric. I chose to only paint 2 parts at a time and watch them until I was confident they didnlt have any fabric lifting. I especially needed to watch the edges but the previous day tacking and blow drying solved 90% of the lifting issues I might have seen had a just tried to drop fabric and paint resin. I've done it both ways and this is the best way to go. This is the reason I painted resin down first.
Here you can see I have trimmed all the hanging fabric off the parts. I used probably one new razor blade per part trimming them. DO NOT USE OLD BLADES! What you want to do is start anywhere at the edge of the part and stick the razor blade in anywhere you need to trim. If you have watied for the resin the "B" stage the extra fabric will just slice right off use a slight sawing motion. If the blade gets gummed up just get another one. If the razor blade sticks just start in from the other side and come towards your original cut. It takes some practice to get the technique down but this is much easier and more accurate than using a dremel after cure. Don't worry about getting it perfect, a few hanging fibers isn't a big deal. Error on the side of cutting too little material off rather than too much. On these parts I wanted to make sure the fabric wrapped around the edge so you would look nice so I left the front edge alone and trimmed the parts so they looked nice and kept the fabric rounded edge intact. If you will remember back to the Quattro badge I covered right over this area with fabric so I had to trim this area out. I could see where the badge should have been and didn;t get too much resin in the area. To get a good cut through the fabric you must have resin in the area to be cut. Dry fibers don;t cut too well but when the resin in included it comes off like cutting a fruit roll-up.
Here's a rough trim on the ashtray. Now I roatated the parts through coating. I coated each part 4-5 times with thin coats before the resin was deep enough. It is not a good idea to dump resin, be neat about it. Some parts such as this ashtray needed a few more coats in some areas due to the shape. I could recoat the parts about every 15 minutes and I just coated until I saw no fiber peaks (texture). After the fabric was covered I coat once more to give me more sanding room. If your resin coverage layers are too thin you will risk sanding through to the fabric which will ruin the look of the part.
Here is a picture of a fully coated and cured part. BTW, on the last resin layer I did add some wax additive to the part to fully cure the resin. You can see it's a bit lumpy despite the car I took coating the part. I have done this a few times as well. Here is the real labor part of the job, you have to sand all of this down.
This picture shows the first demon I had to face. I told you earlier that you would get some resin on the backside of your part, here it is. You need to sand or grind all of it off.
Here's a good tool for the job. This is a drill press with a 60 grit sanding drum all ready to grind. This thing takes off resin very quickly even at it's low RPM. This really cut my labor time on each part down. Each part got this treatment beofre it came to hand sanding.
Here you can see I have taken the resin down just to the aluminum backing and no more. At this point you just rough it down to a point that is easy to finish by hand. Now its time to get out the sanding block to rough everything down semi smooth.
You can see I did not damage the factory part to any great extent. Factory fit is what I'm going for here.
Ughhh here is where we start...again go through all the parts in this manner.
I started with 150 grit and sanded everything down smooth. I only used a sanding block on the very edge to make sure it was straight. You can over do it with the sanding block so be careful. You want to hit these edges right to the bare minimum so they will fit like factory or as close to it as possible. The parts will grow no matter what but you can minimize it. If you oversand the edges you could go through the fiber and end up with a spot of wood coming through. I also used 80 grit very carefuly in some big lumpy spots of resin.
More sanding
Now sand the entire part with 220 grit sandpaper until it looks uniform. It's a good idea to wash the part in between each grit so you;r not mixing grit sizes. This goes for sanding in general, it's a good rule to follow.
Now move up to 320 grit and run through all the parts again. This is as far as I;m going to go here. I could keep sanding up to 2500 grit and then buff them to a shine but I'm going to skip some sanding steps and give us a little more UV protection by clear coating. Typically here is where I would go with this. I would wet sand each part in the following order:
P400
P500
P600
P800
P1000
1200
1500
2000
2500
Buff
By painting the parts I can skip 400,500,600,800 sanding steps and when you;re dealing with 9 parts like this that means time.
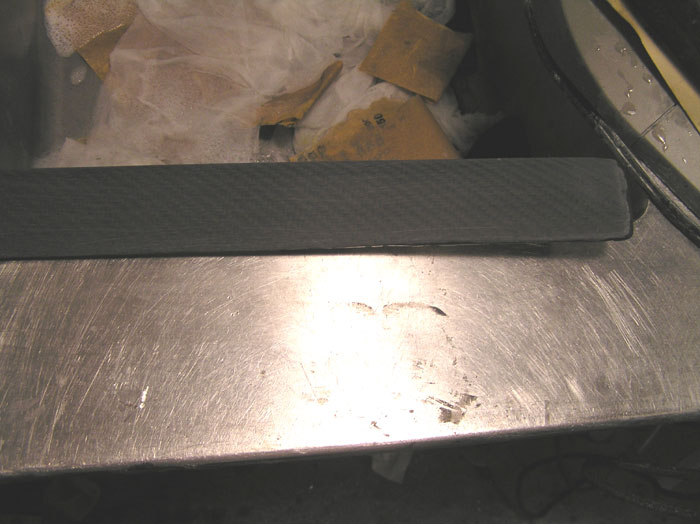
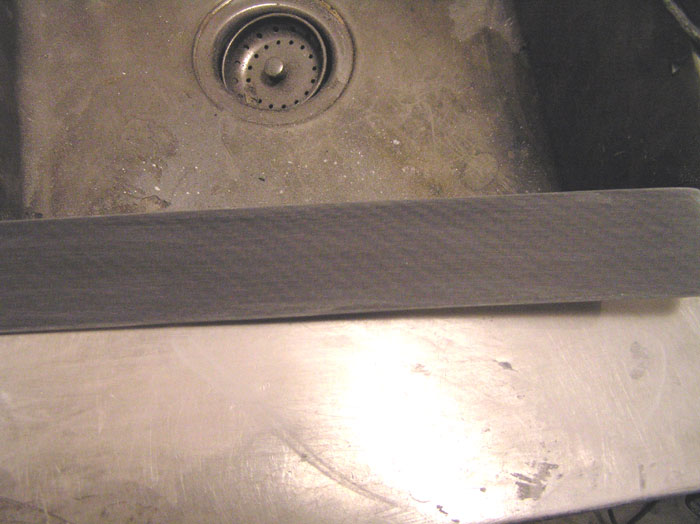
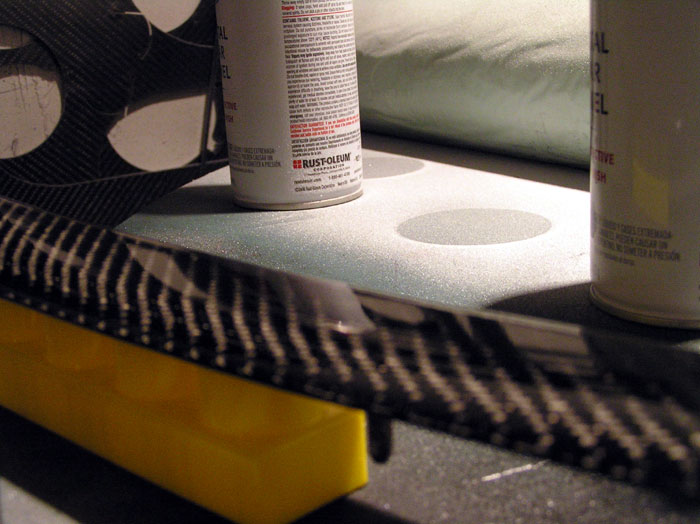
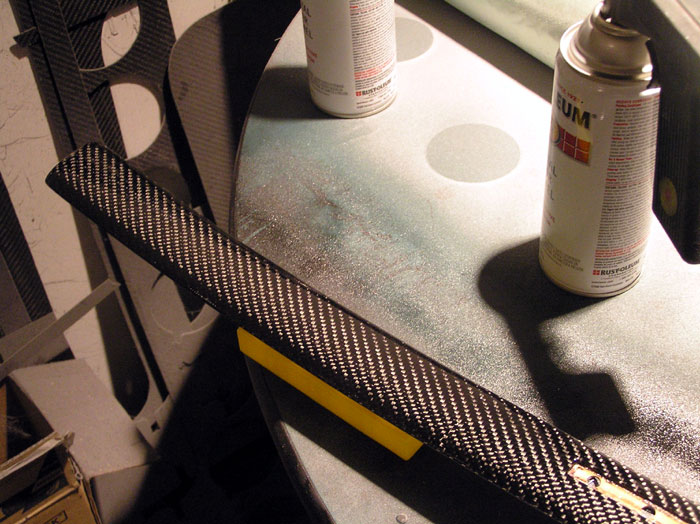
Here are most of the parts with the first sanding done, saving the long center trim for last.
This shot shows some touch up resin work on the edges of the part. Sometimes on the edges you can get little pinholes show up or there may be a small void caused by the way the resin runs off the part. I simply dressed the edges with wax additive resin to fill in the spots that had trouble. The parts I fixed were small and you might think it's nothing to worry about but it drives me crazy to put out anything I know is flawed which I could have fixed. Anyway since the parts were sanded down there was nothing left of the last wax additive layer of resin I used. This means this coat of resin wil stick well. Also I cleaned the parts again before I dressed the edges. After this resin dressing cured all the parts were sadned to proper shape again. We're ready for clear coat... maybe not
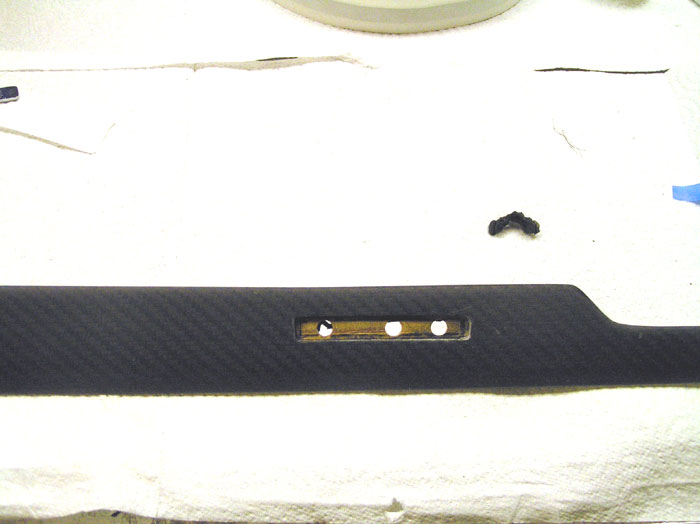
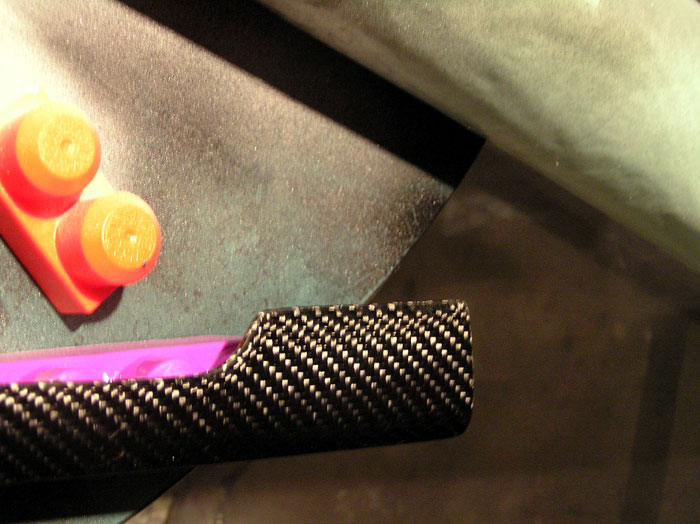
Well I might as well face it I guess. Here is the center trim that holds the silver Quattro badge. What you see here is the cut out as it was left after I trimmed the fabric at "B" stage. I left some extra and it does look rough here. Let's clean it up shall we?
It's a little hard to see here but I cleaned the edges of this coutout until the Quattro button fit snugly in place. I will admit this took some patience but I nailed it. Do not move on until you have the badge fitting exactly as you want it. Time for one last clean up with acetone and paint.
This shifter trim needed some special attention on its edge. This didn't need to be painted since this is hidden when the part is installed but I did it anyway. I taped the part off and left the edge to be painted black.
I also left the back portion free of tape since this was black when I got the part. From here I can let the black dry and shoot my clear.
Here's my first coat clear coat paint shot in my mini spray booth.
More paint
2nd coat
3rd coat
The parts actually look pretty good right now right out of paint but we;re going to the next level with them. From here each part was wet sanded from 800 up through 2500 grit paper. Then each part was buffed with a wool pad and cutting compound. I won't go into this part of the project since it's a pretty large topic all by itself. The best advice I have on wet sanding is sand only in one direction not swirls. Then follow the exact instructions with the cutting compound you are using and use a real wool pad. I use a 3" air powered buffer and I love it for parts like this. Here is what I use to buff: http://www.racingcomposites.net/unt?id=90
Last step call the customer and give him the good news. Here is a shot of the finished parts.
For the rest of the finished parts plus installed images go here:
http://www.lighterfaster.com/audioverlay.html
Just to give you an idea this project took me over 30 hours to complete. I'd be happy to answer any questions you may have. I hope you liked the write-up

 12-03-2006, 08:25 AM
#6
Honda-Tech Member
Join Date: Feb 2005
Location: Ephrata, PA, USA
Posts: 289
Likes: 0
Received 0 Likes
on
0 Posts
Wow, sweet job. I'm curious how you end up charging the customer for work like this? Do you do it by an hourly rate or a fixed price for everything since it was a decent sized job.

Trending Topics
12-03-2006, 09:03 AM
#8
* B A N N E D *

Join Date: Aug 2005
Location: www.compositesfab.com
Posts: 2,844
Likes: 0
Received 0 Likes
on
0 Posts
it all depends the resin he used. i am pretty sure he used UV clear. He could have used a UV resin. Plus it has to be a GOOD clear. We all know that ViS uses a UV clear but most hoods within 2 months are all yellow
12-03-2006, 12:56 PM
#9
Thread Starter
Join Date: Oct 2002
Location: Eagle Mountain, UT, USA
Posts: 1,708
Likes: 0
Received 0 Likes
on
0 Posts
<TABLE WIDTH="90%" CELLSPACING=0 CELLPADDING=0 ALIGN=CENTER><TR><TD>Quote, originally posted by 91TSiGuy »</TD></TR><TR><TD CLASS="quote">Wow, sweet job. I'm curious how you end up charging the customer for work like this? Do you do it by an hourly rate or a fixed price for everything since it was a decent sized job.</TD></TR></TABLE>
All you can do with an overlay really is estimate the time it takes and then set an hourly rate. As you might guess the material costs were pretty minor compared to the time. If you don't bid overlay work all the time its easy to under bid jobs. Even though I have experience I should have charged more for this one. Ahh well customer is happy
All you can do with an overlay really is estimate the time it takes and then set an hourly rate. As you might guess the material costs were pretty minor compared to the time. If you don't bid overlay work all the time its easy to under bid jobs. Even though I have experience I should have charged more for this one. Ahh well customer is happy
12-03-2006, 12:59 PM
#11
Thread Starter
Join Date: Oct 2002
Location: Eagle Mountain, UT, USA
Posts: 1,708
Likes: 0
Received 0 Likes
on
0 Posts
<TABLE WIDTH="90%" CELLSPACING=0 CELLPADDING=0 ALIGN=CENTER><TR><TD>Quote, originally posted by codenamezero »</TD></TR><TR><TD CLASS="quote">did you use UV protection clear coat? else all your CF will become yellow after maybe a year...</TD></TR></TABLE>
Actually it takes less time than that depending on exposure time and the UV index in your area. In epoxy tests conducted on a roof top in Utah I have seen epoxy change color in 3 months. Here is what I say in the post above:
As an aside I chose this resin because it is easy to work with and familiar to me plus it has UV additives to keep it from yellowing which is important even inside a car. An epoxy would need a clear coat for UV protection but you can use epoxy on overlays as shown in the sideskirt overlay project I posted a while back.
The paint is my secret
12-03-2006, 03:12 PM
#12
Honda-Tech Member
Join Date: Jul 2004
Location: I'm everywhere Focker
Posts: 5,463
Likes: 0
Received 2 Likes
on
2 Posts
Where can I get the following info:
Info about the wax additive you talk about
The pigment additive to make the resin black
The spray can clear that alot of guys use
I have done some overlay stuff and some flat panels, but I am having yellowing problems. I am doing some more stuff soon, so trying to research now.
Info about the wax additive you talk about
The pigment additive to make the resin black
The spray can clear that alot of guys use
I have done some overlay stuff and some flat panels, but I am having yellowing problems. I am doing some more stuff soon, so trying to research now.
12-03-2006, 03:27 PM
#13
Thread Starter
Join Date: Oct 2002
Location: Eagle Mountain, UT, USA
Posts: 1,708
Likes: 0
Received 0 Likes
on
0 Posts
Here is some info on the pigment I used:
http://www.fiberglasssupply.co...t.pdf
you can buy it at the bottom of this page under pigments, for use with ester based resins:
http://www.fiberglasssupply.co....html
Here is some info about the wax additive:
http://www.fiberglasssupply.co...t.pdf
The call it surfacing agent but its the same thing. Again only used with ester resins and not epoxies.You can buy it on the same page as the pigments.
As far as the spray can paint there are many choices, just get a quality product and you can get great results, you would be surprised. I couldn't say which one would most commonly be used. What kind of resin are you using that has a yellowing problem, epoxy / PER? Feel free to IM me if you have more questions on the surfacing agent or anything else.
http://www.fiberglasssupply.co...t.pdf
you can buy it at the bottom of this page under pigments, for use with ester based resins:
http://www.fiberglasssupply.co....html
Here is some info about the wax additive:
http://www.fiberglasssupply.co...t.pdf
The call it surfacing agent but its the same thing. Again only used with ester resins and not epoxies.You can buy it on the same page as the pigments.
As far as the spray can paint there are many choices, just get a quality product and you can get great results, you would be surprised. I couldn't say which one would most commonly be used. What kind of resin are you using that has a yellowing problem, epoxy / PER? Feel free to IM me if you have more questions on the surfacing agent or anything else.

 12-04-2006, 10:25 AM
#18
Thread Starter
Join Date: Oct 2002
Location: Eagle Mountain, UT, USA
Posts: 1,708
Likes: 0
Received 0 Likes
on
0 Posts
Just try again later, I'm going back and forth with my web host trying to get 24/7 service. Their bandwidth allocation sucks.  Seems like the extra usage over the holidays is causing this problem
Seems like the extra usage over the holidays is causing this problem
12-04-2006, 12:30 PM
#20
Thread Starter
Join Date: Oct 2002
Location: Eagle Mountain, UT, USA
Posts: 1,708
Likes: 0
Received 0 Likes
on
0 Posts
Over 30 hours or close to 3.5 hours per part if you average it out. I could have done it quicker but the quality would have suffered.
12-04-2006, 01:36 PM
#21
Honda-Tech Member
Join Date: Aug 2004
Location: resident ht bully, USA
Posts: 2,499
Likes: 0
Received 0 Likes
on
0 Posts
man, thats an extensive write-up you created there...
I'll definintely be book-marking this for future reference
great work man
I'll definintely be book-marking this for future reference
great work man
12-04-2006, 04:23 PM
#23
Honda-Tech Member
excuse me if i skiped over reading this
can you list some minor tools that may be needed to go a job like this like exacto knifes. i am concerned about when i get to the eges of my overlay how i am going to clean them up.
can you list some minor tools that may be needed to go a job like this like exacto knifes. i am concerned about when i get to the eges of my overlay how i am going to clean them up.
12-04-2006, 04:47 PM
#24
Honda-Tech Member
Join Date: May 2002
Location: England/Florida/Portland
Posts: 3,203
Likes: 0
Received 3 Likes
on
3 Posts
Excellent write up
Do you produce and sell parts for Honda/Acura's, or is it on a customer order basis?
Do you have your own website with products you sell or have created?
Do you produce and sell parts for Honda/Acura's, or is it on a customer order basis?
Do you have your own website with products you sell or have created?
12-04-2006, 04:57 PM
#25
Thread Starter
Join Date: Oct 2002
Location: Eagle Mountain, UT, USA
Posts: 1,708
Likes: 0
Received 0 Likes
on
0 Posts
<TABLE WIDTH="90%" CELLSPACING=0 CELLPADDING=0 ALIGN=CENTER><TR><TD>Quote, originally posted by Arsenal »</TD></TR><TR><TD CLASS="quote">Excellent write up
Do you produce and sell parts for Honda/Acura's, or is it on a customer order basis?
Do you have your own website with products you sell or have created?</TD></TR></TABLE>
Thanks a lot. Check my sig for some of the everyday stuff we build and sell.
Do you produce and sell parts for Honda/Acura's, or is it on a customer order basis?
Do you have your own website with products you sell or have created?</TD></TR></TABLE>
Thanks a lot. Check my sig for some of the everyday stuff we build and sell.