
Improved Mooncut Valvecover
 04-16-2013, 09:17 PM
#1
OK, for years I have been wondering why soo many people run open timing covers or no covers at all. Even full race guys, Iv'e been to several tracks with gravel parking and rough pit roads; combine that with hot slicks and you may have a recipie for disaster, broken timing belt. Sure enough, some of you have had trouble with this mod, or lack thereof; as I have seen in various threads. The mooncut is definately an improvement to a no-cover build, but still lacks a little more protection. After all, those $400. racing valves plus repairs don't come easy from a working mans budget. Even the car shows that so many of us enjoy with our hoods up for the whole world to see, you can't tell me a jealous ***** wouldn't just toss in a penny to **** off the guy who cut him off last week.
After looking into every option I could research (including that overpriced carbon fiber cover ), I just couldn't deny that easy access to the camgears, and that they just look great was reason enough to keep thinking on the mod. Well, I decided to try a few things and measure a bunch of stuff, and search for different hardware until I came up with what I could live with, was functional and totaly origonal (please don't tell me you've seen this before) because I really searched and would NEVER delibrately say it was mine otherwise. I would like everyone to enjoy this thread and feel free to adapt or transform this mod into any configuration they choose, or just run with a chopped VC and no plastic. I live in the sticks, (dirt roads and rough stuff) not an option for me. So, here it goes:
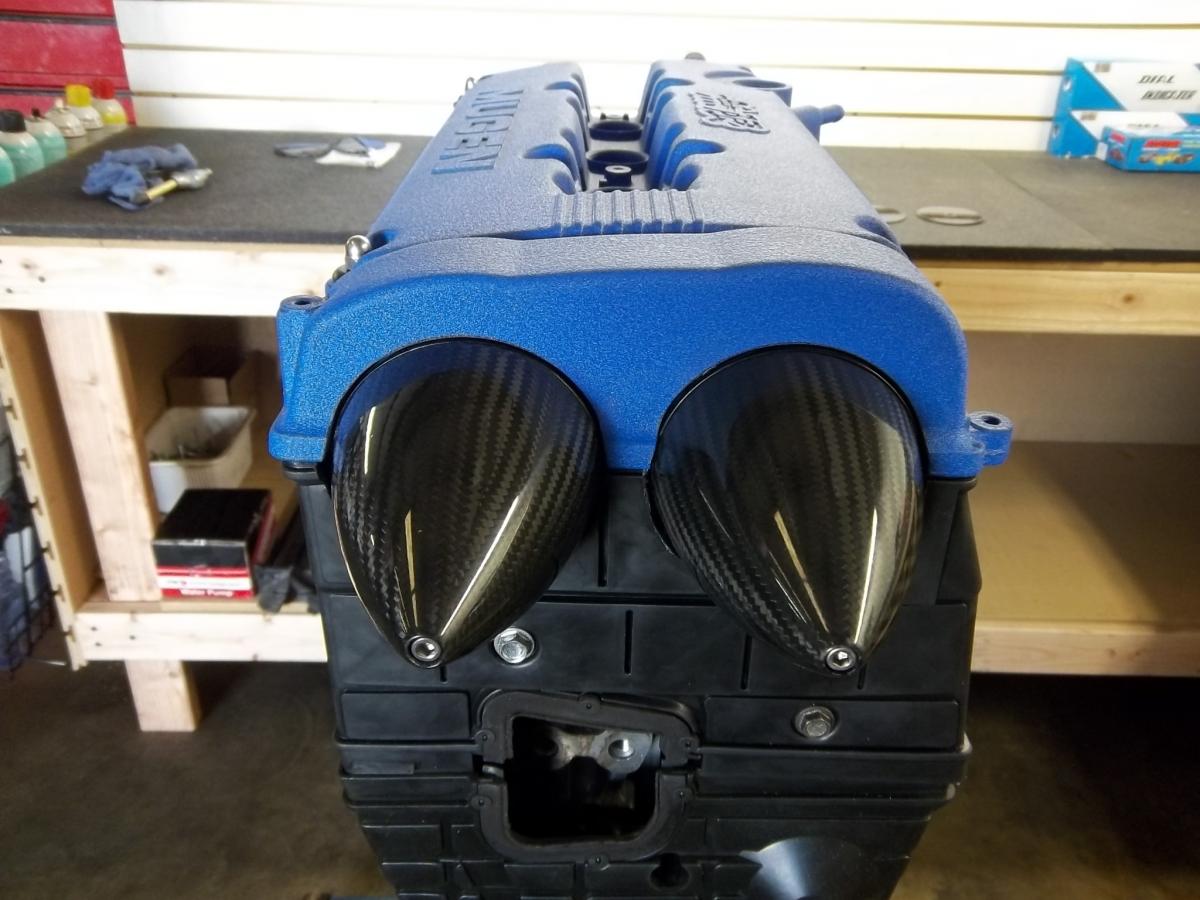
This is the carbon fiber nose cone mod with hardware. These are made for high powered large scale RC airplanes. They only weigh 2.4oz. and are made to high standards for rotational ballance for airplane engines spinning in excess of 10k rpm (twice the speed any 10k RPM motor turns cams). They are easily removable in less than a minute to give full access to the cam timing gears. The total weight increase for the mod is centrally located mass in the new hardware and nearly offsets what a factory steel cam gear weighs compared to HP adjustable aluminum cam gears. The prop cone mod is not the only way this can be achieved; as seen here with the flat carbon fiber disc covers. By the way, these rotate with the cams if you weren't sure yet. And though these are the two examples shown, for the guy who still wants to sport the cam gears; you could easily make some acylic (clear) discs of the appropriate thickness for durability (3/16-1/4 inch). Also, the hardware shown to demonstrate the flat carbon fiber is not asthetically pleasing for this style and requires a SS finish nut or the like.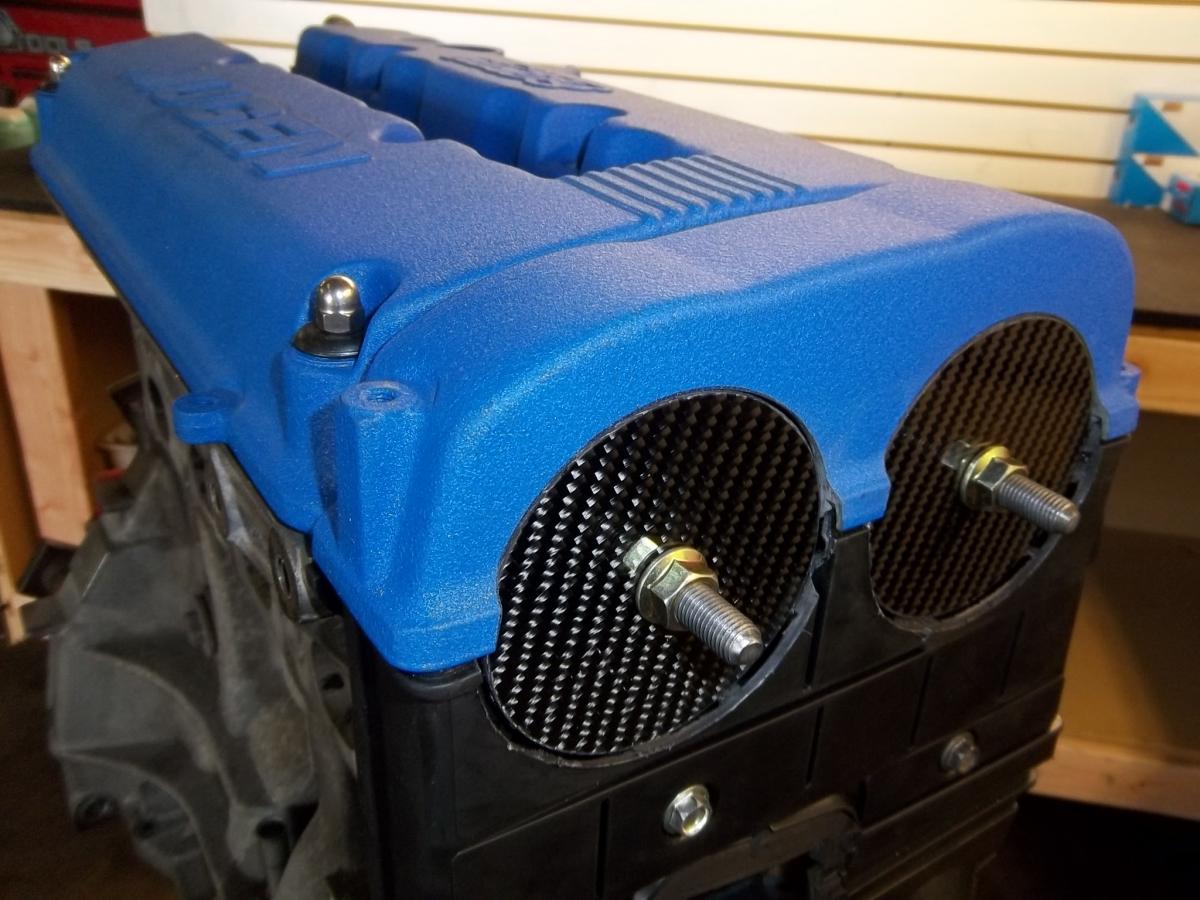
I realize that this is not for everyone, I really just did this for me. If you see a need for this in your build or have a twist on this to suit your mod, go for it. It is just a creation and I can't stop myself from being different.
OK, now to the mod:
First of all, to all the tuners that say "these B20/VTECH covers don't fit without major modification", you probably never tried. They ALMOST fit perfect to be honest. Only a very small little grind to the lower left (facing) upper rear cover is needed. Sure, the small rubber spaghetti seal on the back may have to be trimmed in the same spot, or don't even use it, the cover itself is what's important.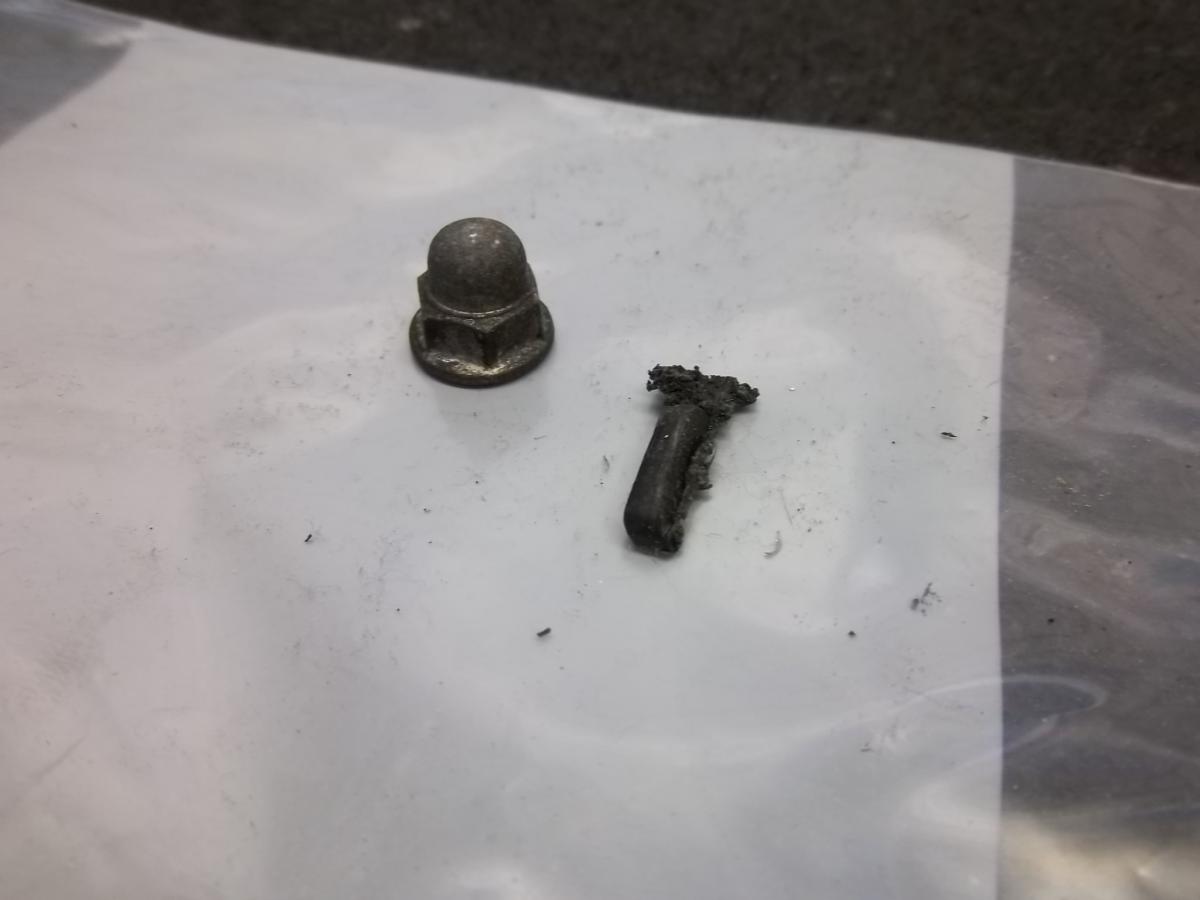
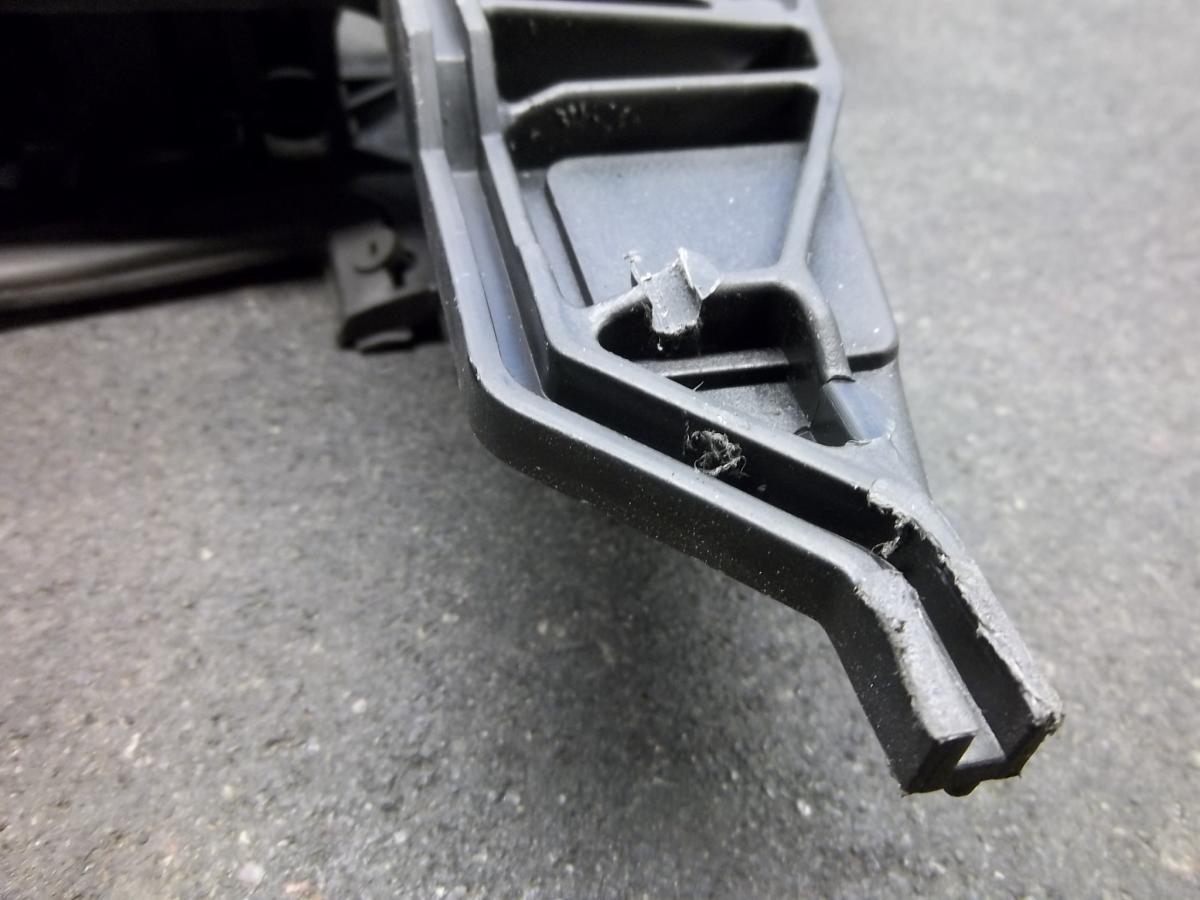 This is the tiny piece you must grind off the lower rear cover for the cover to fit flush with the block; also you can see an additional tiny groove cut just above this trim that perfectly alligns itself with the block casting ridge on the motor face.
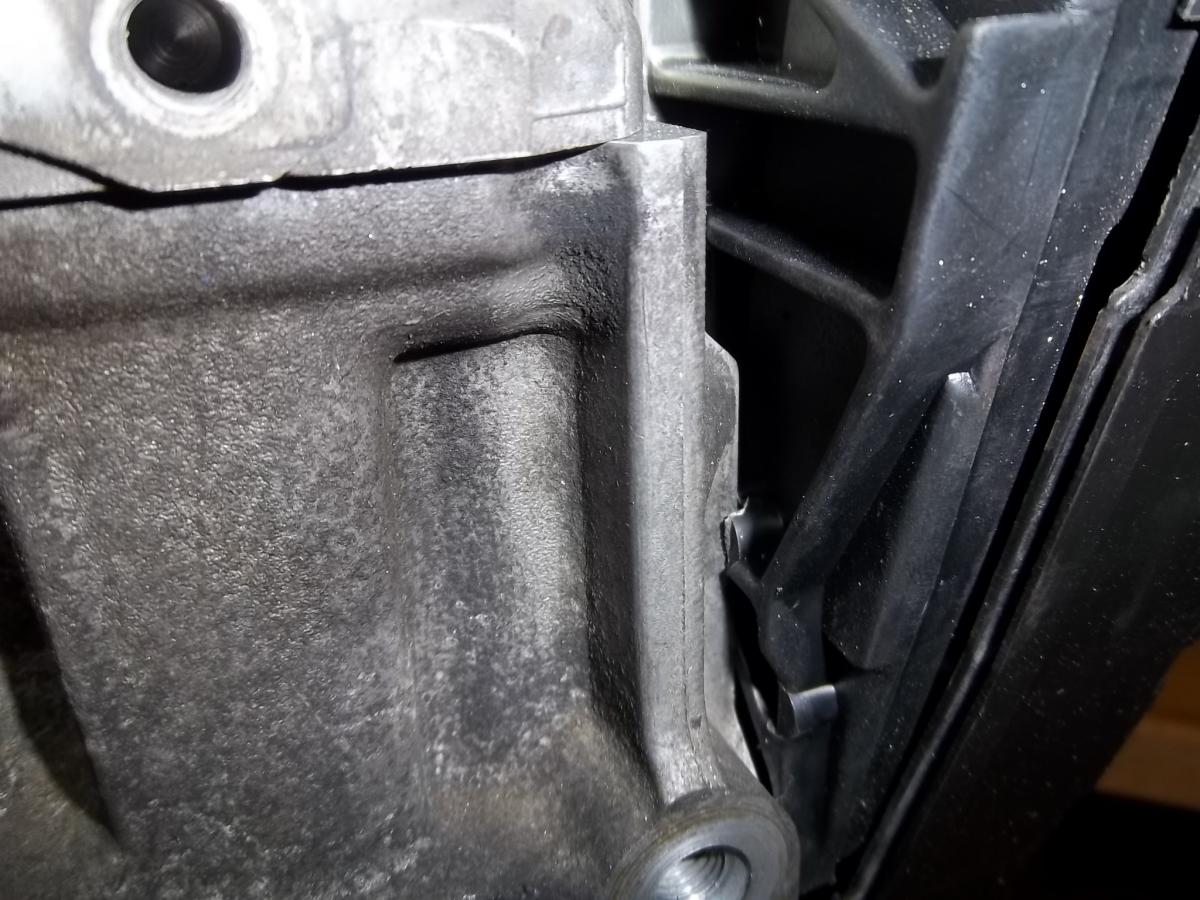
After you do this, your finished with the cover adjustment, really. These are new covers ordered from the dealer, model specific to this build. Next, you gonna have to be patient and precise for the mod to appear correct (disc/ propcone exactly centered) within the VC and timing cover mooncuts. I considered many different approaches to the cuts, and I will share some thoughts with you. Because my motor is in the build stage, I am able to remove, measure, shift, allign etc. all the parts until the pieces are crafted correctly. This of course will be considerably more difficult to do on the car. This mooncut is NOT as easy to PRECISELY do as many have done to their own cars I assure you. Shortcuts and hackjobs will really look like crap. The method I used was like thus: I assembled the timing covers to the head, I assembled the VC gasket to the VC and tightened it as I normally would for installation. While looking into the cam holes from the rear with a flashlight (no cams installed), I eyeballed the exact center spot and it happened to be all in the plastic, not in the VC at all. I removed the plastic and drilled a 1/8 hole in both sides and replaced them to view it once more. The holes were nearly perfect from my eyes view, though they needed a very slight change in position. With a cordless drill and the 1/8 bit I inserted the bit and pulled it sideways in the direction it needed to go, very easy in plastic. Then I sized up the drill to 3/16 and checked again, perfect center through all the cam journals. OK, if your cover is painted or just damm nice, masking tape the mooncut area well before you hole saw for a chip free finish. Then I installed a 3.5" (SHARP) holesaw into the cordless and very slowly drilled the 1/4 pilot hole and EXTREMELY carefuly begin to approach the plastic cover, as it sticks out a tiny further than the VC. You do not want to drill exactly straight or it may bite hard and really screw things up. Make contact on the plastic first and slowly cut into the whole assembly.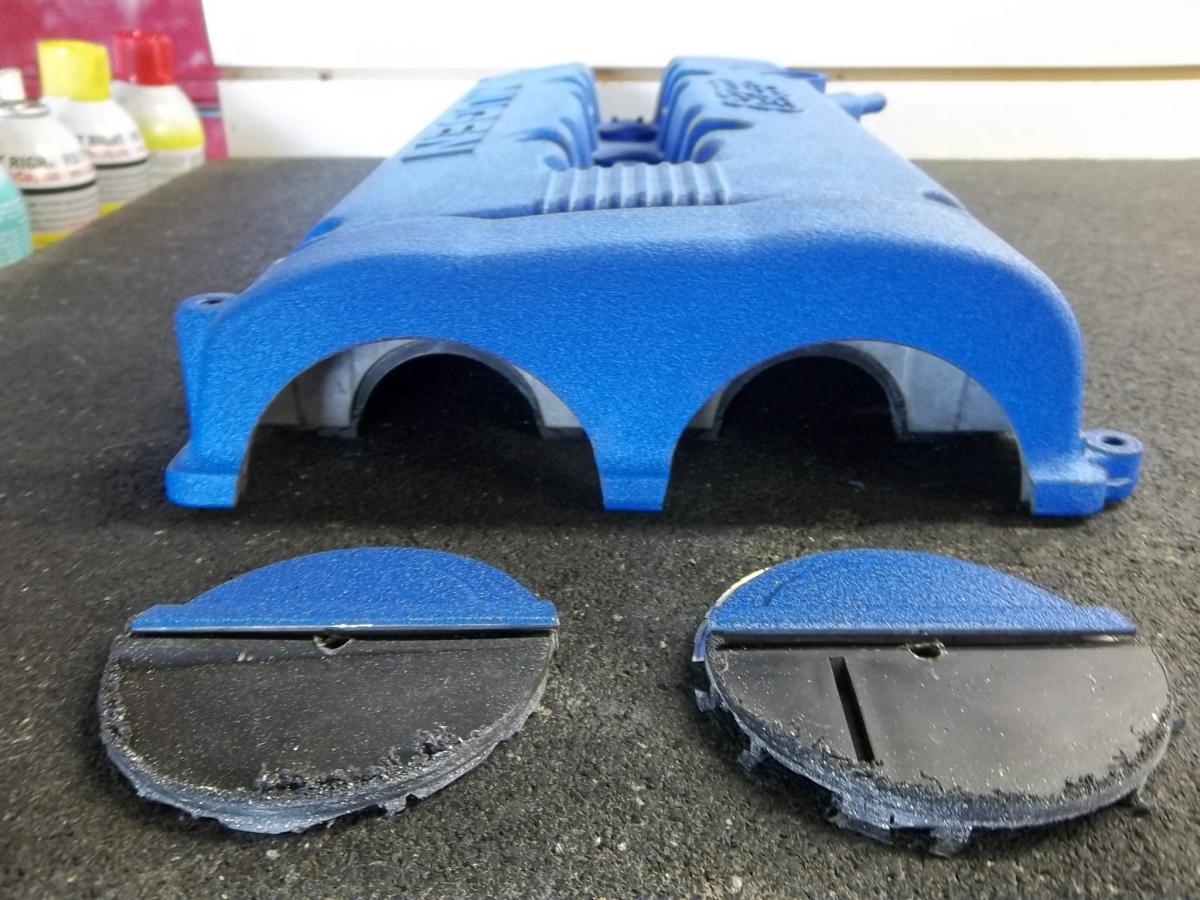 This is what the pieces look like when removed. The 3.5" hole saw is nearly exactly the sze we're shooting for but still need a precice triming. I then installed the cams and gear into the mooncut cover to really see the exact relationship together with the VC too (with gasket, tightened). A very small ammount was needed to be trimed to make things perfect, I opted for a dremel with a coarse sanding roll. I made precise marks to the cover assembly with a fine sharpie and proceded to use the sanding roll to make it right. This is where the patients come in, the final step that everyone will see; and see all your mistakes if your not. Take your time.
Once the mooncuts have been made and crafted perfectly, the new hardware can be fitted to the cam gears for assembly in the correct order. The stud that I found for this is a Honda part #90042-PX5-010. This is a common transmission stud bolt for the mount on hundreds of Hondas and fits the cam boltholes precisely for this mod. A shorter style bolt and capnut are required for the flat disc type; use Honda part#90041-PX5-000. This is the same type of bolt only shorter. One is 50mm long and the other is 32mm long. Here is a pic of the hardware layed out in the correct order for assembly. The very long black oxide bolt adapter is the actual aircraft cone mounting bolt that is used for the RC planes. It has the 10mm internal thread size for the stud and adapts to a 10-32 thread for the cone bolt. These cones come in different sizes, the ones shown here are 3.5" diameter x 3.5" long and requre the XXL hub adaptor bolt.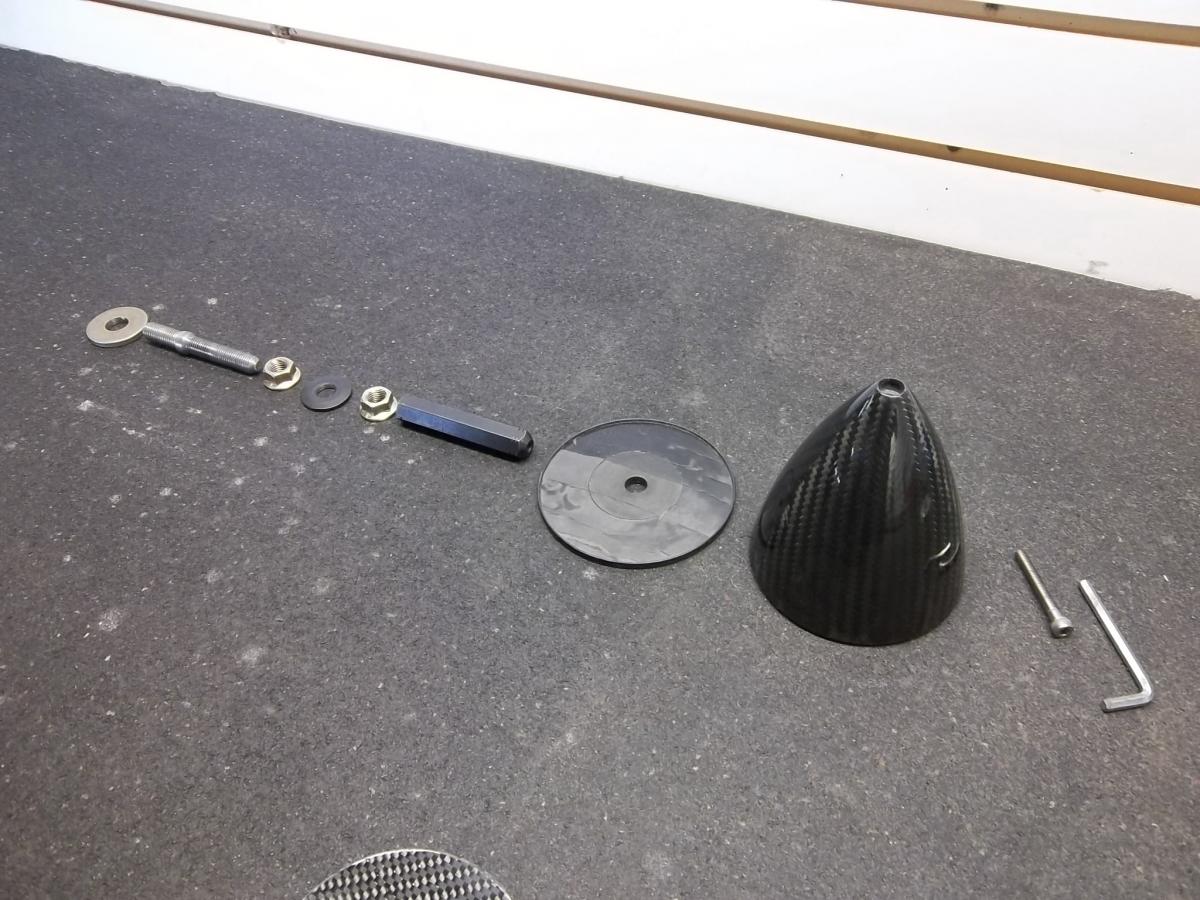
This is what the hardware looks like on the motor ready to recieve the cones. Notice that the base cone centers locate the cone for a perfect fit. (small outter lip) For final installation on your motor I highly reccoment using locktite on the camshaft studs where they enter the camshaft so as not to accidentaly remove it durring routine adjustments to the camgears. The first nut that actually holds the camgear on must be torqued to factory specs for the cambolt. The washer that comes with the propcone hardware is placed next, it it beveled an you want the bevel towards the camgear and the flat towards the propcone base. The propcone base goes on next with the lip facing out at you. Install another nut and snug it down, install the XXL adaptor and snug it down while holding the nut below it with a wrench. Put the propcone on and place the 10-32 allen bolt through the propcone and into the adaptor. I highly reccomend locktite blue (medium strength) on this allen bolt for security .[ATTACH]318808[/ATTACHATTACH]318807
The complete assembly removed for illustation purposes is shown here
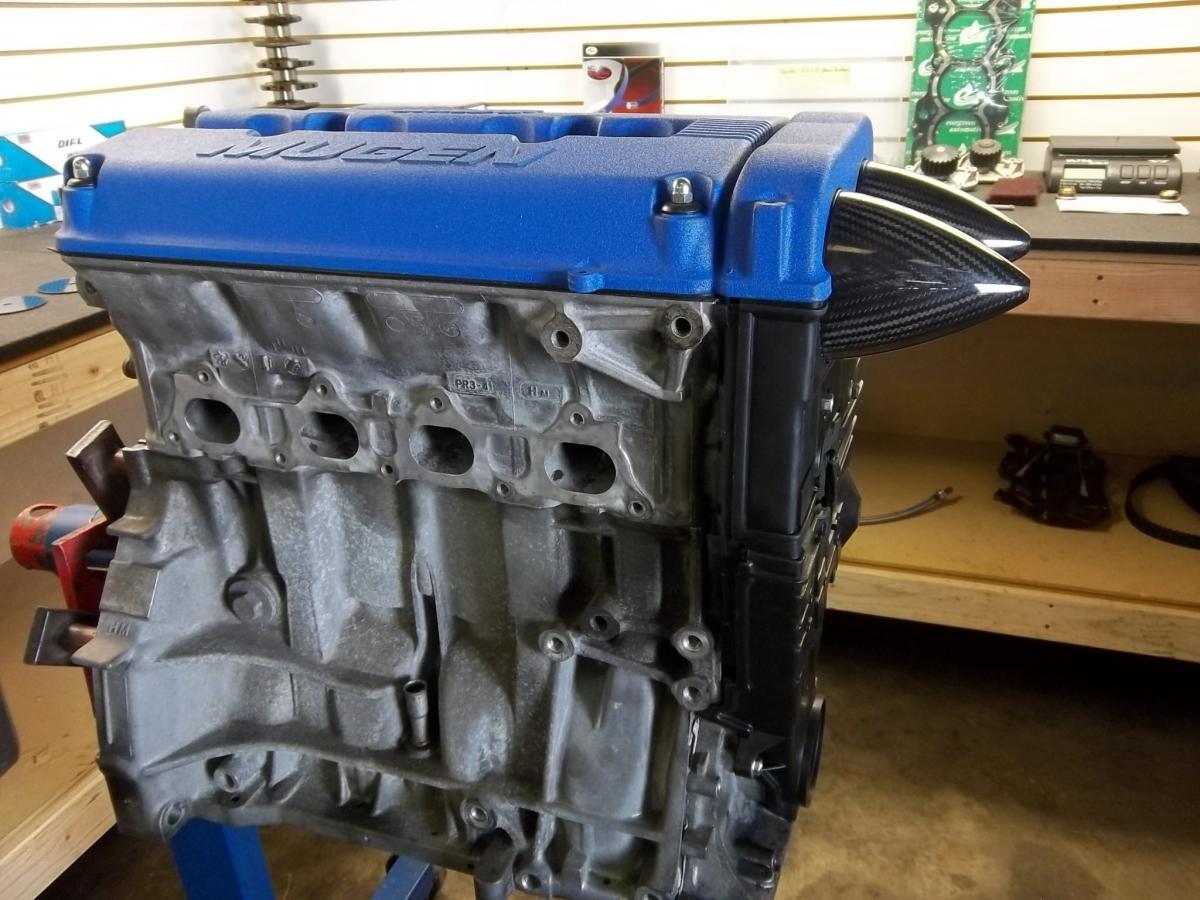
I believe that there are many roads to take with this mod that have not been dicussed here. I would love to see what you come up with. Also, I would advise you to use every ounce of caution with this mod. It does fit with motor mounts in the civic Delsol as shown here, but if you have cruise it may get in the way; but hey, who needs cruise?.[
After looking into every option I could research (including that overpriced carbon fiber cover ), I just couldn't deny that easy access to the camgears, and that they just look great was reason enough to keep thinking on the mod. Well, I decided to try a few things and measure a bunch of stuff, and search for different hardware until I came up with what I could live with, was functional and totaly origonal (please don't tell me you've seen this before) because I really searched and would NEVER delibrately say it was mine otherwise. I would like everyone to enjoy this thread and feel free to adapt or transform this mod into any configuration they choose, or just run with a chopped VC and no plastic. I live in the sticks, (dirt roads and rough stuff) not an option for me. So, here it goes:
This is the carbon fiber nose cone mod with hardware. These are made for high powered large scale RC airplanes. They only weigh 2.4oz. and are made to high standards for rotational ballance for airplane engines spinning in excess of 10k rpm (twice the speed any 10k RPM motor turns cams). They are easily removable in less than a minute to give full access to the cam timing gears. The total weight increase for the mod is centrally located mass in the new hardware and nearly offsets what a factory steel cam gear weighs compared to HP adjustable aluminum cam gears. The prop cone mod is not the only way this can be achieved; as seen here with the flat carbon fiber disc covers. By the way, these rotate with the cams if you weren't sure yet. And though these are the two examples shown, for the guy who still wants to sport the cam gears; you could easily make some acylic (clear) discs of the appropriate thickness for durability (3/16-1/4 inch). Also, the hardware shown to demonstrate the flat carbon fiber is not asthetically pleasing for this style and requires a SS finish nut or the like.
I realize that this is not for everyone, I really just did this for me. If you see a need for this in your build or have a twist on this to suit your mod, go for it. It is just a creation and I can't stop myself from being different.
OK, now to the mod:
First of all, to all the tuners that say "these B20/VTECH covers don't fit without major modification", you probably never tried. They ALMOST fit perfect to be honest. Only a very small little grind to the lower left (facing) upper rear cover is needed. Sure, the small rubber spaghetti seal on the back may have to be trimmed in the same spot, or don't even use it, the cover itself is what's important.
This is the tiny piece you must grind off the lower rear cover for the cover to fit flush with the block; also you can see an additional tiny groove cut just above this trim that perfectly alligns itself with the block casting ridge on the motor face. After you do this, your finished with the cover adjustment, really. These are new covers ordered from the dealer, model specific to this build. Next, you gonna have to be patient and precise for the mod to appear correct (disc/ propcone exactly centered) within the VC and timing cover mooncuts. I considered many different approaches to the cuts, and I will share some thoughts with you. Because my motor is in the build stage, I am able to remove, measure, shift, allign etc. all the parts until the pieces are crafted correctly. This of course will be considerably more difficult to do on the car. This mooncut is NOT as easy to PRECISELY do as many have done to their own cars I assure you. Shortcuts and hackjobs will really look like crap. The method I used was like thus: I assembled the timing covers to the head, I assembled the VC gasket to the VC and tightened it as I normally would for installation. While looking into the cam holes from the rear with a flashlight (no cams installed), I eyeballed the exact center spot and it happened to be all in the plastic, not in the VC at all. I removed the plastic and drilled a 1/8 hole in both sides and replaced them to view it once more. The holes were nearly perfect from my eyes view, though they needed a very slight change in position. With a cordless drill and the 1/8 bit I inserted the bit and pulled it sideways in the direction it needed to go, very easy in plastic. Then I sized up the drill to 3/16 and checked again, perfect center through all the cam journals. OK, if your cover is painted or just damm nice, masking tape the mooncut area well before you hole saw for a chip free finish. Then I installed a 3.5" (SHARP) holesaw into the cordless and very slowly drilled the 1/4 pilot hole and EXTREMELY carefuly begin to approach the plastic cover, as it sticks out a tiny further than the VC. You do not want to drill exactly straight or it may bite hard and really screw things up. Make contact on the plastic first and slowly cut into the whole assembly.
This is what the pieces look like when removed. The 3.5" hole saw is nearly exactly the sze we're shooting for but still need a precice triming. I then installed the cams and gear into the mooncut cover to really see the exact relationship together with the VC too (with gasket, tightened). A very small ammount was needed to be trimed to make things perfect, I opted for a dremel with a coarse sanding roll. I made precise marks to the cover assembly with a fine sharpie and proceded to use the sanding roll to make it right. This is where the patients come in, the final step that everyone will see; and see all your mistakes if your not. Take your time.Once the mooncuts have been made and crafted perfectly, the new hardware can be fitted to the cam gears for assembly in the correct order. The stud that I found for this is a Honda part #90042-PX5-010. This is a common transmission stud bolt for the mount on hundreds of Hondas and fits the cam boltholes precisely for this mod. A shorter style bolt and capnut are required for the flat disc type; use Honda part#90041-PX5-000. This is the same type of bolt only shorter. One is 50mm long and the other is 32mm long. Here is a pic of the hardware layed out in the correct order for assembly. The very long black oxide bolt adapter is the actual aircraft cone mounting bolt that is used for the RC planes. It has the 10mm internal thread size for the stud and adapts to a 10-32 thread for the cone bolt. These cones come in different sizes, the ones shown here are 3.5" diameter x 3.5" long and requre the XXL hub adaptor bolt.
This is what the hardware looks like on the motor ready to recieve the cones. Notice that the base cone centers locate the cone for a perfect fit. (small outter lip) For final installation on your motor I highly reccoment using locktite on the camshaft studs where they enter the camshaft so as not to accidentaly remove it durring routine adjustments to the camgears. The first nut that actually holds the camgear on must be torqued to factory specs for the cambolt. The washer that comes with the propcone hardware is placed next, it it beveled an you want the bevel towards the camgear and the flat towards the propcone base. The propcone base goes on next with the lip facing out at you. Install another nut and snug it down, install the XXL adaptor and snug it down while holding the nut below it with a wrench. Put the propcone on and place the 10-32 allen bolt through the propcone and into the adaptor. I highly reccomend locktite blue (medium strength) on this allen bolt for security .[ATTACH]318808[/ATTACHATTACH]318807
The complete assembly removed for illustation purposes is shown here
I believe that there are many roads to take with this mod that have not been dicussed here. I would love to see what you come up with. Also, I would advise you to use every ounce of caution with this mod. It does fit with motor mounts in the civic Delsol as shown here, but if you have cruise it may get in the way; but hey, who needs cruise?.[
Last edited by Tyler Dirden; 04-16-2013 at 09:38 PM. Reason: spelling errors


 04-19-2013, 07:10 PM
#7
no one wants to hear the truth
Trending Topics
 08-13-2013, 04:41 PM
#11
Honda-Tech Member
I've slung my share of pebbles, never once have they come close to the belt area, I run a lower cover but not an upper. You've got some unicorn pebbles if they make it up in there.
08-15-2013, 01:14 AM
#12
Arriving somewhere but not here
Join Date: Aug 2011
Posts: 119
Likes: 0
Received 0 Likes
on
0 Posts

Thread
Thread Starter
Forum
Replies
Last Post
James89DX
Honda Civic (2001 - 2005)
6
06-24-2012 05:20 PM
jefe
Honda Civic / Del Sol (1992 - 2000)
7
08-15-2004 08:11 PM