
Improved Fuel Delivery System Part 1
 05-11-2013, 09:49 PM
#1
OK, I have read many post about this topic and some were great and some were not. Many adaptors, fittings and incoorectly mounted components proved to be disasterous to some few of you. Also many have made numerous complaints about the nitrous having blown up their motors or junk turbos etc. etc. when the real culprit was the inadaquate fuel system. Restrictions in the factory system are throughout, from the simple banjo bolts to the regulator return line and crimp fittings on high pressure hose. Some of these parts leave less than 1/4" for all the fuel to flow, and when you multiply these restrictions you have a recipie for disaster. The exit holes on the banjo bolt are only .160". 


I have designed this upgrade around the genuine Walbro 455lph pump. This pump is feeding many 500+HP build today and is an awesome deal for the price (about $100 eBay). It's dual vane design is even quieter than the 255lph Walbro. The factory bulkhead is unworkable and unsightly for this upgrade, so I will be fabricating a completely new unit from scratch. Many of you do not posses great fabricating skills, not a crack, just a fact. Fuel system mods need to be safe and perfect, if you can not do this as outlined here, take the photos to a fabricator for help, your life is worth more than the risk. I began by selecting a 3/16" plate of steel for the part and proceded to cut out a 4.5" disc and deburr it. The very best way to transfer the tank stud locations to the disc are as follows; place a piece of cardstock over the tank studs and lightly tap on the top of the cardstock to transfer the exact location and also mark a forward line for assembly.
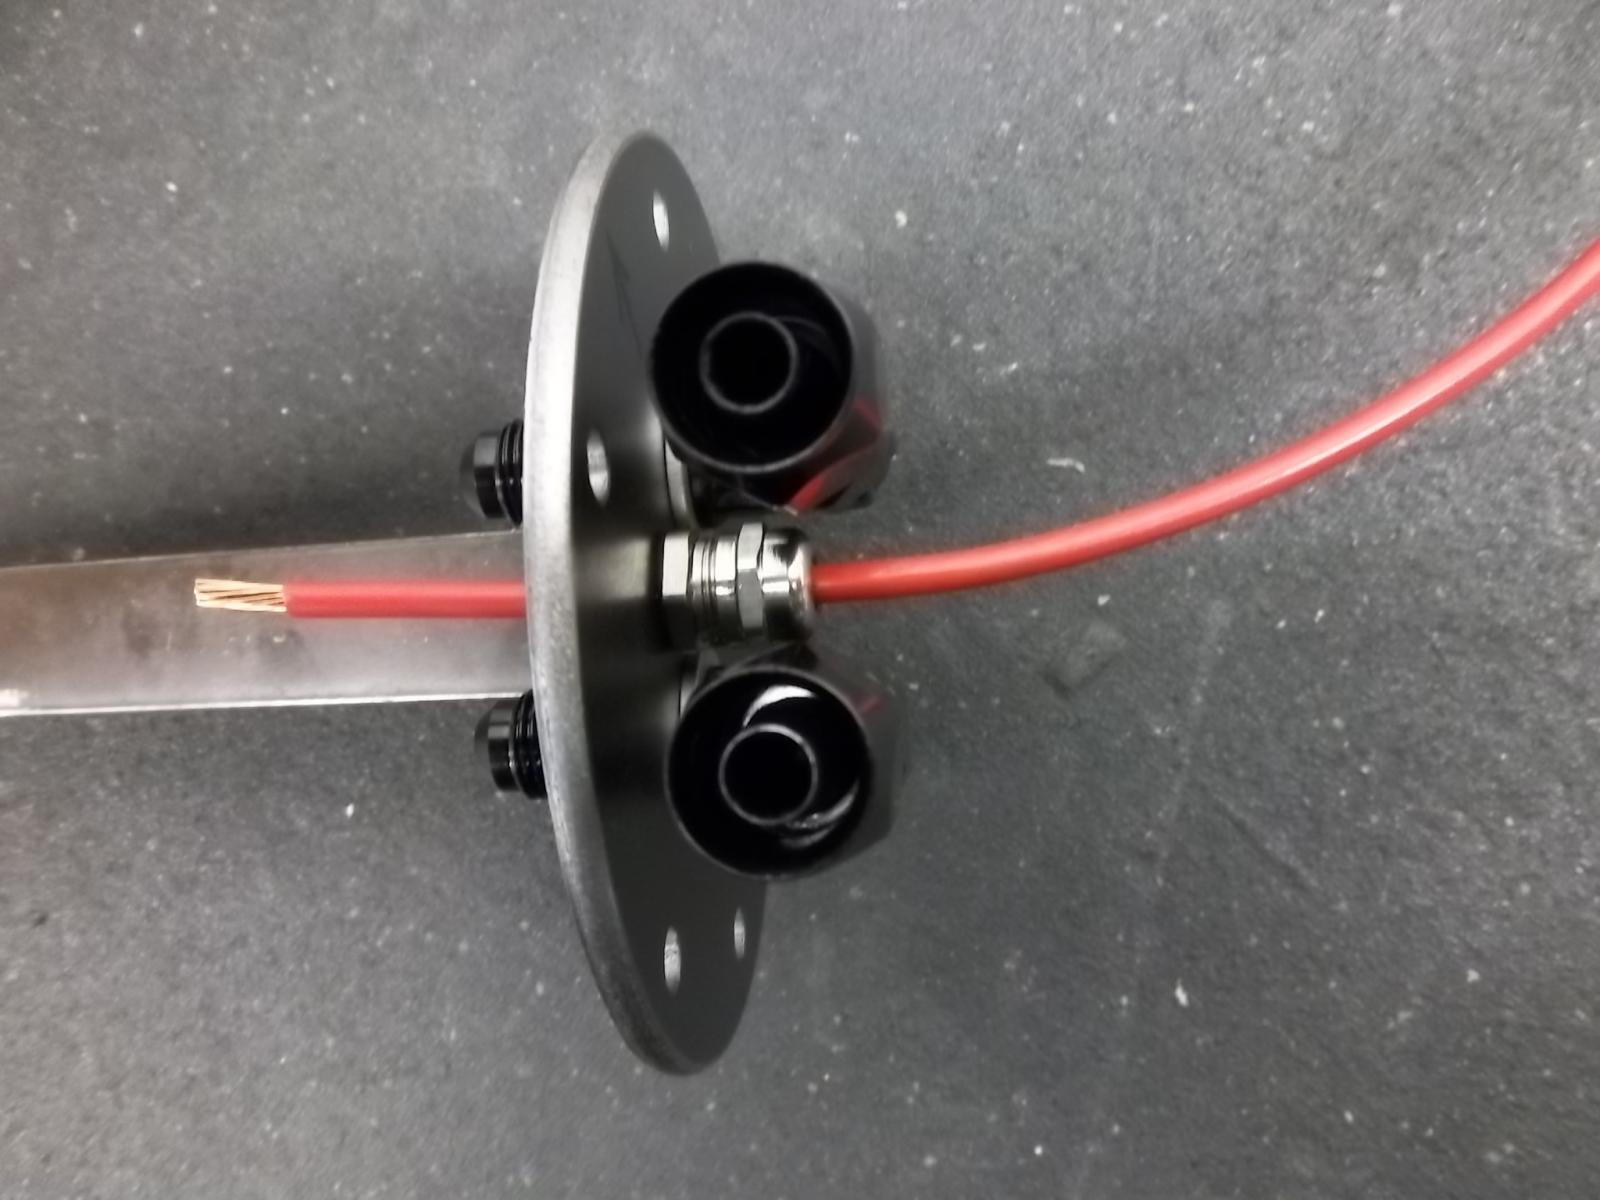
Next you must realize that there is a very small opening in the Honda tank for our new parts to fit, very accurate measurments and planning are critical for a proper fit. I have chosen to use 6AN fitings on the supply and return lines. These are true .375" ID race fittings with full flow hose ends. You may wish to use 8AN fittings though you will have to measure very precisely to get these to fit with the new pump hanger and wire feedthrough. The wire feedthrough that I use are stainless steel with o-ring base seals @ the bulkhead and compression glands @ the wire. They can be found on eBay from China sellers and are called wire glands in the search window. There are many different types that are available, the one chosen here will allow a 12g wire to be used instead of the 18g factory wire. It has a base thread that is 12mmx1.5 and will be tapped into the bulkhead for retention.

The sealing washers on the bulkhead fuel fittings are as follows, on top of the bulkhead an aluminum oilpan bolt washer and inside the tank an aluminum washer with integral o-ring style. Bring your fittings to a parts store and ask to see their AC washer assortment for the o-ring ones. Next you must decide how to hang your pump; I have chosen a 1"x 1/4" steel flat bar, overkill but will last forever. Once I transfer the tanks actual opening onto the bulkhead you will see a very tight circle and careful planing to get this all to fit will be nessecary. After putting the pieces together for marking you will have to trim some off of the pump hanger as shown to get everything inside the circle. Centerpunch all the holes and drill a pilot hole first 1/8" or else the bigger drill hole will wander and screw things up. I have tapped the wire gland hole for retention and it should all look like this.

Notice how even the washers inside the tank had to be clearanced for the parts to all fit.
From this point you have the option to make a return line inside of the tank, I have chosen a 6AN tube nut and 3/8" steel tubing. Also the pump connection to the bulkhead fittings is accomplished with a 6AN to 3/8 hose barb fitting and high pressure fuel clamps. Use fuel injection style clamps and hose for the pump connection.
Use the center nut for the pumps ground connection. All braided line and full flow fittings to the engine compartment are used. A very simple fuel filter is pictured here that is cleanable and affordable, also with one adaptor fitting 9/16x18 o-ring to 6AN male will connect you quite securely to an AEM fule rail. Most aftermarket fuel rails use this size, check if your not sure. The AEM regulator assembly is adjustable, adaptable and beautiful. The same adaptor used for the fuel filter is used on the regulator assembly for the retun line.

It doesn't get any easier than this for a true race SYSTEM! Unless you have intentions on building a 600+hp project, this system will work perfectly. A small bracket off of the alternator bracket will support the fuel filter from vibration, and a small bracket off of the manifold on the pictured boss will support the return line. Look for a part two on this build for the very simple fuel pump control unit that almost anyone can make and everyone can afford.
I have designed this upgrade around the genuine Walbro 455lph pump. This pump is feeding many 500+HP build today and is an awesome deal for the price (about $100 eBay). It's dual vane design is even quieter than the 255lph Walbro. The factory bulkhead is unworkable and unsightly for this upgrade, so I will be fabricating a completely new unit from scratch. Many of you do not posses great fabricating skills, not a crack, just a fact. Fuel system mods need to be safe and perfect, if you can not do this as outlined here, take the photos to a fabricator for help, your life is worth more than the risk. I began by selecting a 3/16" plate of steel for the part and proceded to cut out a 4.5" disc and deburr it. The very best way to transfer the tank stud locations to the disc are as follows; place a piece of cardstock over the tank studs and lightly tap on the top of the cardstock to transfer the exact location and also mark a forward line for assembly.
Next you must realize that there is a very small opening in the Honda tank for our new parts to fit, very accurate measurments and planning are critical for a proper fit. I have chosen to use 6AN fitings on the supply and return lines. These are true .375" ID race fittings with full flow hose ends. You may wish to use 8AN fittings though you will have to measure very precisely to get these to fit with the new pump hanger and wire feedthrough. The wire feedthrough that I use are stainless steel with o-ring base seals @ the bulkhead and compression glands @ the wire. They can be found on eBay from China sellers and are called wire glands in the search window. There are many different types that are available, the one chosen here will allow a 12g wire to be used instead of the 18g factory wire. It has a base thread that is 12mmx1.5 and will be tapped into the bulkhead for retention.
The sealing washers on the bulkhead fuel fittings are as follows, on top of the bulkhead an aluminum oilpan bolt washer and inside the tank an aluminum washer with integral o-ring style. Bring your fittings to a parts store and ask to see their AC washer assortment for the o-ring ones. Next you must decide how to hang your pump; I have chosen a 1"x 1/4" steel flat bar, overkill but will last forever. Once I transfer the tanks actual opening onto the bulkhead you will see a very tight circle and careful planing to get this all to fit will be nessecary. After putting the pieces together for marking you will have to trim some off of the pump hanger as shown to get everything inside the circle. Centerpunch all the holes and drill a pilot hole first 1/8" or else the bigger drill hole will wander and screw things up. I have tapped the wire gland hole for retention and it should all look like this.
Notice how even the washers inside the tank had to be clearanced for the parts to all fit.
From this point you have the option to make a return line inside of the tank, I have chosen a 6AN tube nut and 3/8" steel tubing. Also the pump connection to the bulkhead fittings is accomplished with a 6AN to 3/8 hose barb fitting and high pressure fuel clamps. Use fuel injection style clamps and hose for the pump connection.
Use the center nut for the pumps ground connection. All braided line and full flow fittings to the engine compartment are used. A very simple fuel filter is pictured here that is cleanable and affordable, also with one adaptor fitting 9/16x18 o-ring to 6AN male will connect you quite securely to an AEM fule rail. Most aftermarket fuel rails use this size, check if your not sure. The AEM regulator assembly is adjustable, adaptable and beautiful. The same adaptor used for the fuel filter is used on the regulator assembly for the retun line.
It doesn't get any easier than this for a true race SYSTEM! Unless you have intentions on building a 600+hp project, this system will work perfectly. A small bracket off of the alternator bracket will support the fuel filter from vibration, and a small bracket off of the manifold on the pictured boss will support the return line. Look for a part two on this build for the very simple fuel pump control unit that almost anyone can make and everyone can afford.
 06-19-2013, 11:41 PM
#4
Honda-Tech Member
I was just searching around because I was thinking of doing something like this myself. I assumed that someone had already done it, and well I ran across this thread.
Here is what I found a couple days ago when I pulled the tank from my car and removed the fuel pump hanger. Keep in mind this car that I am rescuing/building sat in a field for a while.

A lot of rust!!! I would like to do something along the lines of what you have done since a factory replacement for the stock hanger is nearly $100 from what I have seen. I think I could make something that would work a lot better, such as what you have done here. I would probably have less $$$ in it too!!
Here is what I found a couple days ago when I pulled the tank from my car and removed the fuel pump hanger. Keep in mind this car that I am rescuing/building sat in a field for a while.
A lot of rust!!! I would like to do something along the lines of what you have done since a factory replacement for the stock hanger is nearly $100 from what I have seen. I think I could make something that would work a lot better, such as what you have done here. I would probably have less $$$ in it too!!
06-20-2013, 06:31 PM
#5
WOW!
I have been a mechanic for 25 years and I have never, seen a pump that looked like that. The cap must have been off to allow that much moisture in I suspect.
Is that YOU in the profile picture? You look like a bass player I used to know 20 years ago back in Philla.
I have been a mechanic for 25 years and I have never, seen a pump that looked like that. The cap must have been off to allow that much moisture in I suspect.
Is that YOU in the profile picture? You look like a bass player I used to know 20 years ago back in Philla.
06-21-2013, 05:03 PM
#6
Honda-Tech Member
WOW!
I have been a mechanic for 25 years and I have never, seen a pump that looked like that. The cap must have been off to allow that much moisture in I suspect.
Is that YOU in the profile picture? You look like a bass player I used to know 20 years ago back in Philla.
I have been a mechanic for 25 years and I have never, seen a pump that looked like that. The cap must have been off to allow that much moisture in I suspect.
Is that YOU in the profile picture? You look like a bass player I used to know 20 years ago back in Philla.
Naaaa, not me in the avatar. That is actually this really funny dude named Riff Raff.

Thread
Thread Starter
Forum
Replies
Last Post