
Coilover DIY, review, and pics. KW ST's on TSX wagon.
 06-13-2015, 07:03 PM
#1
Cool Cool Island Breezes. BOY-EE
Thread Starter
iTrader: (1)
Join Date: Sep 2006
Location: TRILLINOIS....WAY downtown, jerky.
Posts: 11,953
Likes: 0
Received 4 Likes
on
4 Posts
Lowered a TSX wagon on KW ST’s. DIY, review, pics…all in one.
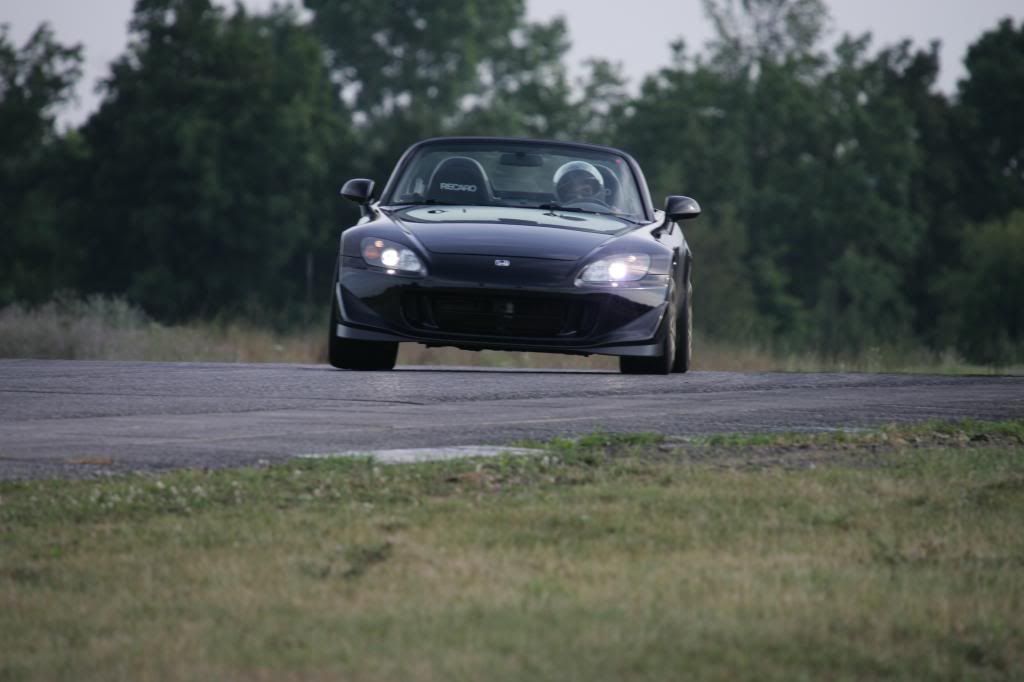
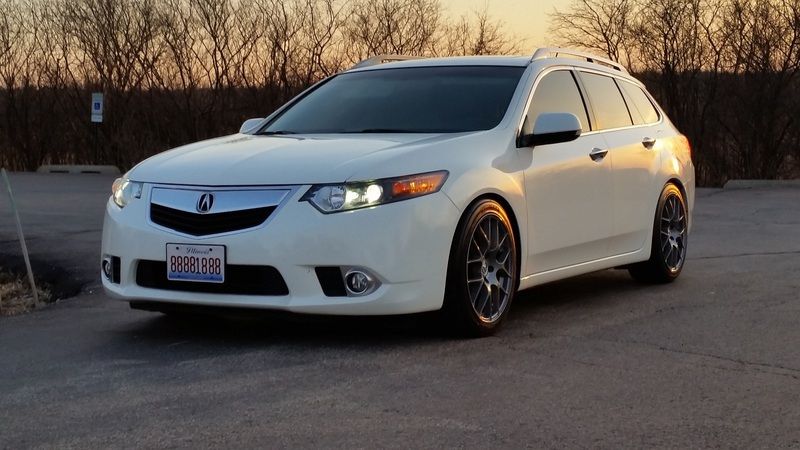
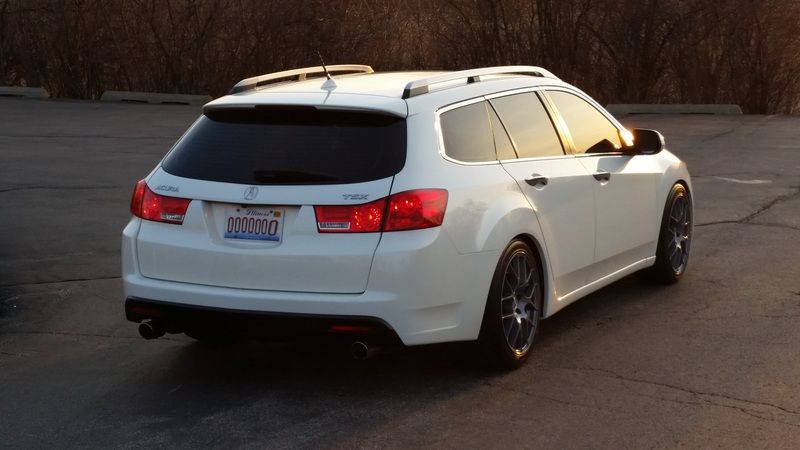
My girlfriend bought a TSX wagon (tech) this past winter. We both loved the car as soon as we drove it. It was a nice change from her S2000 and 8G Si in terms of space, comfort, features, etc.
But…as nice as it was, I can’t just spend all day looking at a stockass wagon. The wheels in my head started to turn.
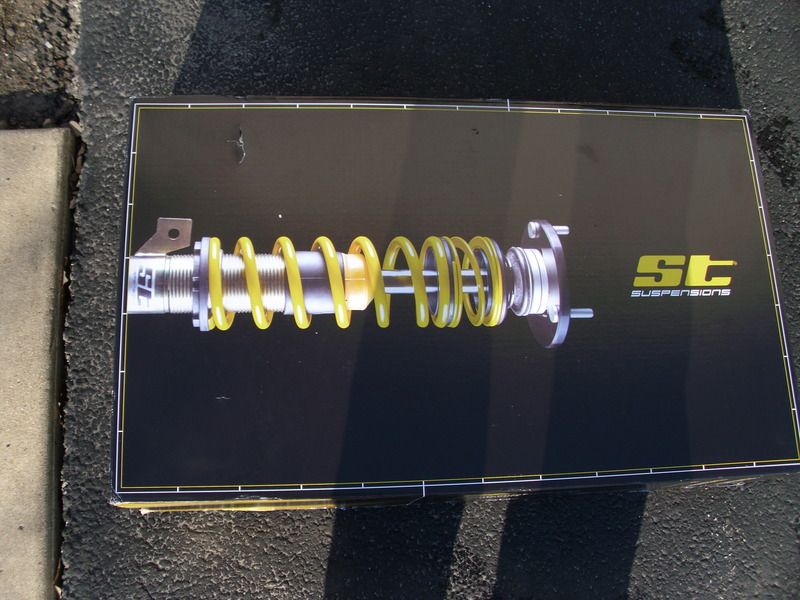
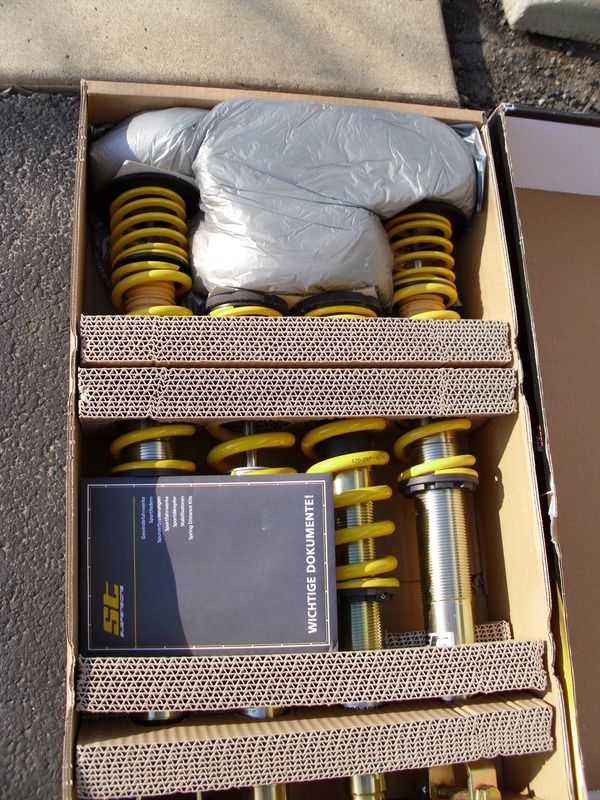
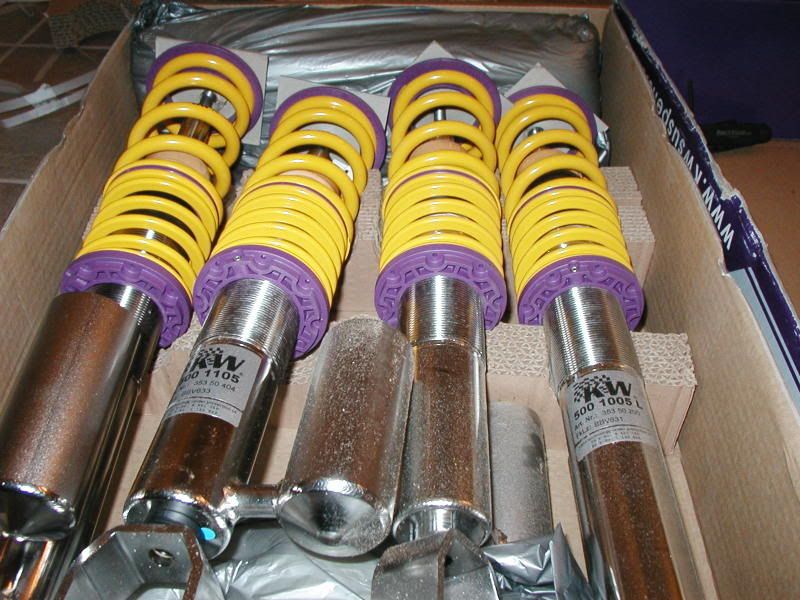
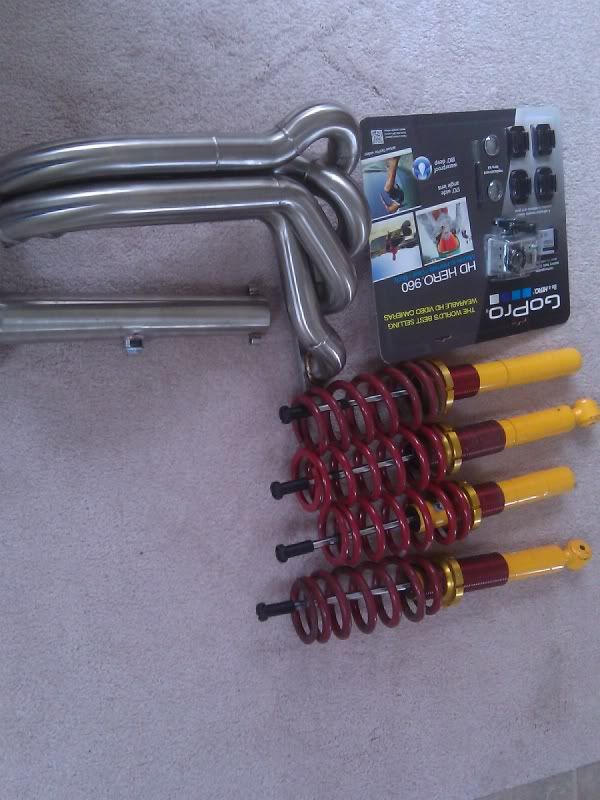
So…I ended up buying some KW ST speedtech coilovers from my main man Nick at THmotorsports.
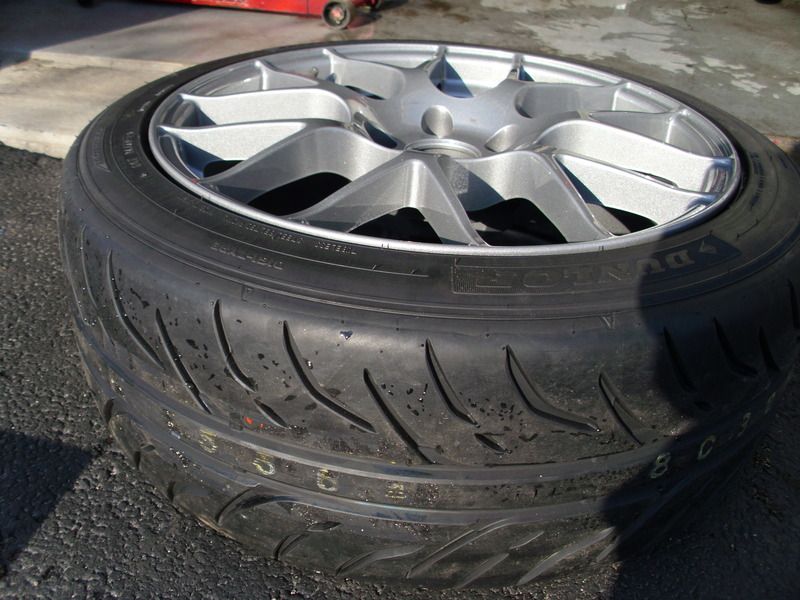
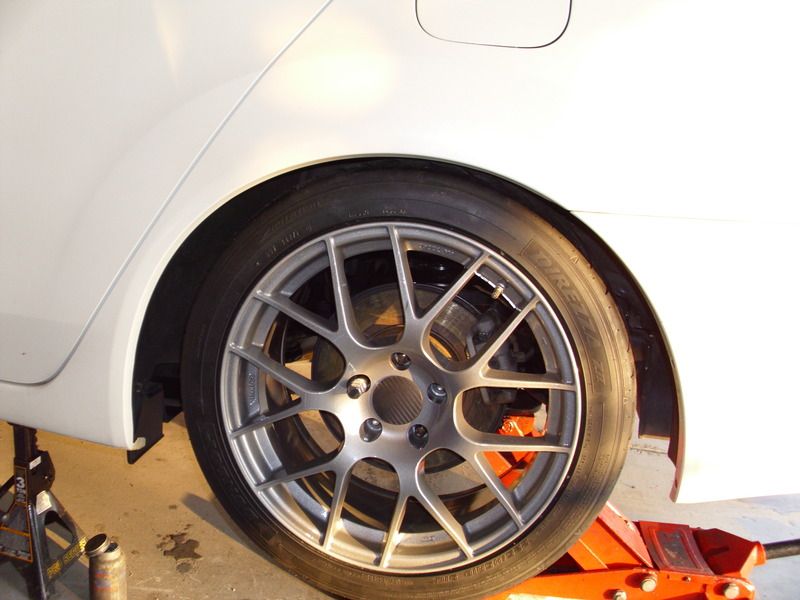
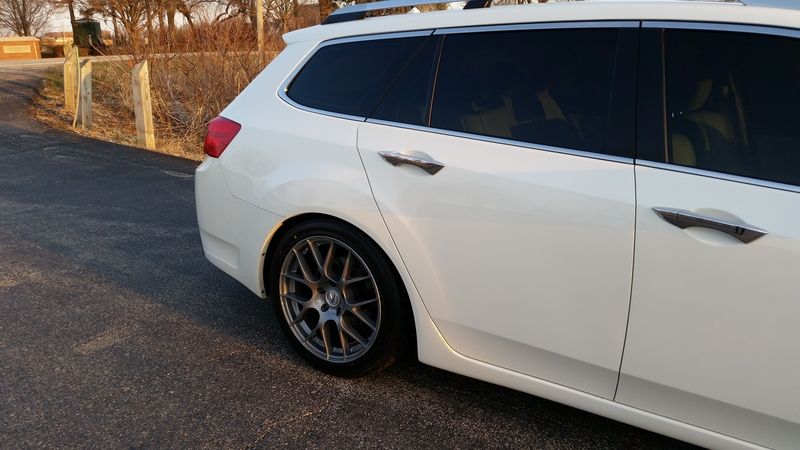
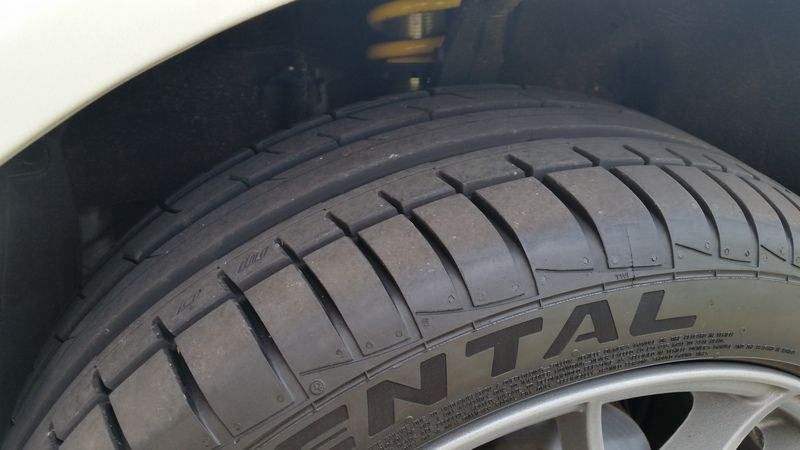
I also bought some 18x8.5 +38 Enkei Raijins with brand new Direzza Z2’s from another friend at Discount Tire. The wheels didn’t come in any colours that I wanted. So I had them powder coated “heavy charcoal”. It’s light enough that I can still use the stock centre caps…but dark enough that the car looks semi-modded.
If you’re still reading, you’re already winning. This thread is a DIY on properly installing a suspension system. After that, you’ll find reviews on the coilovers themselves, and pictures.
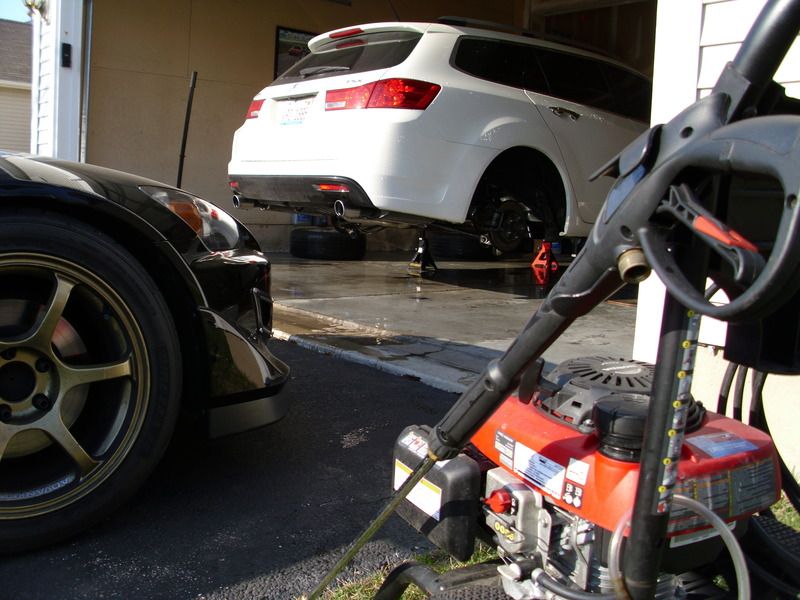
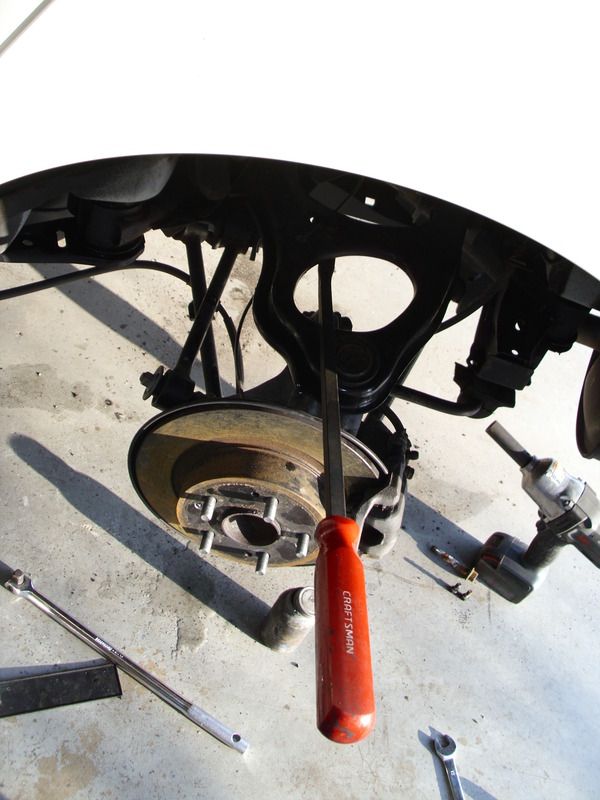
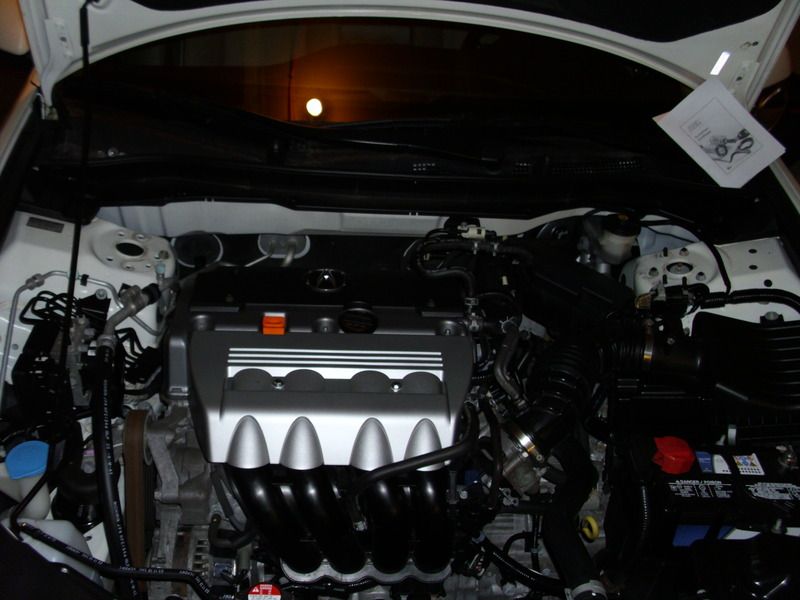
Step1: Pressure wash the chassis. I’m not finna get dirty working on a car. What do you think this is?? Also…jack it up high enough to work on it, and put it on jack stands.
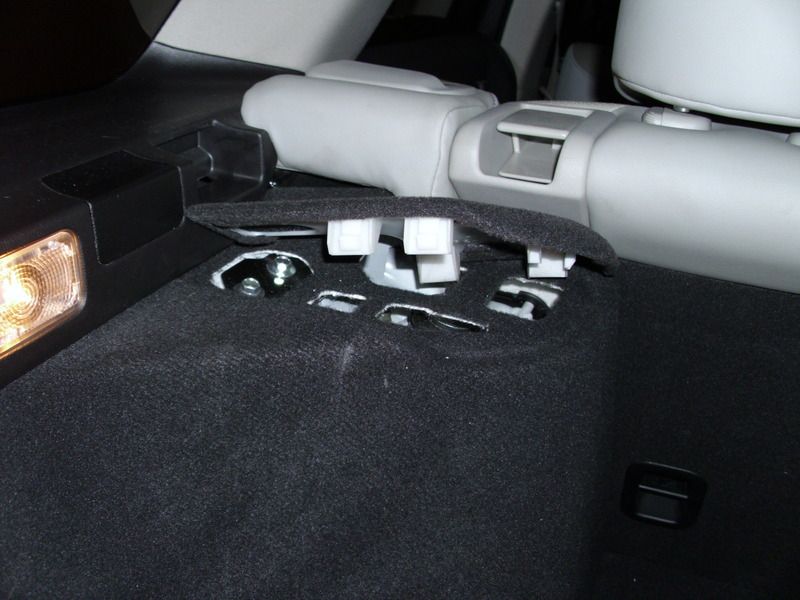
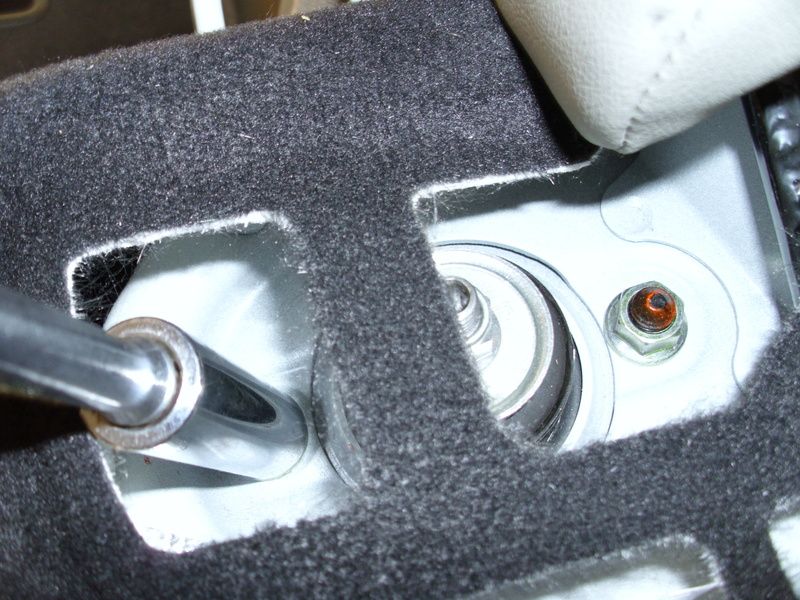
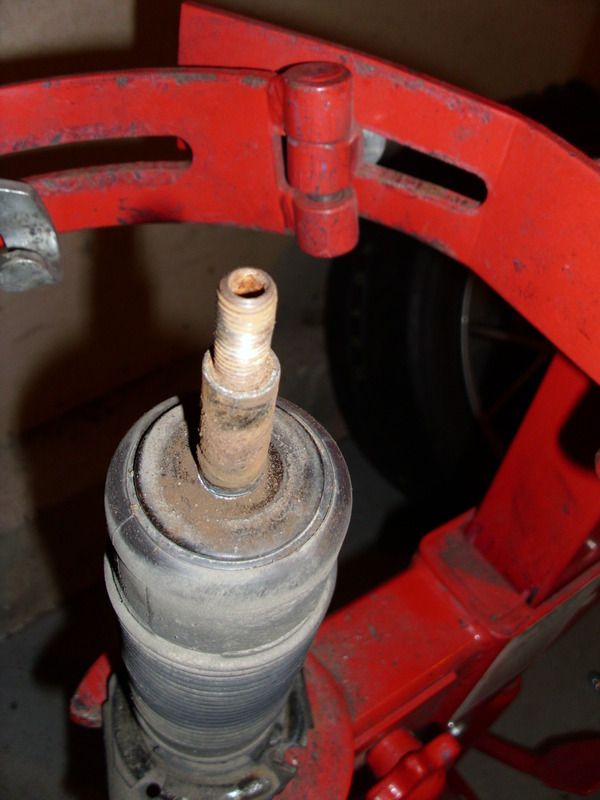
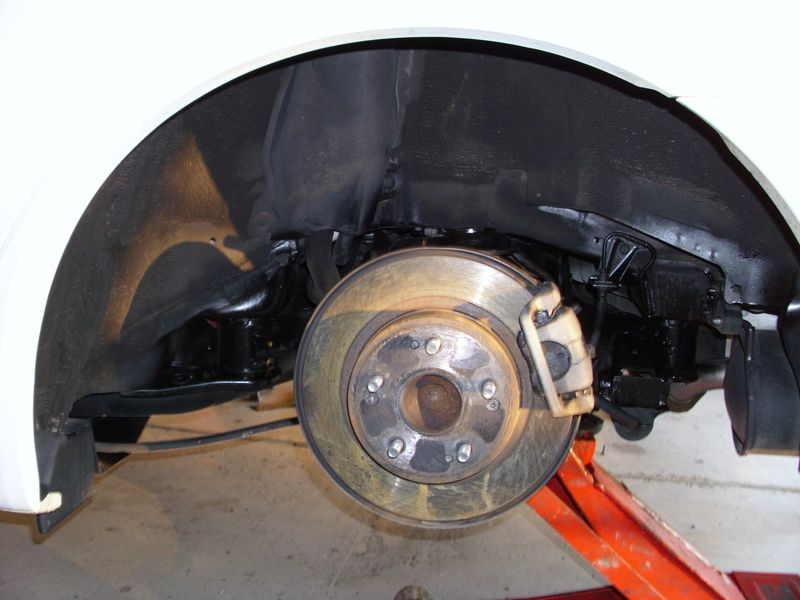
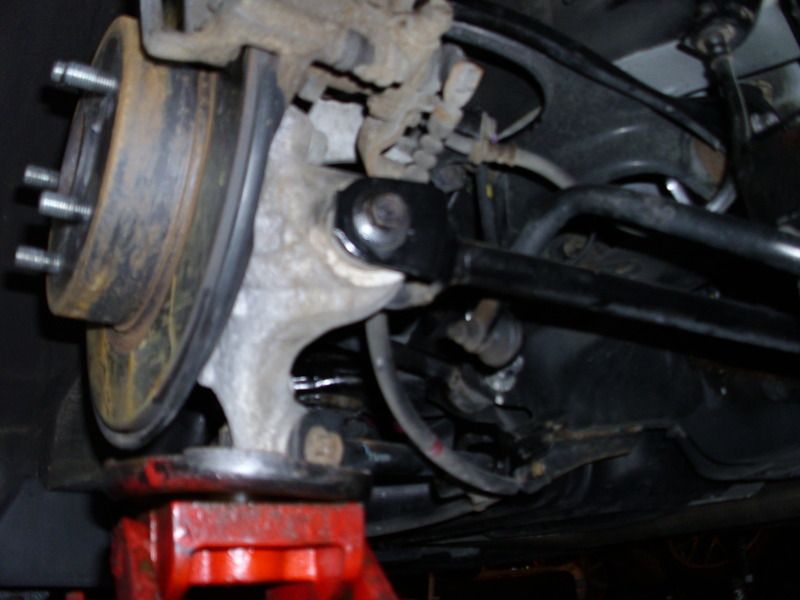
Step2: I wanted to start with the rears. They looked more complex than the fronts. I first took off the upper mount access panel, located behind the seats. I then removed the two upper mount nuts with a 14mm socket. Don’t swing the wrench and smash the window.
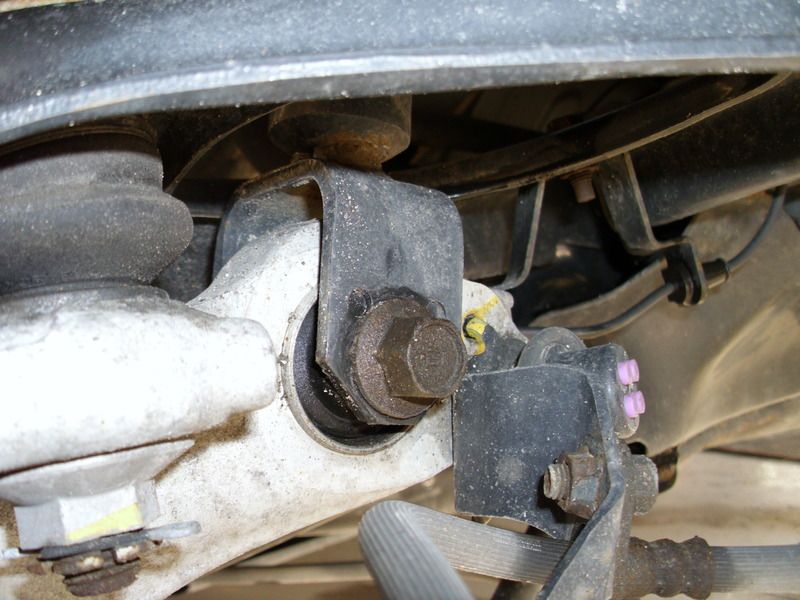
Step3: Remove the rear lower shock bolt (17mm socket), and disconnect the sway bar by removing the bracket bolts (12mm socket). Don’t let the shock fall on your face/genitals.
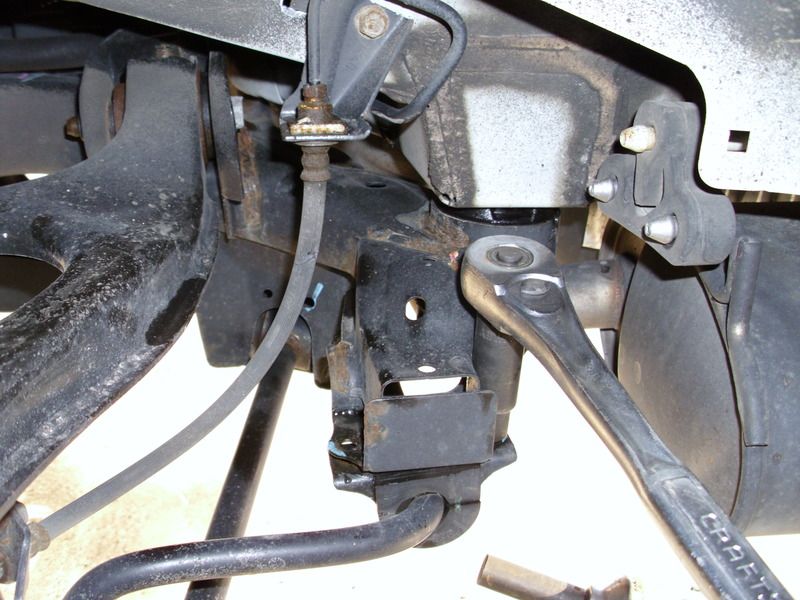
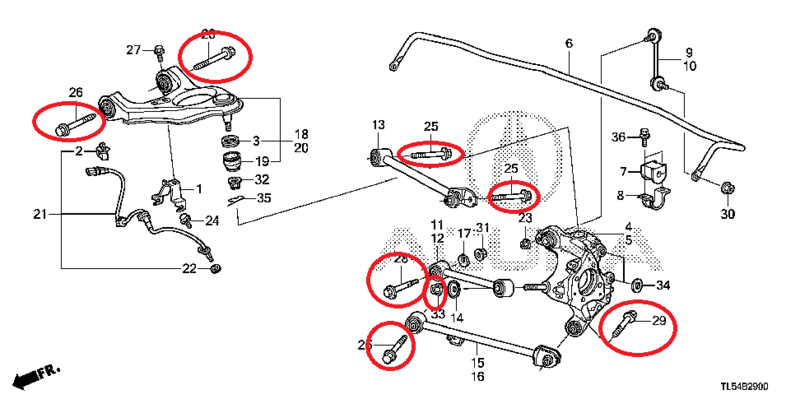
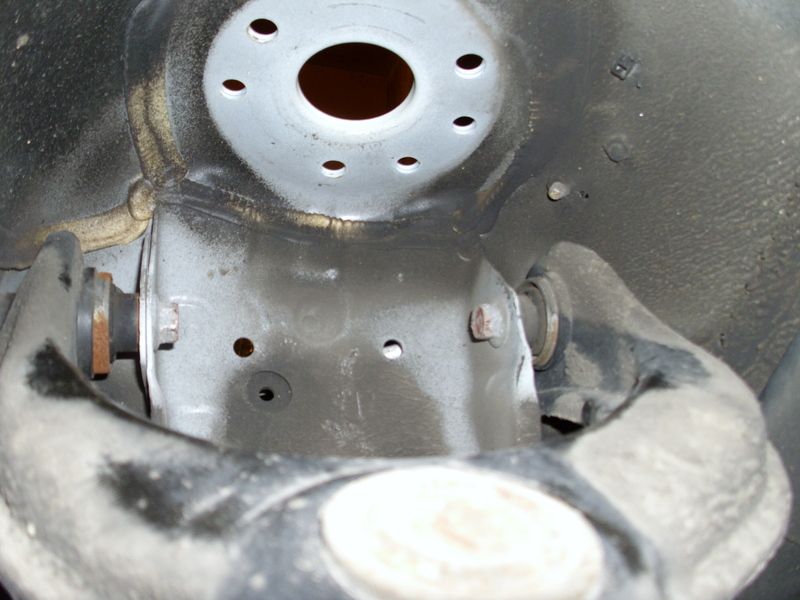
Step4: Loosen all the bolts circled in the diagram (this will come in handy later). Loosening them helps the suspension droop. You can then use a pry bar to pull down on it whilst removing the stock shock/spring assy.
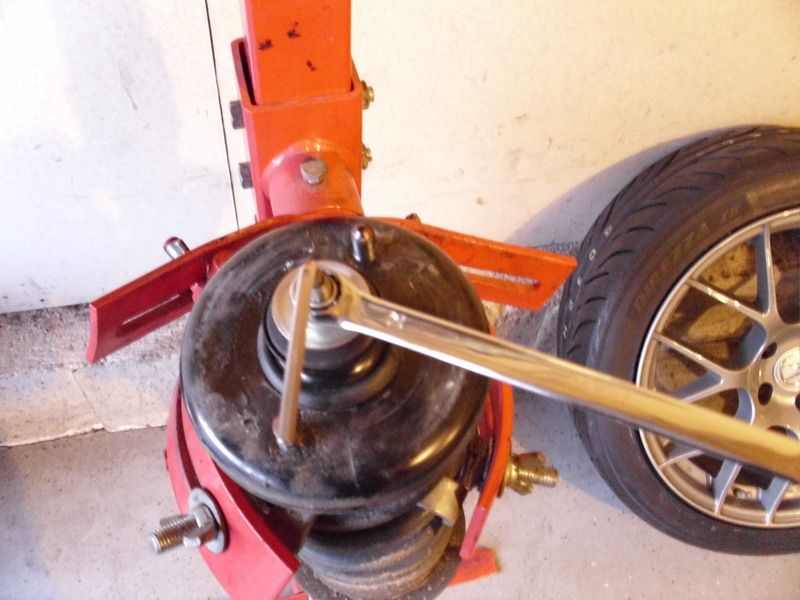
Step5: Use a spring compressor to remove the stock top hats. Ofcourse…if you bought a coilover that came with top hats…then skip this step. Point the spring away from your face/genitals. Then compress it, use a 5mm allen key to hold the shock…and a 14mm wrench to turn the top nut. Some people use an impact to do this…but that’s a little on the ig’nent side because you can damage the shock. I plan to save the stock shocks.
Once off, I apply some shin-ehtsu grease to the rubber parts of the top hat.

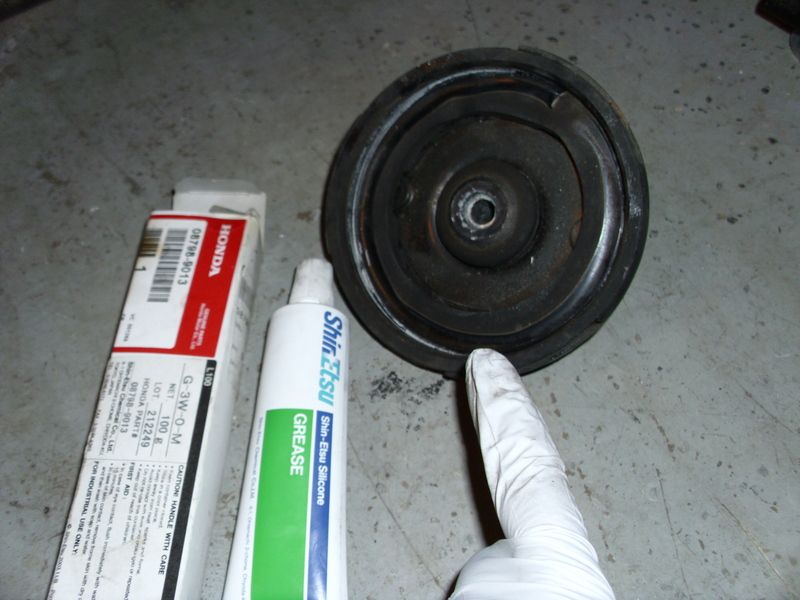
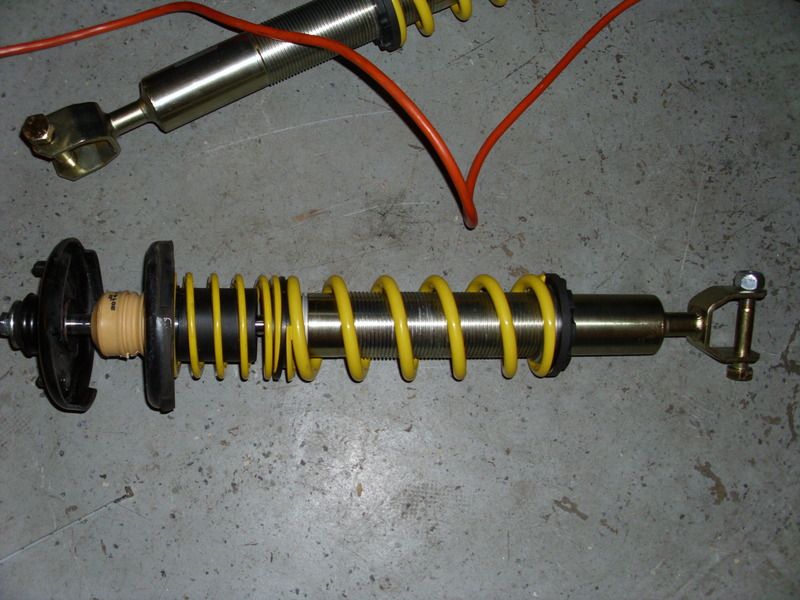
Step 6: I unpacked the coilovers and looked over the instructions.
I use anti sieze on ID of this sleeve when I put it back on the coilover.
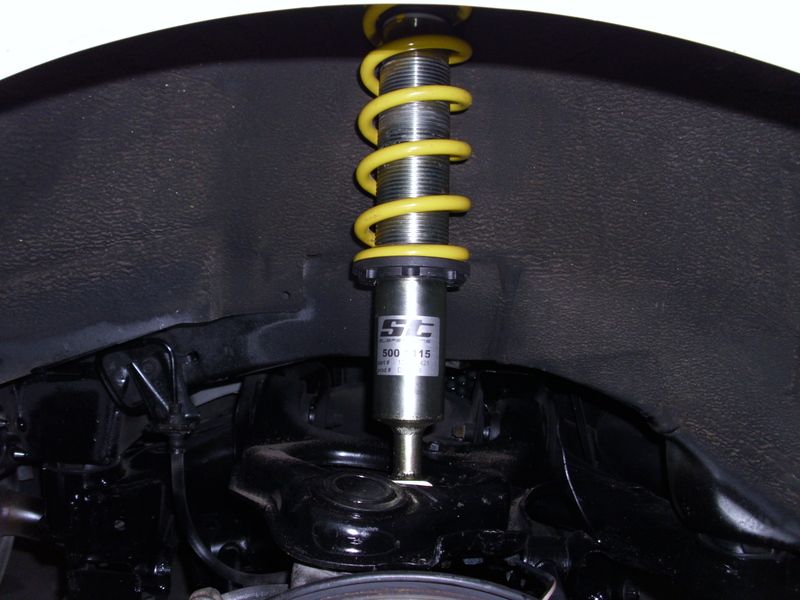
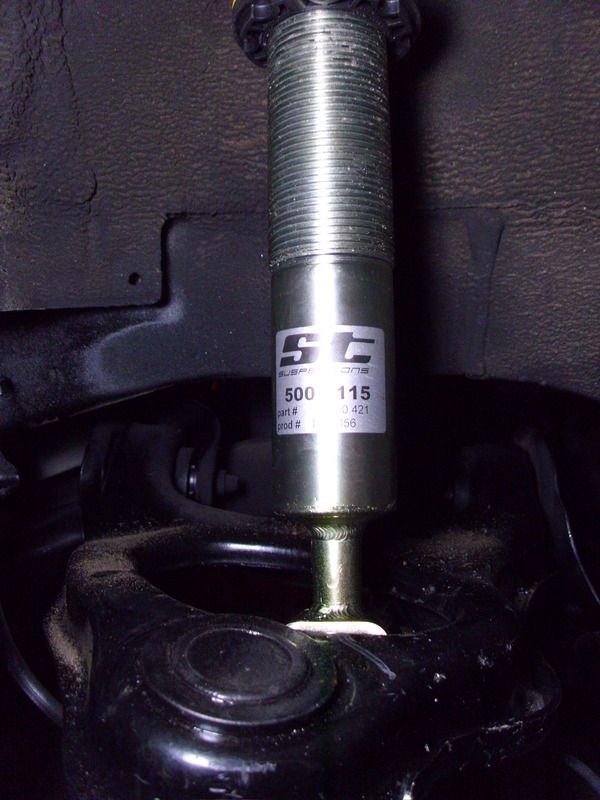
I put the top hats onto the KW’s as per the instructions. I tried to read and follow the German side for funsies. I also threaded the shock ALL the way down to make it easier to re-install into the car.
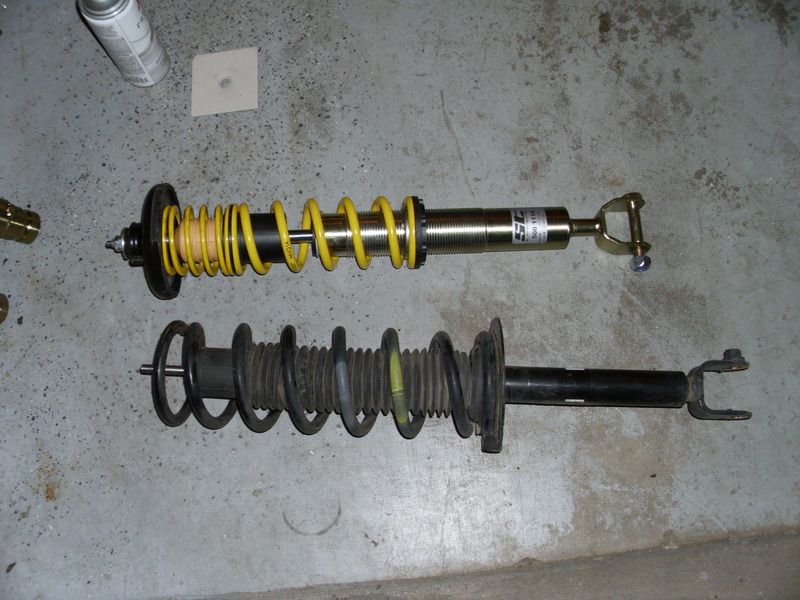
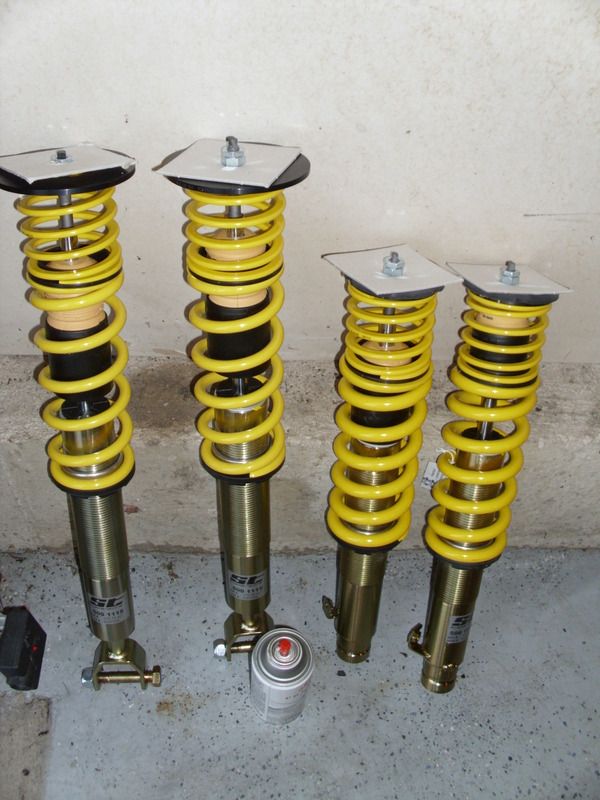
The ST line is plated in yellow dichromate zinc. While yellow zinc is probably the most corrosion resistant of all the zinc coatings…it’s still a metallic coating and I still live in the Chicago burbs. Jerky.
So I clear coated the bodies. I did not spray the shock shaft. Just the bodies. I plan on taking apart the suspension sometime during the summer to clean all the control arms, buy new bolts, and then spray everything with corrosion inhibiter. Or maybe I’ll just move back to the desert.
Step 7: Put those shiny new shocks down, player. They gotta dry out that clear coat.
It’s time to clock the bushings. Unfortunately, this step is usually left out, mainly because people don’t know about it. It’s also time consuming, so some people don’t bother even if they do know. I’ve been advocating it and spreading information about it for like…14 or so years now.
Leaving this step out, however, will cause damage that’s costly and fairly shitty to fix. . Even with a press…I hate doing bushings.
-Grab a wheel. Put it on with one or two lug nuts.
-Then jack up on the LCA until you get the wheel to sit in the wheel well at the ride height you want. ***remember…the coilover is NOT installed at this point****
- Make sure you measure this height. Once you install the coilover, you’ll want to replicate it.
-Remove the wheel BUT LEAVE THE JACK WHERE IT’S AT!!
-Now tighten up all them bolts you loosened in step 4 (except the shock bolt, obvi). Torque them to spec.
-Now lower the jack.
The purpose behind clocking the bushings is to tighten them at ride height. You want to do this to prevent the bushing from over-twisting. If you tighten them with the suspension at droop…they will have to twist WAYYY beyond their range as the suspension settles into its position at ride height.
The bushings are clocked to your factory ride height from the factory. You should always clock bushings to your CURRENT ride height (+/- 0.5’’). That's the purpose of loosening the bolts to re-tighten them at the new height.
Step 8: Install the coilover to the car. Aren’t you glad you threaded the adjuster all the way down?
Step 9: Adjust the coilover to the height you think will correspond with the height in step 9. IIRC, I took KW’s minimum suggested height and added 0.75’’ (3/4’’ or 19mm).
Step 10: Clock the bushing for the coilover/shock.
-Jack up on the LCA in the spot shown. Keep jacking up until that corner of the car BARELY comes off the jack stand.
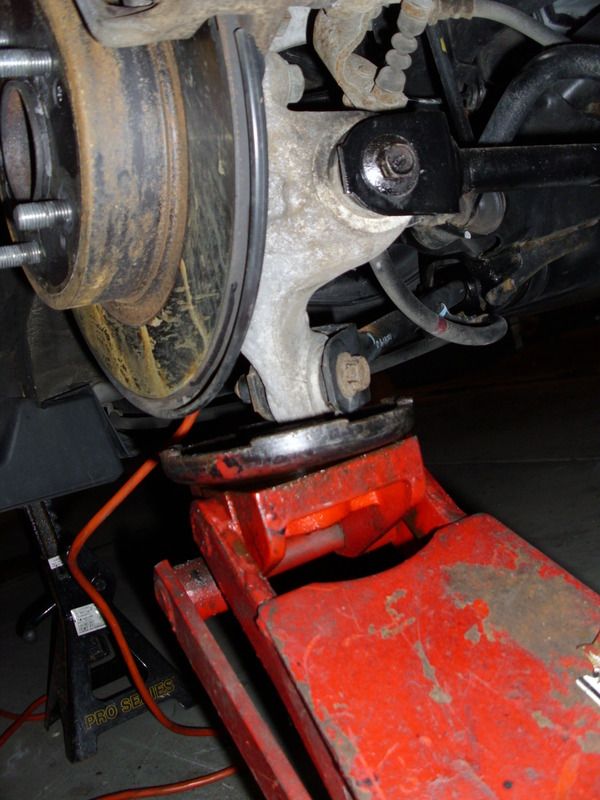
-Tighten the bolt/nut down. KW supplies you with shiny new bolts. Torque them to spec.
Step 11: Repeat all the steps for the other rear corner. Then tighten down the sway bar bracket bolts.
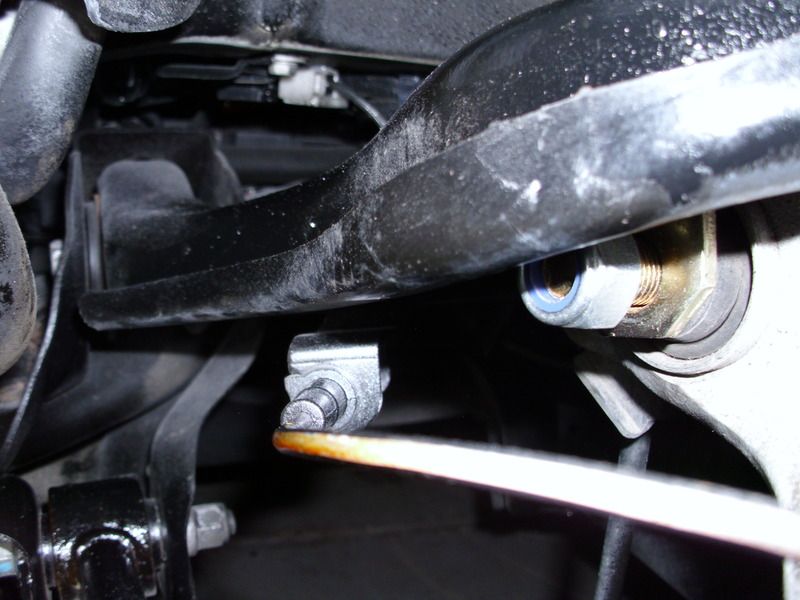
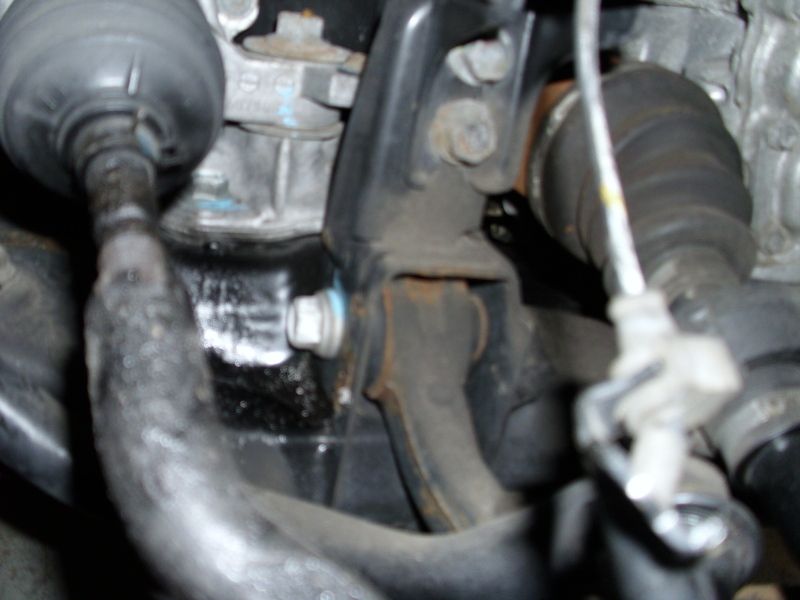
Step 12: Move to the fronts. I started by removing the lower pinch bolt (14mm) and lower shock bolt (17mm). I removed a couple of the ABS wire bracket bolts and tucked the ABS wire under the shock and pushed the shock fork out of the way.
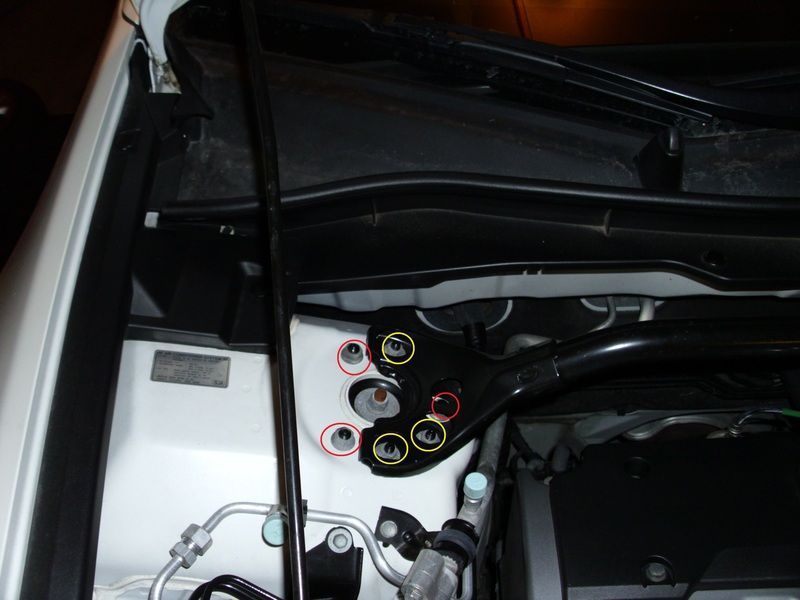
Step 13: Find the upper strut bolts. They’re located on the upper strut.
-Remove the bolts in yellow on BOTH sides first. That way, you can remove the strut bar and put it out of the way.
-Now remove the bolts in red. Don’t let the shock fall on your foot/genitals. Hold it up with your hand.
-Remove the stock shock/spring from the car (no pics, sorry )
-Put the stock front assembly in a spring compressor and remove the top hat. Replace the top hat onto the new coilover, per instructions in the manual. Just like the rear shock. Use Shin Ehtsu grease on the rubbers. (Sorry, no pics )
Step 14: Loosen the LCA and UCA bolts shown until the suspension goes limp and droops down.
Step 15: Clock the front bushings. Remember…not clocking the bushings is bad news.
-Put on a wheel.
-Jack up on the LCA till the wheel sits in the wheel well how you want. Measure this distance and write it down. I use the bottom of the fender to the top of the tire…or bottom of the fender to the centre of the hub.
-Remove the wheel. LEAVE THE JACK. Tighten the bolts from the last step. Then remove the jack.
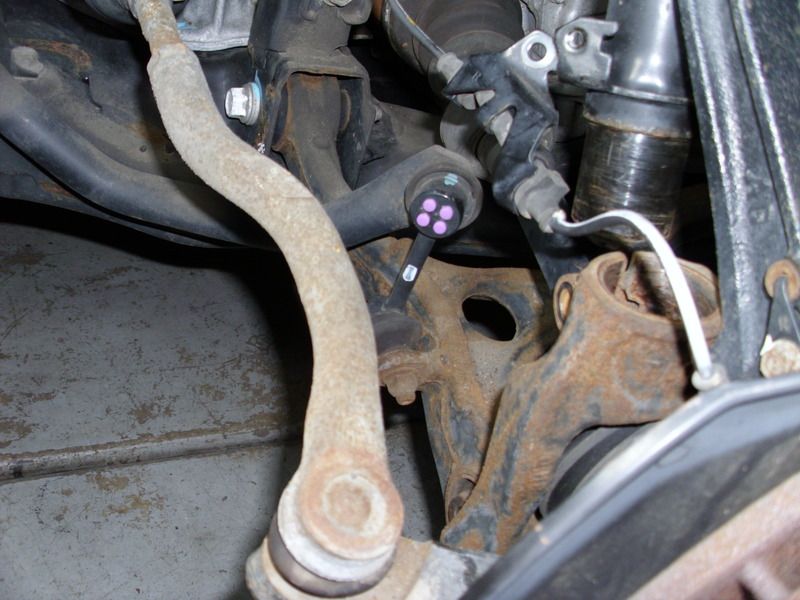
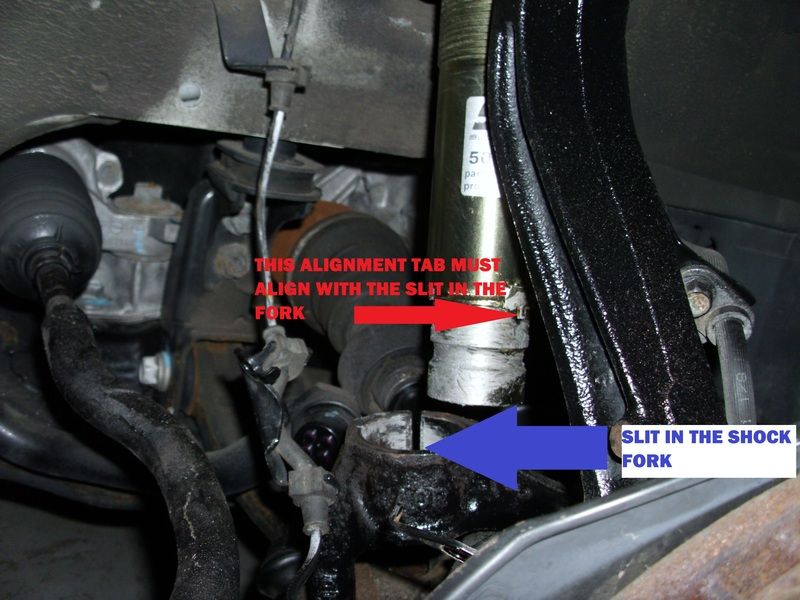
Step 16: Install the coilover. Align the alignment slot as shown. Make sure the ABS wire ends up on the correct side, and reinstall the ABS wire bracket bolts. DO NOT TIGHTEN THE LOWER SHOCK BOLT.
-Then set the coilover height where you want it. DO NOT TIGHTEN THE LOWER SHOCK BOLT.
Step 17: Repeat the necessary steps to complete the coilover install on the other front side.
Step 19: Put the car on the ground. Make sure that it is at the ride height you measured in step 16. Then tighten the lower shock bolt on both fronts.
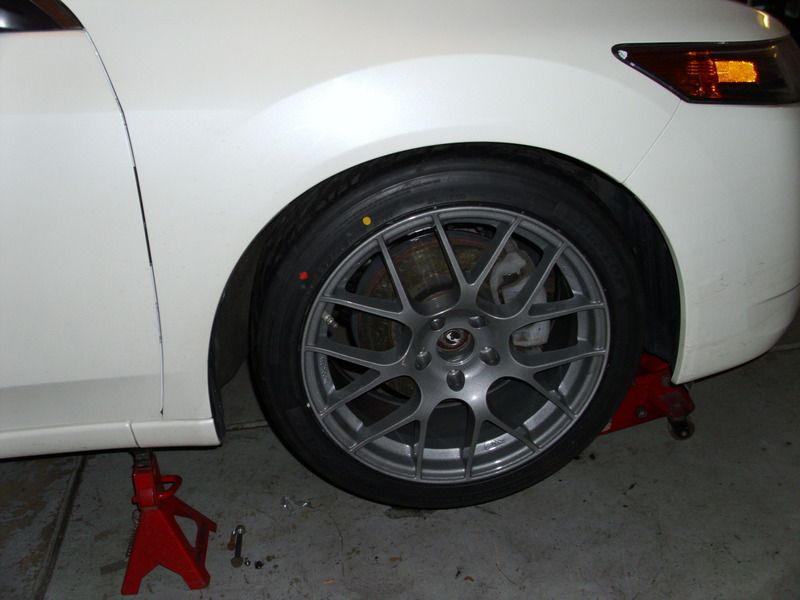
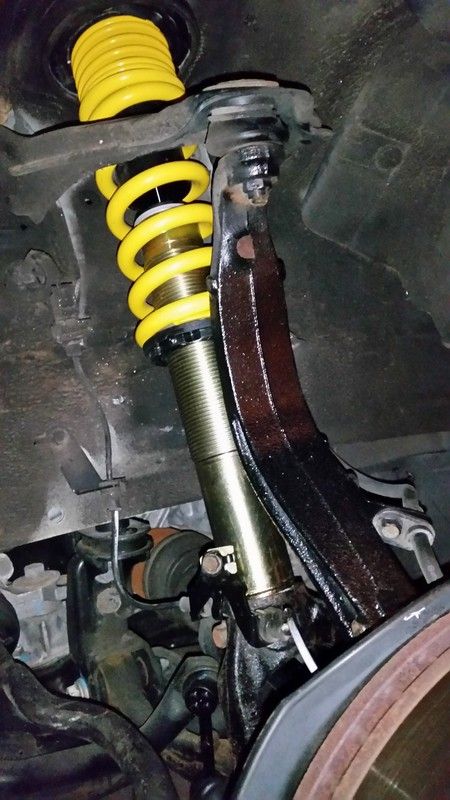
You’re done, player. Stand back and check out your results.
My girlfriend bought a TSX wagon (tech) this past winter. We both loved the car as soon as we drove it. It was a nice change from her S2000 and 8G Si in terms of space, comfort, features, etc.
But…as nice as it was, I can’t just spend all day looking at a stockass wagon. The wheels in my head started to turn.
So…I ended up buying some KW ST speedtech coilovers from my main man Nick at THmotorsports.
I also bought some 18x8.5 +38 Enkei Raijins with brand new Direzza Z2’s from another friend at Discount Tire. The wheels didn’t come in any colours that I wanted. So I had them powder coated “heavy charcoal”. It’s light enough that I can still use the stock centre caps…but dark enough that the car looks semi-modded.
If you’re still reading, you’re already winning. This thread is a DIY on properly installing a suspension system. After that, you’ll find reviews on the coilovers themselves, and pictures.
Step1: Pressure wash the chassis. I’m not finna get dirty working on a car. What do you think this is?? Also…jack it up high enough to work on it, and put it on jack stands.
Step2: I wanted to start with the rears. They looked more complex than the fronts. I first took off the upper mount access panel, located behind the seats. I then removed the two upper mount nuts with a 14mm socket. Don’t swing the wrench and smash the window.
Step3: Remove the rear lower shock bolt (17mm socket), and disconnect the sway bar by removing the bracket bolts (12mm socket). Don’t let the shock fall on your face/genitals.
Step4: Loosen all the bolts circled in the diagram (this will come in handy later). Loosening them helps the suspension droop. You can then use a pry bar to pull down on it whilst removing the stock shock/spring assy.
Step5: Use a spring compressor to remove the stock top hats. Ofcourse…if you bought a coilover that came with top hats…then skip this step. Point the spring away from your face/genitals. Then compress it, use a 5mm allen key to hold the shock…and a 14mm wrench to turn the top nut. Some people use an impact to do this…but that’s a little on the ig’nent side because you can damage the shock. I plan to save the stock shocks.
Once off, I apply some shin-ehtsu grease to the rubber parts of the top hat.
Step 6: I unpacked the coilovers and looked over the instructions.
I use anti sieze on ID of this sleeve when I put it back on the coilover.
I put the top hats onto the KW’s as per the instructions. I tried to read and follow the German side for funsies. I also threaded the shock ALL the way down to make it easier to re-install into the car.
The ST line is plated in yellow dichromate zinc. While yellow zinc is probably the most corrosion resistant of all the zinc coatings…it’s still a metallic coating and I still live in the Chicago burbs. Jerky.
So I clear coated the bodies. I did not spray the shock shaft. Just the bodies. I plan on taking apart the suspension sometime during the summer to clean all the control arms, buy new bolts, and then spray everything with corrosion inhibiter. Or maybe I’ll just move back to the desert.
Step 7: Put those shiny new shocks down, player. They gotta dry out that clear coat.
It’s time to clock the bushings. Unfortunately, this step is usually left out, mainly because people don’t know about it. It’s also time consuming, so some people don’t bother even if they do know. I’ve been advocating it and spreading information about it for like…14 or so years now.
Leaving this step out, however, will cause damage that’s costly and fairly shitty to fix. . Even with a press…I hate doing bushings.
-Grab a wheel. Put it on with one or two lug nuts.
-Then jack up on the LCA until you get the wheel to sit in the wheel well at the ride height you want. ***remember…the coilover is NOT installed at this point****
- Make sure you measure this height. Once you install the coilover, you’ll want to replicate it.
-Remove the wheel BUT LEAVE THE JACK WHERE IT’S AT!!
-Now tighten up all them bolts you loosened in step 4 (except the shock bolt, obvi). Torque them to spec.
-Now lower the jack.
The purpose behind clocking the bushings is to tighten them at ride height. You want to do this to prevent the bushing from over-twisting. If you tighten them with the suspension at droop…they will have to twist WAYYY beyond their range as the suspension settles into its position at ride height.
The bushings are clocked to your factory ride height from the factory. You should always clock bushings to your CURRENT ride height (+/- 0.5’’). That's the purpose of loosening the bolts to re-tighten them at the new height.
Step 8: Install the coilover to the car. Aren’t you glad you threaded the adjuster all the way down?
Step 9: Adjust the coilover to the height you think will correspond with the height in step 9. IIRC, I took KW’s minimum suggested height and added 0.75’’ (3/4’’ or 19mm).
Step 10: Clock the bushing for the coilover/shock.
-Jack up on the LCA in the spot shown. Keep jacking up until that corner of the car BARELY comes off the jack stand.
-Tighten the bolt/nut down. KW supplies you with shiny new bolts. Torque them to spec.
Step 11: Repeat all the steps for the other rear corner. Then tighten down the sway bar bracket bolts.
Step 12: Move to the fronts. I started by removing the lower pinch bolt (14mm) and lower shock bolt (17mm). I removed a couple of the ABS wire bracket bolts and tucked the ABS wire under the shock and pushed the shock fork out of the way.
Step 13: Find the upper strut bolts. They’re located on the upper strut.
-Remove the bolts in yellow on BOTH sides first. That way, you can remove the strut bar and put it out of the way.
-Now remove the bolts in red. Don’t let the shock fall on your foot/genitals. Hold it up with your hand.
-Remove the stock shock/spring from the car (no pics, sorry )
-Put the stock front assembly in a spring compressor and remove the top hat. Replace the top hat onto the new coilover, per instructions in the manual. Just like the rear shock. Use Shin Ehtsu grease on the rubbers. (Sorry, no pics )
Step 14: Loosen the LCA and UCA bolts shown until the suspension goes limp and droops down.
Step 15: Clock the front bushings. Remember…not clocking the bushings is bad news.
-Put on a wheel.
-Jack up on the LCA till the wheel sits in the wheel well how you want. Measure this distance and write it down. I use the bottom of the fender to the top of the tire…or bottom of the fender to the centre of the hub.
-Remove the wheel. LEAVE THE JACK. Tighten the bolts from the last step. Then remove the jack.
Step 16: Install the coilover. Align the alignment slot as shown. Make sure the ABS wire ends up on the correct side, and reinstall the ABS wire bracket bolts. DO NOT TIGHTEN THE LOWER SHOCK BOLT.
-Then set the coilover height where you want it. DO NOT TIGHTEN THE LOWER SHOCK BOLT.
Step 17: Repeat the necessary steps to complete the coilover install on the other front side.
Step 19: Put the car on the ground. Make sure that it is at the ride height you measured in step 16. Then tighten the lower shock bolt on both fronts.
You’re done, player. Stand back and check out your results.
 06-13-2015, 08:25 PM
#2
Cool Cool Island Breezes. BOY-EE
Thread Starter
iTrader: (1)
Join Date: Sep 2006
Location: TRILLINOIS....WAY downtown, jerky.
Posts: 11,953
Likes: 0
Received 4 Likes
on
4 Posts
Review and comparison to other coilovers I've used:
I just took a very short road trip (400 miles) today. And these have now been on the car about 2-3k miles or so total.
The damping is very german. There's tons of low speed bump damping (but not too much). This keeps the car pretty flat around turns. The steering ratio in this car is extremely fast. So keeping the car from excessively rolling is important.
They are refined, and firm. As a matter of fact, they are a little bit more firm than I anticipated. The 12kg/mm front springs kind of clued me in to that when I bought them. I think that they use that rate because they want to accommodate nose heavy V6 cars as well. I'd assume that V6 owners would not notice the stiffness in the front springs.
The damping is SOLID, however. There's no hoppy weirdness.
I think that with either less stiff front springs and maybe some reduced rebound damping, these would be much more compliant. I wouldn't call them uncomfortable...but they're definitely firm.
While, for me, track use was not a consideration; these will work well on a track. Crazy, huh? Without full body adjustability? Without pillowball mounts? Without 87 way damping adjustmentszorsz?!!! Fuggedaboudit. (Yes.)
Features:
Not many. They're height adjustable. The bodies are zinc plated (which I think is a bit of a weird choice by KW), and just like V1 ,V2, and V3 dampers, the spring adjuster is plastic (this is a really good idea, actually) with a stainless steel reinforcement ring.
I wish they had like 1-9 clicks of damping adjustment to kind of tailor the coilover a bit. BUT...I'm glad they don't have some garbage 32-click wheel that doesn't do anything.
Comparison to other coilovers that I've owned/driven (with the chassis they were used on):
Bilstein PSS9 (AP2): Unfair comparison. These have to be one of the best, if not, THE best street coilover out there. Unfortunately, Bilstein doesn't make PSS9's for this Accord/TSX chassis. The damping on PSS9's is amazing. It's hard to find another street coilover that rides this well. They're a little on the soft side for the track. But they still rip, and they're very capable. Unbelievable for a coilover that rides as well as it does.
KW V3 (AP1) This is what I have on my S2000. Unsurprisingly, the ST's feel a lot like the V3's did at their factory settings. They're not quite as well controlled as the V3. But the feel is very very familiar. I have the OG V3's that came with 500/500 (9.5k/9.5k) springs. They were a tiny bit soft for the track. But pretty much just right (a little firm) on the street. I have since upgrayyded to 670/580 (12k/10k) h&r springs.
Tein Street Advance (CL9): I have Tein SA's on my 1G TSX sedan (daily driver). This model of Tein is SOFT...and it likes to stay that way. The ride is a bit more compliant, as compared to the ST. But...the body motion is not nearly as well controlled as the ST. The Tein's have a 16 way damping adjuster (Tein does their damping on a sliding scale. 16 is soft. 1 is stiff).. I am currently using setting -4 (from full stiff) up front and -7 (from full stiff) in back. That setting is definitely firm (high speed damping), but its necessary to get a good amount of low speed damping from the system. But then again, the price is right. And you do get a high quality part that has a predictable damping adjuster. Although, you'll need to hunt around for settings that have the right blend of bump and rebound damping. For example, it may seem that -4 is more firm than -3...but it's likely because there is a different ratio of bump and compression addition between clicks.

Tein Street Basis (EP3): These are the non-damper adjustable version of the Tein SA. Again, high quality, and a great bang for your buck. I used these on my friend's EP3. He's not really into cars...but his stock shocks were blown. He's not going to adjust the damping anyway. The factory damper setting on these is actually really really nice.
Function Form Type2 (97 civic): Nope. They ride pretty much like the Skunk2 Pro-C. They feel a bit dead. The damper **** does work. But...why the f#$k are there 32 fu#$ing settings?! These literally exist as a cheap way to slam a car. The damper ***** exist so you can ...idk...do something with your free time, I guess?
Function Form Type1 (90 K20 CRX):: Hell nope. WTF. I felt like my spine was going to break. But there was tons of body roll? (??!?!?!) No spring control at all. In my old country, "donkey punch" refers to something you'd do to your donkey if he was making you late for school. And these ride worse than that donkey.
Tein Flex (S13) Not a bad setup. Tein does make high quality stuff in terms of durability and longevity (regardless of what the internet says). They were decent. Not great, in terms of anything in particular. But good overall. But this was like 10 years ago.

Koni/GC Standard rates (EM1) : Nice, versatile setup. What people don't talk about with Koni Yellows is that the stock damper kind of works with everything...which is not always the best thing. Don't get me wrong. This was an awesome setup. For something like a civic, it works great. It's a jack-of-all-trades; king of none. If you wanted something more focused, you'd buy something else. This would be because of the same reason as a butcher buys a meat cleaver and not a swiss army knife. I did drive the car 75K miles in 3 years, though. Even with that type of daily use, the Koni and GC worked well.

Koni/GC 360F/380R (DC2 ITR): Ah...my garage rubbish setup on my ITR lol. This worked out surprisngly well. The car freaking rolled OUT on fools at the track (with a staggered tyre setup, and -3.5deg front camber, and 23mm rear bar). But it rode well enough on the street for me to commute 90 miles/day in it at some points.
I just took a very short road trip (400 miles) today. And these have now been on the car about 2-3k miles or so total.
The damping is very german. There's tons of low speed bump damping (but not too much). This keeps the car pretty flat around turns. The steering ratio in this car is extremely fast. So keeping the car from excessively rolling is important.
They are refined, and firm. As a matter of fact, they are a little bit more firm than I anticipated. The 12kg/mm front springs kind of clued me in to that when I bought them. I think that they use that rate because they want to accommodate nose heavy V6 cars as well. I'd assume that V6 owners would not notice the stiffness in the front springs.
The damping is SOLID, however. There's no hoppy weirdness.
I think that with either less stiff front springs and maybe some reduced rebound damping, these would be much more compliant. I wouldn't call them uncomfortable...but they're definitely firm.
While, for me, track use was not a consideration; these will work well on a track. Crazy, huh? Without full body adjustability? Without pillowball mounts? Without 87 way damping adjustmentszorsz?!!! Fuggedaboudit. (Yes.)
Features:
Not many. They're height adjustable. The bodies are zinc plated (which I think is a bit of a weird choice by KW), and just like V1 ,V2, and V3 dampers, the spring adjuster is plastic (this is a really good idea, actually) with a stainless steel reinforcement ring.
I wish they had like 1-9 clicks of damping adjustment to kind of tailor the coilover a bit. BUT...I'm glad they don't have some garbage 32-click wheel that doesn't do anything.
Comparison to other coilovers that I've owned/driven (with the chassis they were used on):
Bilstein PSS9 (AP2): Unfair comparison. These have to be one of the best, if not, THE best street coilover out there. Unfortunately, Bilstein doesn't make PSS9's for this Accord/TSX chassis. The damping on PSS9's is amazing. It's hard to find another street coilover that rides this well. They're a little on the soft side for the track. But they still rip, and they're very capable. Unbelievable for a coilover that rides as well as it does.
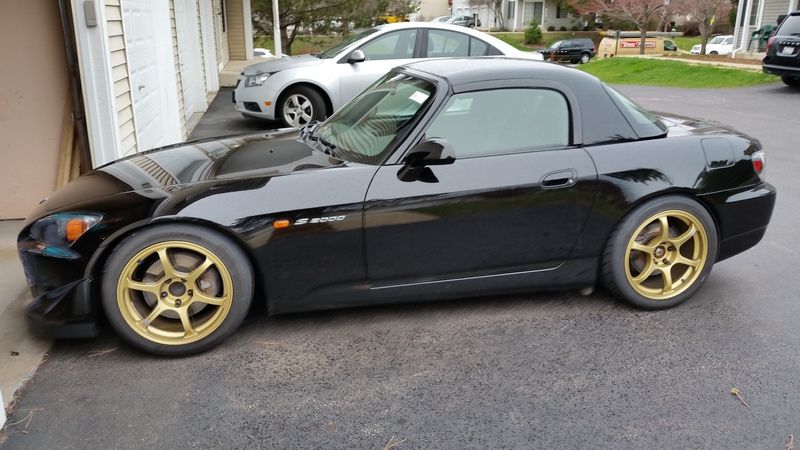
KW V3 (AP1) This is what I have on my S2000. Unsurprisingly, the ST's feel a lot like the V3's did at their factory settings. They're not quite as well controlled as the V3. But the feel is very very familiar. I have the OG V3's that came with 500/500 (9.5k/9.5k) springs. They were a tiny bit soft for the track. But pretty much just right (a little firm) on the street. I have since upgrayyded to 670/580 (12k/10k) h&r springs.
Tein Street Advance (CL9): I have Tein SA's on my 1G TSX sedan (daily driver). This model of Tein is SOFT...and it likes to stay that way. The ride is a bit more compliant, as compared to the ST. But...the body motion is not nearly as well controlled as the ST. The Tein's have a 16 way damping adjuster (Tein does their damping on a sliding scale. 16 is soft. 1 is stiff).. I am currently using setting -4 (from full stiff) up front and -7 (from full stiff) in back. That setting is definitely firm (high speed damping), but its necessary to get a good amount of low speed damping from the system. But then again, the price is right. And you do get a high quality part that has a predictable damping adjuster. Although, you'll need to hunt around for settings that have the right blend of bump and rebound damping. For example, it may seem that -4 is more firm than -3...but it's likely because there is a different ratio of bump and compression addition between clicks.
Tein Street Basis (EP3): These are the non-damper adjustable version of the Tein SA. Again, high quality, and a great bang for your buck. I used these on my friend's EP3. He's not really into cars...but his stock shocks were blown. He's not going to adjust the damping anyway. The factory damper setting on these is actually really really nice.
Function Form Type2 (97 civic): Nope. They ride pretty much like the Skunk2 Pro-C. They feel a bit dead. The damper **** does work. But...why the f#$k are there 32 fu#$ing settings?! These literally exist as a cheap way to slam a car. The damper ***** exist so you can ...idk...do something with your free time, I guess?
Function Form Type1 (90 K20 CRX):: Hell nope. WTF. I felt like my spine was going to break. But there was tons of body roll? (??!?!?!) No spring control at all. In my old country, "donkey punch" refers to something you'd do to your donkey if he was making you late for school. And these ride worse than that donkey.
Tein Flex (S13) Not a bad setup. Tein does make high quality stuff in terms of durability and longevity (regardless of what the internet says). They were decent. Not great, in terms of anything in particular. But good overall. But this was like 10 years ago.
Koni/GC Standard rates (EM1) : Nice, versatile setup. What people don't talk about with Koni Yellows is that the stock damper kind of works with everything...which is not always the best thing. Don't get me wrong. This was an awesome setup. For something like a civic, it works great. It's a jack-of-all-trades; king of none. If you wanted something more focused, you'd buy something else. This would be because of the same reason as a butcher buys a meat cleaver and not a swiss army knife. I did drive the car 75K miles in 3 years, though. Even with that type of daily use, the Koni and GC worked well.
Koni/GC 360F/380R (DC2 ITR): Ah...my garage rubbish setup on my ITR lol. This worked out surprisngly well. The car freaking rolled OUT on fools at the track (with a staggered tyre setup, and -3.5deg front camber, and 23mm rear bar). But it rode well enough on the street for me to commute 90 miles/day in it at some points.
Last edited by B serious; 12-13-2015 at 03:00 PM.
06-13-2015, 08:57 PM
#3
Cool Cool Island Breezes. BOY-EE
Thread Starter
iTrader: (1)
Join Date: Sep 2006
Location: TRILLINOIS....WAY downtown, jerky.
Posts: 11,953
Likes: 0
Received 4 Likes
on
4 Posts
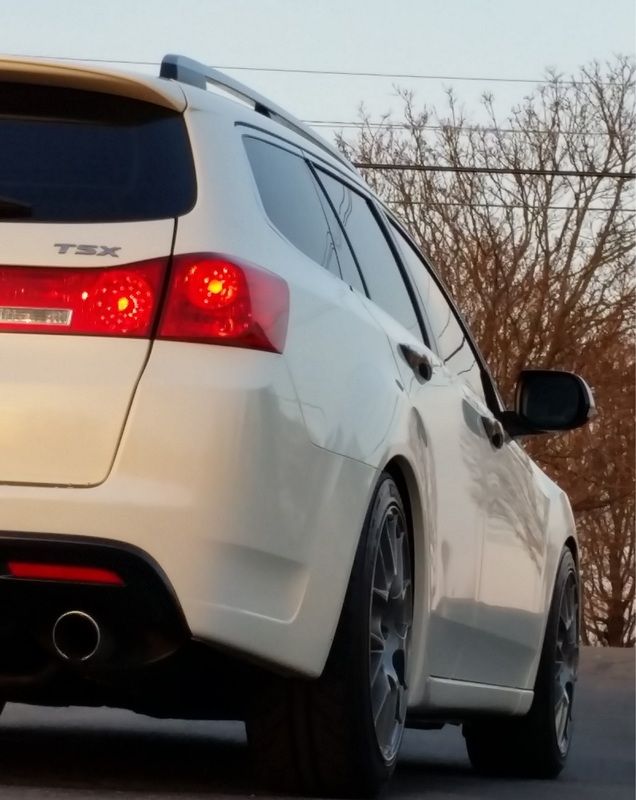
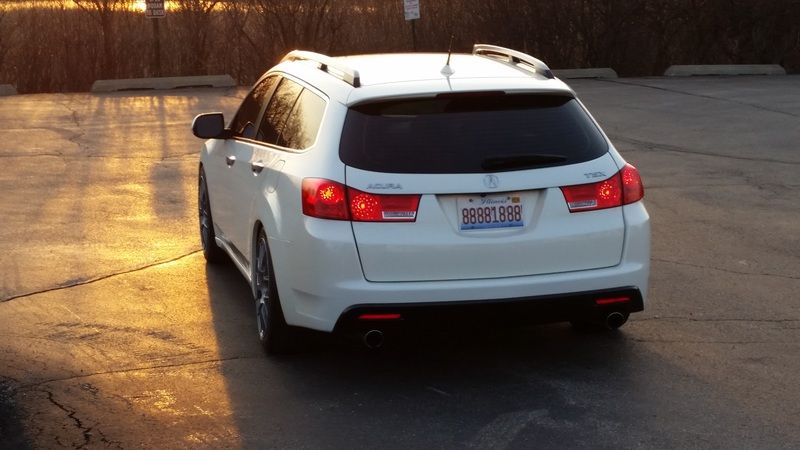
You can definitely slam some cars with this system. The wagon is adjusted almost all the way to their "max" height. Meaning...this is about as HIGH as it goes.


06-15-2015, 03:05 PM
#4
Cool Cool Island Breezes. BOY-EE
Thread Starter
iTrader: (1)
Join Date: Sep 2006
Location: TRILLINOIS....WAY downtown, jerky.
Posts: 11,953
Likes: 0
Received 4 Likes
on
4 Posts
Awfully quiet in here haha. I shoulda made a thread about slamming a Civic on Yonakas or something.
06-17-2015, 06:36 AM
#5
Honda-Tech Member
Love the way it looks! Wheels go very well with the car too. How's the handling compared to stock?
06-17-2015, 02:55 PM
#6
Cool Cool Island Breezes. BOY-EE
Thread Starter
iTrader: (1)
Join Date: Sep 2006
Location: TRILLINOIS....WAY downtown, jerky.
Posts: 11,953
Likes: 0
Received 4 Likes
on
4 Posts
I ordered a different set of tyres thats a bit more soft/compliant. We'll see how the car feels after that. I'll be selling the (almost new) Direzza Z2's soon.
06-17-2015, 03:23 PM
#7
Honda-Tech Member
Join Date: Feb 2010
Location: Lone Star Estado
Posts: 315
Likes: 0
Received 0 Likes
on
0 Posts
Car looks great, great diy thread with the other comparisons btw. I've been looking at Tein Streets for my new to me DD (IS300)
Trending Topics
06-17-2015, 04:40 PM
#8
Cool Cool Island Breezes. BOY-EE
Thread Starter
iTrader: (1)
Join Date: Sep 2006
Location: TRILLINOIS....WAY downtown, jerky.
Posts: 11,953
Likes: 0
Received 4 Likes
on
4 Posts
Thanks. The Street Advance is a really nice coilover for DD use. They're softer than the ST's, and they're adjustable. I was torn between those and the ST's when I was looking for a setup. The price on the ST's was too good to pass up, and I wanted to try them out because I like the KW's on my S2000 so much.
06-29-2015, 06:12 AM
#9
Honda-Tech Member

Join Date: Nov 2008
Posts: 376
Likes: 0
Received 0 Likes
on
0 Posts
I appreciate this post, if anything just for the cool photos..... and letting me dream of the time I could spend that amount of money on my cars!
07-04-2015, 05:49 AM
#11
Cool Cool Island Breezes. BOY-EE
Thread Starter
iTrader: (1)
Join Date: Sep 2006
Location: TRILLINOIS....WAY downtown, jerky.
Posts: 11,953
Likes: 0
Received 4 Likes
on
4 Posts
^Glad I could post something helpful for yous guys.
UPDATE:
-Bought some 245/40/17 Continental DW tires to replace the 225/45 Direzza's.
-Raised the front suspension up about .25 - .50" so that there wouldn't be so much frontward rake.
The car rides so much better that its crazy lol. I think that maybe these springs and dampers just couldn't control the super-hard sidewalled Direzza Z2 enough to provide the ride quality that I wanted from this car.
The Conti's are whisper quiet and comfortable. Hitting sharp bumps no longer has that PING noise/feeling. I don't feel like the car is crashing into high speed bumps anymore.
I'll *kinda* miss the razor sharp steering and glue-like grip of the Direzza. But this car is meant to be a comfortable long distance cruiser that's well also planted.
The Conti's do MUCH better in the rain as well.
The 245 width makes them look a little more meaty. The tires dont look as attractive as Michelin Pilot SS's or Dunlop Z2's. But...whatever.
At this point, if I had to re-review the coilovers.....these are as comfortable, if not, more comfortable than the Tein SA's on my sedan (which has Michelin Pilot SS tires).


Last edited by B serious; 07-04-2015 at 08:10 AM.

Thread
Thread Starter
Forum
Replies
Last Post
^^ALUCARD^^
Honda / Acura
64
07-30-2007 06:04 AM