
DIY: 96-00 Steering wheel install w/o SRS light and working horn
 02-19-2012, 10:31 AM
#1
So I searched and searched for a 99-00 steering wheel install and decided to take pics and do my own write up.
Part needed for SRS:

2.2ohm 5v resistor found here:
http://search.digikey.com/scripts/Dk...ords=SQMW52R2J
Tools Needed:
T30 Torx bit
19mm or 3/4 socket
rachet w/ extension
Phillips screwdriver
Electric spade set
Heat shrink
Heat gun
Soldering iron
Zip Tie

IMPORTANT: Disconnect battery for 30 mins before starting this project. Disabling a SRS airbag might be illegal in your state and I assume no responsibility for you or your car from using this write up to dismantle your SRS system or anything that might occur now or down the road.
1- Pop off the side panels and find the torx screws (1 on each side)


2. youll see the cruise wires, SRS and horn wiring. Unplug everything. Youll notice the horn wire is brown. SRS yellow/green.


3. Next is to remove the wheel. Mark the top of post to mark where the column is pointing.


4. Slide out clock spring assembly

5. The SRS wires are attached to clock spring.. this is where you clip it to attach the resistor.

6. Clip Brown horn wire and pull out of sleeving leaving the cruise wires to be tucked away later.

7. Now how did mine was using a spade with some heatshrink (this will drag on the hub as your positive connection. More on that in a bit.

8. What i did was cut the SRS wires to only have a little bit of wire showing. The Resistor has stiff prongs where i slid it in the wiring jacket and the soldered the wiring to the prong. (dont forget your heatshrink tubing) Heat everything so nothing is touching and its a solid solder.

9. Now that your resistor is set and done, Time to work your horn. I used a spade connector and heatshrunk it to a ziptie to keep constant pressure on the back of the hub. Now i have zipties with holes in them which made it easier to just screw down on the hole from clockspring. (see pics)


** Double check to make sure the only thing dragging is the spade connector on the backside of the hub** Sorry for the blurry pics, my cam is a POS!


10. When everything is good and you know its touching with some pressure, Time to put on hub. Tighten good of course, and double check horn wire. re-adjust if needed. Now is a good time to smear some die-electric grease on the back of the hub. (i didnt like the grease that was on it, so i used my own after cleaning the old stuff off.)

11. Attach your QR (note: dot on hub and QR is showing TOP) and make sure you note which is positive when assembling)

I had to cut off the spade and use the female side for my ground. heat shrunk of course.
12. Attach your wheel and hook up the positive and negative to the horn button.
13. Now if you did everything correctly, and your sure about your soldering skills. Re-attach NEG battery terminal, then turn the key to on.
My SRS light went off as usual and my horn works.
Pics:


Part needed for SRS:
2.2ohm 5v resistor found here:
http://search.digikey.com/scripts/Dk...ords=SQMW52R2J
Tools Needed:
T30 Torx bit
19mm or 3/4 socket
rachet w/ extension
Phillips screwdriver
Electric spade set
Heat shrink
Heat gun
Soldering iron
Zip Tie
IMPORTANT: Disconnect battery for 30 mins before starting this project. Disabling a SRS airbag might be illegal in your state and I assume no responsibility for you or your car from using this write up to dismantle your SRS system or anything that might occur now or down the road.
1- Pop off the side panels and find the torx screws (1 on each side)
2. youll see the cruise wires, SRS and horn wiring. Unplug everything. Youll notice the horn wire is brown. SRS yellow/green.
3. Next is to remove the wheel. Mark the top of post to mark where the column is pointing.
4. Slide out clock spring assembly
5. The SRS wires are attached to clock spring.. this is where you clip it to attach the resistor.
6. Clip Brown horn wire and pull out of sleeving leaving the cruise wires to be tucked away later.
7. Now how did mine was using a spade with some heatshrink (this will drag on the hub as your positive connection. More on that in a bit.
8. What i did was cut the SRS wires to only have a little bit of wire showing. The Resistor has stiff prongs where i slid it in the wiring jacket and the soldered the wiring to the prong. (dont forget your heatshrink tubing) Heat everything so nothing is touching and its a solid solder.
9. Now that your resistor is set and done, Time to work your horn. I used a spade connector and heatshrunk it to a ziptie to keep constant pressure on the back of the hub. Now i have zipties with holes in them which made it easier to just screw down on the hole from clockspring. (see pics)
** Double check to make sure the only thing dragging is the spade connector on the backside of the hub** Sorry for the blurry pics, my cam is a POS!
10. When everything is good and you know its touching with some pressure, Time to put on hub. Tighten good of course, and double check horn wire. re-adjust if needed. Now is a good time to smear some die-electric grease on the back of the hub. (i didnt like the grease that was on it, so i used my own after cleaning the old stuff off.)
11. Attach your QR (note: dot on hub and QR is showing TOP) and make sure you note which is positive when assembling)
I had to cut off the spade and use the female side for my ground. heat shrunk of course.
12. Attach your wheel and hook up the positive and negative to the horn button.
13. Now if you did everything correctly, and your sure about your soldering skills. Re-attach NEG battery terminal, then turn the key to on.
My SRS light went off as usual and my horn works.
Pics:

 ..gonna have to do this


Trending Topics
02-19-2012, 06:34 PM
#8
Honda-Tech Member
not to be off topic but which wire is for the horn? Is it the Blue with red wire near the bottom in this pic?
http://img816.imageshack.us/img816/9223/sdc10079e.jpg
http://img816.imageshack.us/img816/9223/sdc10079e.jpg
02-20-2012, 04:26 AM
#9
Its in that strand.. its the brown line that also is included in the blue/red
6. Clip Brown horn wire and pull out of sleeving leaving the cruise wires to be tucked away later.

6. Clip Brown horn wire and pull out of sleeving leaving the cruise wires to be tucked away later.
04-03-2012, 05:25 PM
#10
Honda-Tech Member
Join Date: Mar 2008
Posts: 97
Likes: 0
Received 0 Likes
on
0 Posts
Do you know another location to get this Digikey? im trying to do this asap so i can use my horn and remove my srs light. I seen other resistor's but i assume that this squared one will work better for what you did here compare to just having it hang with just the small wires holding it. I called digikey its a 2 month wait for that resistor. Im looking for a similar one but having a hard time finding one.
04-03-2012, 11:15 PM
#11
Honda-Tech Member
Join Date: Jul 2007
Location: California
Posts: 479
Likes: 0
Received 0 Likes
on
0 Posts
Do you know another location to get this Digikey? im trying to do this asap so i can use my horn and remove my srs light. I seen other resistor's but i assume that this squared one will work better for what you did here compare to just having it hang with just the small wires holding it. I called digikey its a 2 month wait for that resistor. Im looking for a similar one but having a hard time finding one.
04-04-2012, 04:23 AM
#13
Honda-Tech Member
Join Date: Mar 2008
Posts: 97
Likes: 0
Received 0 Likes
on
0 Posts
yeah they are sold out for a month, i like the way this resistor is built because of the way its installed. compared to the fry's resister. Does anyone know of a location where they sale a resister like the digikey?
 04-04-2012, 10:12 AM
#15

Great how to! most people don't even hook up the horn because they don't know how. Thanks to you more people will have their horn with their after market steering wheel. You explain it very simple. Nice Job!
Happy Tuning!
Happy Tuning!
04-04-2012, 11:43 AM
#16
Honda-Tech Member
Join Date: Jul 2007
Location: California
Posts: 479
Likes: 0
Received 0 Likes
on
0 Posts
04-04-2012, 05:15 PM
#17
Honda-Tech Member

Join Date: Mar 2012
Posts: 35
Likes: 0
Received 0 Likes
on
0 Posts
I was thinking why not just remove the bulb for the srs light??? or will this cause some sort of malfunction of something???????
04-05-2012, 12:02 AM
#18
Honda-Tech Member
Join Date: Jul 2007
Location: California
Posts: 479
Likes: 0
Received 0 Likes
on
0 Posts
Removing the srs bulb or not will prevent the passenger side airbag from deploying since the srs unit knows that the driver side airbag isn't there. With the resistor installed, it fools the system so light turns off, and whoever sits in your passenger seat will be safe because it will deploy when you get into a serious accident.
10-31-2012, 10:54 PM
#19
Honda-Tech Member

Join Date: Aug 2012
Location: Sunny SoCa
Posts: 23
Likes: 0
Received 0 Likes
on
0 Posts
Is there any way that i can use wire crimps instead of soldering? I have never done soldering and i dont plan on practicing with this project.
11-02-2012, 04:30 AM
#20
hey all, I shouldve updated this thread..
I switched out my rigged horn set up for this OEM horn Shoe. It will keep pressure on the back of the hub. I just screwed it down to the plastic.
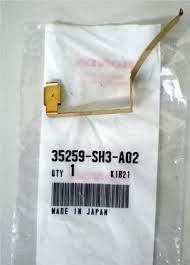
for the horn the way it should be done for longevity reasons is to install it like the pre srs cars do it with a shoe horn connector here is what it looks like
here is the part number 35259-SH3-A02 its $4 from honda
I switched out my rigged horn set up for this OEM horn Shoe. It will keep pressure on the back of the hub. I just screwed it down to the plastic.
for the horn the way it should be done for longevity reasons is to install it like the pre srs cars do it with a shoe horn connector here is what it looks like
here is the part number 35259-SH3-A02 its $4 from honda
 05-24-2013, 10:09 AM
#22
Honda-Tech Member
great write up. but i have a problem. i hooked up the resistor just like you should and the srs light was out for a week or two. and now its back. idk wat could have happened. any ideas?
