1st Gen CRV DIY Complete Color Change
 07-26-2010, 06:19 PM
#1
Honda-Tech Member
Thread Starter
Join Date: Jan 2004
Location: Further down the spiral, TX, usa
Posts: 10,629
Likes: 0
Received 1 Like
on
1 Post
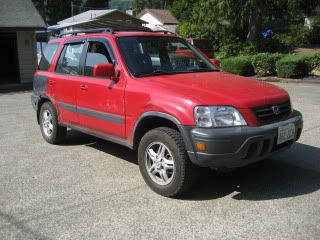
Hi all, a few months back I did a complete color change on our 99 CRV, and I thought I would share the pics of the process and such. This was all 100% done at home with a big compressor and mostly basic body tools.
Here's how the car started out:
The pics look good because it was just waxed, but the paint was actually pretty bad; scratches, egg damage (or something), dings, rock chips, etc etc.... It also needed a new rear bumper cover and a dent on the front fender fixed.
Here's how the car started out:
The pics look good because it was just waxed, but the paint was actually pretty bad; scratches, egg damage (or something), dings, rock chips, etc etc.... It also needed a new rear bumper cover and a dent on the front fender fixed.
 07-26-2010, 06:23 PM
#2
Honda-Tech Member
Thread Starter
Join Date: Jan 2004
Location: Further down the spiral, TX, usa
Posts: 10,629
Likes: 0
Received 1 Like
on
1 Post
The 1st step, and the most tedious, was doing the door jambs and other little stuff. Lots of taping, taping, and more taping followed by more taping and masking. Everything was removed so that no green will be showing anywhere...
07-26-2010, 06:25 PM
#3
Honda-Tech Member
Thread Starter
Join Date: Jan 2004
Location: Further down the spiral, TX, usa
Posts: 10,629
Likes: 0
Received 1 Like
on
1 Post
Same with the rear end; all parts removed, and everything green that could be seen from any angle was shot tan 
Ignore my riced out Prelude, it needs a paint job too, haha.
Ignore my riced out Prelude, it needs a paint job too, haha.
07-26-2010, 06:28 PM
#4
Honda-Tech Member
Thread Starter
Join Date: Jan 2004
Location: Further down the spiral, TX, usa
Posts: 10,629
Likes: 0
Received 1 Like
on
1 Post
Here's maybe the worst part, getting the texture off of all the plastic parts so that they can be primed and painted. By the end I had no fingerprints left at all.
Also repaired a crack in the $2 rear bumper with 3M Automix and wire mesh, but I didn't get any pics
Anyhow, here's all the parts sanded and hit with a good coat of surfacer:
Also repaired a crack in the $2 rear bumper with 3M Automix and wire mesh, but I didn't get any pics
Anyhow, here's all the parts sanded and hit with a good coat of surfacer:
07-26-2010, 06:33 PM
#5
Honda-Tech Member
Thread Starter
Join Date: Jan 2004
Location: Further down the spiral, TX, usa
Posts: 10,629
Likes: 0
Received 1 Like
on
1 Post
Shot a guide coat on the cured surfacer and wetsanded/block sanded until everything was smooth and ready for final paint. Also painted the door handles ahead of time and installed them ahead of time.
Don't mind the blue room, it is actually a lot darker in person....
Don't mind the blue room, it is actually a lot darker in person....
Trending Topics
07-26-2010, 06:41 PM
#8
Honda-Tech Member
Thread Starter
Join Date: Jan 2004
Location: Further down the spiral, TX, usa
Posts: 10,629
Likes: 0
Received 1 Like
on
1 Post
The 'trick' to this booth is the exhaust fan housing that sucks in cooled air from the house while filtering overspray.
Here is the car detaped and almost done....
Here is the car detaped and almost done....
07-26-2010, 06:45 PM
#9
Honda-Tech Member
Thread Starter
Join Date: Jan 2004
Location: Further down the spiral, TX, usa
Posts: 10,629
Likes: 0
Received 1 Like
on
1 Post
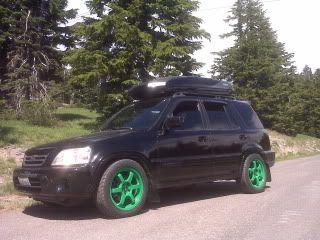
And finally, 99% put back together and looking good!
Hope everyone enjoyed the pics and any comments/flames/questions are welcome.
Hope everyone enjoyed the pics and any comments/flames/questions are welcome.
07-26-2010, 06:48 PM
#10
Honda-Tech Member
Thread Starter
Join Date: Jan 2004
Location: Further down the spiral, TX, usa
Posts: 10,629
Likes: 0
Received 1 Like
on
1 Post
Future plans for this car are getting these wheels painted the darker brown color and mounted, and OEM Honda roof rack, tint, rear sway bar, possible adjustable suspension, rear camber kit, and a JRSC
Oh, and the corner lights on back and reflectors up front are aftermarket clear units with a transparent mix of paint/clearcoat on them so they look tan, but actually do let light through. I did not just paint over them, haha.
Oh, and the corner lights on back and reflectors up front are aftermarket clear units with a transparent mix of paint/clearcoat on them so they look tan, but actually do let light through. I did not just paint over them, haha.
07-27-2010, 02:51 PM
#14
Honda-Tech Member
Thread Starter
Join Date: Jan 2004
Location: Further down the spiral, TX, usa
Posts: 10,629
Likes: 0
Received 1 Like
on
1 Post
Thanks guys
We can't wait to get more stuff going with it. I should have a sandblaster soon and those wheels will get blasted and painted....
If there is anyone interested in getting rid of an OEM roof rack let me know.
We can't wait to get more stuff going with it. I should have a sandblaster soon and those wheels will get blasted and painted....
If there is anyone interested in getting rid of an OEM roof rack let me know.
07-27-2010, 06:53 PM
#17
Honda-Tech Member
Wish you had a better camera to see more detail. Got any suggestions for cars that have multiple dings down the side, any advice? Also any advice to prevent orange peel or cure the problem of orange peel after paint?
07-27-2010, 07:27 PM
#18
Honda-Tech Member
Join Date: May 2008
Posts: 331
Likes: 0
Received 0 Likes
on
0 Posts
great job on that tedious work... i know u said ur getting new wheels/tires setup. here are the few things i don't like tho.
1. puny spare... remove and replace that pls.
2. not feeling the grille.. stick with the SE grille.
3. not feeling the blackout headlights... put the OEM headlights.
4. get a spoiler. LOL
1. puny spare... remove and replace that pls.
2. not feeling the grille.. stick with the SE grille.
3. not feeling the blackout headlights... put the OEM headlights.
4. get a spoiler. LOL
07-28-2010, 02:42 PM
#19
Honda-Tech Member
Thread Starter
Join Date: Jan 2004
Location: Further down the spiral, TX, usa
Posts: 10,629
Likes: 0
Received 1 Like
on
1 Post
Otherwise, they can be filled with body filler and sanded smooth, but that's really a bad way to do it.
No orange peel is all about GUN SETTINGS and to some degree GUN CONTROL. It takes practice to get the right mix of air/paint for minimal orange peel, but once you do it is soooo worth it. You want the max amount of air you can use without creating dry spray on the piece (which is where the paint starts to dry before it hits the surface and builds up like sponge or sandpaper). Too much paint in the ratio and you will get orange peel and possibly runs and thick spots. Hard to explain properly, but the main thing is practice
If you have peel after the paint dries, it can be sanded smooth and buffed out as long as the top layer is not a metallic, candy, or anything else like that. That is why I like solid colors and single stage paint, because you can just put on a bunch of coats and if anything ever happens it can be cut and buffed rather easily.
07-28-2010, 02:46 PM
#20
Honda-Tech Member
Thread Starter
Join Date: Jan 2004
Location: Further down the spiral, TX, usa
Posts: 10,629
Likes: 0
Received 1 Like
on
1 Post
great job on that tedious work... i know u said ur getting new wheels/tires setup. here are the few things i don't like tho.
1. puny spare... remove and replace that pls.
2. not feeling the grille.. stick with the SE grille.
3. not feeling the blackout headlights... put the OEM headlights.
4. get a spoiler. LOL
1. puny spare... remove and replace that pls.
2. not feeling the grille.. stick with the SE grille.
3. not feeling the blackout headlights... put the OEM headlights.
4. get a spoiler. LOL
-The spare is much lighter than the OEM spare and does its job. It is from an Evo VIII, haha.
-Your opinion differs greatly from mine and my wife's.
-Those are the OEM headlights
Chrome is not my thing anyhow.-LOL, I haven't had a need for more downforce in my daily commute. A roof rack will be nice though....