
Write-Up: DIY Front Wheel Bearing Replacement
 11-22-2009, 04:19 PM
#1
DO IT ON ALL FOURS
Thread Starter
*** UPDATED 09/06/2015 ***
!!! PLEASE READ THE ENTIRE PROCESS BEFORE YOU BEGIN OR YOU WILL BE SORRY !!!
The purpose of this write-up is to make Front Wheel Bearings relatively simple to change out with the basic tools one might have at home. To keep it slow connection & phone compatible I will try to limit the amount of pictures showing multiple angles. Keep in mind that some parts to make the tool may have to be purchased; once you have them though you will never have to purchase them again. My local shop charges around $30 ~ $40 a bearing to be pressed out (had to call them and ask them). You can probably purchase everything to do this (tool wise) for around $20.
I am not going to list part numbers or prices for anything because everything costs different amounts in different areas. All TEXT captions for the pictures will be ABOVE the picture as it should be in a write-up.
I am making this to HELP you help YOURSELF. I am not responsible if you do not do it right or have problems doing it. If you break things then it is your own tough luck, it is not my fault. The way I am showing you, I did it myself to be SURE that it does and will work. Sorry for the crappy cell phone pictures.
Well here we go…
The first step is to pull the spindle completely out of the car and take off everything for the brakes (caliper bracket and rotor). I am sorry but if you cannot do this, then I do believe replacing a wheel bearing is too much for you. If you want to replace wheel studs then you should do it at this time as well.
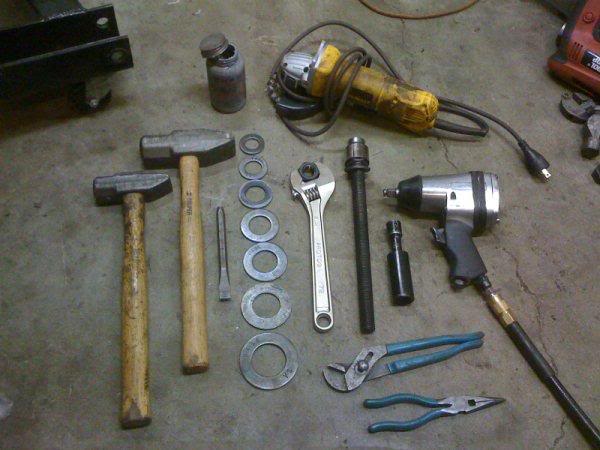
So, with that out of the way you will need to gather your tools. I will get into specifics and reasoning as we go along.
1.) 3 LB and 6 LB hammer (at least a 3 LB and something big to hit the bearing out)
2.) 12” Adjustable Wrench or correct Combination Wrench (Depending on what size bolt you use of course)
3.) Chisel w/ Hammer
4.) Socket or Metal sized correctly to hammer out Hub
5.) Socket or Metal sized correctly to hammer out Bearing (if you don’t have a 6 LB)
6.) Channel Lock Pliers
7.) Needle Nose Pliers
8.) �” Impact with correct socket for the bolt you are using
9.) 4” Angle Grinder (or a die grinder, Dremel, or something to cut metal with!!!)
10.) Anti-Seize (it is your friend)
11.) Assortment of washers/steel plate sized correctly
12.) Some blocks of wood to support the spindle (preferably some 4”x4”s)
13.) Some type of Bolt or Threaded Round Stock to use as the compression device. A 6” piece/ bolt will do. (This should preferably be 7/8”. You could use 1” or you could use �” or even smaller if need be. I say 7/8” because the washer fits perfectly in the front side of the Hub.)
14.) If you are not good with a cutoff tool then a file or at least some emery cloth.
If you go the stackable washer way they you will need two of each of the following: 7/8”, 1-1/4”, 1-3/4”… and only one 1” washer.
If you go the metal plate way, you will need a 3” round piece, 2-3/4” round piece, 2” round piece, and a 1-3/4” round piece. (You might be better off just getting the washers…)
This should all be able to be found at your local home building store or even a hardware store.
To skip #11 and #13 in the tools list there is a special tool kit specifically designed for this. It is somewhat pricey, but it works none the less. You can purchase it from Harbor Freight at the following link...
http://www.harborfreight.com/fwd-fro...html?hftref=cj
IF you bought that tool then look here:
https://honda-tech.com/honda-civic-d...829-a-2984426/[/
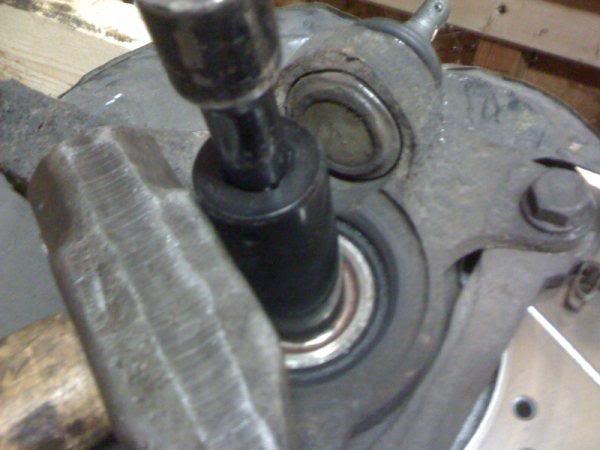
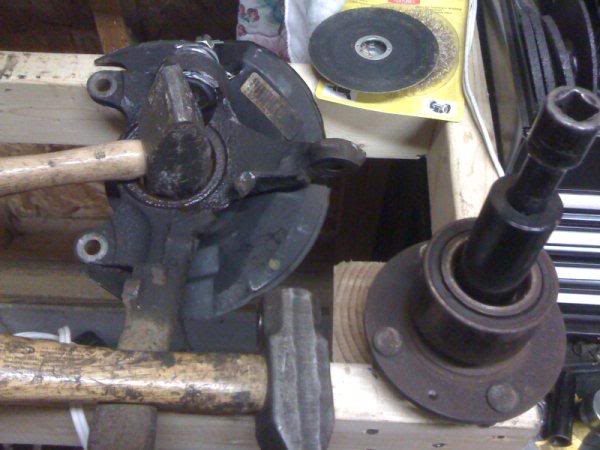
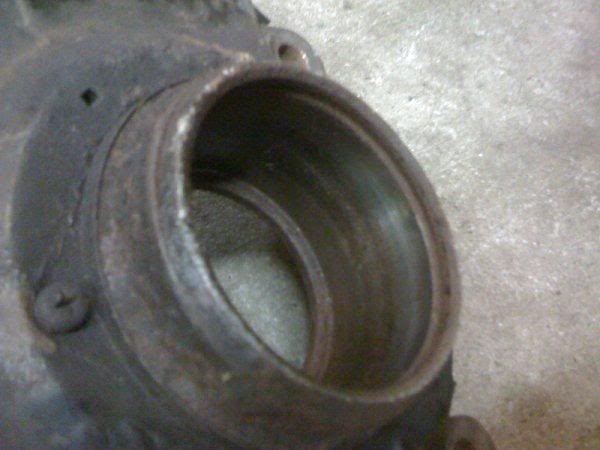
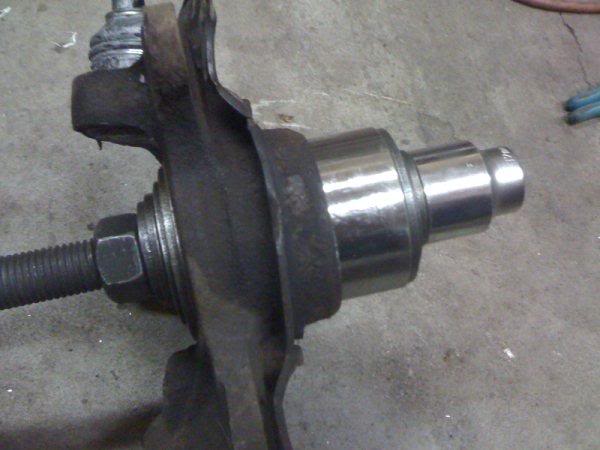
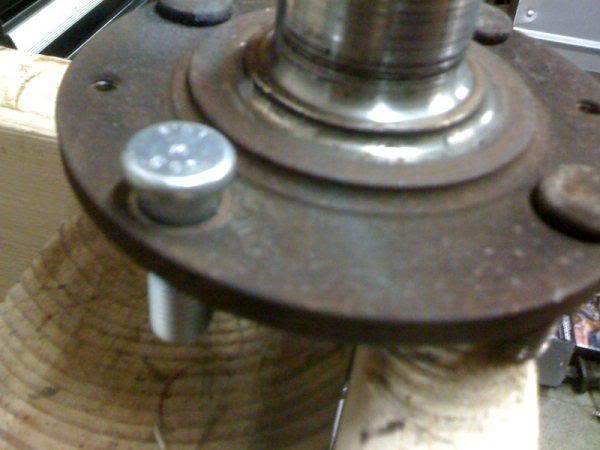
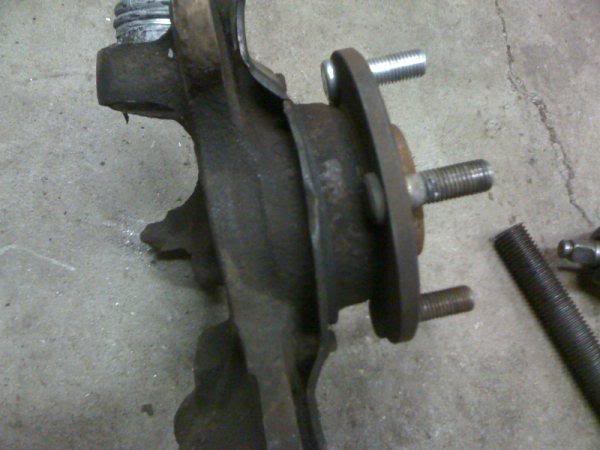
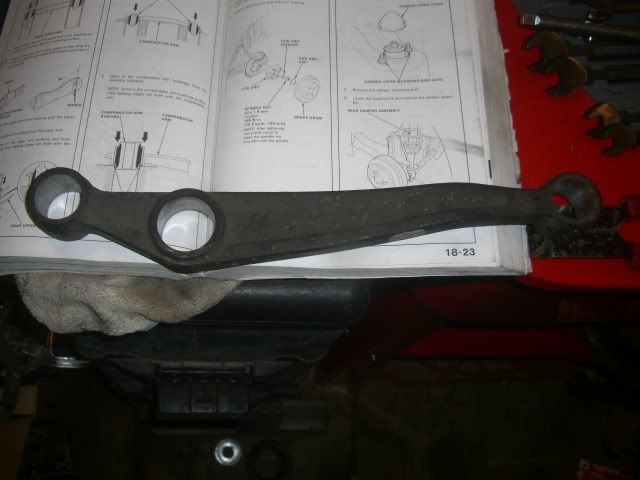
Step 1.) Set up your spindle in a fashion you can pound out the Hub. As you see in the picture below the Hub is defined by a red/brown ring of rust. The rest of it is the bearing then the spindle. The picture is of the back side of the spindle.

Step 2.) Set up your socket how it is in the picture below and get your 3 LB hammer ready (or whatever you are going to use that is about 1-3/8” Outer Diameter). Pound out the Hub (don’t worry part of the wheel bearing inner race will come with it).
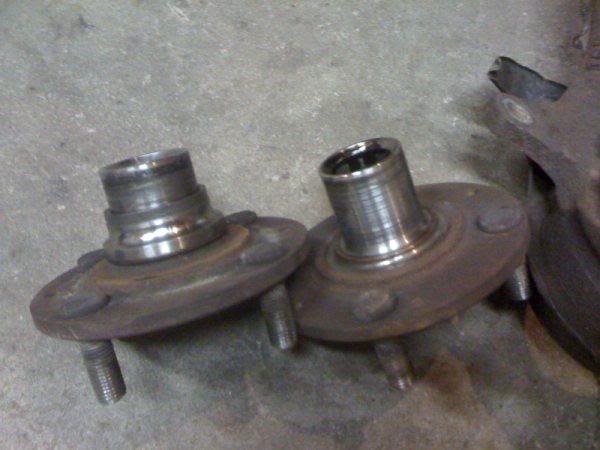
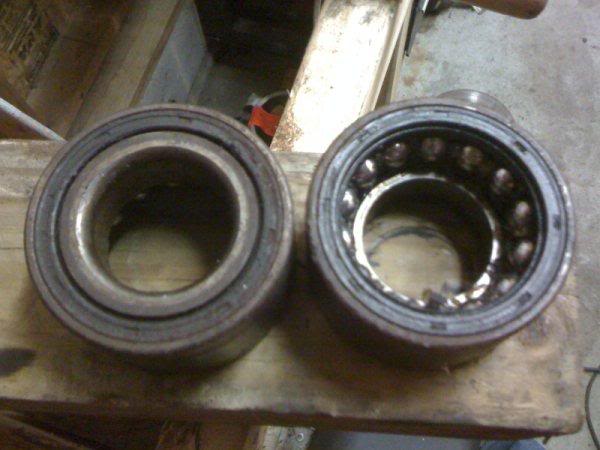
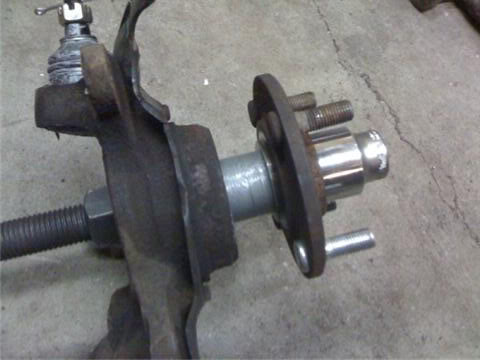
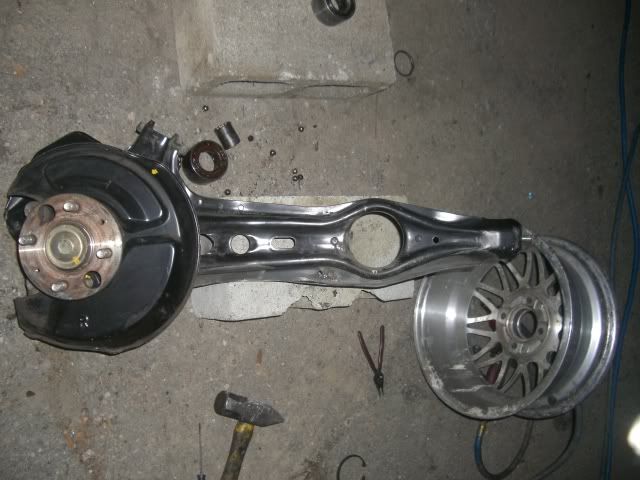
Step 3.) After you have hammered out the Hub you should have half of the inner wheel bearing race stuck on it if you are unlucky. The next object is to get the Hub on the left to look like the one on the right in the picture below.
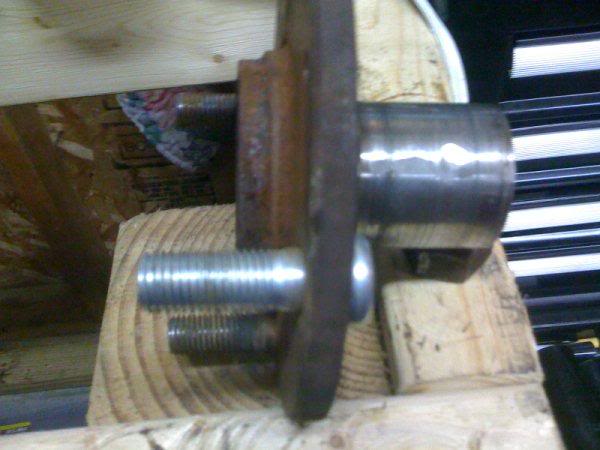
Step 4.) Now to remove the inner race from the Hub without special tools is a delicate task. You could use a bearing puller and a gear puller or a press but those are all special tools most don’t have. Take your grinder cut 3 roughly evenly spaced grooves. These do not need to be very deep, maybe around 1/8” or a touch more. If you nick a little bit of the Hub shaft by going too far, don’t worry. Just don’t gouge it severely. Use the chisel to break it through the rest of the way. Put the end of your chisel into your score and give it a quick and hard smack with the hammer. It should break cleanly like in the picture below. Repeat this for the other scores as needed until you can remove the race completely. Be sure to take a file or some emery cloth if you nick up the surface. You don’t want the bearing “hanging up or sticking” on an imperfection.
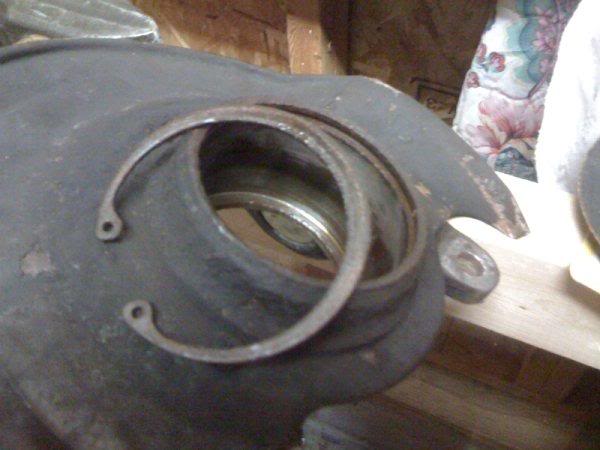
Step 5.) There is an internal snap ring on the front side of the wheel bearing you have to remove. This can be done with a pair of needle nose pliers (if you have a snap ring tool then great, use that instead). I like to take a hammer and screwdriver to sort of “pop” the ring out of its rusted seat; then use the pliers to easily pull it out. (Sorry, I forgot to snap a picture BEFORE I took it out so I had to take one after I put the new one in.)

Step 6.) Now is time to pound out the wheel bearing. I like to spray it down with some PB Blaster or WD-40 on both sides before I start. You don’t have to, but can if you have the stuff. I like using the 6 LB hammer sitting on the wheel bearing and hitting it with the 3 LB. You can use a socket if you like but it has to be about 2-1/4” OD to work right.
Step 7.) Now wipe out the spindle and the shaft of the Hub. You don’t have to use Anti-Seize if you don’t want to but you will want to use some type of lubricant like oil. I am in love with anti-seize and use it on everything possible. I hate trying to fight stuff if I ever have to pull it back apart. Anti-seize the Hub shaft and the inside of the spindle where the bearing sits liberally.
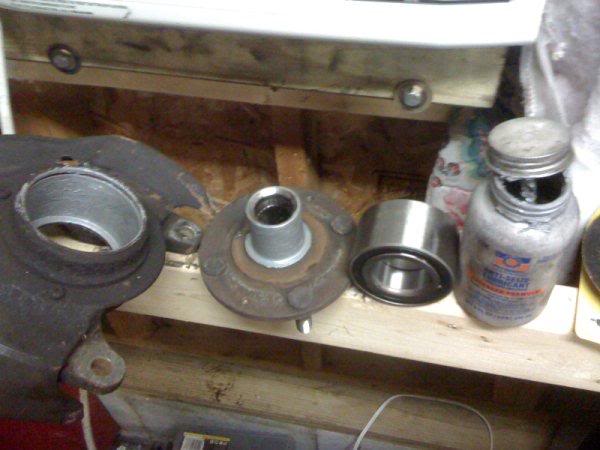
Step 8 - A.) Now for the good stuff... If you take your new wheel bearing (if you haven’t figured it out yet) the outside race is one piece and the inside race is two pieces. This poses a problem when you are putting in the Hub, but we will get to that later as it is easily overcame.
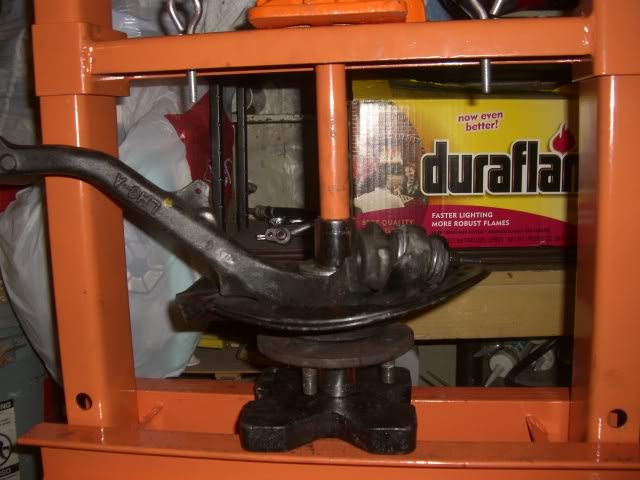
If you put the wheel bearing into the hole you will notice it goes in a little bit, around 1/4” to 3/8”. This will help you get it aligned correctly. Now when I talked about earlier it all depends on what type of setup you use… this is where that all kicks in. I used 7/8” Threaded Stock. The 7/8” washer fits perfectly in the front side for pressing the Hub in. See back to the top if you are confused on what you should use. (Arrange your washers/ plates accordingly to get the desired effect.) You need the 3” diameter piece to go on the backside of the spindle and rest on the edge. On the front side you will need the 2-3/4” diameter to go on the bearing and be sure to center the washer so it does not hang up on the spindle edge while the bearing is being pressed in.
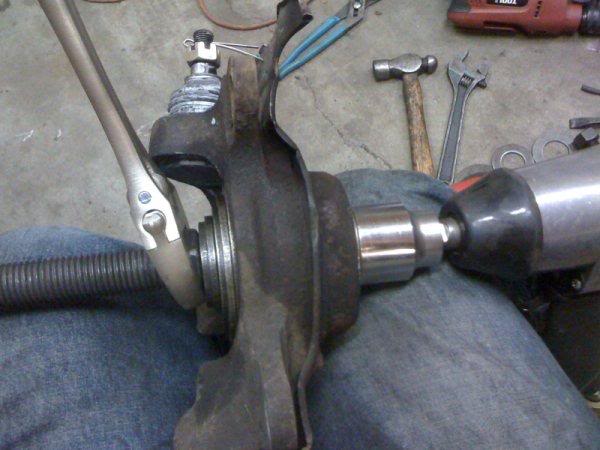
Step 8 – B.) Now get your �” impact ready (you don’t technically need one but you will be one tired Mother EF’er when you are done if you don’t have one). Use your combination or adjustable on the other side as shown in the picture and press her in until the socket stops turning. Be sure to install your internal snap ring for the bearing. It never hurts to install a new one; depending on the condition of your old one you can reuse it.
Step 9.) --Optional Step-- Now is a good time to replace your wheel studs if you have the funds. It is practically impossible to do it after the Hub is installed in the knuckle. All you need to do is hammer them out and press the new ones in with a lug nut and some washers.


Step 10.) Take out your bolt setup and get ready for the next piece, the Hub. Doing the same with arranging the washers/plates to get the desired effect; you will need 2” to go on the backside of the bearing (keeping the inner race from falling out) and a 1-3/4” to go in the “cup” of the front of the Hub. Some say you can use the axle to do this but I looked at it and there is practically NO WAY to do it with the axle… Now take the Hub and line it up, put your assembly together and push her in like the wheel bearing. You will go until it stops.
Step 11.) Pat yourself on the back because you just did your own wheel bearing!!!

*** FOR ABS PEOPLE, PLEASE WATCH THE FOLLOWING VIDEO. ***
This will tell you which direction to put the bearing in:
If you have any questions I will try and answer them and update this write-up as needed.
*** UPDATED 09/06/2015 ***
!!! PLEASE READ THE ENTIRE PROCESS BEFORE YOU BEGIN OR YOU WILL BE SORRY !!!
The purpose of this write-up is to make Front Wheel Bearings relatively simple to change out with the basic tools one might have at home. To keep it slow connection & phone compatible I will try to limit the amount of pictures showing multiple angles. Keep in mind that some parts to make the tool may have to be purchased; once you have them though you will never have to purchase them again. My local shop charges around $30 ~ $40 a bearing to be pressed out (had to call them and ask them). You can probably purchase everything to do this (tool wise) for around $20.
I am not going to list part numbers or prices for anything because everything costs different amounts in different areas. All TEXT captions for the pictures will be ABOVE the picture as it should be in a write-up.
I am making this to HELP you help YOURSELF. I am not responsible if you do not do it right or have problems doing it. If you break things then it is your own tough luck, it is not my fault. The way I am showing you, I did it myself to be SURE that it does and will work. Sorry for the crappy cell phone pictures.
Well here we go…
The first step is to pull the spindle completely out of the car and take off everything for the brakes (caliper bracket and rotor). I am sorry but if you cannot do this, then I do believe replacing a wheel bearing is too much for you. If you want to replace wheel studs then you should do it at this time as well.
So, with that out of the way you will need to gather your tools. I will get into specifics and reasoning as we go along.
1.) 3 LB and 6 LB hammer (at least a 3 LB and something big to hit the bearing out)
2.) 12” Adjustable Wrench or correct Combination Wrench (Depending on what size bolt you use of course)
3.) Chisel w/ Hammer
4.) Socket or Metal sized correctly to hammer out Hub
5.) Socket or Metal sized correctly to hammer out Bearing (if you don’t have a 6 LB)
6.) Channel Lock Pliers
7.) Needle Nose Pliers
8.) �” Impact with correct socket for the bolt you are using
9.) 4” Angle Grinder (or a die grinder, Dremel, or something to cut metal with!!!)
10.) Anti-Seize (it is your friend)
11.) Assortment of washers/steel plate sized correctly
12.) Some blocks of wood to support the spindle (preferably some 4”x4”s)
13.) Some type of Bolt or Threaded Round Stock to use as the compression device. A 6” piece/ bolt will do. (This should preferably be 7/8”. You could use 1” or you could use �” or even smaller if need be. I say 7/8” because the washer fits perfectly in the front side of the Hub.)
14.) If you are not good with a cutoff tool then a file or at least some emery cloth.
If you go the stackable washer way they you will need two of each of the following: 7/8”, 1-1/4”, 1-3/4”… and only one 1” washer.
If you go the metal plate way, you will need a 3” round piece, 2-3/4” round piece, 2” round piece, and a 1-3/4” round piece. (You might be better off just getting the washers…)
This should all be able to be found at your local home building store or even a hardware store.
To skip #11 and #13 in the tools list there is a special tool kit specifically designed for this. It is somewhat pricey, but it works none the less. You can purchase it from Harbor Freight at the following link...
http://www.harborfreight.com/fwd-fro...html?hftref=cj
IF you bought that tool then look here:
https://honda-tech.com/honda-civic-d...829-a-2984426/[/
Step 1.) Set up your spindle in a fashion you can pound out the Hub. As you see in the picture below the Hub is defined by a red/brown ring of rust. The rest of it is the bearing then the spindle. The picture is of the back side of the spindle.
Step 2.) Set up your socket how it is in the picture below and get your 3 LB hammer ready (or whatever you are going to use that is about 1-3/8” Outer Diameter). Pound out the Hub (don’t worry part of the wheel bearing inner race will come with it).
Step 3.) After you have hammered out the Hub you should have half of the inner wheel bearing race stuck on it if you are unlucky. The next object is to get the Hub on the left to look like the one on the right in the picture below.
Step 4.) Now to remove the inner race from the Hub without special tools is a delicate task. You could use a bearing puller and a gear puller or a press but those are all special tools most don’t have. Take your grinder cut 3 roughly evenly spaced grooves. These do not need to be very deep, maybe around 1/8” or a touch more. If you nick a little bit of the Hub shaft by going too far, don’t worry. Just don’t gouge it severely. Use the chisel to break it through the rest of the way. Put the end of your chisel into your score and give it a quick and hard smack with the hammer. It should break cleanly like in the picture below. Repeat this for the other scores as needed until you can remove the race completely. Be sure to take a file or some emery cloth if you nick up the surface. You don’t want the bearing “hanging up or sticking” on an imperfection.
Step 5.) There is an internal snap ring on the front side of the wheel bearing you have to remove. This can be done with a pair of needle nose pliers (if you have a snap ring tool then great, use that instead). I like to take a hammer and screwdriver to sort of “pop” the ring out of its rusted seat; then use the pliers to easily pull it out. (Sorry, I forgot to snap a picture BEFORE I took it out so I had to take one after I put the new one in.)
Step 6.) Now is time to pound out the wheel bearing. I like to spray it down with some PB Blaster or WD-40 on both sides before I start. You don’t have to, but can if you have the stuff. I like using the 6 LB hammer sitting on the wheel bearing and hitting it with the 3 LB. You can use a socket if you like but it has to be about 2-1/4” OD to work right.
Step 7.) Now wipe out the spindle and the shaft of the Hub. You don’t have to use Anti-Seize if you don’t want to but you will want to use some type of lubricant like oil. I am in love with anti-seize and use it on everything possible. I hate trying to fight stuff if I ever have to pull it back apart. Anti-seize the Hub shaft and the inside of the spindle where the bearing sits liberally.
Step 8 - A.) Now for the good stuff... If you take your new wheel bearing (if you haven’t figured it out yet) the outside race is one piece and the inside race is two pieces. This poses a problem when you are putting in the Hub, but we will get to that later as it is easily overcame.
If you put the wheel bearing into the hole you will notice it goes in a little bit, around 1/4” to 3/8”. This will help you get it aligned correctly. Now when I talked about earlier it all depends on what type of setup you use… this is where that all kicks in. I used 7/8” Threaded Stock. The 7/8” washer fits perfectly in the front side for pressing the Hub in. See back to the top if you are confused on what you should use. (Arrange your washers/ plates accordingly to get the desired effect.) You need the 3” diameter piece to go on the backside of the spindle and rest on the edge. On the front side you will need the 2-3/4” diameter to go on the bearing and be sure to center the washer so it does not hang up on the spindle edge while the bearing is being pressed in.
Step 8 – B.) Now get your �” impact ready (you don’t technically need one but you will be one tired Mother EF’er when you are done if you don’t have one). Use your combination or adjustable on the other side as shown in the picture and press her in until the socket stops turning. Be sure to install your internal snap ring for the bearing. It never hurts to install a new one; depending on the condition of your old one you can reuse it.
Step 9.) --Optional Step-- Now is a good time to replace your wheel studs if you have the funds. It is practically impossible to do it after the Hub is installed in the knuckle. All you need to do is hammer them out and press the new ones in with a lug nut and some washers.
Step 10.) Take out your bolt setup and get ready for the next piece, the Hub. Doing the same with arranging the washers/plates to get the desired effect; you will need 2” to go on the backside of the bearing (keeping the inner race from falling out) and a 1-3/4” to go in the “cup” of the front of the Hub. Some say you can use the axle to do this but I looked at it and there is practically NO WAY to do it with the axle… Now take the Hub and line it up, put your assembly together and push her in like the wheel bearing. You will go until it stops.
Step 11.) Pat yourself on the back because you just did your own wheel bearing!!!
*** FOR ABS PEOPLE, PLEASE WATCH THE FOLLOWING VIDEO. ***
This will tell you which direction to put the bearing in:
If you have any questions I will try and answer them and update this write-up as needed.
*** UPDATED 09/06/2015 ***
Last edited by OneBadTurboCRV; 09-06-2015 at 04:58 PM. Reason: Updated

The following users liked this post:
11-22-2009, 04:34 PM
#3
DO IT ON ALL FOURS
Thread Starter
 11-22-2009, 09:27 PM
#5
Honda-Tech Member
Join Date: Jul 2007
Location: Des Moines, IA
Posts: 290
Likes: 0
Received 0 Likes
on
0 Posts
holy **** man, thanks i been looking around for a diy for this! i changed bearing on my accord but EF are little diff, mine is toasted, lol mad props man! is it bad if i just hammer the bearing in? with the old bearing on top of course?
11-22-2009, 10:25 PM
#7
crazy mad murdock
Join Date: Jul 2002
Location: portland, or
Posts: 1,215
Likes: 0
Received 0 Likes
on
0 Posts
simpler write up:
Take off knuckle
take to shop
pay 20$ to put new bearings in
return knuckle
Wicked write up for people that do everything =D
Take off knuckle
take to shop
pay 20$ to put new bearings in
return knuckle
Wicked write up for people that do everything =D
Trending Topics
11-23-2009, 01:05 AM
#8
Junior Member
Join Date: Mar 2006
Location: Evansville, In
Posts: 75
Likes: 0
Received 0 Likes
on
0 Posts
Nice write up. The shop here charges 60 buck to press one bearing. **** that. I learned my lesson. I can take out and put bearing in 30 minutes. That money can go to other thing that I cannot make.
11-23-2009, 07:40 PM
#12
Honda-Tech Member
Join Date: Dec 2005
Location: wally world next three exits
Posts: 347
Likes: 0
Received 0 Likes
on
0 Posts
Great write up.
The shop here locally that did my machine work closed. They charged me like $25 each to press em out. Now the only other place within 30 miles of here charged me like $55 or $60 each.
I will use this next time for sure. Thanks !
The shop here locally that did my machine work closed. They charged me like $25 each to press em out. Now the only other place within 30 miles of here charged me like $55 or $60 each.
I will use this next time for sure. Thanks !
11-23-2009, 09:03 PM
#13
Honda-Tech Member
THANK YOU!!! thanks to you, i will now be able to finally replace all parts on my ex knuckles before i swap them. thanks a bunch!
11-24-2009, 07:27 AM
#14
Honda-Tech Member
Join Date: May 2006
Location: 954, FL
Posts: 1,327
Likes: 0
Received 0 Likes
on
0 Posts
ill be using this write up to replace both of mine. the only shop here with a freakin press is goodyear, and they charge an arm and a leg.
would you think about doing a rear trailing arm bushing write up?
would you think about doing a rear trailing arm bushing write up?
11-24-2009, 10:47 AM
#15
Honda-Tech Member
Join Date: Jan 2006
Location: Mililani, Hawaii, USA
Posts: 251
Likes: 0
Received 0 Likes
on
0 Posts
That is practically the same way I did mine a few months ago. The only slight differences was that I cut notches into the inner race so that I could pull it off with a gear puller and I used an old outer end of a front axle to pull the new bearing on.
11-26-2009, 06:02 PM
#16
Honda-Tech Member
Used this method earlier, and did it without air tools and wasnt hard at all. (I have air tools but was too lazy to cut the threaded rod to the right size).
Cant thank you enough for sharing this.
Cant thank you enough for sharing this.
12-01-2009, 07:34 PM
#17
DO IT ON ALL FOURS
Thread Starter
Maybe yes, if I ever have to do them again. Those are something that I don't do even 1/4 as much as wheel bearings, LOL!
To all that appreciated this write-up, you are welcome. I have TONS of tools that could have made this job easier; but for Honda-Tech I did it the hard way to show those that don't have unlimited tools, how to do it.
12-01-2009, 07:38 PM
#18
DO IT ON ALL FOURS
Thread Starter
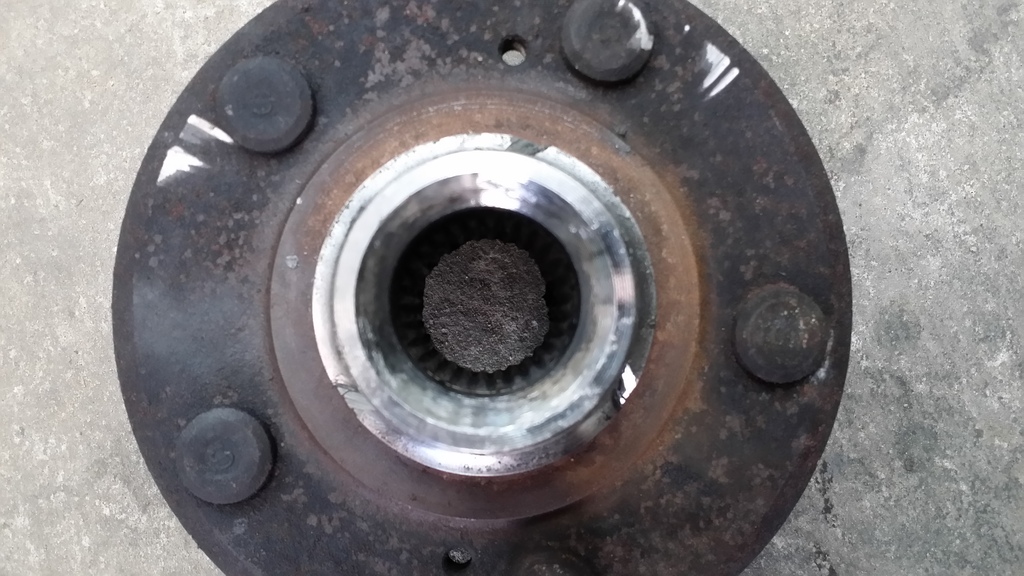
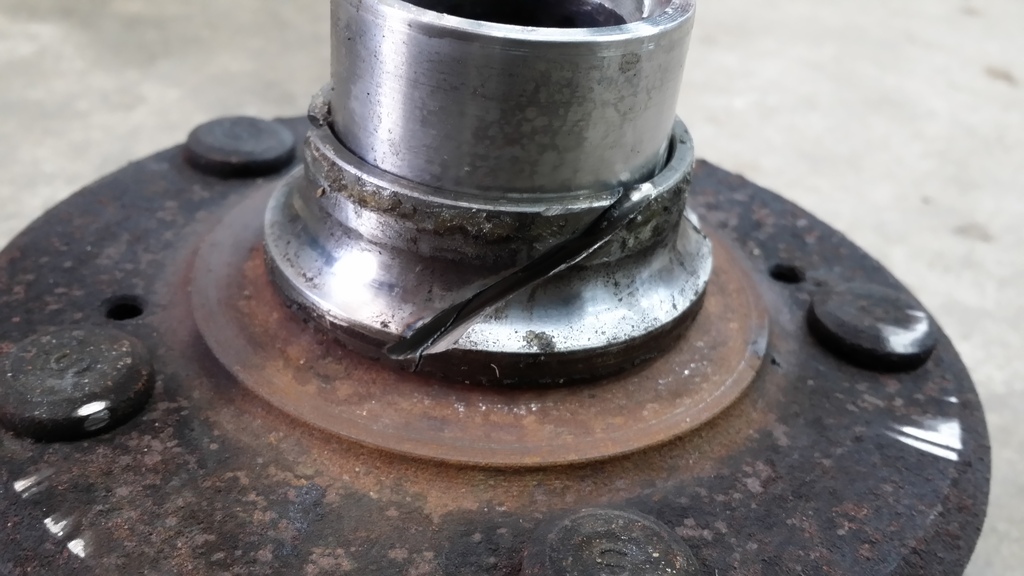
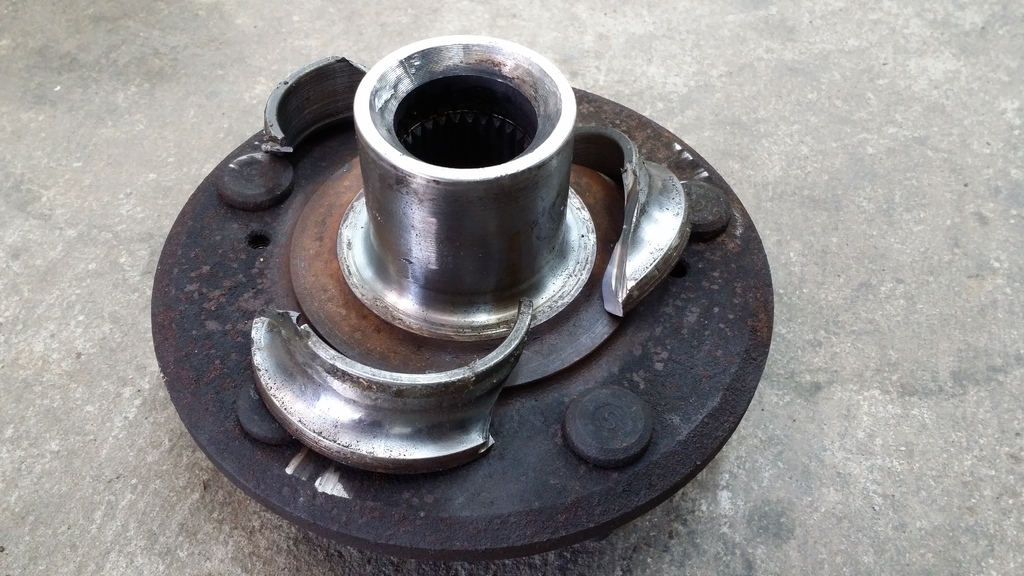
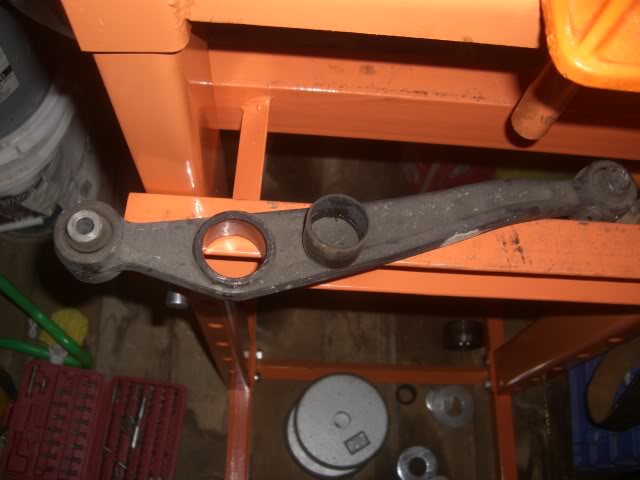
I prefer to use the Air-ARC method. It is much faster and easier. Best of all I am very good with it (as I do it all the time at work) so I don't even touch the hub when removing the inner race. For those who do not know what it is: basically it is reverse welding, utilizing air to blow away the metal that gets heated up. Here are some pictures below to give you an idea.
12-11-2009, 11:52 AM
#19
Honda-Tech Member
iTrader: (2)
Join Date: Nov 2007
Location: Pasadena, CA, USA
Posts: 7,217
Likes: 0
Received 0 Likes
on
0 Posts
YEA..... I tried, and said **** that, bearing puller FTW so as not to grind off any material by accident on the hub. AND I'm just going to wait until I buy my hydraulic press. Make my life MUCH easier! lolz
12-21-2009, 05:12 PM
#20
Honda-Tech Member
iTrader: (2)
Join Date: Nov 2007
Location: Pasadena, CA, USA
Posts: 7,217
Likes: 0
Received 0 Likes
on
0 Posts
HAH even WITH a bearing puller it's a joke! WOW those things are a real PITA to remove even with heat and WD40! lolz, dunno how you got them off without frustration!  Gonna get my press after XMAS so I can start doing these babies myself!
Gonna get my press after XMAS so I can start doing these babies myself!
12-21-2009, 05:50 PM
#21
a tip is to freeze the new bearings in a ziploc bag and install them frozen. the metal contracts slightly when frozen and they go in easier
12-22-2009, 11:31 AM
#22
New User

Join Date: Dec 2009
Posts: 1
Likes: 0
Received 0 Likes
on
0 Posts
No need to get all crazy with grinders and torches and home made plasma cutters. The inner race is hardened so all you need to do is use a Dremmel or similar and cut a small groove along the race that does not go all the way through. Take a cold chisel and smack it with a hammer once or twice and it should crack. Then just slide it off. Best of all no risk of harming the surface the new bearing goes on.
12-29-2009, 08:03 PM
#23
Honda-Tech Member
iTrader: (2)
Join Date: Nov 2007
Location: Pasadena, CA, USA
Posts: 7,217
Likes: 0
Received 0 Likes
on
0 Posts
This makes life SOOOO much easier! I use it to remove the bearing races too! No damage done!
o0o and do this...
and this too...
No damage done!o0o and do this...
and this too...
 12-31-2009, 01:10 PM
#25
DO IT ON ALL FOURS
Thread Starter
No need to get all crazy with grinders and torches and home made plasma cutters. The inner race is hardened so all you need to do is use a Dremmel or similar and cut a small groove along the race that does not go all the way through. Take a cold chisel and smack it with a hammer once or twice and it should crack. Then just slide it off. Best of all no risk of harming the surface the new bearing goes on.
One thing I don't get is your comment about homemade plasma cutter? I do have a plasma cutter but in the pictures above I used an Air Arc. Some people know them as a Ready Arc, but that is just a brand name. Air Arcing is essentially reverse welding utilizing carbon rod, air, and electricity. A plasma cutter would be practically impossible to use in this scenario. You would surely damage the hub while trying to get the race off.
I have a press and bearing puller setup as well. It takes way more time to do it that way than it does to get out the good old Air Arc. I have more tools then I know what to do with actually... LOL...