
RHD conversion how-to. The method that keeps the stock v.i.n. and windshield
 08-26-2009, 08:25 PM
#1
Honda-Tech Member
Thread Starter
Hi everybody. I just thought I would share with you all my rhd conversion on my 1988 honda crx. I did not do it the conventional way of drilling out 1,000 spot welds. Some may say I did it the "lazy way" or this isn't the right way to do it but It is much easier than drilling and I'm confident that it can be done in one week or less. Anyway enough talk here we go. OH and sorry for the cell phone pics, but i figured it would still make plenty of sense.
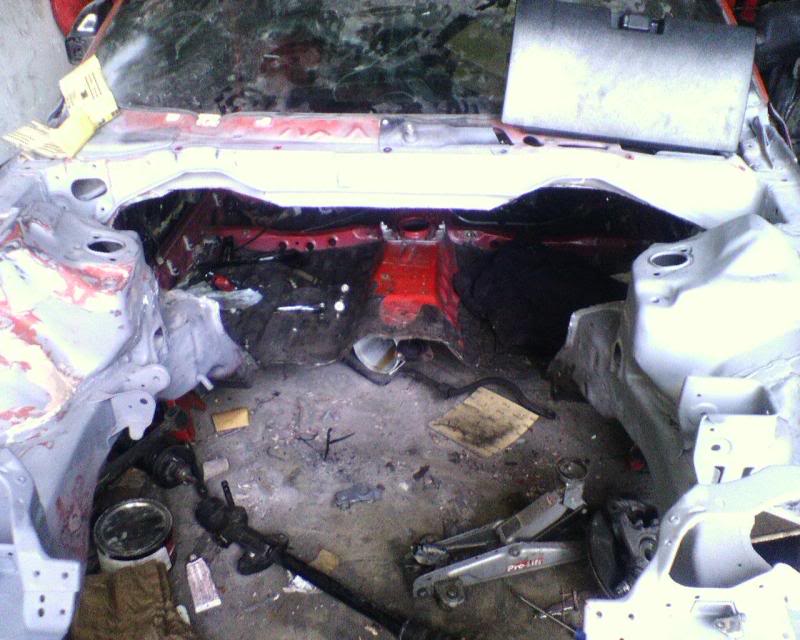
First of all, strip your car down to the bare shell(well, make sure everything from the front seats up is gone). Yes even the motor has to go. Good news though, you don't have to remove your windshield using this method AND your factory usdm vin on the firewall will remain intact and untouched. Bad news is, you will have to keep your lhd usdm windshield wipers. The difference is they sweep the wrong way. I didn't mind because it honestly wouldnt make that big of a difference and i dont drive my car in the rain anyway.
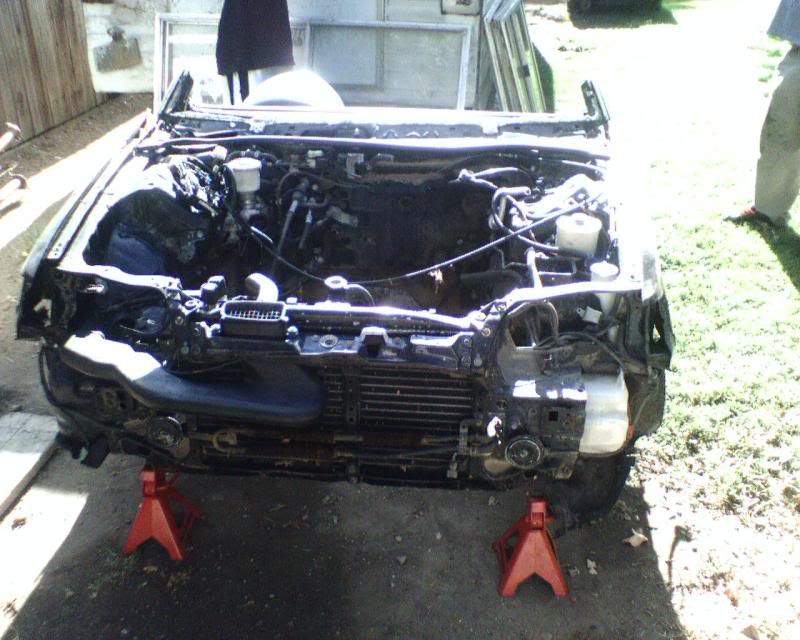
your car should look like this when you're starting. The front end can stay but i just removed mine because i was shaving and primering the engine bay.
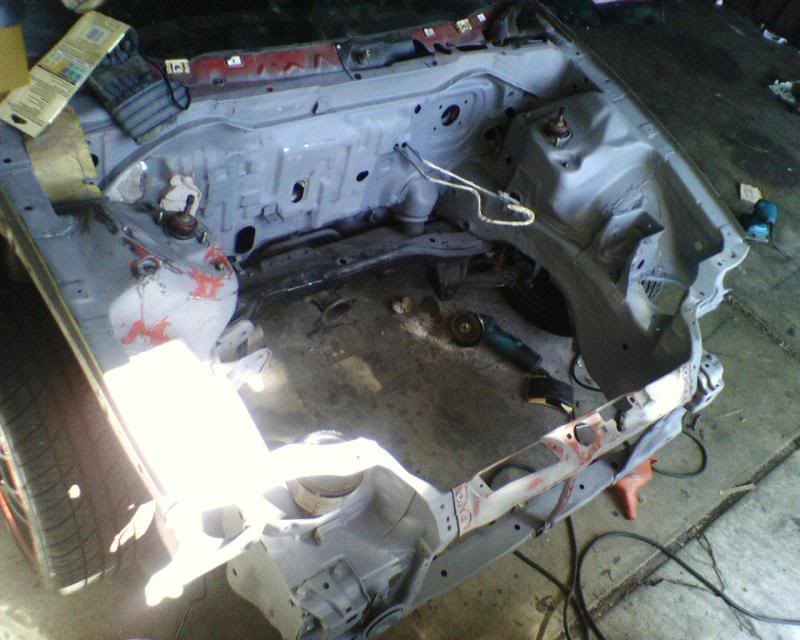
make sure to remove your old lhd steering rack as well. I removed mine after I snapped this picture.
***This method involves very little drilling and the integrity of the chassis is unchanged.***
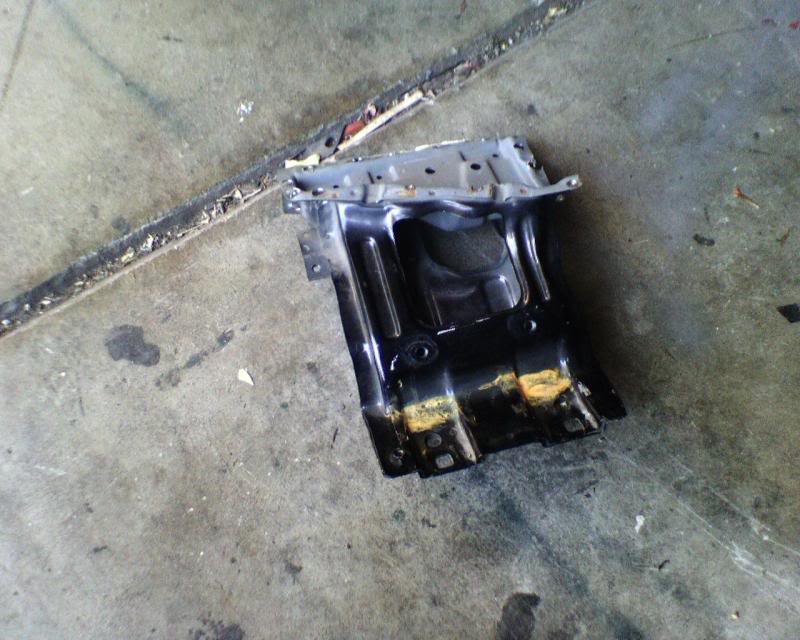
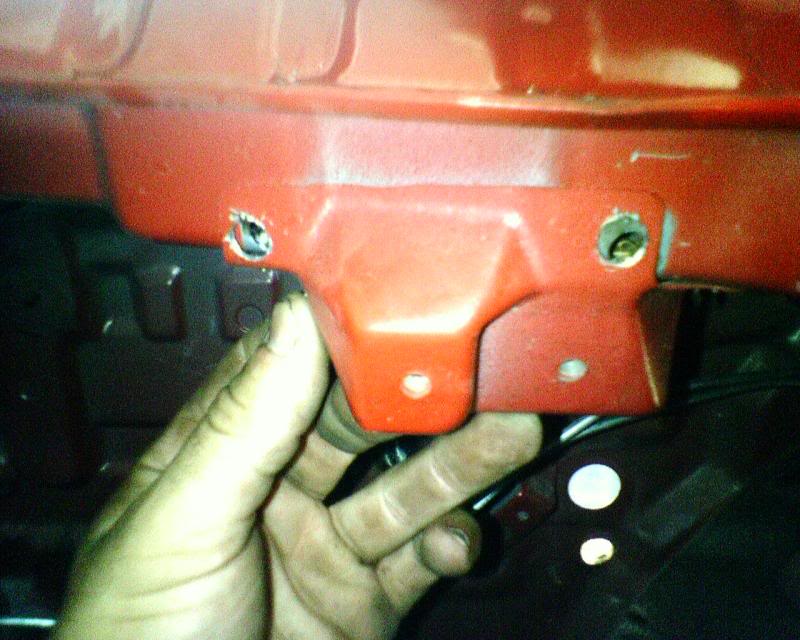
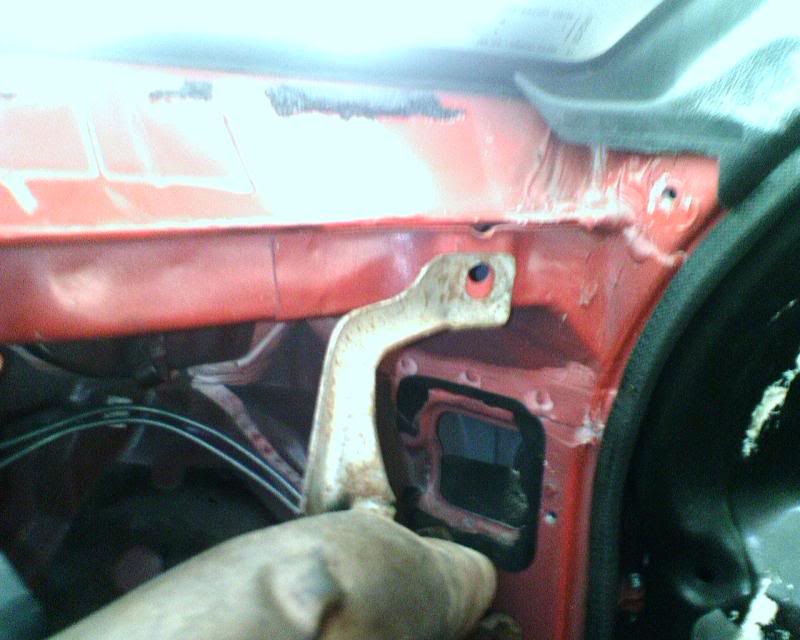
the first thing I did was remove the steering column support bracket from the rhd clip. In this pic i am holding it. this is what the steering column and part of the pedals bolt onto. You remove it by drilling the spot welds out.
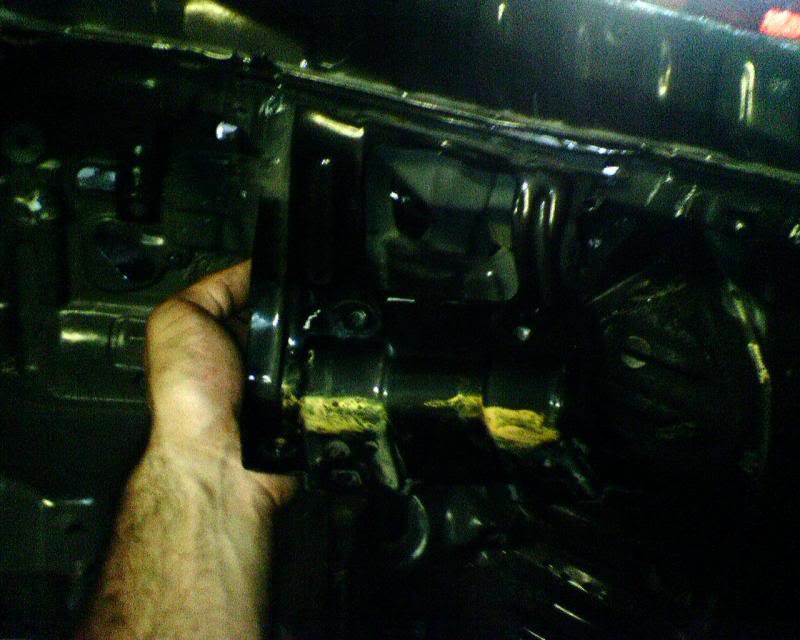
Here it is removed
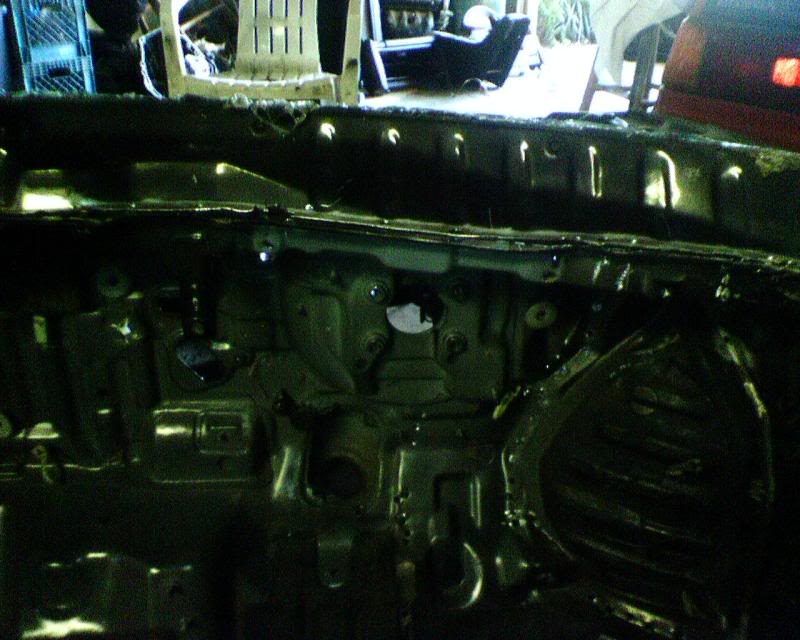
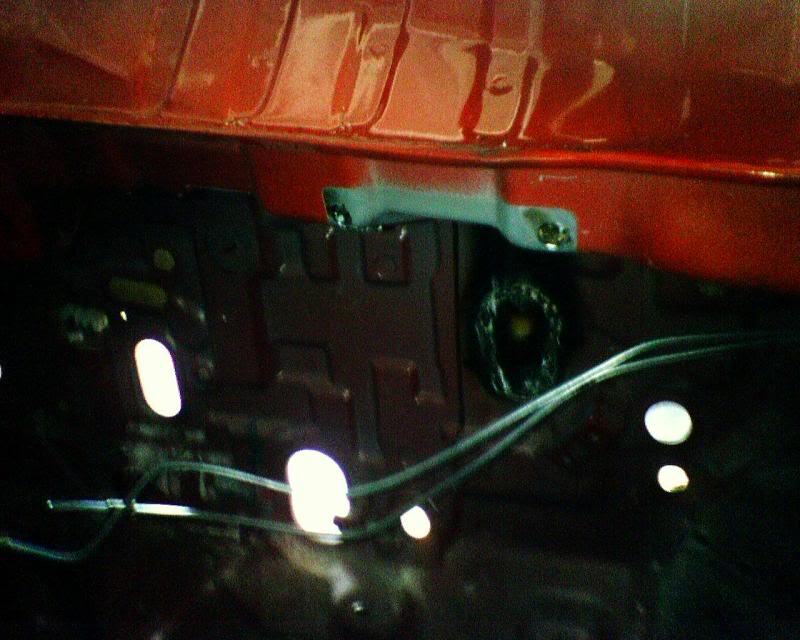
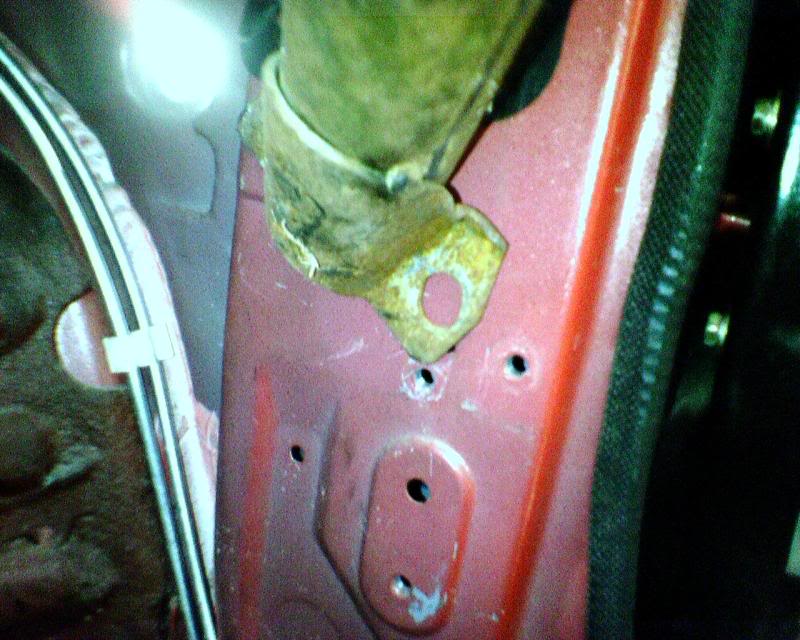
The next step is to drill out the stock steering column support bracket from your car. The rhd steering column bracket will go on the right side obviously but this bracket is right where it needs to be so drill it off
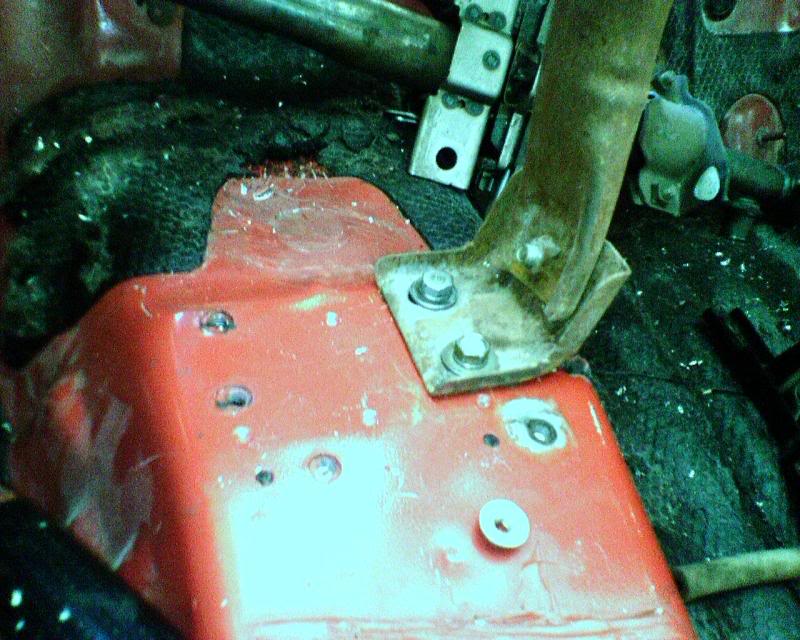
Next you need to find the right location for the steering column support bracket itself. what i did was bolt the steering column support bar (big bar that is bolted to the exhaust tunnel and goes up and over the steering column support bracket and bolts to the a-pillar underneath the dash) into place on the exhaust tunnel. My 88 crx had the holes with nuts already welded to the bottom from the factory. They were however covered with sound deadener. here is the bar bolted up to the tunnel. If you look you can see the 2 holes for the lhd steering column support bracket.
you can find the exact spot to weld the steering column support bracket in by bolting it down to the steering column support bar as shown in the picture. I marked mine with a permanent marker in a spot where I wasn't going to be welding.
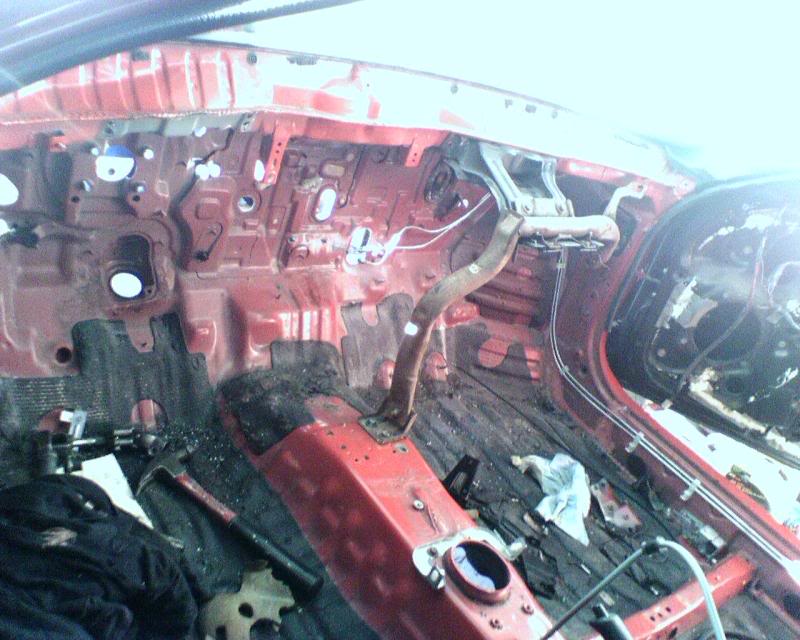
One issue i ran into though. The steering column support bar doesnt bolt in on the a pillar now because the holes are not threaded or simply not there. Here's what I mean:
It is not a big issue however. If you seam weld the steering column support bracket on instead of spot welding it will not flex at all. I tested mine vigorously before i realized this and was satisfied. If you are not satisfied you can always cut the pillar and weld a nut to the back. It isn't necessary though.
Now before you weld the column support bracket down it is a good idea to bolt the steering column on and install the steering wheel and dash handtight. This way you can tell if the bracket is in the right place. (I didn't have to move mine it was perfect)
here were my test fit results:
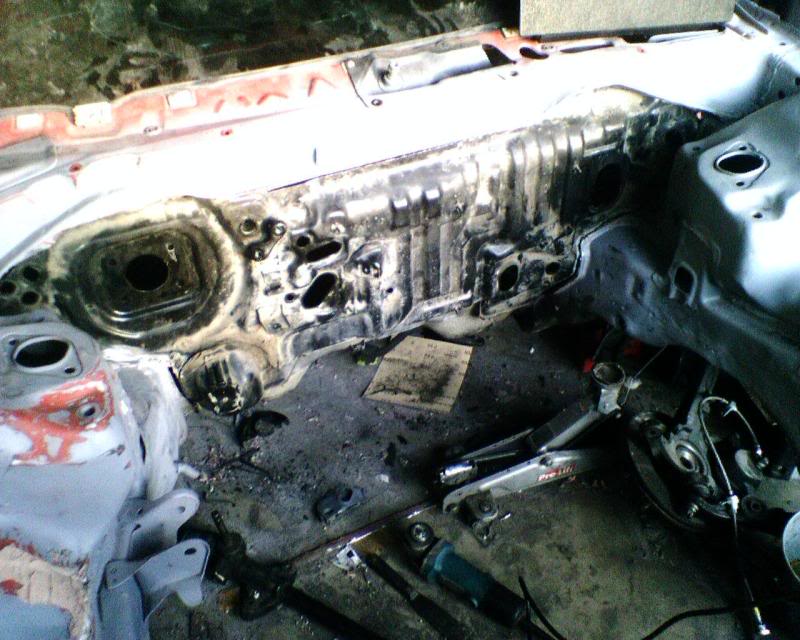
The next part was the toughest for me. Not because it was difficult or mind boggling but because It involves cutting out your stock firewall!
A long story short though, here is where I cut my firewall. I used an angle grinder and a meatl cutting wheel. Make sure NOT to use a grinding wheel. It won't cut accurately enough.
i basicly cut straight across the floor and over the exhaust tunnel, and then straight up where the seam sealer was for the firewall in the engine bay. Basicly i cut straight up at the edge of the frame rail. When you are doing this be sure not to cut through the spot welds. leave about a 1/4" so you can weld the new firewall on. And you can see where i cut the rest out. Just be sure to cut the rhd firewall a bit bigger so you have room to play with. (Don't be lazy like me. Remove the sound deadener before you cut anything. it makes it tons easier when it's time to weld)
it took an entire day to get the firewall all trimmed up and ready to go on. here it is test fitted in it's new home:
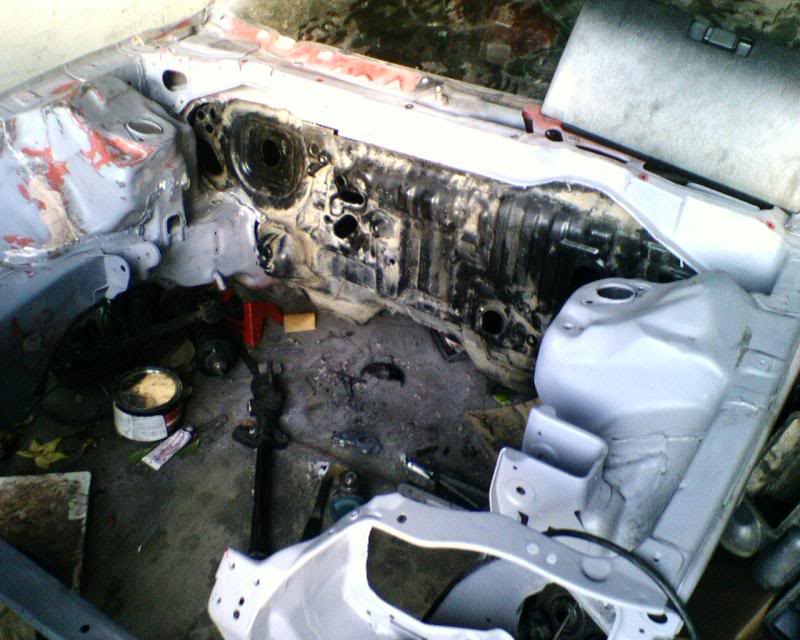
Don't forget to sand the edges of the firewall down before you start welding. Keep a water bottle handy for small fires that WILL break out. (unless you want to strip a whole lot of sound deadener and seam sealer)
Another tip:
before you weld the firewall into it's new home, it's a good idea to bolt the steering rack, pedals, and steering column in hand tight. the pedals will hold the firewall and steering column bracket in place while you weld it down. If you bypass this step you might end up welding the firewall down in the wrong place and the pedal bolts won't line up. Very important!
Also before you weld, put a steering wheel on and make sure it turns lock-to-lock without hitting the firewall.
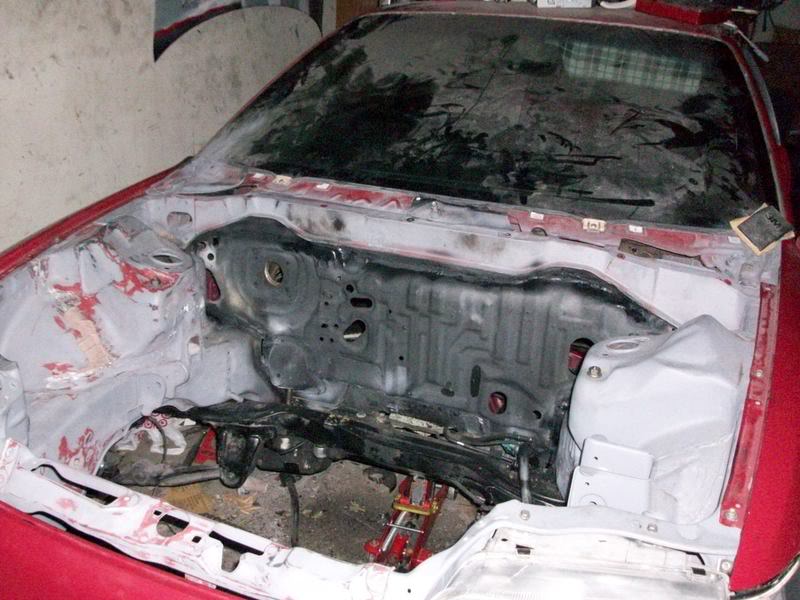
here is the firewall all welded up and finished. If you want you can now grind the welds down and smooth it over with some body filler.
Another tip:
If you want to keep your heat and a/c in your car, use all of the rhd components. If your lucky, your front clip came from a car that had AUTO/AIR CON (automatic air conditioning). If so, and you use the stock jdm chassis harness you will have plug-and-play auto AIRCON. You set it and forget it....
BUT MAKE SURE you cut all the tabs below the windshield with the threaded bolt holes from the rhd clip and weld them into your car to mount the HVAC stuff. The lhd and rhd cars have the tabs in different locations.
Not all rhd models came equipped with the auto air/con. It was optional equipment just like the glass roof on the crx.
NOW HERE ARE SOME NOTES THAT WILL HELP YOU THAT I WISH I HAD AT THE TIME:
-the rhd and lhd steering racks are different. You can NOT use an lhd rack and flip it. I tried it.
-don't buy your clip without the steering rack, pedals, steering column, or rear subframe. These are the bear necessities needed for the conversion. ASK ME HOW I KNOW. The firewall goes without saying.
-if you get an SiR clip with the SiR steering rack then it is a good idea to buy some crx/civic SiR front knuckles and brakes If your clip doesn't have them. They have the bigger "10.2 rotors, stronger calipers, and you will have issues if you try to use usdm knuckles with the SiR steering rack and tie rod ends. Do a search on "jdm SiR steering knuckles" and you'll see what I mean. I used a sohc ef sedan steering rack with the same size brakes as my usdm crx so i was able to use da9 10.2" rotor knuckles and have it aligned without any issues or custom fabrication.
-try to get a clip fom a sohc car or from a model equipped with any ZC. The reason is the dohc equipped hondas DO NOT have provisions on the rear subframe for dual cam AND single cam transmission brackets like our usdm ef's have. They only have the holes in the location for a b-series transmission bracket and you have to use stock crx/civic SiR mounts INCLUDING the actual transmission mount bracket that is welded to the framerail. So if you have a b-series motor and some swap mounts you wont be able to use them. So in other words if you wanted to use a single cam in your new rhd car than you will have to weld the rear mount onto the subframe. The sohc and zc equipped cars have a rear subframe EXACTLY like our usdm cars(minus being rhd of course)and give you The option to use stock sohc usdm mounts or usdm swap mounts. REMEMBER our swap mounts were built around the sohc rear subframe. I was lucky enough to recieve a rear subframe from an ef-sedan.
-The manual rhd steering rack is VERY rare. So count on keeping all the power steering equipment or converting your power rack to manual.
-It is a felony in some states to tamper with your v.i.n. numbers. This is why i chose to use this method. Keep the v.i.n. plate from your old dash and re-install it onto the rhd dash. You can use a drill and *lightly* drill on the rivets and they will come right out. You can buy a rivet gun from any autoparts store for the install onto your rhd dash. The plate is to be facing the front of the car. An officer must be able to read it from standing outside the car.
You need 3 v.i.n. plates on your car:
1) in the door jams
2)under the hood on the firewall
3)on the dash on the driver side.
If you use this method there is no need for a chp inspection, or any need to notify the dmv.
If you are asked about the v.i.n. being moved you can say you ordered a new dash directly from honda.
-For the wiring of the car you can choose from the following:
1) use the rhd harness from the clip including all fuseboxes. I did this and it worked great. Especially because it was an SiR harness and already had vtec wires, four injectors, dash harness (so plug and play SiR cluster), plug and play automatic heat and air conditioning(if you have the SiR climate control), plug and play power windows(i already had the SiR jdm doors), the h4 headlights are already wired up for you jdm front people out there, AND it means if you have the SiR engine harness it's plug and play vtec swap.
The bad part is the harness that goes to the rear of the car is usually cut at the b pillar and there are no usdm equivalents. What I did was take my old usdm rear harness and cut it in the same spot and wire them up directly. So the part that plugs into the fusebox is the jdm harness, and the part that runs to the rear for the tailights, fuel pump, rear wiper, etc., are from the stock usdm factory harness. You might get lucky and have a harness that isnt cut though.
2)use your old lhd harness and flip it. This presents problems of it's own but they are simple to fix if you are electronically inclined. Certain things like the turn signal indicators need to be re-pinned but its not a big issue.
-keep all the brakelines from the clip as you will need them for the brake master cylinder's new location. This is also a good time to relocate your prop valve and tuck it. That's what I did.
-your front clip should come with the rhd hood cable and hood release lever. there will already be threaded holes to bolt it in on the right side. just bolt it down. It's the same for the rhd trunk/gas lid release lever. you can use your usdm trunk release cable, but for the gas lid release, you need a jdm cable. the usdm cable is too short
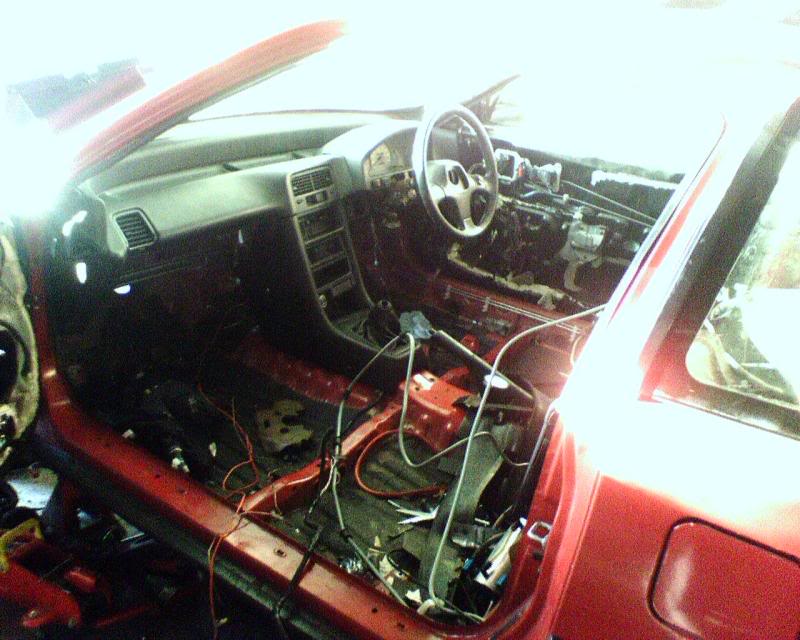
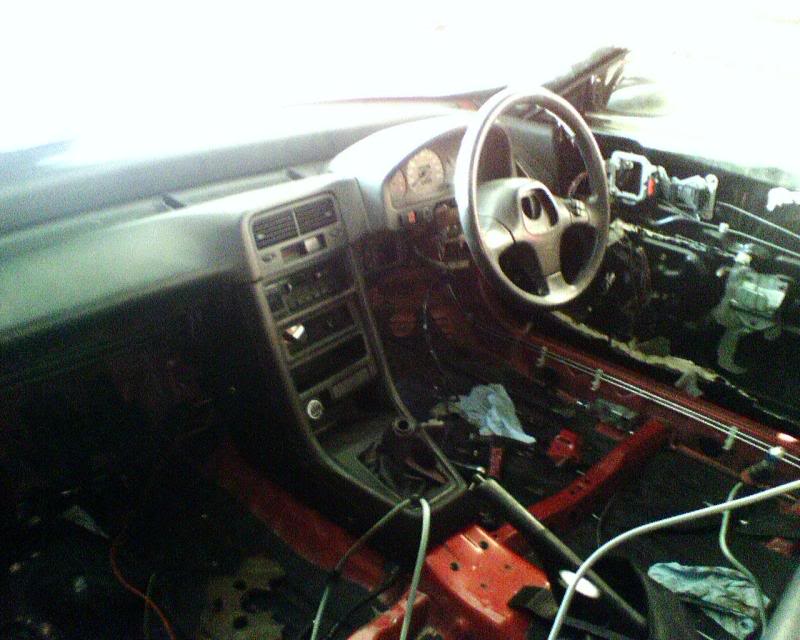
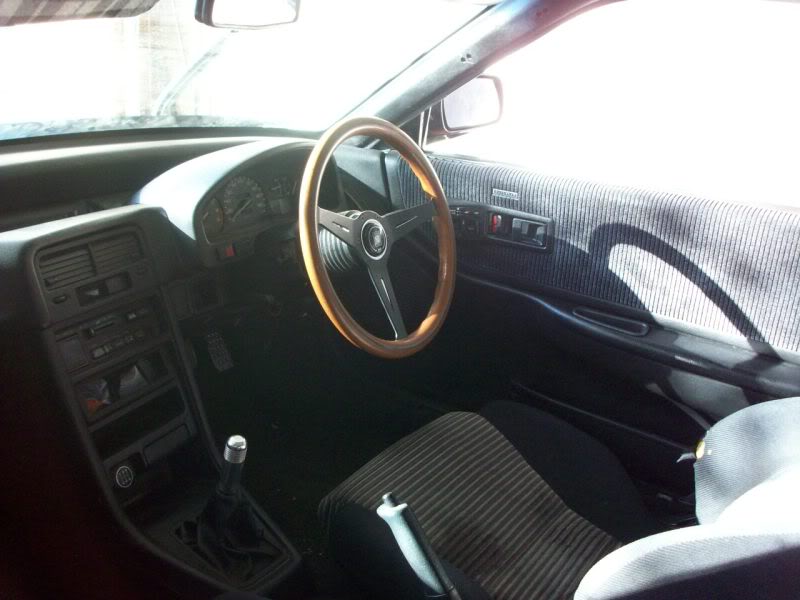
OH here she is after all is said and done.

Well that is about all I can think of. I hope my writeup helped someone because i like to give back and not just recieve. This site has been THE SOURCE for most if not all of my technical questions and I have seldomly had to make my own thread. the search feature is your friend and if this thread is not worthy of being added to the f.a.q. section then let it fall into archives.
A thread like this though would have been helpful to me when I was converting my car over. I could have saved some gray hairs.
Anyway if I can think of anything else to add here I will. if you have any questions that aren't nswered here send me a shout!
First of all, strip your car down to the bare shell(well, make sure everything from the front seats up is gone). Yes even the motor has to go. Good news though, you don't have to remove your windshield using this method AND your factory usdm vin on the firewall will remain intact and untouched. Bad news is, you will have to keep your lhd usdm windshield wipers. The difference is they sweep the wrong way. I didn't mind because it honestly wouldnt make that big of a difference and i dont drive my car in the rain anyway.
your car should look like this when you're starting. The front end can stay but i just removed mine because i was shaving and primering the engine bay.
make sure to remove your old lhd steering rack as well. I removed mine after I snapped this picture.
***This method involves very little drilling and the integrity of the chassis is unchanged.***
the first thing I did was remove the steering column support bracket from the rhd clip. In this pic i am holding it. this is what the steering column and part of the pedals bolt onto. You remove it by drilling the spot welds out.
Here it is removed
The next step is to drill out the stock steering column support bracket from your car. The rhd steering column bracket will go on the right side obviously but this bracket is right where it needs to be so drill it off
Next you need to find the right location for the steering column support bracket itself. what i did was bolt the steering column support bar (big bar that is bolted to the exhaust tunnel and goes up and over the steering column support bracket and bolts to the a-pillar underneath the dash) into place on the exhaust tunnel. My 88 crx had the holes with nuts already welded to the bottom from the factory. They were however covered with sound deadener. here is the bar bolted up to the tunnel. If you look you can see the 2 holes for the lhd steering column support bracket.
you can find the exact spot to weld the steering column support bracket in by bolting it down to the steering column support bar as shown in the picture. I marked mine with a permanent marker in a spot where I wasn't going to be welding.
One issue i ran into though. The steering column support bar doesnt bolt in on the a pillar now because the holes are not threaded or simply not there. Here's what I mean:
It is not a big issue however. If you seam weld the steering column support bracket on instead of spot welding it will not flex at all. I tested mine vigorously before i realized this and was satisfied. If you are not satisfied you can always cut the pillar and weld a nut to the back. It isn't necessary though.
Now before you weld the column support bracket down it is a good idea to bolt the steering column on and install the steering wheel and dash handtight. This way you can tell if the bracket is in the right place. (I didn't have to move mine it was perfect)
here were my test fit results:
The next part was the toughest for me. Not because it was difficult or mind boggling but because It involves cutting out your stock firewall!
A long story short though, here is where I cut my firewall. I used an angle grinder and a meatl cutting wheel. Make sure NOT to use a grinding wheel. It won't cut accurately enough.
i basicly cut straight across the floor and over the exhaust tunnel, and then straight up where the seam sealer was for the firewall in the engine bay. Basicly i cut straight up at the edge of the frame rail. When you are doing this be sure not to cut through the spot welds. leave about a 1/4" so you can weld the new firewall on. And you can see where i cut the rest out. Just be sure to cut the rhd firewall a bit bigger so you have room to play with. (Don't be lazy like me. Remove the sound deadener before you cut anything. it makes it tons easier when it's time to weld)
it took an entire day to get the firewall all trimmed up and ready to go on. here it is test fitted in it's new home:
Don't forget to sand the edges of the firewall down before you start welding. Keep a water bottle handy for small fires that WILL break out. (unless you want to strip a whole lot of sound deadener and seam sealer)
Another tip:
before you weld the firewall into it's new home, it's a good idea to bolt the steering rack, pedals, and steering column in hand tight. the pedals will hold the firewall and steering column bracket in place while you weld it down. If you bypass this step you might end up welding the firewall down in the wrong place and the pedal bolts won't line up. Very important!
Also before you weld, put a steering wheel on and make sure it turns lock-to-lock without hitting the firewall.
here is the firewall all welded up and finished. If you want you can now grind the welds down and smooth it over with some body filler.
Another tip:
If you want to keep your heat and a/c in your car, use all of the rhd components. If your lucky, your front clip came from a car that had AUTO/AIR CON (automatic air conditioning). If so, and you use the stock jdm chassis harness you will have plug-and-play auto AIRCON. You set it and forget it....
BUT MAKE SURE you cut all the tabs below the windshield with the threaded bolt holes from the rhd clip and weld them into your car to mount the HVAC stuff. The lhd and rhd cars have the tabs in different locations.
Not all rhd models came equipped with the auto air/con. It was optional equipment just like the glass roof on the crx.
NOW HERE ARE SOME NOTES THAT WILL HELP YOU THAT I WISH I HAD AT THE TIME:
-the rhd and lhd steering racks are different. You can NOT use an lhd rack and flip it. I tried it.
-don't buy your clip without the steering rack, pedals, steering column, or rear subframe. These are the bear necessities needed for the conversion. ASK ME HOW I KNOW. The firewall goes without saying.
-if you get an SiR clip with the SiR steering rack then it is a good idea to buy some crx/civic SiR front knuckles and brakes If your clip doesn't have them. They have the bigger "10.2 rotors, stronger calipers, and you will have issues if you try to use usdm knuckles with the SiR steering rack and tie rod ends. Do a search on "jdm SiR steering knuckles" and you'll see what I mean. I used a sohc ef sedan steering rack with the same size brakes as my usdm crx so i was able to use da9 10.2" rotor knuckles and have it aligned without any issues or custom fabrication.
-try to get a clip fom a sohc car or from a model equipped with any ZC. The reason is the dohc equipped hondas DO NOT have provisions on the rear subframe for dual cam AND single cam transmission brackets like our usdm ef's have. They only have the holes in the location for a b-series transmission bracket and you have to use stock crx/civic SiR mounts INCLUDING the actual transmission mount bracket that is welded to the framerail. So if you have a b-series motor and some swap mounts you wont be able to use them. So in other words if you wanted to use a single cam in your new rhd car than you will have to weld the rear mount onto the subframe. The sohc and zc equipped cars have a rear subframe EXACTLY like our usdm cars(minus being rhd of course)and give you The option to use stock sohc usdm mounts or usdm swap mounts. REMEMBER our swap mounts were built around the sohc rear subframe. I was lucky enough to recieve a rear subframe from an ef-sedan.
-The manual rhd steering rack is VERY rare. So count on keeping all the power steering equipment or converting your power rack to manual.
-It is a felony in some states to tamper with your v.i.n. numbers. This is why i chose to use this method. Keep the v.i.n. plate from your old dash and re-install it onto the rhd dash. You can use a drill and *lightly* drill on the rivets and they will come right out. You can buy a rivet gun from any autoparts store for the install onto your rhd dash. The plate is to be facing the front of the car. An officer must be able to read it from standing outside the car.
You need 3 v.i.n. plates on your car:
1) in the door jams
2)under the hood on the firewall
3)on the dash on the driver side.
If you use this method there is no need for a chp inspection, or any need to notify the dmv.
If you are asked about the v.i.n. being moved you can say you ordered a new dash directly from honda.
-For the wiring of the car you can choose from the following:
1) use the rhd harness from the clip including all fuseboxes. I did this and it worked great. Especially because it was an SiR harness and already had vtec wires, four injectors, dash harness (so plug and play SiR cluster), plug and play automatic heat and air conditioning(if you have the SiR climate control), plug and play power windows(i already had the SiR jdm doors), the h4 headlights are already wired up for you jdm front people out there, AND it means if you have the SiR engine harness it's plug and play vtec swap.
The bad part is the harness that goes to the rear of the car is usually cut at the b pillar and there are no usdm equivalents. What I did was take my old usdm rear harness and cut it in the same spot and wire them up directly. So the part that plugs into the fusebox is the jdm harness, and the part that runs to the rear for the tailights, fuel pump, rear wiper, etc., are from the stock usdm factory harness. You might get lucky and have a harness that isnt cut though.
2)use your old lhd harness and flip it. This presents problems of it's own but they are simple to fix if you are electronically inclined. Certain things like the turn signal indicators need to be re-pinned but its not a big issue.
-keep all the brakelines from the clip as you will need them for the brake master cylinder's new location. This is also a good time to relocate your prop valve and tuck it. That's what I did.
-your front clip should come with the rhd hood cable and hood release lever. there will already be threaded holes to bolt it in on the right side. just bolt it down. It's the same for the rhd trunk/gas lid release lever. you can use your usdm trunk release cable, but for the gas lid release, you need a jdm cable. the usdm cable is too short
OH here she is after all is said and done.
Well that is about all I can think of. I hope my writeup helped someone because i like to give back and not just recieve. This site has been THE SOURCE for most if not all of my technical questions and I have seldomly had to make my own thread. the search feature is your friend and if this thread is not worthy of being added to the f.a.q. section then let it fall into archives.
A thread like this though would have been helpful to me when I was converting my car over. I could have saved some gray hairs.
Anyway if I can think of anything else to add here I will. if you have any questions that aren't nswered here send me a shout!
Last edited by thevtecnician; 06-04-2012 at 06:45 PM.

The following 2 users liked this post by thevtecnician:
08-26-2009, 08:46 PM
#3
Honda-Tech Member
very nice, did you have the RHD heater box and all that, or did you ahve part of a clip. I have an EG hatch and parts of a RHD clip, firewall and front end, rack, steering, dash no pedals, wipers and few other parts, can I swap the rest of my LHD to RHD?
08-26-2009, 08:53 PM
#4
Who the fack changed my title?!
from my recollection, yes
08-26-2009, 08:59 PM
#5
Honda-Tech Member
Thread Starter
thanks carlos!
and yeah it took a while. it just dawned on me that maybe someone else would like to know this info.
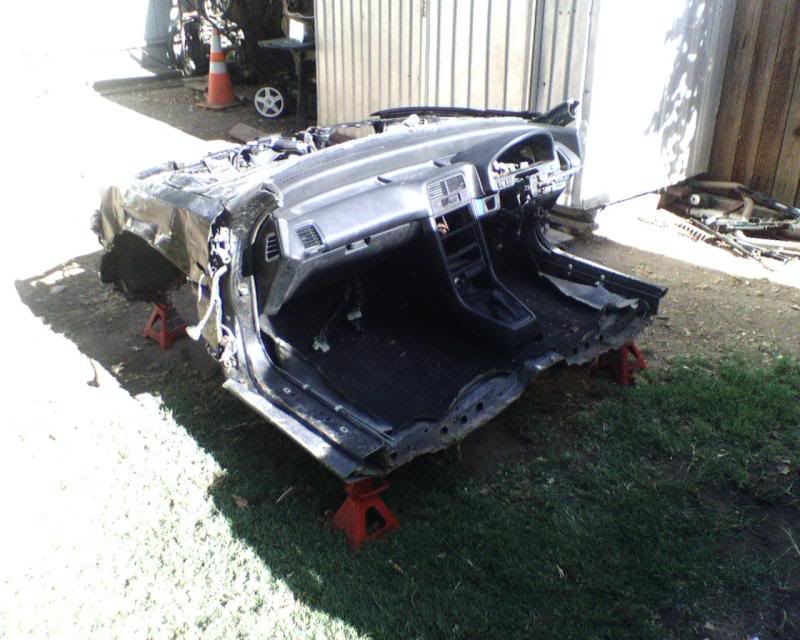
And for the question, my clip came complete minus the steering rack and rear subframe. here it was when i first laid eyes on it BTW. i forgot to add that pic so here it is
the rhd pedals are important to have. The lhd pedals WILL work on the eg technically, but the brake switch is in the wrong spot and you wouldn't have brake lights. unless you cut it off and weld it in the right spot
and yeah it took a while. it just dawned on me that maybe someone else would like to know this info.
And for the question, my clip came complete minus the steering rack and rear subframe. here it was when i first laid eyes on it BTW. i forgot to add that pic so here it is
the rhd pedals are important to have. The lhd pedals WILL work on the eg technically, but the brake switch is in the wrong spot and you wouldn't have brake lights. unless you cut it off and weld it in the right spot
08-27-2009, 02:39 AM
#6
Honda-Tech Member
iTrader: (2)
Join Date: Nov 2007
Location: Pasadena, CA, USA
Posts: 7,217
Likes: 0
Received 0 Likes
on
0 Posts
nice writeup man. So if I am getting this correct, you cut the firewall BELOW the original vin number?
08-27-2009, 04:49 AM
#7
DO IT ON ALL FOURS
Well good job and all but it is still a felony to drill out a VIN plate and move it. You just informed some yahoo on how to basically steal a car and change the VINs... By law you are not supposed to tamper with the VIN in any way but I am sure there are plenty of VIN swapped stolen Hondas out there driving around as we speak.
Either way... I like the way you switched the firewall over and that is much better looking then some of the full clip transfers I have seen.
Trending Topics
08-27-2009, 06:21 AM
#8
Honda-Tech Member
Thread Starter
Thanks guys. And yes you cut below the firewall VIN.
I could be wrong but I don't consider moving the vin to be a felony. Changing the vin, different story.
Also, maybe thiefs are reading this. What people decide to do on their own spare time is their own business. I doubt that a thief needs to read this for the thought of a vin swap to cross his mind. Plus there are 3 v.I.n.'s on a car. Not just the one on the dash.
If you don't feel comfortable movinf the vin yourself you can just drive around without it. When you get pulled over you will be sent to the dmv or chp station for a vin verification where you will be issued a 3rd vin. It will be placed in the door jam next to the other vin though. And not on the dash
03-26-2010, 07:30 PM
#9
Honda-Tech Member
Join Date: Dec 2008
Location: East La
Posts: 646
Likes: 0
Received 0 Likes
on
0 Posts
FUUU UUUHH KKK is a RHD conversion legal in cali???
i've heard yes and no...
soo....
?!?!?!
i've heard yes and no...
soo....
?!?!?!
03-26-2010, 08:16 PM
#10
Honda-Tech Member
Thread Starter
Its legal.
The only reason its questionable is because most rhd conversions require installing an entirely different firewall from a foreign car with no U.S. History.
These converted cars simply go into the DMV for a V.I.N. Verification. If there's only 2 VIN #'s they just stamp a new one in the door jambs.
The only reason its questionable is because most rhd conversions require installing an entirely different firewall from a foreign car with no U.S. History.
These converted cars simply go into the DMV for a V.I.N. Verification. If there's only 2 VIN #'s they just stamp a new one in the door jambs.
 02-12-2012, 11:59 AM
#15
Honda-Tech Member

Join Date: Jan 2010
Posts: 6
Likes: 0
Received 0 Likes
on
0 Posts
Good write up I'm interested in this to a eg in NY but I'm still sketchy on the vin on the dash....
02-14-2012, 07:50 AM
#16
Honda-Tech Member
I have a Boner stock CRX.. i want to do a RHD conversion.. where do you get the kit??? and also i just happen to have a K20Z3 laying around :p which is going in it.. is there enough room on under the hood for RHD and a k swap, since the k swap puts the motor a little more on the passenger side where the rack and everything would be..???? PLEase help
 04-28-2012, 07:22 PM
#18
I have a Boner stock CRX.. i want to do a RHD conversion.. where do you get the kit??? and also i just happen to have a K20Z3 laying around :p which is going in it.. is there enough room on under the hood for RHD and a k swap, since the k swap puts the motor a little more on the passenger side where the rack and everything would be..???? PLEase help
05-01-2012, 04:14 AM
#20
Restoration shops play with the vin plates all the time, collision shops too I'd bet. I'm sure the laws vary by state. One of the more painless conversions I've seen, nice job.
06-04-2012, 09:09 AM
#21
Honda-Tech Member

Join Date: Nov 2011
Location: Baltimore MD
Posts: 437
Likes: 0
Received 0 Likes
on
0 Posts
I have a Boner stock CRX.. i want to do a RHD conversion.. where do you get the kit??? and also i just happen to have a K20Z3 laying around :p which is going in it.. is there enough room on under the hood for RHD and a k swap, since the k swap puts the motor a little more on the passenger side where the rack and everything would be..???? PLEase help
Im wondering the same thing, I currently have a Hseries in my Ef sedan and was wondering if a RHD swap is doable. Any insight you could add to that?
06-04-2012, 09:29 AM
#22
Honda-Tech Member
you buy a whole front clip i believe and it comes with everything, like what was pictured, and you un bolt everything, then start cutting/drilling
06-04-2012, 10:02 AM
#23
Honda-Tech Member
Join Date: Nov 2011
Location: Baltimore MD
Posts: 437
Likes: 0
Received 0 Likes
on
0 Posts
I completely understand how he did his RHD swap but thats with the stock D series in it. I want to know if I complete the RHD swap will my H22 hit the booster or the rear crossmember?
06-04-2012, 10:02 AM
#24
Honda-Tech Member
Thread Starter
The conversion for the sedan is dflefinitely doable. The sedan clips are rare though, but you can always use a crx or hatchback clfirewall. But then in that case you'll have to use the crx or hatch dash as well
06-04-2012, 10:09 AM
#25
Honda-Tech Member
Join Date: Nov 2011
Location: Baltimore MD
Posts: 437
Likes: 0
Received 0 Likes
on
0 Posts
Thanks Vtech for the thread/reply. Id like to do the RHD conversion could you PM me regarding it so I dont waste bandwidth here. Thanks!