
Aftermarket Radio Removal DIY
 06-19-2009, 05:14 PM
#1
Honda-Tech Member
Thread Starter
Join Date: Mar 2007
Location: Douglasville, Georgia, United States
Posts: 560
Likes: 0
Received 0 Likes
on
0 Posts
Alright well this is going to be my first DIY so don't bash it too bad.
Tools Needed:
Phillips Screwdriver x1 (I recommend using a short one and a long one)
Small Flat Head Screwdriver x1
10mm Socket (to remove battery connectors)
8mm Socket (might be needed)
Panel Puller (optional)
Ok the first step is going to be to remove the battery terminal connectors.

For 01/02 models start here for 03-05 look below the pics for the instructions for both a Manual and Automatic follow those steps starting at step 3.
After that you are going to pull off the 12v Plug Panel, to do that simply pull it out and up.
Once you have it out you are going to remove the connector that hooks to the 12v socket and if you have OEM fogs the connector that goes to the fog switch.
Once you have that out just set it aside.
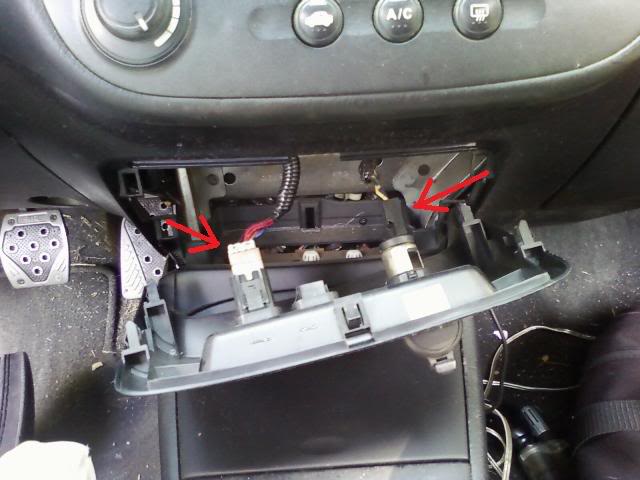
Next you are going to look up under the radio where you removed the 12v Panel, you should see either 2 8mm screws or 2 Philips head screws remove them and set them aside.
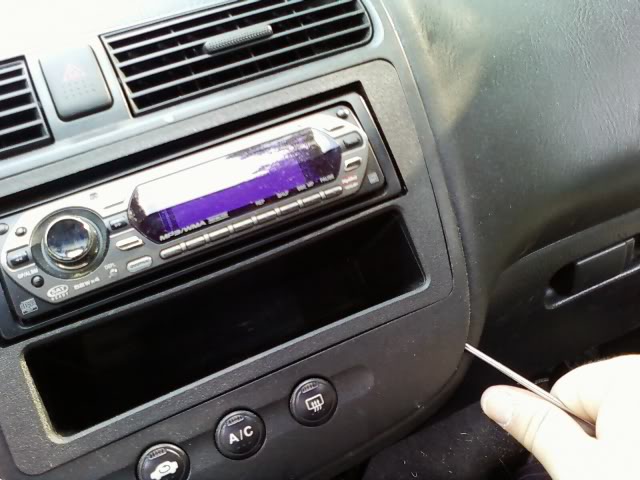
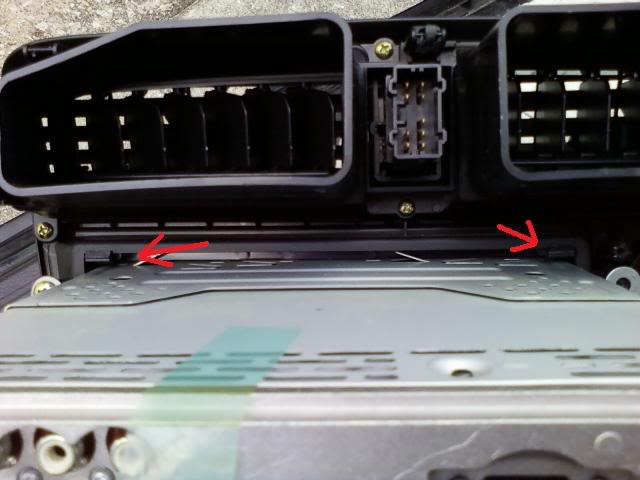
Alright now it is time to pull out the Radio Panel. Simply slide any flat object be it a screw driver or a panel puller into the edge of it and use that to gently pry the panel out.
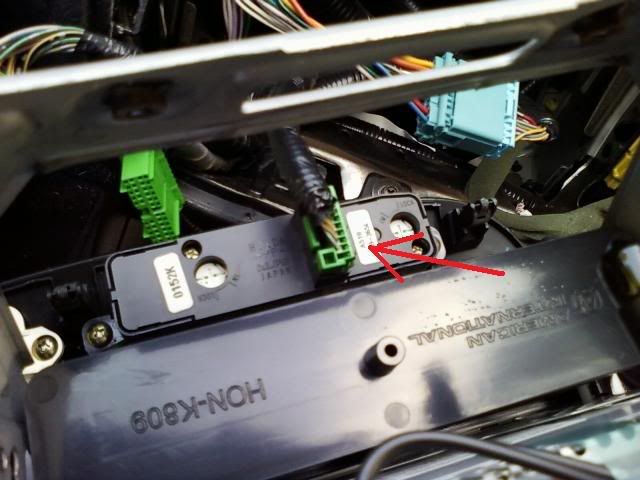
Once that is out you can pull the radio panel out a little ways. Once you have it out you need to disconnect the wires that are hooked to the radio. First remove the connector that goes to the emergency lights(my fingers are covering it up), Next remove the antenna connector on the top right(may be in a different place depending on your radio), than disconnect the two green plugs that go to the climate control panel, finally the connector that hooks to the back of your radio. DO NOT TRY AND PULL IT OUT NOW THERE IS STILL ONE MORE CONNECTOR TO REMOVE.
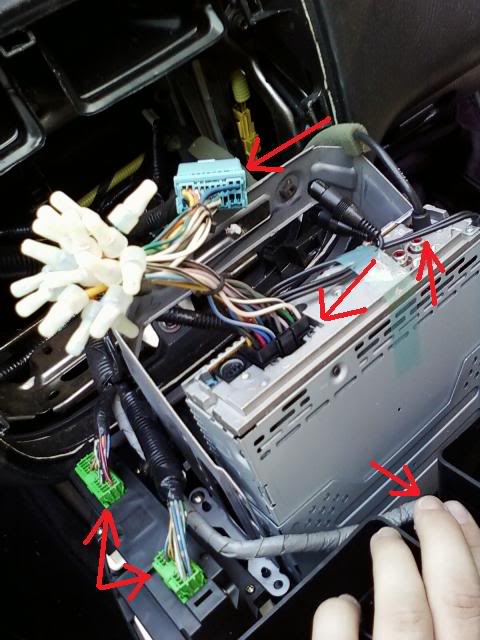
Lean the radio panel forward a little and you will see another green connector disconnect that and you can remove the radio panel completely.
(The next two steps are somewhat optional but they make it easier in the long run)
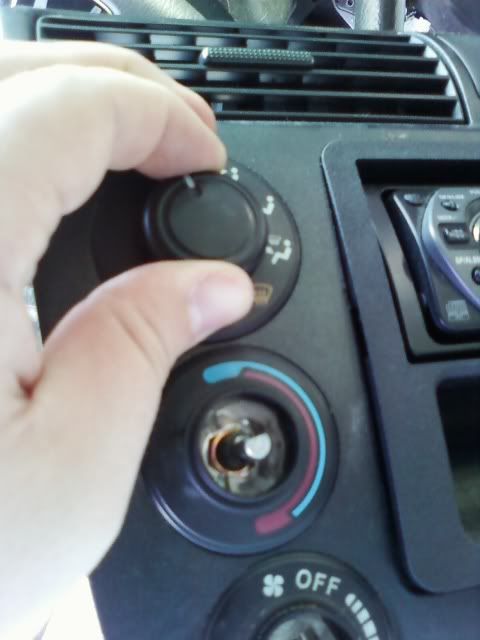
On the front of the panel you are going to need to pull off the climate control *****. To do this simply grasp them and pull they come right off.
Once those are off turn the panel around and unscrew the 3 screws that connect the climate control unit and simply remove it and set it aside.
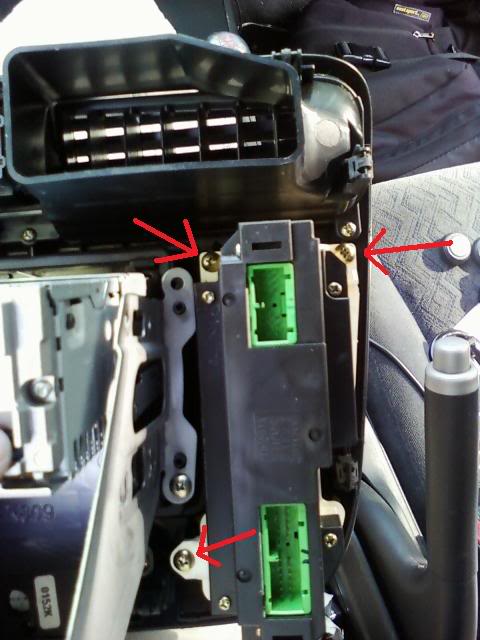
You might have screws connecting your radio to the harness you might not. If you do they will be located here (why you needed to remove the climate control panel) and on the other side in the same spot.
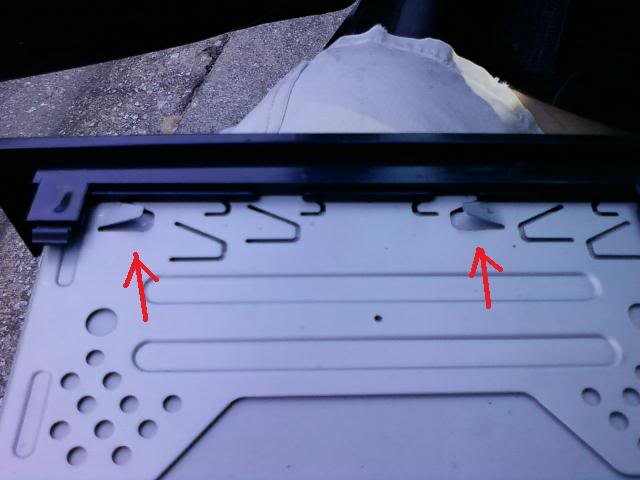
After those are out look under the A/C vents and press down on the tabs with a screw driver or your fingers if you can reach them while pushing forward at the same time. The radio harness will slide out of the panel from the front.
After it is out it is easy to get the radio out simply push down on the tabs that are sticking up on the top, sides, and bottom.
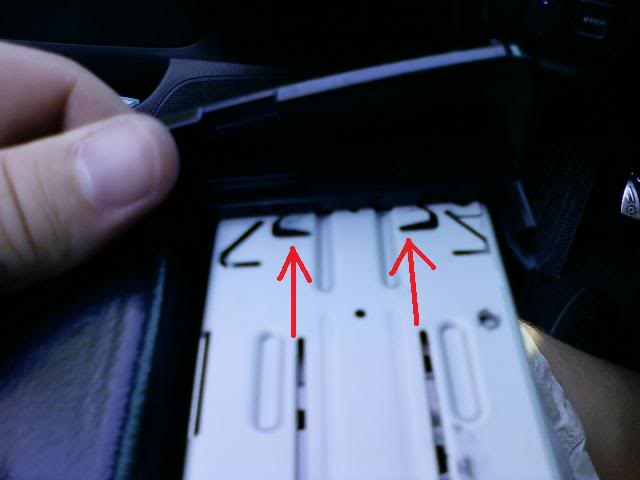
Once they are down simply slide the radio out from the front and slide your new radio in.
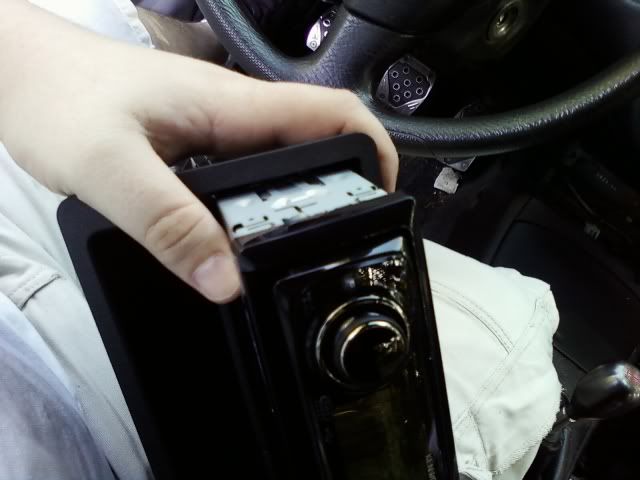
For the purpose of wiring simply read the instructions in the back of the instillation manual that came with your radio. Once you have the wires connected simply follow the steps in reverse and slide every thing back in.
For all you 03-05 people follow these steps first than go back to step 3 up top.
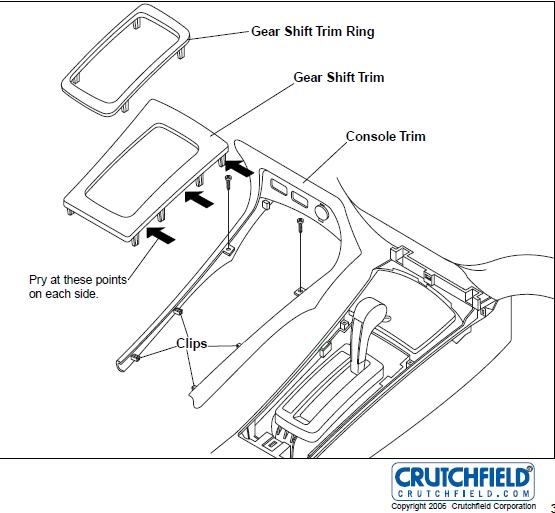
Manual
1.Open cup holder.
2. Pull down chrome collar under gear shift ****.
3. Unscrew gear shift **** and remove.
4. Pry up all edges of gear shift trimpanel to release and remove.
5. Remove two (2) phillips screws exposed by removal of gear shift trimpanel.
6. Push out rear clips securing sides of console trim with a flat blade screwdriver.
7. Lift rear console trim and pry front of trim toward rear of vehicle to release clips. Disconnect harnesses and remove trim.

Automatic
1. Carefully pry up gear shift trim ring.
2. Pry up gear shift trim from three points on each side and remove trim.
3. Remove two (2) phillips screws from console trim exposed by removal of gear shift trim.
4. Push out rear of clips securing sides of console trim using a flat blade screwdriver.
5. Lift rear of console trim and pry front of trim toward rear of vehicle to release clips. Disconnect harnesses and remove trim.
Hope this helps.
From the previous DIY thread:
Tools Needed:
Phillips Screwdriver x1 (I recommend using a short one and a long one)
Small Flat Head Screwdriver x1
10mm Socket (to remove battery connectors)
8mm Socket (might be needed)
Panel Puller (optional)
Ok the first step is going to be to remove the battery terminal connectors.
For 01/02 models start here for 03-05 look below the pics for the instructions for both a Manual and Automatic follow those steps starting at step 3.
After that you are going to pull off the 12v Plug Panel, to do that simply pull it out and up.
Once you have it out you are going to remove the connector that hooks to the 12v socket and if you have OEM fogs the connector that goes to the fog switch.
Once you have that out just set it aside.
Next you are going to look up under the radio where you removed the 12v Panel, you should see either 2 8mm screws or 2 Philips head screws remove them and set them aside.
Alright now it is time to pull out the Radio Panel. Simply slide any flat object be it a screw driver or a panel puller into the edge of it and use that to gently pry the panel out.
Once that is out you can pull the radio panel out a little ways. Once you have it out you need to disconnect the wires that are hooked to the radio. First remove the connector that goes to the emergency lights(my fingers are covering it up), Next remove the antenna connector on the top right(may be in a different place depending on your radio), than disconnect the two green plugs that go to the climate control panel, finally the connector that hooks to the back of your radio. DO NOT TRY AND PULL IT OUT NOW THERE IS STILL ONE MORE CONNECTOR TO REMOVE.
Lean the radio panel forward a little and you will see another green connector disconnect that and you can remove the radio panel completely.
(The next two steps are somewhat optional but they make it easier in the long run)
On the front of the panel you are going to need to pull off the climate control *****. To do this simply grasp them and pull they come right off.
Once those are off turn the panel around and unscrew the 3 screws that connect the climate control unit and simply remove it and set it aside.
You might have screws connecting your radio to the harness you might not. If you do they will be located here (why you needed to remove the climate control panel) and on the other side in the same spot.
After those are out look under the A/C vents and press down on the tabs with a screw driver or your fingers if you can reach them while pushing forward at the same time. The radio harness will slide out of the panel from the front.
After it is out it is easy to get the radio out simply push down on the tabs that are sticking up on the top, sides, and bottom.
Once they are down simply slide the radio out from the front and slide your new radio in.
For the purpose of wiring simply read the instructions in the back of the instillation manual that came with your radio. Once you have the wires connected simply follow the steps in reverse and slide every thing back in.
For all you 03-05 people follow these steps first than go back to step 3 up top.
Manual
1.Open cup holder.
2. Pull down chrome collar under gear shift ****.
3. Unscrew gear shift **** and remove.
4. Pry up all edges of gear shift trimpanel to release and remove.
5. Remove two (2) phillips screws exposed by removal of gear shift trimpanel.
6. Push out rear clips securing sides of console trim with a flat blade screwdriver.
7. Lift rear console trim and pry front of trim toward rear of vehicle to release clips. Disconnect harnesses and remove trim.
Automatic
1. Carefully pry up gear shift trim ring.
2. Pry up gear shift trim from three points on each side and remove trim.
3. Remove two (2) phillips screws from console trim exposed by removal of gear shift trim.
4. Push out rear of clips securing sides of console trim using a flat blade screwdriver.
5. Lift rear of console trim and pry front of trim toward rear of vehicle to release clips. Disconnect harnesses and remove trim.
Hope this helps.
From the previous DIY thread:
http://www.megaupload.com/?d=2F1IYZ9Y
http://www.jigglz.com/images/FRINSTALL.pdf
Download the FRINSTALL file for a guide on:
- How to install an aftermarket headunit
- How to remove door panels
- How to install front/rear speakers for both coupe/sedan.
Speaker sizes:
Coupes have 6.5" front and 6x9" rear.
Sedans have 6.5" both front and rear.
Last edited by It Wasn't Me; 11-02-2009 at 06:07 PM.


 06-19-2009, 06:31 PM
#5
Junior Member
Join Date: Mar 2007
Posts: 42
Likes: 0
Received 0 Likes
on
0 Posts
I did this about 5 times today troubleshooting a blitzsafe alpine/honda changer adapter.
instead of prying the HVAC/RADIO unit out from the dash and possibly denting/damaging the soft dash material, I just pushed from the back and it started to pop out.
I did manage to lose one of the metal clips from the top left tab on the HVAC unit, heard it fall into the dash
instead of prying the HVAC/RADIO unit out from the dash and possibly denting/damaging the soft dash material, I just pushed from the back and it started to pop out.
I did manage to lose one of the metal clips from the top left tab on the HVAC unit, heard it fall into the dash
06-19-2009, 09:02 PM
#6
Honda-Tech Member
Thread Starter
Join Date: Mar 2007
Location: Douglasville, Georgia, United States
Posts: 560
Likes: 0
Received 0 Likes
on
0 Posts
Yeah I was really careful to not dent it up at all. It honestly would have worked better had I used one of those panel remover tools. But the flat head did the trick just fine.
06-22-2009, 08:22 PM
#7
New User
Join Date: Jun 2009
Posts: 2
Likes: 0
Received 0 Likes
on
0 Posts
I did this my dimmer doesnt work anymore its always on bright i cant adjust the lights anymore..
 can anyone help theres a illuminater white orange wire and a solide dimmer orange wire where does that wire go?
can anyone help theres a illuminater white orange wire and a solide dimmer orange wire where does that wire go?
Trending Topics
08-05-2009, 05:20 AM
#8
Honda-Tech Member
Thread Starter
Join Date: Mar 2007
Location: Douglasville, Georgia, United States
Posts: 560
Likes: 0
Received 0 Likes
on
0 Posts
Hey let me check for you, sorry for not noticing this earlier. Are you using a wiring harness or are you just splicing lines?
02-29-2016, 06:10 PM
#10
Trial User

Join Date: Feb 2016
Posts: 1
Likes: 0
Received 0 Likes
on
0 Posts
I have an 04 civic ex manual I put an aftermarket radio in and now it doesn't pick up stations checked all connections everything is hooked right and plugged in As far as I can tell at first it worked the next day it wasn't any ideas. It does play aux and cds just no stations
Last edited by toyomatt84; 02-29-2016 at 10:36 PM.
02-29-2016, 10:38 PM
#11
I have an 04 civic ex manual I put an aftermarket radio in and now it doesn't pick up stations checked all connections everything is hooked right and plugged in As far as I can tell at first it worked the next day it wasn't any ideas. It does play aux and cds just no stations

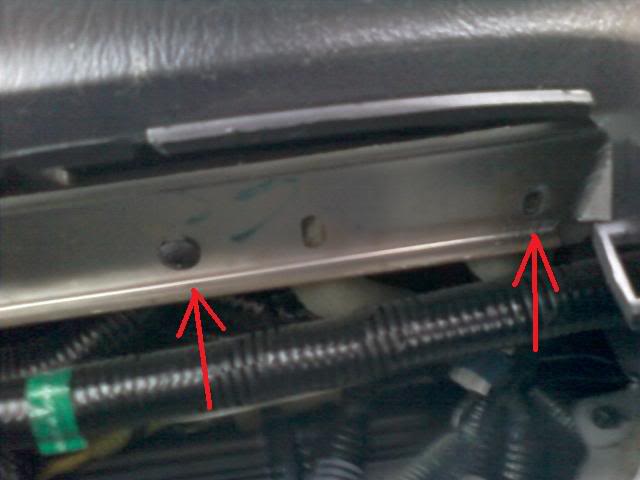
On the right side of this picture, you can see a cable with foam on it. That's your antenna cable.
03-15-2016, 09:41 AM
#12

I used the directions above, along with crutchfield.com's downloadable pdf file, to pull my manual transmission, 2003 Civic LX's OEM radio/CD Player this morning. It went great. A painter's tool (see below) and 4-inch putty knife helped a lot. I think they are much better than a screwdriver. I do not think I marred the finish of the dash or trim at all.
On advice from member hardtarget2, I bought a replacement radio/CD Player from Crutchfield: Car Stereo, Speakers, Home Theater, Pro Audio, 4k TV. Crutchfield had an "open box special" on the Axxera AXD130 model, and I jumped on it. I am awaiting its arrival now. How easy this was, and how inexpensive a replacement radio/CD player is, is terrific. I wish I'd done it a few years ago, when my CD player first started acting up.
FWIW before deciding to buy a new radio/CD player, I tried an $8 CD player lens cleaner on the old, OEM one. It helped for a little while, but then the auto-eject became persistent, especially in cold weather.
Jstans84 and all contributors here, thank you for posting.

Thread
Thread Starter
Forum
Replies
Last Post