
$20 H/F Balance shaft removal.
 09-20-2008, 04:42 PM
#1
Honda-Tech Member
Thread Starter
Join Date: Nov 2003
Location: Kitchener, Ontario, CANADA
Posts: 5,986
Likes: 0
Received 2 Likes
on
2 Posts
<FONT SIZE="6">H/F Series Balance Shaft Removal</FONT>
These are instructions for the DIYer on how to remove the H/F series balance shafts for under $20.
It is assumed that anyone attempting this has some experience with drilling/tapping aluminum and freeze plug and bearing removal and installation.
Parts:
(1) 12 x 20 m6* Dowel
(3) 10 x 16 m6* Dowel
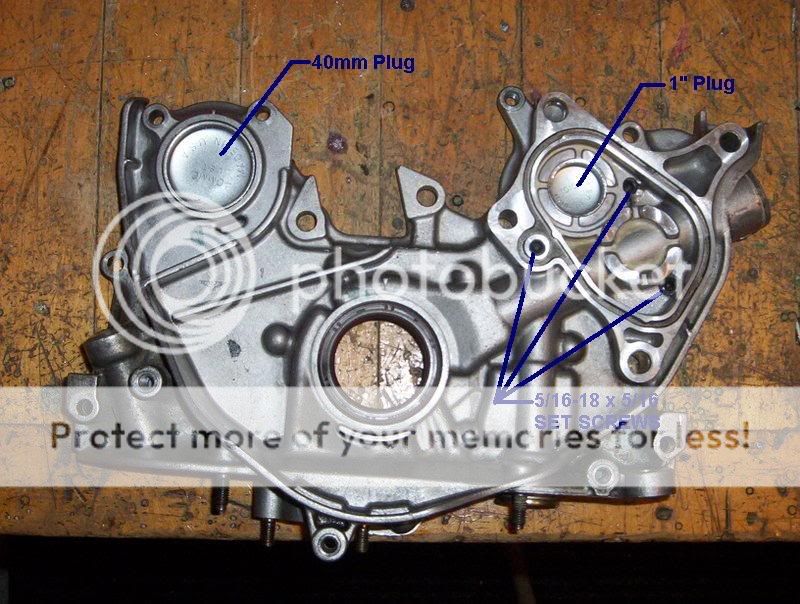
(1) 40mm Freeze Plug
(1) 1" Freeze Plug
(1) 1/8" NPT plug
(3) 5/16-18 set screws
Loctite
Permatex sealant
Tools:
- Hammer
- Dremel with Pencil attachment
- Punch
- Tap set
- Drill bit set (fraction and letter)
- Press (optional)
*"m6" is the spec for how tight a dowel pin fits inside of the hole. m6 is tight but removable, perfect IMO.
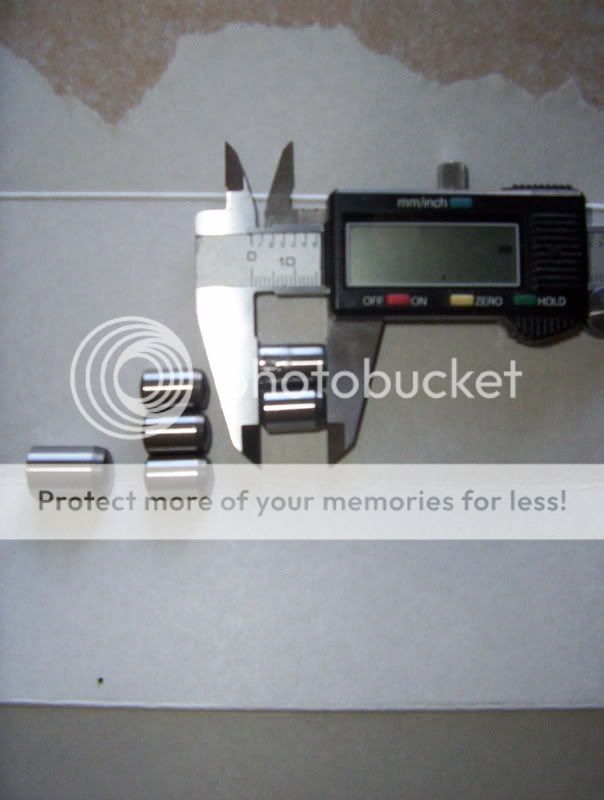
I purchased these dowel pins at a local supply store that specializes in fasteners. At first glance they look shorter than the hollow Honda OEM dowel pins but they are in fact the exact same height. Note that one end is tapered.

Set screws

1/8" npt plug.
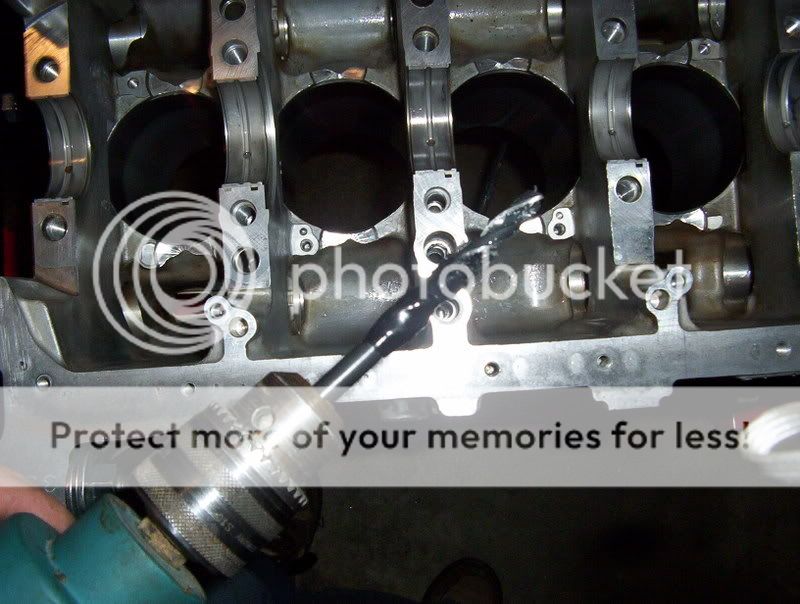
<FONT SIZE="4"><U>Rear Balance Shaft</U></FONT>
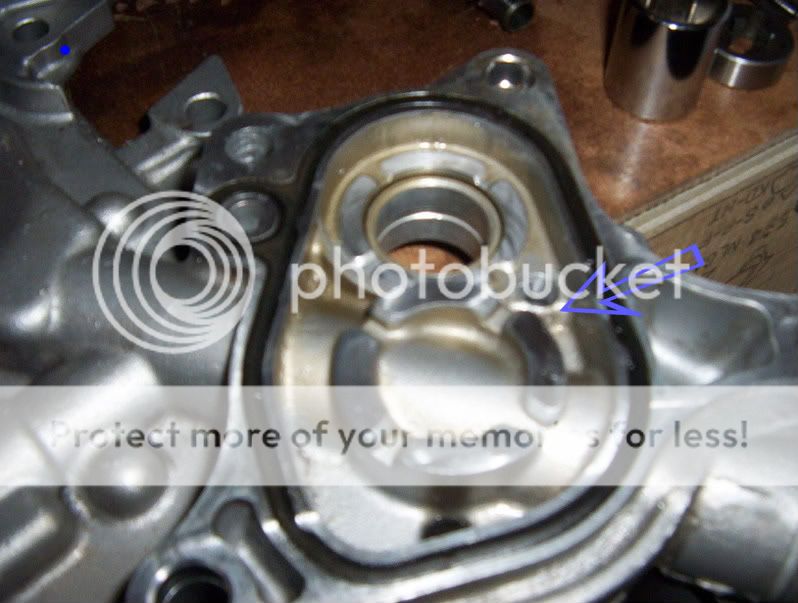
My experience tells me that this small piece of aluminum should be ground off before drilling and tapping this hole. Otherwise there is a good chance that this will crack off when you tap this hole.
2-3 minutes of careful grinding and this hole is ready to be drilled.
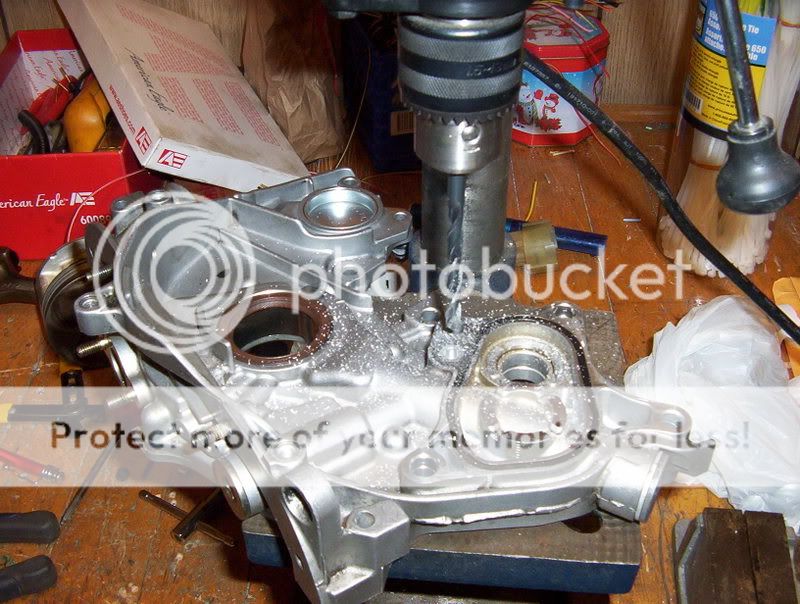
An "F" drill bit is ideal for a 5/16-18 tap
Dill holes as required.
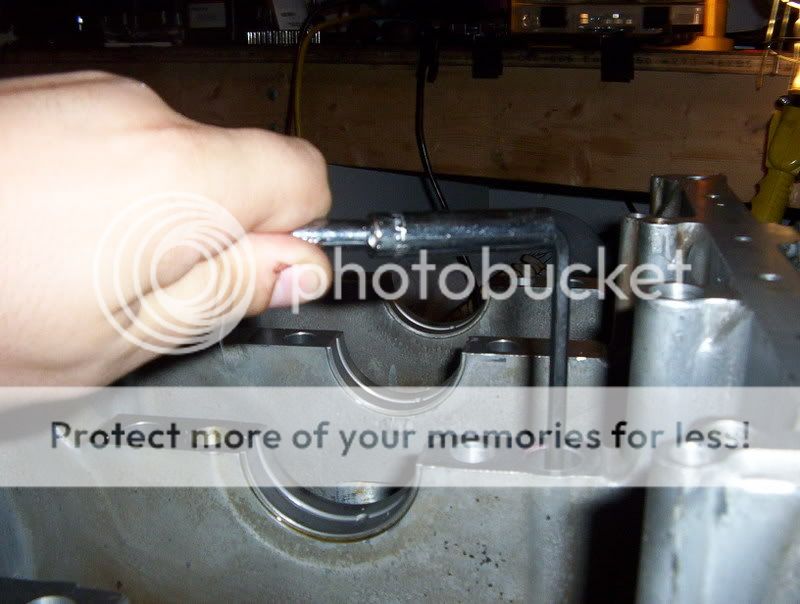
<FONT COLOR="Red">Since (non-tapered) set screws are being used it is a good idea not to tap all the way through the holes. This allows you to tighten the screws.</FONT> It took me a couple of tries on each hole to get the holes deep enough.
Clean holes and install set screws using an appropriate amount of sealant. I used black permatex sealant.
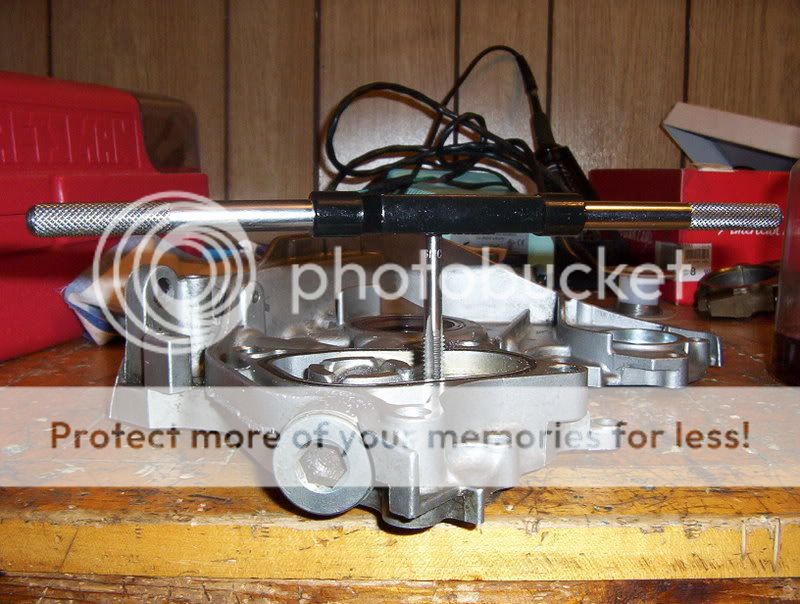
- Press out Bearing. The pictures shows an appropriately sized socked pressing out the bearing.
- Install 1" plug flush with the oil pump using your sealant of choice. Don't worry about the oil hole on the other side of the plug.
<U><FONT SIZE="4">
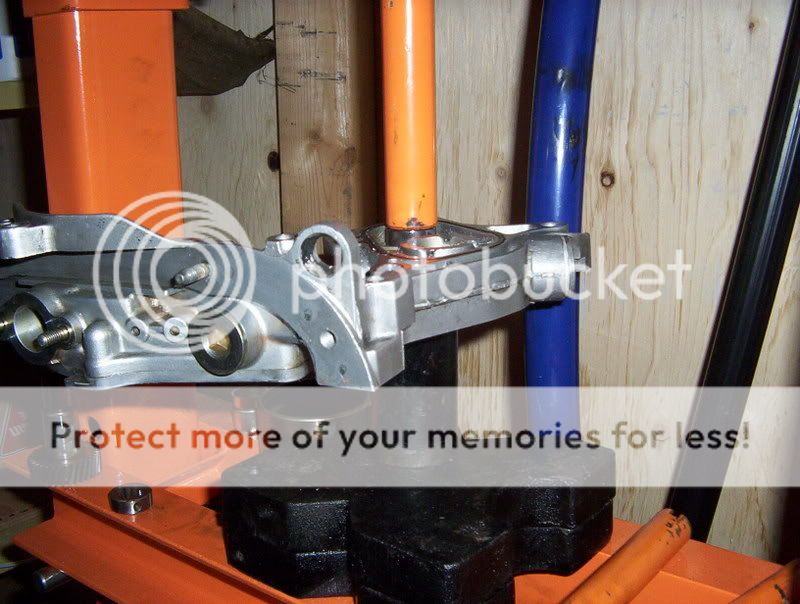
Front Balance Shaft (Oil Pump Assembly)</FONT></U>
oil pump pic
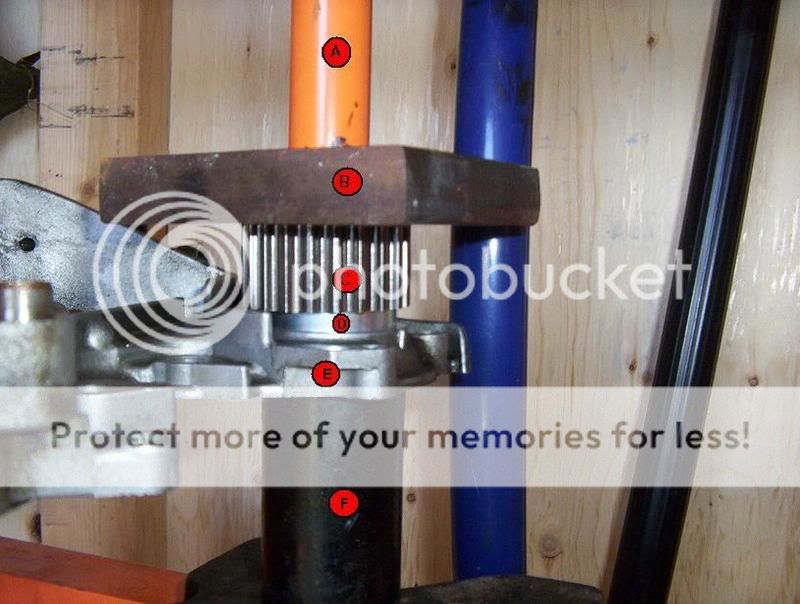
A - Harbor Freight press (which BTW can be purchased with the money you save not buying an expensive balance shaft removal kit)
B - Chunk of metal
C- One of the balance shaft gears (works prefect!)
D - 40mm Freeze Plug
E - Oil Pump Assembly
F - Perfectly sized 32mm impact socket
This is the point you realized that you forgot to put loctite/sealant on the 40mm freeze plug. Take this all apart, clean hole, apply loctite, re-assemble and press in the freeze plug as required.
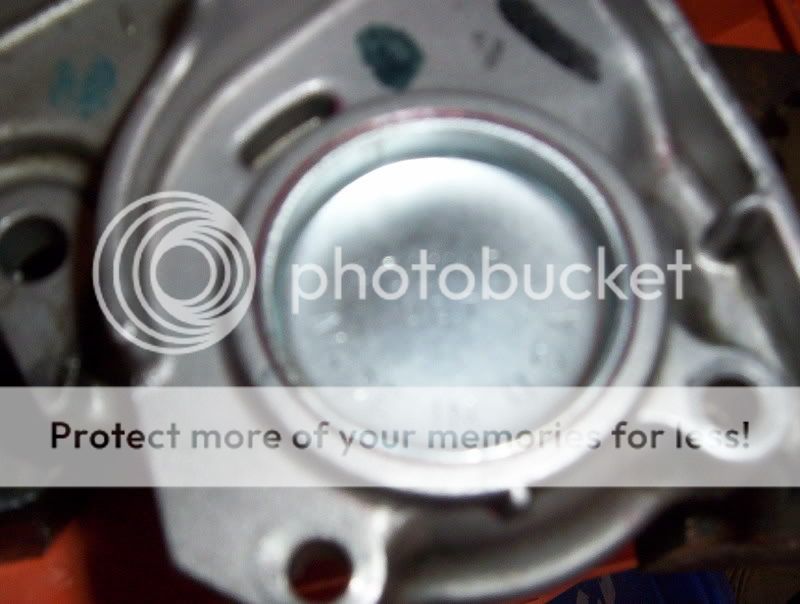
40mm "Made in the USA" freeze plug installed; save money on your balance shaft removal and support the American economy.
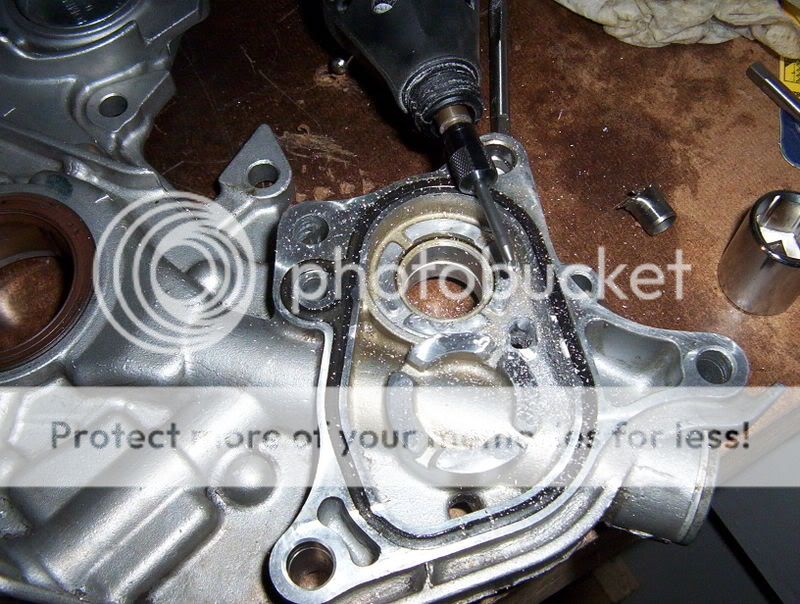
<U><FONT SIZE="4">Removing Bearing</FONT></U>
Don't have a cam bearing removal tool? There's an easier way!
The first thing I did was give the bearings tab a decent beating.. My first intention was to beat it out of there but that didn't quite work. Bending the tab down did however help later on in the process.
Using a dremel pencil attachment and a grinding stone I cut a slot into the bearing. (bearing not pictured) No need to get emotional about nicking the aluminum.
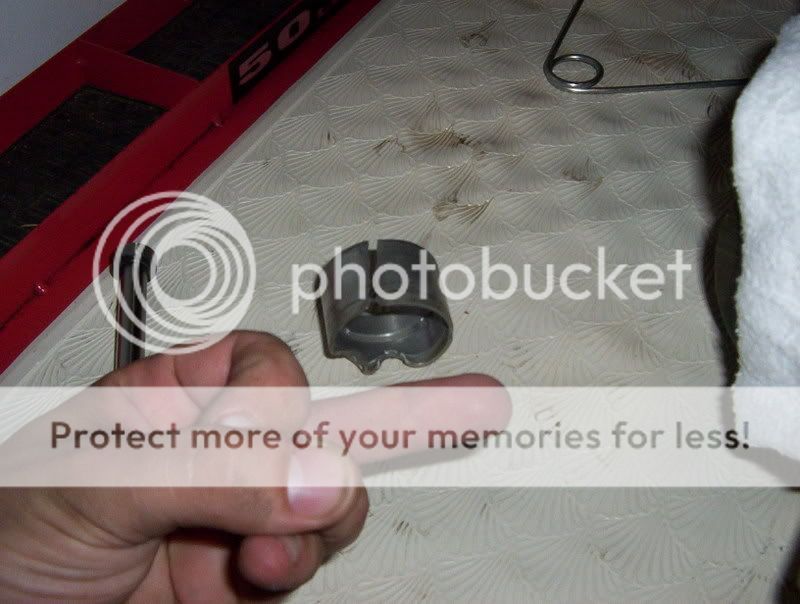
A few light taps with a hammers handle on the bent bearing tab and the bearing is out.
<U><FONT SIZE="4">Tapping Oil Hole</FONT></U>
A dowel will not work for this hole, a tapped hole with an 1/8" npt plug works perfect.
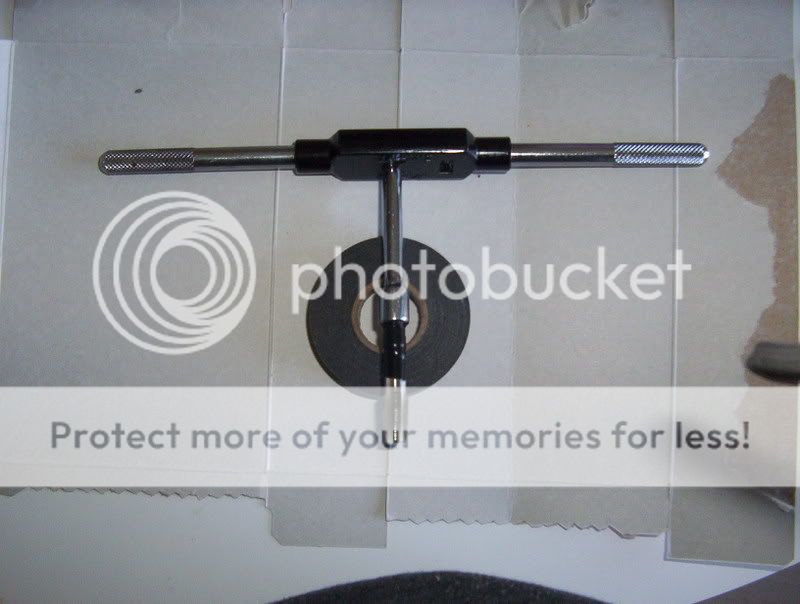
Tap not long enough? Use a 1/4" extension with a tiny bit of electrical or pipe tape around the tap. This of course only works with taps with a small shank. If anyone has a better way to do this please speak up.
21/64" bit with some electrical tape in case of a slip. Aluminum likes to grab drill bits when you have a pre-drilled hole so hold on tight.

If you don't have experience tapping aluminum now is not the time to learn. You've been warned.
I had to go pretty deep with this particular npt tap to get the plug slightly counter-sunk. Took a couple of test fits before I got it just right.
A dab of red loctite and a half-turn with a small pipe (after finger tight) and this hole is plugged!
<U><FONT SIZE="4">Plugging oil holes</FONT></U>
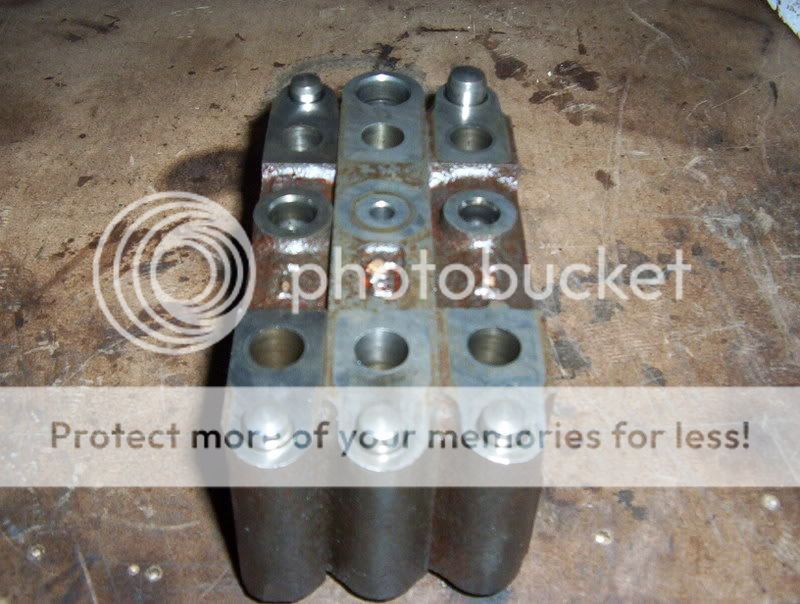
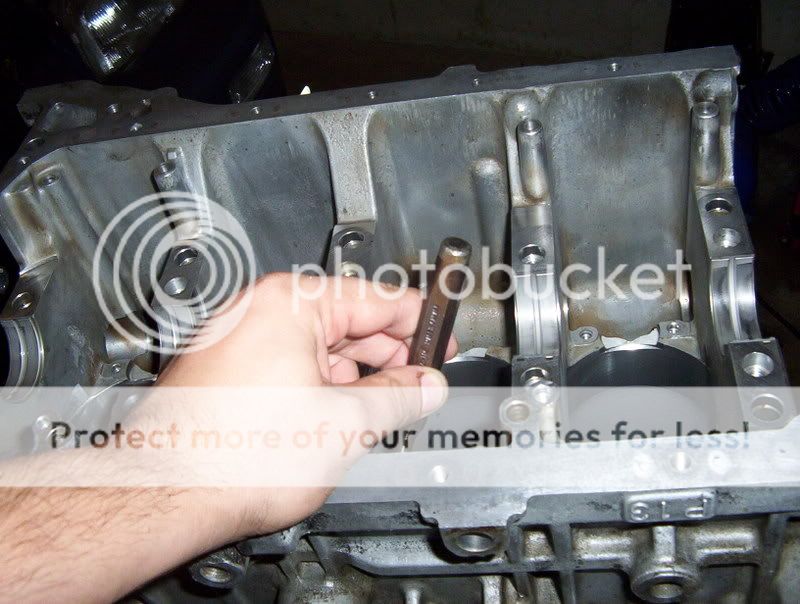
Main caps 1,3 and 4 pictured. The solid dowel pins are plugging the oil holes to the balance shafts]. I chose to tap the dowels in to the main caps with the tapered side sticking out. This was a bit tricky and took some time.
There is around .100" sticking out for location purposes. This is enough in my opinion but you can always step up to a longer dowel if it makes you feel better.
-----

Not sure where to stick this thread.
These are instructions for the DIYer on how to remove the H/F series balance shafts for under $20.
It is assumed that anyone attempting this has some experience with drilling/tapping aluminum and freeze plug and bearing removal and installation.
Parts:
(1) 12 x 20 m6* Dowel
(3) 10 x 16 m6* Dowel
(1) 40mm Freeze Plug
(1) 1" Freeze Plug
(1) 1/8" NPT plug
(3) 5/16-18 set screws
Loctite
Permatex sealant
Tools:
- Hammer
- Dremel with Pencil attachment
- Punch
- Tap set
- Drill bit set (fraction and letter)
- Press (optional)
*"m6" is the spec for how tight a dowel pin fits inside of the hole. m6 is tight but removable, perfect IMO.
I purchased these dowel pins at a local supply store that specializes in fasteners. At first glance they look shorter than the hollow Honda OEM dowel pins but they are in fact the exact same height. Note that one end is tapered.
Set screws
1/8" npt plug.
<FONT SIZE="4"><U>Rear Balance Shaft</U></FONT>
My experience tells me that this small piece of aluminum should be ground off before drilling and tapping this hole. Otherwise there is a good chance that this will crack off when you tap this hole.
2-3 minutes of careful grinding and this hole is ready to be drilled.
An "F" drill bit is ideal for a 5/16-18 tap
Dill holes as required.
<FONT COLOR="Red">Since (non-tapered) set screws are being used it is a good idea not to tap all the way through the holes. This allows you to tighten the screws.</FONT> It took me a couple of tries on each hole to get the holes deep enough.
Clean holes and install set screws using an appropriate amount of sealant. I used black permatex sealant.
- Press out Bearing. The pictures shows an appropriately sized socked pressing out the bearing.
- Install 1" plug flush with the oil pump using your sealant of choice. Don't worry about the oil hole on the other side of the plug.
<U><FONT SIZE="4">
Front Balance Shaft (Oil Pump Assembly)</FONT></U>
oil pump pic
A - Harbor Freight press (which BTW can be purchased with the money you save not buying an expensive balance shaft removal kit)
B - Chunk of metal
C- One of the balance shaft gears (works prefect!)
D - 40mm Freeze Plug
E - Oil Pump Assembly
F - Perfectly sized 32mm impact socket
This is the point you realized that you forgot to put loctite/sealant on the 40mm freeze plug. Take this all apart, clean hole, apply loctite, re-assemble and press in the freeze plug as required.
40mm "Made in the USA" freeze plug installed; save money on your balance shaft removal and support the American economy.
<U><FONT SIZE="4">Removing Bearing</FONT></U>
Don't have a cam bearing removal tool? There's an easier way!
The first thing I did was give the bearings tab a decent beating.. My first intention was to beat it out of there but that didn't quite work. Bending the tab down did however help later on in the process.
Using a dremel pencil attachment and a grinding stone I cut a slot into the bearing. (bearing not pictured) No need to get emotional about nicking the aluminum.
A few light taps with a hammers handle on the bent bearing tab and the bearing is out.
<U><FONT SIZE="4">Tapping Oil Hole</FONT></U>
A dowel will not work for this hole, a tapped hole with an 1/8" npt plug works perfect.
Tap not long enough? Use a 1/4" extension with a tiny bit of electrical or pipe tape around the tap. This of course only works with taps with a small shank. If anyone has a better way to do this please speak up.
21/64" bit with some electrical tape in case of a slip. Aluminum likes to grab drill bits when you have a pre-drilled hole so hold on tight.
If you don't have experience tapping aluminum now is not the time to learn. You've been warned.
I had to go pretty deep with this particular npt tap to get the plug slightly counter-sunk. Took a couple of test fits before I got it just right.
A dab of red loctite and a half-turn with a small pipe (after finger tight) and this hole is plugged!
<U><FONT SIZE="4">Plugging oil holes</FONT></U>
Main caps 1,3 and 4 pictured. The solid dowel pins are plugging the oil holes to the balance shafts]. I chose to tap the dowels in to the main caps with the tapered side sticking out. This was a bit tricky and took some time.
There is around .100" sticking out for location purposes. This is enough in my opinion but you can always step up to a longer dowel if it makes you feel better.
-----
Not sure where to stick this thread.
 09-21-2008, 07:52 AM
#7
Honda-Tech Member
Thread Starter
Join Date: Nov 2003
Location: Kitchener, Ontario, CANADA
Posts: 5,986
Likes: 0
Received 2 Likes
on
2 Posts
<TABLE WIDTH="90%" CELLSPACING=0 CELLPADDING=0 ALIGN=CENTER><TR><TD>Quote, originally posted by pgpbubble »</TD></TR><TR><TD CLASS="quote">Pics are down.</TD></TR></TABLE>
fixed.
fixed.
Trending Topics
09-21-2008, 09:12 AM
#8
Member

A slightly easier way on the balance shaft bearing holes, if you have access to a cam bearing removal/ install tool, is knock the bearing out, turn it and re-install, covering up the oil holes.
09-21-2008, 11:12 AM
#10
Honda-Tech Member
Thread Starter
Join Date: Nov 2003
Location: Kitchener, Ontario, CANADA
Posts: 5,986
Likes: 0
Received 2 Likes
on
2 Posts
<TABLE WIDTH="90%" CELLSPACING=0 CELLPADDING=0 ALIGN=CENTER><TR><TD>Quote, originally posted by DonF »</TD></TR><TR><TD CLASS="quote">A slightly easier way on the balance shaft bearing holes, if you have access to a cam bearing removal/ install tool, is knock the bearing out, turn it and re-install, covering up the oil holes.</TD></TR></TABLE>
I did a lot of research on balance shaft removal and I came to the conclusion that what you are describing was easier said that done. A few described this as a PITA. A even easier way than what you are describing is to tap some 12mm freeze plugs down the holes, no special tools required and you're done in 2 min.
I actually purchased 12mm freeze plugs be decided not to use them. I'm not sure how air would purge from all the extra open space in the oil system. I felt better about cutting off the oil supply at the source.
09-21-2008, 11:36 AM
#11
Member
I do not have a block here to look at. But we did do that about 6 years ago. Made a bunch of custom stuff for the pump, your way looks easier. We used to turn the rear cam bearing on the Foad 1600 blocks, when converting to a 4 valve BDA and just a jackshaft, no cam. I know we studied the oil system and decided it would work. Just like drilling the lower main bearings and modifying the end of the main gally holes and plugs. Did you just shim or machine the end plugs in the gally?
 09-21-2008, 08:40 PM
#13
Honda-Tech Member
Thread Starter
Join Date: Nov 2003
Location: Kitchener, Ontario, CANADA
Posts: 5,986
Likes: 0
Received 2 Likes
on
2 Posts
<TABLE WIDTH="90%" CELLSPACING=0 CELLPADDING=0 ALIGN=CENTER><TR><TD>Quote, originally posted by DonF »</TD></TR><TR><TD CLASS="quote">Did you just shim or machine the end plugs in the gally?</TD></TR></TABLE>
I haven't done either, but I will take a close look at those end plugs.
<TABLE WIDTH="90%" CELLSPACING=0 CELLPADDING=0 ALIGN=CENTER><TR><TD>Quote, originally posted by 98vtec »</TD></TR><TR><TD CLASS="quote">looks good. But i like my CNC bling </TD></TR></TABLE>
The kits are great.
I spent a lot of time in the machine shop at my last job and got pretty comfortable with grinding, drilling and tapping so I couldn't justify the price.
10-04-2008, 04:29 PM
#14
Honda-Tech Member
So, I plan to follow this on my F23 build. Someone mentioned using 12mm frost plugs instead of tapping and using NPT fittings to plug the balance shaft oil gallys, will they hold up to the oil pressure? or is it best to tap it and put pipe fittings?
I am not new to tapping but I am too chicken **** to drill and tap a hole so close to the crank.
ETA: we have the same vernier
Modified by JDM_DC4_Fanatic at 5:39 PM 10/4/2008
I am not new to tapping but I am too chicken **** to drill and tap a hole so close to the crank.
ETA: we have the same vernier
Modified by JDM_DC4_Fanatic at 5:39 PM 10/4/2008
10-04-2008, 04:34 PM
#15
Honda-Tech Member
Thread Starter
Join Date: Nov 2003
Location: Kitchener, Ontario, CANADA
Posts: 5,986
Likes: 0
Received 2 Likes
on
2 Posts
<TABLE WIDTH="90%" CELLSPACING=0 CELLPADDING=0 ALIGN=CENTER><TR><TD>Quote, originally posted by JDM_DC4_Fanatic »</TD></TR><TR><TD CLASS="quote">So, I plan to follow this on my F23 build. Someone mentioned using 12mm frost plugs instead of tapping and using NPT fittings to plug the balance shaft oil gallys, will they hold up to the oil pressure? or is it best to tap it and put pipe fittings?
I am not new to tapping but I am too chicken **** to drill and tap a hole so close to the crank.</TD></TR></TABLE>
I will check this on my block tomorrow.
No one should be attempting any of this with the crank sitting in the block..
I am not new to tapping but I am too chicken **** to drill and tap a hole so close to the crank.</TD></TR></TABLE>
I will check this on my block tomorrow.
No one should be attempting any of this with the crank sitting in the block..
10-04-2008, 04:41 PM
#16
Honda-Tech Member
no, my block is bare, what I ment was, I didnt want to drill close to the main supports for the crank.
atleast I have 2 other block if I [freak] up. I am a mechanic apprentice, so I know my way around an engine, and I know how to tap holes and stuff, but I have never done anything like this, especially INSIDE the block.
atleast I have 2 other block if I [freak] up. I am a mechanic apprentice, so I know my way around an engine, and I know how to tap holes and stuff, but I have never done anything like this, especially INSIDE the block.
10-04-2008, 06:53 PM
#17
Honda-Tech Member
Join Date: May 2006
Location: upstate NY
Posts: 1,989
Likes: 0
Received 0 Likes
on
0 Posts

i wish you had made this post a month or so ago before I bought my kaizen speed kit.
<TABLE WIDTH="90%" CELLSPACING=0 CELLPADDING=0 ALIGN=CENTER><TR><TD>Quote, originally posted by 2point2 »</TD></TR><TR><TD CLASS="quote">Tap not long enough? Use a 1/4" extension with a tiny bit of electrical or pipe tape around the tap. This of course only works with taps with a small shank. If anyone has a better way to do this please speak up.</TD></TR></TABLE>
I use an appropriate 12pt socket to hold the tap and a ratchet extension of the necessary length.
10-05-2008, 06:34 PM
#19
Honda-Tech Member
Join Date: May 2007
Location: Broken in, CT
Posts: 116
Likes: 0
Received 0 Likes
on
0 Posts
<TABLE WIDTH="90%" CELLSPACING=0 CELLPADDING=0 ALIGN=CENTER><TR><TD>Quote, originally posted by bluedlude »</TD></TR><TR><TD CLASS="quote">
i wish you had made this post a month or so ago before I bought my kaizen speed kit.
I use an appropriate 12pt socket to hold the tap and a ratchet extension of the necessary length.</TD></TR></TABLE>
This works too but be careful with the slop in it. Tap straight or you'll be pissed!
i wish you had made this post a month or so ago before I bought my kaizen speed kit.
I use an appropriate 12pt socket to hold the tap and a ratchet extension of the necessary length.</TD></TR></TABLE>
This works too but be careful with the slop in it. Tap straight or you'll be pissed!
 10-07-2009, 10:22 PM
#23
Honda-Tech Member
Join Date: Aug 2006
Location: NJ
Posts: 840
Likes: 0
Received 0 Likes
on
0 Posts
Has there been a considerable increase in power on the motor since performing this removal? I think more than that, would you say, in your opinion, having done this, its worth doing or has more benefit to it than not at all?
04-15-2010, 08:49 PM
#24
Honda-Tech Member

Join Date: Jun 2001
Posts: 52
Likes: 0
Received 0 Likes
on
0 Posts
I'm about to make the modification and I have a question...
Is he suggesting that by flipping ALL the bearings of the balancer shaft to cover the holes, that I don't need to plug any holes in the 1,3,4 main caps AND tap/plug the middle oil hole? They all align with the bearings when I look through the holes that needs to be plugged...
Last edited by FreaQ; 04-16-2010 at 03:47 AM.
