
HOW TO: S2K Seat Pan Swap into EG/Del Sol/EK
 07-05-2008, 10:31 PM
#1
Honda-Tech Member
Thread Starter
Join Date: Nov 2005
Location: 805, CA, US
Posts: 9,872
Likes: 0
Received 0 Likes
on
0 Posts
So I picked up a set of S2K seats this past week for dirt-cheap and in damn good condition. Not wanting to deal with the “wobble” (happens if you just put s2k seats in an eg/dc/ek/sol only being able to get 3 of the bolts in) I went for the safer and better way of a full pan swap. Total time was about 2 ˝ -3 hours of work on the first seat (taking my time and referring to other write-ups I have been able to find (most with expired pics). Second seat I was able to do in about 1 ˝ to 2 hours of time.
First, we will begin with the S2K seat teardown:
Start by removing the plastics, the little handle just pulls off the main piece is held on by a couple of simple Phillips screws:

At this point, you will see 3 14mm bolts you need to remove:

Next you’ll run into 1 12mm nut and 1 14 mm bolt on the opposite side of the seat that needs to be removed(the 14mm bolt holding the seatbelt release can stay untouched(it doesn’t have any bearing on getting the pan or rails removed)

At this point, the seat bottom and back should come apart easily
This becomes the not so fun part
There are 2 14mm bolts hidden just above the reclining mechanism:

With the backrest portion of the seat, facing down at the bottom most portions you can fill a slight rise this is the little plastic ridge that holds the backrest portion tightly with the rest of the seat.


With all three section of the plastic ridge undone, the backrest will just hang freely:
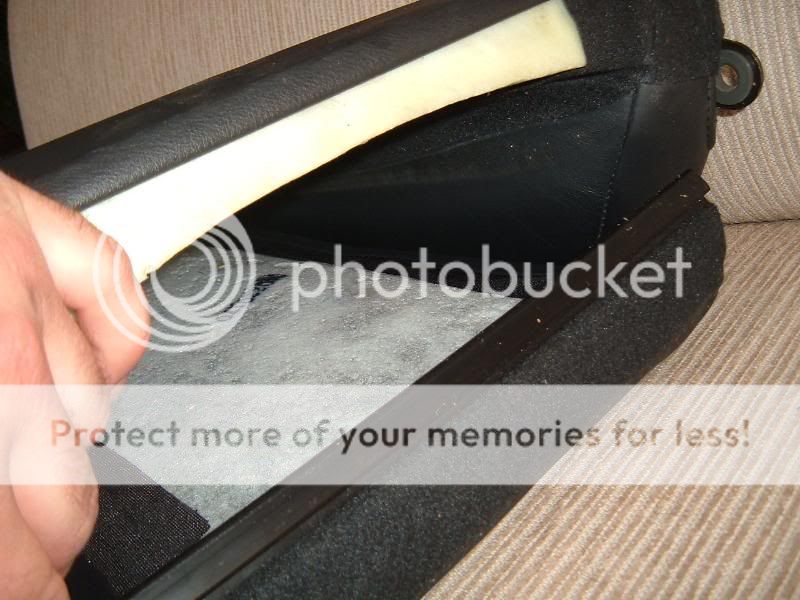
By far the hardest part is right here:
Now you need to slide the cover up enough to expose BOTH 14mm bolts there are TWO, about 3” apart:

Now we will skip over to the sol seat very quick. I’ve already removed the railings removing the rails are the same for an EG/DC/EK/Sol and maybe EFs too IDK about that though
We are going to get the reclining mechanism off the sol seat to put on the s2k seat where we were.
Start by finding the one hog ring that needs to be undone:

Then unzip the side close to the mechanism:

Much easier to get to the hidden 14mm bolts on the sol seat:

The EG/DC/EK/sol reclining mechanism is a long “L” unlike that of the S2K and attaches to the seat pan with 2 14mm bolts:

With the S2K bolt holes still exposed:

Slide the old seat’s reclining mechanism into place on the S2K seat and bolt it down:

Long “L” shape of the EG/DC/EK/Sol reclining mechanism and rail mount:

Compared to the short”L” shape of the S2K’s due to the rails mounting on the bottom of the pan:

With the top portions of the seats done we now go back to the infamous “pan swap”
I found it easiest to have the two seat bottoms right next to each other to remove all the hog rings at once, swap out the S2K pan for the EG/EK/DC/Sol pan and then redo the hog rings on the S2K.
Pics of the infamous hog rings (be careful….THEY ARE SHARP AS [freak]!):
All hog rings removed from both seats:
Now add that nice shiny S2K seat pan to the parts pile to be thrown away (or you can attempt to sell them (I’m going to give it a shot, but doubt I’ll get any offers LOL, S2K seats are the nicest OEM seats not too many S2K owners are probably not going to want to be swapping for other OEM Honda seats where pan swaps are possible) said parts pile:
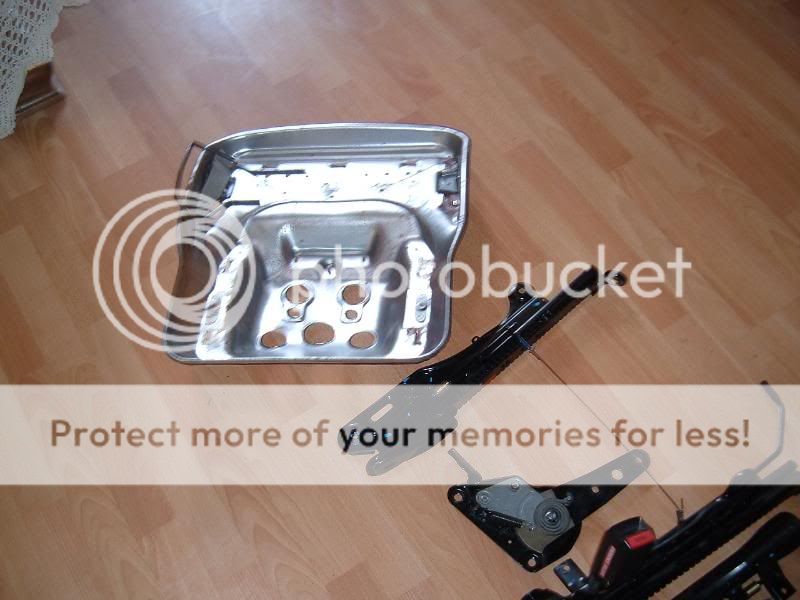
Now take that older seat pan and put it right into place of where the S2K pan just was:

Finally button up the hog rings:

You are now done with the hardest parts of the change over.
Unfortunately, my camera crapped out right here but I will try to summarize the final assembly as best as I can (it is simple and should be self-explanatory if you were able to get this far):
- Slide the inner rail into place by lining up the little hole on bottom of the seat back (will be on the side towards the center of the car) with the corresponding lower portion of the seat and loosely thread it together
- Then loosely thread in the 14 mm bolts to the seat pan
ON THE OPPOSITE SIDE IF THE SEAT NOW:
Loosely thread the 2 14mm bolts
At this point, you can install the rails
-Now go ahead and tighten everything up
-put the plastics back on with the 2 Phillips screws
-slide the handle of your choice onto the lever for the reclining mechanism….I chose to use the bigger S2K handle because it matches the seat perfectly
-Install your now very safe wobble-less S2L seats into your car and you are DONE!!!!!!!!!
Modified by broketuner-Sol_Si at 4:22 PM 7/18/2008
First, we will begin with the S2K seat teardown:
Start by removing the plastics, the little handle just pulls off the main piece is held on by a couple of simple Phillips screws:
At this point, you will see 3 14mm bolts you need to remove:
Next you’ll run into 1 12mm nut and 1 14 mm bolt on the opposite side of the seat that needs to be removed(the 14mm bolt holding the seatbelt release can stay untouched(it doesn’t have any bearing on getting the pan or rails removed)
At this point, the seat bottom and back should come apart easily
This becomes the not so fun part
There are 2 14mm bolts hidden just above the reclining mechanism:
With the backrest portion of the seat, facing down at the bottom most portions you can fill a slight rise this is the little plastic ridge that holds the backrest portion tightly with the rest of the seat.
With all three section of the plastic ridge undone, the backrest will just hang freely:
By far the hardest part is right here:
Now you need to slide the cover up enough to expose BOTH 14mm bolts there are TWO, about 3” apart:
Now we will skip over to the sol seat very quick. I’ve already removed the railings removing the rails are the same for an EG/DC/EK/Sol and maybe EFs too IDK about that though
We are going to get the reclining mechanism off the sol seat to put on the s2k seat where we were.
Start by finding the one hog ring that needs to be undone:
Then unzip the side close to the mechanism:
Much easier to get to the hidden 14mm bolts on the sol seat:
The EG/DC/EK/sol reclining mechanism is a long “L” unlike that of the S2K and attaches to the seat pan with 2 14mm bolts:
With the S2K bolt holes still exposed:
Slide the old seat’s reclining mechanism into place on the S2K seat and bolt it down:
Long “L” shape of the EG/DC/EK/Sol reclining mechanism and rail mount:
Compared to the short”L” shape of the S2K’s due to the rails mounting on the bottom of the pan:
With the top portions of the seats done we now go back to the infamous “pan swap”
I found it easiest to have the two seat bottoms right next to each other to remove all the hog rings at once, swap out the S2K pan for the EG/EK/DC/Sol pan and then redo the hog rings on the S2K.
Pics of the infamous hog rings (be careful….THEY ARE SHARP AS [freak]!):
All hog rings removed from both seats:
Now add that nice shiny S2K seat pan to the parts pile to be thrown away (or you can attempt to sell them (I’m going to give it a shot, but doubt I’ll get any offers LOL, S2K seats are the nicest OEM seats not too many S2K owners are probably not going to want to be swapping for other OEM Honda seats where pan swaps are possible) said parts pile:
Now take that older seat pan and put it right into place of where the S2K pan just was:
Finally button up the hog rings:
You are now done with the hardest parts of the change over.
Unfortunately, my camera crapped out right here but I will try to summarize the final assembly as best as I can (it is simple and should be self-explanatory if you were able to get this far):
- Slide the inner rail into place by lining up the little hole on bottom of the seat back (will be on the side towards the center of the car) with the corresponding lower portion of the seat and loosely thread it together
- Then loosely thread in the 14 mm bolts to the seat pan
ON THE OPPOSITE SIDE IF THE SEAT NOW:
Loosely thread the 2 14mm bolts
At this point, you can install the rails
-Now go ahead and tighten everything up
-put the plastics back on with the 2 Phillips screws
-slide the handle of your choice onto the lever for the reclining mechanism….I chose to use the bigger S2K handle because it matches the seat perfectly
-Install your now very safe wobble-less S2L seats into your car and you are DONE!!!!!!!!!
Modified by broketuner-Sol_Si at 4:22 PM 7/18/2008
 07-06-2008, 07:51 AM
#3
Honda-Tech Member
Join Date: Dec 2007
Location: FoCo, Georgia, United States
Posts: 224
Likes: 0
Received 0 Likes
on
0 Posts
very nice write up. having done this about 2 days ago i only wish this could have been posted about... 2 days ago.
haha, but you did a very good job at capturing where the bolts and such are that some may miss or misunderstand. it really isnt a bad job, just time consuming with all the friggin hog rings. oh and <FONT SIZE="5">the hog rings</FONT> when you get the sol pan on the s2k foams may be a little loose or fit slightly awkwardly but it's ok! the seat cover will still be tight... kinda freaked me out at first.
but basically, it can easily be knocked out in an afternoon from sol seat removal to s2k seat installation.
07-06-2008, 08:57 AM
#4
Member
Join Date: Oct 2004
Location: back in, nj, USA
Posts: 2,294
Likes: 0
Received 0 Likes
on
0 Posts
finally a write up with undeaded pics..lol..too bad this wasnt up a few months back..the hardest part = pulling the leather back on the side to get to those bolts...that step unminted my seats
07-06-2008, 01:36 PM
#5
Honda-Tech Member
Thread Starter
Join Date: Nov 2005
Location: 805, CA, US
Posts: 9,872
Likes: 0
Received 0 Likes
on
0 Posts
thanks. yeah EVERY thread I found had dead pics....had to do it entirely off of other's instructions no pics to guide me(sucked because I'm much more of a visual learner). the one I found most helpful if someone gets lost with my instructions is the one in the FAQ section. 
Trending Topics

Thread
Thread Starter
Forum
Replies
Last Post
99civic_coupe
Honda Civic / Del Sol (1992 - 2000)
2
12-20-2012 04:54 PM
Smith Wise
Honda Civic / Del Sol (1992 - 2000)
5
12-07-2003 06:30 PM