
96-00 Civic Scarebird brake conversion write up.
 03-16-2008, 08:40 AM
#1
Junior Member
Thread Starter
Well lets start off with what this is. This is a install write up/review of the Scarebird 96-00 Civic rear drum to disc conversion bracket. This is being done to my 97 Civic Ex. So lets get started.
1.) Loosen the lugnuts on the wheels and jack the car up. When its at a workable height get your jackstands under the car. Make sure its safely on the jackstands before you remove the wheels.
2.) Now that you have the car up and the wheels removed go ahead and remove the brake drums.
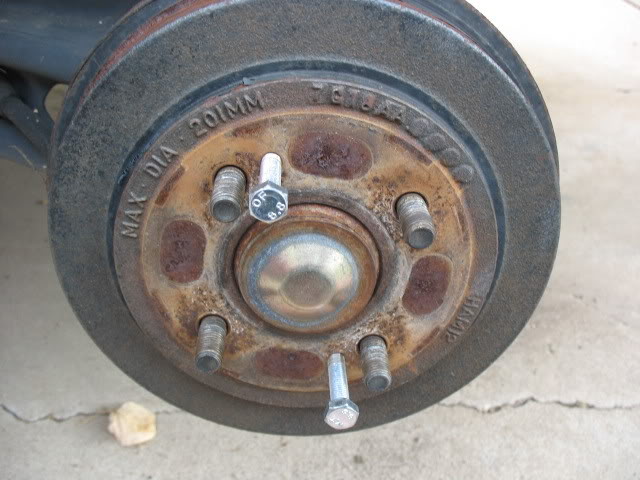
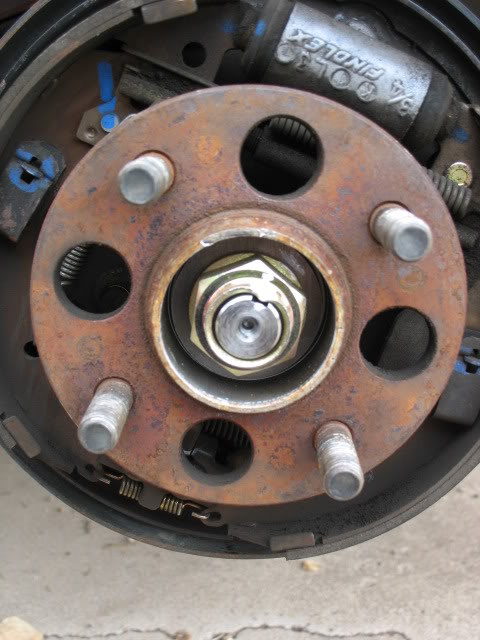
3.) Take the dust cap off to get to the spindle nut.
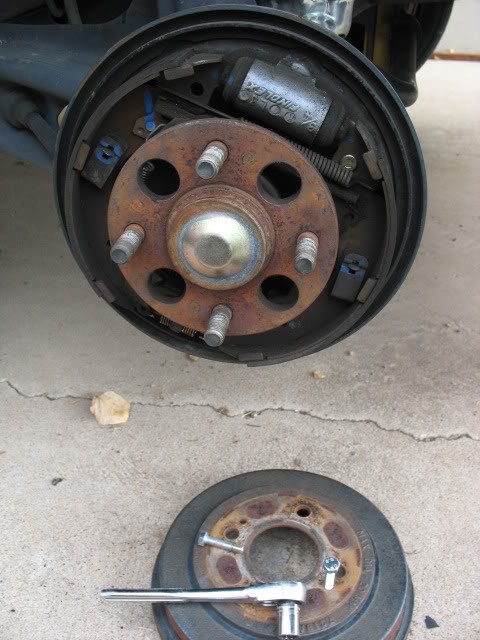
4.) Unstack the spindle nut and remove it. Then slide the hub off of the spindle.
5.) Remove the retainer springs to get the drum shoes away from the backing plate. Then unhook the parking brake cable from the brake shoes.
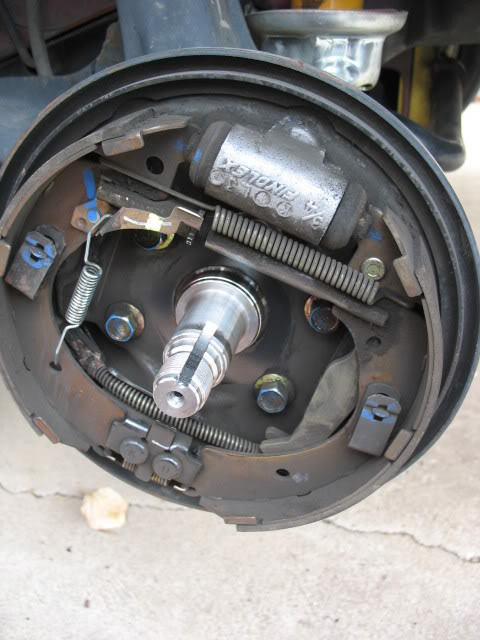
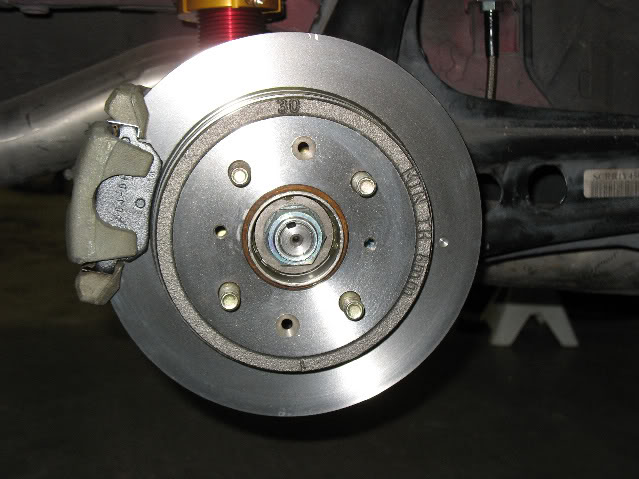
6.) Remove the parking brake cable from the backing plate by sliding a 12mm box end wrench onto the tangs to compress them and slide it though the hole.
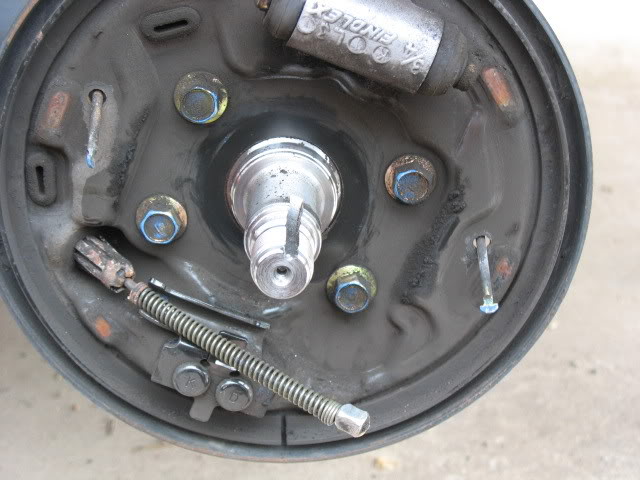
7.) Using a flare nut wrench remove the brake line from the wheel cylinder.
8.) Remove the four bolts that are holding the backing plate to the spindle. Remove the backing plate.
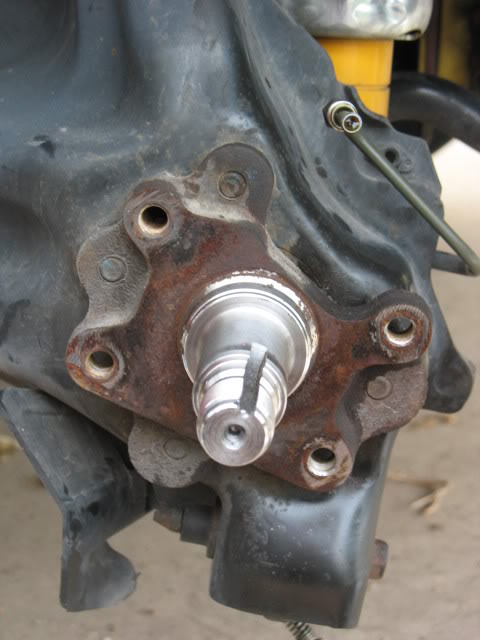
9.) Now take the Scarebird conversion bracket and place it on the spindle. It does matter how it goes on. Caliper mounting holes need to be at the rear and the offset needs to be going into the car. It will sit on the spindle casting.
10.) Put loctite on the threads of the new bolts and thread them into the holes that held the backing plate on. Make sure the new bolts are tight and the conversion bracket is secure.
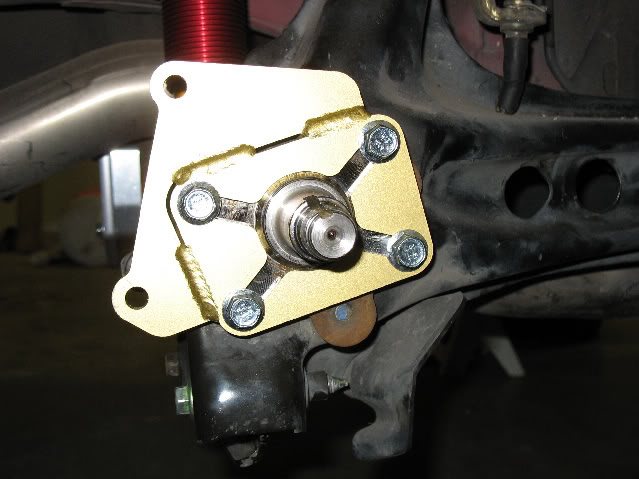
11.) Reinstall the hub onto the spindle and using a new spindle nut torque it to 134 ft-lbs.
12.) Place the rotor on the hub and install the caliper mount onto the Scarebird bracket with the supplied bolts. This is also a good time to pull the slider pins out and apply new brake grease to them if you are using used calipers. Also apply a small amount of the grease to the retainers that hold the brake pads. Place the new pads on the retainers.

13.) Place the caliper onto the caliper bracket and tighten the bolts. Use these steps to do the other side.
14.) You can now connect the new brake hose. You will need to unconnect the drum brake hose from the body and connect the new hose to the hard line. Route the brake hose to the caliper and using new crush washers on both sides of the banjo bolt attach it to the caliper. Honda made two different brackets to attach the brake hose to on the backside of the trailing arm. One for disc and one for drum. So if you want you can go to Honda purchase the bracket and just swap it with the one thats already there or you can cut the one you have. I ended up cutting the one I had and drilled a hole to put a bolt though. Worked great. (no pictures)
15.) You now need to swap your drum e-brake cables to the disc e-brake cables. This is done by taking out all the plastic clips/bolts that hold the gas tank cover on. Some of the bolts are hard to get cause the exhaust can get in the way. I ended up dropping the rear section of the exhaust off of the hangers to gain access to some bolts. After you have the cover off you will need to unbolt the e-brake cables from the trailing arms and the underbody. Get in the car and remove the center console. You will then unhook the cables from the parking brake equalizer. Pull the cables out of the cabin. (no pictures)
16.) Installing the e-brake cables is reverse the removal. Make sure you get the rubber seals on the cables installed good so nothing will sneak by and get in the cabin. Make sure you paid attention to how the cables were routed and route the new lines the same. After you have the cables hooked up to the calipers and bolted to the underbody you can reinstall the gas tank cover and exhaust.
17.) To adjust the parking brake cable you need to pull the parking brake lever up till you hear it click once. You will then need to turn the adjusting nut clockwise to tighten the cables. Every couple turns of the adjusting nut you need to get out and turn the wheel. Your looking for a slight drag. Once you get the brakes adjusted put the brake lever down and check to make sure there is no drag on the rear brakes by spinning them. (no pictures)
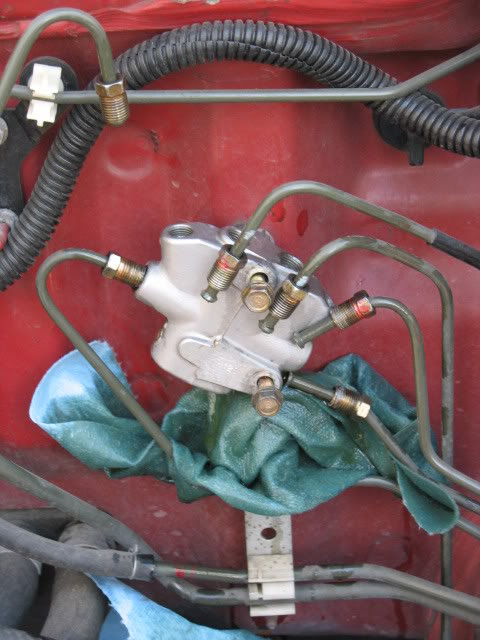
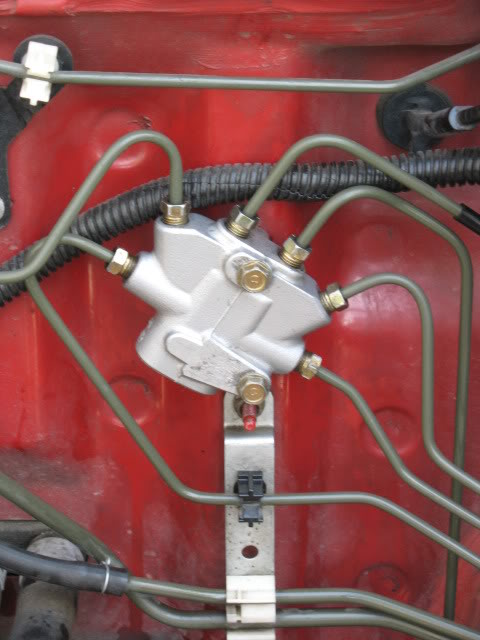
18.) Next up is the proportioning valve. Since im already working with a Ex and im duplicating the brake setup from an Si I just need to change my proportioning valve and not my brake booster/master cylinder like some others might. So lets get started. Take your flare nut wrench and loosen all six brake hard lines that attach to the proportioning valve. Then unbolt the proportiong valve from the firewall. Grab the Si (also comes on 96-00 2/3 door Dx's, Cx's. Part number 46210-S04-902 There is no marking on these types of proportioning valves. So be sure you are getting the right proportiong valve.) proportion valve and bolt it to the firewall. Take the brake hardlines and put them back in there correct hole. Tighten them up using a flare nut wrench.
19.) Last step! Brake bleeding time. Now everyone has there way of doing it, but heres the way I do it, cause I never seem to have a friend around when I bleed my brakes. Grab a bottle. I like to use 32oz Gatorade bottles. And a long piece of clear tubing. You will want the tubing to fit snugly over the bleeder valve. Now pour a little brake fluid in the bottle and drop the other end of the tube into it. You want the end of the tube to be submerged in the brake fluid. Always make sure theres enough brake fluid in the reservoir. Now grab your flare nut wrench and loosen the bleeder valve just enough to be bled. Push the pedal 3/4 of the way to the floor, but never all the way. Keep pumping till you get clean clear fluid coming though the tube or till you run to low in the reservoir. Keep filling and pumping till all the brakes are putting out clean clear fluid. You should also feel the brakes getting firmer. And remember to start with the right rear then move to the left front, the left rear and the right front.
20.) Oh...I guess I forgot the last step. Crack open your favorite drink, sit back and admire your new brakes.

Modified by CerealWars at 10:21 AM 5/10/2008
1.) Loosen the lugnuts on the wheels and jack the car up. When its at a workable height get your jackstands under the car. Make sure its safely on the jackstands before you remove the wheels.
2.) Now that you have the car up and the wheels removed go ahead and remove the brake drums.
3.) Take the dust cap off to get to the spindle nut.
4.) Unstack the spindle nut and remove it. Then slide the hub off of the spindle.
5.) Remove the retainer springs to get the drum shoes away from the backing plate. Then unhook the parking brake cable from the brake shoes.
6.) Remove the parking brake cable from the backing plate by sliding a 12mm box end wrench onto the tangs to compress them and slide it though the hole.
7.) Using a flare nut wrench remove the brake line from the wheel cylinder.
8.) Remove the four bolts that are holding the backing plate to the spindle. Remove the backing plate.
9.) Now take the Scarebird conversion bracket and place it on the spindle. It does matter how it goes on. Caliper mounting holes need to be at the rear and the offset needs to be going into the car. It will sit on the spindle casting.
10.) Put loctite on the threads of the new bolts and thread them into the holes that held the backing plate on. Make sure the new bolts are tight and the conversion bracket is secure.
11.) Reinstall the hub onto the spindle and using a new spindle nut torque it to 134 ft-lbs.
12.) Place the rotor on the hub and install the caliper mount onto the Scarebird bracket with the supplied bolts. This is also a good time to pull the slider pins out and apply new brake grease to them if you are using used calipers. Also apply a small amount of the grease to the retainers that hold the brake pads. Place the new pads on the retainers.
13.) Place the caliper onto the caliper bracket and tighten the bolts. Use these steps to do the other side.
14.) You can now connect the new brake hose. You will need to unconnect the drum brake hose from the body and connect the new hose to the hard line. Route the brake hose to the caliper and using new crush washers on both sides of the banjo bolt attach it to the caliper. Honda made two different brackets to attach the brake hose to on the backside of the trailing arm. One for disc and one for drum. So if you want you can go to Honda purchase the bracket and just swap it with the one thats already there or you can cut the one you have. I ended up cutting the one I had and drilled a hole to put a bolt though. Worked great. (no pictures)
15.) You now need to swap your drum e-brake cables to the disc e-brake cables. This is done by taking out all the plastic clips/bolts that hold the gas tank cover on. Some of the bolts are hard to get cause the exhaust can get in the way. I ended up dropping the rear section of the exhaust off of the hangers to gain access to some bolts. After you have the cover off you will need to unbolt the e-brake cables from the trailing arms and the underbody. Get in the car and remove the center console. You will then unhook the cables from the parking brake equalizer. Pull the cables out of the cabin. (no pictures)
16.) Installing the e-brake cables is reverse the removal. Make sure you get the rubber seals on the cables installed good so nothing will sneak by and get in the cabin. Make sure you paid attention to how the cables were routed and route the new lines the same. After you have the cables hooked up to the calipers and bolted to the underbody you can reinstall the gas tank cover and exhaust.
17.) To adjust the parking brake cable you need to pull the parking brake lever up till you hear it click once. You will then need to turn the adjusting nut clockwise to tighten the cables. Every couple turns of the adjusting nut you need to get out and turn the wheel. Your looking for a slight drag. Once you get the brakes adjusted put the brake lever down and check to make sure there is no drag on the rear brakes by spinning them. (no pictures)
18.) Next up is the proportioning valve. Since im already working with a Ex and im duplicating the brake setup from an Si I just need to change my proportioning valve and not my brake booster/master cylinder like some others might. So lets get started. Take your flare nut wrench and loosen all six brake hard lines that attach to the proportioning valve. Then unbolt the proportiong valve from the firewall. Grab the Si (also comes on 96-00 2/3 door Dx's, Cx's. Part number 46210-S04-902 There is no marking on these types of proportioning valves. So be sure you are getting the right proportiong valve.) proportion valve and bolt it to the firewall. Take the brake hardlines and put them back in there correct hole. Tighten them up using a flare nut wrench.
19.) Last step! Brake bleeding time. Now everyone has there way of doing it, but heres the way I do it, cause I never seem to have a friend around when I bleed my brakes. Grab a bottle. I like to use 32oz Gatorade bottles. And a long piece of clear tubing. You will want the tubing to fit snugly over the bleeder valve. Now pour a little brake fluid in the bottle and drop the other end of the tube into it. You want the end of the tube to be submerged in the brake fluid. Always make sure theres enough brake fluid in the reservoir. Now grab your flare nut wrench and loosen the bleeder valve just enough to be bled. Push the pedal 3/4 of the way to the floor, but never all the way. Keep pumping till you get clean clear fluid coming though the tube or till you run to low in the reservoir. Keep filling and pumping till all the brakes are putting out clean clear fluid. You should also feel the brakes getting firmer. And remember to start with the right rear then move to the left front, the left rear and the right front.
20.) Oh...I guess I forgot the last step. Crack open your favorite drink, sit back and admire your new brakes.
Modified by CerealWars at 10:21 AM 5/10/2008

The following users liked this post:
03-16-2008, 08:55 AM
#2

Great write up, very detailed!
BrakeExpert approved
Scarebird makes a great adapter bracket, those welds they do are real solid. Now I gotta sell my Scarebird brackets.
BrakeExpert approved
Scarebird makes a great adapter bracket, those welds they do are real solid. Now I gotta sell my Scarebird brackets.
03-16-2008, 10:50 AM
#4
Junior Member
Thread Starter
Also forgot to add that if your wanting a set of these brackets you can get them straight from Scarebird. http://www.scarebird.com/
03-16-2008, 11:48 AM
#6
Honda-Tech Member
Join Date: Jul 2007
Location: Winnipeg Manitoba
Posts: 299
Likes: 0
Received 0 Likes
on
0 Posts
<TABLE WIDTH="90%" CELLSPACING=0 CELLPADDING=0 ALIGN=CENTER><TR><TD>Quote, originally posted by edmek4 »</TD></TR><TR><TD CLASS="quote">how much did this cost? and what does the kit come with?
</TD></TR></TABLE>
x2
Good write up.
</TD></TR></TABLE>
x2
Good write up.
03-16-2008, 12:22 PM
#7
Honda-Tech Member
<TABLE WIDTH="90%" CELLSPACING=0 CELLPADDING=0 ALIGN=CENTER><TR><TD>Quote, originally posted by CerealWars »</TD></TR><TR><TD CLASS="quote">Also forgot to add that if your wanting a set of these brackets you can get them straight from Scarebird. http://www.scarebird.com/</TD></TR></TABLE>
good write up and good information HOWEVER i do not see the parts listed for honda applications
good write up and good information HOWEVER i do not see the parts listed for honda applications
Trending Topics
03-16-2008, 12:22 PM
#8
Junior Member
Thread Starter
Im not sure how much Mark (Scarebird) is going to charge for these bracket. I was a test monkey.  As for what comes in the kit two brackets and 12 bolts. Everything else can be found here, ebay or your local autoparts store.
As for what comes in the kit two brackets and 12 bolts. Everything else can be found here, ebay or your local autoparts store.
03-16-2008, 12:26 PM
#9
Junior Member
Thread Starter
<TABLE WIDTH="90%" CELLSPACING=0 CELLPADDING=0 ALIGN=CENTER><TR><TD>Quote, originally posted by Richard... »</TD></TR><TR><TD CLASS="quote">
good write up and good information HOWEVER i do not see the parts listed for honda applications </TD></TR></TABLE>Ill have to let him know that he needs to update his website. But if you drop him a email hes always quick to answer.
good write up and good information HOWEVER i do not see the parts listed for honda applications
</TD></TR></TABLE>Ill have to let him know that he needs to update his website. But if you drop him a email hes always quick to answer.
03-16-2008, 04:49 PM
#10
Honda-Tech Member
<TABLE WIDTH="90%" CELLSPACING=0 CELLPADDING=0 ALIGN=CENTER><TR><TD>Quote, originally posted by CerealWars »</TD></TR><TR><TD CLASS="quote">Ill have to let him know that he needs to update his website. But if you drop him a email hes always quick to answer.</TD></TR></TABLE>
WHY not tell him to make some for the NSX brake calipers for our cars lol...!
WHY not tell him to make some for the NSX brake calipers for our cars lol...!
03-16-2008, 05:56 PM
#13
Honda-Tech Member
Join Date: Jul 2005
Posts: 800
Likes: 0
Received 0 Likes
on
0 Posts
FINALLY! Someone re-visited a spindle adapter for the rear!
As long as things hold up solidly, this would be a great way to do a Rear Brake Conversion without dealing with bent and rusted TAs with rotted out bushings! It also eliminates the frustration of stripped Torx Head Bolts that sometimes happens with Spindle swaps.
Those are OEM Calipers with 9.4" Rotors, right?
Let us know how things work out, and great job!
JasonGhostz
03-16-2008, 06:08 PM
#14
Not to threadjack, but if anyone wants a pair of these, I got a set that were ran for 3 days (practically new) for 100$ shipped.
Also, I make a rear adapter to use 11.1" rotors, and soon to have one to use the 10.2" rear brakes (but won't be making one that can take the stock 9.4" like this). I made some that put the rear NSX calipers on, but will probably not be making them for the public (yes a drum to NSX caliper adapter)
Again, great thread, very nice pictures, and exceptionally detailed write up. Lets get this in the FAQ thread of course.
03-16-2008, 08:31 PM
#15
Junior Member
Thread Starter
<TABLE WIDTH="90%" CELLSPACING=0 CELLPADDING=0 ALIGN=CENTER><TR><TD>Quote, originally posted by Richard... »</TD></TR><TR><TD CLASS="quote">
WHY not tell him to make some for the NSX brake calipers for our cars lol...!</TD></TR></TABLE>If you want it bad enough and provide him with the parts im sure he would make them for you.
<TABLE WIDTH="90%" CELLSPACING=0 CELLPADDING=0 ALIGN=CENTER><TR><TD>Quote, originally posted by jdmztrane »</TD></TR><TR><TD CLASS="quote">I'd definitely be down for getting a set of these. Try to get a price from him. </TD></TR></TABLE>Will do.
<TABLE WIDTH="90%" CELLSPACING=0 CELLPADDING=0 ALIGN=CENTER><TR><TD>Quote, originally posted by JasonGhostz »</TD></TR><TR><TD CLASS="quote">As long as things hold up solidly, this would be a great way to do a Rear Brake Conversion without dealing with bent and rusted TAs with rotted out bushings! It also eliminates the frustration of stripped Torx Head Bolts that sometimes happens with Spindle swaps.
Those are OEM Calipers with 9.4" Rotors, right?</TD></TR></TABLE>Thats the way I felt to. Ive had friends purchase disc TA's and they always seemed to be beat to hell. And yes they are OEM calipers off of a 99-00 Si (can be found on many other cars) and Brembo rotors also for a 99-00 Si.


 03-17-2008, 04:39 PM
#20
Junior Member
Thread Starter
<TABLE WIDTH="90%" CELLSPACING=0 CELLPADDING=0 ALIGN=CENTER><TR><TD>Quote, originally posted by Slystone »</TD></TR><TR><TD CLASS="quote">a complete TEG work fine too! </TD></TR></TABLE>Yes it does...but not the point of this thread. 
</TD></TR></TABLE>Yes it does...but not the point of this thread.
03-17-2008, 04:40 PM
#21
Junior Member
Thread Starter
<TABLE WIDTH="90%" CELLSPACING=0 CELLPADDING=0 ALIGN=CENTER><TR><TD>Quote, originally posted by Eran »</TD></TR><TR><TD CLASS="quote">Does Scarebird still make this kit? I can't find anything on their site for a Honda.</TD></TR></TABLE>Yes he does. Im getting him to update his site. If you have any questions just drop him a email. Hes a great guy and will help you with any questions you have.
04-09-2008, 10:39 PM
#23
Junior Member
Thread Starter
<TABLE WIDTH="90%" CELLSPACING=0 CELLPADDING=0 ALIGN=CENTER><TR><TD>Quote, originally posted by zerovandez »</TD></TR><TR><TD CLASS="quote">So the OEM dust shield would bolt up to this kit?</TD></TR></TABLE>I honestly couldnt answer that for you. I was going to try, but didnt want to spend the money to get them from the dealer. My thoughts would be yes, but that you would want to put them in front of the brackets.