
First attempts - collector, pipe to pipe, pipe to plate
 08-10-2007, 05:05 AM
#1
Honda-Tech Member
Thread Starter
Join Date: Aug 2003
Location: rochester, ny, usa
Posts: 933
Likes: 0
Received 0 Likes
on
0 Posts
looking for some comments, constructive critisicm, and tips on where to improve. these are my first (or second) attempts at any of this.
Setup: This is scratch start tig welding with .045 mild wire, 100% argon at a flow rate of 20, sch40 mild scrap pipe.
Second attempt at a collector:
My dad was lucky enough to get some scrap 1.5" sch40 pipe.about 10 feet of it freshly sandblasted :6
slicing it up on my "jig" haha


another good fitment


snky snky

A little bevel

After beveling, wirewheeling, and wiped with rubbing alcohol

<u>Root pass no filler</u>
<u>Side 1</u>


Sh$% tack weld on side 2 broke. had to vice it back together and retack.

<u>Side 2</u>

not fully penetrating on the root passes tho. idk if i need more heat or just go slower?

This happened once after a weld, as soon as i turned off the gas it went blue. i think the tungsten was too hot when i turned the gas off.

Side 2 root pass done

Side 1 root pass done

The top on the root pass. ugh..still not good. it wont form a puddle forever and then as soon as i start moving at the top it burns it up extremely fast.

1 pass with filler side 2

1 pass with filler side 1

top with filler

end result from the inside

It definitely came out alot better than the first one. i think cleanliness and the thicker material helped alot with that one. but also learning new tricks from everyone's comments. that helped a lot. i made sure to keep the tungsten out only about 1/16", always ground the tungsten in parallel, cleaned and beveled the material like suggested kept consistent speed etc etc.
-Luke
Setup: This is scratch start tig welding with .045 mild wire, 100% argon at a flow rate of 20, sch40 mild scrap pipe.
Second attempt at a collector:
My dad was lucky enough to get some scrap 1.5" sch40 pipe.about 10 feet of it freshly sandblasted :6
slicing it up on my "jig" haha
another good fitment
snky snky
A little bevel
After beveling, wirewheeling, and wiped with rubbing alcohol
<u>Root pass no filler</u>
<u>Side 1</u>
Sh$% tack weld on side 2 broke. had to vice it back together and retack.
<u>Side 2</u>
not fully penetrating on the root passes tho. idk if i need more heat or just go slower?
This happened once after a weld, as soon as i turned off the gas it went blue. i think the tungsten was too hot when i turned the gas off.
Side 2 root pass done
Side 1 root pass done
The top on the root pass. ugh..still not good. it wont form a puddle forever and then as soon as i start moving at the top it burns it up extremely fast.
1 pass with filler side 2
1 pass with filler side 1
top with filler
end result from the inside
It definitely came out alot better than the first one. i think cleanliness and the thicker material helped alot with that one. but also learning new tricks from everyone's comments. that helped a lot. i made sure to keep the tungsten out only about 1/16", always ground the tungsten in parallel, cleaned and beveled the material like suggested kept consistent speed etc etc.
-Luke
 08-10-2007, 05:06 AM
#2
Honda-Tech Member
Thread Starter
Join Date: Aug 2003
Location: rochester, ny, usa
Posts: 933
Likes: 0
Received 0 Likes
on
0 Posts
second attempt at pipe to pipe
BIG bevel this time. as big as the bevel that came on my stainless 90 bends that will be used for the actual mani.

root pass no filler


1 pass with .045 filler


Definitly an improvement again. i still need better control over my torch and following the curve but its an improvement i would say. Would you guys do a second filler pass over this? or leave as is?
Also, ignore the cuts you see in some of the pipe, this was some scrap that i started to do a collector cut on but stopped.
-Luke
BIG bevel this time. as big as the bevel that came on my stainless 90 bends that will be used for the actual mani.
root pass no filler
1 pass with .045 filler
Definitly an improvement again. i still need better control over my torch and following the curve but its an improvement i would say. Would you guys do a second filler pass over this? or leave as is?
Also, ignore the cuts you see in some of the pipe, this was some scrap that i started to do a collector cut on but stopped.
-Luke
08-10-2007, 05:07 AM
#3
Honda-Tech Member
Thread Starter
Join Date: Aug 2003
Location: rochester, ny, usa
Posts: 933
Likes: 0
Received 0 Likes
on
0 Posts
first attempt at pipe to flange.
slightly smaller bevel on this pipe as the pipe to pipe i just did. i figured i'd keep the bevel a bit smaller to keep the material thicknesses closer. just a thought to try out.

I was not able to do a root pass. No matter how long i waited i could never get the puddle on the pipe to meat the puddle on the flange. So i just did 1 filler pass.
Bead 1

Bead 2

Bead 3

Bead 4

Bead 5

Tough to see but not too much action showing through on the inside

Bottom side of the plate

Overall i am VERY pleased with the way this turned out for my first ever pipe to flange attempt. Issues that concern me is this weld on the actual mani will see a lot of strain as it will hold a lot of the weight. Without a root pass, and only 1 filler pass i would worry about cracking issues.
What do you guys recommend? 2nd filler pass ontop? or just go back over it with just the torch to try and push the first filler pass deeper in?
Thanks for looking
-Luke
Modified by lkailburn at 11:16 AM 8/12/2007
slightly smaller bevel on this pipe as the pipe to pipe i just did. i figured i'd keep the bevel a bit smaller to keep the material thicknesses closer. just a thought to try out.
I was not able to do a root pass. No matter how long i waited i could never get the puddle on the pipe to meat the puddle on the flange. So i just did 1 filler pass.
Bead 1
Bead 2
Bead 3
Bead 4
Bead 5
Tough to see but not too much action showing through on the inside
Bottom side of the plate
Overall i am VERY pleased with the way this turned out for my first ever pipe to flange attempt. Issues that concern me is this weld on the actual mani will see a lot of strain as it will hold a lot of the weight. Without a root pass, and only 1 filler pass i would worry about cracking issues.
What do you guys recommend? 2nd filler pass ontop? or just go back over it with just the torch to try and push the first filler pass deeper in?
Thanks for looking
-Luke
Modified by lkailburn at 11:16 AM 8/12/2007
08-10-2007, 05:50 AM
#4
Honda-Tech Member
Not too bad for first attempts.
Looks like you need to work on torch angle, rythm, speed and how much heat you need to apply.
You're getting quite a bit of contamination too. Turn up the gas a bit. It should help.
Are you shaping the tungsten at all? What tungsten are you using? What grade MS filler rod?
Looks like you need to work on torch angle, rythm, speed and how much heat you need to apply.
You're getting quite a bit of contamination too. Turn up the gas a bit. It should help.
Are you shaping the tungsten at all? What tungsten are you using? What grade MS filler rod?
08-10-2007, 05:53 AM
#5
Honda-Tech Member
Thread Starter
Join Date: Aug 2003
Location: rochester, ny, usa
Posts: 933
Likes: 0
Received 0 Likes
on
0 Posts
thanks
is the contamination coming from the metal itself or from poor gas'ing? i was thinking about picking up a gas lense as i hear they are night and day difference over the standard collet bodies.
i make sure to grind the tungsten in parallel with the grinding wheel. i shape it just like a pencil, and then nick just the very tip off. and i always make sure the tungsten sticks out just 1/16" from the cup.
im not sure which tungsten, its whatever came with the tig torch? and i don't know what grade filler rod it is? Sorry. i'll see if i can find out that info.
-Luke
08-10-2007, 06:00 AM
#6
Honda-Tech Member
Could be from the metal if not cleaned properly. Use a SS wire brush. The SS is stronger than the MS and will not "impregnate" the MS.
Run the gas flow at about 28-30.
What machie are you using?
You should be using red tungsten as well.
You are getting too hot and with a combo of too slow. Together they are causing everything to look really burnt.
Once you touch the metal with the tungsten while welding, you need to stop, resharpen the tungsten, and then continue. I don't know if you have been doing this or not.
A gas lens will help, but you need to work at getting better too with what you currently have. MS is one of the easiest metals to weld, well, at least for me it is.
08-10-2007, 06:06 AM
#7
Honda-Tech Member
Thread Starter
Join Date: Aug 2003
Location: rochester, ny, usa
Posts: 933
Likes: 0
Received 0 Likes
on
0 Posts
true. i'll pick up a stainless wirewheel.
i'll keep working with what i have to improve that. i kept reading about 18-20 on the gas flow was normal. 30 seems really high? but i'll give it a shot, no harm done.
its really hard to keep the tungsten clean...its a scratch start haha so i actually have to touch the tungsten to the base metal, then pull away to start the arc. it really sucks and i heard you can add a foot pedal to it but i have yet to try that.
thanks again,
-Luke
Trending Topics
08-10-2007, 06:17 AM
#8
Honda-Tech Member
Ohhhhh. You're on the HF tig machine?
You have a few things going against you then....
Scratch start sucks and that would explain some things. Uncontrolled amperage is hurting you too.
You have a few things going against you then....
Scratch start sucks and that would explain some things. Uncontrolled amperage is hurting you too.
08-10-2007, 06:18 AM
#9
Honda-Tech Member
Join Date: May 2006
Location: brookfield, wi, usa
Posts: 322
Likes: 0
Received 0 Likes
on
0 Posts
you got the tecnique down for the fitting, just learn to weld!
practice more on just plate. lets see how a weld loks like without you cleaning off the weld with a wire weel or blasting.
practice more on just plate. lets see how a weld loks like without you cleaning off the weld with a wire weel or blasting.
08-10-2007, 06:41 AM
#10
Honda-Tech Member
Thread Starter
Join Date: Aug 2003
Location: rochester, ny, usa
Posts: 933
Likes: 0
Received 0 Likes
on
0 Posts
i didn't actually clean any of those welds for the picture. any wirewheeling or sandblasting was done before i welded on the metal.
its not the HF, its from Forney welding. here's a picture:

i did most of this welding at 70 amps. i played with it up and down but that seemed comfortable.
-Luke
its not the HF, its from Forney welding. here's a picture:
i did most of this welding at 70 amps. i played with it up and down but that seemed comfortable.
-Luke
08-11-2007, 05:52 PM
#12
Honda-Tech Member
Join Date: Oct 2004
Location: sheridan, wyoming, usa
Posts: 1,972
Likes: 0
Received 0 Likes
on
0 Posts
You're moving WAY to slow and I'm guessing from your highly irregular filler passes you are holding to extreme of a torch and allowing the filler to ball up until it falls into the puddle.
08-11-2007, 08:25 PM
#13
Honda-Tech Member
Thread Starter
Join Date: Aug 2003
Location: rochester, ny, usa
Posts: 933
Likes: 0
Received 0 Likes
on
0 Posts
manbearpig- can you point out what indicates that im moving too slow? i want to see what you see.
and i don't understand what you mean by im "holding to extreme of a torch" ? sometimes the filler melts before i poke it into the puddle but not usually. i try my best at pulling it out far enough without pulling it out of the gas.
thanks
-Luke
and i don't understand what you mean by im "holding to extreme of a torch" ? sometimes the filler melts before i poke it into the puddle but not usually. i try my best at pulling it out far enough without pulling it out of the gas.
thanks
-Luke
08-12-2007, 12:13 AM
#14
Honda-Tech Member
Join Date: Jul 2004
Location: I'm everywhere Focker
Posts: 5,463
Likes: 0
Received 2 Likes
on
2 Posts
I think overall your technique just needs alot of work. You need heat control, you need consistency, and you need cleanliness.
I'm also kind of lost on the "collector" your doing. I see your attempting to make a manifold, but you've made some type of 2-1 collector. What will you do with the other two runners?
I think this will be a good learning experience for you, but at this time you really need to work on your welding before spending alot on wasting material trying to make a manifold.
On the collector thing, your also trying to get big penetration and heating the hell out of it. Due to the cut angle, you have some really thick material to penetrate. My collectors generally get an outside pass, then get welded on the inside. I then do a finish port to just smooth stuff out. With the inside and outside pass you have over 100% penetration if the fill is good. This is one of mine finished on the inside.
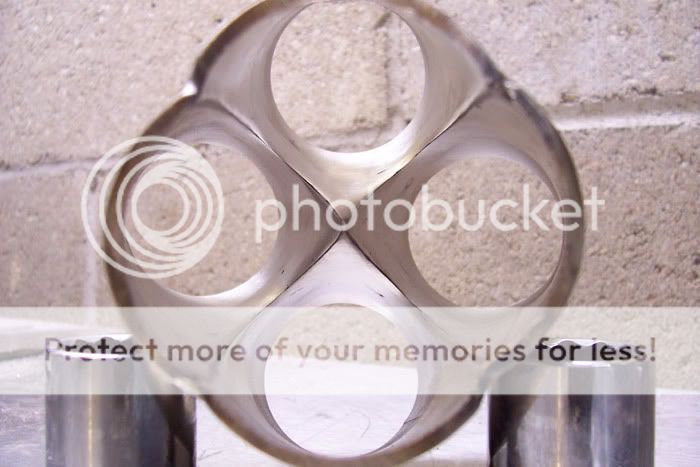
08-12-2007, 07:23 AM
#15
Honda-Tech Member
Thread Starter
Join Date: Aug 2003
Location: rochester, ny, usa
Posts: 933
Likes: 0
Received 0 Likes
on
0 Posts
RC000E - thanks for the reply. could you go a bit more indepth on heat control. is 70 amps too hott for sch40? whenever i tried anything less, say 65, it just seemed too cold. alot of people were saying i was too hott by the 'burn' marks seen in my root passes. however when i do a filler pass at the same heat, it seems good. since the filler helps cool down the puddle.
also, theses peices were about as clean as i could think to get them. pipes were freshly sandblasted a few days back, wirewheeled and then cleaned with rubbing alcohol. im not sure what more i could do? i do think getting a gas lense will help a lot during the actual weld.
don't worry about the mani design. its correct so far.
on a 2-1 collector i don't know if its possible to do an inside weld? i don't think i could ever get my torch in there, even with one of those small back caps. its a #17 torch if that means anything in terms of size
nice job on that inside port, that was after an inside weld?
-Luke
08-12-2007, 09:20 AM
#17
Honda-Tech Member
Join Date: Jul 2004
Location: I'm everywhere Focker
Posts: 5,463
Likes: 0
Received 2 Likes
on
2 Posts
Yeah...#17 is what I use as well. Gas lenses give you some flexibility as well with pulling out the tungsten like I told you by pm. You definitely CAN weld the inside of that 2-1 without question. You just have to use the brain a little and figure out how....haha. Just remember, argon is heavier and will fill an area if you allow it.
That collector was welded on the inside then finish ported.
That collector was welded on the inside then finish ported.
08-12-2007, 11:02 AM
#18
Honda-Tech Member
Thread Starter
Join Date: Aug 2003
Location: rochester, ny, usa
Posts: 933
Likes: 0
Received 0 Likes
on
0 Posts
just bought some gas lense parts with a back cap delete peice. shipped priority so hopefully by earyl end of the week i'll have it and i'll post up new pics trying it out
-Luke
-Luke
08-12-2007, 06:25 PM
#20
Honda-Tech Member
Join Date: Oct 2004
Location: sheridan, wyoming, usa
Posts: 1,972
Likes: 0
Received 0 Likes
on
0 Posts
By too extreme of a torch angle I was theorizing that you are leaning the torch to far back away from the direction of travel and the heat is being directed at the end of the filler instead of the the actual weld.
By too hot I mean you are lingering over the weld to long. You just need to up your travel speed. You can tell the steel is cooked pretty well by the dull gray finish it has. It should be some sort of rainbow color. it should be some silver-gold-blue and/or every hue in between if you are using something resembling the right overall heat input. First work on getting color and then work on getting it cool eoungh to make it at least gold. Silver/clear is the ultimate goal.
You just need a lot more practice on some more simple welds. Try something in a straight line first.
08-12-2007, 06:30 PM
#21
Honda-Tech Member
Thread Starter
Join Date: Aug 2003
Location: rochester, ny, usa
Posts: 933
Likes: 0
Received 0 Likes
on
0 Posts
manbearpig - ahh ok you left out the word 'angle'. but yes i wuld proably agree i do sometimes lose the correct 70* angle. but its something i try my best to maintain.
i'll do some more practice welds and see if i can step up the pace.
i think what i actually need is more heat and a much faster pace. because presently, i actually have to wait for the puddle. thats why im going slower.
thanks again
-Luke
i'll do some more practice welds and see if i can step up the pace.
i think what i actually need is more heat and a much faster pace. because presently, i actually have to wait for the puddle. thats why im going slower.
thanks again
-Luke
08-13-2007, 07:06 AM
#22
Honda-Tech Member
Join Date: Oct 2004
Location: sheridan, wyoming, usa
Posts: 1,972
Likes: 0
Received 0 Likes
on
0 Posts
resist the temptation to add a lot more heat just yet. First work on finding the correct travel speed for 70 amps. You can get a dark blue color with that setup if you are doing it right. At this point in your learning process if you just add more heat you are going to have to speed it up even more and it's going to be hard to learn the proper rythem of add filler and maintaining your torch angle around that pipe.
In all honesty you need to put the pipe away and practice on some plate. You will learn a lot faster that way.
In all honesty you need to put the pipe away and practice on some plate. You will learn a lot faster that way.
08-13-2007, 07:18 AM
#23
Honda-Tech Member
Thread Starter
Join Date: Aug 2003
Location: rochester, ny, usa
Posts: 933
Likes: 0
Received 0 Likes
on
0 Posts
thanks again for the tips. im at the heat i am now because people suggested to start at a lower heat and work on my methods, then increase later as that will also force you to increase your speeds. so i'll stick to theirs and your advice and i'll stay at 70amps for now and keep practicing.
i have a gas lense setup coming by the end of the week so i'll be sure to post up results from trying out that.
-Luke
i have a gas lense setup coming by the end of the week so i'll be sure to post up results from trying out that.
-Luke
08-14-2007, 04:06 PM
#25
Junior Member
Join Date: May 2007
Location: marion, oh, united states
Posts: 40
Likes: 0
Received 0 Likes
on
0 Posts
Do you purge your pipe welds at all, I seen the penetration on the one was really ugly, and its not really from your welds(watch the atoms jumping around in the puddle they look like fisheyes, 1 is not penetrating good, 2 is perfect and 3 is ready to put a hole in the metal), if you let the pipes have some purge pressure in them then it will help you out, do you walk the cup at all, and what about pulsing? none the less this forum you have started will really help you with all the welders on the pages, so your heading in the right direction and just keep trying until you get it down and dont forget to make plenty of tacks, ive learned that the hard way sometimes, espcially when you weld one side nice and get to the other and its now got a gap

Thread
Thread Starter
Forum
Replies
Last Post