When you click on links to various merchants on this site and make a purchase, this can result in this site earning a commission. Affiliate programs and affiliations include, but are not limited to, the eBay Partner Network.
NOTE:If you reply to this thread with a question that as already been answered or an issue that has already been addressed, I will delete you post to keep this thread clean. If you want to discuss or ask question, go to the discussion thread. I am keeping this thread clean to help everyone else on here from having to sift through pages and pages of information. Thanks
What is H2B?
H2B, can also be called F2B is mating a F or H engine to a B-series transmission. F and H have the same bolt pattern for the transmission, since you can use a F trans on a H engine, and vice versa, H2B is also F2B. For clarity Instead of calling the setup "H2B/F2B" I will call it H2B from this point foward.
On our civics/integras we have 3 main mounts:
Rear transmission mount
Passenger side transmission mount
Drivers side <FONT COLOR="blue">engine</FONT> mount
As you can see, only one mount actually connects to the engine. Both H2B kits include a custom timing belt mount on the engine that mates to the stock B-series chassis mount This means, you use B-series mounts. Both H2B kits strongly reccomend using aftermarket mounts and at the minimum to use mount inserts.
Advantages of H2B:
The main advantage is displacement. Big Bore = Big Power. With the relatively low cost of the H/F-series longblocks, it gets to a point where H2B/F2B is a lot more cost effective than building a B-series, particulary NA. In my opinion this is a good alternative to the K-series swap.
When comparing it to a K-swap, you don't have to worry about the shifter, you don't have to spend an arm and a leg for the mounts, you don't have to buy that expensive K-pro, no custom axles. There is plenty of aftermarket support and knowledge for the H/F-series engines, as well as plenty of aftermarket support and knowledge for the B-series transmission. The best of both worlds. H2B kits may seem expensive at first, but when you compare all these other factors, it begins to seem like a bargain. Remember, All other non-D swaps require custom axles, mounts, and shifter modification.
Other issues with H2B:
The engine sits in a higher location than normal h22 swaps (non-h2b) so hood clearance is an issue. You can space the hood with longer bolts + washers/spacers. The thread pitch is M6-1.0. The other option would be to maybe fabricate a custom rear t-bracket that drops the engine/trans about 1" or so and put washers between the chassis mounts and the trans. Whichever you prefer.
Header/exhaust manifold issue:
The H/F series tilts towards the firewall like this / (drivers side view) but with H2B the engine is placed in a more vertical position like this | With that said, the stock prelude/accord exhaust manifold will point up towards the firewall. You have two options here, you can heat the stock manifold up and bend it to the desired position. The custom route is also available, camp1320 currently offers an H2B header at a reasonable price, I've also heard of RMF supplying custom H2B headers and I believe (could be wrong) that Bisi is working on one for his evolution kit.
Wiring:You will need to use a b-series harness and extend the alternator wires. You may have to do some hybrid wiring with the distributor plug. There is abundant information on this, especially here: https://honda-tech.com/zerothread/650329
Other things worth mentioning:
Some swaps (depending on the kit) may tilt the engines too far foward that henders normal engine oil drain issues. If your setup requires a drain plug relocation, you can weld one of these nuts wherever you prefer. https://honda-tech.com/zerothread/2008473
I know there's another H2B faq, but it's a traffic jam of information and I'm seeing several H2B faq threads floating around these forums. I am making this to help the other guys that aren't as familiar with H2B aware of this information.
<FONT SIZE="3">Another very important thing</FONT> I am growing tired of seeing this Evo vs QSD, or Bisi vs RMF stuff. I will not tolerate any of this useless bickering. I don't care who said what, don't make posts that encourage this pointless debate. If you don't like a certain kit, speak about it on a mature and technical level. Thanks.
Another question: "Can I run an H2B without banging my framerail?"
YES! But you cannot use the balance shafts and timing belt covers unless you modify the covers or make your own out of sheet metal or any other sturdy material. The balance shafts will remain on the motor but are not used. If you want to completely remove them I suggest the balance shaft eliminator kit from http://www.kaizenspeed.com but you will have to take out the crankshaft girdle.
This was done on my eg hatch but im sure all other chassis provide about the same clearance. I'm running the QSD kit by the way. First thing is to remove your crank pulley and timing balancer belt drive pulley. Next step is to take them to a machine shop to have them shave down your crank pulley and make a spacer out of the balancer belt drive pulley. I had both done for $60. (1st pic below. This is what drives the balance shafts) make sure they cut enough material out of the spacer so it fits over the crank pulley opening. Now, you can either make your own alternator bracket or buy one from QSD. Im running the lower alternator bracket moved 1/2" to the passenger side with a D-series alternator(they are smaller and I had 3 laying around)
Pic of balancer belt drive pulley after it was cut out to make the spacer.
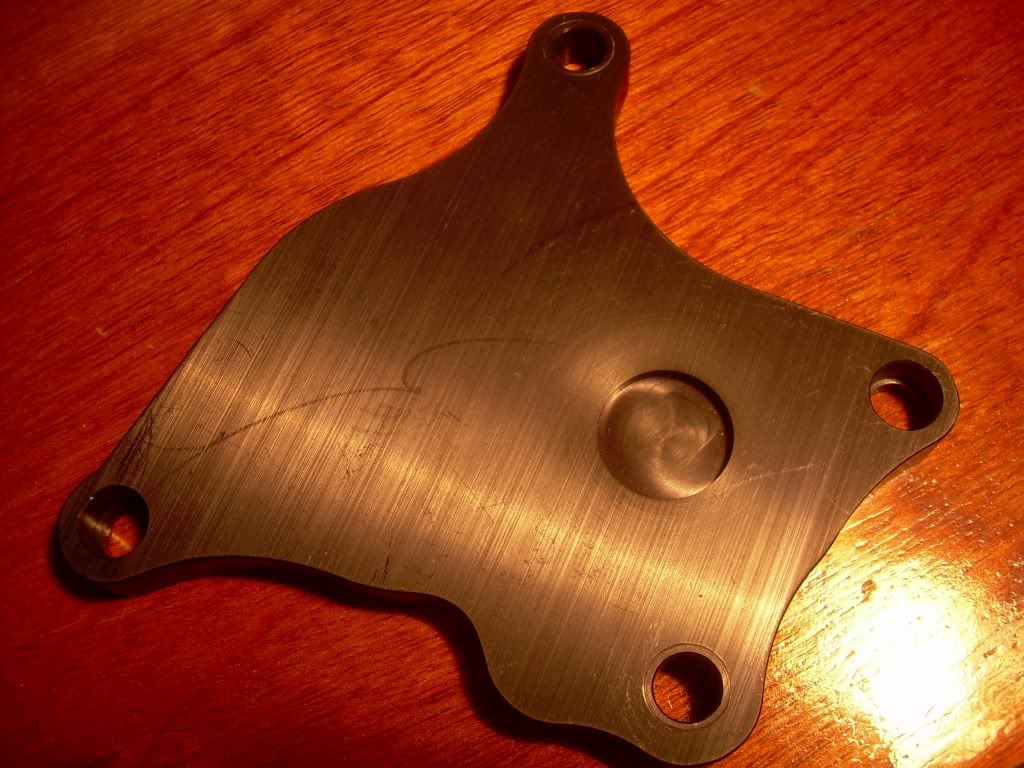
The rear balance shaft gear was thrown away so I illustrated with the water pump gear. Use your jaw pullers to remove the balance shaft gear(bought at harbor freight for a few bucks). Once the gear is off you need to cover that area. I used a freeze plug size 1.25" bought from kragen and some JB weld(you can see the opening that needs to be covered in the 2nd pic below). The front balance shaft gear just has 1 bolt holding it. I took it off for a cleaner look you can also get the neat balance shaft block off plate from bisimoto( pic below)
Illustration of how to remove the rear balance shaft gear(shown using the water pump gear)
Lastly, slide the crank pulley first and spacer second Thanks for the pics bserious!
Clearance between framerail-crank pulley and spacers used to replace that balance shaft belt tensioner.
Modified by 2fast4u831 at 8:41 PM 5/30/2007
Modified by 2fast4u831 at 11:47 AM 11/26/2007
Last edited by 2fast4u831; 11-09-2015 at 06:24 PM.
There's also this solution that I found, a washer that will work on moving the crank pulley inboard. It was only $4.82 from mcmaster.com. 30965A213 is the part number.
When I lightly torqued the pulley onto the crankshaft with the washer in place, it "locked" that washer onto the pulley. The OD of the washer is JUST the right size to go into place. People will probably not like the larger notch in the washer. With the low price of $4.82, maybe you can stick two pellets in there, who cares, it's not going to be an issue
After:
.
.
.
Edit: 20230831_1851:
Cleaned up some of the broken HTML that originally pointed to posts that I had quoted. Previous, yesteryear forum software conversion from zeroforum to Vbulletin broke these. Cleaned up wording to make sense with removed HTML quotes.
Re-uploaded images that had been hosted on my old photobucket to get rid of the nasty watermark.
There are a handfull of companies that are currently producing H2B headers (RMF, Camp1320, SixSigma, etc...) but they start at $500+. Another option is to mod a less expensive aftermarket header if you are tight on money and you can do this yourself with handtools.
1. Purchase a section of piping from the muffler shop, I chose 2.5" because Im also running a 2.5" exhaust.
2. Use a piece of string and measure the cirumfrance of the 2.5" piping.
3. Next take this same piece of string and measure the collector until you find the area of the collector that has a circumferance that is equal to that of the 2.5" piping.
4. You can use a hacksaw, and will want to make a rough cut that leaves you room to make further adjustments.
5. The cut up collector will be oval shaped and your piping is round. You can use a shop vice to bend the piping to the corresponding shape.
6. Next mount the header to the head, mock up the piping, and trim the collector until you get the desired angle.
7. Once you have everything lined up, mark it with a marker so that you know how it mates up, and take it to a muffler shop to have them weld it up.
Can you just remove the balance shafts completely? Would this solve the banging problem? Also does anyone make a crank pully similar to the n1 crank pully?
<TABLE WIDTH="90%" CELLSPACING=0 CELLPADDING=0 ALIGN=CENTER><TR><TD>Quote, originally posted by GetawayInMoscow »</TD></TR><TR><TD CLASS="quote">Can you just remove the balance shafts completely? </TD></TR></TABLE>
<TABLE WIDTH="90%" CELLSPACING=0 CELLPADDING=0 ALIGN=CENTER><TR><TD>Quote, originally posted by GetawayInMoscow »</TD></TR><TR><TD CLASS="quote">Would this solve the banging problem? </TD></TR></TABLE>
Take a closer look at this picture below, just posted above:
Do you see the shiny, sliver spout in the background, hidden half way behind the crank pulley/alternator belt in the picture? That is the Balance shaft counter gear housing WITHOUT the gear on it.
Imagine if the gear was there, then some banging would be required.
Last edited by Bserious; 12-08-2009 at 04:47 PM.
Reason: Spelling of 'offere'.
Another Idea that I considered is "machining" the back side of the crank pulley about 1/4" and moving that pulley even closer to the engine. Then the 3 ribbed alternator belt for the d-series would ride on the outside ribs of the crank pulley. We might have to run another similar washer from mcmaster. Please note that in south carolina, "machining" really means to use your angle grinder with a softer disk.
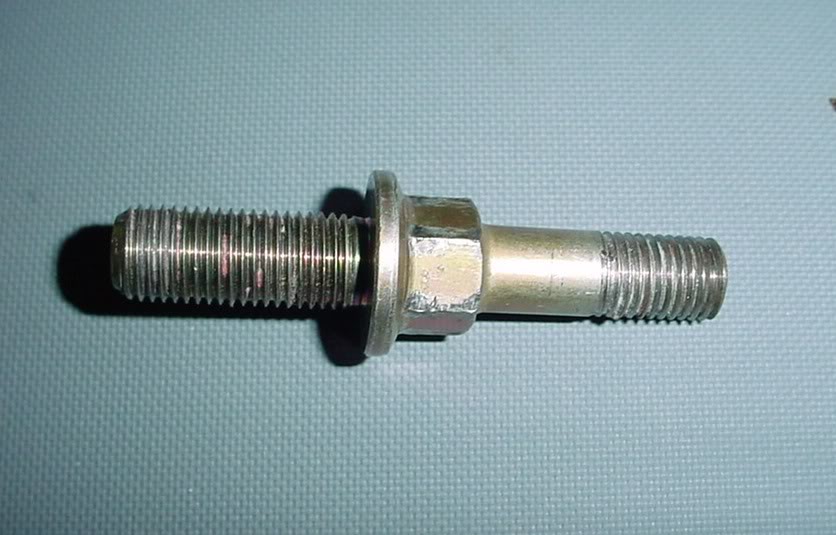
My H2D has even less room than the H2B. If you convert to the F22/H23 manual timing belt tensioner (which I highly reccomend) you can shorten that timing belt bolt. Just an FYI that custom bolt from honda uses a M11-1.25 thread that goes into the block, and it's M10-1.25 external thread. The easiest and best solution is going to be to use a M10-1.25 die from mcmaster, (part number 2573A58, ~$10.16) to thread the bolt like so. Photo courtesy of Aaron Hillman:
Thread it first then shorten the bolt. This is pretty much the only option here because honda decided to use a M11-1.25 thread in the block. You absolutely will not find another M11-1.25 bolt. They don't make them. Or you could do it south carolina style and Just jam a 7/16-20 bolt. Which is 11.1125mm and 1.25 pitch is equivalent to 20.32 threads per inch or something stupid close lol.
Moving on, if you remove the balance shafts with the kaizen speed kit, use a machined h22 crank pulley and use an explicitspeed alternator kit 1/2" moved over* along with that shortened H23 tensioner stud. I see no reason at all that anyone will need to modify the frame at all.
* = explicitspeed will have to make this for you, read their site for more info about this.
If you don't want to go through the process of removing the balance shafts, you could just run this cover that bisi sells, it is made so that you can just remove the gear cover and bolt this thing on with the balance shaft still in place. I did this and remove the gear from the exhaust side balance shaft.
Is the Flywheel and Spacer the only difference in the 2 kits? Not starting a debate but maybe if someone chimes in if there are any other differences it would help. thanks
<TABLE WIDTH="90%" CELLSPACING=0 CELLPADDING=0 ALIGN=CENTER><TR><TD>Quote, originally posted by 2fastGSR »</TD></TR><TR><TD CLASS="quote">Is the Flywheel and Spacer the only difference in the 2 kits? Not starting a debate but maybe if someone chimes in if there are any other differences it would help. thanks</TD></TR></TABLE>This is based on what I've seen so quote me if you will. The EVO/Bisi kit moves the transmission and motor to the passenger side ~1/2", the engine also sits lower to the ground ~1". I think you cannot run stock mounts, must be the EVO/Bisi h2b mounts.
From what I know the QSD kit leaves the trans in the original location giving ideal axle angle and to keep the shift linkage from binding up. I do see a problem with that that the oil pan now tilts towards the front of the car, submerging the pickup tube in less oil and also the exhaust issues but Bense solved the oil drain issue and i think i might just add a little extra oil when I run mine.
I dont know if this should go here but who is making all that EGR block off plates for h22's I know he does euro r manifold work too
I found it finally Bense so I dunno if you wanna delete this or use this info but this guy makes a lot of good stuff for f20 h22 guys wanting to run the euro r manifold and block egr http://www.roskoracing.com
<TABLE WIDTH="90%" CELLSPACING=0 CELLPADDING=0 ALIGN=CENTER><TR><TD>Quote, originally posted by HeikDiesel »</TD></TR><TR><TD CLASS="quote">I found it finally Bense so I dunno if you wanna delete this or use this info but this guy makes a lot of good stuff for f20 h22 guys wanting to run the euro r manifold and block egr http://www.roskoracing.com </TD></TR></TABLE>
Well, I did a euro manifold writeup in the prelude section. Rosko does excellent work
So I have a question fellas. On the balancer shaft drive gear you guys are machining that down to be put on after the pulley? so it should go timing belt drive, spacer, pulley, spacer, bolt?
So basically your taking number 15 out completely, making a spacer that sits inside the driverside of the pully and it shifts it that much over? What about altenator angles and such?
<TABLE WIDTH="90%" CELLSPACING=0 CELLPADDING=0 ALIGN=CENTER><TR><TD>Quote, originally posted by HeikDiesel »</TD></TR><TR><TD CLASS="quote">So I have a question fellas. On the balancer shaft drive gear you guys are machining that down to be put on after the pulley? so it should go timing belt drive, spacer, pulley, spacer, bolt?</TD></TR></TABLE>
no, you would only run one spacer depending on where you want the crank pulley (moved in or at the OE location).
<TABLE WIDTH="90%" CELLSPACING=0 CELLPADDING=0 ALIGN=CENTER><TR><TD>Quote, originally posted by skunked »</TD></TR><TR><TD CLASS="quote">no, you would only run one spacer depending on where you want the crank pulley (moved in or at the OE location).</TD></TR></TABLE>
<TABLE WIDTH="90%" CELLSPACING=0 CELLPADDING=0 ALIGN=CENTER><TR><TD>Quote, originally posted by HeikDiesel »</TD></TR><TR><TD CLASS="quote">
So what about altenator belt angles and such?</TD></TR></TABLE>
If your running the alternator inline with the crank pulley in it's OEM location you would run the spacer behind the crank pulley only.
The ony reason you run a spacer on the outside of the crank pulley (see Bense's pics above) would be if you are trying to move the pulley closer to the motor. In this case you would not run the spacer between the T-belt gear and crank pulley. This would also require a custom alternator bracket that would move the alternator inline with the crank pulley.
So just to make sure im just gonna run that washer, timing belt drive, pulley, spacer and then bolt to move it inboard. I just checked I did order the explicit 1/2" over kit so that should work golden
What radiator hoses are we supposed to use, I figured it wasnt the same as a normal swap because of the angle? I dont think Ive ever seen this question adressed?


 05-29-2007, 12:37 PM


 you can also get the neat balance shaft block off plate from bisimoto( pic below)