
DIY accurate toe alignment with inaccurate tools
 01-13-2012, 06:16 PM
#1
Honda-Tech Member
Thread Starter
Part 1: How to do it
What you will need:
- some kind of laser pointer thing
- some "mount a laser pointer to your wheel" thing
- jack stands
- long stick of wood
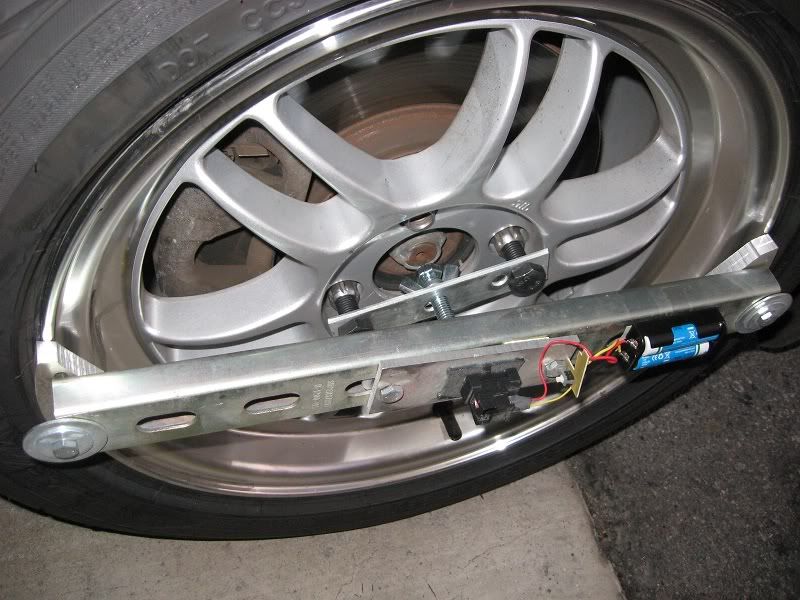
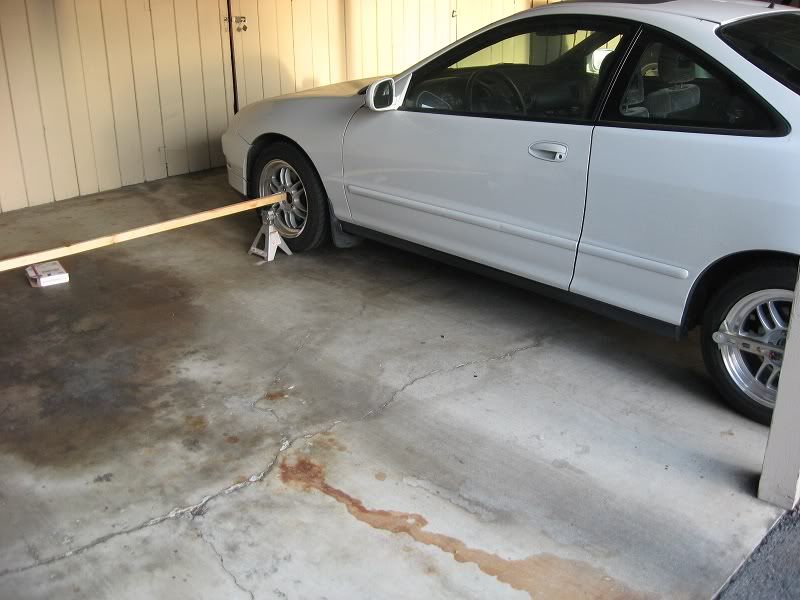
This is my contraption. I bought the cheapest laser level thing at Fry's and cracked it open to get to the actual laser part. This is glued rigidly to a unistrut and has a couple of blocks that help the piece rest against the rim. It has some bolts that screw into my lug nuts to hold the whole thing in place. The laser does not need to be parallel to the mounting points for this to work. You could probably get away with using c clamps or bungee cords even.
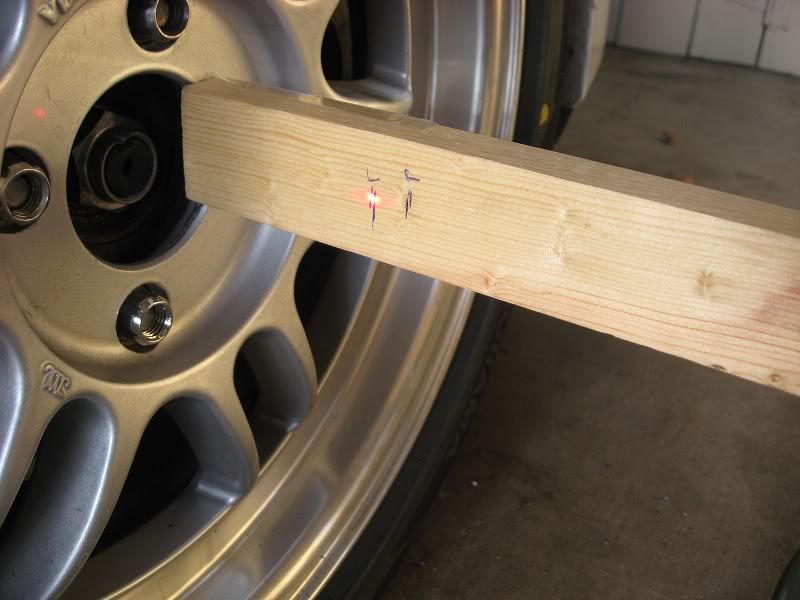
Mount these to your wheels and first aim them backwards. Set up the jackstands about 12 feet from the wheel, approx hub height, and put the stick of wood on them. Adjust the laser contraptions until both spots are on the stick. Mark the spots on the stick.
Do not touch the laser things again.
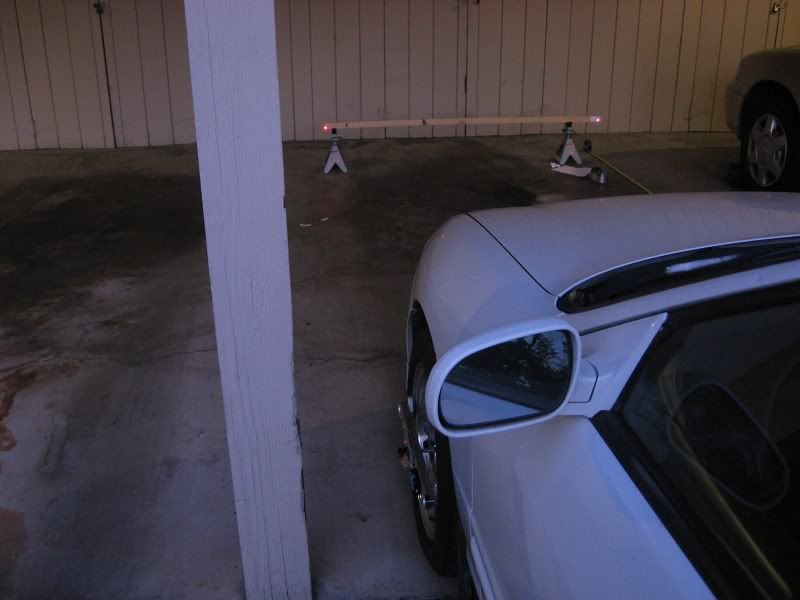
(Yes, I know this image is with the beams pointing forwards. You will actual do this second)
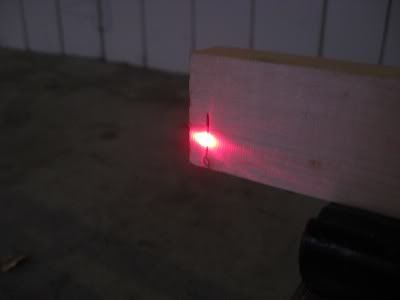
The laser section of this picture is overexposed. The actual beam spot is much smaller.
Now roll the car until the laser beams point forwards. Set up the jackstands 12 feet in front of the wheel and roll the car until the beams land on the stick again. (BTW, you don't have to get the 12 ft exact either.) Compare to the previous marks.

In my case, the beams when pointing rearwards are inwards by 1/4". Now some math stuff.
This is 1/4" deviation per 24 feet total, for both wheels, which means that the total toe out for both wheel is .25/(24*12)=.00086 radians or 0.05 degrees.
If I wanted to zero out the toe, I would figure as follows: The tie rod link point looks like it is about 5" or so from the hub center. 0.00086 radians * 5" = 0.004" which is the length to lengthen the tie rod. I think they are threaded with 1.5mm pitch, or .06" per rotation. So that means I would rotate the nut about .004/.06=.07 of a revolution, or about 1/2 of a hex flat. I think I am not going to bother.
Part 2: Theory of why it works
Unlike the strings or toe plate measurement techniques, this measures the true toe via the rotational axis of the wheels. It doesn't matter if the tire sidewall is bulgy, the rim is warped, or even if the laser pointers are crooked. If there is a non-90 degrees angle between the laser beam and the rotation axis, that same angle shows up when you point the beams in the opposite direction. Since you are comparing forwards vs. backwards measurements, this effect cancels out.
PS. Don't tell me about how your strings or toe plate method "works fine".
What you will need:
- some kind of laser pointer thing
- some "mount a laser pointer to your wheel" thing
- jack stands
- long stick of wood
This is my contraption. I bought the cheapest laser level thing at Fry's and cracked it open to get to the actual laser part. This is glued rigidly to a unistrut and has a couple of blocks that help the piece rest against the rim. It has some bolts that screw into my lug nuts to hold the whole thing in place. The laser does not need to be parallel to the mounting points for this to work. You could probably get away with using c clamps or bungee cords even.
Mount these to your wheels and first aim them backwards. Set up the jackstands about 12 feet from the wheel, approx hub height, and put the stick of wood on them. Adjust the laser contraptions until both spots are on the stick. Mark the spots on the stick.
Do not touch the laser things again.
(Yes, I know this image is with the beams pointing forwards. You will actual do this second)
The laser section of this picture is overexposed. The actual beam spot is much smaller.
Now roll the car until the laser beams point forwards. Set up the jackstands 12 feet in front of the wheel and roll the car until the beams land on the stick again. (BTW, you don't have to get the 12 ft exact either.) Compare to the previous marks.
In my case, the beams when pointing rearwards are inwards by 1/4". Now some math stuff.
This is 1/4" deviation per 24 feet total, for both wheels, which means that the total toe out for both wheel is .25/(24*12)=.00086 radians or 0.05 degrees.
If I wanted to zero out the toe, I would figure as follows: The tie rod link point looks like it is about 5" or so from the hub center. 0.00086 radians * 5" = 0.004" which is the length to lengthen the tie rod. I think they are threaded with 1.5mm pitch, or .06" per rotation. So that means I would rotate the nut about .004/.06=.07 of a revolution, or about 1/2 of a hex flat. I think I am not going to bother.
Part 2: Theory of why it works
Unlike the strings or toe plate measurement techniques, this measures the true toe via the rotational axis of the wheels. It doesn't matter if the tire sidewall is bulgy, the rim is warped, or even if the laser pointers are crooked. If there is a non-90 degrees angle between the laser beam and the rotation axis, that same angle shows up when you point the beams in the opposite direction. Since you are comparing forwards vs. backwards measurements, this effect cancels out.
PS. Don't tell me about how your strings or toe plate method "works fine".
 01-13-2012, 08:17 PM
#2
Honda-Tech Member
Join Date: Aug 2010
Location: Maryland
Posts: 2,686
Likes: 0
Received 0 Likes
on
0 Posts
My head is spinning trying to accurately comprehend this at 12am. Looks like a good write up though. I'll have to come back in the morning and read it.
01-13-2012, 10:56 PM
#4
Honda-Tech Member
Join Date: Apr 2009
Location: Fontana Ca.
Posts: 480
Likes: 0
Received 0 Likes
on
0 Posts
Yea that's why btcc uses string to set toe. And me also at the track 5 min. And I'm done to 1/16 accuracy.
Sorry , did I mentioned string.
Sorry , did I mentioned string.
01-14-2012, 05:21 AM
#6
Honda-Tech Member
iTrader: (1)
Join Date: Aug 2008
Location: La
Posts: 415
Likes: 0
Received 0 Likes
on
0 Posts
Great alternative method for measuring toe. Especially good for someone like me who is measuring challenged. If you are looking for zero toe then make the laser dots hit the same point on the stick front and rear. Couple of comments.
- You cant set your thrust angle with this method. That's the big advantage I've found with strings. Having the front and rear all going the same direction is especially important on power challenged cars to minimize scrub.
- You do eliminate tire bulge and bent rims from the equation, but I bet different tire diameters are going to really screw you up. I honestly think this is more of a factor because of manufacturing tolerances and you are going to wear tires on one side of the car more than the other.
I finally gave up and bought the smart strings setup for doing alignments. I can now see why I could never find one of these for sale used. Super easy to setup a virtual centerline by measuring off the hubs, or if you really wanted to get **** you could mark an actual centerline and go from there.
01-14-2012, 12:54 PM
#7

How do you compensate when you roll the car forward and back to straighten the wheels after you raise and lower the car.
String are so simple its almost not worth messing with anything else. I set initial with strings and then check or make small adjustments with toe plates. They are easy enough to work with.
String are so simple its almost not worth messing with anything else. I set initial with strings and then check or make small adjustments with toe plates. They are easy enough to work with.
Trending Topics
01-14-2012, 06:03 PM
#8
Honda-Tech Member
Thread Starter
Part 3: What to do if you drive NASCAR and one of your tires is bigger than the other
When one of your tires happens to be a little larger diameter than the other, what happens when you roll the car 1/2 rotation is that the laser beams will no longer be level to each other. Do not despair, there are still several options.
Option 1) Raise one end of the stick by a little bit. Duh.
Option 2) If you need to raise the end of the stick by more, use this handy chart to ADD these numbers to your measured mark.
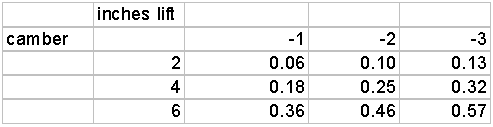
The formula I used is: track*(1-cos(stick lift/track))+stick lift * camber angle / 57
Option 3) Readjust one of your laser things by a little bit if you think your rim isn't bent.
Option 4) Jack up that corner of the car and rotate the wheel by a little bit, then lower and remeasure.
Option 5) There is a way to do this by making some more marks on the stick. It doesn't require any extra math or a chart and doesn't make any new assumptions about what is bent or not. I can describe the procedure if anybody cares.
Part 4: Thrust angle
Take the stick and hold it against some part of the wheel near the hub area. Mount the laser on the rear wheel and aim it at the stick.
If you want to be extra careful, or are not sure if the rim is bent, roll the car 1/2 rotation and repeat the measurement. Take the average of your two marks.
Unmount your laser thing and remount it on the other wheel. (i.e. use the same laser thingie for both sides. This way, you move any non-parallelism errors from one side to the other.) Move the stick to the other side and measure. The difference in the two marks represents your thrust angle.
Oops, better get that fixed, heh heh. At least my rims aren't bent.
When one of your tires happens to be a little larger diameter than the other, what happens when you roll the car 1/2 rotation is that the laser beams will no longer be level to each other. Do not despair, there are still several options.
Option 1) Raise one end of the stick by a little bit. Duh.
Option 2) If you need to raise the end of the stick by more, use this handy chart to ADD these numbers to your measured mark.
The formula I used is: track*(1-cos(stick lift/track))+stick lift * camber angle / 57
Option 3) Readjust one of your laser things by a little bit if you think your rim isn't bent.
Option 4) Jack up that corner of the car and rotate the wheel by a little bit, then lower and remeasure.
Option 5) There is a way to do this by making some more marks on the stick. It doesn't require any extra math or a chart and doesn't make any new assumptions about what is bent or not. I can describe the procedure if anybody cares.
Part 4: Thrust angle
Take the stick and hold it against some part of the wheel near the hub area. Mount the laser on the rear wheel and aim it at the stick.
If you want to be extra careful, or are not sure if the rim is bent, roll the car 1/2 rotation and repeat the measurement. Take the average of your two marks.
Unmount your laser thing and remount it on the other wheel. (i.e. use the same laser thingie for both sides. This way, you move any non-parallelism errors from one side to the other.) Move the stick to the other side and measure. The difference in the two marks represents your thrust angle.
Oops, better get that fixed, heh heh. At least my rims aren't bent.
01-14-2012, 06:13 PM
#9
Honda-Tech Member
Thread Starter
01-14-2012, 07:48 PM
#10
Honda-Tech Member
Join Date: Apr 2009
Location: Fontana Ca.
Posts: 480
Likes: 0
Received 0 Likes
on
0 Posts
You have a good idea but I'm sorry not practical at least at the track when you have sometimes just minutes to adjust .
If you need to adjust your rear toe also and lets say the rear width is narrower than the front which happens to be the case in my car what do you do?
Carry 2x4's around seems impractical to me . Like I said you have a good idea but smart strings beats it hands down.
You can jack the car , drop it , roll it and never have to readjust the strings.
Also what I do I have 8 pieces of aluminum cut in squares of about 12 x 12 and of about 16 ga and I sandwitch two under each wheel with a little bit of oil in between that takes all the binding out of the tires and suspension.
01-15-2012, 06:48 AM
#11
Honda-Tech Member
iTrader: (1)
Join Date: Aug 2008
Location: La
Posts: 415
Likes: 0
Received 0 Likes
on
0 Posts
Originally Posted by lwnslw
If you need to adjust your rear toe also and lets say the rear width is narrower than the front which happens to be the case in my car what do you do?
01-15-2012, 08:05 AM
#12
Honda-Tech Member
Join Date: Apr 2009
Location: Fontana Ca.
Posts: 480
Likes: 0
Received 0 Likes
on
0 Posts
Pretty soon is going to look like Han solo and chewbaka shooting their way out of the death star to free princess leia. Sorry I couldn't hold it anymore.
01-15-2012, 12:16 PM
#13
something different
Join Date: Sep 2002
Location: grand rapids/chicago, usa
Posts: 6,995
Likes: 0
Received 1 Like
on
1 Post
My toe plates take about 1 minute to set up.....I'm stuck with them. Good jib though. Very interesting

Thread
Thread Starter
Forum
Replies
Last Post