
Bushing Tutorial: Sway Bar end links 95-97 accord
 05-10-2011, 09:03 AM
#1
Honda-Tech Member
Thread Starter
Join Date: Sep 2009
Location: Tecumseh Oklahoma
Posts: 236
Likes: 0
Received 0 Likes
on
0 Posts
Tools
Jack
2 Jack Stands
12mm and 14mm sockets,and socket wrench
12mm and 14mm wrenches
cinder block or heavy rock
prothane grease
torque wrench
Parts
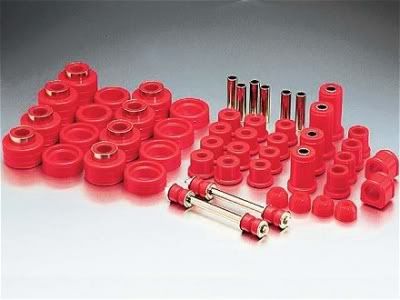
1 Energy Suspension polyurethane Sway Bar end link set. $25
(you can probably find them for cheaper )

you can also buy a master bushing kit. I plan on buying this eventually.
its around $100
Install time. about 30 mins TOPS.
this is really easy but I figured I would share anyways because I wasn't sure how to do this, I just jumped in and done it.
Ok so I was investigating my bushings to see why my car was so "Rickety"
sounding on bumps and turns and to my surprise I had missing bushings and
most of them are cracked and squashed to death.
so I plan on replacing all the bushings and making tutorials for each bushing
install.
But today im starting with the first problem I seen.
Sway Bar End Link Bushings.
At first I thought my cv joins where going bad because every now and then
when I turned I would hear 1 to 2 pops by my tires, and here is why
1-1.jpg?t=1305041264
1 of my 4 bushings are missing, note how cracked the stock ones are too.
Step 1
put your emergency brake all the way up and put cinder blocks or heavy
rocks behind the rear tires. (you DON"T want this thing to crush you, you'll be right in a low spot, ......you know unless you want your face
to be smushed to 3 inches thick...........didn't think so )

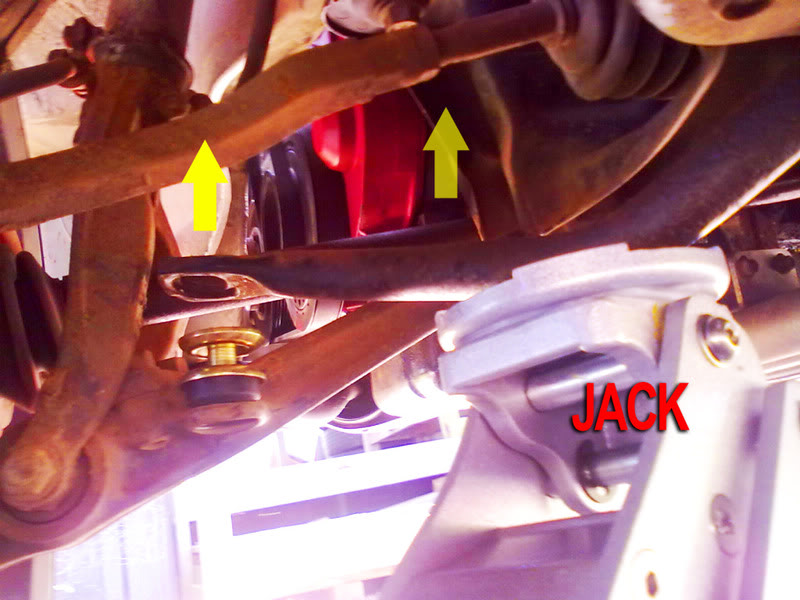
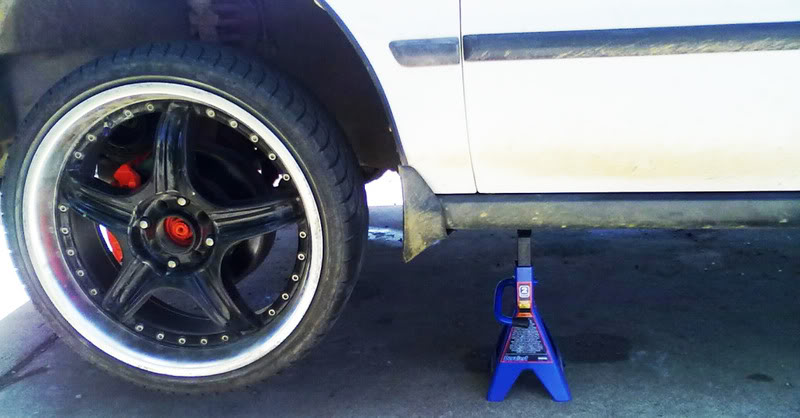
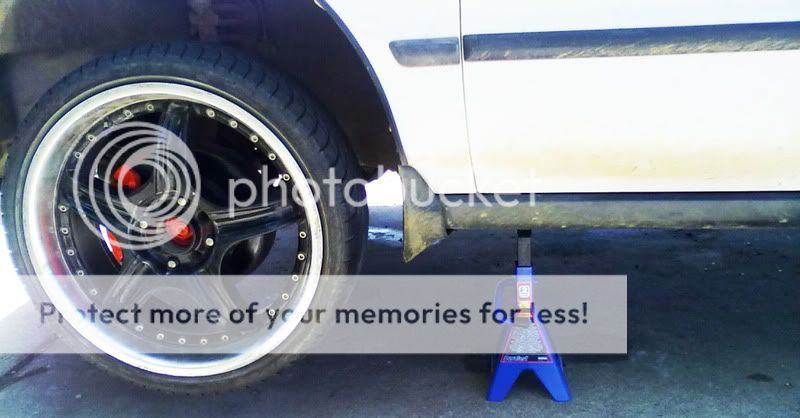
Jack the front of the car up and put it on jack stands
NOTE .You probably could install this without jacking the car up,
but it sure is a LOT easier this way.
Ill be showing everything from the drivers side end link.
the passenger side is a mirror of this side, its exactly the same.
Step 2
the stock end link bolts use 12mm bolts and nuts.
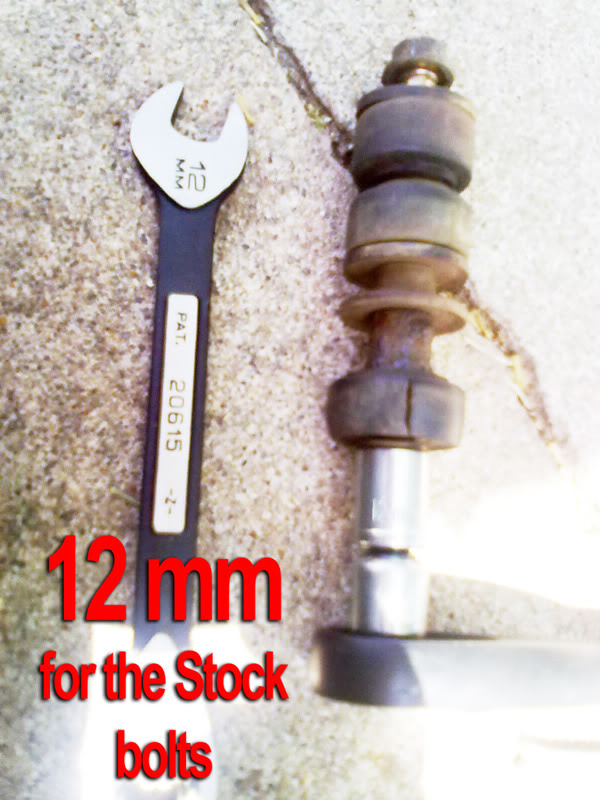
you get them off by placing your wrench on top and socket wrench on bottom.
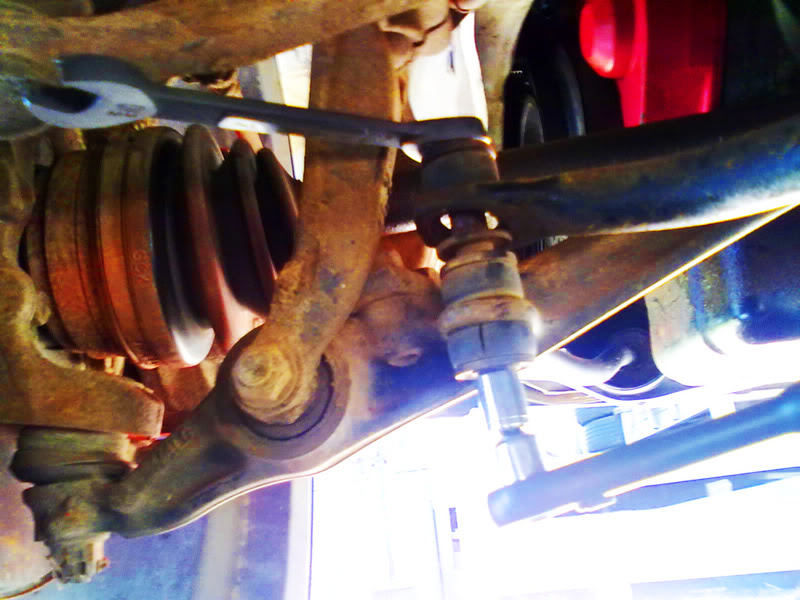
note. you may have to take your wheels off
to get a better angle for the wrench on top
luckily I have big open rims so I could fit my arm through to reach the wrench.
the bolts may be aged together pretty good, but once you get the nut off, the bolt
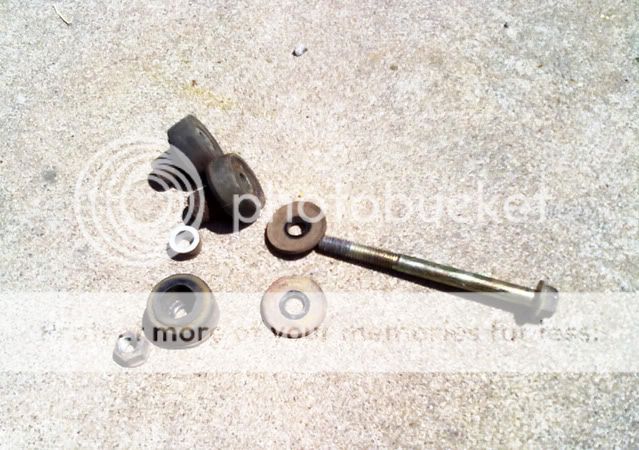
comes right out and all the washers,spacers,and bushings come out and apart like this
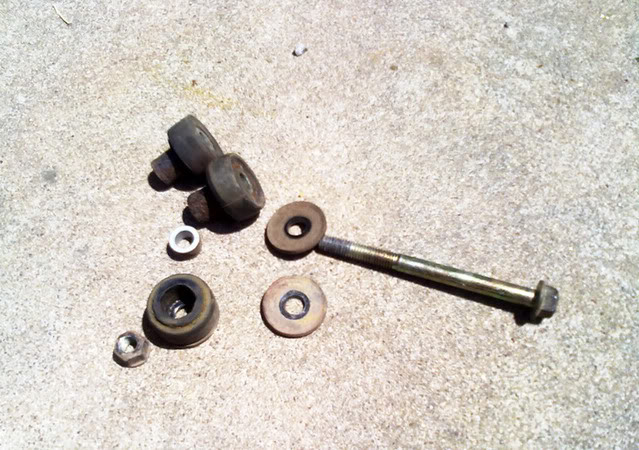
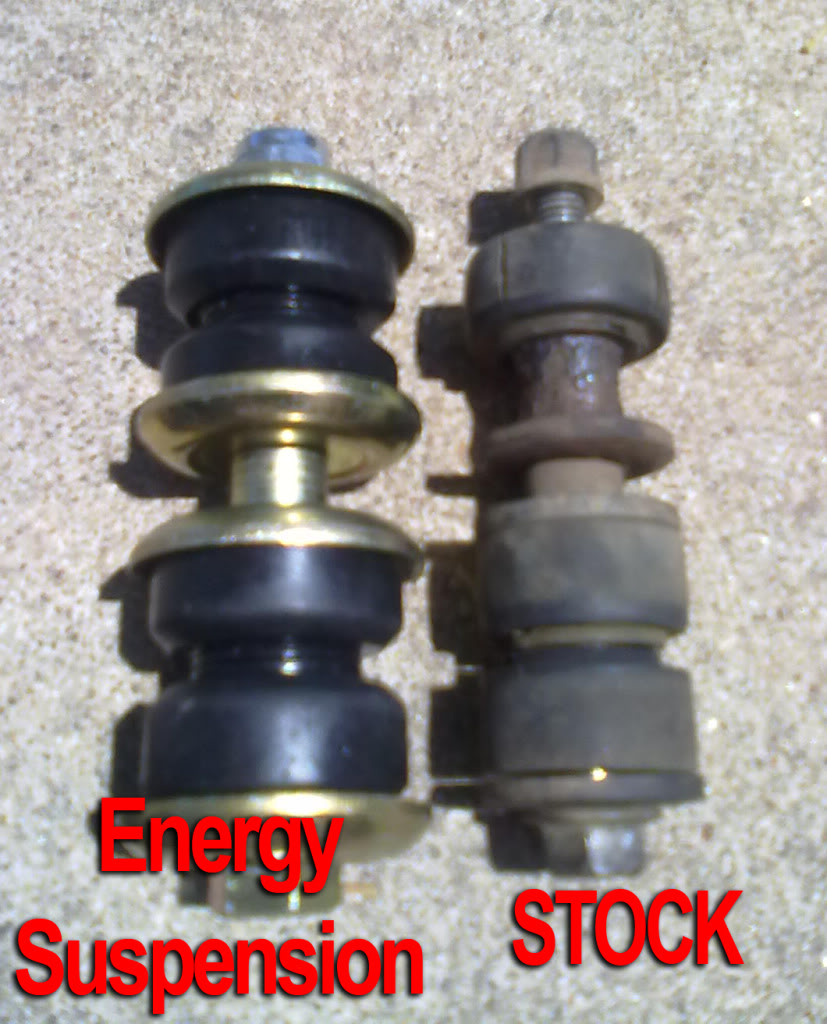
here is a nice side by side comparison of the Energy Suspension link and the stock one.
when I opened the Energy Suspension box I was like "HOLY SHART These are HUGE"
they are really beefy! and felt heavy.
Step 3
now before you start putting the new one on you will want to lube the bushings up.
" I didn't do this yet but I would recommend it, when I get some prothane grease
I will be redoing this install "
the new end link bolts use 14mm bolts and nuts

Note: The stock links where installed with the nut on Top,
but I put the new nut on the Bottom.
I was fidgeting with all the washers, spacer and bushings,
but gravity was NOT letting me put them in that way,
everything keep falling to the ground when I had
the washers, spacer, and bushings stacked and balanced on each other.
so put them in how you want to. up or down.
here is the order of parts from top to bottom
..Bolt..
washer
bushing
-----------------swaybar---------
bushing
washer
.. []..
spacer
.. []..
washer
bushing
---------
bushing
washer
..nut..
Step 4
you will need to jack the sway bar up just a little bit in order to fit the middle
washers, spacer, and bushings.
remember just enough to fit the washers, spacer, and bushings. you don't want to bend anything.
now you can fit it all in and drop the top bolt,washer and bushing in the top to hold it all in place.
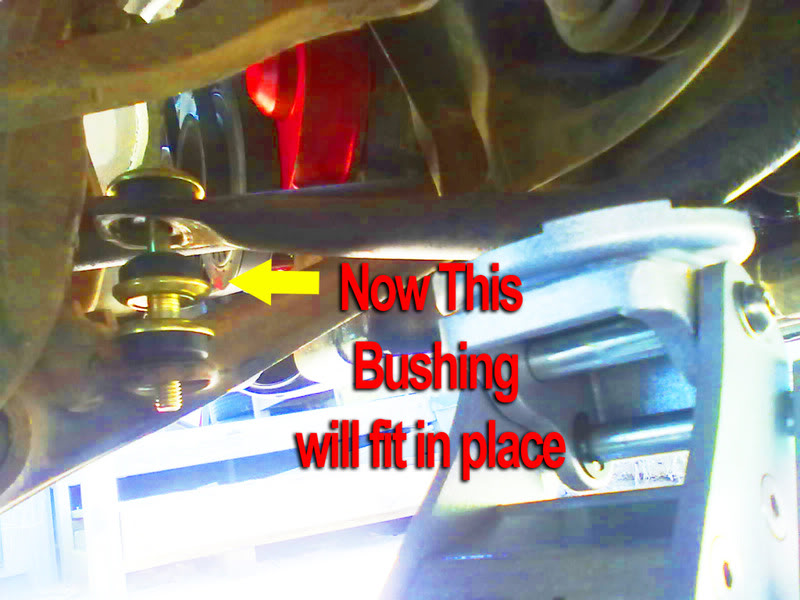
release the jack so the sway bar drops back in place.
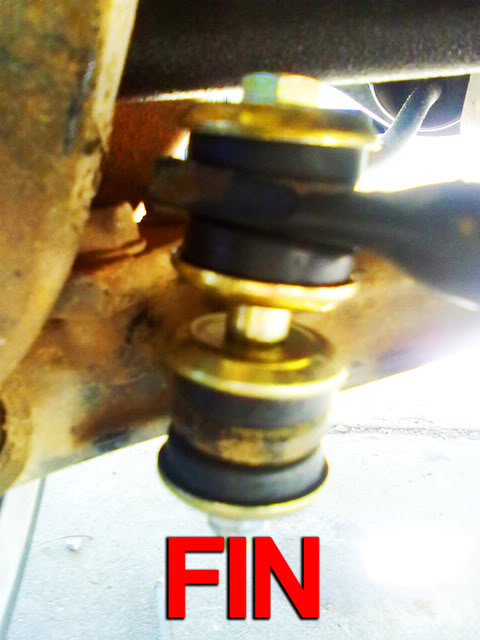
you tighten them with the wrenches the same way you took them off.
torque the nut to 14 lb-ft
and Wala!
just repeat to the other side!
PERFORMANCE
the first thing I noticed was NO popping sounds on turns.
Turns also felt more fluid and supported by the bigger bushings as compared to metal on metal with crappy cracked rubber.
I hope this helps ill be making some more of these bushing tutorials sometime in the future.
p.s. let me know of any mistakes or info that might be miss leading or bad for your car.
Jack
2 Jack Stands
12mm and 14mm sockets,and socket wrench
12mm and 14mm wrenches
cinder block or heavy rock
prothane grease
torque wrench
Parts
1 Energy Suspension polyurethane Sway Bar end link set. $25
(you can probably find them for cheaper )
you can also buy a master bushing kit. I plan on buying this eventually.
its around $100
Install time. about 30 mins TOPS.
this is really easy but I figured I would share anyways because I wasn't sure how to do this, I just jumped in and done it.
Ok so I was investigating my bushings to see why my car was so "Rickety"
sounding on bumps and turns and to my surprise I had missing bushings and
most of them are cracked and squashed to death.
so I plan on replacing all the bushings and making tutorials for each bushing
install.
But today im starting with the first problem I seen.
Sway Bar End Link Bushings.
At first I thought my cv joins where going bad because every now and then
when I turned I would hear 1 to 2 pops by my tires, and here is why
1-1.jpg?t=1305041264
1 of my 4 bushings are missing, note how cracked the stock ones are too.
Step 1
put your emergency brake all the way up and put cinder blocks or heavy
rocks behind the rear tires. (you DON"T want this thing to crush you, you'll be right in a low spot, ......you know unless you want your face
to be smushed to 3 inches thick...........didn't think so )
Jack the front of the car up and put it on jack stands
NOTE .You probably could install this without jacking the car up,
but it sure is a LOT easier this way.
Ill be showing everything from the drivers side end link.
the passenger side is a mirror of this side, its exactly the same.
Step 2
the stock end link bolts use 12mm bolts and nuts.
you get them off by placing your wrench on top and socket wrench on bottom.
note. you may have to take your wheels off
to get a better angle for the wrench on top
luckily I have big open rims so I could fit my arm through to reach the wrench.
the bolts may be aged together pretty good, but once you get the nut off, the bolt
comes right out and all the washers,spacers,and bushings come out and apart like this
here is a nice side by side comparison of the Energy Suspension link and the stock one.
when I opened the Energy Suspension box I was like "HOLY SHART These are HUGE"
they are really beefy! and felt heavy.
Step 3
now before you start putting the new one on you will want to lube the bushings up.
" I didn't do this yet but I would recommend it, when I get some prothane grease
I will be redoing this install "
the new end link bolts use 14mm bolts and nuts
Note: The stock links where installed with the nut on Top,
but I put the new nut on the Bottom.
I was fidgeting with all the washers, spacer and bushings,
but gravity was NOT letting me put them in that way,
everything keep falling to the ground when I had
the washers, spacer, and bushings stacked and balanced on each other.
so put them in how you want to. up or down.
here is the order of parts from top to bottom
..Bolt..
washer
bushing
-----------------swaybar---------
bushing
washer
.. []..
spacer
.. []..
washer
bushing
---------
bushing
washer
..nut..
Step 4
you will need to jack the sway bar up just a little bit in order to fit the middle
washers, spacer, and bushings.
remember just enough to fit the washers, spacer, and bushings. you don't want to bend anything.
now you can fit it all in and drop the top bolt,washer and bushing in the top to hold it all in place.
release the jack so the sway bar drops back in place.
you tighten them with the wrenches the same way you took them off.
torque the nut to 14 lb-ft
and Wala!
just repeat to the other side!
PERFORMANCE
the first thing I noticed was NO popping sounds on turns.
Turns also felt more fluid and supported by the bigger bushings as compared to metal on metal with crappy cracked rubber.
I hope this helps ill be making some more of these bushing tutorials sometime in the future.
p.s. let me know of any mistakes or info that might be miss leading or bad for your car.
Last edited by granny racer; 05-11-2011 at 06:22 AM.

 it has been added to the FAQ.
05-10-2011, 09:48 AM
it has been added to the FAQ.
05-10-2011, 09:48 AM
#3
Honda-Tech Member
Thread Starter
Join Date: Sep 2009
Location: Tecumseh Oklahoma
Posts: 236
Likes: 0
Received 0 Likes
on
0 Posts
thanks. would you happen to know the torque setting?
i figured bushings where like skateboard bushing. you can make em tight or loose depending on how you like it.
i figured bushings where like skateboard bushing. you can make em tight or loose depending on how you like it.
 05-10-2011, 11:46 AM
#5
Honda-Tech Member
Thread Starter
Join Date: Sep 2009
Location: Tecumseh Oklahoma
Posts: 236
Likes: 0
Received 0 Likes
on
0 Posts
05-10-2011, 11:51 AM
#6
Honda-Tech Member
Nice write up.
You probably want to change most of your bushings to poly with those heavy wheels you have there.
You probably want to change most of your bushings to poly with those heavy wheels you have there.
05-10-2011, 11:56 AM
#7
Honda-Tech Member
Thread Starter
Join Date: Sep 2009
Location: Tecumseh Oklahoma
Posts: 236
Likes: 0
Received 0 Likes
on
0 Posts
Trending Topics
05-10-2011, 12:05 PM
#8
Honda-Tech Member
yeah any weight you add to the preload of the suspension will take some toll on the bushings I believe.
05-10-2011, 12:44 PM
#9
Honda-Tech Member
Thread Starter
Join Date: Sep 2009
Location: Tecumseh Oklahoma
Posts: 236
Likes: 0
Received 0 Likes
on
0 Posts
05-12-2011, 01:13 AM
#12
MM Gruppe B
Point of Order!
Honda has the cupped washer flipped away from the bushing.
Urethane bushings do NOT compress. Now, although the reason for the washers being cupped is for strength, I find it interesting that Honda has them flipped. I wonder if this allows for bind free movement of the bushing.
Don't forget to take note kiddies, that often times, urethane bushing companies do NOT instruct one to trim the bushings to fit for bind free movement(in control arms), when they should.
05-12-2011, 03:15 AM
#13
Point of Order!
Honda has the cupped washer flipped away from the bushing.
Urethane bushings do NOT compress. Now, although the reason for the washers being cupped is for strength, I find it interesting that Honda has them flipped. I wonder if this allows for bind free movement of the bushing.
Don't forget to take note kiddies, that often times, urethane bushing companies do NOT instruct one to trim the bushings to fit for bind free movement(in control arms), when they should.
Honda has the cupped washer flipped away from the bushing.
Urethane bushings do NOT compress. Now, although the reason for the washers being cupped is for strength, I find it interesting that Honda has them flipped. I wonder if this allows for bind free movement of the bushing.
Don't forget to take note kiddies, that often times, urethane bushing companies do NOT instruct one to trim the bushings to fit for bind free movement(in control arms), when they should.
05-12-2011, 06:22 AM
#14
Honda-Tech Member

Join Date: Apr 2011
Location: Blair, NE
Posts: 87
Likes: 0
Received 0 Likes
on
0 Posts
did mine about a month ago and this is pretty good write up on this...when you released the bolt from the link when taking it apart did you notice the energy explosion...destroyed bushings and washers flew all over from the sway bar dropping...it was cool...
05-12-2011, 06:31 AM
#15
Honda-Tech Member
Thread Starter
Join Date: Sep 2009
Location: Tecumseh Oklahoma
Posts: 236
Likes: 0
Received 0 Likes
on
0 Posts
was your car on jack stands? or on ramps?
05-12-2011, 07:22 AM
#16
Honda-Tech Member
Join Date: Apr 2011
Location: Blair, NE
Posts: 87
Likes: 0
Received 0 Likes
on
0 Posts
jack stands...had alot less bushings left than on your pics...solved my problem of hitting a bump and having the feeling of pulling to the right because of basically no bushings there...almost just had a bolt washers and the sway bar was just moving all over...on both pass. and drivers side....super easy fix
05-12-2011, 08:07 AM
#17
Honda-Tech Member
Nice write-up. I did mine back in '08 and still holding strong with no tears/cracks in the bushing. Mine's red though.
05-12-2011, 12:09 PM
#18
MM Gruppe B

Note how the washer is worn. On the inside of the cup there are only wear marks from the bolt head or spacer sleeve. It's not polished or rubbed as it would be if the bushing was resting/rubbing on it. Poly does not compress like rubber, it will distort and squeeze out. I'm fairly sure the stock endlink bushings are polyurethane as well, the Honda suspension engineer took this into account and the washers are flipped.
Also...
Unless you have jackstands with the notch, I would not recommend resting the car on the spare tire jacking tab. Place the jack on the subframe that is inboard. #17/19 in this link http://www.hondaautomotiveparts.com/...y5=INNER+PANEL
Less likely to cause cosmetic and structural damage.
05-13-2011, 05:42 AM
#19
Honda-Tech Member
Thread Starter
Join Date: Sep 2009
Location: Tecumseh Oklahoma
Posts: 236
Likes: 0
Received 0 Likes
on
0 Posts
Note how the washer is worn. On the inside of the cup there are only wear marks from the bolt head or spacer sleeve. It's not polished or rubbed as it would be if the bushing was resting/rubbing on it. Poly does not compress like rubber, it will distort and squeeze out. I'm fairly sure the stock endlink bushings are polyurethane as well, the Honda suspension engineer took this into account and the washers are flipped.
Also...
Unless you have jackstands with the notch, I would not recommend resting the car on the spare tire jacking tab. Place the jack on the subframe that is inboard. #17/19 in this link http://www.hondaautomotiveparts.com/...y5=INNER+PANEL
Less likely to cause cosmetic and structural damage.
and the stock bushings are polyurethane not rubber?
05-16-2011, 11:09 AM
#20
MM Gruppe B
I'm fairly sure they are, I had one bushing coated in oil and it was unaffected. They do not appear to dry rot out like other rubber bushings. There is no dry rotting or checking. The worst bushing I had was simply split on its casting seam.
05-16-2011, 12:05 PM
#21
Honda-Tech Member
Thread Starter
Join Date: Sep 2009
Location: Tecumseh Oklahoma
Posts: 236
Likes: 0
Received 0 Likes
on
0 Posts
Typically the top of jack stands will look like ( or [. But there are a few that have a notch in the center that will clear the jacking rail without damaging it. But they are not as common. The subframe is a better support area.
I'm fairly sure they are, I had one bushing coated in oil and it was unaffected. They do not appear to dry rot out like other rubber bushings. There is no dry rotting or checking. The worst bushing I had was simply split on its casting seam.
I'm fairly sure they are, I had one bushing coated in oil and it was unaffected. They do not appear to dry rot out like other rubber bushings. There is no dry rotting or checking. The worst bushing I had was simply split on its casting seam.
hmmm interesting. dont know what the bushings are made out of. but if you look at the first few pics there is a crack down quite a few of them. i just figured they where rubber. either way. they where old and i needed to replace them

I also looked at my gfs 97 accord link bushings and they where still in great shape. no cracks. i guess its the age difference. plus my 95 accord rotted in a desert in Missouri for a few years and hers probably stayed running in Oklahoma most of its life.
05-16-2011, 12:25 PM
#22
MM Gruppe B
The seam is just that a seam, the rocker forms a hollow tube for structural rigidity. In the indicated jacking spots there will be a third piece of medal in the seam to help reinforce it for use as a jacking point.
05-17-2011, 06:53 AM
#23
Honda-Tech Member
Thread Starter
Join Date: Sep 2009
Location: Tecumseh Oklahoma
Posts: 236
Likes: 0
Received 0 Likes
on
0 Posts
you should make a jack tutorial cause i didnt know anything about that. and ill link it from here!

 05-18-2011, 06:22 AM
#25
Honda-Tech Member
Thread Starter
Join Date: Sep 2009
Location: Tecumseh Oklahoma
Posts: 236
Likes: 0
Received 0 Likes
on
0 Posts