
GunMoto's 92-95 Civic EG 4dr (sedan) Side Marker Template & DIY
 11-22-2009, 07:51 PM
#1
Honda-Tech Member
Thread Starter
Join Date: Feb 2005
Location: Orange County, CA
Posts: 385
Likes: 0
Received 0 Likes
on
0 Posts
First and foremost, feel free to add your comments, suggestions, or experience to this topic.
EDIT: Another suggestion is to cover all newly exposed metal with something to prevent rust (suggestion by: DeSchlong).
EDIT 2/20/10: Images re-hosted.
EDIT 5/30/10: Images re-hosted.
Upon my initial research to determine the side marker location of the 92-95 Civic EG 4dr (sedan), I discovered that the location of the side markers (in relation to the side trim/molding), are DIFFERENT between the 2/3dr and 4dr EGs.
Based on images of the 92-95 Civic EG 4dr (sedan) fenders with factory installed side markers (e.g., JDM, EDM), I revised the original [92-95 Civic EG 2/3dr Side Marker Template] for a "92-95 Civic EG 4dr (sedan)" application. I repeat, "I did not have actual JDM/EDM Civic EG 4dr fenders in my possession," and therefore, the location I have implied in my [92-95 Civic EG 4dr (sedan) Side Marker Template] is approximate but comparatively accurate.
The [92-95 Civic EG 4dr (sedan) Side Marker Template] is attached to the bottom of this post.
The following subsequent information is a basic guideline that I have outlined during the course of my own installation procedure. You (or your installer) may rely on this information at his/her own risk.
Caveat and limitations: Installer should be comfortable and experienced working with power tools. I will not take responsibility for undesired outcomes that results in loss or injury. Eye protection and general safety is the responsibility of the installer.
Here's a general step-by-step outline of what I did:
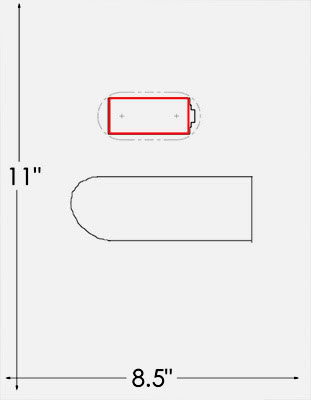
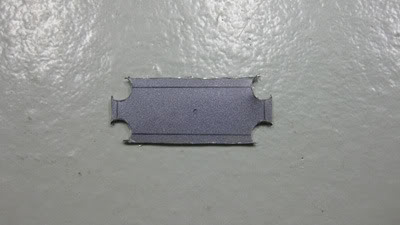
1. Use the template (attached to the bottom of this post) to mask the location of the hole for the sidemarker.
*Consider ONLY the rectangular portion of the cutout, as shown in the red outline below.
2. Here, I cut the template and used the [top edge of the trim indentation] and [trailing edge of the fender] as the reference point, as shown by the red arrow below.
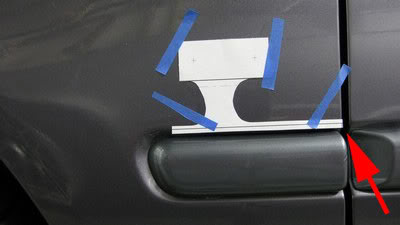
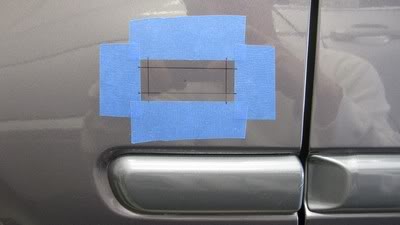
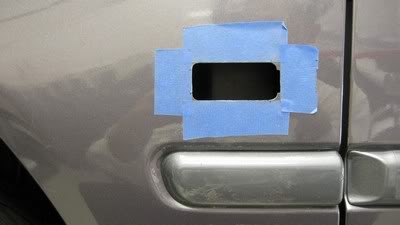
3. I masked the area to be cut and double-checked the location with the measurements, as shown in the template. Adjust as necessary.
I then outlined 6/32" from borders of the masked area using a fine tip Sharpie.
*I measured 6/32" because I will drill 5/16" holes at each corner, leaving a 1/32" margin.
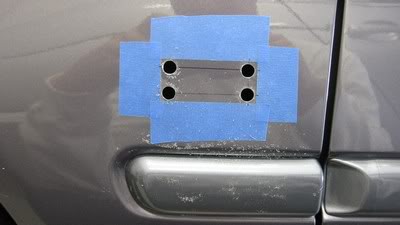
4. I started with 1/16" drill bit at the intersection of the marked outline. Then increased to a larger 13/64" bit, then 1/4", and finally 5/16."
*BE CAREFUL not to drill outside of the masked area.
5. Next I used a dremel with a cutoff wheel to grind between each 5/16" hole, carefully following the edge of the masked area.
From there, you grind a little more...[think baby steps]...making the edges straight of the rectangular hole.
For the corners, I used a cylindrical grinding stone to smooth the corners out and to align it to the straight edges of the rectangular hole. You may choose to make 90 degree corners at your discretion, as shown in the template.
*Be careful NOT to grind outside the masked area.
6. I relocated the masking tape on the trailing edge of the fender about 2mm. This is where I made a small indented cut like the template shows.
(In my case, the 2nd indented cut, as shown in the template was not needed.)
Be sure to test fit the sidemarker; make this an easier task by temporarily removing the retaining clip on the sidemarker.
If the rectangular hole is too small, you need to choose one side that needs to be opened more and then grinding slightly outside of the masked area. You may consider relocating the masking tape in 1mm increments to help.
(In my case, I needed to relocate the top edge an additional 1mm.)
*Remember to grind LITTLE-BY-LITTLE and test fit after each moment that you grind.
7. Once your sidemarker fits, reinstall the retaining clip and do another test fit. This is the point where you can adjust the spring tension of the retaining clip (by slightly bending it), which secures the sidemarker.
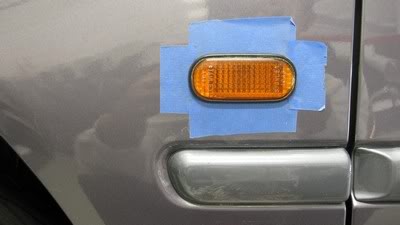
7. At this point you should be done with the physical installation! You may also consider masking the exposed edges of the hole to spray down a rust-preventing spray. Goodluck!
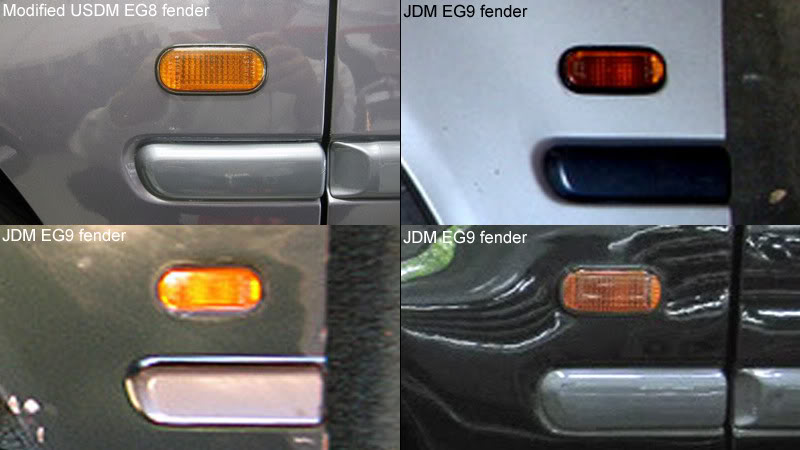
A comparison to JDM EG9 fenders:
The [92-95 Civic EG 4dr (sedan) Side Marker Template] is attached below (EG4dr_sidemarker.pdf):
EDIT: Another suggestion is to cover all newly exposed metal with something to prevent rust (suggestion by: DeSchlong).
EDIT 2/20/10: Images re-hosted.
EDIT 5/30/10: Images re-hosted.
Upon my initial research to determine the side marker location of the 92-95 Civic EG 4dr (sedan), I discovered that the location of the side markers (in relation to the side trim/molding), are DIFFERENT between the 2/3dr and 4dr EGs.
Based on images of the 92-95 Civic EG 4dr (sedan) fenders with factory installed side markers (e.g., JDM, EDM), I revised the original [92-95 Civic EG 2/3dr Side Marker Template] for a "92-95 Civic EG 4dr (sedan)" application. I repeat, "I did not have actual JDM/EDM Civic EG 4dr fenders in my possession," and therefore, the location I have implied in my [92-95 Civic EG 4dr (sedan) Side Marker Template] is approximate but comparatively accurate.
The [92-95 Civic EG 4dr (sedan) Side Marker Template] is attached to the bottom of this post.
The following subsequent information is a basic guideline that I have outlined during the course of my own installation procedure. You (or your installer) may rely on this information at his/her own risk.
Caveat and limitations: Installer should be comfortable and experienced working with power tools. I will not take responsibility for undesired outcomes that results in loss or injury. Eye protection and general safety is the responsibility of the installer.
Here's a general step-by-step outline of what I did:
1. Use the template (attached to the bottom of this post) to mask the location of the hole for the sidemarker.
*Consider ONLY the rectangular portion of the cutout, as shown in the red outline below.
2. Here, I cut the template and used the [top edge of the trim indentation] and [trailing edge of the fender] as the reference point, as shown by the red arrow below.
3. I masked the area to be cut and double-checked the location with the measurements, as shown in the template. Adjust as necessary.
I then outlined 6/32" from borders of the masked area using a fine tip Sharpie.
*I measured 6/32" because I will drill 5/16" holes at each corner, leaving a 1/32" margin.
4. I started with 1/16" drill bit at the intersection of the marked outline. Then increased to a larger 13/64" bit, then 1/4", and finally 5/16."
*BE CAREFUL not to drill outside of the masked area.
5. Next I used a dremel with a cutoff wheel to grind between each 5/16" hole, carefully following the edge of the masked area.
From there, you grind a little more...[think baby steps]...making the edges straight of the rectangular hole.
For the corners, I used a cylindrical grinding stone to smooth the corners out and to align it to the straight edges of the rectangular hole. You may choose to make 90 degree corners at your discretion, as shown in the template.
*Be careful NOT to grind outside the masked area.
6. I relocated the masking tape on the trailing edge of the fender about 2mm. This is where I made a small indented cut like the template shows.
(In my case, the 2nd indented cut, as shown in the template was not needed.)
Be sure to test fit the sidemarker; make this an easier task by temporarily removing the retaining clip on the sidemarker.
If the rectangular hole is too small, you need to choose one side that needs to be opened more and then grinding slightly outside of the masked area. You may consider relocating the masking tape in 1mm increments to help.
(In my case, I needed to relocate the top edge an additional 1mm.)
*Remember to grind LITTLE-BY-LITTLE and test fit after each moment that you grind.
7. Once your sidemarker fits, reinstall the retaining clip and do another test fit. This is the point where you can adjust the spring tension of the retaining clip (by slightly bending it), which secures the sidemarker.
7. At this point you should be done with the physical installation! You may also consider masking the exposed edges of the hole to spray down a rust-preventing spray. Goodluck!
A comparison to JDM EG9 fenders:
The [92-95 Civic EG 4dr (sedan) Side Marker Template] is attached below (EG4dr_sidemarker.pdf):
Last edited by Gunmoto; 05-30-2010 at 07:03 PM.

 11-22-2009, 11:38 PM
#3
EXCELLENT walk-through. Thorough, and I see you've done your research. Good info on the location of 4dr being different. Good ideas for technique - I need to do this myself soon, so this will help. Thanks!
Another suggestion is to cover all newly exposed metal with something to prevent rust.
Another suggestion is to cover all newly exposed metal with something to prevent rust.
Last edited by deschlong; 11-22-2009 at 11:44 PM.
11-23-2009, 07:12 PM
#4
Honda-Tech Member

hey ingorant noob, your mindless post is a big waste of time. This write up is a big help to anyone wanting to do this themselves instead of spending extra money to buy focked up "real" jdm fenders and spending even more money to have a body shop fix and paint them. Not everyone cares to have real jdm fenders so that they can be cool on h-t.
11-23-2009, 10:19 PM
#5
Honda-Tech Member
Thread Starter
Join Date: Feb 2005
Location: Orange County, CA
Posts: 385
Likes: 0
Received 0 Likes
on
0 Posts
The following shows a rough comparison of the side marker locations between an EG6 hatch and EG9 sedan:
EDIT 2/20/10: Image re-hosted.
EDIT 5/30/10: Images re-hosted.
 Thanks! I added your very important suggestion to my original post; good catch!
Thank you for concurring; this is exactly what I was avoiding...the additional cost for JDM fenders, prep, and paint, if I had chosen to follow that method.
Thanks! I added your very important suggestion to my original post; good catch!
Thank you for concurring; this is exactly what I was avoiding...the additional cost for JDM fenders, prep, and paint, if I had chosen to follow that method.
EDIT 2/20/10: Image re-hosted.
EDIT 5/30/10: Images re-hosted.
EXCELLENT walk-through. Thorough, and I see you've done your research. Good info on the location of 4dr being different. Good ideas for technique - I need to do this myself soon, so this will help. Thanks!
Another suggestion is to cover all newly exposed metal with something to prevent rust.
Another suggestion is to cover all newly exposed metal with something to prevent rust.
Last edited by Gunmoto; 05-30-2010 at 07:04 PM.
11-23-2009, 10:23 PM
#6
Honda-Tech Member
Grow a set before you post ever again... seriously.
OP great write-up and template. I have had a set sitting in my room for a year now.... i have just been a bit scared to do it. your post may get my confidence up enough to give it a shot since im going to be rebuilding and painting soon.
OP great write-up and template. I have had a set sitting in my room for a year now.... i have just been a bit scared to do it. your post may get my confidence up enough to give it a shot since im going to be rebuilding and painting soon.
11-23-2009, 11:36 PM
#7
Honda-Tech Member
now do one for a 97 civic ek hatch cuz like some ppl on here i dont want to buy a whole new set of fenders and get them painted just for the side markers lol i just need a confidence boost to actually do this lol
Trending Topics
01-06-2010, 11:47 PM
#9
Honda-Tech Member
iTrader: (1)
Join Date: Nov 2009
Location: SoCal
Posts: 1,848
Likes: 0
Received 0 Likes
on
0 Posts
lol, i'm late.
but nice diy. i didn't notice it before but i took a look at some pictures and actually noticed the difference in position of the markers relative to the molding.
trippy XD
but nice diy. i didn't notice it before but i took a look at some pictures and actually noticed the difference in position of the markers relative to the molding.
trippy XD
07-02-2010, 10:28 AM
#10
Honda-Tech Member

Join Date: Oct 2009
Posts: 941
Likes: 0
Received 0 Likes
on
0 Posts
Is there a diy for wiring? I'm wondering if since they're a single-element bulb if you can wire them up to work with the running lights- on and steady when driving, but switch between off and on when the blinker function is active.
07-02-2010, 08:25 PM
#12
Honda-Tech Member
Join Date: Oct 2009
Posts: 941
Likes: 0
Received 0 Likes
on
0 Posts
Deschlong your resources amaze me. Truly dedicated to hondas man. I give mad props to you and gunmoto for this. Pretty sick details and you guys don't stop till it's done right.
07-08-2010, 08:58 PM
#13
Honda-Tech Member
The following users liked this post:
10-24-2010, 01:16 PM
#16
Honda-Tech Member
Join Date: Feb 2010
Location: Valparaiso, IN
Posts: 31
Likes: 0
Received 0 Likes
on
0 Posts
youre really going to talk **** about this?
he took the time to make a good write up, like everyone else said, is a good write up to HELP people out, and you have the nerve to tell him its a waste of time?
you are a waste of time, if you are going to talk **** at the very least grow up enough to at least back up your claims.
anyways
good write up man! it looks good.
03-21-2014, 04:51 PM
#21
Honda-Tech Member

I'm confused, where do you measure from and to? Ex: 11" from bottom of trim to top of cut-out?
Great write up tho sir
Great write up tho sir
Last edited by CTRfan00; 03-21-2014 at 04:52 PM. Reason: Forgot to give props
03-22-2014, 08:11 PM
#22
Honda-Tech Member
Join Date: Oct 2009
Posts: 941
Likes: 0
Received 0 Likes
on
0 Posts

 06-05-2020, 08:17 PM
#25
Honda-Tech Member

Join Date: Jun 2020
Posts: 2
Likes: 0
Received 0 Likes
on
0 Posts
Hi Good day
I am starting to do restoration project for my Ferio.
So anyone knows where can I buy the Function7 LCA. I really need it. (only authentic)
Thanks in advance
I am starting to do restoration project for my Ferio.
So anyone knows where can I buy the Function7 LCA. I really need it. (only authentic)
Thanks in advance

Thread
Thread Starter
Forum
Replies
Last Post
boostnhatch
Paint and Body
1
06-05-2008 11:03 PM