
Front wheel bearings job with hub tool [PIC]
 07-18-2009, 03:15 PM
#1
Honda-Tech Member
Thread Starter
Join Date: Feb 2006
Location: 717
Posts: 700
Likes: 0
Received 0 Likes
on
0 Posts
EDIT: now that i am done with this project, i created these lists and instructions:
my car is a 2000 LS
PARTS LIST
2 wheel bearings (i used timken 510030)
2 axle nuts (W0133-1642540)
2 castle nuts (90363-SF1-000)
2 cotter pins
TOOLS LIST
jack
2 jack stands
lug nut wrench
FWD wheel bearing removal tool kit
impact wrench
impact socket that fits long bolt in bearing kit (1 1/8" if harbor freight)
wrench that fits long nut in bearing kit (1 1/4" if harbor freight)
32mm impact socket
17mm socket
ratchet wrench
torque wrench
17mm wrench
retaining clip pliers
needle nose pliers
chisel
BFH, 4lb deadblow is a good one
ODDS AND ENDS I ENJOY
bungee cords to hold brake calipers up up and away
WD40 or other penetrating oil
wire brush
sandpaper
c clamp for brake reinstall
PART 1: GET YOUR NUTS OFF
1. Set your emergency brake and block a rear wheel. Break the lug nuts on both your front wheels and put the car up on jack stands using the tabs behind the front wheels.
2. Remove the front wheels.
3. Use a chisel to bend the axle nuts out of the indentation on the axles. They will not spin free until you remove this indentation.
4. Apply the brake pedal, and use a 32mm impact socket to remove the axle nuts with an impact wrench.
5. Remove the brake calipers and secure them up and out of the way. Remove the brake rotors.
PART 2: FREE THE KNUCKLES
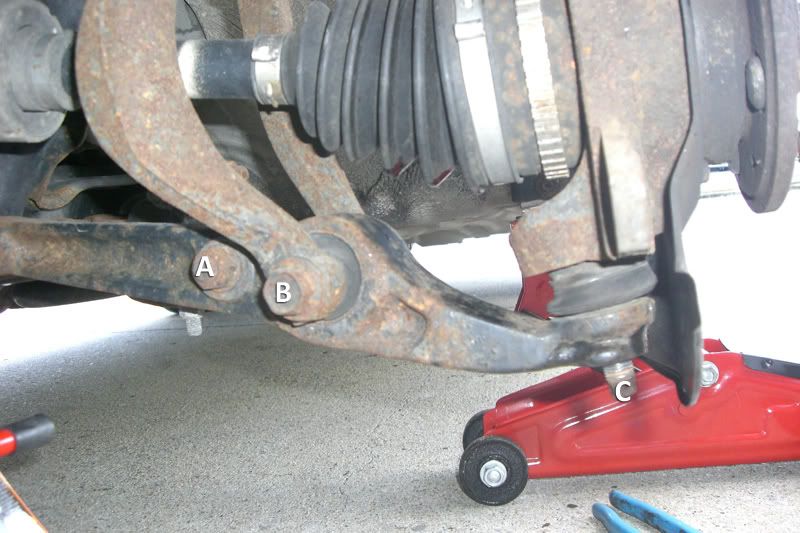
1. Remove the cotter pin from the castle nut on the lower ball joint This is the ball joint at 6 o'clock when looking at the knuckle/wheel hub assembly, or bolt C in the picture below.
2. Remove the 17mm castle nut.
3. Break the lower control arm free from the ball joint and knuckle. Even though the castle nut is removed, these parts are going to be seized together way tighter than you can imagine. Your options are the tried and true we todd method (search youtube.com for "honda painless ball joint removal" for a video), a pickle fork, or some other ball joint separator tool.
4. Use two 17mm wrenches to loosen and remove the long bolt holding the suspension fork to the lower control arm. This is bolt B here:
5. Lift the wheel assembly up so the ball joint stud clears the lower control arm. Take care of the axle as it should slide and fall out of the wheel hub at this point. Inspect the rubber boot for damage and leaks. Wrap it in a rag to protect it from the lower control arm where it will lay and the knuckle that now moves freely. Here's a picture of one of my axles that was leaking grease (lower right):

PART 3: PULL THOSE BEARINGS
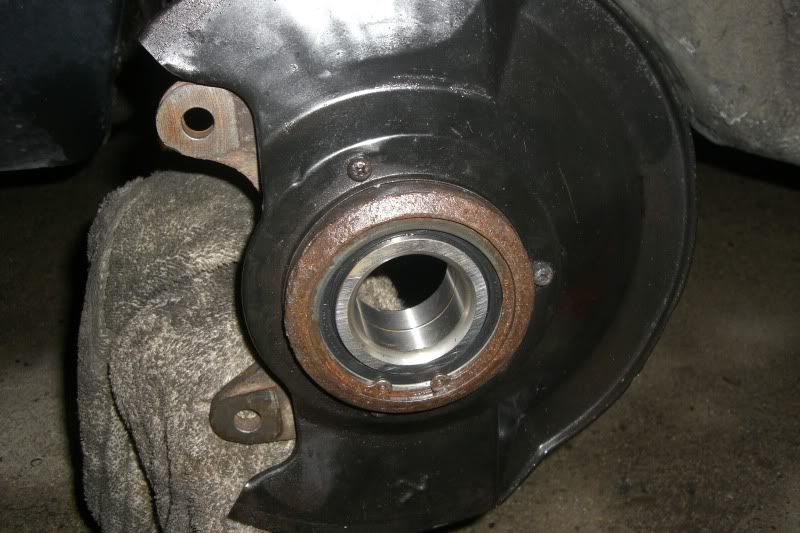
1. Look at the back of your knuckle and identify the difference between the hub at the very center and the bearing's inner race outside of that.
2. Attach your bearing removal kit from the rear, using a disc (or just the washer if you have the harbor freight kit like me) that is just smaller than the hub and a washer. Scroll up to my "greasy axle" picture to see my setup ready for the next step.
3. Beat the head of your bearing kit's long bolt with your BFH until the wheel hub falls out the front of the knuckle. Don't be shy, this part is the most fun of the whole job.
4. When the hub is removed, you will see the the retaining clip or "c clip" holding the bearing in the knuckle. Soak this in WD40. Tap it lightly with a hammer or punch the whole way around to break up some of the rust. Use retaining clip pliers to remove it from the knuckle.
5. Attach your bearing tool to the wheel assembly again, using the cylinder cup on the front to catch the bearing, and a disc that is just smaller than the bearing outer race in the back.
6. Put a wrench on the long nut on the rear of your bearing tool, and position it so it wedges against the knuckle or with against the ground/floor with a tube over the end.
7. Use your impact wrench to tighten the bearing tool assembly, squeezing the bearing out the front of the knuckle.
PART 4: NEW PARTS GOING IN
1. Figure out which way your new bearings go in. If you have rubber on one side and steel on the other, the rubber stays out.
2. Set up your bearing tool with a disc on the back that is bigger than the hole, and a disc on the front that will push on the outer race of the bearing.
3. Position your wrench on the long nut behind the knuckle and hold it with your free hand. You don't need to wedge it against anything to push the new bearing in.
4. Tighten the bearing tool rig to push the bearing into place. It is not possible to push the bearing too far. In fact, you want to be sure your impact wrench whines a little when the bearing reaches the back of the slot. This ensures you have enough space in front of the bearing for the retaining clip.
5. Clean the retaining clips and smooth their surfaces with sandpaper before reinserting them. Be sure they seat completely in their grooves.
6. Remove the old bearing inner races from your wheel hubs if they are still stuck in place. This is very likely. I tried to cut grooves with a dremel and use a puller as suggested and pictured here https://honda-tech.com/forums/acura-integra-6/wheel-bearing-replacement-using-hub-tamer-no-press-needed-1996133/ (great thread for same project), but gave up and had a shop remove them for $10.
7. Press the hubs into the wheel assembly using a disc in the rear that is just smaller than the bearing inner race.
8. Put everything back together using new castle nuts, new cotter pins and new axle nuts. Dent the axle nuts into the grooves in the axles just like they were when you found them.
NOTES
* Read the rest of this thread for more tips and pictures.
* The lower control arms are seized to the knuckles really tight. I can't stress this enough.
* Do not leave one wheel on the ground. You need to raise the car equally on both sides or the suspension torsion bar will force the lower control arm upwards and make it nearly impossible to lift the lower ball joint stud out of the lower control arm. Have a friend hold your brake pedal while you loosen the axle nuts.
* The retaining clips are rusted in place and do not want to be moved. I tapped them with a hammer and even used a flat head screwdriver to break up the rust holding them in place.
* When you put the castle nuts back on the lower ball joint studs, the ball joints will start to spin as you try to tighten the nuts. I jacked my car up high enough to get my impact wrench under the nut, and the speed was able to overcome the friction of the ball joint and spin the nut down (or up, in the literal sense).
* Mind your brakes. You may need a c clamp to squeeze the piston back into the caliper if the job takes you more than a few hours. Also, inspect your dust shields. I bent mine up and they rubbed the rotors pretty badly during my test ride around the block. Bend them back into place after bolting the brakes back up.
END EDIT
hey, guys. i am doing a front wheel bearings job on my 00 LS.
pardon my rust, this is pennsylvania.
enjoy!
my car is a 2000 LS
PARTS LIST
2 wheel bearings (i used timken 510030)
2 axle nuts (W0133-1642540)
2 castle nuts (90363-SF1-000)
2 cotter pins
TOOLS LIST
jack
2 jack stands
lug nut wrench
FWD wheel bearing removal tool kit
impact wrench
impact socket that fits long bolt in bearing kit (1 1/8" if harbor freight)
wrench that fits long nut in bearing kit (1 1/4" if harbor freight)
32mm impact socket
17mm socket
ratchet wrench
torque wrench
17mm wrench
retaining clip pliers
needle nose pliers
chisel
BFH, 4lb deadblow is a good one
ODDS AND ENDS I ENJOY
bungee cords to hold brake calipers up up and away
WD40 or other penetrating oil
wire brush
sandpaper
c clamp for brake reinstall
PART 1: GET YOUR NUTS OFF
1. Set your emergency brake and block a rear wheel. Break the lug nuts on both your front wheels and put the car up on jack stands using the tabs behind the front wheels.
2. Remove the front wheels.
3. Use a chisel to bend the axle nuts out of the indentation on the axles. They will not spin free until you remove this indentation.
4. Apply the brake pedal, and use a 32mm impact socket to remove the axle nuts with an impact wrench.
5. Remove the brake calipers and secure them up and out of the way. Remove the brake rotors.
PART 2: FREE THE KNUCKLES
1. Remove the cotter pin from the castle nut on the lower ball joint This is the ball joint at 6 o'clock when looking at the knuckle/wheel hub assembly, or bolt C in the picture below.
2. Remove the 17mm castle nut.
3. Break the lower control arm free from the ball joint and knuckle. Even though the castle nut is removed, these parts are going to be seized together way tighter than you can imagine. Your options are the tried and true we todd method (search youtube.com for "honda painless ball joint removal" for a video), a pickle fork, or some other ball joint separator tool.
4. Use two 17mm wrenches to loosen and remove the long bolt holding the suspension fork to the lower control arm. This is bolt B here:
5. Lift the wheel assembly up so the ball joint stud clears the lower control arm. Take care of the axle as it should slide and fall out of the wheel hub at this point. Inspect the rubber boot for damage and leaks. Wrap it in a rag to protect it from the lower control arm where it will lay and the knuckle that now moves freely. Here's a picture of one of my axles that was leaking grease (lower right):
PART 3: PULL THOSE BEARINGS
1. Look at the back of your knuckle and identify the difference between the hub at the very center and the bearing's inner race outside of that.
2. Attach your bearing removal kit from the rear, using a disc (or just the washer if you have the harbor freight kit like me) that is just smaller than the hub and a washer. Scroll up to my "greasy axle" picture to see my setup ready for the next step.
3. Beat the head of your bearing kit's long bolt with your BFH until the wheel hub falls out the front of the knuckle. Don't be shy, this part is the most fun of the whole job.
4. When the hub is removed, you will see the the retaining clip or "c clip" holding the bearing in the knuckle. Soak this in WD40. Tap it lightly with a hammer or punch the whole way around to break up some of the rust. Use retaining clip pliers to remove it from the knuckle.
5. Attach your bearing tool to the wheel assembly again, using the cylinder cup on the front to catch the bearing, and a disc that is just smaller than the bearing outer race in the back.
6. Put a wrench on the long nut on the rear of your bearing tool, and position it so it wedges against the knuckle or with against the ground/floor with a tube over the end.
7. Use your impact wrench to tighten the bearing tool assembly, squeezing the bearing out the front of the knuckle.
PART 4: NEW PARTS GOING IN
1. Figure out which way your new bearings go in. If you have rubber on one side and steel on the other, the rubber stays out.
2. Set up your bearing tool with a disc on the back that is bigger than the hole, and a disc on the front that will push on the outer race of the bearing.
3. Position your wrench on the long nut behind the knuckle and hold it with your free hand. You don't need to wedge it against anything to push the new bearing in.
4. Tighten the bearing tool rig to push the bearing into place. It is not possible to push the bearing too far. In fact, you want to be sure your impact wrench whines a little when the bearing reaches the back of the slot. This ensures you have enough space in front of the bearing for the retaining clip.
5. Clean the retaining clips and smooth their surfaces with sandpaper before reinserting them. Be sure they seat completely in their grooves.
6. Remove the old bearing inner races from your wheel hubs if they are still stuck in place. This is very likely. I tried to cut grooves with a dremel and use a puller as suggested and pictured here https://honda-tech.com/forums/acura-integra-6/wheel-bearing-replacement-using-hub-tamer-no-press-needed-1996133/ (great thread for same project), but gave up and had a shop remove them for $10.
7. Press the hubs into the wheel assembly using a disc in the rear that is just smaller than the bearing inner race.
8. Put everything back together using new castle nuts, new cotter pins and new axle nuts. Dent the axle nuts into the grooves in the axles just like they were when you found them.
NOTES
* Read the rest of this thread for more tips and pictures.
* The lower control arms are seized to the knuckles really tight. I can't stress this enough.
* Do not leave one wheel on the ground. You need to raise the car equally on both sides or the suspension torsion bar will force the lower control arm upwards and make it nearly impossible to lift the lower ball joint stud out of the lower control arm. Have a friend hold your brake pedal while you loosen the axle nuts.
* The retaining clips are rusted in place and do not want to be moved. I tapped them with a hammer and even used a flat head screwdriver to break up the rust holding them in place.
* When you put the castle nuts back on the lower ball joint studs, the ball joints will start to spin as you try to tighten the nuts. I jacked my car up high enough to get my impact wrench under the nut, and the speed was able to overcome the friction of the ball joint and spin the nut down (or up, in the literal sense).
* Mind your brakes. You may need a c clamp to squeeze the piston back into the caliper if the job takes you more than a few hours. Also, inspect your dust shields. I bent mine up and they rubbed the rotors pretty badly during my test ride around the block. Bend them back into place after bolting the brakes back up.
END EDIT
hey, guys. i am doing a front wheel bearings job on my 00 LS.
pardon my rust, this is pennsylvania.
enjoy!
Last edited by follie gatts; 08-13-2009 at 02:02 PM.
 07-22-2009, 04:48 PM
#3
Honda-Tech Member
Thread Starter
Join Date: Feb 2006
Location: 717
Posts: 700
Likes: 0
Received 0 Likes
on
0 Posts
I have one side nearly done. I didn't take many pics on the first one since it was largely a learning experience for me. I am going to take more pics on the passenger side. Here are important lessons I have learned so far:
1. Jack up both sides of the car. I was working on the driver side with the passenger wheel on the ground, expecting it to prevent the axles from turning. This was a mistake. Removing the knuckle from the lower ball joint bolt was impossible until I put the other side up on a jack stand as well. The torsion bar is always connected to both sides.
2. Order more than just new bearings. New axle nuts (W0133-1642540) are a must. On Monday, I decided to order two new lower ball joint castle nuts (90363-SF1-000) and new tie rod ball joint nuts (4030-10080). It is not required to remove the nuts at the tie rod ball joint, but now that I have done so and mangled one of them, fifty three cents each does not set me back so much.
3. It's all seized. The castle nuts on the lower ball joints suck. The retaining clips holding the bearings in suck. The simple steps take all the time.
I have the driver's side bearing in place, but I have yet to get the bearing inner race free from the wheel hub. I am waiting to get both of the hubs out to take them to a friend because I don't have a dremel.
My problem now is that the passenger lower ball joint castle nut is seized to the bolt. I jacked up the car high enough to get my electric impact wrench on the nut. This wrench was powerful enough to pull and set the bearings, but I can't loosen this nut with it! I might see if I can convince my buddy to bring his air impact wrench over. I think my neighbor has a compressor. I can't believe that my impact can't free the nut, so I cleaned up my tools, shut the garage, and I am drinking rum for the rest of the night. It's dark anyways, but ****.
07-22-2009, 06:33 PM
#4
Honda-Tech Member
Join Date: Jun 2001
Location: Long Island, NY, USA
Posts: 909
Likes: 0
Received 0 Likes
on
0 Posts
07-22-2009, 06:54 PM
#5
You don't need to take a or b off. Just take the knuckle off and bring it to a shop to have the old bearing pressed out and the new one in. It costs about $40.
07-23-2009, 12:49 PM
#6
Honda-Tech Member
Thread Starter
Join Date: Feb 2006
Location: 717
Posts: 700
Likes: 0
Received 0 Likes
on
0 Posts
07-23-2009, 12:50 PM
#7
Honda-Tech Member
Thread Starter
Join Date: Feb 2006
Location: 717
Posts: 700
Likes: 0
Received 0 Likes
on
0 Posts
Trending Topics
07-24-2009, 04:20 PM
#8
Honda-Tech Member
Thread Starter
Join Date: Feb 2006
Location: 717
Posts: 700
Likes: 0
Received 0 Likes
on
0 Posts
ok. today, i borrowed my buddy's 100psi air impact wrench and my neighbor's air compressor. guess who won? tomorrow morning i am planning on a harbor freight run to get a 25 inch breaker bar. i really don't want to trash this ball joint, but i am running out of options.
07-25-2009, 05:09 AM
#9
Honda-Tech Member
iTrader: (1)
Join Date: Jan 2002
Location: Nowhere and Everywhere
Posts: 29,530
Likes: 0
Received 52 Likes
on
46 Posts
If you remove bolt B from the shock fork, you can't use the we-todd method for separating the ball joint from the LCA. The WTDR method relies on the spring force pushing down after you push up with the jack to separate the ball joint.
07-26-2009, 05:20 PM
#10
Honda-Tech Member
Thread Starter
Join Date: Feb 2006
Location: 717
Posts: 700
Likes: 0
Received 0 Likes
on
0 Posts
i bolted the suspension fork back onto the lower control arm to execute the we todd separation of these two components. by the end of the day, i went out and bought a 4 pound dead blow/plastic sledge hammer to help. my friend and i beat on a 1/2" ratchet handle for the rest of the day with my new BFH until it started raining around 6.
car wins again. i'll get you next time, my pretty.
07-29-2009, 04:50 PM
#11
Honda-Tech Member
Thread Starter
Join Date: Feb 2006
Location: 717
Posts: 700
Likes: 0
Received 0 Likes
on
0 Posts
i have installed both new bearings. tomorrow i am going to try to stop by my friend's house (has dremel) to try and get the races off the hubs.
here are some pictures from tonight. this passenger side bearing was way more loose than the driver's, but i am not sure that all the grease is from the bearing. my CV boot is tight, but it could still be leaking i guess. i am not going to take the boot off until i order a new clamp tonight. acura gave me a boot clamp kit but its crappy so i'm going to buy another.
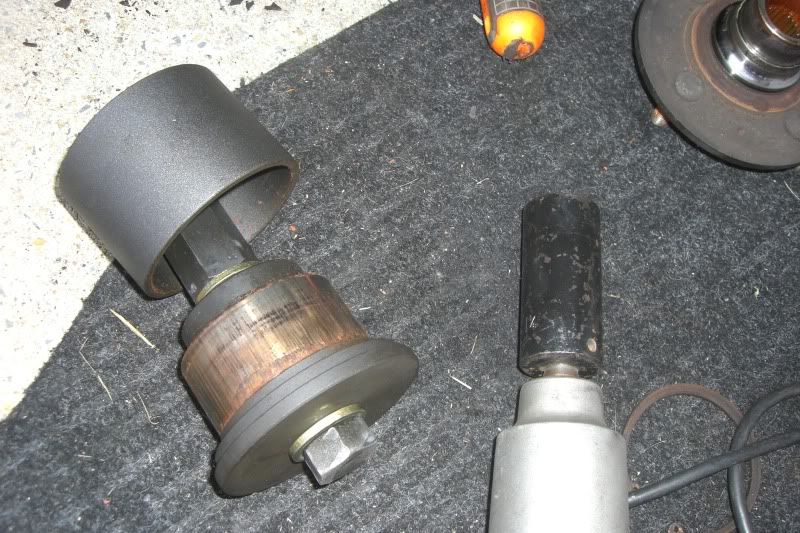
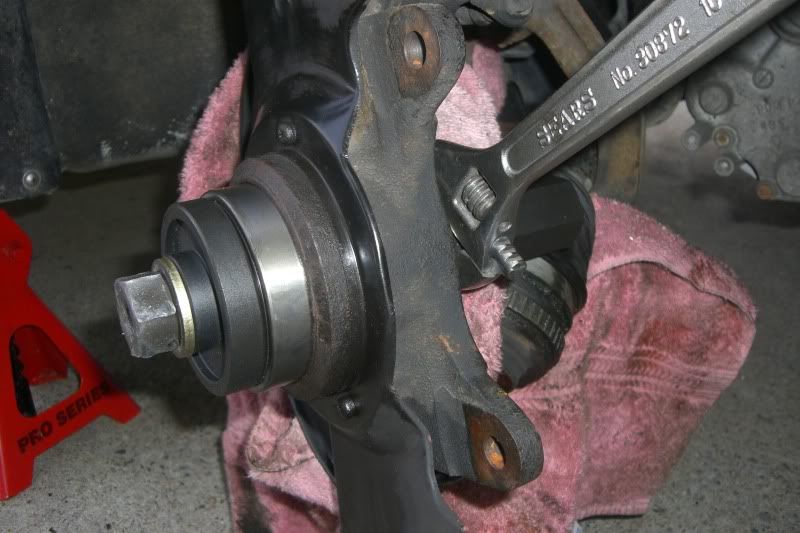
here is a picture of my hub tool assembly getting ready to be beaten with my BFH to knock the hub out of the knuckle. the concept is fairly simple; the washer is a bit smaller than the hub, and the long bolt runs the whole way through the hub with another washer and a nut on the other side. i wrapped the threads in hockey tape to protect the hub splines and the threads themselves.
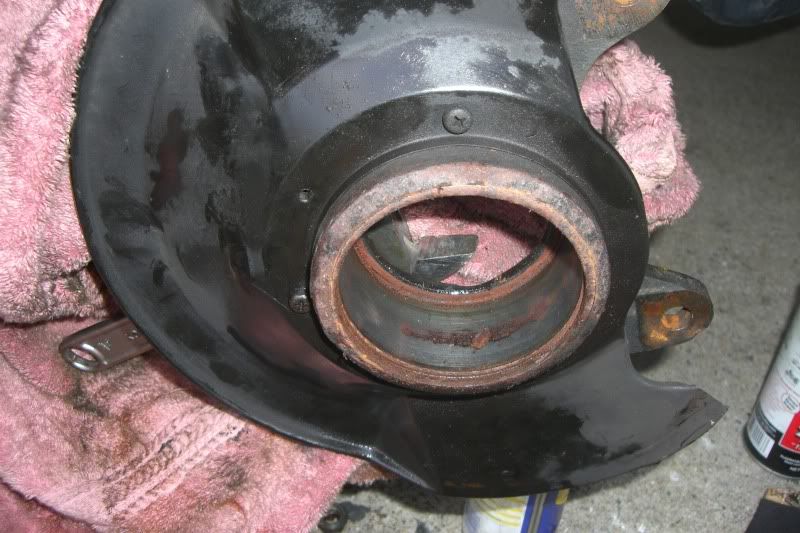
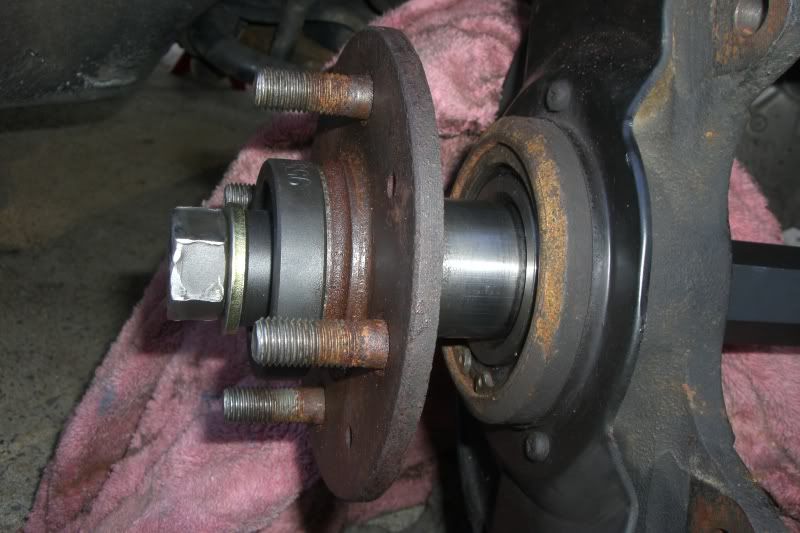
here is the hub after i pounded it out with the rig and bearing inner race still attached.

just before i pulled the old bearing. the cylinder on the front creates a cup for the bearing to fit into as it is squeezed out.

knuckle sans bearing. the big crescent wrench in the back holds the long nut of the hub tool and jams itself up against the knuckle while the impact does its job.
here is the old bearing right after it fell out.
this is a shot of the new bearing being pressed in place. the important thing here is to press the bearing in as far as possible so that the retaining clip has enough room to expand in place in front of it.
stay tuned!
here are some pictures from tonight. this passenger side bearing was way more loose than the driver's, but i am not sure that all the grease is from the bearing. my CV boot is tight, but it could still be leaking i guess. i am not going to take the boot off until i order a new clamp tonight. acura gave me a boot clamp kit but its crappy so i'm going to buy another.
here is a picture of my hub tool assembly getting ready to be beaten with my BFH to knock the hub out of the knuckle. the concept is fairly simple; the washer is a bit smaller than the hub, and the long bolt runs the whole way through the hub with another washer and a nut on the other side. i wrapped the threads in hockey tape to protect the hub splines and the threads themselves.
here is the hub after i pounded it out with the rig and bearing inner race still attached.
just before i pulled the old bearing. the cylinder on the front creates a cup for the bearing to fit into as it is squeezed out.
knuckle sans bearing. the big crescent wrench in the back holds the long nut of the hub tool and jams itself up against the knuckle while the impact does its job.
here is the old bearing right after it fell out.
this is a shot of the new bearing being pressed in place. the important thing here is to press the bearing in as far as possible so that the retaining clip has enough room to expand in place in front of it.
stay tuned!
07-29-2009, 06:55 PM
#12
Honda-Tech Member
Join Date: Jun 2001
Location: Long Island, NY, USA
Posts: 909
Likes: 0
Received 0 Likes
on
0 Posts
wow, that looks very greasy, if it is coming from the CV joint it may be time to replace it if you have been driving on it without grease.
To get the ball joint out easier without the we todd method, you can buy this tool from Harbor Freight.

http://www.harborfreight.com/cpi/cta...emnumber=99849
I have the honda version but it is much more costly. This cheaper copy should do the trick.
For the race, you can get a puller that will separate it from the hub if you can get access to the dremel.
To get the ball joint out easier without the we todd method, you can buy this tool from Harbor Freight.
http://www.harborfreight.com/cpi/cta...emnumber=99849
I have the honda version but it is much more costly. This cheaper copy should do the trick.
For the race, you can get a puller that will separate it from the hub if you can get access to the dremel.
07-29-2009, 08:45 PM
#13
Honda-Tech Member
Thread Starter
Join Date: Feb 2006
Location: 717
Posts: 700
Likes: 0
Received 0 Likes
on
0 Posts
i know. my situation is odd because there's a lot of grease. i have no clicking like a bad axle, but the whirling sound coming from this wheel that is more pronounced when the wheels are not straight. so, the sounds indicate bad bearing, but the grease indicates bad axle. i am going to put a new clamp on the boot after a regrease job, and the bearings are now brand new, so we'll see. now that i have this experience, replacing the axles would be fairly easy for me. especially with the new lower ball joint castle nuts i bought.
08-04-2009, 10:21 AM
#15

Join Date: May 2009
Posts: 9
Likes: 0
Received 0 Likes
on
0 Posts
Awesome pics follie. I'm about to tackle the fronts on my 3G LS. I have the bearings, and was going to just get the 12-ton shop press from Harbor Freight but then I saw this on-knuckle
FWD bearing remover/press kit for $79.99... is this the one you're using?

I'm thinking of ordering that and selling it after using it. I'll lose a few bucks, but I think of it as a rental fee. Also looking at:
10" circlip pliers $9.99
3/4" ball joint separator $17.99
Large bearing separator $19.99 (I got a dremel & pullers, might pass on this)
And because it's Harbor Freight, a whole bunch of other sockets (like a 32mm) & other stuff. I've been building a list
Anyway, just curious if these are the tools you used to get the job done, because if they are I sure would feel less about ordering it.
FWD bearing remover/press kit for $79.99... is this the one you're using?
I'm thinking of ordering that and selling it after using it. I'll lose a few bucks, but I think of it as a rental fee. Also looking at:
10" circlip pliers $9.99
3/4" ball joint separator $17.99
Large bearing separator $19.99 (I got a dremel & pullers, might pass on this)
And because it's Harbor Freight, a whole bunch of other sockets (like a 32mm) & other stuff. I've been building a list
Anyway, just curious if these are the tools you used to get the job done, because if they are I sure would feel less
about ordering it.
08-04-2009, 12:05 PM
#16
Member
Join Date: Oct 2002
Location: Bloomington, IN
Posts: 1,612
Likes: 0
Received 0 Likes
on
0 Posts
You can use the loan a tool service from autozone to get the "tie rod end puller" that can be used on the lower ball joint. Takes about 15 seconds to pop it loose with no damage.
http://www.autozone.com/autozone/ima...ores/27022.jpg
http://www.autozone.com/autozone/ima...ores/27022.jpg
08-04-2009, 12:06 PM
#17
Honda-Tech Member
Thread Starter
Join Date: Feb 2006
Location: 717
Posts: 700
Likes: 0
Received 0 Likes
on
0 Posts
Awesome pics follie. I'm about to tackle the fronts on my 3G LS. I have the bearings, and was going to just get the 12-ton shop press from Harbor Freight but then I saw this on-knuckle
FWD bearing remover/press kit for $79.99... is this the one you're using?
I'm thinking of ordering that and selling it after using it. I'll lose a few bucks, but I think of it as a rental fee. Also looking at:
10" circlip pliers $9.99
3/4" ball joint separator $17.99
Large bearing separator $19.99 (I got a dremel & pullers, might pass on this)
And because it's Harbor Freight, a whole bunch of other sockets (like a 32mm) & other stuff. I've been building a list
Anyway, just curious if these are the tools you used to get the job done, because if they are I sure would feel less about ordering it.
FWD bearing remover/press kit for $79.99... is this the one you're using?
I'm thinking of ordering that and selling it after using it. I'll lose a few bucks, but I think of it as a rental fee. Also looking at:
10" circlip pliers $9.99
3/4" ball joint separator $17.99
Large bearing separator $19.99 (I got a dremel & pullers, might pass on this)
And because it's Harbor Freight, a whole bunch of other sockets (like a 32mm) & other stuff. I've been building a list
Anyway, just curious if these are the tools you used to get the job done, because if they are I sure would feel less
about ordering it.i don't recommend cutting the grooves in the races and using a jaw puller. i got so frustrated with that method not working that i took my hubs to a shop and they charged me $10 to remove the inner races. that is far less than i spent on cutting discs for the dremel and the two jaw puller set i already bought. lessons learned, i guess. they told me to cut at a 45 degree angle to the hub along the race until it is thin enough to break off using a chisel. i didn't like this idea so i handed them over, and the shop used a bearing separator (like this http://www.bing.com/images/search?q=bearing+separator) to break the races free.
i have some pics to put up tonight. i am bolting everything back together, and i may be able to take a test ride tonight. i am also going to write up a step by step to edit into my first post on this thread.
i do recommend the we todd method over the ball joint separator. here's a video that demonstrates how easy it can be: http://www.youtube.com/watch?v=ISY8bGof3bQ
1. jack up the wheel assembly to create room for your ratchet handle to fit in between the LCA and the knuckle
2. insert wrench
3. remove jack to pinch the wrench firmly in place
4. hit the wrench with a BFH
i had trouble on one side with this method, but turning the wheel the opposite direction let the wrench protrude out the back of the knuckle and outside the fender. the hardest part when swinging the hammer is getting a good swing and clearing the fender to hit the wrench.
08-04-2009, 02:00 PM
#18
Join Date: May 2009
Posts: 9
Likes: 0
Received 0 Likes
on
0 Posts

Awesome, I'm looking forward to it. I used a printout of one of these step-by-step picture threads alongside my Helms when doing the clutch, it was very helpful to have.
08-04-2009, 05:29 PM
#19
Honda-Tech Member
Thread Starter
Join Date: Feb 2006
Location: 717
Posts: 700
Likes: 0
Received 0 Likes
on
0 Posts
here's a picture of my passenger side axle after i cleaned it up, cut the factory boot clamp off, squeezed some grease inside, and put a new boot clamp on as tight as i could manage. makes a neat before and after with the picture i posted a few days ago:

a shot of the hub tool rig before i pressed the hub back into the knuckle:

the important note here is when you are pressing the bearing to select a disc that is just smaller than and rests on the OUTER race of the bearing. when pressing the hub, select a disc that is just smaller than and rests on the INNER race of the bearing. this the reason for taking the picture above.
here is the front of the same setup after the bearing has been pressed in about a quarter of the way:
i did get to take a test ride tonight, but my brake rotor dust shields are a little torqued from all the work and are rubbing on the rotors like crazy. always something left to take care of. step by step, tools and parts lists all yet to come.
a shot of the hub tool rig before i pressed the hub back into the knuckle:
the important note here is when you are pressing the bearing to select a disc that is just smaller than and rests on the OUTER race of the bearing. when pressing the hub, select a disc that is just smaller than and rests on the INNER race of the bearing. this the reason for taking the picture above.
here is the front of the same setup after the bearing has been pressed in about a quarter of the way:
i did get to take a test ride tonight, but my brake rotor dust shields are a little torqued from all the work and are rubbing on the rotors like crazy. always something left to take care of. step by step, tools and parts lists all yet to come.
08-13-2009, 01:40 PM
#20
Join Date: May 2009
Posts: 9
Likes: 0
Received 0 Likes
on
0 Posts
follie, I'm into the job using your method and the HF kit. Everything up to the point of pressing the old bearings out of the knuckle is accomplished. But the bearings? They ain't budging. I spent the last hour impacting, soaking with PB Blaster, impacting some more, etc. There's still 1/2 inner race and full outer race in the knuckles. I dunno, I think my options here are: dremel carefully? Can't think of anything else...
08-13-2009, 01:51 PM
#21
Honda-Tech Member
Thread Starter
Join Date: Feb 2006
Location: 717
Posts: 700
Likes: 0
Received 0 Likes
on
0 Posts
follie, I'm into the job using your method and the HF kit. Everything up to the point of pressing the old bearings out of the knuckle is accomplished. But the bearings? They ain't budging. I spent the last hour impacting, soaking with PB Blaster, impacting some more, etc. There's still 1/2 inner race and full outer race in the knuckles. I dunno, I think my options here are: dremel carefully? Can't think of anything else...
as long as...
1. your disc on the back of the rig fits inside the hole in the knuckle and presses on the outer race
2. you have a big wrench holding the long nut from turning so the assembly is tightened together
something must give! are you using an electric or air impact?
i found the actual removal and installation of the bearing to be the easiest part of the job. as soon as my big wrench was wedged onto the caliper, the disc started pulling the bearing out. i guess my question is... is your impact wrench turning the long bolt? if so, it HAS to be working unless the long nut is spinning instead of tightening on the threads.
edit: it's this picture http://i289.photobucket.com/albums/l...a/CIMG1512.jpg that shows the big wrench (even though the pic is during the reinstall it's the same concept). that wrench must prevent the long nut from turning, so when the bolt turns it moves up the threads and tightens the assembly together.
Last edited by follie gatts; 08-13-2009 at 02:04 PM.
08-13-2009, 02:14 PM
#22
Join Date: May 2009
Posts: 9
Likes: 0
Received 0 Likes
on
0 Posts
I actually have the rig set up pretty similar to yours. I think you were using the smallest or 2nd smallest disc in the kit on the back, which has a little overlap on the inboard side of the inner race which stays in the knuckle after the hub comes out. Using the 2nd biggest cup in the front which lines up pretty well with the raised portion of the knuckle. Using air impact. In fact, I have the bolt side of the rig up in front. I also threaded an additional 3/4"-16 nut onto it so i can put a deep-well on it for some extra purchase. That socket has a breaker bar on it and is immobilized against the chassis. I'm using the big nut on the back and impacting that with another deep-well. And here's what's moving: nothing. I find it hard to believe I'm more seized up than you there in Penn, esp after seeing the pics
I'm gonna go hit it them again, nothing better to do. All I can say for sure is: I'm positive the disc on the back is small enough to put the load on the bearings, and the cup in front is surely anchored on the knuckle.
FWIW, that large bearing separator I linked up above was able to the outboard inner races off both hubs, although it was a tough go - ended up stripping one of the long bolts just as the 2nd race came free, BFH handled the rest.
Edit: the number on the disc in the back is 955-11.
Edit 2: New strategy is more effective: Instead of impact, go with another breaker bar. It's moving now, although I'm hitting parts where I gotta jump on the thing to keep it going.
You didn't use any substances to help slide the bearing or hub in, did you? Anti-seize or anything? Doesn't seem like the place you'd want it, but it sure wouldn't be such an SOB if there's a next time. I'm just going with bearings in the freezer right now.
Last edited by Ralonzo; 08-13-2009 at 02:35 PM.
08-13-2009, 02:42 PM
#23
Honda-Tech Member
Thread Starter
Join Date: Feb 2006
Location: 717
Posts: 700
Likes: 0
Received 0 Likes
on
0 Posts
how many PSI are you running through the wrench? hard to believe air couldn't do it.
if you have a socket on the back of the long bolt, maybe its hitting the socket and not moving because there's nowhere for it to go?
when i pulled the bearings, i had the bolt head on the front and the long nut on the back like in this pic: http://i289.photobucket.com/albums/l...a/CIMG1506.jpg
maybe you're confusing my install pics with my removal pics?
08-13-2009, 03:14 PM
#24
Honda-Tech Member
Thread Starter
Join Date: Feb 2006
Location: 717
Posts: 700
Likes: 0
Received 0 Likes
on
0 Posts
good luck! next week i am going to buy the parts for timing belt / water pump. you in for that one, too? : )
08-13-2009, 08:36 PM
#25
Join Date: May 2009
Posts: 9
Likes: 0
Received 0 Likes
on
0 Posts
Heh, just did it at 180K.
Long story short: Got the bearings out... eventually. The head of the long bolt on the puller popped clean off. Whoa. Good thing I have that extra nut. Wonder about that "limited lifetime warranty" on this kit... I'll have to try to put it to use.
I can see some deformities/depressions on the inner races that were removed. Very small & slight, but definitely there. Also, it looks like the passenger side released its grease to a certain extent. My CV is clean but the bearing-facing surface of the hub was pretty goopy when I got it off, as was the back of the knuckle. That might explain that roaring noise from that side. In any case, these are ready for replacement, no doubt about it.
I'm double-checking the installation instructions. Looks like discs 11 and 09 are the puppies for the bearing install. Dunno about hub just yet.
You know, this pic you posted http://i289.photobucket.com/albums/l...a/CIMG1512.jpg looks like the bearing install, and if that's right, it'd have the flat side of that disc against the bearing. I was actually going to use the same disc but flip it so the lip showing there is against the outer race. I think the inner race is raised a little on my bearings and you mentioned not putting load on them while pressing in.
It also looks like your long bolt is in the process of shearing it's head like mine did... that depression in the center is a telltale sign.

