
Basic Guide for accords
 03-11-2004, 05:57 PM
#1
Honda-Tech Member
Thread Starter
Just some general fact+some of my experience and opinion about those product.
I try to throw in some general concept about suspension for accord, I am not going to go into great in depth/detail(i can go for hours and hours). Look for hints and tricks from my past experience. remember I am not God so yeah.
CHAPTER 1-LOWERING SPRING

Springs kit by Eibach
1)Lower spring-it helps to reduce body roll,etc a.k.a.
help you goes around the corner with more grip by increasing the degree of negative camber.
there's a bunch of lowering springs in the market but only a handful of those spring are actually performs well, in the street as well as the track. I come with warranty, registtion card, spec sheet for cutting the bumpstop and a pair of decals.
1)eibach-probably one of the most popular lowering spring maker in the US market today, they offer two type/style of spring for accords, they are eibach prokit and sportline. I personally love how the eibach ride in the street.
a)PROKIT is designed and road test with use in conjunction of OEM stock shocks in mind, so it's okay to use stock shock with prokit, in fact i had the same set up before.
*note: some people experience the "boat look" with eibach prokit, boat look=the front is higher than the rear.
b)SPORTLINE sits some what lower than prokit, sporline requires an aftermarket(stiff damper) shocks. Sportline is pretty much the lowest you can go without rubbing.
2)H&R-another popular spring makers, offering three type of spring for accord.
They are the cheaper alternative to eibach, which like eibach, their springs are very good in quality.
a)O.E. SPEC spring- they are what my friends called "***** drop", it lower the car like less than an inch or so. they are built with a higher spring rate=stiffer ride. Perfect for sleeper, i guess.
b)SPORT-another ultra popular springs for the honda crowd, they are cheap and works, need aftermarket shocks to accompany the increased rate.
c)RACE-the low-est spring h&r offer, you'll need to throw in some aftermarket shocks for this springs also. They are progressive spring, alot of people experience some "clunking" when the lower part of the coil hit each other when the spring is compressed.
3)Tein-the green suspension company from Japan, they got some amazing stuff with a reasonable price. Not the best in the world but top notch stuff right here
They only offer one type of lowering spring for accord, to my surprise, s-tech didn't live out the tein reputation.
a) S-tech-The entry level spring to the bigger coil-over brother. They are inexpensive to begin with, they are designed to used with oem stock shock but they fall short on the performance side. Some of my boy with those s-tech, claim they are way too soft even with an aftermarket shocks.
4)Tanabe, tanabe USA offer number of springs for honda, not much actual info at this point yet.
<<<<<<<<OTHER SPRING REVIEW UPDATE SOON>>>>>>>
EXTRAS
-4th gen and 5th gen accord share some suspension parts, such as shock and spring,etc. HOWEVER the spring rate and damper is said to be different, so choose accordingly.
-If you are poor just like me, look for used quality spring instead of buying cheap low quality new spring. ebay have deal like used sportline for 100buck shipped all year long, just need to be patient.
-one of the way to reduce/decrease the clunking noise on progressive spring is to wrap the lower part of the springs with silicone sleeve.
-6th gen 98-02 accord have many compatible suspension parts with bigger v6 brother and tl, cl, tl-s, cl-s
CHAPTER 2-ADJUSTABLE SPRING, SLEEVE-OVER

GroundControl "coilover/sleeveover" kit with eibach springs
They are often mistakenly called coilover, which they are not.
sleeve over or adjustable spring have NO build in damper/shock.
The only adjustable part is the ride height.
1)GROUND CONTROL-perhaps the only sleeve-over should be alive in the market today, think of GC as the ONLY good guy the world of bad sleeve-over. GC didn't suck like most of the sleeve-over because they used spring made by eibach. EVERY ground control sleeve-over uses eibach's top notch spring.
GC allow the customer to specail order a set of sleeve over with custom spring rate, which is a great advertiage for track car.
2)Ebay style sleeve-over- due to popular demands here a picture of the ebay style coilover.

ONE word to sum it up: GARBAGE
Bouncy, no controlled spring rate, no protection aganist botteming out, sagging, Just pure garbage.
They costs around 50-75 buck brand new in ebay, you'll get what you pay for.
3)Skunk2 Racing Adjustable Springs-pricey but not well built, alot of honda folk had skunk2 when the coilover things first pops out, NOT worth the money IMHO
EXTRAS
-Many sleeve-over/adj. spring experiencing some rusting on the threads, which could preventing the spring from adjusting.
-whenever you adjust the ride height, you'll changing the camber and toe angle, so you'll end up getting an alignment done everytime you change the height.

Zeal b6 coilover system
CHAPTER 3- REAL COILOVERS
Coilover-direct replacement for the oem springs and shocks(some top notce coilover even come with a camber adjustment plate), engineered and built as one unit.
Some coilover come with revalvable shock which you can reuse the blown shock.
ALL coilover kit are heigh adjustable but not all coilover have damper adjustment(ex: tein basic).
1)TEIN-The green Japanese suspension company took the import in US by storm.
a)basic-The entry level coilover set up, Adjustable height but non-adjustable damper(shock's compress and rebound rate), very affordable coilover setup, priced just around 700(you can find most of the online places shipped for $700).
b)Super Street Type SS-the higher level coilover system with adjustable damper, ideal for street and track use. They costs little bit more than "basic".
Alot of honda/acura guys raise this setup.
2)apex'i-known for quality and very well designed parts for the import crowd.
One of the big "boss" at the drift D1 event(for the socal folks )
a) World Sport Damper Coil Overs-priced almost the same as the tein SS kit, i didnt heard much good praise from WS for some odd reason.
3)B&G-unknown
a)Adjustable Coil Overs-retails around 1grand and with no adjustment for the shock,
tein or apexi ws would be a better choice, IMHO. It comes with a helper/secondary springs.
4)Tokico-another popular coilover setup, tokico is known for their affordable shocks/damper
a)Illumina Coil Overs-height and damper adjustable, illumina adjustable shock with H&R springs in a combo package, a great valve if you consider buying the same setup seperately.
5)Tanabe-another Japanese import part gaint, now offering 2 type of coilover for usdm accord.
a)Sustec Pro S-OC Type-II Coilovers-another fixed damper coilover, priced around tein basic
b)Sustec Pro S-S Type II Coilover Kit-Damper and height adjustable, magically price around 1000, just like the tein SS
c)Tanabe Sustec Pro Street Coil Overs-another step up to the S-S II, retails at $1489, not much info/experience, yet.
6)OTHER Truth coilover(availble for accord)
a)HKS- Hiper Damper Kits, built with rust resistance material, damper and height adjustable.
b)Progress Competition Coil Over Suspension Systems-aluminum body for resistant to rust, damper and height adjustable(one to three inch), REVALVABLE shocks for the track ******. Reasonable price
c)Zeal Suspension System B6 Series-aka buddyclub in Japan(?), very pricey but worth it from what i heard. Height and damper adjustable, ideal for track use.

KYB AGX Adjustable shocks

Tokico HP blue non-adjustable shocks
Chapter 4- damper/shock/strut
-shock control the springs rebound and compression, while the springs support the actual weight of the car, the damper control the spring bounce and rebounce"circle". A good damper can tell your car is going over a bump/pothole from a corner in a track.
Some shocks can be revalve to reuse after it's blew but most of the shocks in the market today are non-serviceable(mostly gas shocks).
thumbs or rules for shock= adj>non-adj(so-called self-adj)
1)KYB-very popular shock/suspension company for aftermarket imports
a)GR2-reasonable priced aftermarket shock with OEM spec shock, ideal for oem replacement. Good combo with prokit, s-tech, H&R O.E.
b)agx-bandwagon shocks for lowered honda, very very popular, known for it's high quality and very reasonable price for adjustable shock. priced around 350-400 for a new set. NOT AVAILBLE FOR 6th gen accord
2)Tokico-another popular choice for import suspension.
a)HP BLUE-non-adjustable gas shock, design to use with lowering spring for street use. perfect combo with lowering spring for mostly street driven car/once a month weekend track user. dont expect a whole lot but it's a big jump from oem shocks.
a new set is around $250.
b)illumina-damper adjustable damper, same as agx if not better, priced just above agx. Great valve if you getting the illumina+springs package.
3)Koni-maker of car suspension for over 50 years.
a)RED-non-adjustable shocks, not much info on this setup.
b)YELLOW-honda-tech's top pick for choice of shock, proven performance in the track, autox across US. Reserviceable, custom valve,etc.
many autocrosser/trackwhore in H-T praise the GC with koni yellow combo(custom rate). VERY pricey but worth the cost.
4)Bilstein Self-Adjusting Mono Tube Gas Shocks-non-adjustable, monotube.
EXTRAS
-Always use the bumpstop at all time, a lowering spring would wears a shorten(trimmed) bumpstop according to spec. The bumpstop is like a foolproof device, it would save your shock from damaging itselt from potholes,etc.
it only take one good slam to kill the shock without bumpstop.
-always use the dirtcap, it's the only thing protecting the polished piston shalf from damage, grease accordingly when install/reinstall.
-there a right way to test the status of the shocks/damper, IM me
Chapter 5- Strut bar

Neuspeed One piece with multi-mounting points(98-02 accord)

strut bar is the metal(or even better carbon fiber) supporting bars that design and place of a sepcified spot that strengthen the unibody during pressure(cornering, drag,etc).
<UPPER FRONT STRUT BAR>(located in the engine bay, top of the two front strut)
<LOWER FRONT STRUT BAR>(located so what near the tie rod/control arm under the front suspension)
<UPPER REAR STRUT BAR>(located on top of the rear shock assembly, mostly front in trunk but for 6th gen, it's right behind the rear seat, just infront of the rear speakers)
<LOWER REAR STRUT/TIE BAR>(located between the two LCA bolts)
1)comptech-possibly be the one of the most expensive suspension part maker, top notice quality.
a)comtech titanium series upper strut bar- titanium is tough and lightweigh, only part is bad is that they are hard to work with which translate to expensive parts.
For 6th gen accord/ TL/CL/TLS/CLS, it replace the two oem finger-sized bar with a meaty bar that connects the left and right shock/strut tower and it extends to the firewall. retail is around $360
2)Neuspeed-another popular tuner parts maker in US.
a)NEUSPEED Front Strut Tie Bars-similar design like the comtech one, neuspeed have a one piece design, which consider superior than multi-pieces design.
neuspeed used aluminum instead, strong yet lightweight and cost considerablely less($145)
3)OEM-6th gen accord can swap in oem strut bar from CL, TL, CLs, TLS.
acura retail them for 40 if I am not mistaken.
4)OTHER-multi-piece design
a)skunk2-3 pieces
b)Tanabe Sustec Front Strut Tower Bars-the mother of ebay style strut bar.
c)ebay style-very very cheap, around 25-40 dollar, some fits good while some need some cutting. A good buy for those in budget.
EXTRAs
-rules of thumbs tells us...
-one piece>multi-piece
-ebay style cheap-strut bar work just fine for most street driven car.
-when installing strut bar on lowered car, jack up the front end and then put on the
strut bar, that way the bar would sit "right" but please do pay attention so you dont drop your spring/shock assembly.
-adjust the but to tighten the adjusting nut to get tanabe(or tanable knockoff,ebay style) bar to fit tight(no flex)
-There's a lower frame(FRONT) braces for accord, dont know how well it perfroms tho'
CHAPTER 6-ANTI-SWAY BAR

Example of eibach's front and rear sway bar SETs with bushing and endlink.
The anti-sway bar, also called sway bar, stabilizer bar, anti-roll bar. Perhaps it's the best suspension you can do after putting on a set of sticky tires. Performs you really can feel. eibach describe it as, "Our Anti-Roll-Kits reduce body roll through increased design stiffness over stock bars. The result: increased handling and cornering grip in any performance-driving situation." Okay, so what's body roll? body roll is when you entered a corner with speed, assuming you makine a left turn 40mph, the left wheel(side) "dive" under and the right(side) wheel "pops" up.
They sell sway bar as a set of both front and rear, or something they just sell individual piece, there's some adjustable anti-sway bar in the market now.
Installition of sway bar might require some drilling on some accord model.
Read chapter 6's extra for more info on under and oversteer with conjunction with sway bar.
1)Eibach-Anti-roll kit-the so-called "stage three" suspension tuning(stage one=springs, stage two=damper/shocks). Built to use expecailly with conjunction of eibach's prokit and sportline springs in mind. Comes with all bushing, endlinks, brackets. Expect more from eibach
2)Suspension Technique(ST) sway bar-One of the best selling kits on the market today, very affordable(250 for a full set, brand new) and finish is superb, I have wonderful personal experiene with ST sway. Comes with everything including a silicone lube tube. If you're on budget and looking for maxinum performance for the money, ST is for you.
3)Comptech-Accord Sway Bar Kit- I actually known a guy with a set of comptech swaybar on his car(tl-s with comptech EVERYTHING minus the blower). It's alot of money but I am very please with comptech's piece, although i never own one myself.
Comptech is more on the high end side, they use foam pad to ship their stuff so nothing will get damage in the shipping. Everything is included in their package.
4)OEM SWAY BAR-6th gen 4cylinder can benefit from swaying their sway bar with 6th gen accord v6, TL+CL(share the same sway bar size as v6 accord), and the even bigger size for the factory tuned CL-S/TL-S. Very cost effective for racer on budget, i got my set for 40 bucks(TL-S 500miles, both front and rear with bushing and bracket, with all four tl-s oem spring)in ebay, couldnt be happier.
EXTRAS
-most the manufacturer recommends the consumer to use their swaybar as a set, so called "tuned-set".
-FWD with Big front sway bar=more understeering
-FWD with Big rear sway bar=more oversteering
-oem front and aftermarket swaybar is pretty good setup, considering if you cannot afford the whole set. Some trackwhore even disconnect the front oem sway and using a BIG aftermarket rear sway. Tried it couple of time and i almost lost control of my car , but that just me.
-make sure to grease/lude the bushing accordingly.
-adjustable sway bar(adj. by the position of the endlink) allow the owner to change the stiffiness setting according to the condition or type of the road.
-Most modern day passenger car would have at least the front sway bar if not both.
CHAPTER 5-Camber kit

we increase the degree of negative camber when we lower the car. 1.0-1.5(or even 2.0 some might argue)degree of negative camber is best for traction/cornering, but the downside of the lowering is that it will wear out your tires much faster(pre-mature wear). The camber kit or camber correction/adjusting kit allow the adjustment with camber degree.
1)INGALLS-the bandwagon of the camber kit for most honda, price is not bad at all considering a set of tires would cost much more than that.
2)Other- GSR(nothing to do with acura integra, just a name of the company), sprint, ebay style camber kit.(i would stay away from cheap camber kit, since they love to break on high stress)
3)rear washer trick- some honda(not six gen accord) can benefit from a mod called "rear washer trick", by using a longer bolt and number of spacers/washers, we can correct the rear camber issue to a extend degree. VERY cheap alternative considering all the part you can get at homedepot for less than 10 buck.
Need more info? SEARCH
EXTRAS
-Consider buying a camber kit when you lowering the car more than 2inch, that's only for honda's, some car will have much more camber issue than other car(z3 for example)
-always have the car aligned after lowering, have the dude there adjust the camber kit to oem spec(or anything you want from 1.5-3.0 degree for most camber kit).
FAQ
Q)What causes my tires to wear out so quickly after i put on lowering spring?
A)The combination of negative camber and toe contributed to the pre-mature tire wear. Toe can be corrected with a 4 wheels computerized alignment, while camber can be corrected with a "cambe kit"(read chapter 5)
Q)What is "wife swapping"?
A)The term simply refer to tire rotation, which is extremely useful for lowered car.
becareful not to put on those directional tire the wrong way. rules of thumb of wife swapping: every 5-6K or every two oil change.
Q)Should i be getting an alignment done after suspension work(lowering,etc)?
A)Yes, especially after putting on spring or shocks, the toe would be altered.
Let the new springs "settle"(about 2week of driving) and then get the alignment.
Q)Where should i go with my lowered car for alignment?
A)Almost all the alignment place can do it, unless the drop is very low.
Bring wooden boards or take off the bumper if the car is having problem getting on the rack. A four wheel computerized alignment should cost around 60 dollar, DEMAND a spec sheet(before and after).
Q)Why is my spring is getting lower and softer after a year or two?
A)"Sagging" springs happens alot especailly on low grade springs. Most of the major suspension company(eibach, h&R) offer free replacement on sagging springs.
Q)How can i tell the stiffiness of the spring?
A)Most big suspensin companies offer a spec number for spring rate(progressive or not). Choose accordingly in conjunction of damper in mind.
Q)How hard is spring/shock installation? Can i be done at home?
A)Yes, spring installation is not hard at all, just take time. You'll need some basic socket rachet, a breaker bar(optional), hex key, spring compressor(can be rent free of charge at autozone, kragen,etc), Jack and jackstand. Of course, like always, a buddy or two would be helpful. free>50-100 buck installation at most shop.
Q)What should i get for my race car on budget?
A)For street driven accord, i recommend eibach sportline, AGX adjustable and a rear ST sway bar. Very resonably priced and proven performance
Q)I just lowered my car with Brand A spring with stock shock, why is my ride so bouncy"
A)The lowering spring is too "stiff" for the stock shock, the damper is not enough for the spring which OFTEN translated to bouncy ride.
The solution-get some oem stock shock compatible springs, eibach prokit for example.
Modified by iam7head at 10:43 AM 3/13/2004
I try to throw in some general concept about suspension for accord, I am not going to go into great in depth/detail(i can go for hours and hours). Look for hints and tricks from my past experience. remember I am not God so yeah.
CHAPTER 1-LOWERING SPRING
Springs kit by Eibach
1)Lower spring-it helps to reduce body roll,etc a.k.a.
help you goes around the corner with more grip by increasing the degree of negative camber.
there's a bunch of lowering springs in the market but only a handful of those spring are actually performs well, in the street as well as the track. I come with warranty, registtion card, spec sheet for cutting the bumpstop and a pair of decals.
1)eibach-probably one of the most popular lowering spring maker in the US market today, they offer two type/style of spring for accords, they are eibach prokit and sportline. I personally love how the eibach ride in the street.
a)PROKIT is designed and road test with use in conjunction of OEM stock shocks in mind, so it's okay to use stock shock with prokit, in fact i had the same set up before.
*note: some people experience the "boat look" with eibach prokit, boat look=the front is higher than the rear.
b)SPORTLINE sits some what lower than prokit, sporline requires an aftermarket(stiff damper) shocks. Sportline is pretty much the lowest you can go without rubbing.
2)H&R-another popular spring makers, offering three type of spring for accord.
They are the cheaper alternative to eibach, which like eibach, their springs are very good in quality.
a)O.E. SPEC spring- they are what my friends called "***** drop", it lower the car like less than an inch or so. they are built with a higher spring rate=stiffer ride. Perfect for sleeper, i guess.
b)SPORT-another ultra popular springs for the honda crowd, they are cheap and works, need aftermarket shocks to accompany the increased rate.
c)RACE-the low-est spring h&r offer, you'll need to throw in some aftermarket shocks for this springs also. They are progressive spring, alot of people experience some "clunking" when the lower part of the coil hit each other when the spring is compressed.
3)Tein-the green suspension company from Japan, they got some amazing stuff with a reasonable price. Not the best in the world but top notch stuff right here
They only offer one type of lowering spring for accord, to my surprise, s-tech didn't live out the tein reputation.
a) S-tech-The entry level spring to the bigger coil-over brother. They are inexpensive to begin with, they are designed to used with oem stock shock but they fall short on the performance side. Some of my boy with those s-tech, claim they are way too soft even with an aftermarket shocks.
4)Tanabe, tanabe USA offer number of springs for honda, not much actual info at this point yet.
<<<<<<<<OTHER SPRING REVIEW UPDATE SOON>>>>>>>
EXTRAS
-4th gen and 5th gen accord share some suspension parts, such as shock and spring,etc. HOWEVER the spring rate and damper is said to be different, so choose accordingly.
-If you are poor just like me, look for used quality spring instead of buying cheap low quality new spring. ebay have deal like used sportline for 100buck shipped all year long, just need to be patient.
-one of the way to reduce/decrease the clunking noise on progressive spring is to wrap the lower part of the springs with silicone sleeve.
-6th gen 98-02 accord have many compatible suspension parts with bigger v6 brother and tl, cl, tl-s, cl-s
CHAPTER 2-ADJUSTABLE SPRING, SLEEVE-OVER
GroundControl "coilover/sleeveover" kit with eibach springs
They are often mistakenly called coilover, which they are not.
sleeve over or adjustable spring have NO build in damper/shock.
The only adjustable part is the ride height.
1)GROUND CONTROL-perhaps the only sleeve-over should be alive in the market today, think of GC as the ONLY good guy the world of bad sleeve-over. GC didn't suck like most of the sleeve-over because they used spring made by eibach. EVERY ground control sleeve-over uses eibach's top notch spring.
GC allow the customer to specail order a set of sleeve over with custom spring rate, which is a great advertiage for track car.
2)Ebay style sleeve-over- due to popular demands here a picture of the ebay style coilover.
ONE word to sum it up: GARBAGE
Bouncy, no controlled spring rate, no protection aganist botteming out, sagging, Just pure garbage.
They costs around 50-75 buck brand new in ebay, you'll get what you pay for.
3)Skunk2 Racing Adjustable Springs-pricey but not well built, alot of honda folk had skunk2 when the coilover things first pops out, NOT worth the money IMHO
EXTRAS
-Many sleeve-over/adj. spring experiencing some rusting on the threads, which could preventing the spring from adjusting.
-whenever you adjust the ride height, you'll changing the camber and toe angle, so you'll end up getting an alignment done everytime you change the height.
Zeal b6 coilover system
CHAPTER 3- REAL COILOVERS
Coilover-direct replacement for the oem springs and shocks(some top notce coilover even come with a camber adjustment plate), engineered and built as one unit.
Some coilover come with revalvable shock which you can reuse the blown shock.
ALL coilover kit are heigh adjustable but not all coilover have damper adjustment(ex: tein basic).
1)TEIN-The green Japanese suspension company took the import in US by storm.
a)basic-The entry level coilover set up, Adjustable height but non-adjustable damper(shock's compress and rebound rate), very affordable coilover setup, priced just around 700(you can find most of the online places shipped for $700).
b)Super Street Type SS-the higher level coilover system with adjustable damper, ideal for street and track use. They costs little bit more than "basic".
Alot of honda/acura guys raise this setup.
2)apex'i-known for quality and very well designed parts for the import crowd.
One of the big "boss" at the drift D1 event(for the socal folks
)a) World Sport Damper Coil Overs-priced almost the same as the tein SS kit, i didnt heard much good praise from WS for some odd reason.
3)B&G-unknown
a)Adjustable Coil Overs-retails around 1grand and with no adjustment for the shock,
tein or apexi ws would be a better choice, IMHO. It comes with a helper/secondary springs.
4)Tokico-another popular coilover setup, tokico is known for their affordable shocks/damper
a)Illumina Coil Overs-height and damper adjustable, illumina adjustable shock with H&R springs in a combo package, a great valve if you consider buying the same setup seperately.
5)Tanabe-another Japanese import part gaint, now offering 2 type of coilover for usdm accord.
a)Sustec Pro S-OC Type-II Coilovers-another fixed damper coilover, priced around tein basic
b)Sustec Pro S-S Type II Coilover Kit-Damper and height adjustable, magically price around 1000, just like the tein SS
c)Tanabe Sustec Pro Street Coil Overs-another step up to the S-S II, retails at $1489, not much info/experience, yet.
6)OTHER Truth coilover(availble for accord)
a)HKS- Hiper Damper Kits, built with rust resistance material, damper and height adjustable.
b)Progress Competition Coil Over Suspension Systems-aluminum body for resistant to rust, damper and height adjustable(one to three inch), REVALVABLE shocks for the track ******. Reasonable price
c)Zeal Suspension System B6 Series-aka buddyclub in Japan(?), very pricey but worth it from what i heard. Height and damper adjustable, ideal for track use.
KYB AGX Adjustable shocks
Tokico HP blue non-adjustable shocks
Chapter 4- damper/shock/strut
-shock control the springs rebound and compression, while the springs support the actual weight of the car, the damper control the spring bounce and rebounce"circle". A good damper can tell your car is going over a bump/pothole from a corner in a track.
Some shocks can be revalve to reuse after it's blew but most of the shocks in the market today are non-serviceable(mostly gas shocks).
thumbs or rules for shock= adj>non-adj(so-called self-adj)
1)KYB-very popular shock/suspension company for aftermarket imports
a)GR2-reasonable priced aftermarket shock with OEM spec shock, ideal for oem replacement. Good combo with prokit, s-tech, H&R O.E.
b)agx-bandwagon shocks for lowered honda, very very popular, known for it's high quality and very reasonable price for adjustable shock. priced around 350-400 for a new set. NOT AVAILBLE FOR 6th gen accord
2)Tokico-another popular choice for import suspension.
a)HP BLUE-non-adjustable gas shock, design to use with lowering spring for street use. perfect combo with lowering spring for mostly street driven car/once a month weekend track user. dont expect a whole lot but it's a big jump from oem shocks.
a new set is around $250.
b)illumina-damper adjustable damper, same as agx if not better, priced just above agx. Great valve if you getting the illumina+springs package.
3)Koni-maker of car suspension for over 50 years.
a)RED-non-adjustable shocks, not much info on this setup.
b)YELLOW-honda-tech's top pick for choice of shock, proven performance in the track, autox across US. Reserviceable, custom valve,etc.
many autocrosser/trackwhore in H-T praise the GC with koni yellow combo(custom rate). VERY pricey but worth the cost.
4)Bilstein Self-Adjusting Mono Tube Gas Shocks-non-adjustable, monotube.
EXTRAS
-Always use the bumpstop at all time, a lowering spring would wears a shorten(trimmed) bumpstop according to spec. The bumpstop is like a foolproof device, it would save your shock from damaging itselt from potholes,etc.
it only take one good slam to kill the shock without bumpstop.
-always use the dirtcap, it's the only thing protecting the polished piston shalf from damage, grease accordingly when install/reinstall.
-there a right way to test the status of the shocks/damper, IM me
Chapter 5- Strut bar
Neuspeed One piece with multi-mounting points(98-02 accord)
strut bar is the metal(or even better carbon fiber) supporting bars that design and place of a sepcified spot that strengthen the unibody during pressure(cornering, drag,etc).
<UPPER FRONT STRUT BAR>(located in the engine bay, top of the two front strut)
<LOWER FRONT STRUT BAR>(located so what near the tie rod/control arm under the front suspension)
<UPPER REAR STRUT BAR>(located on top of the rear shock assembly, mostly front in trunk but for 6th gen, it's right behind the rear seat, just infront of the rear speakers)
<LOWER REAR STRUT/TIE BAR>(located between the two LCA bolts)
1)comptech-possibly be the one of the most expensive suspension part maker, top notice quality.
a)comtech titanium series upper strut bar- titanium is tough and lightweigh, only part is bad is that they are hard to work with which translate to expensive parts.
For 6th gen accord/ TL/CL/TLS/CLS, it replace the two oem finger-sized bar with a meaty bar that connects the left and right shock/strut tower and it extends to the firewall. retail is around $360
2)Neuspeed-another popular tuner parts maker in US.
a)NEUSPEED Front Strut Tie Bars-similar design like the comtech one, neuspeed have a one piece design, which consider superior than multi-pieces design.
neuspeed used aluminum instead, strong yet lightweight and cost considerablely less($145)
3)OEM-6th gen accord can swap in oem strut bar from CL, TL, CLs, TLS.
acura retail them for 40 if I am not mistaken.
4)OTHER-multi-piece design
a)skunk2-3 pieces
b)Tanabe Sustec Front Strut Tower Bars-the mother of ebay style strut bar.
c)ebay style-very very cheap, around 25-40 dollar, some fits good while some need some cutting. A good buy for those in budget.
EXTRAs
-rules of thumbs tells us...
-one piece>multi-piece
-ebay style cheap-strut bar work just fine for most street driven car.
-when installing strut bar on lowered car, jack up the front end and then put on the
strut bar, that way the bar would sit "right" but please do pay attention so you dont drop your spring/shock assembly.
-adjust the but to tighten the adjusting nut to get tanabe(or tanable knockoff,ebay style) bar to fit tight(no flex)
-There's a lower frame(FRONT) braces for accord, dont know how well it perfroms tho'
CHAPTER 6-ANTI-SWAY BAR
Example of eibach's front and rear sway bar SETs with bushing and endlink.
The anti-sway bar, also called sway bar, stabilizer bar, anti-roll bar. Perhaps it's the best suspension you can do after putting on a set of sticky tires. Performs you really can feel. eibach describe it as, "Our Anti-Roll-Kits reduce body roll through increased design stiffness over stock bars. The result: increased handling and cornering grip in any performance-driving situation." Okay, so what's body roll? body roll is when you entered a corner with speed, assuming you makine a left turn 40mph, the left wheel(side) "dive" under and the right(side) wheel "pops" up.
They sell sway bar as a set of both front and rear, or something they just sell individual piece, there's some adjustable anti-sway bar in the market now.
Installition of sway bar might require some drilling on some accord model.
Read chapter 6's extra for more info on under and oversteer with conjunction with sway bar.
1)Eibach-Anti-roll kit-the so-called "stage three" suspension tuning(stage one=springs, stage two=damper/shocks). Built to use expecailly with conjunction of eibach's prokit and sportline springs in mind. Comes with all bushing, endlinks, brackets. Expect more from eibach
2)Suspension Technique(ST) sway bar-One of the best selling kits on the market today, very affordable(250 for a full set, brand new) and finish is superb, I have wonderful personal experiene with ST sway. Comes with everything including a silicone lube tube. If you're on budget and looking for maxinum performance for the money, ST is for you.
3)Comptech-Accord Sway Bar Kit- I actually known a guy with a set of comptech swaybar on his car(tl-s with comptech EVERYTHING minus the blower). It's alot of money but I am very please with comptech's piece, although i never own one myself.
Comptech is more on the high end side, they use foam pad to ship their stuff so nothing will get damage in the shipping. Everything is included in their package.
4)OEM SWAY BAR-6th gen 4cylinder can benefit from swaying their sway bar with 6th gen accord v6, TL+CL(share the same sway bar size as v6 accord), and the even bigger size for the factory tuned CL-S/TL-S. Very cost effective for racer on budget, i got my set for 40 bucks(TL-S 500miles, both front and rear with bushing and bracket, with all four tl-s oem spring)in ebay, couldnt be happier.
EXTRAS
-most the manufacturer recommends the consumer to use their swaybar as a set, so called "tuned-set".
-FWD with Big front sway bar=more understeering
-FWD with Big rear sway bar=more oversteering
-oem front and aftermarket swaybar is pretty good setup, considering if you cannot afford the whole set. Some trackwhore even disconnect the front oem sway and using a BIG aftermarket rear sway. Tried it couple of time and i almost lost control of my car
, but that just me.-make sure to grease/lude the bushing accordingly.
-adjustable sway bar(adj. by the position of the endlink) allow the owner to change the stiffiness setting according to the condition or type of the road.
-Most modern day passenger car would have at least the front sway bar if not both.
CHAPTER 5-Camber kit
we increase the degree of negative camber when we lower the car. 1.0-1.5(or even 2.0 some might argue)degree of negative camber is best for traction/cornering, but the downside of the lowering is that it will wear out your tires much faster(pre-mature wear). The camber kit or camber correction/adjusting kit allow the adjustment with camber degree.
1)INGALLS-the bandwagon of the camber kit for most honda, price is not bad at all considering a set of tires would cost much more than that.
2)Other- GSR(nothing to do with acura integra, just a name of the company), sprint, ebay style camber kit.(i would stay away from cheap camber kit, since they love to break on high stress)
3)rear washer trick- some honda(not six gen accord) can benefit from a mod called "rear washer trick", by using a longer bolt and number of spacers/washers, we can correct the rear camber issue to a extend degree. VERY cheap alternative considering all the part you can get at homedepot for less than 10 buck.
Need more info? SEARCH
EXTRAS
-Consider buying a camber kit when you lowering the car more than 2inch, that's only for honda's, some car will have much more camber issue than other car(z3 for example)
-always have the car aligned after lowering, have the dude there adjust the camber kit to oem spec(or anything you want from 1.5-3.0 degree for most camber kit).
FAQ
Q)What causes my tires to wear out so quickly after i put on lowering spring?
A)The combination of negative camber and toe contributed to the pre-mature tire wear. Toe can be corrected with a 4 wheels computerized alignment, while camber can be corrected with a "cambe kit"(read chapter 5)
Q)What is "wife swapping"?
A)The term simply refer to tire rotation, which is extremely useful for lowered car.
becareful not to put on those directional tire the wrong way. rules of thumb of wife swapping: every 5-6K or every two oil change.
Q)Should i be getting an alignment done after suspension work(lowering,etc)?
A)Yes, especially after putting on spring or shocks, the toe would be altered.
Let the new springs "settle"(about 2week of driving) and then get the alignment.
Q)Where should i go with my lowered car for alignment?
A)Almost all the alignment place can do it, unless the drop is very low.
Bring wooden boards or take off the bumper if the car is having problem getting on the rack. A four wheel computerized alignment should cost around 60 dollar, DEMAND a spec sheet(before and after).
Q)Why is my spring is getting lower and softer after a year or two?
A)"Sagging" springs happens alot especailly on low grade springs. Most of the major suspension company(eibach, h&R) offer free replacement on sagging springs.
Q)How can i tell the stiffiness of the spring?
A)Most big suspensin companies offer a spec number for spring rate(progressive or not). Choose accordingly in conjunction of damper in mind.
Q)How hard is spring/shock installation? Can i be done at home?
A)Yes, spring installation is not hard at all, just take time. You'll need some basic socket rachet, a breaker bar(optional), hex key, spring compressor(can be rent free of charge at autozone, kragen,etc), Jack and jackstand. Of course, like always, a buddy or two would be helpful. free>50-100 buck installation at most shop.
Q)What should i get for my race car on budget?
A)For street driven accord, i recommend eibach sportline, AGX adjustable and a rear ST sway bar. Very resonably priced and proven performance
Q)I just lowered my car with Brand A spring with stock shock, why is my ride so bouncy"
A)The lowering spring is too "stiff" for the stock shock, the damper is not enough for the spring which OFTEN translated to bouncy ride.
The solution-get some oem stock shock compatible springs, eibach prokit for example.
Modified by iam7head at 10:43 AM 3/13/2004
 03-12-2004, 04:05 PM
#2
Member
Join Date: Nov 2003
Location: Michigan State University, USA
Posts: 7,240
Likes: 0
Received 1 Like
on
1 Post
First of all, id like to say that ive compiled what i know from alot of time spent researching. Feel free to PM for any changes/additions you think need to be made
First Off, lets talk about the advantages of an aftermarket exhaust system. As many of you may know, the main purpose of the exhaust components is to minimize pollution; both sound and air. In addition, exhaust tubing creates an effect known as back pressure, which to make a long story short, allows for you Naturally Aspirated engine to produce some extra torque, while sacraficing a small amount of horsepower. There are 3 main "goals" of an aftermarket exhaust system:
1. Create the shortest, straightest path for the exhaust gas to travel. In otherwords, create a less-restrictive path. This helps to add a bit of top end power
2. While creating a less restrictive path, exhausts must also retain a decent amount of backpressure in order to allow the engine to make enough low end torque.
3. The most ovbious reason, to make the car sound "cooler"
DISCLAIMER: in some states (california is the worst) there are very strict emissions laws. Modifying your exhaust systems can cause your car to fail if u dont know the tricks of the trade (see rotarybzzz's How To Pass Emisions Thread). In addition, many states have sound ordinances regarding exhaust/total car volume. In many cases, the limit is 95dB. Most exhaust systems will comply with these laws, but some do not. Make sure you do your research before you spend your hard earned money!
There are 4 MAIN parts when it comes to exhaust systems: Headers, Cat-Converter, Piping, Muffler. I will give info on a few of the more popular brands

Headers:Aftermarket headers allow for the gases to flow better. They often have larger "collectors." They are either 1 or 2 pieces (self explanitory), and are either 4-1, or 4-2-1 (way the piping runs, ex. 4-2-1= 4 right off the ports, which flow into 2 pipes, which flow into a single downpipe). Headers bolt up to the Catalytic Converter. There are a few good choices when it comes to choosing a header:
1. Greddy (TRUST in Japan) S.S. 4-2-1 header for 5th gen accords. 2 pieces, and stainless steel to resisit corrosion. High Quality and 50 st. legal $380ish
2. DC Sports Ceramic for 4th gen +. 4-2-1 design, 2 pieces. cheaper than stainless steele. coated with ceramic to absorb heat and keep the engine bay cooler $300ish
3. DC Sports Stainless Steel for 5th gens. basically same design as the greddy, made in the USA $380ish
4. Comptech Header for 6th gen v6's. i know very little about this specific product, except that it can free up quiet a bit of power. Comptech is definantly a high end manufacturer $1000+
5. Custom: For most people, a complete custom header is out of the question, but custom downpipes are available, though without the use of an aftermarket header, they serve little purpose
6. Ebay - like the saying goes, you get what u pay for. Header design is very complex, and most "real" headers a designed with the molecular level in mind...

Catalytic Converters: The role of the catalytic converter is to oxidize the dangerous carbonmonoxide into its less dangerous cousin, carbon dioxide, as well as burn off excess gas that was never burnt during combustion. Modification of the cat (as it is called) is not recomended on 96+ accords, as there is an 02 sensor located in the cat on these models (this is where the term OBD2 comes in, see bottom for explination), and a non-properly working cat will result in CEL/<U>Horrible</U>gas mileage. There are basically 3 types of cat modification:
1. High-Flow cats: there are numerous brands (Carsound, Random Technology, etc.) these allow for a fully functional catalytic converter that at the same time, is less restrictive than the stock model. Many of these care Legal in states w/ emissions test, but make sure you verify if that situation applies to you. $175ish+
2. Test Pipe: Test pipes are basically a straight tube that takes place of the cat converter. In most cases, they are illegal. Test pipes are the least restrictive off all when it comes to cat's, yet they MAY cause a loss of low end torque. Some muffler shops will make one for you (they legally cant do the instal though), and some are available on EBAY $40ish
3. Gutted Cat aka. Flamer Thrower: The ghetto way of doing things. basically, it involves taking a screw driver and scraping out all the linings of the cat, which oxodize the incoming gases (these are carcenogenic BTW). Once again this will create less restriction in some scenarios, but can cost you low end torque. They do however give you the ability to shoot massives flames out ur muffler at times. $Free + you and your friends all get cancer

Cat-Back Exhaust Systems: As the name suggests, cat-back exhaust bolt up to the cat, and then run all the way to the muffler (which comes w/ the package). For NA engines, piping diameter should run around 60-80mm or 2-2.5in. Remember, the larger the piping, the less the backpressure = decreased low end torque. When paired w/ a good header and intake, you should begin to see SMALL gains in power at the higher end of the powerband. The system should come with new gaskets to go between the flanges that connect the numerous pipes, and in some cases, a removable silencer which is placed in the end of the muffler to help decrease the sound (though this eliminates any power gained by the catback). In addition, it should utilize factory hangers. For those of you who live in the snowbelt, it is important that you choose an exhaust with Stainless Steel piping, as it will resist corrosion. There are literaly dozens of excellent cat-back systems available, but i will go through the most common for accords.
1.Apex'i: World Sport & World Sport 2: Available for 4th-6th gen accords. Origonal: Mild Steel Tubing, Stainless Steel Muffler; W.S 2: All Stainless Steel. Often choosen by those who want a "sleeper"car. Very quiet untill WOT, when it gives out a distinctive low growl. "OEM Style" muffler w/ large outlit tip. $400ish
2.Greddy: Evo & Evo 2: 5th-6th gen accords. Origional: Mild Steel Tubing, Stainless Steel Muffter; Evo2: All Stainless Steel. Straight through design (muffler does not look like a maze when cross sectioned, but rather a straigh through path). The Evo is designed to sit higher up from the ground, improving ground clearance for lowered cars. Somewhat loud, with a full, deep tone.
3. Greddy Sp & Sp2: 4th-6th Gen. Same scenario as the Evo vs. Evo 2. Straight through design. One of the most popular exhausts regardless of make/model. Basiacaly, a more expensive, louder version of the Apex'i W.S. $500-550ish
4. Tanabe Super Hyper Medallion: 4th-7th Gen. Mild Steel piping and Stainless Muffler and tip. Straight through design, similar styling to the WS and SP. $500ish for single outlet, $700ish+ for V6 dual outlet
5. Tanabe Super Racing Medallion: 5th Gen. Same as above, yet mirrors the Japanese N1 style muffler. Apparently this specific setup is VERY loud. $550ish
6. DC Sports: 4th-6th gen. DC is one of the most well known domestic tuner companies, though they were recently bought out by AEM, causing their prices to drop significantly which means more savings for all of us. Utelizes a "pre-muffler" silencer to drown out the high pitched frequencys that are soo common of 4cyl cars. "OEM Style" muffler with huge 4" outlet tip
7. Thermal R&D CL Style: 4th-6th gen. Arguably one of the best exhausts for the Accord. Mild/Stainless Steel. Specifically designed for cars that are more higly tuned / are driven more aggressivly. Very deep, throaty sound. Look very much like OEM muffler, (EX style with dual tip).
8. Custom: Wether you order the piping from a place like Kteller.com (a member here), or have custom work done at a shop, be sure to use mandrel bent stainless steel piping, and that u match it with resonators/mufflers that will give you just the tone quality you desire. The advantage is that these are usually less expensive if done right. The downside is you dont neccesarily get a proven design, and you loose the "bling-bling" name brand factor.
9.Ebay: Personally ive had mixed experiences with Ebay exhausts. My best friend has a 3" DP back SS exhaust from ebay on his 89 Rx7....it didnt come with resonators so its incredibly loud, but when analyzing the welds, they looked of suprisingly high quality. Basically, if u choose an off-brand on ebay, you run a big risk, but sometimes the results can be just as good

Mufflers & Universal Aftermarket Mufflers: As the name suggests, once again, the muffler's main goal is to minimize the sound. OEM Mufflers are usually like a hollow box, with a maze-like path running through it. This, with help from sound dampening material with the muffler, help to absorb sound. Some people choose to bypass the whole cat-back system, and simply attack a universal muffler. In this scenario, they are basically only achiveing #3 on the list of reasons for an after market exhaust (see above). Many companies who make entire catback systems also offer universal mufflers. The actual goal of these aftermarket mufflers is to be used in a cutom setup (see #9 of "Cat-Back Exhaust"). This allows for some creativity in exhaust setup.
1. Apex'i N1 Universal Muffler. Avaiable in a wide variety of colors. By using these mufflers w/ a custom system, Accord owners can have an exact replica of the famous Apex'i N1 Slant Tip Cat-Back (very very sexy looking IMO) $200ish
2. Magnaflow. Magnaflow makes a wide variety of muffler designs, from OEM style to N1 style, theyve got almost everything. These mufflers usually are somewhat quiet, but at WOT the can roar with a nice deep tone. $70-100+
3. Ebay. Ebay offers a number of imitation mufflers. I would avoid them at all costs, as they use very poor sound insulators which will easily burn away through daily driving, making ur car sound like a constant nuclear explosion, and no one wants that. $.01-$50+
Heres a few key things to know when it comes to accord Exhaust:
-Exhaust Ports for F22/F23 (stock accord engine) o oo o
-Exhaust Ports For H22 (most commonly swapped engine) o o o o
In other words, F22/23 headers do NO work on H series engines
-Pre '96 Accords are OBD1, meaning that there is one O2 sensor, located before the catalytic converter.
-'96-on Accords are OBD2, meaning theres an 02 sensor located within the cat.
-As previously stated, for NA engines, back pressure is neccesary. However, for custom-made turbo exhaust systems, back pressure is your worst enemy, as it limits the turbo's ability to maximize power. Therefore, if and only if you are planning on turboing, choose a 2.5-3" diameter piping.
Modified by fw190bvi at 11:19 PM 3/13/2004
First Off, lets talk about the advantages of an aftermarket exhaust system. As many of you may know, the main purpose of the exhaust components is to minimize pollution; both sound and air. In addition, exhaust tubing creates an effect known as back pressure, which to make a long story short, allows for you Naturally Aspirated engine to produce some extra torque, while sacraficing a small amount of horsepower. There are 3 main "goals" of an aftermarket exhaust system:
1. Create the shortest, straightest path for the exhaust gas to travel. In otherwords, create a less-restrictive path. This helps to add a bit of top end power
2. While creating a less restrictive path, exhausts must also retain a decent amount of backpressure in order to allow the engine to make enough low end torque.
3. The most ovbious reason, to make the car sound "cooler"
DISCLAIMER: in some states (california is the worst) there are very strict emissions laws. Modifying your exhaust systems can cause your car to fail if u dont know the tricks of the trade (see rotarybzzz's How To Pass Emisions Thread). In addition, many states have sound ordinances regarding exhaust/total car volume. In many cases, the limit is 95dB. Most exhaust systems will comply with these laws, but some do not. Make sure you do your research before you spend your hard earned money!
There are 4 MAIN parts when it comes to exhaust systems: Headers, Cat-Converter, Piping, Muffler. I will give info on a few of the more popular brands
Headers:Aftermarket headers allow for the gases to flow better. They often have larger "collectors." They are either 1 or 2 pieces (self explanitory), and are either 4-1, or 4-2-1 (way the piping runs, ex. 4-2-1= 4 right off the ports, which flow into 2 pipes, which flow into a single downpipe). Headers bolt up to the Catalytic Converter. There are a few good choices when it comes to choosing a header:
1. Greddy (TRUST in Japan) S.S. 4-2-1 header for 5th gen accords. 2 pieces, and stainless steel to resisit corrosion. High Quality and 50 st. legal $380ish
2. DC Sports Ceramic for 4th gen +. 4-2-1 design, 2 pieces. cheaper than stainless steele. coated with ceramic to absorb heat and keep the engine bay cooler $300ish
3. DC Sports Stainless Steel for 5th gens. basically same design as the greddy, made in the USA $380ish
4. Comptech Header for 6th gen v6's. i know very little about this specific product, except that it can free up quiet a bit of power. Comptech is definantly a high end manufacturer $1000+
5. Custom: For most people, a complete custom header is out of the question, but custom downpipes are available, though without the use of an aftermarket header, they serve little purpose
6. Ebay - like the saying goes, you get what u pay for. Header design is very complex, and most "real" headers a designed with the molecular level in mind...
Catalytic Converters: The role of the catalytic converter is to oxidize the dangerous carbonmonoxide into its less dangerous cousin, carbon dioxide, as well as burn off excess gas that was never burnt during combustion. Modification of the cat (as it is called) is not recomended on 96+ accords, as there is an 02 sensor located in the cat on these models (this is where the term OBD2 comes in, see bottom for explination), and a non-properly working cat will result in CEL/<U>Horrible</U>gas mileage. There are basically 3 types of cat modification:
1. High-Flow cats: there are numerous brands (Carsound, Random Technology, etc.) these allow for a fully functional catalytic converter that at the same time, is less restrictive than the stock model. Many of these care Legal in states w/ emissions test, but make sure you verify if that situation applies to you. $175ish+
2. Test Pipe: Test pipes are basically a straight tube that takes place of the cat converter. In most cases, they are illegal. Test pipes are the least restrictive off all when it comes to cat's, yet they MAY cause a loss of low end torque. Some muffler shops will make one for you (they legally cant do the instal though), and some are available on EBAY $40ish
3. Gutted Cat aka. Flamer Thrower: The ghetto way of doing things. basically, it involves taking a screw driver and scraping out all the linings of the cat, which oxodize the incoming gases (these are carcenogenic BTW). Once again this will create less restriction in some scenarios, but can cost you low end torque. They do however give you the ability to shoot massives flames out ur muffler at times. $Free + you and your friends all get cancer
Cat-Back Exhaust Systems: As the name suggests, cat-back exhaust bolt up to the cat, and then run all the way to the muffler (which comes w/ the package). For NA engines, piping diameter should run around 60-80mm or 2-2.5in. Remember, the larger the piping, the less the backpressure = decreased low end torque. When paired w/ a good header and intake, you should begin to see SMALL gains in power at the higher end of the powerband. The system should come with new gaskets to go between the flanges that connect the numerous pipes, and in some cases, a removable silencer which is placed in the end of the muffler to help decrease the sound (though this eliminates any power gained by the catback). In addition, it should utilize factory hangers. For those of you who live in the snowbelt, it is important that you choose an exhaust with Stainless Steel piping, as it will resist corrosion. There are literaly dozens of excellent cat-back systems available, but i will go through the most common for accords.
1.Apex'i: World Sport & World Sport 2: Available for 4th-6th gen accords. Origonal: Mild Steel Tubing, Stainless Steel Muffler; W.S 2: All Stainless Steel. Often choosen by those who want a "sleeper"car. Very quiet untill WOT, when it gives out a distinctive low growl. "OEM Style" muffler w/ large outlit tip. $400ish
2.Greddy: Evo & Evo 2: 5th-6th gen accords. Origional: Mild Steel Tubing, Stainless Steel Muffter; Evo2: All Stainless Steel. Straight through design (muffler does not look like a maze when cross sectioned, but rather a straigh through path). The Evo is designed to sit higher up from the ground, improving ground clearance for lowered cars. Somewhat loud, with a full, deep tone.
3. Greddy Sp & Sp2: 4th-6th Gen. Same scenario as the Evo vs. Evo 2. Straight through design. One of the most popular exhausts regardless of make/model. Basiacaly, a more expensive, louder version of the Apex'i W.S. $500-550ish
4. Tanabe Super Hyper Medallion: 4th-7th Gen. Mild Steel piping and Stainless Muffler and tip. Straight through design, similar styling to the WS and SP. $500ish for single outlet, $700ish+ for V6 dual outlet
5. Tanabe Super Racing Medallion: 5th Gen. Same as above, yet mirrors the Japanese N1 style muffler. Apparently this specific setup is VERY loud. $550ish
6. DC Sports: 4th-6th gen. DC is one of the most well known domestic tuner companies, though they were recently bought out by AEM, causing their prices to drop significantly which means more savings for all of us. Utelizes a "pre-muffler" silencer to drown out the high pitched frequencys that are soo common of 4cyl cars. "OEM Style" muffler with huge 4" outlet tip
7. Thermal R&D CL Style: 4th-6th gen. Arguably one of the best exhausts for the Accord. Mild/Stainless Steel. Specifically designed for cars that are more higly tuned / are driven more aggressivly. Very deep, throaty sound. Look very much like OEM muffler, (EX style with dual tip).
8. Custom: Wether you order the piping from a place like Kteller.com
(a member here), or have custom work done at a shop, be sure to use mandrel bent stainless steel piping, and that u match it with resonators/mufflers that will give you just the tone quality you desire. The advantage is that these are usually less expensive if done right. The downside is you dont neccesarily get a proven design, and you loose the "bling-bling" name brand factor.9.Ebay: Personally ive had mixed experiences with Ebay exhausts. My best friend has a 3" DP back SS exhaust from ebay on his 89 Rx7....it didnt come with resonators so its incredibly loud, but when analyzing the welds, they looked of suprisingly high quality. Basically, if u choose an off-brand on ebay, you run a big risk, but sometimes the results can be just as good
Mufflers & Universal Aftermarket Mufflers: As the name suggests, once again, the muffler's main goal is to minimize the sound. OEM Mufflers are usually like a hollow box, with a maze-like path running through it. This, with help from sound dampening material with the muffler, help to absorb sound. Some people choose to bypass the whole cat-back system, and simply attack a universal muffler. In this scenario, they are basically only achiveing #3 on the list of reasons for an after market exhaust (see above). Many companies who make entire catback systems also offer universal mufflers. The actual goal of these aftermarket mufflers is to be used in a cutom setup (see #9 of "Cat-Back Exhaust"). This allows for some creativity in exhaust setup.
1. Apex'i N1 Universal Muffler. Avaiable in a wide variety of colors. By using these mufflers w/ a custom system, Accord owners can have an exact replica of the famous Apex'i N1 Slant Tip Cat-Back (very very sexy looking IMO) $200ish
2. Magnaflow. Magnaflow makes a wide variety of muffler designs, from OEM style to N1 style, theyve got almost everything. These mufflers usually are somewhat quiet, but at WOT the can roar with a nice deep tone. $70-100+
3. Ebay. Ebay offers a number of imitation mufflers. I would avoid them at all costs, as they use very poor sound insulators which will easily burn away through daily driving, making ur car sound like a constant nuclear explosion, and no one wants that. $.01-$50+
Heres a few key things to know when it comes to accord Exhaust:
-Exhaust Ports for F22/F23 (stock accord engine) o oo o
-Exhaust Ports For H22 (most commonly swapped engine) o o o o
In other words, F22/23 headers do NO work on H series engines
-Pre '96 Accords are OBD1, meaning that there is one O2 sensor, located before the catalytic converter.
-'96-on Accords are OBD2, meaning theres an 02 sensor located within the cat.
-As previously stated, for NA engines, back pressure is neccesary. However, for custom-made turbo exhaust systems, back pressure is your worst enemy, as it limits the turbo's ability to maximize power. Therefore, if and only if you are planning on turboing, choose a 2.5-3" diameter piping.
Modified by fw190bvi at 11:19 PM 3/13/2004
03-12-2004, 06:51 PM
#3
Farts in the shower
Join Date: Jun 2003
Location: Colorado
Posts: 15,559
Likes: 0
Received 0 Likes
on
0 Posts
<FONT SIZE="5"><U>BASIC guide to the Honda accord</U></FONT>
<U>Here are some basic terms you need to know, follow, and remember</U>:
OBDI-on board diagnostics 1
OBDII- on board diagnostics 2 (main difference is 2 o2 sensors)
AT-automatic transmission
MT-manual transmission
Gen-generation
IMO-in my opinion
CEL- Check Engine Light
Whip- your ride
*for now...*
<U>*<FONT COLOR="red"> Also I will not get into what is a better product as far as performance and if you want to rice out your vehicle...thats your own damn decision. If you like it then that is ok just don't expect everyone else to like it </FONT> *</U>
And first things first, if you are working on your car please do yourself a favor and purchase some sort of manual (I have always preferred the Chiltons manual) but there are many others: Haynes, Chilton, Helms etc. Visit your local auto parts store or http://www.amazon.com if you cannot leave the house and have to be on the internet . These manuals will help you out tremendously IMO when working on your car. I have found that taking pictures while uninstalling or installing something can help out too....also makes for a good write up if you want to.
Alright, the accord models obviously come in different levels of trim and also canadian trims are one step down:
lx=ex
ex=ex-R
etc
Generations run accordingly:
76-81 1st gen
82-85 2nd gen
86-89 3rd gen
90-93 4th gen
94-97 5th gen
98-02 6th gen
03-current 7th gen .
.
<U>ECU codes you may need</U>
...and how to get those CEL codes
But before I really get into that lets define what an accord is generation-wise I will not get into 1st and 2nd generation accord since they barely exist:
<U>3rd generation</U>:

These cars were produces from 86-89 and on a side note every 3 years honda produced a different looking accord. The car came in different forms of "luxury". These models are the DX,LX and LX-i, EX-i etc (see below). The LX-i and EX-i are the only one of the group that is fuel injected all others were carbureted. I am not 100% sure to what options came with or power but the codes are follows for this I chose a 86 accord so they should be the same:
Chassis codes:
CA4 (2000CC engine)
CA5 (1600CC engine)
Levels of trim:
STD, LX, GL
EX
EX 2.0I
EXR (for the canadian folks)
EXC
Engine codes:
A20A1 2000CC with carburetor (kg only)
A20A2 2000CC with carburetor
A20A4 2000CC with Fuel injection
A16A1 1600CC with carburetor
This car was available in 5 speed and automatic, the tranny codes are:
Manual:
A2K5 2000CC engine
A1M5 1600CC engine
Automatic:
F4 2000CC engine
C9 1600CC engine
There is a lot more info on this car and a renowned site is For your 3rd Gen Accord . Most people on this forum have 4th gens or newer, sorry for the limited information.
Here is a list of all the years of 3rd gens with engine type and code (thanks jwogen1):
1986 Accord: 2.0L(1955cc), BS, 2bbl, SOHC 12-valve
1986 Accord LXi: 2.0L(1955cc), BT, EFI, SOHC 12-valve
1987 Accord: 2.0L(1955cc), A20A1, 2bbl, SOHC 12-valve
1987 Accord LXi: 2.0L(1955cc), A20A3, EFI, SOHC 12-valve
1988 Accord DX/LX: 2.0L(1955cc), A20A1, 2bbl, SOHC 12-valve
1988 Accord LXi: 2.0L(1955cc), A20A3, EFI, SOHC 12-valve
1989 Accord DX/LX: 2.0L(1955cc), A20A1, 2bbl, SOHC 12-valve
1989 Accord LXi: 2.0L(1955cc), A20A3, EFI, SOHC 12-valve
<U>4th Generation accord:</U>

This car was drasically changed from the 3rd gen mainly due to all 4th gens came with fuel injection had more hp and tq and was a very roomy and aerodynamically improved car.
Here is a link explaining the main difference with trim/options etc.
<U>CB7 difference through the years</U>
The engines that came with are as follows (and the chassis code for all 4th gens are CB7) thanks jwogen1:
1990 Accord DX/LX: 2.2L(2156cc), F22A1, MPFI, SOHC 16-valve (single exhaust manifold)
1990 Accord EX: 2.2L(2156cc), F22A4, MPFI, SOHC 16-valve (dual exhaust manifold)
1991 Accord DX/LX: 2.2L(2156cc) F22A1, MPFI, SOHC 16-valve (single exhaust manifold)
1991 Accord EX: 2.2L(2156cc), F22A4, MPFI, SOHC 16-valve (dual exhaust manifold)
1991 Accord SE: 2.2L(2156cc), F22A6, MPFI, SOHC 16-valve (dual intake manifold)
1992 Accord DX/LX: 2.2L(2156cc) F22A1, MPFI, SOHC 16-valve (single exhaust manifold)
1992 Accord EX: 2.2L(2156cc), F22A4, MPFI, SOHC 16-valve (dual exhaust manifold)
1992 Accord EX-R: 2.2L(2156cc), F22A6, MPFI, SOHC 16-valve (dual intake manifold)
1993 Accord DX/LX: 2.2L(2156cc) F22A1, MPFI, SOHC 16-valve (Canadian models: LX/EX)
1993 Accord EX/SE: 2.2L(2156cc), F22A6, MPFI, SOHC 16-valve (Canadian models: EX-R/SE)
If you would like some basic hp tq, weight numbers I refer to http://www.edmunds.com
<U>5th Generation Accord</U>:
The 5th generation accord was another huge step in the accord family, not only did the accord have the best sales for the 4th gen but Honda finally put the VTEC motor into a stock accord, horsepower and torque went up along with the styles. Also this accord was the first to be offered with a V6 (but because of early technologies hp/tq was up but so was weight). There are a few asthetic differences with the 94-95 and 96-97 I will try to list a couple, but first a few pics:
<U>94-95</U>:

1994 Accord EX: 2.2L(2156cc), F22B1, MPFI, SOHC 16-valve (Canadian:EX-R)
1994 Accord DX/LX: 2.2L(2156cc), F22B2, MPFI, SOHC 16-valve (Canadian:LX/EX)
1995 Accord EX: 2.2L(2156cc), F22B1, MPFI, SOHC 16-valve (Canadian:EX-R)
1995 Accord DX/LX: 2.2L(2156cc), F22B2, MPFI, SOHC 16-valve (Canadian:LX/EX)
1995 Accord V-6: 2.7L(2675cc), C27A4, MPFI, SOHC 24-valve
<U>96-97</U>:

1996 Accord EX: 2.2L(2156cc), F22B1, MPFI, SOHC 16-valve
1996 Accord DX/LX: 2.2L(2156cc), F22B2, MPFI, SOHC 16-valve
1997 Accord EX: 2.2L(2156cc), F22B1, MPFI, SOHC 16-valve
1997 Accord DX/LX: 2.2L(2156cc), F22B2, MPFI, SOHC 16-valve
*mind you the f22b1 is the VTEC motor for the 5th generation accord*
NOT DONE YET, MORE TO COME...
Modified by VRDrvr at 8:38 PM 3/15/2004
Modified by VRDrvr at 8:41 PM 3/15/2004
Modified by VRDrvr at 9:51 PM 3/15/2004
<U>Here are some basic terms you need to know, follow, and remember</U>:
OBDI-on board diagnostics 1
OBDII- on board diagnostics 2 (main difference is 2 o2 sensors)
AT-automatic transmission
MT-manual transmission
Gen-generation
IMO-in my opinion
CEL- Check Engine Light
Whip- your ride
*for now...*
<U>*<FONT COLOR="red"> Also I will not get into what is a better product as far as performance and if you want to rice out your vehicle...thats your own damn decision. If you like it then that is ok just don't expect everyone else to like it </FONT> *</U>
And first things first, if you are working on your car please do yourself a favor and purchase some sort of manual (I have always preferred the Chiltons manual) but there are many others: Haynes, Chilton, Helms etc. Visit your local auto parts store or http://www.amazon.com if you cannot leave the house and have to be on the internet
. These manuals will help you out tremendously IMO when working on your car. I have found that taking pictures while uninstalling or installing something can help out too....also makes for a good write up if you want to. Alright, the accord models obviously come in different levels of trim and also canadian trims are one step down:
lx=ex
ex=ex-R
etc
Generations run accordingly:
76-81 1st gen
82-85 2nd gen
86-89 3rd gen
90-93 4th gen
94-97 5th gen
98-02 6th gen
03-current 7th gen
. <U>ECU codes you may need</U>
...and how to get those CEL codes
But before I really get into that lets define what an accord is generation-wise I will not get into 1st and 2nd generation accord since they barely exist:
<U>3rd generation</U>:
These cars were produces from 86-89 and on a side note every 3 years honda produced a different looking accord. The car came in different forms of "luxury". These models are the DX,LX and LX-i, EX-i etc (see below). The LX-i and EX-i are the only one of the group that is fuel injected all others were carbureted. I am not 100% sure to what options came with or power but the codes are follows for this I chose a 86 accord so they should be the same:
Chassis codes:
CA4 (2000CC engine)
CA5 (1600CC engine)
Levels of trim:
STD, LX, GL
EX
EX 2.0I
EXR (for the canadian folks)
EXC
Engine codes:
A20A1 2000CC with carburetor (kg only)
A20A2 2000CC with carburetor
A20A4 2000CC with Fuel injection
A16A1 1600CC with carburetor
This car was available in 5 speed and automatic, the tranny codes are:
Manual:
A2K5 2000CC engine
A1M5 1600CC engine
Automatic:
F4 2000CC engine
C9 1600CC engine
There is a lot more info on this car and a renowned site is For your 3rd Gen Accord . Most people on this forum have 4th gens or newer, sorry for the limited information.
Here is a list of all the years of 3rd gens with engine type and code (thanks jwogen1):
1986 Accord: 2.0L(1955cc), BS, 2bbl, SOHC 12-valve
1986 Accord LXi: 2.0L(1955cc), BT, EFI, SOHC 12-valve
1987 Accord: 2.0L(1955cc), A20A1, 2bbl, SOHC 12-valve
1987 Accord LXi: 2.0L(1955cc), A20A3, EFI, SOHC 12-valve
1988 Accord DX/LX: 2.0L(1955cc), A20A1, 2bbl, SOHC 12-valve
1988 Accord LXi: 2.0L(1955cc), A20A3, EFI, SOHC 12-valve
1989 Accord DX/LX: 2.0L(1955cc), A20A1, 2bbl, SOHC 12-valve
1989 Accord LXi: 2.0L(1955cc), A20A3, EFI, SOHC 12-valve
<U>4th Generation accord:</U>
This car was drasically changed from the 3rd gen mainly due to all 4th gens came with fuel injection had more hp and tq and was a very roomy and aerodynamically improved car.
Here is a link explaining the main difference with trim/options etc.
<U>CB7 difference through the years</U>
The engines that came with are as follows (and the chassis code for all 4th gens are CB7) thanks jwogen1:
1990 Accord DX/LX: 2.2L(2156cc), F22A1, MPFI, SOHC 16-valve (single exhaust manifold)
1990 Accord EX: 2.2L(2156cc), F22A4, MPFI, SOHC 16-valve (dual exhaust manifold)
1991 Accord DX/LX: 2.2L(2156cc) F22A1, MPFI, SOHC 16-valve (single exhaust manifold)
1991 Accord EX: 2.2L(2156cc), F22A4, MPFI, SOHC 16-valve (dual exhaust manifold)
1991 Accord SE: 2.2L(2156cc), F22A6, MPFI, SOHC 16-valve (dual intake manifold)
1992 Accord DX/LX: 2.2L(2156cc) F22A1, MPFI, SOHC 16-valve (single exhaust manifold)
1992 Accord EX: 2.2L(2156cc), F22A4, MPFI, SOHC 16-valve (dual exhaust manifold)
1992 Accord EX-R: 2.2L(2156cc), F22A6, MPFI, SOHC 16-valve (dual intake manifold)
1993 Accord DX/LX: 2.2L(2156cc) F22A1, MPFI, SOHC 16-valve (Canadian models: LX/EX)
1993 Accord EX/SE: 2.2L(2156cc), F22A6, MPFI, SOHC 16-valve (Canadian models: EX-R/SE)
If you would like some basic hp tq, weight numbers I refer to http://www.edmunds.com
<U>5th Generation Accord</U>:
The 5th generation accord was another huge step in the accord family, not only did the accord have the best sales for the 4th gen but Honda finally put the VTEC motor into a stock accord, horsepower and torque went up along with the styles. Also this accord was the first to be offered with a V6 (but because of early technologies hp/tq was up but so was weight). There are a few asthetic differences with the 94-95 and 96-97 I will try to list a couple, but first a few pics:
<U>94-95</U>:
1994 Accord EX: 2.2L(2156cc), F22B1, MPFI, SOHC 16-valve (Canadian:EX-R)
1994 Accord DX/LX: 2.2L(2156cc), F22B2, MPFI, SOHC 16-valve (Canadian:LX/EX)
1995 Accord EX: 2.2L(2156cc), F22B1, MPFI, SOHC 16-valve (Canadian:EX-R)
1995 Accord DX/LX: 2.2L(2156cc), F22B2, MPFI, SOHC 16-valve (Canadian:LX/EX)
1995 Accord V-6: 2.7L(2675cc), C27A4, MPFI, SOHC 24-valve
<U>96-97</U>:
1996 Accord EX: 2.2L(2156cc), F22B1, MPFI, SOHC 16-valve
1996 Accord DX/LX: 2.2L(2156cc), F22B2, MPFI, SOHC 16-valve
1997 Accord EX: 2.2L(2156cc), F22B1, MPFI, SOHC 16-valve
1997 Accord DX/LX: 2.2L(2156cc), F22B2, MPFI, SOHC 16-valve
*mind you the f22b1 is the VTEC motor for the 5th generation accord*
NOT DONE YET, MORE TO COME...
Modified by VRDrvr at 8:38 PM 3/15/2004
Modified by VRDrvr at 8:41 PM 3/15/2004
Modified by VRDrvr at 9:51 PM 3/15/2004
03-14-2004, 09:03 PM
#4
Honda-Tech Member
Join Date: Feb 2003
Location: Bend, OR, 97701
Posts: 7,550
Likes: 0
Received 0 Likes
on
0 Posts
ECU CODES<U></U>
http://hybrid2.honda-perf.org/tech/codes.html
HOW TO CHECK ECU CODES
http://www.c-speedracing.com/faq/06.php
Modified by baGged93aCcord at 10:30 AM 3/15/2004
http://hybrid2.honda-perf.org/tech/codes.html
HOW TO CHECK ECU CODES
http://www.c-speedracing.com/faq/06.php
Modified by baGged93aCcord at 10:30 AM 3/15/2004
03-16-2004, 02:44 PM
#5
New User
Join Date: Apr 2001
Posts: 4,569
Likes: 0
Received 0 Likes
on
0 Posts
just some basic info most of us know, but may be helpful.
1st generation accords: 1976-1981
2nd generation accords: 1982-1985
3rd generation accords: 1986-1989
4th generation accords: 1990-1993
5th generation accords: 1994-1997
6th generation accords: 1998-2002
7th generation accords: 2003+
(Trim and equipment levels range from DX, LX, LXi, EX, EX-R, SE, SEi, V-6)
-these include canadian models
Engine Identification(year/model, engine displacement, engine series, fuel system, engine type)
2nd Gens
1984 Accord: 1.8L(1829cc), ES2, 3bbl, SOHC 12-valve
1985 Accord: 1.8L(1829cc), ES2, 2bbl, SOHC 12-valve
1985 Accord SEi: 1.8L(1829cc), ES3, 2bbl, SOHC 12-valve
3rd Gens
1986 Accord: 2.0L(1955cc), BS, 2bbl, SOHC 12-valve
1986 Accord LXi: 2.0L(1955cc), BT, EFI, SOHC 12-valve
1987 Accord: 2.0L(1955cc), A20A1, 2bbl, SOHC 12-valve
1987 Accord LXi: 2.0L(1955cc), A20A3, EFI, SOHC 12-valve
1988 Accord DX/LX: 2.0L(1955cc), A20A1, 2bbl, SOHC 12-valve
1988 Accord LXi: 2.0L(1955cc), A20A3, EFI, SOHC 12-valve
1989 Accord DX/LX: 2.0L(1955cc), A20A1, 2bbl, SOHC 12-valve
1989 Accord LXi: 2.0L(1955cc), A20A3, EFI, SOHC 12-valve
4th Gens
1990 Accord DX/LX: 2.2L(2156cc), F22A1, MPFI, SOHC 16-valve (single exhaust manifold)
1990 Accord EX: 2.2L(2156cc), F22A4, MPFI, SOHC 16-valve (dual exhaust manifold)
1991 Accord DX/LX: 2.2L(2156cc) F22A1, MPFI, SOHC 16-valve (single exhaust manifold)
1991 Accord EX: 2.2L(2156cc), F22A4, MPFI, SOHC 16-valve (dual exhaust manifold)
1991 Accord SE: 2.2L(2156cc), F22A6, MPFI, SOHC 16-valve (dual intake manifold)
1992 Accord DX/LX: 2.2L(2156cc) F22A1, MPFI, SOHC 16-valve (single exhaust manifold)
1992 Accord EX: 2.2L(2156cc), F22A4, MPFI, SOHC 16-valve (dual exhaust manifold)
1992 Accord EX-R: 2.2L(2156cc), F22A6, MPFI, SOHC 16-valve (dual intake manifold)
1993 Accord DX/LX: 2.2L(2156cc) F22A1, MPFI, SOHC 16-valve (Canadian models: LX/EX)
1993 Accord EX/SE: 2.2L(2156cc), F22A6, MPFI, SOHC 16-valve (Canadian models: EX-R/SE)
5th Gens
1994 Accord EX: 2.2L(2156cc), F22B1, MPFI, SOHC 16-valve (Canadian models: EX-R)
1994 Accord DX/LX: 2.2L(2156cc), F22B2, MPFI, SOHC 16-valve (Canadian models: LX/EX)
1995 Accord EX: 2.2L(2156cc), F22B1, MPFI, SOHC 16-valve (Canadian models: EX-R)
1995 Accord DX/LX: 2.2L(2156cc), F22B2, MPFI, SOHC 16-valve (Canadian models: LX/EX)
1995 Accord V-6: 2.7L(2675cc), C27A4, MPFI, SOHC 24-valve
1996 Accord EX: 2.2L(2156cc), F22B1, MPFI, SOHC 16-valve
1996 Accord DX/LX: 2.2L(2156cc), F22B2, MPFI, SOHC 16-valve
1997 Accord EX: 2.2L(2156cc), F22B1, MPFI, SOHC 16-valve
1997 Accord DX/LX: 2.2L(2156cc), F22B2, MPFI, SOHC 16-valve
obviously need more general FAQ info in here, so feel free to post and i will update. I stopped short of 6th and 7th gens, as well this is just a start to general info. not sure where we would like this to go, and please fill in any blanks and info to add.
Also, this should probably be combined with VRDrvr's thread, so keep that in mind when reviewing both
03-16-2004, 02:44 PM
#6
New User
Join Date: Apr 2001
Posts: 4,569
Likes: 0
Received 0 Likes
on
0 Posts
this is always handy...I found this link on H-T somewhere, so not trying to take credit for this but it is a great piece. http://www.extremeredline.net/....html
AUTO to MANUAL SWAP SECTION
Parts List:
1. 5 speed transmission (F22, F23, H22, H23)
2. 5 speed starter (90-02 Accord 92-02 Prelude)
3. 5 speed shifter assembly w/ shifter cables (90-97 Accord 92-96 Prelude)
4. 5 speed drivers side axle (your year accord, but from 5-spd version)
5. 5 speed intermediate shaft (your year accord, but from 5-spd version)
6. 5 speed clutch pedal assembly (90-97 Accord 92-96 Prelude)
7. 5 speed brake pedal arm (90-97 Accord 92-96 Prelude)
8. Clutch master cylinder w/ reservoir (90-97 Accord 92-96 Prelude)
9. Clutch line from Clutch master cylinder to clutch dampener (90-97 Accord 92-96 Prelude)
10. Clutch dampener assembly (90-97 Accord 92-96 Prelude)
11. Clutch line from Clutch dampener to 5 speed tranny (90-97 Accord 92-96 Prelude)
12. Clutch line from 5 speed tranny to slave cylinder (90-97 Accord 92-96 Prelude)
13. Slave cylinder (90-97 Accord 92-96 Prelude)
14. Clutch (90-02 Accord 92-01 Prelude)
15. Flywheel (90-02 Accord 92-01 Prelude)
16. 5 speed mount (Your year, 5-spd version)
17. 5 speed mount bracket (go to honda - tell them to look for the bracket that is welded on the car - part is S.O.P and costs 15-25.00) (see notes)
18. MIG WELDER (see notes)
19. BOLTS: 8 Flywheel Bolts, 6 Pressure Plate Bolts, 3 Intermediate Shaft Bolts, 1 Long Tranny Bolt
20. Recommended: HELMS Service Manual (www.helminc.com) CHILTONS Manual
Disconnect the battery. Remove it, the battery tray and the air intake to gain working room. (Distributor helps also) Raise the front of the car up in the air, support it on jack stands and remove the front wheels. Drain auto transmission fluid. Remove the axle nut (36mm). (note: this nut is at 180 lb-ft, the best way to remove the bolt is to put an extension pipe on the socket wrench you are using, works great, have someone stomp on the brakes as you loosen it) Remove the lower ball joint cotter pin and nut (17mm) on both sides. Take a floor jack and start to raise the car up on the lower knuckle so the ball joint pops out. When it does remove the axles. To pry the axles from the tranny, insert a decent size flat head screwdriver in-between the axle and the tranny, then just pop it. It will pop out of socket, then you can pull it out the rest of the way. Be sure to keep pressure on the ends of the axles because if the cv joints come apart its not fun putting them back together. Remove the passenger side radius rod (suspension piece right under the tranny) When that's done start removing the wire harnesses connected to the tranny. Remove the starter from the tranny. Remove the torque converter cover and the tranny cable from underneath the tranny. Now you have to remove each of the 8 bolts that hold the torque converter to the flex plate. This is done 1 or 2 at a time, and then you must rotate the crank to get to the next couple. Make sure you have something holding the tranny (jack or lift) Remove the tranny bell housing bolts and remove the tranny mount. Drop the tranny slowly. Be careful because it's heavy. Remove the 8 bolts holding the flex plate to the block. They are 17 mm 12 point sockets. Then bolt up the flywheel using the NEW bolts you got, because the flex plate bolts are too short.
Remove the center console in the car, disconnect the shifter assembly and the cables attached. Remove the brake pedal arm (there is a spring at the top - keep it) remove the plate that's covering the clutch master cylinder access. Take up passenger side carpet and remove the a/t control unit Unplug it - you don't need it anymore. Replace the ECU with the 5-speed version at the same time.
Bolt all the hydraulic lines linking the clutch master cylinder to the tranny, then to the slave cylinder.
(Cut off the old tranny mount before putting the new tranny into the engine bay.)* Install the tranny in reverse order of removal. Weld the 5 speed tranny mount onto the car. Then run the shift linkage cables from the inside of the car to the top/rear of the tranny. Connect these where they belong and put the cotter pins on to keep them on the right places. Install the old auto passenger side axle and the new intermediate shaft into the tranny. Bolt the intermediate shaft hanger to the block using the new bolts. Then install the new drivers side axle. Put the axles into the hubs and reinstall the balljoint that was taken apart. Then have your friend stand on the brakes again so you can tighten the axle nuts. Install the new manual tranny starter. You will need the long bolt that goes through the starter then through the tranny and into the block. Connect the power cable to the starter and the ground cable to the tranny. You might have to pull the clips off of the cables to get them to reach, no biggie.
Wiring:
Method 1: Now its time to make the car start, first off start by taking the 2 nuts holding the white part on the automatic shifter and plug the 2 wire in that need to go where they belong (brown plug and a long white plug) Then tuck them in somewhere next - put in neutral and hope the car starts, if it does have fun you now have completed the impossible just to correct...
Method 2: I did not remove the a/t control unit, no need to, just extra time to do it. There is also some more wiring that I had to do, maybe because I didn't pull the computer, not sure. When you pull the auto shifter assembly, there will be 4 or so harnesses left laying there. On one harness (on the drivers side, I think it was the biggest connector on that side) I connected pin # 2 (green) to pine #5 (counting sraight accross, left to right) brown or black, not sure, its a ground I think, and the other harness I had to modify was also on the drivers side of the shifter assembly, its two bigger guage wires, I just connected them together. These two harnesses control the kill starter (makes sure car is not in gear when you start it) and the other makes it so you can take your keys out of the ignition, basically, I tricked the computer into thinking it is always in park.
Notes:
Mounts #1: I did not have to modify any mounts, but I used a 94 H23 tranny and motor when I did mine, not the accord tranny. The only modification I had to make to the engine bay was the rear support beam, I had to grind off about 1/2"X1.5" so this little bracket/bolt thing wouldn't hit it, nothing a grinder didn't take care of.
Mounts #2: I put my H23 tranny in with a F23A1 engine and did not need to modify any mounts. Of course the engine was a little off to the drivers side, and there were some clearance issues. But those were solved with some trimming of the crank pulley and the absence of A/C.
Mounts #3: The mount on the 5th gen Accords is the same for the manual and automatic versions so no modifications are required.
Disclaimer:
The people who wrote this, and presented this information are in no way responsible for your actions. You perform these modifications at YOUR OWN RISK. If you are not capable of doing these things, let someone else do it for you.
03-17-2004, 05:15 PM
#7
New User
Join Date: Apr 2001
Posts: 4,569
Likes: 0
Received 0 Likes
on
0 Posts
from a post by baGged93aCcord:
Aight here we go
Basic Body werk 101
http://www.samarins.com/maintenance/bodymain.html
http://www.team.net/www/morgan....html
Basic Dent Removal
http://www.autobodytoolmart.com/dent1.html
http://www.autobodytoolmart.com/dent4.html
http://www.autobodytoolmart.com/dent6.html
Metal Work Questions
http://www.paneldoctor.com/FAQ/faqmetal.htm
http://www.irinfo.com/polish/html/polish.html
Basic Air-Ride components
http://www.truckn-store.com/tech_instructions.asp
http://www.ridetech.com/magart...g.asp
This is only the begining..
Trending Topics
03-18-2004, 01:58 PM
#8
Join Date: Mar 2004
Location: Burleson, TX
Posts: 157
Likes: 0
Received 0 Likes
on
0 Posts
Here it is, basic instructions for swapping an H22 motor into a 4th and 5th generation Accords.
<U>What You Need(4th Gen.):</U>
1. Stock Mounts
2. 93-95 Prelude Header (If using stock exhaust)
3. Stock Harness (Modified)
4. Accord Axles (5-speed of auto axles, whatever tranny your using)
5. Oil Pressure Sensor from F22 (Plug is different on H22 version)
<U>Wiring(4th Gen.):</U>
1. VTEC Solenoid: Pin A4
2. VTEC Pressure Switch: Pin D6
3. Knock Sensor: Pin D3
4. Secondary Intake Solenoid: Pin A17
<U>What You Need(5th Gen.):</U>
Same as above plus:
1. 92-95 Prelude Driver Side Mount. (Ground down to fit)
<U>Wiring(5th Gen.):</U>
Same as above plus:
1. Swap Pin A6 with Pin A11.
<U>Instructions:</U>
Evacuate the AC system prior to starting this swap. Have an experienced shop do this to prevent any freon from escaping into the environment. Remove the battery. Disconnect the power steering lines, radiator hoses, and front AC line. Remove the Radiator, the Power Steering Pump and the Alternator, and the AC compressor. Disconnect all the wiring plugs and label them if necessary. Remove the front wheels and disconnect the axles. Disconnect all the mounts. Now remove the engine. Make sure you have the engine crane on the motor before removing the motor mounts. (Duh!!)
Prepare the Prelude engine by replacing any worn parts such as the timing belt and water pump. This is easier now that the engine is out of the car. Transfer the Accord wiring harness to the prelude engine. Make sure you plug the same plugs into the same sensors on both engines. You will probably need to extend some wires like those for the alternator part of the harness. If the Prelude engine came with a harness, snip the plugs off of it for the VTEC Solenoid, VTEC Pressure switch and Knock Sensor. These are the wires you will be adding. Attach the Accord half shaft at this point. If the engine has a Prelude half shaft remove it and use the Accord one. The Prelude one will not work. Remove the Front, Rear, and Driver side mounts from the Prelude engine. Place the Front, Rear, and Drivers mount from the Accord engine onto the Prelude engine. For the transmission, use the mount that corresponds to the tranny you are using.
Now you are almost ready to drop the engine in, but first you must prepare the engine bay. First off, swap out the power steering line from the Prelude one. Next, run three wires through the firewall to correspond to the wires that you are adding for the VTEC system. Run four wires through the firewall if your car is an LX or DX because you are going to be missing one in the distributor. I am not sure which wire it is exactly, but I know the LX and DX are missing the one wire. Add two more wires if you are converting from Automatic to Manual for the reverse sensor in the transmission.
If you are doing a automatic to manual swap this will be the point where you will do this. Unplug and remove the shifter and all it's components from the inside of the car. Replace it with the 5 Speed shifter assembly. It should bolt right in using the same bolt holes. Now remove the brake pedal assembly and replace it with the 5 speed brake pedal. Next remove the two bolts holding the cover plate that covers the holes for the clutch master cylinder and pedal assembly. Put the clutch master cylinder and pedal assembly together through the holes in the firewall. Next run the clutch hydraulic line from the clutch master cylinder along the firewall and the passenger side frame rail to the clutch dampener assembly. You will have to drill and tap holes to mount the dampener assembly.
At this point you can drop the motor right into the car using the four mounts. Install the appropriate axles to the transmission and hub. Connect the wires that you added as well as the other harness plugs. Attach the new AC line, power steering lines, Clutch line from the dampener to the transmission, and radiator lines. Attach the shifter cables at this point. run them over the power steering rack or else it will be too short and won't reach the shifter inside the car. Plug the ECU into the factory harness and wire up the VTEC wire to the appropriate pin outs. This is where the Chiltons or Hayes manual comes in handy.
If you converted from automatic to manual, you will have to wire up a starter relay, jump the shifter lock wire, and jump the key lock wire. You will also need to attach the reverse sensor leads to the reverse lights in the shifter wiring harness. These are all in the plugs that you removed from the Automatic shifter assembly. You will also need to switch a few wires around if you plan to use your Cruise Control. It's all in the wiring diagrams in the repair manuals. Don't worry about the automatic control unit that is next to the ECU. You can just unplug it and remove it. You don't need it anymore for the manual transmission.
If your using a 97+ H22 and are putting it into an OBD1 Accord (90-95), you are going to need:
1. OBD1 Injectors
2. OBD1 ECU
3. OBD1 Distributor
Here's the ECU Pinouts:
OBD 0
Pinout '88 HF/Si '90-1 DX (Std.) '90-1 HF/Si '89-92 EF8/9 SiR
A1 No.1 INJ Aux INJ w/A3 No.1 INJ No.1 INJ
A2 GRD w/A4 to Main Relay GRD w/A4 to Main Relay GRD w/A4 to Main Relay GRD w/A4 to Main Relay
A3 No.2 INJ Aux INJ w/A1 No.2 INJ No.2 INJ
A4 GRD w/A2 to Main Relay GRD w/A2 to Main Relay GRD w/A2 to Main Relay GRD w/A2 to Main Relay
A5 No.3 INJ Main INJ w/A7 No.3 INJ No.3 INJ
A6 Purge Cut-Off Solenoid Valve Purge Cut-Off Solenoid Valve Purge Cut-Off Solenoid Valve (HF Only) Purge Cut-Off Solenoid Valve
A7 No.4 INJ Main INJ w/A5 No.4 INJ No.4 INJ
A8 Lock-up Control Solenoid Valve Lock-up Control Solenoid Valve Lock-up Control Solenoid Valve Spool (VTEC) Solenoid Valve
A9 - - - -
A10 - EGR Valve (CA A/T Only) EGR Valve (HF Only) Pressure Regulator Cut-Off Solenoid Valve
A11 EACV w/A17 EACV w/A17 EACV w/A17 EACV
A12 Main Relay w/A14 Main Relay w/A14 Main Relay w/A14 Main Relay w/A14
A13 Main Relay w/A15 Main Relay w/A15 Main Relay w/A15 Main Relay w/A15
A14 Main Relay w/A12 Main Relay w/A12 Main Relay w/A12 Main Relay w/A12
A15 Main Relay w/A13 Main Relay w/A13 Main Relay w/A13 Main Relay w/A13
A16 GRD w/A18 GRD w/A18 GRD w/A18 GRD w/A18
A17 EACV w/A11 - - -
A18 GRD w/A16 GRD w/A16 GRD w/A16 GRD w/A16
B1 Hazard Fuse w/Brake Switch Hazard Fuse w/Brake Switch - Hazard Fuse w/Brake Switch
B2 Tandem Valve Control Solenoid Valve Tandem Valve Control Solenoid Valve - -
B3 A/C Clutch Relay A/C Clutch Relay Fast Idle Valve A/C Clutch Relay
B4 Radiator Fan Relay Radiator Fan Relay Radiator Fan Relay -
B5 Alternator Alternator Alternator Oil Pressure Switch
B6 Check Engine Light Check Engine Light Check Engine Light Check Engine Light(10A)
B7 Shift Position Sensor (A/T Only) Shift Position Sensor (A/T Only) A/C Switch w/B8 -
B8 A/C Switch A/C Switch A/C Switch w/B7 A/C Switch
B9 - - - Brake Switch
B10 - - Crank Angle Sensor Crank Angle Sensor
B11 Shift Position Sensor (AT Only) Shift Position Sensor (AT Only) Clutch Switch (HF Only) Rear Defogger Switch
B12 - - Crank Angle Sensor Crank Angle Sensor
B13 No.2 Fuse (10A) No.2 Fuse (10A) No.2 Fuse (10A) No.2 Fuse (10A)
B14 Alternator Alternator Alternator Alternator
B15 Igniter Unit w/B17 Igniter Unit w/B17 Igniter Unit w/B17 Igniter Unit w/B17
B16 Speed Sensor Speed Sensor Speed Sensor Speed Sensor (Electrical)
B17 Igniter Unit w/B15 Igniter Unit w/B15 Igniter Unit w/B15 Igniter Unit w/B15
B18 - - - -
B19 ELD ELD ELD Knock Sensor
B20 Ign. Timing Adj. Connector Ign. Timing Adj. Connector Ign. Timing Adj. Connector Ign. Timing Adj. Connector
C1 Crank Angle Sensor Crank Angle Sensor Cylinder Position Sensor Cylinder Position Sensor
C2 Crank Angle Sensor Crank Angle Sensor Cylinder Position Sensor Cylinder Position Sensor
C3 TDC Sensor TDC Sensor TDC Sensor TDC Sensor
C4 TDC Sensor TDC Sensor TDC Sensor TDC Sensor
C5 TA Sensor TA Sensor TA Sensor TA Sensor
C6 TW Sensor TW Sensor TW Sensor TW Sensor
C7 Throttle Angle Sensor Throttle Angle Sensor Throttle Angle Sensor Throttle Angle Sensor
C8 - EGR Valve Lift Sensor (CA A/T Only) - O2 Sensor B
C9 PA Sensor PA Sensor PA Sensor P/S oil switch
C10 Brake Switch Brake Switch Brake and Reverse Light Switch (HF Only) Brake Switch
C11 MAP Sensor MAP Sensor MAP Sensor MAP Sensor
C12 PA Sensor PA Sensor Throttle Angle Sensor Throttle Angle Sensor
C13 PA Sensor PA Sensor Throttle Angle Sensor Throttle Angle Sensor
C14 MAP Sensor MAP Sensor MAP Sensor MAP Sensor
C15 MAP Sensor MAP Sensor MAP Sensor MAP Sensor
C16 O2 Sensor A O2 Sensor A O2 Sensor A O2 Sensor A
OBD 1 and 2
OBD2a OBD2b Function OBD1 Color Notes
A01 B05 Injector 4 A02 Yellow
A02 B04 Injector 3 A05 Light Blue
A03 B03 Injector 2 A03 Red
A04 B11 Injector 1 A01 Brown
A05 A08 SO2H No connection on OBD1
A06 C01 PO2H A06 Orange/black
A08 B12 VTS A04 Orange/White
A09 B20 LG1 A26 Black/Red
A10 B02 PG1 A23 Black
A11 B01 IGP1 A25 Yellow/Black
A12 B23 IACV A09 Green/White
A15 A06 PCS A20 Red
A16 A16 FLR A07 Green/Yellow
A17 A17 ACC A15 Black/Red
A18 A18 MIL A13 Green/Orange
A19 A02 ALTC A16 White/Yellow No connection on D16Y8 P2Nb
A20 B13 ICM A21 Red/Green
A22 B22 LG2 B02 Brown
A23 B10 PG2 A24 Black
A24 B09 ICP2 B01 Yellow Black
A27 A20 FANC A12 Yellow/Green
C01 C31 CKFP No connection on OBD1
C02 C08 CKPP B15 Blue/Green
C03 C20 TDCP B13 Orange/Blue
C04 C29 CYPP B11 Orange
C05 A27 ACS B05 Blue/Red
C06 A24 STS B09 Blue/White
C07 A10 SCS D04 Brown
C10 B21 VBU D01 White/Blue
C11 C22 CKFM No connection on OBD1
C12 C09 CKPM B16 Blue/Yellow
C13 C21 TDCM B14 White/Blue
C14 C30 CYPM B12 White
C15 C10 VTM D06 Orange/Green Connected to VTS on OBD2a
C16 A26 PSW B08 Brown/Red
C17 C05 ALTF D09 Pink No connection on D16Y8 P2Nb
C18 C23 VSS B10 Yellow/Blue
D01 C27 TPS D11 Pink/Black
D02 C26 ECT D13 Red/White
D03 C17 MAP D17 Pink/White
D04 C19 VCC1 D19 Yellow/Green
D05 A32 BKSM D02 Greem/White
D06 C03 KS D03 Red/Green No connection on P08, P28
D07 C16 PO2S D14 White
D08 C25 IAT D15
D10 C28 VCC2 D20 Yellow/White
D11 C18 SG2 D22 Green/White
D12 C07 SG1 D21 Green/Blue
D14 A23 SO2S No connection on OBD1
D16 A30 EL D10 Green/Red No connection on D16Y8 P2Nb
Here's a website that has a list of ECU's:
http://www.hondaswap.com/forum...29826
Same site with list of Honda engines:
http://www.hondaswap.com/forum...29825
A few sites to purchase items that deal with swaps:
http://www.totaljdm.com/
http://hasport.com/
http://www.topendmotorsports.com
More to come!!!
3rd Gen. Swaps
6th Gen. Swaps
05-21-2004, 10:25 AM
#9
New User
Join Date: Apr 2001
Posts: 4,569
Likes: 0
Received 0 Likes
on
0 Posts
BY: Iam7head
Due to popular demands, here is the guideline.
*car- 2002 accord 4cylinder(should work for all honda)
*what you need to know- your accord gen/year location of the srs service connector(MES or something)
*tools- paperclip, flashlight
The MES connector is located in the backside of the hood release latch for 6th gen accord.

The SRS connector's evil twin brother. The real deal is the one I am pointing at, the one that harder to reach. They both have the similar color of wires coming out so don't be fooled.

Another view

Insert paperclip
**************************************
For the poor souls without helms.
Erasing the DTC memory/resetting SRS light
1) turn ignition switch off
2) connect the scs service connector to the MES connector. Do not use a jumper wire
3) turn igition switch to on
4) The SRS indicator light will come on for about 6 seconds, and then go off. Remove the SCS service connector from the MES connector within 4 seconds after the light comes on
5) The SRS indicator will come on again. Reconnect the SCS service conector(or in ghetto world of honda, paperclip) to the MES connector(read: the yellow connector, see picture) within 4 seconds after the light comes on.
6) When the SRS indicator light goes off, remove the SCS service connector from the MES connector within 4 seconds.
7) The SRS indicator light will blink 2 times indicating that the memory has been errased/clear.
8) turn the ignition switch to off and wait for 10 seconds.
I think there's some similar article/post in the past, but none with pictures, see if this would help some of the visual learning generations of honda owners. make it sticky will ya?!
Modified by iam7head at 11:24 AM 5/21/2004
06-17-2006, 10:02 AM
#10
Working
From Turbowa
Official auto to 5spd swap guide for 6th gen accords.
Disclaimer: This swap is not a-tell all guide. I�m sure at some point some minor details will be left out. I am by no means an expert or claim to be one in this area. You will need a very good understanding of how the cars electrical system and mechanical systems work. I you don�t stop right now before you get in over your head. This is to be taken as information only and to be used as you see fit. I have completed this swap and now that it will work but I can not control how well you will be able to complete this swap. I do not accept any responsibility nor blame if you burn down, screw up, or and other miss fortune you may have. You can feel free to e-mail or pm me for information. But you will be at your own risk when doing this.
Removing auto tranny:
1: Jack front of the car up and support it with jack stand. (Never crawl under the car with just a jack to support it.)
2: Remove both front tires and plastic under skirting under engine bay.
3: Dis-connect and remove the battery and battery tray. You will also want to remove the radiator coolant over flow and intake tubing. Note: leave air filter in box if still using the stock air box as this will help prevent any thing from falling down in to the lower portion of the box.
4: Drain transmission fluid and dis-connect tranny cooler lines from radiator.
5: Remove big nut on the end of both the pass. and driver side axles. Dis-connect both lower ball joints and separate from lower control arm.
6: Remove axles from transmission and set the pass. side one aside. You will be able to re-use this one later on.
7: Remove both bolts on either side for the radius rods on the lower control arms. At this point you will want to support the engine with a jack and 2x4 under the oil pan. *Very important to have a 2x4 on the jack end so not to crush the oil pan in*. You will just want it to be snug on the pan to ease the pressure of the engine. Now you can remove the bolt from the front motor mount and the remaining bolts for the front sub-frame. Be careful as this may be heavy. Now you can remove the mount from the engine block. ( You will see why later)
8: Dis-connect both wires from starter and remove the 2 starter bolt and remove starter.
9: Remove the support bracket that is bolted to the lower tranny and the bottom of the block. Once this is done all the torque converter bolts are accessible. You will need to remove all of these. There are a lot. You can turn the crank by the crank bolt to get to all the bolts.
10: Then you can remove the cover for the auto shift cable. Once this cover is off you will be able to pull the cable back and access the retaining bolt. There is a lock on it that will need to come off with a flat head screw driver. Once the bolt is off the cable will slide off rather freely.
11: Now go around the tranny and remove all the 17mm bolts that are holding it on the the block except for the middle top 2 under the distributor. Leave these till last. I be leave there are 2 or 3 in the rear mount that need to come out as well. These I think though are 19mm.
12: Dis-connect all electrical connections on the transmission and pull harness out of the way. You may choose to take out the distributor at this time. I left mine in but you may find it easier to remove the harness with this out and removal of the last to bolts. ( Do not remove these bolts yet.
13: Now with another floor jack or cherry picker support the tranny and remove the side tranny mount bolt from the mounting bracket. Once done slowly lower the transmission and engine down some, but not much. Now you should have enough access to the mounting bracket on the frame rail. Remove all 3 bolts and remove bracket.
14: Almost home free. Now remove those 2 last bolts in the engine that are going through the transmission. Lower the engine a little more and the tranny a little more and pull every so slightly forward to clear the rear sub frame.
15: Be VERY CAREFUL at this point the tranny weights a ton. If it falls on you, you WILL get hurt. Very carefully but with some force start to pry the transmission from the engine. When it starts to come off and is free slowly lower the jack under the tranny till the tranny is totally free. It will want to fall of the jack so be careful. And lower it to the ground and remove from under the car. Now you will have a big hole were the tranny once was. Congrats you just removed the tranny.
***KEEP IN MIND THAT THE JACK UNDER THE ENGINE MUST STAY THERE. THERE IS ONLY ONE MOUNT HOLDING THE MOTOR IN. THE JACK IS THE MAIN SOURE OF SUPPORT***
Install of new tranny:
1: You can use either the F22, F23, H22 or H23 manual trannys its really your choose. If you are using any other tranny other then the F23 you will need to take off the fitting for the F23 slave cyl. As this will only work on the F23 tranny.
2: Now that you can see it you want to remove the flex-plate from the engine. Once off you can install your fly wheel. I have the ACT pro-lite. You will need new factory bolts to do this. Then install the clutch of your choose with new factory bolts. I went with the ACT extreme pressure plate and un-sprung 6 puck. 90% of you won�t need this much clamping force. But they all install the same. Make sure you torque the bolts down in a crossing pattern and by hand at first. This way you won�t twist the pressure plate. Put the bolts in hand tight and the only turn each bolt one full turn max each time till its tight. Then with an impact slightly tighten each bolt a little more. To tighten the fly wheel bolts. Start the first few threads by hand and then run them in with an impact gun.
3: Install a new through out bearing into your tranny. Never re-use the one it came with.
4: Re-install the tranny mount bracket to the frame rail on the pass side with the 3 bolts you took out. Now bolt the new 5spd bracket for the tranny on to it.
5: Have a friend or if you feel like getting a hernia install the 5spd on to the engine. I have a cherry pick that I always use. I like my back to much to screw it up doing this. Make sure the tranny is flush with the block or at least with in a �� of the block before starting the bolts.
6: Install the top 2 bolts the work your way around the tranny. You can re-attach the auto rear mount to the 5spd tranny with out a problem. I currently have mine this way.
7: Once the bolts for the tranny are all in and the rear mount is hooked up slide the side mount bolt in and tighten it. Pull the wiring harness over the tranny at this point to. It will help later.
8: Install the front sub frame. Start by putting the front motor mount bolt in and then going from there. The radius rods will be done last.
9: Now you can take the jack out from under the engine. The tranny and engine are now one. Sit back and take a brake.
10: Go inside the car after cleaning up some and remove the center console. This will give you access to the shifter assembly. There are 4 bolts holding it down. Remove these and un-do the two plugs.
11: Pull the shifter assembly out. It will still have the shift cable attached to it, that�s fine.
12: Install the new shifter cables on to the shift assembly base of the new 5spdshifter out of the car, its much easier. Then install the shifter assembly and cables in reveres order.Make sure the rubber boot is tight against the body or it will leak water into the car. Once done re-install the center console.
13: Go under the car and remove the hold down bracket that looks like it attaches under the car, mines removed it just got in the way. With bracket removed route the cables to the top side of the tranny and install into there brackets and lock in and install the cotter pins and washers.
14: Install the 5spd starter for your year tranny.
15: Install the pass. side drive axle and the new drivers side half shaft. It will bolt to the block in three places. Then install the new driver side half shaft. Torque the axle nuts down and install your tires.
16: Fill the tranny with either Honda manual tranny fluid or 5w30 motor oil depending on your year. I highly recommend using the factory fluid. Its safe to use in any year manual tranny.
17: Re-install splash shield and lower car back down. You have just now swapped the transmission.
18: Now you can re-install the battery tray and battery. But leave the intake tube and the coolant over flow out. Do not hook up the battery just yet.
Removing the interior trim:
1: Remove both the drivers and pass side fuse panel covers from the dash. Also remove the trim panel from under the radio. You will need a 90 degree pick or small screw driver to remove this. If it breaks (mine did) no big deal there fairly cheap for new ones at the dealer.
2: Remove the 2 screws in the fuse panels on both sides for the lower dash panel. Then re-move the screw under the radio for each panel. These 2 will be just to the outer inside edges of the center console. Once these screws are out pull fairly hard on the panels and they will come off.
3: Open the glove box and remove the 2 screws by the striker. Then on the outer edges there are black plastic covers, pop these off and take the screws out that are under them.
4: At the bottom of the glove box there should be a steel bar. Remove this. It is held in place with some more screws and a couple of bolts. Once removed, the glove box will pull out. May need to use a little force to get it out, but do not pull hard or it will break.
5: Now you will have access to the pass. side fuse box front and back as well as the multi-plex unit. Same on the drivers side. You will also want to pull the carpet out from the center console base on the pass. side to gain access to the ECU plugs
6: Remove the trim panel around the speedo cluster andthen unscrew the speedo cluster from the dash and tip forward. There is no need to fully remove it, you just need to have access to the wiring plugs on the back side.
Now for the really really fun part WIRING. Proceed with extreme caution. This will be a royal pain in the ***:
**There are 3 wires for the 5spd. VSS. The auto has an in-put and out-put speed sensor that each have 2 wires.**The Three wires are blue/white or blue. This is your signal wire. Black is ground, and black/yellow is 12volt ignition.
1: The first thing that needs to be done is source the 3 wire VSS plug with about 4-6� of good wiring on it. The coolers will be blue/white or blue (signal wire), black (ground), and black/yellow (12volt ignition). We will start with them in this order. ALL honda VSS harness connectors have the same pin locations. If your looking at the plug from the back side it will be from left to right black, black/yellow, and blue/white or blue. These can all be double checked with a multi-meter.
2: Locate the auto out-put speed sensor plug, it will have 2 wires, blue/white or blue and green, this will depend on the year and model. It may also be known as the countershaft speed sensor. The one your looking for right now is the blue/white or blue wire. Now that you have found this wire label it and go inside to the ECU. This wire is located in plug 16P and is a gray connector. I will be the one all the way to the right. Looking at the plug still in the ECU it will be in the middle row third wire in from the right. Remove the plug from the ECU with this wire located and check for continuity with the wire under the hood. It should have continuity. Label this wire at the ECU now too.
3:Now, with this wire located at the ECU in connector 16P you will need to re-pin this at the ECU. With a pick, and be very careful, pull on the white lock on top of the connector, it will only come up a little bit. With this lock up pull the wire out with a pair of needle nose pliers very carefully. It may take a good steady pull. The place it needs to go is in connector 31P, this will be blue and the third from the left. From the back side looking at the plug still in the ECU it will be on the bottom row all the way in the left corner. There should be no wire in there at this time. Once again pull up on the lock on top of the connector. Once the lock is up push the wire firmly in till it bottoms out, you may feel it kind of click in there. While your still pushing it in push the lock back down. There you have just re-pinned a connector.
4: That green wire that is on the sensor cut. Go back in side the car and locate the same connector 16p at the ECU, on the bottom row all the way to the right there should also be a green wire. With a multi-meter check for continuity between the green wire under the hood and the green wire at the ECU. If you have continuity, witch you should this will become your ground. Cut this wire at the ECU and add about 6-8� of wire to it. Put a crimp on eye connecter on it big enough to get a 10mm bolt through the hole. Take out the 10mm bolt holding the ECU down on that same side and ground the wire there. Label the other end under the hood.
5: Here�s were it gets tricky. Locate the pass side mutli-plex unit and fuse box. On the back side of the fuse box look for a green 18 pin connector. Sense theirs 2 look for the one that has white/black wire and a blank spot under the locking tab. The other one will have a blank spot and a white/red wire. You want the first plug. You want to find and label the blue/white wire in the corner. Now go to the front of the fuse panel and find the 18 pin green connector. There will be a blank spot and a blue/red wire under the lock tab. Un-plug this connector. With the multi-meter check for continuity between the blue/white wire on the back and pin in the fuse box where the blank spot was under the lock tab. There should be continuity. You need to add a wire here. Un-do the lock clip for this plug as you did with the ECU, be careful not to break it. I removed my a/c so I used the blue/red wire in the top corner. You will need to find a suitable wiring pin to put in this spot if your keeping the a/c. You will want at least 3-4� of good wire there. Now with some spare wiring solder a piece of extra wire about 7 feet long to this pin wire. Wrap in electrical tap and re-check to make sure you still have continuity. If you do plug the harness back in to the fuse box. Run the extra wire that you just soldered down to the ECU and splice it into the blue/white or blue wire you just re-pinned. I you ended up with to much wire just trim as needed.
6: The last wire you have to add is the black/yellow wire. On the drivers side fuse panel on the back side locate the green 18 pin connector. There are 3 of these you want the one with red/black and green/orange wires under the lock tab. With this located you want the black/yellow wire that is located just the other side of the red/black wire. Splice a section of wiring in this wire about 12� long. Its best to strip back a little bit of wire and solder the two together then cover with tape.
7: Now with you r multi-meter once again check for continuity between this wire and the #6 fuse on the front side of the fuse box. There should be continuity. If there is run this wire out the fire wall on the driver side through a factory grommet over to where the rest of the tranny wires are. Label this wire as needed.
8: Once again, starting to see a pattern. With your multi-meter check to make sure you have continuity from the black/yellow wire you just ran to the black/yellow wire in the speedo gauge cluster. It will be in the middle connector between a red and white/blue wire. There should be continuity. Then check the blue/white wire that is between a blank spot and blue wire on the lock tab side of the connector and the blue/white wire under the hood, yours may be blue under the hood. There should be continuity here too. And finaly check between the black wire and body ground. This should have continuity as well.
9: Still on the drivers side of the dash locate the black/white wire on the ignition switch harness. It will be in a brown plug and a fairly good size wire. The other wire you need is also a black/white wire. This will be located on the back side of the driver side fuse box. I will be in a green 7 pin connector. There will only be 4 wires it. You want the black/white wire. Cut both these wires and solder together.
10: Now locate the big plug under the hood on the tranny harness. Cut the big plug off. You will twist together the black, gray, and red wires together. DO NOT solder them together just yet.
11: Hook up the battery for a second and leave your auto ECU hooked up. See if the car will turn over just for a second. If it does solder these wires together and tape. If not then take the gray wire out of the group of wires and try again. It will start one of these two ways. After it turns over a couple of times dis-connect the battery again and continue.
12: With you VSS pig tail and plug solder the blue/white wire to the blue/white or blue wire in the engine bay, the green wire to the black wire and the yellow/black to the one you extended out to under the hood. Now plug the speed sensor in. I highly recommend a new one from the dealer I had 2 different used ones and they were both bad.
13: Re-install the battery and connect. With your multi-meter stick one end in the black wire and the other in the blue/white or blue wire. Turn the ignition switch on and spin the VSS drive gear. The multi-meter should bounce between roughly 5volts and 0volts when you spinning it. If it does congratulations your speedo will work.
14: Clean up all the wiring inside the car and re-install the dash pieces. Do not plug the tranny plug back in to the ECU. Under the hood tidy up the wiring and if you�d like cut off all the extra plugs and re-tap the harness. This will make for a cleaner looking engine bay.
15: Once all tidied up start the car and drive, now you can enjoy shifting you car instead of just sitting there and enjoying the ride like your passengers.
Back-up light wiring.
1: There are 2 wires for the revers light switch. One is yellow and the other one is light green/black. The yellow wire just nees to see power when the car is turned on. It can go to any fused ignition source.
2: The liht green/black wire needs to go inside the car. This will be pinned on the back side of the drivers fuse panel. You'll want to find the green 18 pin connector (connector K) with a yellow wire and a brown wire under the lock tab. Where the yellow wire goes it may be empty depending on your year and modle.
3: With this connector located on the top row where the lock is located at there will be an empty spot between an orange/white and green/blue wire. This is were the green/black wire goes from the revers switch. Its also called pin location #2.
4: Once both wires are hooked up turn the car to the on position, but DO NOT START IT and make sure theres no burning smell. If theres not then put the car in revers and go to the back and check to see if you have lights, you should. If they aren't on you did something wrong.
Last notes: I know there are some small details missing. But this was written fairly quick. I got sick of answering 10-15 e-mails a day about the same thing and count less PM�s. Let me know if there is something I missed and I can add or change it. If you want a parts list some one else can do that home work. Same with a tool list I�m not going to hold your hand through this swap. If you want me to do that I will come and install it for you. But you must pay all my expenses plus $200. Or if you want to bring the car to me you will save the expense, but it will still cost you $200. Good luck.
This will be edited as needed so stay tuned.
06-17-2006, 10:08 AM
#11
Working
From turbowa
This is how i hooked up the reverse...
The reverse sensor (backup switch) have a yellow cable and a green/black cable. The green/black cable from the switch goes to the white cable on the male end (which is also is white on the female side of the harness) of the AT shift selector cable. If you have the ETM, its Pin #9. The yellow cable is the power. Cross referencing from the Auto and the 5spd Diagram, the yellow cable should be connected to the yellow cable of the shift lock solenoid. The shift lock solenoid harness is actually a 2-pin harness that is located right next to the auto shifter assembly. Use one of those micro screw drivers to pop out the wires from the harness or you could just cut the cable free from the harness. Your choice. **Almost Done** Go to the driver's under-dase fuse/relay box. Look for the harness that is located on the back side of the fuse block and look for Harness "K". I provide a pic of it from the ETM book which is reference number 14 on the diagram. Pop out pin #11 (white cable) and relocate it to pin #2 (should be empty). And that should be it. Test it out.. and enjoy. **A little Disclaimer to cover my @ss... this post should be used just as a reference. So if you end up screwing yourself and others, that is your own fault.. not mine.**
Pics of the harness I used. I clipped it off of the Shift Selector which is attached to the AT tranny. I didnt feel like screwing around with the main harness in the car. If you look at the diagram in the background, its the pin outs for the harness itself. PS- this is the male end of the harness.

Pics of the male harness with a crimp at the end to the White cable for the reverse output and an extension for the yellow cable to go to the cabin for power provided by the yellow cable of the shift lock soldnoid harness.

Heres a diagram of the harness from the driver fuse/relay box. Remember, it's harness K thats need to be worked on, which is #14 on the diagram

I hope this helps for anyone that want to do this auto-5spd swap.
I do a write up on how to wire the cruise control in a couple of days. Thanks again to Turbowa!
This is how i hooked up the reverse...
The reverse sensor (backup switch) have a yellow cable and a green/black cable. The green/black cable from the switch goes to the white cable on the male end (which is also is white on the female side of the harness) of the AT shift selector cable. If you have the ETM, its Pin #9. The yellow cable is the power. Cross referencing from the Auto and the 5spd Diagram, the yellow cable should be connected to the yellow cable of the shift lock solenoid. The shift lock solenoid harness is actually a 2-pin harness that is located right next to the auto shifter assembly. Use one of those micro screw drivers to pop out the wires from the harness or you could just cut the cable free from the harness. Your choice. **Almost Done** Go to the driver's under-dase fuse/relay box. Look for the harness that is located on the back side of the fuse block and look for Harness "K". I provide a pic of it from the ETM book which is reference number 14 on the diagram. Pop out pin #11 (white cable) and relocate it to pin #2 (should be empty). And that should be it. Test it out.. and enjoy. **A little Disclaimer to cover my @ss... this post should be used just as a reference. So if you end up screwing yourself and others, that is your own fault.. not mine.**
Pics of the harness I used. I clipped it off of the Shift Selector which is attached to the AT tranny. I didnt feel like screwing around with the main harness in the car. If you look at the diagram in the background, its the pin outs for the harness itself. PS- this is the male end of the harness.
Pics of the male harness with a crimp at the end to the White cable for the reverse output and an extension for the yellow cable to go to the cabin for power provided by the yellow cable of the shift lock soldnoid harness.
Heres a diagram of the harness from the driver fuse/relay box. Remember, it's harness K thats need to be worked on, which is #14 on the diagram
I hope this helps for anyone that want to do this auto-5spd swap.
I do a write up on how to wire the cruise control in a couple of days. Thanks again to Turbowa!
06-17-2006, 10:11 AM
#12
Working
6th gen FAQ https://honda-tech.com/zero...age=1
5th gen FAQ https://honda-tech.com/zerothread?id=1527894
5th gen FAQ https://honda-tech.com/zerothread?id=1527894
09-21-2006, 11:18 AM
#13
Working
A good helper picture for new members. Be advised that the power steering resivoir is labeled as brake fluid and that is wrong. I did not create this image so it is what it is. Hope this does not confuse anyone.
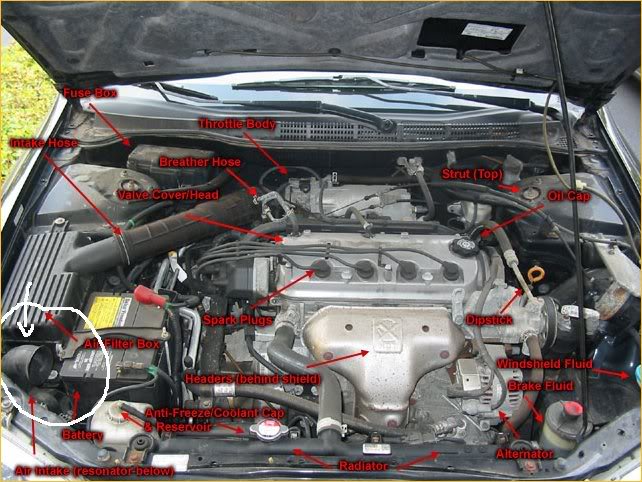
Last edited by -RedneckDave-; 02-20-2009 at 01:59 AM.
05-19-2007, 08:47 AM
#14
Working
02-11-2012, 06:12 AM
#15
Trial User

Join Date: Feb 2012
Posts: 1
Likes: 0
Received 0 Likes
on
0 Posts
BY: Iam7head
Due to popular demands, here is the guideline.
*car- 2002 accord 4cylinder(should work for all honda)
*what you need to know- your accord gen/year location of the srs service connector(MES or something)
*tools- paperclip, flashlight
The MES connector is located in the backside of the hood release latch for 6th gen accord.
The SRS connector's evil twin brother. The real deal is the one I am pointing at, the one that harder to reach. They both have the similar color of wires coming out so don't be fooled.
Another view
Insert paperclip
**************************************

Thread
Thread Starter
Forum
Replies
Last Post
Project_ED8
Honda Civic / Del Sol (1992 - 2000)
1
08-10-2007 06:05 PM
Aron Parsons
Honda CRX / EF Civic (1988 - 1991)
1
10-09-2002 01:04 PM

