
[FAQ] DIY How-To: Install Civic 92-95 Amber/Red Dash Lighting (56k no no)
 10-27-2003, 09:25 PM
#1
Risky Business
Thread Starter
Join Date: Jul 2002
Location: Trackside with the smoking bee
Posts: 25,211
Likes: 0
Received 47 Likes
on
39 Posts
Welcome to my 3rd write-up, How-To Install Amber/Red Dash Lighting on 92-95 Civics!
I originally got the idea from AztecEJ (original thread is here: https://honda-tech.com/zerothread?id=304289 ). I was getting tired of my ricey white gauge faces and white climate control, so I figured, why the hell not…lets give it a shot. I got new cluster and climate control bulbs and painted them EXACTLY how AztecEJ said to. It turned out really REALLY good and I am extremely pleased with the results. MAKE SURE YOU USE NEW BULBS. I painted the stock bulbs the first time, and my dash was so dim I could barely see it. Make sure you use all new bulbs when you do this! Because I love sharing my knowledge, I documented everything and now have a step-by-step writeup for j00! Lets get going!
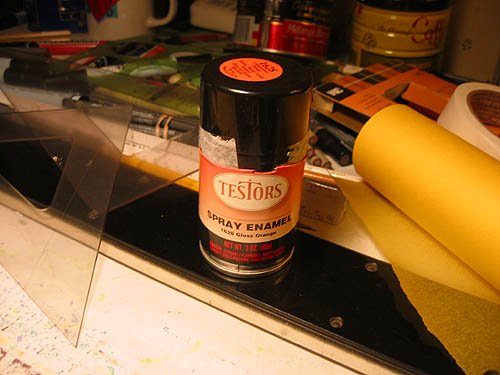
First thing, you need to go to Michael’s or wherever and pick up a can of Testors Competition Orange #1628(spray can works best):
You also need to go to your local pep boys and get five #24 automotive bulbs (they come in 2-pack, so you’ll get six) and also three #74 bulbs. The cluster takes five #24’s and one #74, and the climate control takes two #74’s. Take a piece of scotch tape and wrap it around the bottom to make sure you don’t get any paint on the connectors. I used several coats, but you can use as many or as few as you want. I let them dry overnight, to make sure that they were nice and dry.

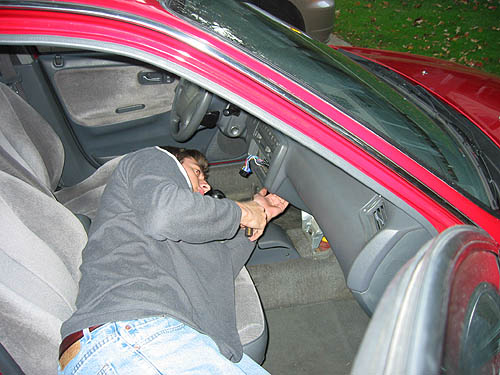
Okay, now that your bulbs are drying/dried…we can start ripping the dash apart.
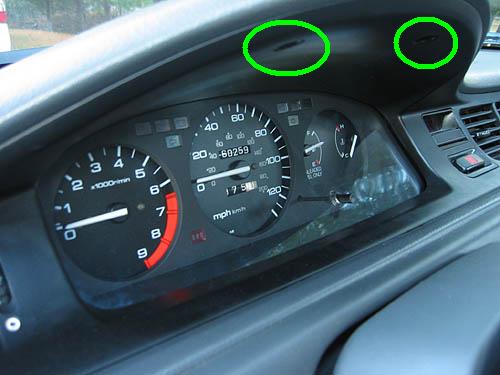
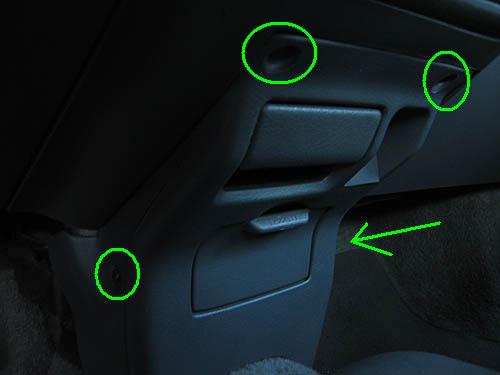
First, take these two screws out:
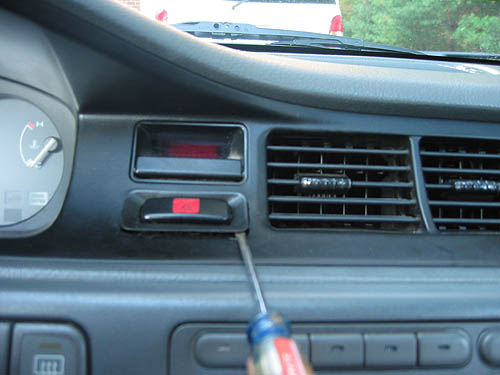
Then, pop your hazard switch out:
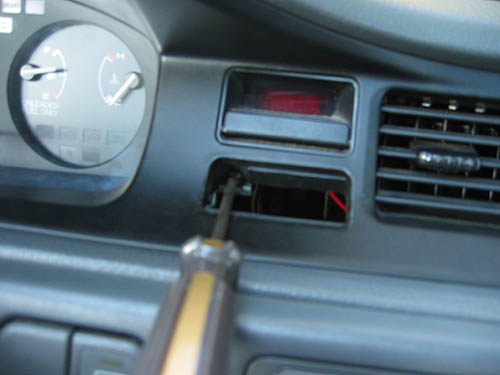
Make sure you pull this plug out:

There is a screw behind there:
Then, gently pry away at the trim piece, there are about six or seven clips holding it in. Pull on it until it comes out, don’t worry if you break any of the clips, all of mine are gone Make sure you don’t forget the plug behind the clock:

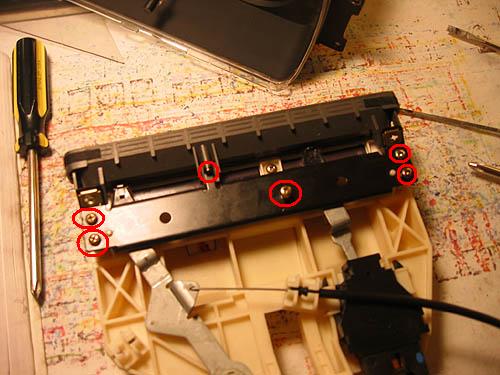
Now we gotta remove the gauge cluster. There are two screws, here:
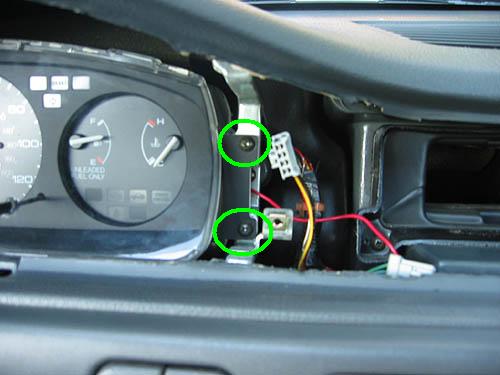
And here:
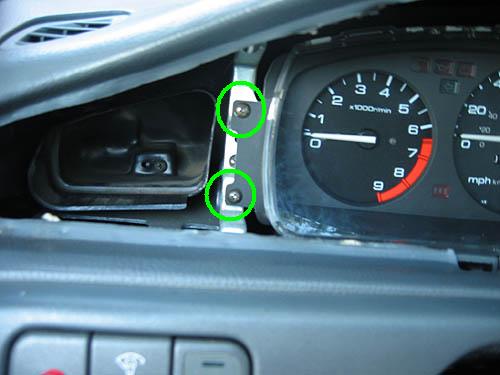
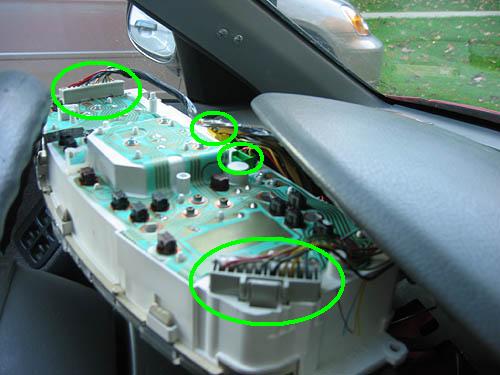
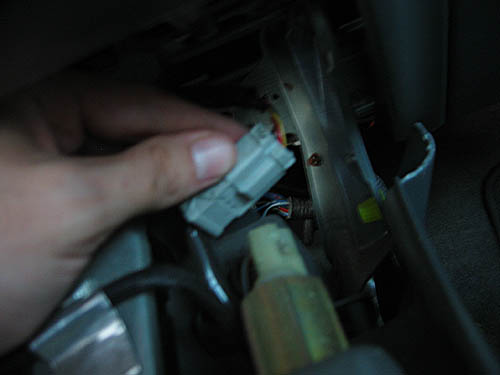
Once you pop the screws out, turn the gauge cluster face down and jiggle it around until it comes out. Once you get it out, there are four plugs on the back:
Okay, the cluster is out. Now its time for the climate control. There are four screws for the lower dash console:
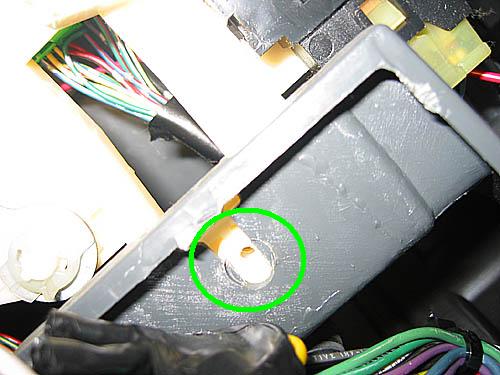
When you pull it out, don’t forget the plug for the cigarette lighter:
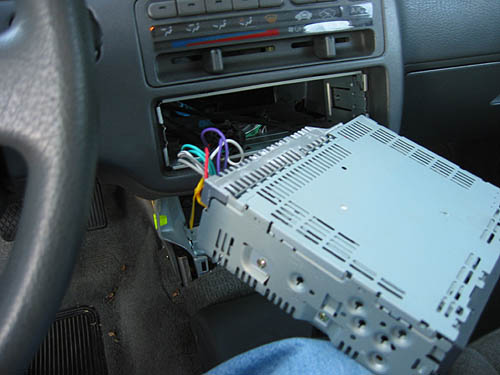
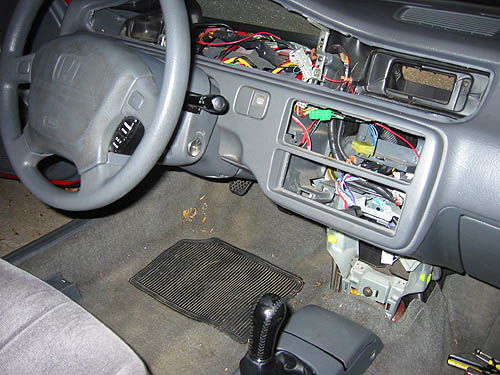
Once you get that out, you’ll have easy access to your radio. Every radio is different, but mine just kinda slid out if you pushed on it from the back:
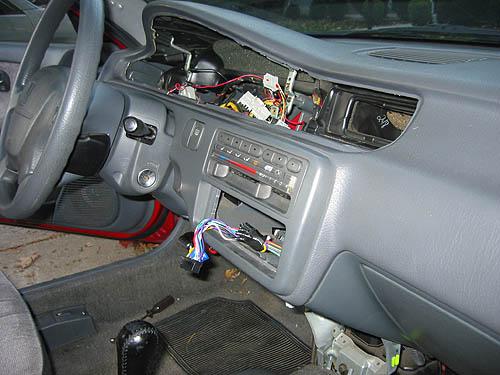
Look ma, no cluster or radio:
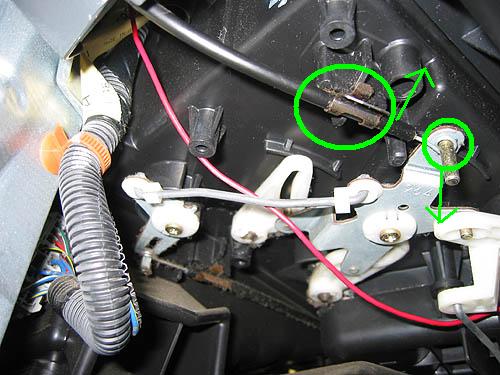
Now its time to get going with the climate control. First thing you do is take the heater control cable off the bracket, and then off of the heater control mechanism (all located under the dashboard near the glovebox on the passenger side):
Here’s me workin hard (or hardly workin)
Okay, now to get to the climate control, there are three screws. Two underneath the front of it:

And then one on the bottom in the center:
Once you get the three screws out, pull the climate control out. There are two connectors on the back that are a bitch to get to, but just keep ****ing with them and you’ll get it. The locking clips are on the bottom. Now your EG should look like it just got recovered from a theft:
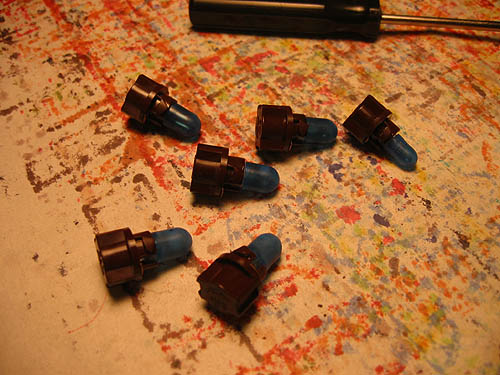
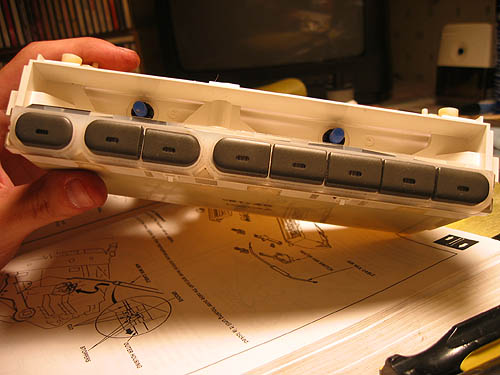
Now…lets put the bulbs in. For the cluster, there are five #24’s (in blue), and one #74 (in red).
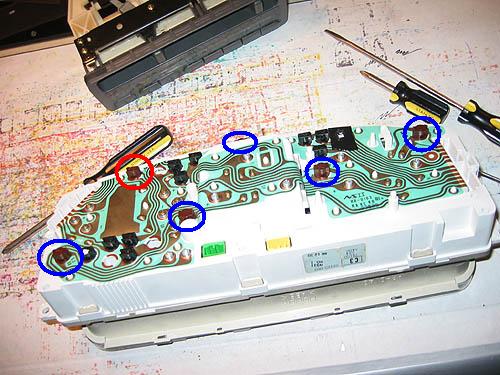
Here are what the cluster bulbs look like when taken out:
Get rid of those things!
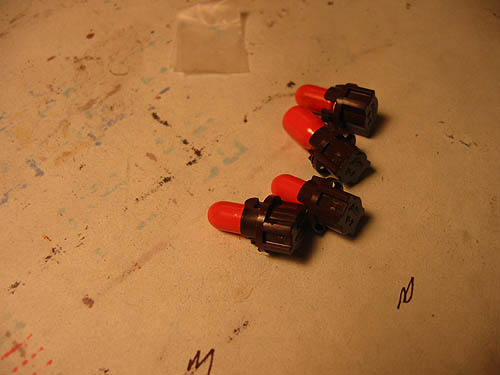
In with the amber!
Now for the climate control. First, unhook the faceplate by pulling the tabs off:

Then there are a few screws. You need to unhook the buttons from the heater cable and blower control unit as well for the faceplate to come off:
Once you get the faceplate off, here are the two bulbs you need to replace (both #74’s):
Installation is reverse of disassembly. Just read from the bottom up A few things to note, the #74’s are a bit too big for their sockets, but if you shove them into the sockets, they work just fine  Also, when I put my climate control back in, I only used the bottom center screw, because the other two are a bitch to get to and I didn’t feel like ever dealing with them again <IMG NAME="icon" SRC="https://honda-tech.com/forums/images/smilies/mad.gif" BORDER="0">
OKAY…time for the RESULTS!!!
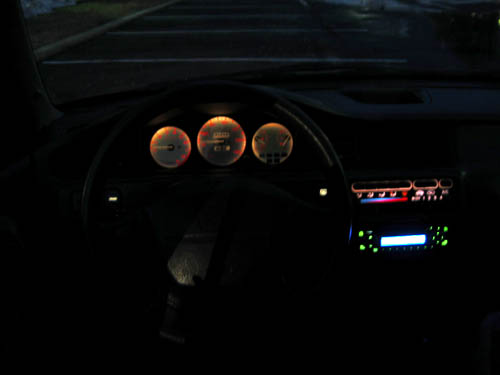
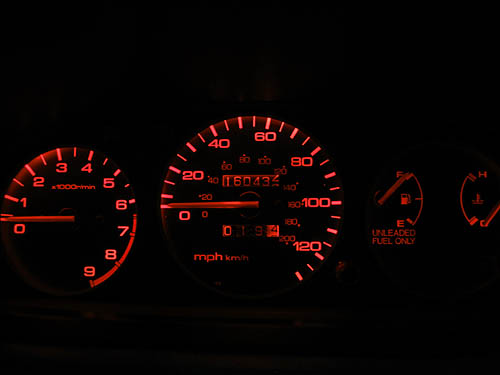
Here was my old setup, ractive white gauge faces with stock climate control:
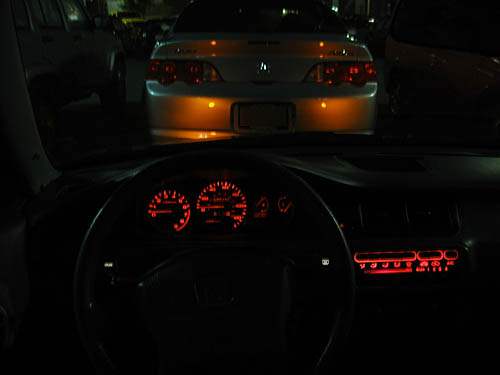
:Drumroll Please: TAA DAA! The new Hotness is in!
Climate control, check:
Stock cluster:
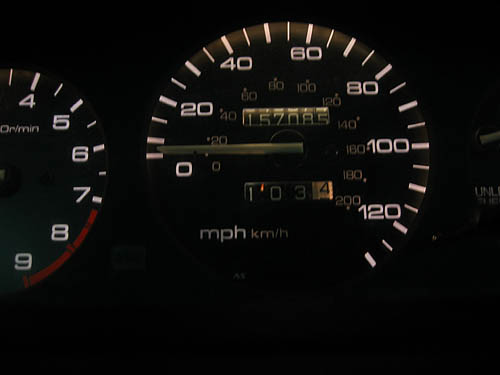
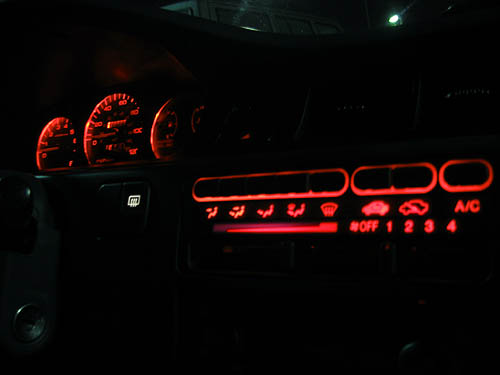
New Cluster:
The color came out to be a dark orange/red color just like AztecEJ said…I love it! Looks much better than the pale yellow/orange that the JDM cluster gives. Make sure you use all new bulbs when you do this! Don’t want you guys to be unhappy with the results as I was the first time. Hope you all enjoyed it! Hopefully it will inspire and help others, just as it inspired me
I originally got the idea from AztecEJ (original thread is here: https://honda-tech.com/zerothread?id=304289 ). I was getting tired of my ricey white gauge faces and white climate control, so I figured, why the hell not…lets give it a shot. I got new cluster and climate control bulbs and painted them EXACTLY how AztecEJ said to. It turned out really REALLY good and I am extremely pleased with the results. MAKE SURE YOU USE NEW BULBS. I painted the stock bulbs the first time, and my dash was so dim I could barely see it. Make sure you use all new bulbs when you do this! Because I love sharing my knowledge, I documented everything and now have a step-by-step writeup for j00! Lets get going!
First thing, you need to go to Michael’s or wherever and pick up a can of Testors Competition Orange #1628(spray can works best):
You also need to go to your local pep boys and get five #24 automotive bulbs (they come in 2-pack, so you’ll get six) and also three #74 bulbs. The cluster takes five #24’s and one #74, and the climate control takes two #74’s. Take a piece of scotch tape and wrap it around the bottom to make sure you don’t get any paint on the connectors. I used several coats, but you can use as many or as few as you want. I let them dry overnight, to make sure that they were nice and dry.
Okay, now that your bulbs are drying/dried…we can start ripping the dash apart.
First, take these two screws out:
Then, pop your hazard switch out:
Make sure you pull this plug out:
There is a screw behind there:
Then, gently pry away at the trim piece, there are about six or seven clips holding it in. Pull on it until it comes out, don’t worry if you break any of the clips, all of mine are gone
Make sure you don’t forget the plug behind the clock:Now we gotta remove the gauge cluster. There are two screws, here:
And here:
Once you pop the screws out, turn the gauge cluster face down and jiggle it around until it comes out. Once you get it out, there are four plugs on the back:
Okay, the cluster is out. Now its time for the climate control. There are four screws for the lower dash console:
When you pull it out, don’t forget the plug for the cigarette lighter:
Once you get that out, you’ll have easy access to your radio. Every radio is different, but mine just kinda slid out if you pushed on it from the back:
Look ma, no cluster or radio:
Now its time to get going with the climate control. First thing you do is take the heater control cable off the bracket, and then off of the heater control mechanism (all located under the dashboard near the glovebox on the passenger side):
Here’s me workin hard (or hardly workin)
Okay, now to get to the climate control, there are three screws. Two underneath the front of it:
And then one on the bottom in the center:
Once you get the three screws out, pull the climate control out. There are two connectors on the back that are a bitch to get to, but just keep ****ing with them and you’ll get it. The locking clips are on the bottom. Now your EG should look like it just got recovered from a theft:
Now…lets put the bulbs in. For the cluster, there are five #24’s (in blue), and one #74 (in red).
Here are what the cluster bulbs look like when taken out:
Get rid of those things!
In with the amber!
Now for the climate control. First, unhook the faceplate by pulling the tabs off:
Then there are a few screws. You need to unhook the buttons from the heater cable and blower control unit as well for the faceplate to come off:
Once you get the faceplate off, here are the two bulbs you need to replace (both #74’s):
Installation is reverse of disassembly. Just read from the bottom up
A few things to note, the #74’s are a bit too big for their sockets, but if you shove them into the sockets, they work just fine Also, when I put my climate control back in, I only used the bottom center screw, because the other two are a bitch to get to and I didn’t feel like ever dealing with them again <IMG NAME="icon" SRC="https://honda-tech.com/forums/images/smilies/mad.gif" BORDER="0">OKAY…time for the RESULTS!!!
Here was my old setup, ractive white gauge faces with stock climate control:
:Drumroll Please: TAA DAA! The new Hotness is in!
Climate control, check:
Stock cluster:
New Cluster:
The color came out to be a dark orange/red color just like AztecEJ said…I love it! Looks much better than the pale yellow/orange that the JDM cluster gives. Make sure you use all new bulbs when you do this! Don’t want you guys to be unhappy with the results as I was the first time. Hope you all enjoyed it! Hopefully it will inspire and help others, just as it inspired me
Last edited by BauleyCivic; 05-18-2010 at 07:30 PM.
 10-27-2003, 09:35 PM
#2
Join Date: Feb 2002
Location: BC/WA, USA
Posts: 422
Likes: 0
Received 0 Likes
on
0 Posts
Good write-up, looks good! There's a guy on here that painted the clear ring around the gauges flat black so that the cluster was all back-lit instead of light shining on the faces...looked even better.
10-27-2003, 10:16 PM
#5
Junior Member
Join Date: Sep 2002
Location: Fremont, ca, usa
Posts: 137
Likes: 0
Received 0 Likes
on
0 Posts
Thats excellent. Looks great Is there just amber bulbs that you could use instead of painting those?
Is there just amber bulbs that you could use instead of painting those?
10-27-2003, 10:17 PM
#6
Risky Business
Thread Starter
Join Date: Jul 2002
Location: Trackside with the smoking bee
Posts: 25,211
Likes: 0
Received 47 Likes
on
39 Posts
Yes, but they come out a faint yellowish color, I liked the dark amber I saw on aztecej's car and decided to go with what he did But yes, there are amber #24 bulbs available that you can buy and use...many people have done it. I didn't see any amber #24 bulbs at all at the two advance auto parts stores I went to.
But yes, there are amber #24 bulbs available that you can buy and use...many people have done it. I didn't see any amber #24 bulbs at all at the two advance auto parts stores I went to.
Trending Topics
10-27-2003, 10:31 PM
#9
Risky Business
Thread Starter
Join Date: Jul 2002
Location: Trackside with the smoking bee
Posts: 25,211
Likes: 0
Received 47 Likes
on
39 Posts
<TABLE WIDTH="90%" CELLSPACING=0 CELLPADDING=0 ALIGN=CENTER><TR><TD>Quote, originally posted by GReddy SI »</TD></TR><TR><TD CLASS="quote">very nice ,, did u do the clock also?
</TD></TR></TABLE>
Nope. To do the amber clock, you need this transparent orange film that NO ONE around here carries (How to amber clock: http://www.geocities.com/mt3c/....html ). I mean I tried EVERYONE. Michaels, Jo Ann, Staples, Target, Kinkos...no one. If I ever get my hands on some i'll be sure to do it...otherwise for now i'm gonna stick with the stock one...and later i'll DIY amber or buy the JDM amber clock.
<TABLE WIDTH="90%" CELLSPACING=0 CELLPADDING=0 ALIGN=CENTER><TR><TD>Quote, originally posted by SikCivic »</TD></TR><TR><TD CLASS="quote">can u do it in blue on a EK?
</TD></TR></TABLE>
Why do you keep asking this? Yes you can...you paint the ******* bulbs blue instead of orange
Read this: http://www.jdmuniverse.com/for...01542
</TD></TR></TABLE>
Nope. To do the amber clock, you need this transparent orange film that NO ONE around here carries (How to amber clock: http://www.geocities.com/mt3c/....html ). I mean I tried EVERYONE. Michaels, Jo Ann, Staples, Target, Kinkos...no one. If I ever get my hands on some i'll be sure to do it...otherwise for now i'm gonna stick with the stock one...and later i'll DIY amber or buy the JDM amber clock.
<TABLE WIDTH="90%" CELLSPACING=0 CELLPADDING=0 ALIGN=CENTER><TR><TD>Quote, originally posted by SikCivic »</TD></TR><TR><TD CLASS="quote">can u do it in blue on a EK?
</TD></TR></TABLE>
Why do you keep asking this? Yes you can...you paint the ******* bulbs blue instead of orange
Read this: http://www.jdmuniverse.com/for...01542
 10-27-2003, 10:59 PM
#12
Honda-Tech Member
Join Date: Oct 2003
Location: city by the bay
Posts: 9,460
Likes: 0
Received 0 Likes
on
0 Posts
All of this, just to make your cluster/climate control light up orange..
IMO waste of time.
IMO waste of time.
10-27-2003, 11:05 PM
#14
Risky Business
Thread Starter
Join Date: Jul 2002
Location: Trackside with the smoking bee
Posts: 25,211
Likes: 0
Received 47 Likes
on
39 Posts
<TABLE WIDTH="90%" CELLSPACING=0 CELLPADDING=0 ALIGN=CENTER><TR><TD>Quote, originally posted by GoT HaTcH »</TD></TR><TR><TD CLASS="quote">i did it and my climate control wont light up.. i wonder why  </TD></TR></TABLE>
Make sure you check all the plugs in the back, I forgot one when i was putting it back together and had to disassemble the entire thing again. Otherwise, make sure the bulbs are pressed firmly into the sockets.
</TD></TR></TABLE>Make sure you check all the plugs in the back, I forgot one when i was putting it back together and had to disassemble the entire thing again. Otherwise, make sure the bulbs are pressed firmly into the sockets.
10-28-2003, 01:00 AM
#17
Honda-Tech Member
Join Date: Jan 2002
Location: Jessica Beale AFB, Califas...
Posts: 2,278
Likes: 0
Received 0 Likes
on
0 Posts
Totally Hott write-up........Your cluster came out so much better than using autozone amber bulbs, gonna do some painting this weekend !!!
10-28-2003, 05:47 AM
#20
Junior Member
Join Date: Aug 2003
Location: ph0tec y0
Posts: 204
Likes: 0
Received 0 Likes
on
0 Posts
I did this like a year ago when AztecEJ first posted it. After a few months the paint starting cracking off and it looked a little burnt and needed to be redone.
10-28-2003, 05:56 AM
#22
Honda-Tech Member
Join Date: Jan 2002
Location: Raleigh, NC
Posts: 15,334
Likes: 0
Received 0 Likes
on
0 Posts
<TABLE WIDTH="90%" CELLSPACING=0 CELLPADDING=0 ALIGN=CENTER><TR><TD>Quote, originally posted by SikCivic »</TD></TR><TR><TD CLASS="quote">nice job can u do this in a EK with blue?</TD></TR></TABLE>
Yup. I just did mine a week or so ago. The ideas are the same, even down to the 2 bulbs in the climate control. Just be careful not to turn the bulbs on too quickly or have anything on them or the paint won't stick. I used actual red paint and it comes out very very amber. If you have any ?s feel free to PM me!
Yup. I just did mine a week or so ago. The ideas are the same, even down to the 2 bulbs in the climate control. Just be careful not to turn the bulbs on too quickly or have anything on them or the paint won't stick. I used actual red paint and it comes out very very amber. If you have any ?s feel free to PM me!
10-28-2003, 06:05 AM
#23
Honda-Tech Member
Join Date: Jan 2002
Location: Raleigh, NC
Posts: 15,334
Likes: 0
Received 0 Likes
on
0 Posts
<TABLE WIDTH="90%" CELLSPACING=0 CELLPADDING=0 ALIGN=CENTER><TR><TD>Quote, originally posted by SOHC_MShue »</TD></TR><TR><TD CLASS="quote">anyone have links on how to do this on a 96-98 civic gauge cluster?</TD></TR></TABLE>
Just pop out the 2 screws in the surround, pull the surround out (there are some clips at the bottom). From there there are 4 screws holding the cluster in, take those out and then take out the plugs. Just pull all of the bulbs in the back of the cluster that have the blue condom things on them and repaint them. I forgot the top 2 in the cluster the first time, so watch out for those. As for the climate control and rear defroster/hazzard switch you have to take out the glovebox, drivers side lower panel where your knees hit (don't know what it's called), and the lower panel where the cig. lighter is. From there, pry out the hazzard and the defroster panels and remove the screws from behind them. Pull out the 2 screws on the bottom of the center panel that houses the radio/climate control from under the dash (under the panel where the cig lighter is.) Pull out the plugs to the climate control and slide the whole assembly (surround and all) out some. There are 4 screws used to hold the climate control in, so remove them and then take out the climate control. Take it apart like BauleyCivic said, or just remove the bulbs from the back if you don't want to do that, paint them and reinstall the whole thing. Sorry for the lack of pics, but I already did it and am not pulling the dash back apart.
Just pop out the 2 screws in the surround, pull the surround out (there are some clips at the bottom). From there there are 4 screws holding the cluster in, take those out and then take out the plugs. Just pull all of the bulbs in the back of the cluster that have the blue condom things on them and repaint them. I forgot the top 2 in the cluster the first time, so watch out for those. As for the climate control and rear defroster/hazzard switch you have to take out the glovebox, drivers side lower panel where your knees hit (don't know what it's called), and the lower panel where the cig. lighter is. From there, pry out the hazzard and the defroster panels and remove the screws from behind them. Pull out the 2 screws on the bottom of the center panel that houses the radio/climate control from under the dash (under the panel where the cig lighter is.) Pull out the plugs to the climate control and slide the whole assembly (surround and all) out some. There are 4 screws used to hold the climate control in, so remove them and then take out the climate control. Take it apart like BauleyCivic said, or just remove the bulbs from the back if you don't want to do that, paint them and reinstall the whole thing.
Sorry for the lack of pics, but I already did it and am not pulling the dash back apart.
10-28-2003, 06:06 AM
#24
Member
Join Date: Oct 2002
Location: CHEESE BALL, USA
Posts: 2,236
Likes: 0
Received 0 Likes
on
0 Posts
anyone ever tell you that you look like Samuel 'screech' Powers? haha J/P
anyways....that paint you used for the little bulbs how many coats of paint did you put on the light also you painted both sides right? because on you picture you only have one side painted.....also would the paint be transparend enough to have light shine through a corner light or a tail light???
thanks..
10-28-2003, 06:10 AM
#25
Honda-Tech Member
Join Date: Jan 2002
Location: Raleigh, NC
Posts: 15,334
Likes: 0
Received 0 Likes
on
0 Posts
I did 1 good coat on mine. Do both sides or one side of the cluster will be lighter than the other.

