

 03-25-2015, 10:40 AM
Last edit by: IB Advertising
See related guides and technical advice from our community experts:
Browse all: Engine and Powertrain
- Honda Accord: How to replace radiator
Step by step instructions for do-it-yourself repairs.
Browse all: Engine and Powertrain

5th Gen Radiator and thermostat install and how-to
05-25-2009, 08:25 PM
#1
Honda-Tech Member
Thread Starter
Join Date: Jan 2003
Posts: 78
Likes: 0
Received 0 Likes
on
0 Posts
Hey everyone,
Made a how to on how to install a radiator and thermostat on my 95 Accord LX 5spd. But this how to should work for all 5th gen 5spd's and there are some minor difference's for auto's. So let's get to it, first though I AM IN NO WAY RESPONSIBLE FOR WHAT HAPPENS TO YOUR CAR, INSTALL AT YOUR OWN RISK!!
in case you guys are too lazy to read the whole thing, i've narrated it and put it on youtube.
Tools:
Socket wrench, extension, wobble joint would be helpful and 10, 12mm sockets
Pliers
12mm box wrench
Parts:
Radiator (preferably Denso stock radiator)
Upper and lower hoses
2 gallons radiator fluid
Stock thermostat
4 hose clamps (I'm a fan of the screw tight ones from the parts shop rather than the stock auto tightening ones).
First, don't ever buy Visteon products! They are a subsidiary of Ford and I was dumb enough to buy one of their radiators from a local parts shop. It didn't even last 30k! So this time, of course went with the stock Denso radiator.
The hardware...

1. Start by removing the intake tube and filter. I'm assuming you know how to do this and I didn't take any pics.
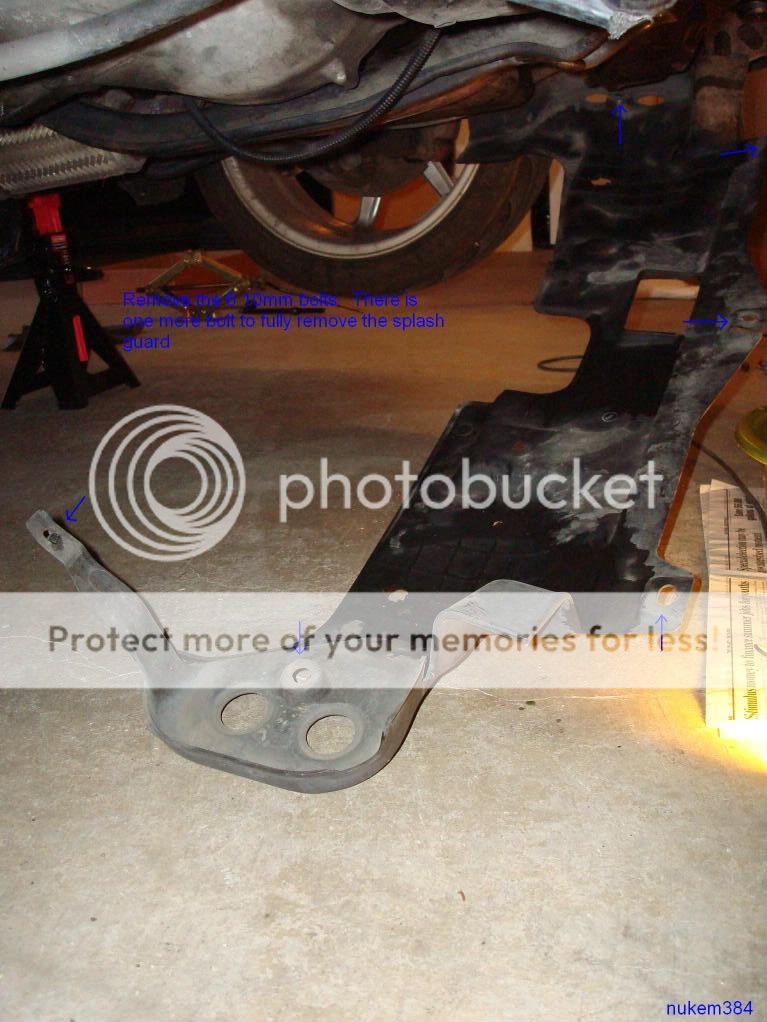
2. Remove the splash guard from under the car. There are 6 10mm bolts to get the guard mostly out of the way to do your work. If you want, you can remove the last 10mm bolt to completely remove the splash guard, in the pics, it would be on the driver side.
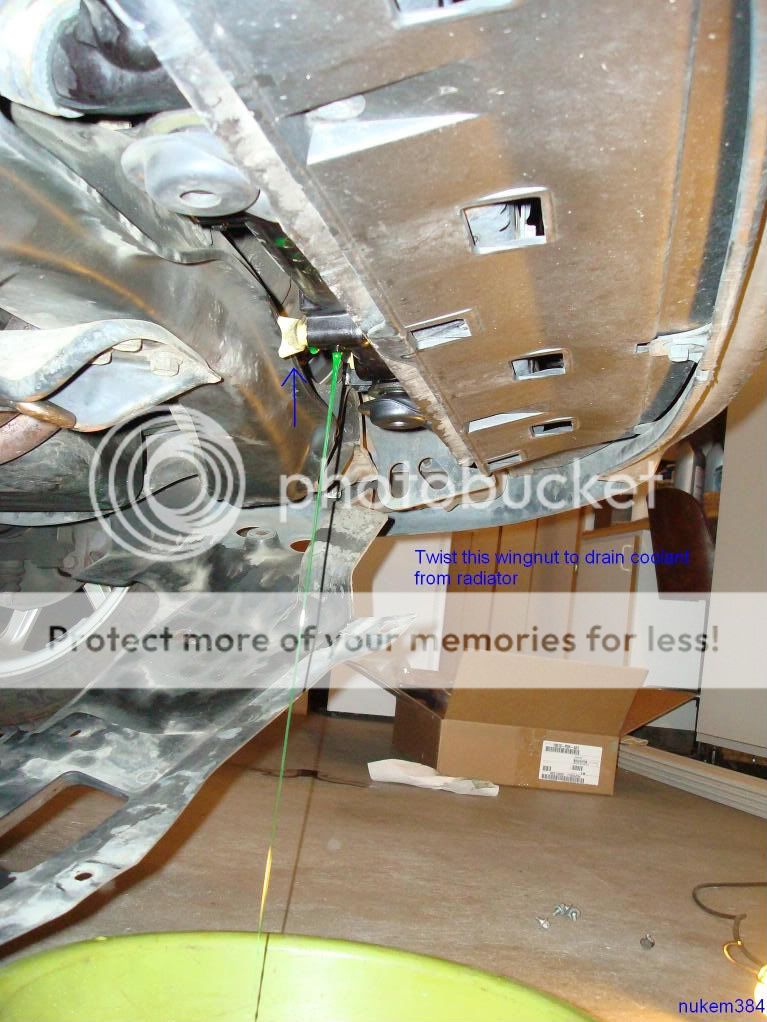
3. Drain the radiator fluid. Turn the white wingnut counterclockwise and be ready for the coolant to pour out. Sometimes, like in the case of my new radiator, the wingnut is black.
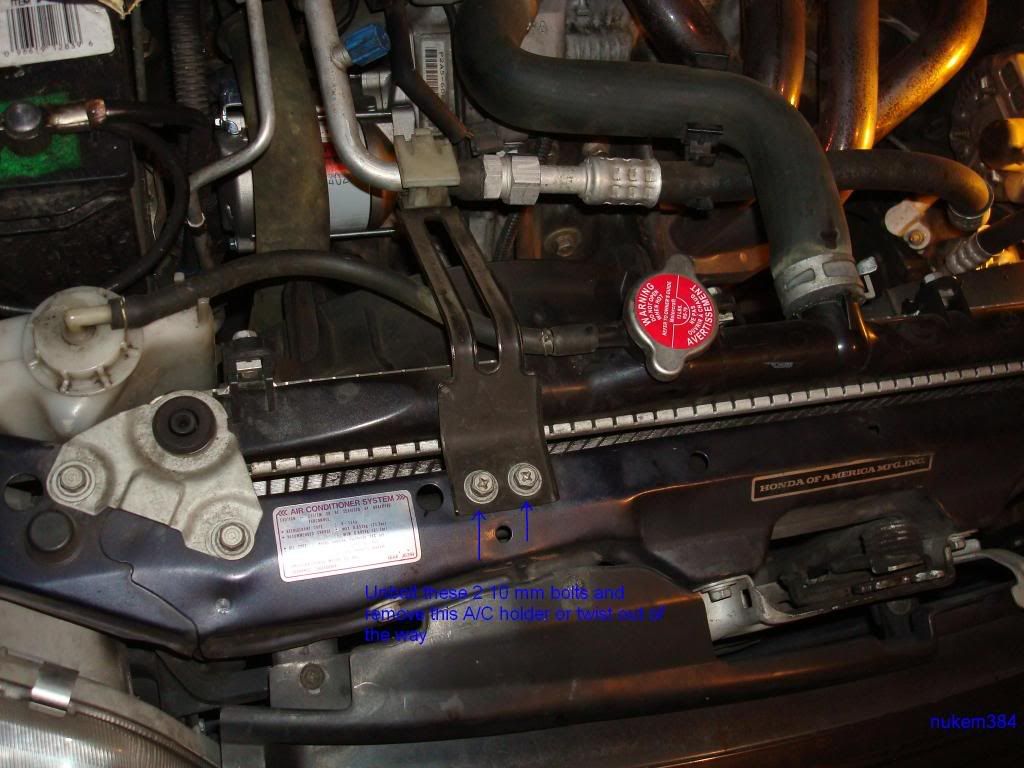
4. Remove the 2 10mm bolts that hold the A/C bracket in place. Move it out of the way or remove.
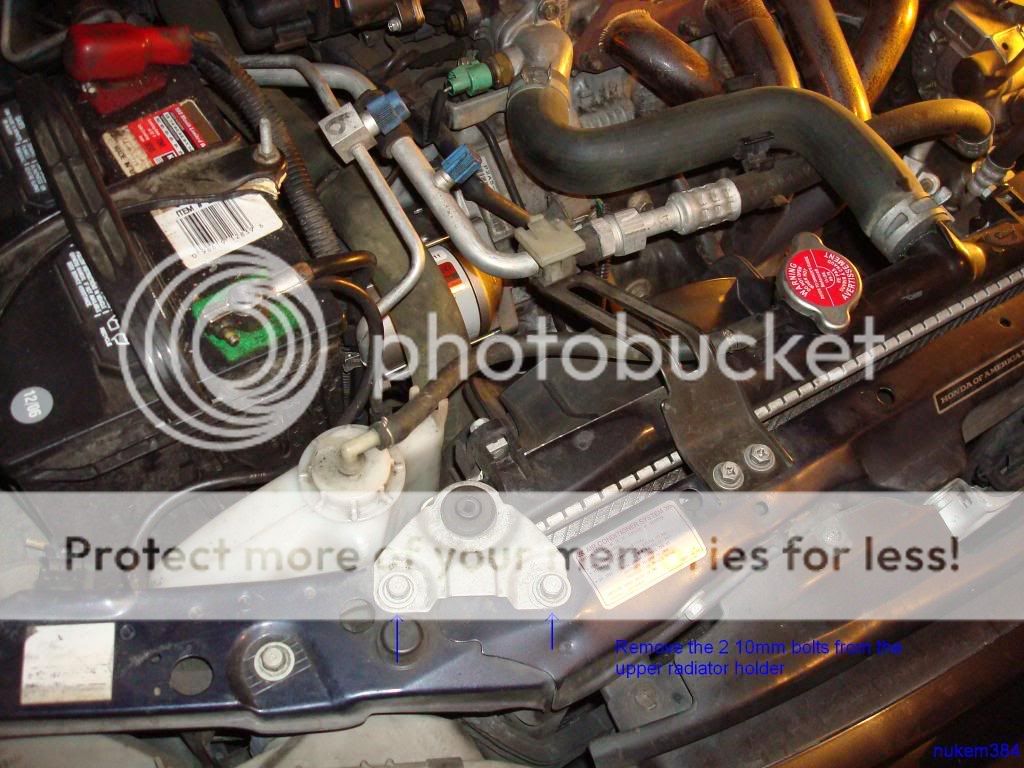
5. Remove the 2 10mm bolts that hold the upper radiator holder in place. Repeat on other side of car.
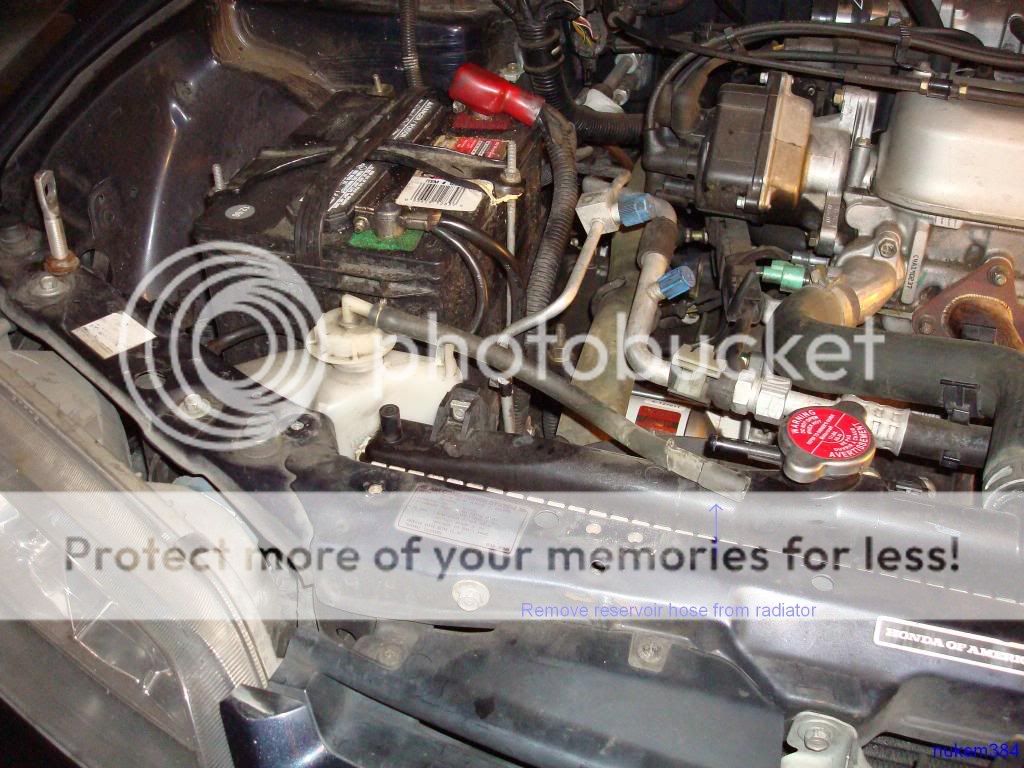
6. Remove the hose that connects the reservoir to the radiator. Remove reservoir from the car.
7. Remove the upper radiator hose from the radiator. Use your pliers and wiggle the clamp back until it is totally off the neck of the radiator. You should do this to the other side that's connected to the engine if you are replacing your hoses.

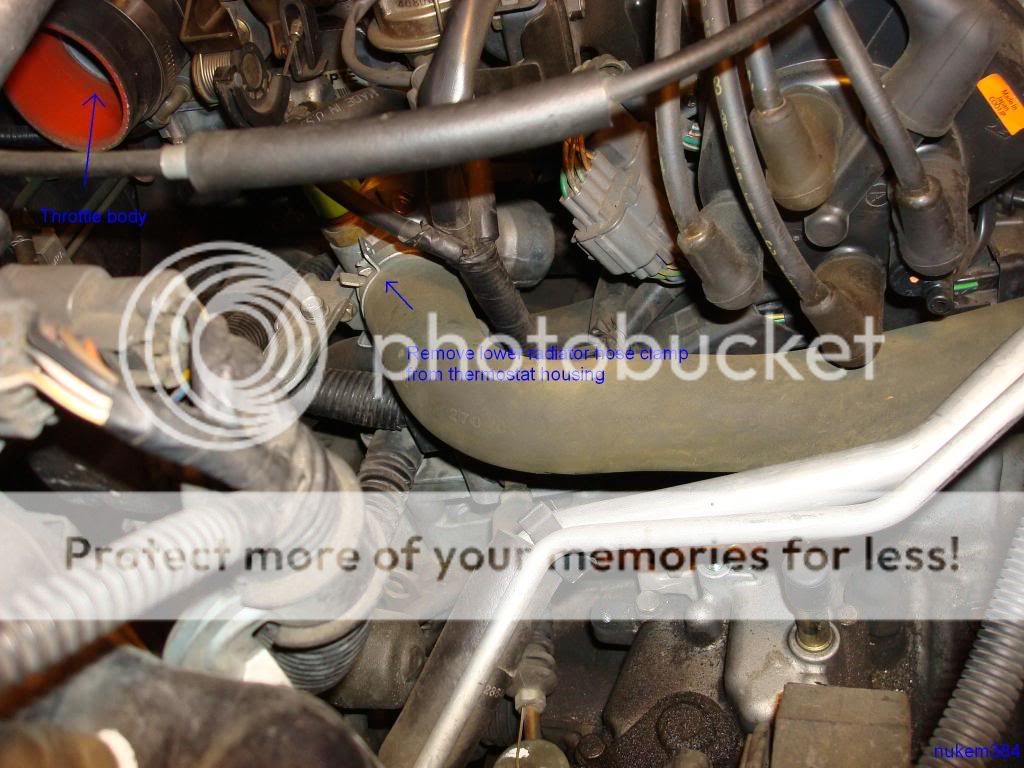
8. Remove the lower radiator hose that's connected to the thermostat housing the same way you did for the upper hose. You can take the hose off the radiator side now if you want, I just left it and dealt with it after I got the radiator out of the car. Just have to snake the hose past the A/C lines and you should be good to go.
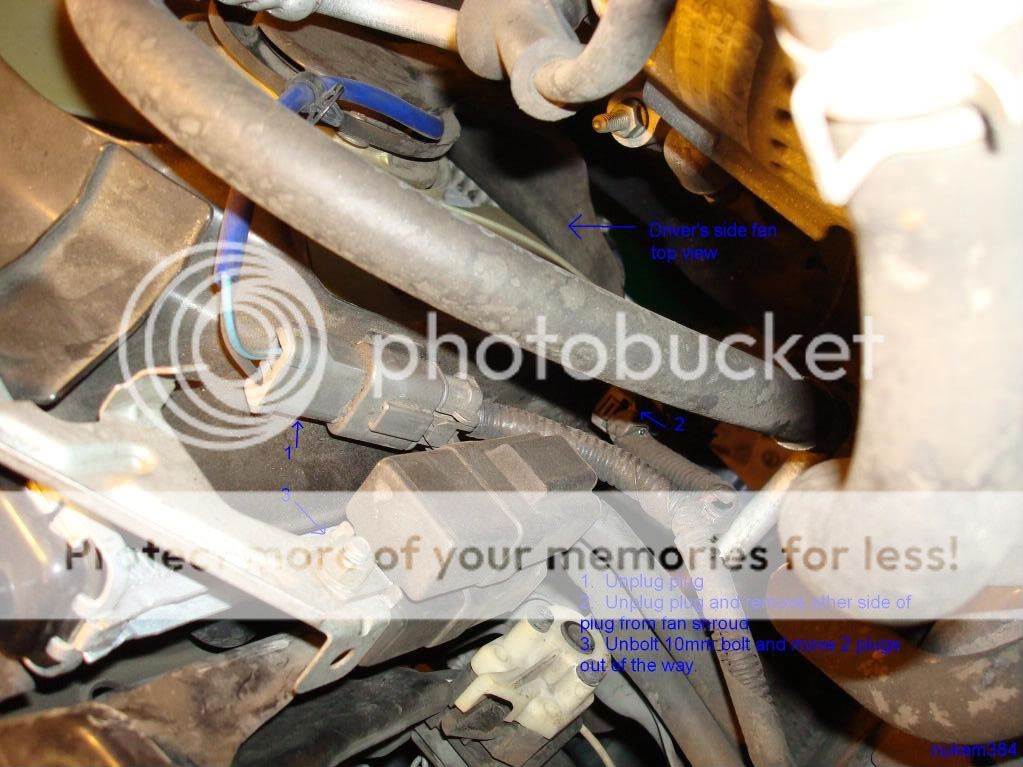
9. Once you've removed the hoses, start unplugging things. I unplugged the driver side plugs first. 2 plugs and 1 bolt to remove.
10. Then remove the passenger side plug from under the car.

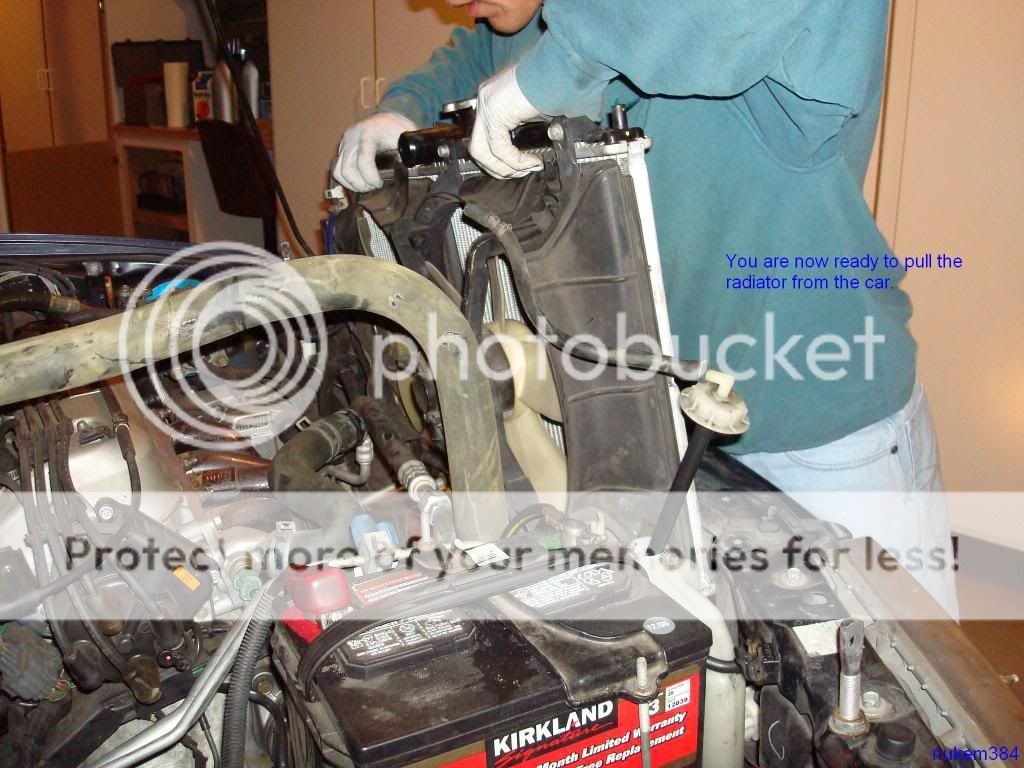
11. You're now ready to remove the radiator from the car. Note: If you have an auto, you will need to remove the 2 tranny fluid lines as well. They are located on the bottom of the radiator. I would assume they have the same type of hose clamps as everywhere else. Wiggle the radiator past the A/C lines. If you don't want to take the fans out too, you can remove the bolts now and leave the fans in the engine bay. I have a pic of where the bolts are later.
12. Now would be the time to install your thermostat. I don't have any pics cause I just changed it 30k ago when my first stock radiator broke. So remove the 2 I think 12mm bolts that hold the thermostat housing in place. On the left side of the pic, you need to remove those other 2 bolts, I think 10mm? to get to the thermostat housing bolt under there. A wobble joint would be helpful here. Place the new rubber gasket over the thermostat. There should be a little cut out section, this should be over the pin on the thermostat. Make sure the pin is straight up when re-installing. Take a look at what the thermostat looks like in the housing and mimic with the new one.

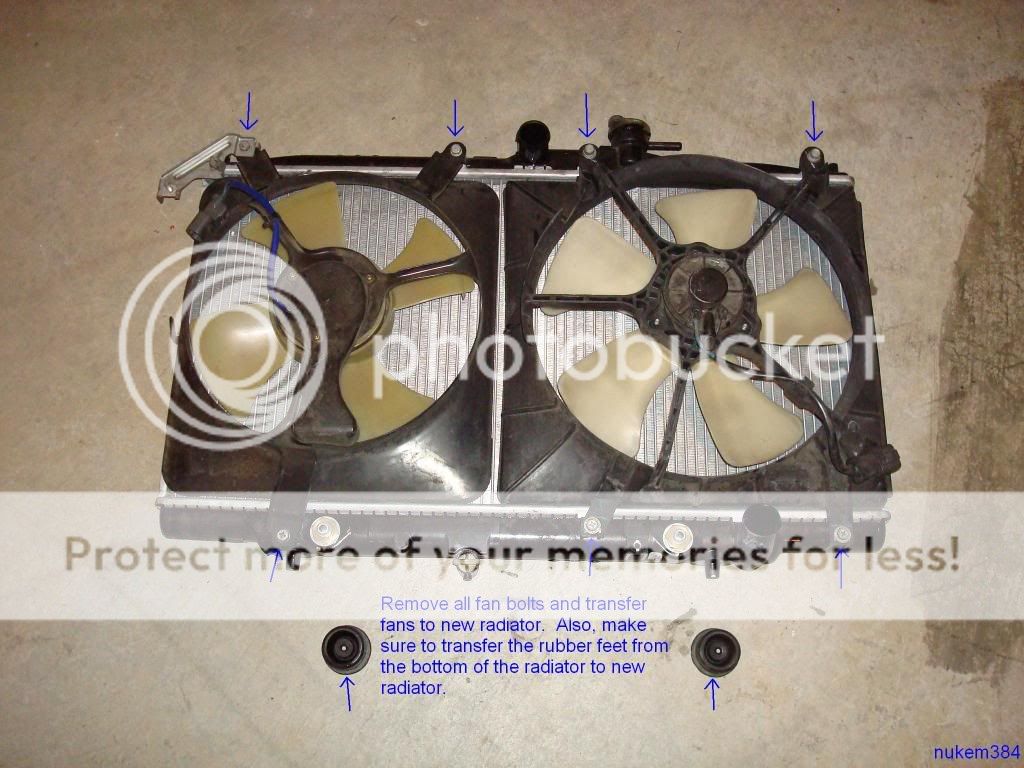
13. Radiator is out! Remove the 7 bolts that hold the fans in place. Swap fans and bolts to new radiator. Also, make sure the swap the rubber feet as well. If you look closely, the 2 holes that look sort of out of place near the bottom bolts, those are where the auto tranny fluid lines would go if I had an auto. You should have to swap the tubes for the auto tranny lines from the old radiator as well.
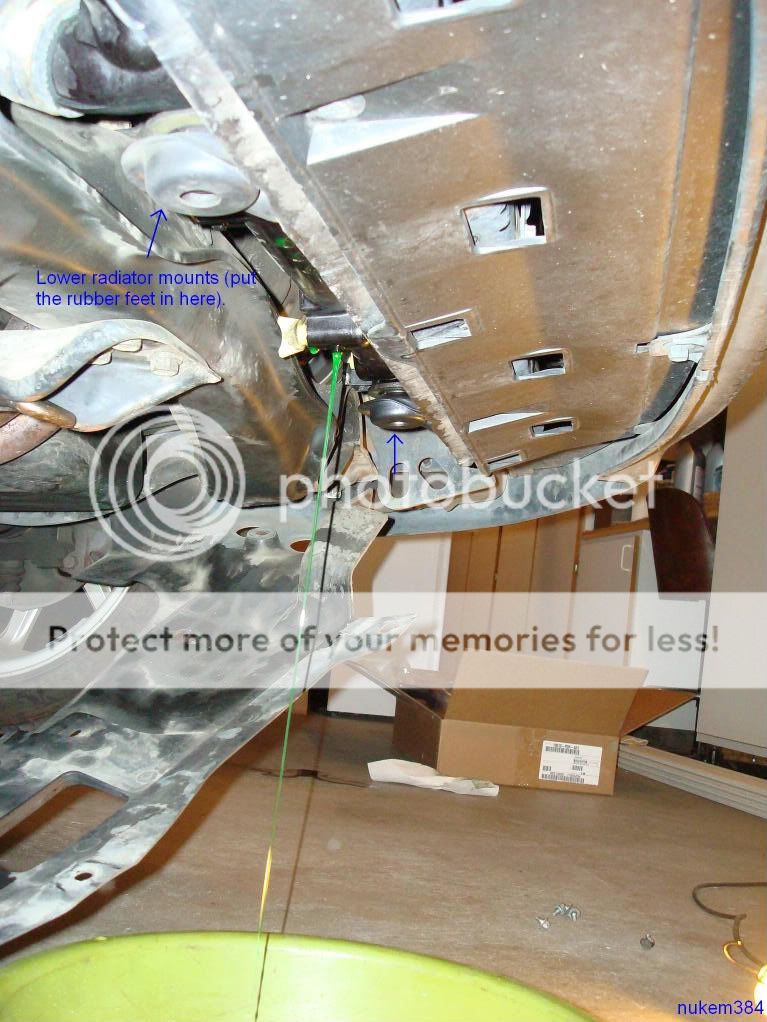
14. New radiator should now be ready to go back in. Make sure the rubber feet are back in the mounts on the frame.
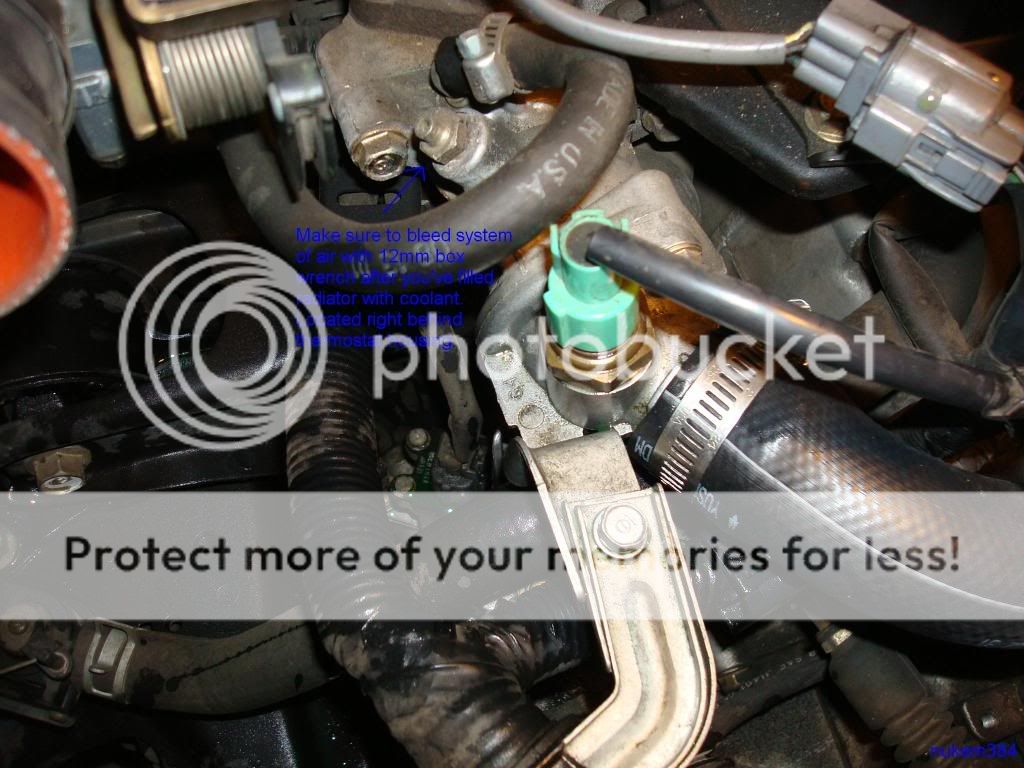
15. From here, you basically just have to reverse the order of how things went in. Maneuver the lower radiator hose past the A/C lines to get it into place. After you've filled the radiator up with coolant, make sure you bleed the system of air. To do this, have someone slowly pour more coolant into the radiator while you open up the bleeder valve with your 12mm box wrench. Don't unscrew the bleeder valve all the way, just crack it open a little so fluid can come out. When coolant comes out of the valve in a nice constant stream, close it up and stop pouring more fluid into the radiator. Make sure you've filled your reservoir back up also.
16. Put everything back together and lower the car. Make sure both your fans are working before you drive the car around and inadvertently overheat your car. The way you should do it is let your car idle for a while (maybe 10 mins.) and let the fans come on when they need to.
17. That's it! Check for leaks and you're good to go. You should check the reservoir level after about a week and see if it's way low. If it goes down a little, that would make sense, but if the whole reservoir is gone after a week, then you have a leak somewhere.
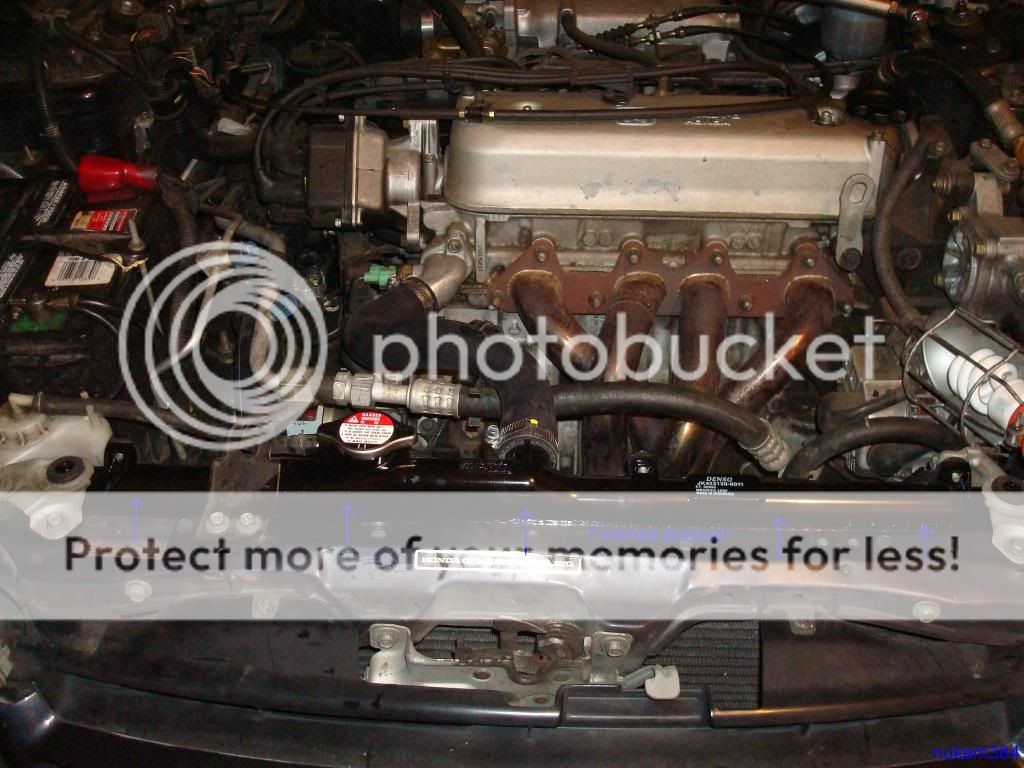
Finished product!
Made a how to on how to install a radiator and thermostat on my 95 Accord LX 5spd. But this how to should work for all 5th gen 5spd's and there are some minor difference's for auto's. So let's get to it, first though I AM IN NO WAY RESPONSIBLE FOR WHAT HAPPENS TO YOUR CAR, INSTALL AT YOUR OWN RISK!!
in case you guys are too lazy to read the whole thing, i've narrated it and put it on youtube.
Tools:
Socket wrench, extension, wobble joint would be helpful and 10, 12mm sockets
Pliers
12mm box wrench
Parts:
Radiator (preferably Denso stock radiator)
Upper and lower hoses
2 gallons radiator fluid
Stock thermostat
4 hose clamps (I'm a fan of the screw tight ones from the parts shop rather than the stock auto tightening ones).
First, don't ever buy Visteon products! They are a subsidiary of Ford and I was dumb enough to buy one of their radiators from a local parts shop. It didn't even last 30k! So this time, of course went with the stock Denso radiator.
The hardware...
1. Start by removing the intake tube and filter. I'm assuming you know how to do this and I didn't take any pics.
2. Remove the splash guard from under the car. There are 6 10mm bolts to get the guard mostly out of the way to do your work. If you want, you can remove the last 10mm bolt to completely remove the splash guard, in the pics, it would be on the driver side.
3. Drain the radiator fluid. Turn the white wingnut counterclockwise and be ready for the coolant to pour out. Sometimes, like in the case of my new radiator, the wingnut is black.
4. Remove the 2 10mm bolts that hold the A/C bracket in place. Move it out of the way or remove.
5. Remove the 2 10mm bolts that hold the upper radiator holder in place. Repeat on other side of car.
6. Remove the hose that connects the reservoir to the radiator. Remove reservoir from the car.
7. Remove the upper radiator hose from the radiator. Use your pliers and wiggle the clamp back until it is totally off the neck of the radiator. You should do this to the other side that's connected to the engine if you are replacing your hoses.
8. Remove the lower radiator hose that's connected to the thermostat housing the same way you did for the upper hose. You can take the hose off the radiator side now if you want, I just left it and dealt with it after I got the radiator out of the car. Just have to snake the hose past the A/C lines and you should be good to go.
9. Once you've removed the hoses, start unplugging things. I unplugged the driver side plugs first. 2 plugs and 1 bolt to remove.
10. Then remove the passenger side plug from under the car.
11. You're now ready to remove the radiator from the car. Note: If you have an auto, you will need to remove the 2 tranny fluid lines as well. They are located on the bottom of the radiator. I would assume they have the same type of hose clamps as everywhere else. Wiggle the radiator past the A/C lines. If you don't want to take the fans out too, you can remove the bolts now and leave the fans in the engine bay. I have a pic of where the bolts are later.
12. Now would be the time to install your thermostat. I don't have any pics cause I just changed it 30k ago when my first stock radiator broke. So remove the 2 I think 12mm bolts that hold the thermostat housing in place. On the left side of the pic, you need to remove those other 2 bolts, I think 10mm? to get to the thermostat housing bolt under there. A wobble joint would be helpful here. Place the new rubber gasket over the thermostat. There should be a little cut out section, this should be over the pin on the thermostat. Make sure the pin is straight up when re-installing. Take a look at what the thermostat looks like in the housing and mimic with the new one.
13. Radiator is out! Remove the 7 bolts that hold the fans in place. Swap fans and bolts to new radiator. Also, make sure the swap the rubber feet as well. If you look closely, the 2 holes that look sort of out of place near the bottom bolts, those are where the auto tranny fluid lines would go if I had an auto. You should have to swap the tubes for the auto tranny lines from the old radiator as well.
14. New radiator should now be ready to go back in. Make sure the rubber feet are back in the mounts on the frame.
15. From here, you basically just have to reverse the order of how things went in. Maneuver the lower radiator hose past the A/C lines to get it into place. After you've filled the radiator up with coolant, make sure you bleed the system of air. To do this, have someone slowly pour more coolant into the radiator while you open up the bleeder valve with your 12mm box wrench. Don't unscrew the bleeder valve all the way, just crack it open a little so fluid can come out. When coolant comes out of the valve in a nice constant stream, close it up and stop pouring more fluid into the radiator. Make sure you've filled your reservoir back up also.
16. Put everything back together and lower the car. Make sure both your fans are working before you drive the car around and inadvertently overheat your car. The way you should do it is let your car idle for a while (maybe 10 mins.) and let the fans come on when they need to.
17. That's it! Check for leaks and you're good to go. You should check the reservoir level after about a week and see if it's way low. If it goes down a little, that would make sense, but if the whole reservoir is gone after a week, then you have a leak somewhere.
Finished product!
Last edited by nukem384; 09-05-2012 at 08:55 PM.
 05-25-2009, 08:51 PM
#2
GREAT DIY!
I just bookmarked it! My radiator is leaking and I currently have a radiator, new hoses, and an oem thermostat sitting in the back of my car waiting to be installed! I have been reading up on how to do it, but the pictures really help.
Other than that, How much coolant did you use? And when you refill it, how much do you put in the radiator, i.e. when is it full?
Thanks :D
05-25-2009, 09:10 PM
#3
Honda-Tech Member
Thread Starter
Join Date: Jan 2003
Posts: 78
Likes: 0
Received 0 Likes
on
0 Posts
Thanks! I actually used just a little over 1 gallon. I thought it would be more, but it's safer to have the 2 gallons so you can refill later anyway. Just keep filling the radiator up until you basically overflow it. The rest of the system will fill up by itself as you are doing this.
07-08-2009, 08:11 PM
#7
Honda-Tech Member
Thread Starter
Join Date: Jan 2003
Posts: 78
Likes: 0
Received 0 Likes
on
0 Posts
in case you guys are too lazy to read the whole thing, i've narrated it and put it on youtube.
http://www.youtube.com/user/nukem384.../0/SFalezH8rCc
http://www.youtube.com/user/nukem384.../0/SFalezH8rCc
Trending Topics
09-25-2009, 11:48 AM
#8
Honda-Tech Member

Join Date: Dec 2008
Location: Sammamish, WA
Posts: 73
Likes: 0
Received 0 Likes
on
0 Posts
Just going out on a whim here, lately I've noticed my car does NOT heat up above a quarter on the temperature gauge next to the speedometer. I was just wondering if this means I have a problem with the thermostat/radiator? Or if this is normal.
09-25-2009, 03:36 PM
#9
Honda-Tech Member

Join Date: Apr 2007
Location: Rutherford, NJ, USA
Posts: 145
Likes: 0
Received 0 Likes
on
0 Posts
thermostat stuck open (test by turning on the heater and see if you get hot air or just lukewarm air)
11-26-2009, 09:50 AM
#10
Honda-Tech Member
Join Date: Dec 2005
Posts: 12
Likes: 0
Received 0 Likes
on
0 Posts
If you have an automatic I suggest you disconnect the two small AT hoses not at the radiator connections (leave them attached there) but at the connections that are higher up in the engine bay. So you will remove and re-install the radiator with short sections of the AT hoses (and the accompanying bracket) attached. It is also imperative to attach and remove the radiator with both cooling fans attached. Both of these modifications to the procedure are necessary in order to avoid undue frustration and taking much more time than is required. And make judicious use of WD40 in detaching stubborn hoses.
- Kofi
- Kofi
 11-26-2009, 11:59 AM
#12
Honda-Tech Member
Nice DIY bro. Mine's sorta leaking too. I might just save up for a Fluidyn one or something.
That wingnut drain plug under the radiator is also called a "Cockpit" if I'm not mistaken. lol Good stuff bruh.
That wingnut drain plug under the radiator is also called a "Cockpit" if I'm not mistaken. lol Good stuff bruh.
10-12-2010, 09:31 PM
#14
Trial User

Join Date: Oct 2010
Posts: 1
Likes: 0
Received 0 Likes
on
0 Posts
on my 95 Ex automatic you have to take the lip off before you can get to under pan he was talking about. I took off the fans off also to get the hoses from the auto transmission to the radiator there was no room to squeeze the clamps from underneath the car. fans connectors are a pain to takeoff, only a half a cup tranny fluid came out when I took the hoses off even less after I took radiator out. took about 2hours to take all off. next going to take off air intake to get to lower hose clamp at themostat
02-14-2011, 08:25 AM
#15
We've been having -15ish degree weather here lately and I have been leaking tons of coolant from the lower radiator hose where it goes into the bottom of the radiator b/c the clamp isn't tight enough.
Can I remove the passenger side fan from the radiator to access the hose clamp without having to remove the radiator/hoses? I haven't really had time to look as it has been freezing out and I don't have a garage. It looks like I can pull out the overflow tank and I can slide the fan to the left (if facing the car) to clear the upper rad hose and then pull it straight up.
Can I remove the passenger side fan from the radiator to access the hose clamp without having to remove the radiator/hoses? I haven't really had time to look as it has been freezing out and I don't have a garage. It looks like I can pull out the overflow tank and I can slide the fan to the left (if facing the car) to clear the upper rad hose and then pull it straight up.
07-05-2011, 05:57 AM
#16
Honda-Tech Member

Join Date: Apr 2009
Posts: 93
Likes: 0
Received 0 Likes
on
0 Posts
I worked yesterday to replace all the hoses. Initially I do not want to remove the radiator but when I went under the car, there is no space for me to remove the clamps and hoses. I ended up remove the radiator and cut the auto transmission hoses.
07-22-2011, 08:08 AM
#17
Honda-Tech Member

Join Date: Jul 2004
Location: tempe az
Posts: 708
Likes: 0
Received 0 Likes
on
0 Posts

 01-27-2012, 04:26 PM
#20
Honda-Tech Member
Just saw the video on youtube and it is great but i have a few questions:
1. Shouldn't you flush the system now that you are putting new coolant in
2. instead of using the bleeder valve, can you just start the car with the rad cap off until the bubbles stop in the radiator, and add coolant accordinly?
Thanks
1. Shouldn't you flush the system now that you are putting new coolant in
2. instead of using the bleeder valve, can you just start the car with the rad cap off until the bubbles stop in the radiator, and add coolant accordinly?
Thanks
 01-28-2012, 07:08 AM
#21

Just saw the video on youtube and it is great but i have a few questions:
1. Shouldn't you flush the system now that you are putting new coolant in
2. instead of using the bleeder valve, can you just start the car with the rad cap off until the bubbles stop in the radiator, and add coolant accordinly?
Thanks
1. Shouldn't you flush the system now that you are putting new coolant in
2. instead of using the bleeder valve, can you just start the car with the rad cap off until the bubbles stop in the radiator, and add coolant accordinly?
Thanks
2) Use the bleeder. Once you have the system sealed back up. Open the bleeder, set the heat to max-some auto hvac system you might need to turn the key to on to power the motor that drives the cable....the idea is the heater control valve is open so you get the air out of the heater core. Then fill the system with coolant until a steady stream is coming out of the bleeder, close it off, top off rad and overflow. Replace cap, run engine until cooling fans cycle while keeping and eye on the gauge. 95% if the time, you're done and no further bleeding needed.
01-28-2012, 02:49 PM
#22
Honda-Tech Member
1) Can't hurt. I'd do it before installing the new parts but that is me.
2) Use the bleeder. Once you have the system sealed back up. Open the bleeder, set the heat to max-some auto hvac system you might need to turn the key to on to power the motor that drives the cable....the idea is the heater control valve is open so you get the air out of the heater core. Then fill the system with coolant until a steady stream is coming out of the bleeder, close it off, top off rad and overflow. Replace cap, run engine until cooling fans cycle while keeping and eye on the gauge. 95% if the time, you're done and no further bleeding needed.
2) Use the bleeder. Once you have the system sealed back up. Open the bleeder, set the heat to max-some auto hvac system you might need to turn the key to on to power the motor that drives the cable....the idea is the heater control valve is open so you get the air out of the heater core. Then fill the system with coolant until a steady stream is coming out of the bleeder, close it off, top off rad and overflow. Replace cap, run engine until cooling fans cycle while keeping and eye on the gauge. 95% if the time, you're done and no further bleeding needed.
01-29-2012, 06:14 AM
#23
1) Flush. This might start a debate. I'm going to try to avoid that. There are chemicals that you can use, follow directions. Or you can use just a water hose (not too much pressure) and reverse flush it, remove t-stat.
2) If this is a 4 cyl 5th gen, the overflow will pretty much lift right out. Might have to move the battery back a bit.
2) If this is a 4 cyl 5th gen, the overflow will pretty much lift right out. Might have to move the battery back a bit.
10-27-2012, 05:58 PM
#24
Honda-Tech Member

Join Date: Jan 2012
Posts: 6
Likes: 0
Received 0 Likes
on
0 Posts
Great Great how to . thanks, but is it the same for a 2000?
My daughter has a 2000 automatic which i havent seen and is needing a new radiator. I'm hoping it's similar . Anyone know?
Thanks
My daughter has a 2000 automatic which i havent seen and is needing a new radiator. I'm hoping it's similar . Anyone know?
Thanks
05-08-2013, 04:57 AM
#25
Honda-Tech Member

Join Date: May 2013
Location: Manhattan, Kansas
Posts: 2
Likes: 0
Received 0 Likes
on
0 Posts
