
***The Basics of Reading a Spark Plug***
 06-09-2012, 04:58 AM
#1
Honda-Tech Member
Thread Starter
HI There H-T Members,
Need to share a sparks plugs tips that i read & gathered details about it.
So talking About The Basics of Reading a Spark Plug.
Tuning an Engine by the Spark Plug.
by BrianOdom.
When tuning a performance engine the spark plug is a important tuning tool. Being that there are many different tuning techniques, I will keep this article about the basics of spark plug reading on a Quarter-Mile Drag Strip (or wide-open-throttle tuning).
When tuning by the spark plug, you must always use a NEW plug to get an accurate reading.
To get a clean plug reading the engine should be shut down after the run and towed back to the pits.
Any running of the engine after that will skew the plug reading.
When tuning by the spark plug, you must always remember there are two major variables at play (air fuel ratio and ignition timing).
To make it easier to determine your on the right track when tuning, make small incremental changes and only 1 or 2 changes at a time.
Engine tuning is a learned skill or art, with many different outcomes of getting a good plug reading.
These tips are to identifying a safe engine tune, horsepower or torque numbers may not be peak.
For example, if I was looking a spark plug showing to much heat. I could pull some timing out or add more fuel, both changes would result in less heat.
As I have already stated, air fuel ratios and ignition timing play a huge
part in the outcome of a good engine tune.
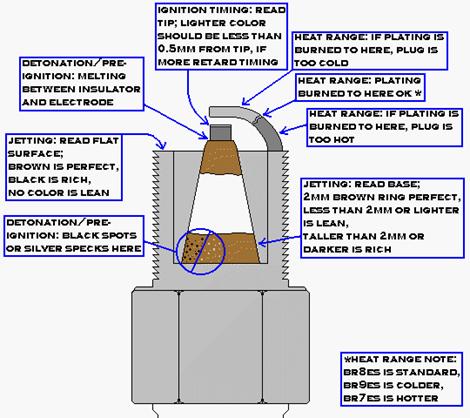
The following tips are just a base line of what to inspect on the spark plug. When reading a spark plug there are four different places to look.
The first place I inspect is the plug strap, this is
the ignition timing.
The strap will show a color change in two spots on the 90 degree bend. The first mark shows the base timing and the second indicates total timing.
IF THE SECOND MARK IS SHOWING AT THE BASE WHERE THE STRAP IS WELDED ON, THIS IS A SIGN OF TOO MUCH HEAT.
An ideal �Safe� Timing range is when the total timing discoloring is located just passed the bend.

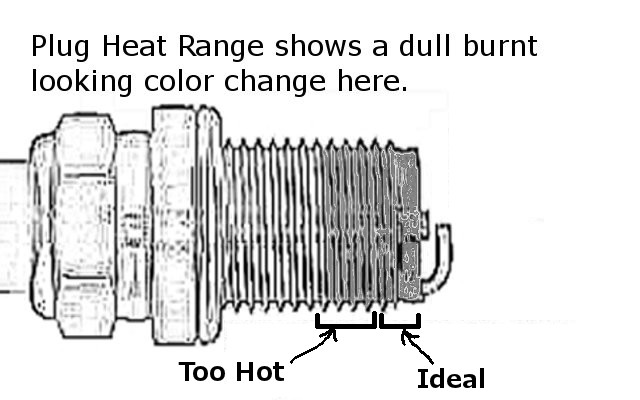
Next I�ll inspect the threaded area for the heat range. The threads will show dull burnt looking color change, 2-3 threads is ideal. To increase the number of burnt threads, increase the heat range of the plug.
If you have 4-5-6 threads burnt you need to get a colder plug.
Inspecting for Air/Fuel can be found in two spots, one spot known as the Fuel Ring.
On the Fuel Ring, your look for a complete �Full Turn� of discoloring. Ideally this should be lightly colored soot.
As the Fuel Ring colored soot darkens, this indicates a richer Air/Fuel ratio. If your tuning the engine for maximum horsepower, the ring should be very light and not make a full circle around the ring.
BUT,BEWARE THIS IS ON THE EDGE OF BEING TOO LEAN.

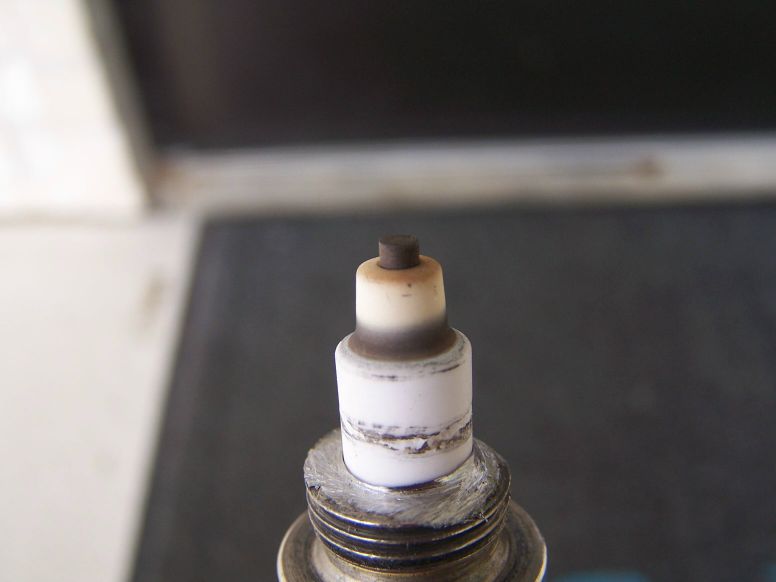
The second place to inspect for the air/fuel ratio is the the porcelain.
Excessive fuel leaves light to dark color rings on the porcelain.
Ideal conditions show the porcelain as new to shinny white.
But, beware of a grayish specials as it is most-likely piston material.
Example#

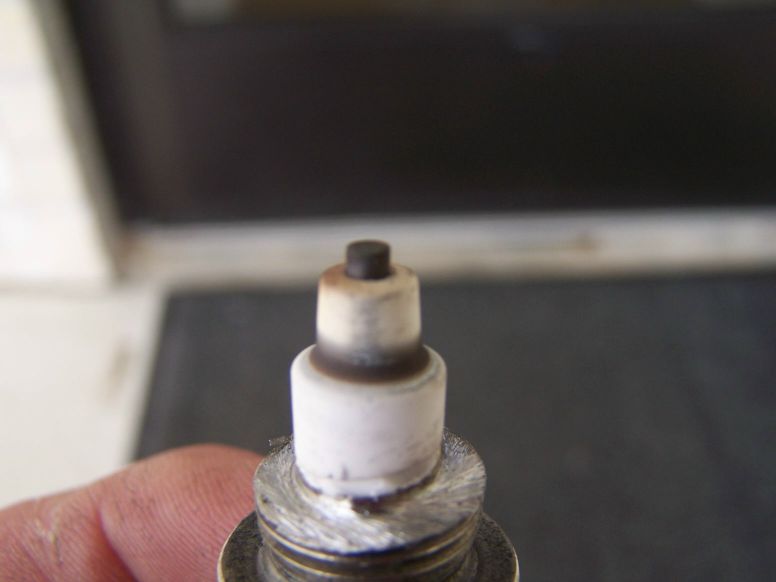
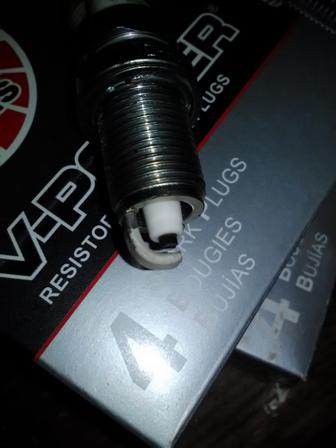
Lets analyze this plug, sorry the numbered points aren't clear but it's 1-4 you can figure it out.
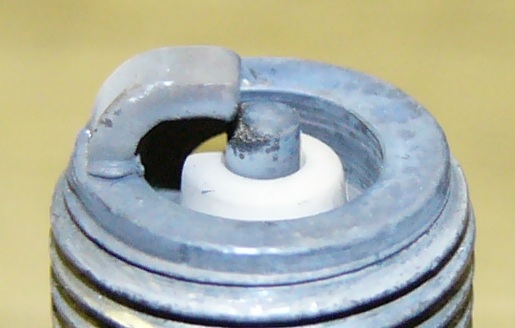
#1 Is a timing indicator, you'll see a definite color change on the ground strap, see it right about at the arrow. Too much timing and the color change will be very close to the threaded body of the plug, too little and it'll be closer to the tip. Ideally we want it right in the apex or center of the 90 bend on the ground strap, in this image timing is perfect.
#4 Arrow shows another indicator of timing, you'll usually see a brown ring right at the tip of the porcelain area it should be a sharp and defined ring about .020 wide. Wider indicates not enough timing and any smaller , or only 1/2 way around or nonexistent as in this image is the second indication of Good timing in the motor.
#2 The tip of the ground strap, Base timing is Done perfect .
#3 The threaded portion of the plug gives you the heat range, look at the threads you'll see that a few toward the tip are a dull burnt looking color the rest are black and shiny. You want about 2 threads showing the heat on the end of the plug and the rest of the threads to be shiny, If you using a longer reach plug than this one 2.5 to 3 threads is optimum.
To increase the number of burnt threads increase the heat range of the plug, if you have 4-5-6 threads burnt you need to get a colder plug.
The Air/Fuel Map
Look at the porcelain and divide it into 3 areas, top, middle and bottom in about 1/3rds.
Top Area: This area is your idle circuit and for the racer real has very little meaning. However if your car is a street driven vehicle then we need to attempt to get this portion to a dark gray/tan color by tuning the AFR with the Air Bleeds and the four corner Idle adjustments until we get a clean crisp idle and total combustion of the fuel at idle. Keep in mind that the idle circuits are totally isolated from the rest of the carburetor and can be tuned with very minimal affect on the WOT position A/F Ratio.
Center Area: This is the area that will show the combustion chamber condition at part throttle or cruise with the power valve and secondary venturi's closed. Usually about 30-50 MPH depending on the gear and weight of the car.
Bottom Area: This is where the racer needs to concentrate all his efforts, using a 5x or 10x scope you need to look right down to the bottom of the porcelain where it meets the metal housing of the plug. This is the area that will leave the color that you need to study and tune to. The other 2/3rds of the porcelain will be burned clean by the high heat generated by WOT and high RPM, this is not the time to read for cruise or Idle characteristics.
We're looking for a colored ring right at the base of that porcelain which I refer to as a Fuel Ring. The color will vary depending on the type of fuel your burning, Unleaded Pump gas will leave very little color because of all the additives such as injector cleaners and methanol. Most of us run a 108 or 110 in our bracket cars and these fuels will leave a tan color while the C17 and higher octane fuels will leave an almost gray fuel ring. If you study the ring you will see that it starts to show color just below the base of the ground strap, this is caused by the shielding affect of the strap leaving that portion cooler thus showing the most color. The ring will develop from each side and form a full circle of correct color as you get closer and closer to the correct tune up. If you look down into the bottom of the porcelain and you detect a thin oily deposit you are seeing oil from the combustion chamber caused by either worn or improperly seated rings, you may also detect this with a new engine that hasn't fully seated the rings yet, just don't confuse this with the "Fuel Ring".
Plug Characteristics
Shiny or Glazed Porcelain: This occurs for two reasons, excessive idling or rich idle condition leaving heavy soot deposits. These deposits will burn and create excessive porcelain temps causing the glass to melt usually resulting in a down track popping through the exhaust..
You will usually see splotchy deposits on the plugs after the run, either green or yellow in color and of course the tell tale shiny glaze.
This glazing of the porcelain actually becomes a conductor and the spark will jump from the electrode to the porcelain resulting is a very weak small if any spark.
The porcelain should always have a chalky or dull finish.
Base of threads sooty: This is usually a indication of the plug not being tight enough allowing it allow air to pulled in to the chamber and fuel being pushed out, change the plug, tighten to spec.
This area should have a nice dark to medium gray color without heavy deposits.

Black or brown specs: This is an indication of detonation usually caused by too hot of a plug, drop one or two heat ranges and it should go away.
The plug gets so hot that it will start to detonate the fuel before the ignition fires, this cause a double flame front and reduces the efficiency of the combustion process as these two flame fronts battle each other in the combustion chamber.
The black spots are the result of the fuel deposits being burned onto the porcelain by the double flame front.
Once you cool down the plug and remove the secondary ignition source you can re-set your timing to produce the correct combustion chamber temp for optimum power.
I've heard 100's of so called tuners and engine builders tell people that this is normal and nothing to worry about......WRONG. Do not underestimate the damage that this condition can do to your engine, drop the plug heat range.
Shiny little diamond like deposits: It's too late you've already started to blow the pistons out of it. Start over from scratch, fatten the carb, back-up the timing and cool down the plugs. Now start a proper tuning procedure and hopefully you caught it before too much damage was done.
No color mark on ground strap: If your showing good color on the porcelain but the ground strap fails to show an indicator then your plug is too cold, go up 1 heat range.
If the ground strap is showing a good color line but the porcelain is showing no color at the base then your plug may be too hot, drop down a range.
I will use maybe 3 different ranges on one bank, make a pass and from those three different plugs determine which one is correct for the engine.
Added Spark plug FAQ for maximum Knowledge
Spark plug
A spark plug (sometimes in British English a sparking plug, colloquially a plug) is a device for delivering electric current from an ignition system to the combustion chamber of a spark-ignition engine to ignite the compressed fuel/air mixture by an electric spark, while containing combustion pressure within the engine.
A spark plug has a metal threaded shell, electrically isolated from a central electrode by a porcelain insulator.
The central electrode, which may contain a resistor, is connected by a heavily insulated wire to the output terminal of an ignition coil or magneto. The spark plug's metal shell is screwed into the engine's cylinder head and thus electrically grounded.
The central electrode protrudes through the porcelain insulator into the combustion chamber, forming one or more spark gaps between the inner end of the central electrode and usually one or more protuberances or structures attached to the inner end of the threaded shell and designated the "side", "earth", or "ground" electrode.
Spark plugs may also be used for other purposes; in Saab Direct Ignition when they are not firing, spark plugs are used to measure ionization in the cylinders - this ionic current measurement is used to replace the ordinary cam phase sensor, knock sensor and misfire measurement function.
Spark plugs may also be used in other applications such as furnaces wherein a combustible fuel/air mixture must be ignited.
In this case, they are sometimes referred to as flame igniters.
Operation
The plug is connected to the high voltage generated by an ignition coil or magneto.
As the electrons flow from the coil, a voltage difference develops between the central electrode and side electrode.
No current can flow because the fuel and air in the gap is an insulator, but as the voltage rises further, it begins to change the structure of the gases between the electrodes.
Once the voltage exceeds the dielectric strength of the gases, the gases become ionized.
The ionized gas becomes a conductor and allows electrons to flow across the gap.
Spark plugs usually require voltage of 12,000�25,000 volts or more to 'fire' properly, although it can go up to 45,000 volts.
They supply higher current during the discharge process resulting in a hotter and longer-duration spark.
As the current of electrons surges across the gap, it raises the temperature of the spark channel to 60,000 K.
The intense heat in the spark channel causes the ionized gas to expand very quickly, like a small explosion.
This is the "click" heard when observing a spark, similar to lightning and thunder.
The heat and pressure force the gases to react with each other, and at the end of the spark event there should be a small ball of fire in the spark gap as the gases burn on their own.
The size of this fireball or kernel depends on the exact composition of the mixture between the electrodes and the level of combustion chamber turbulence at the time of the spark.
A small kernel will make the engine run as though the ignition timing was retarded, and a large one as though the timing was advanced.

Components of a typical, four stroke cycle, DOHC piston engine. (E) Exhaust camshaft, (I) Intake camshaft, (S) Spark plug, (V) Valves, (P) Piston, (R) Connecting rod, (C) Crankshaft, (W) Water jacket for coolant flow.
Spark plug construction
A spark plug is composed of a shell, insulator and the central conductor.
It passes through the wall of the combustion chamber and therefore must also seal the combustion chamber against high pressures and temperatures without deteriorating over long periods of time and extended use.
Parts of the plug Terminal
The top of the spark plug contains a terminal to connect to the ignition system.
The exact terminal construction varies depending on the use of the spark plug.
Most passenger car spark plug wires snap onto the terminal of the plug, but some wires have spade connectors which are fastened onto the plug under a nut.
Plugs which are used for these applications often have the end of the terminal serve a double purpose as the nut on a thin threaded shaft so that they can be used for either type of connections.
Insulator
The main part of the insulator is typically made from sintered alumina, a very hard ceramic material with high dielectric strength, printed with the manufacturer's name and identifying marks, then glazed to improve resistance to surface spark tracking.
Its major function is to provide mechanical support and electrical insulation for the central electrode, while also providing an extended spark path for flashover protection.
This extended portion, particularly in engines with deeply recessed plugs, helps extend the terminal above the cylinder head so as to make it more readily accessible.
Ribs
By lengthening the surface between the high voltage terminal and the grounded metal case of the spark plug, the physical shape of the ribs functions to improve the electrical insulation and prevent electrical energy from leaking along the insulator surface from the terminal to the metal case. The disrupted and longer path makes the electricity encounter more resistance along the surface of the spark plug even in the presence of dirt and moisture. Some spark plugs are manufactured without ribs; improvements in the dielectric strength of the insulator make them less important.
Insulator tip
On modern (post 1930's) spark plugs, the tip of the insulator protruding into the combustion chamber is the same sintered aluminium oxide (alumina) ceramic as the upper portion, merely unglazed.
It is designed to withstand 650 �C (1,200 �F) and 60,000 volts.
The dimensions of the insulator and the metal conductor core determine the heat range of the plug. Short insulators are usually "cooler" plugs, while "hotter" plugs are made with a lengthened path to the metal body, though this also depends on the thermally conductive metal core.
Older spark plugs, particularly in aircraft, used an insulator made of stacked layers of mica, compressed by tension in the centre electrode.
With the development of leaded petrol in the 1930s, lead deposits on the mica became a problem and reduced the interval between needing to clean the spark plug.
Sintered alumina was developed by Siemens in Germany to counteract this. Sintered alumina is a superior material to mica or porcelain because it is a relatively good thermal conductor for a ceramic, it maintains good mechanical strength and (thermal) shock resistance at higher temperatures, and this ability to run hot allows it to be run at "self cleaning" temperatures without rapid degradation.
It also allows a simple single piece construction at low cost but high mechanical reliability.
Seals
Because the spark plug also seals the combustion chamber or the engine when installed, seals are required to ensure there is no leakage from the combustion chamber.
The internal seals of modern plugs are made of compressed glass/metal powder, but old style seals were typically made by the use of a multi-layer braze.
The external seal is usually a crush washer, but some manufacturers use the cheaper method of a taper interface and simple compression to attempt sealing.
Metal case
The metal case (or the "jacket" as many people call it) of the spark plug withstands the torque of tightening the plug, serves to remove heat from the insulator and pass it on to the cylinder head, and acts as the ground for the sparks passing through the central electrode to the side electrode.
Spark plug threads are cold rolled to prevent thermal cycle fatigue. Also, a marine spark plug's shell is double-dipped, zinc-chromate coated metal.
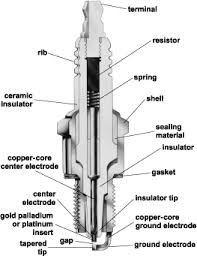
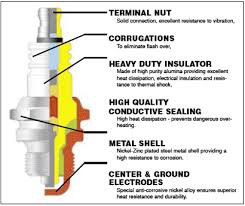
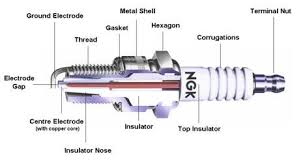
Central electrode
The central electrode is connected to the terminal through an internal wire and commonly a ceramic series resistance to reduce emission of RF noise from the sparking.
The tip can be made of a combination of copper, nickel-iron, chromium, or noble metals. In the late seventies, the development of engines reached a stage where the �heat range� of conventional spark plugs with solid nickel alloy centre electrodes was unable to cope with their demands.
A plug that was �cold� enough to cope with the demands of high speed driving would not be able to burn off the carbon deposits caused by stop-start urban conditions, and would foul in these conditions, making the engine misfire. Similarly, a plug that was �hot� enough to run smoothly in town, could melt when called upon to cope with extended high speed running on motorways. The answer to this problem, devised by the spark plug manufacturers, was a centre electrode that carried the heat of combustion away from the tip more effectively than was possible with a solid nickel alloy.
Copper was the material chosen for the task and a method for manufacturing the copper-cored centre electrode was created by Floform.
The central electrode is usually the one designed to eject the electrons (the cathode) because it is the hottest (normally) part of the plug; it is easier to emit electrons from a hot surface, because of the same physical laws that increase emissions of vapor from hot surfaces (see thermionic emission).
In addition, electrons are emitted where the electrical field strength is greatest; this is from wherever the radius of curvature of the surface is smallest, from a sharp point or edge rather than a flat surface (see corona discharge).
It would be easiest to pull electrons from a pointed electrode but a pointed electrode would erode after only a few seconds.
Instead, the electrons emit from the sharp edges of the end of the electrode; as these edges erode, the spark becomes weaker and less reliable.
At one time it was common to remove the spark plugs, clean deposits off the ends either manually or with specialized sandblasting equipment and file the end of the electrode to restore the sharp edges, but this practice has become less frequent for two reasons:
1.cleaning with tools such as a wire brush leaves traces of metal on the insulator which can provide a weak conduction path and thus weaken the spark (increasing emissions)
2. plugs are so cheap relative to labor cost, economics dictate replacement, particularly with modern long-life plugs.
The development of noble metal high temperature electrodes (using metals such as yttrium, iridium, tungsten, or palladium, as well as the relatively high value platinum, silver or gold) allows the use of a smaller center wire, which has sharper edges but will not melt or corrode away.
These materials are used because of their high melting points and durability, not because of their electrical conductivity (which is irrelevant in series with the plug resistor or wires).
The smaller electrode also absorbs less heat from the spark and initial flame energy.
At one point, Firestone marketed plugs with polonium in the tip, under the (questionable) theory that the radioactivity would ionize the air in the gap, easing spark formation.

Side (ground, earth) electrode
The side electrode is made from high nickel steel and is welded or hot forged to the side of the metal shell.
The side electrode also runs very hot, especially on projected nose plugs. Some designs have provided a copper core to this electrode, so as to increase heat conduction.
Multiple side electrodes may also be used, so that they don't overlap the central electrode.
Spark plug gap
Spark plugs are typically designed to have a spark gap which can be adjusted by the technician installing the spark plug, by bending the ground electrode slightly.
The same plug may be specified for several different engines, requiring a different gap for each.
Spark plugs in automobiles generally have a gap between 0.035"�0.070" (0.9�1.8 mm).
The gap may require adjustment from the out-of-the-box gap.
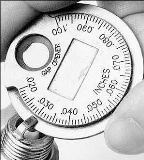
A spark plug gap gauge is a disc with a sloping edge, or with round wires of precise diameters, and is used to measure the gap.
Use of a feeler gauge with flat blades instead of round wires, as is used on distributor points or valve lash, will give erroneous results, due to the shape of spark plug electrodes.
The simplest gauges are a collection of keys of various thicknesses which match the desired gaps and the gap is adjusted until the key fits snugly.
With current engine technology, universally incorporating solid state ignition systems and computerized fuel injection, the gaps used are much larger than in the era of carburetors and breaker point distributors, to the extent that spark plug gauges from that era are much too small for measuring the gaps of current cars.
The gap adjustment can be crucial to proper engine operation.
A narrow gap may give too small and weak a spark to effectively ignite the fuel-air mixture, but the plug will almost always fire on each cycle.
A gap that is too wide might prevent a spark from firing at all or may missfire at high speeds, but will usually have a spark that is strong for a clean burn. A spark which intermittently fails to ignite the fuel-air mixture may not be noticeable directly, but will show up as a reduction in the engine's power and fuel efficiency.
As a plug ages, and the metal of both the tip and hook erode, the gap will tend to widen; therefore experienced mechanics often set the gap on new plugs at the engine manufacturer's minimum recommended gap, rather than in the middle of the specified acceptable range, to ensure longer life between plug changes.
On the other hand, since a larger gap gives a "hotter" or "fatter" spark and more reliable ignition of the fuel-air mixture, and since a new plug with sharp edges on the central electrode will spark more reliably than an older, eroded plug, experienced mechanics also realize that the maximum gap specified by the engine manufacturer is the largest which will spark reliably even with old plugs and will in fact be a bit narrower than necessary to ensure sparking with new plugs; therefore, it is possible to set the plugs to an extremely wide gap for more reliable ignition in high performance applications, at the cost of having to replace or re-gap the plugs more frequently, as soon as the tip begins to erode.


Variations on the basic design
Over the years variations on the basic spark plug design have attempted to provide either better ignition, longer life, or both.
Such variations include the use of two, three, or four equally spaced ground electrodes surrounding the central electrode.
Other variations include using a recessed central electrode surrounded by the spark plug thread, which effectively becomes the ground electrode (see "surface-discharge spark plug").
Also there is the use of a V-shaped notch in the tip of the ground electrode. Multiple ground electrodes generally provide longer life, as when the spark gap widens due to electric discharge wear, the spark moves to another closer ground electrode.
The disadvantage of multiple ground electrodes is that a shielding effect can occur in the engine combustion chamber inhibiting the flame face as the fuel air mixture burns.
This can result in a less efficient burn and increased fuel consumption.
Surface-discharge spark plug
A piston engine has a part of the combustion chamber that is always out of reach of the piston; and this zone is where the conventional spark plug is located.
A Wankel engine has a permanently varying combustion area; and the spark plug is inevitably swept by the tip seals. Clearly, if a spark plug were to protrude into the Wankel's combustion chamber it would foul the rotating tip; and if the plug were recessed to avoid this, the sunken spark might lead to poor combustion.
So a new type of "surface discharge" plug was developed for the Wankel. Such a plug presents an almost flat face to the combustion chamber.
A stubby centre electrode projects only very slightly; and the entire earthed body of the plug acts as the side electrode.
The advantage is that the plug sits just beneath the tip-seal that sweeps over it, keeping the spark accessible to the fuel/air mixture.
The "plug gap" remains constant throughout its life; and the spark path will continually vary (instead of darting from the centre to the side electrode as in a conventional plug).
Whereas a conventional side electrode will (admittedly, rarely) come adrift in use and potentially cause engine damage, this is impossible with a surface discharge plug, as there is nothing to break off.
Surface-discharge spark plugs have been produced by inter alia, Denso, Champion and Bosch.
Sealing to the cylinder head
Most spark plugs seal to the cylinder head with a single-use hollow or folded metal washer which is crushed slightly between the flat surface of the head and that of the plug, just above the threads.
Some spark plugs have a tapered seat that uses no washer.
The torque for installing these plugs is supposed to be lower than a washer-sealed plug.
Tip protrusion
The length of the threaded portion of the plug should be closely matched to the thickness of the head.
If a plug extends too far into the combustion chamber, it may be struck by the piston, damaging the engine internally.
Less dramatically, if the threads of the plug extend into the combustion chamber, the sharp edges of the threads act as point sources of heat which may cause preignition; in addition, deposits which form between the exposed threads may make it difficult to remove the plugs, even damaging the threads on aluminium heads in the process of removal.
The protrusion of the tip into the chamber also affects plug performance, however; the more centrally located the spark gap is, generally the better the ignition of the air-fuel mixture will be, although experts believe the process is more complex and dependent on combustion chamber shape.
On the other hand, if an engine is "burning oil", the excess oil leaking into the combustion chamber tends to foul the plug tip and inhibit the spark; in such cases, a plug with less protrusion than the engine would normally call for often collects less fouling and performs better, for a longer period. In fact, special "antifouling" adapters are sold which fit between the plug and the head to reduce the protrusion of the plug for just this reason, on older engines with severe oil burning problems; this will cause the ignition of the fuel-air mixture to be less effective, but in such cases, this is of lesser significance.
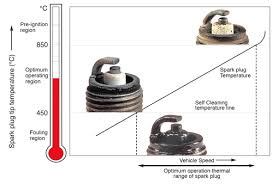
Heat range
The operating temperature of a spark plug is the actual physical temperature at the tip of the spark plug within the running engine.
This is important because it determines the efficiency of plug self-cleaning and is determined by a number of factors, but primarily the actual temperature within the combustion chamber.
There is no direct relationship between the actual operating temperature of the spark plug and spark voltage.
However, the level of torque currently being produced by the engine will strongly influence spark plug operating temperature because the maximum temperature and pressure occurs when the engine is operating near peak torque output (torque and RPM directly determine the power output).
The temperature of the insulator responds to the thermal conditions it is exposed to in the combustion chamber but not vice versa.
If the tip of the spark plug is too hot it can cause pre-ignition or sometimes detonation/knocking and damage may occur. I
f it is too cold, electrically conductive deposits may form on the insulator causing a loss of spark energy or the actual shorting-out of the spark current.
A spark plug is said to be "hot" if it is a better heat insulator, keeping more heat in the tip of the spark plug.
A spark plug is said to be "cold" if it can conduct more heat out of the spark plug tip and lower the tip's temperature.
Whether a spark plug is "hot" or "cold" is known as the heat range of the spark plug. The heat range of a spark plug is typically specified as a number, with some manufacturers using ascending numbers for hotter plugs and others doing the opposite, using ascending numbers for colder plugs.
The heat range of a spark plug is affected by the construction of the spark plug: the types of materials used, the length of insulator and the surface area of the plug exposed within the combustion chamber.
For normal use, the selection of a spark plug heat range is a balance between keeping the tip hot enough at idle to prevent fouling and cold enough at maximum power to prevent pre-ignition or engine knocking.
By examining "hotter" and "cooler" spark plugs of the same manufacturer side by side, the principle involved can be very clearly seen; the cooler plugs have a more substantial ceramic insulator filling the gap between the center electrode and the shell, effectively allowing more heat to be carried off by the shell, while the hotter plugs have less ceramic material, so that the tip is more isolated from the body of the plug and retains heat better.
Heat from the combustion chamber escapes through the exhaust gases, the side walls of the cylinder and the spark plug itself.
The heat range of a spark plug has only a minute effect on combustion chamber and overall engine temperature.
A cold plug will not materially cool down an engine's running temperature. (Too hot of a plug may, however, indirectly lead to a runaway pre-ignition condition that can increase engine temperature.)
Rather, the main effect of a "hot" or "cold" plug is to affect the temperature of the tip of the spark plug.
It was common before the modern era of computerized fuel injection to specify at least a couple of different heat ranges for plugs for an automobile engine; a hotter plug for cars which were mostly driven slowly around the city, and a colder plug for sustained high speed highway use.
This practice has, however, largely become obsolete now that cars' fuel/air mixtures and cylinder temperatures are maintained within a narrow range, for purposes of limiting emissions.
Racing engines, however, still benefit from picking a proper plug heat range. Very old racing engines will sometimes have two sets of plugs, one just for starting and another to be installed for driving once the engine is warmed up.
Spark plug manufacturers use different numbers to denote heat range of their spark plugs.

Reading spark plugs
The spark plug's firing end will be affected by the internal environment of the combustion chamber.
As the spark plug can be removed for inspection, the effects of combustion on the plug can be examined.
An examination, or "reading" of the characteristic markings on the firing end of the spark plug can indicate conditions within the running engine.
The spark plug tip will bear the marks as evidence of what is happening inside the engine.
Usually there is no other way to know what is going on inside an engine running at peak power.
Engine and spark plug manufacturers will publish information about the characteristic markings in spark plug reading charts.
Such charts are useful for general use but are of almost no use in reading racing engine spark plugs, which is an entirely different matter.
A light brownish discoloration of the tip of the block indicates proper operation; other conditions may indicate malfunction.
For example, a sandblasted look to the tip of the spark plug means persistent, light detonation is occurring, often unheard.
The damage that is occurring to the tip of the spark plug is also occurring on the inside of the cylinder.
Heavy detonation can cause outright breakage of the spark plug insulator and internal engine parts before appearing as sandblasted erosion but is easily heard.
As another example, if the plug is too cold, there will be deposits on the nose of the plug.
Conversely if the plug is too hot, the porcelain will be porous looking, almost like sugar.
The material which seals the central electrode to the insulator will boil out. Sometimes the end of the plug will appear glazed, as the deposits have melted.
An idling engine will have a different impact on the spark plugs than one running at full throttle.
Spark plug readings are only valid for the most recent engine operating conditions and running the engine under different conditions may erase or obscure characteristic marks previously left on the spark plugs.
Thus, the most valuable information is gathered by running the engine at high speed and full load, immediately cutting the ignition off and stopping without idling or low speed operation and removing the plugs for reading.
Spark plug reading viewers, which are simply combined flashlight/magnifiers, are available to improve the reading of the spark plugs.

Indexing spark plugs
A matter of some debate is the "indexing" of plugs upon installation, usually only for high performance or racing applications; this involves installing them so that the open area of the spark gap, not shrouded by the ground electrode, faces the center of the combustion chamber, towards the intake valve, rather than the wall.
Some engine tuners who believe that this will maximize the exposure of the fuel-air mixture to the spark, also ensuring that every combustion chamber is an even in layout and therefore result in better ignition ; others, however, believe that this is useful only to keep the ground electrode out of the way of the piston in ultra-high-compression engines if clearance is insufficient.
In any event, this is accomplished by marking the location of the gap on the outside of the plug, installing it, and noting the direction in which the mark faces; then the plug is removed and additional washers are added so as to change the orientation of the tightened plug.
This must be done individually for each plug, as the orientation of the gap with respect to the threads of the shell is random.
Some plugs are made with a non-random orientation of the gap and are usually marked as such by a suffix to the model number; typically these are specified by manufacturers of very small engines where the spark plug tip and electrodes form a significantly large part of the shape of the combustion chamber.
The Honda Insight has indexed spark plugs from factory, with four different part numbers available corresponding to the different degrees of indexing to achieve most efficient combustion and maximum fuel efficiency.
From wikipedia link below:
http://en.wikipedia.org/wiki/Spark_plug
New Link's
Reading Spark Plugs
(This applies to Naturally Aspirated as well as Nitrous Engines)
http://www.angelfire.com/fl4/pontiac...Readplugs.html
Reading Spark Plugs
by Meaux Racing Heads
http://www.dragstuff.com/techarticle...ead-plugs.html
Spark Plug Reading 101
by Mike Canter
http://www.dragstuff.com/techarticle...ark-plugs.html
Blown Alcohol Motor Spark Plug Reading 101
by Mike Canter
http://www.dragstuff.com/techarticle...ark-plugs.html
Nitrous Spark Plug Pictures
by John Heard and Friends...
http://www.dragstuff.com/techarticle...-pictures.html
So guy's feel free to ADD Tips.
Need to share a sparks plugs tips that i read & gathered details about it.
So talking About The Basics of Reading a Spark Plug.
Tuning an Engine by the Spark Plug.
by BrianOdom.
When tuning a performance engine the spark plug is a important tuning tool. Being that there are many different tuning techniques, I will keep this article about the basics of spark plug reading on a Quarter-Mile Drag Strip (or wide-open-throttle tuning).
When tuning by the spark plug, you must always use a NEW plug to get an accurate reading.
To get a clean plug reading the engine should be shut down after the run and towed back to the pits.
Any running of the engine after that will skew the plug reading.
When tuning by the spark plug, you must always remember there are two major variables at play (air fuel ratio and ignition timing).
To make it easier to determine your on the right track when tuning, make small incremental changes and only 1 or 2 changes at a time.
Engine tuning is a learned skill or art, with many different outcomes of getting a good plug reading.
These tips are to identifying a safe engine tune, horsepower or torque numbers may not be peak.
For example, if I was looking a spark plug showing to much heat. I could pull some timing out or add more fuel, both changes would result in less heat.
As I have already stated, air fuel ratios and ignition timing play a huge
part in the outcome of a good engine tune.
The following tips are just a base line of what to inspect on the spark plug. When reading a spark plug there are four different places to look.
The first place I inspect is the plug strap, this is
the ignition timing.
The strap will show a color change in two spots on the 90 degree bend. The first mark shows the base timing and the second indicates total timing.
IF THE SECOND MARK IS SHOWING AT THE BASE WHERE THE STRAP IS WELDED ON, THIS IS A SIGN OF TOO MUCH HEAT.
An ideal �Safe� Timing range is when the total timing discoloring is located just passed the bend.
Next I�ll inspect the threaded area for the heat range. The threads will show dull burnt looking color change, 2-3 threads is ideal. To increase the number of burnt threads, increase the heat range of the plug.
If you have 4-5-6 threads burnt you need to get a colder plug.
Inspecting for Air/Fuel can be found in two spots, one spot known as the Fuel Ring.
On the Fuel Ring, your look for a complete �Full Turn� of discoloring. Ideally this should be lightly colored soot.
As the Fuel Ring colored soot darkens, this indicates a richer Air/Fuel ratio. If your tuning the engine for maximum horsepower, the ring should be very light and not make a full circle around the ring.
BUT,BEWARE THIS IS ON THE EDGE OF BEING TOO LEAN.
The second place to inspect for the air/fuel ratio is the the porcelain.
Excessive fuel leaves light to dark color rings on the porcelain.
Ideal conditions show the porcelain as new to shinny white.
But, beware of a grayish specials as it is most-likely piston material.
Example#
Lets analyze this plug, sorry the numbered points aren't clear but it's 1-4 you can figure it out.
#1 Is a timing indicator, you'll see a definite color change on the ground strap, see it right about at the arrow. Too much timing and the color change will be very close to the threaded body of the plug, too little and it'll be closer to the tip. Ideally we want it right in the apex or center of the 90 bend on the ground strap, in this image timing is perfect.
#4 Arrow shows another indicator of timing, you'll usually see a brown ring right at the tip of the porcelain area it should be a sharp and defined ring about .020 wide. Wider indicates not enough timing and any smaller , or only 1/2 way around or nonexistent as in this image is the second indication of Good timing in the motor.
#2 The tip of the ground strap, Base timing is Done perfect .
#3 The threaded portion of the plug gives you the heat range, look at the threads you'll see that a few toward the tip are a dull burnt looking color the rest are black and shiny. You want about 2 threads showing the heat on the end of the plug and the rest of the threads to be shiny, If you using a longer reach plug than this one 2.5 to 3 threads is optimum.
To increase the number of burnt threads increase the heat range of the plug, if you have 4-5-6 threads burnt you need to get a colder plug.
The Air/Fuel Map
Look at the porcelain and divide it into 3 areas, top, middle and bottom in about 1/3rds.
Top Area: This area is your idle circuit and for the racer real has very little meaning. However if your car is a street driven vehicle then we need to attempt to get this portion to a dark gray/tan color by tuning the AFR with the Air Bleeds and the four corner Idle adjustments until we get a clean crisp idle and total combustion of the fuel at idle. Keep in mind that the idle circuits are totally isolated from the rest of the carburetor and can be tuned with very minimal affect on the WOT position A/F Ratio.
Center Area: This is the area that will show the combustion chamber condition at part throttle or cruise with the power valve and secondary venturi's closed. Usually about 30-50 MPH depending on the gear and weight of the car.
Bottom Area: This is where the racer needs to concentrate all his efforts, using a 5x or 10x scope you need to look right down to the bottom of the porcelain where it meets the metal housing of the plug. This is the area that will leave the color that you need to study and tune to. The other 2/3rds of the porcelain will be burned clean by the high heat generated by WOT and high RPM, this is not the time to read for cruise or Idle characteristics.
We're looking for a colored ring right at the base of that porcelain which I refer to as a Fuel Ring. The color will vary depending on the type of fuel your burning, Unleaded Pump gas will leave very little color because of all the additives such as injector cleaners and methanol. Most of us run a 108 or 110 in our bracket cars and these fuels will leave a tan color while the C17 and higher octane fuels will leave an almost gray fuel ring. If you study the ring you will see that it starts to show color just below the base of the ground strap, this is caused by the shielding affect of the strap leaving that portion cooler thus showing the most color. The ring will develop from each side and form a full circle of correct color as you get closer and closer to the correct tune up. If you look down into the bottom of the porcelain and you detect a thin oily deposit you are seeing oil from the combustion chamber caused by either worn or improperly seated rings, you may also detect this with a new engine that hasn't fully seated the rings yet, just don't confuse this with the "Fuel Ring".
Plug Characteristics
Shiny or Glazed Porcelain: This occurs for two reasons, excessive idling or rich idle condition leaving heavy soot deposits. These deposits will burn and create excessive porcelain temps causing the glass to melt usually resulting in a down track popping through the exhaust..
You will usually see splotchy deposits on the plugs after the run, either green or yellow in color and of course the tell tale shiny glaze.
This glazing of the porcelain actually becomes a conductor and the spark will jump from the electrode to the porcelain resulting is a very weak small if any spark.
The porcelain should always have a chalky or dull finish.
Base of threads sooty: This is usually a indication of the plug not being tight enough allowing it allow air to pulled in to the chamber and fuel being pushed out, change the plug, tighten to spec.
This area should have a nice dark to medium gray color without heavy deposits.
Black or brown specs: This is an indication of detonation usually caused by too hot of a plug, drop one or two heat ranges and it should go away.
The plug gets so hot that it will start to detonate the fuel before the ignition fires, this cause a double flame front and reduces the efficiency of the combustion process as these two flame fronts battle each other in the combustion chamber.
The black spots are the result of the fuel deposits being burned onto the porcelain by the double flame front.
Once you cool down the plug and remove the secondary ignition source you can re-set your timing to produce the correct combustion chamber temp for optimum power.
I've heard 100's of so called tuners and engine builders tell people that this is normal and nothing to worry about......WRONG. Do not underestimate the damage that this condition can do to your engine, drop the plug heat range.
Shiny little diamond like deposits: It's too late you've already started to blow the pistons out of it. Start over from scratch, fatten the carb, back-up the timing and cool down the plugs. Now start a proper tuning procedure and hopefully you caught it before too much damage was done.
No color mark on ground strap: If your showing good color on the porcelain but the ground strap fails to show an indicator then your plug is too cold, go up 1 heat range.
If the ground strap is showing a good color line but the porcelain is showing no color at the base then your plug may be too hot, drop down a range.
I will use maybe 3 different ranges on one bank, make a pass and from those three different plugs determine which one is correct for the engine.
Added Spark plug FAQ for maximum Knowledge
Spark plug
A spark plug (sometimes in British English a sparking plug, colloquially a plug) is a device for delivering electric current from an ignition system to the combustion chamber of a spark-ignition engine to ignite the compressed fuel/air mixture by an electric spark, while containing combustion pressure within the engine.
A spark plug has a metal threaded shell, electrically isolated from a central electrode by a porcelain insulator.
The central electrode, which may contain a resistor, is connected by a heavily insulated wire to the output terminal of an ignition coil or magneto. The spark plug's metal shell is screwed into the engine's cylinder head and thus electrically grounded.
The central electrode protrudes through the porcelain insulator into the combustion chamber, forming one or more spark gaps between the inner end of the central electrode and usually one or more protuberances or structures attached to the inner end of the threaded shell and designated the "side", "earth", or "ground" electrode.
Spark plugs may also be used for other purposes; in Saab Direct Ignition when they are not firing, spark plugs are used to measure ionization in the cylinders - this ionic current measurement is used to replace the ordinary cam phase sensor, knock sensor and misfire measurement function.
Spark plugs may also be used in other applications such as furnaces wherein a combustible fuel/air mixture must be ignited.
In this case, they are sometimes referred to as flame igniters.
Operation
The plug is connected to the high voltage generated by an ignition coil or magneto.
As the electrons flow from the coil, a voltage difference develops between the central electrode and side electrode.
No current can flow because the fuel and air in the gap is an insulator, but as the voltage rises further, it begins to change the structure of the gases between the electrodes.
Once the voltage exceeds the dielectric strength of the gases, the gases become ionized.
The ionized gas becomes a conductor and allows electrons to flow across the gap.
Spark plugs usually require voltage of 12,000�25,000 volts or more to 'fire' properly, although it can go up to 45,000 volts.
They supply higher current during the discharge process resulting in a hotter and longer-duration spark.
As the current of electrons surges across the gap, it raises the temperature of the spark channel to 60,000 K.
The intense heat in the spark channel causes the ionized gas to expand very quickly, like a small explosion.
This is the "click" heard when observing a spark, similar to lightning and thunder.
The heat and pressure force the gases to react with each other, and at the end of the spark event there should be a small ball of fire in the spark gap as the gases burn on their own.
The size of this fireball or kernel depends on the exact composition of the mixture between the electrodes and the level of combustion chamber turbulence at the time of the spark.
A small kernel will make the engine run as though the ignition timing was retarded, and a large one as though the timing was advanced.
Components of a typical, four stroke cycle, DOHC piston engine. (E) Exhaust camshaft, (I) Intake camshaft, (S) Spark plug, (V) Valves, (P) Piston, (R) Connecting rod, (C) Crankshaft, (W) Water jacket for coolant flow.
Spark plug construction
A spark plug is composed of a shell, insulator and the central conductor.
It passes through the wall of the combustion chamber and therefore must also seal the combustion chamber against high pressures and temperatures without deteriorating over long periods of time and extended use.
Parts of the plug Terminal
The top of the spark plug contains a terminal to connect to the ignition system.
The exact terminal construction varies depending on the use of the spark plug.
Most passenger car spark plug wires snap onto the terminal of the plug, but some wires have spade connectors which are fastened onto the plug under a nut.
Plugs which are used for these applications often have the end of the terminal serve a double purpose as the nut on a thin threaded shaft so that they can be used for either type of connections.
Insulator
The main part of the insulator is typically made from sintered alumina, a very hard ceramic material with high dielectric strength, printed with the manufacturer's name and identifying marks, then glazed to improve resistance to surface spark tracking.
Its major function is to provide mechanical support and electrical insulation for the central electrode, while also providing an extended spark path for flashover protection.
This extended portion, particularly in engines with deeply recessed plugs, helps extend the terminal above the cylinder head so as to make it more readily accessible.
Ribs
By lengthening the surface between the high voltage terminal and the grounded metal case of the spark plug, the physical shape of the ribs functions to improve the electrical insulation and prevent electrical energy from leaking along the insulator surface from the terminal to the metal case. The disrupted and longer path makes the electricity encounter more resistance along the surface of the spark plug even in the presence of dirt and moisture. Some spark plugs are manufactured without ribs; improvements in the dielectric strength of the insulator make them less important.
Insulator tip
On modern (post 1930's) spark plugs, the tip of the insulator protruding into the combustion chamber is the same sintered aluminium oxide (alumina) ceramic as the upper portion, merely unglazed.
It is designed to withstand 650 �C (1,200 �F) and 60,000 volts.
The dimensions of the insulator and the metal conductor core determine the heat range of the plug. Short insulators are usually "cooler" plugs, while "hotter" plugs are made with a lengthened path to the metal body, though this also depends on the thermally conductive metal core.
Older spark plugs, particularly in aircraft, used an insulator made of stacked layers of mica, compressed by tension in the centre electrode.
With the development of leaded petrol in the 1930s, lead deposits on the mica became a problem and reduced the interval between needing to clean the spark plug.
Sintered alumina was developed by Siemens in Germany to counteract this. Sintered alumina is a superior material to mica or porcelain because it is a relatively good thermal conductor for a ceramic, it maintains good mechanical strength and (thermal) shock resistance at higher temperatures, and this ability to run hot allows it to be run at "self cleaning" temperatures without rapid degradation.
It also allows a simple single piece construction at low cost but high mechanical reliability.
Seals
Because the spark plug also seals the combustion chamber or the engine when installed, seals are required to ensure there is no leakage from the combustion chamber.
The internal seals of modern plugs are made of compressed glass/metal powder, but old style seals were typically made by the use of a multi-layer braze.
The external seal is usually a crush washer, but some manufacturers use the cheaper method of a taper interface and simple compression to attempt sealing.
Metal case
The metal case (or the "jacket" as many people call it) of the spark plug withstands the torque of tightening the plug, serves to remove heat from the insulator and pass it on to the cylinder head, and acts as the ground for the sparks passing through the central electrode to the side electrode.
Spark plug threads are cold rolled to prevent thermal cycle fatigue. Also, a marine spark plug's shell is double-dipped, zinc-chromate coated metal.
Central electrode
The central electrode is connected to the terminal through an internal wire and commonly a ceramic series resistance to reduce emission of RF noise from the sparking.
The tip can be made of a combination of copper, nickel-iron, chromium, or noble metals. In the late seventies, the development of engines reached a stage where the �heat range� of conventional spark plugs with solid nickel alloy centre electrodes was unable to cope with their demands.
A plug that was �cold� enough to cope with the demands of high speed driving would not be able to burn off the carbon deposits caused by stop-start urban conditions, and would foul in these conditions, making the engine misfire. Similarly, a plug that was �hot� enough to run smoothly in town, could melt when called upon to cope with extended high speed running on motorways. The answer to this problem, devised by the spark plug manufacturers, was a centre electrode that carried the heat of combustion away from the tip more effectively than was possible with a solid nickel alloy.
Copper was the material chosen for the task and a method for manufacturing the copper-cored centre electrode was created by Floform.
The central electrode is usually the one designed to eject the electrons (the cathode) because it is the hottest (normally) part of the plug; it is easier to emit electrons from a hot surface, because of the same physical laws that increase emissions of vapor from hot surfaces (see thermionic emission).
In addition, electrons are emitted where the electrical field strength is greatest; this is from wherever the radius of curvature of the surface is smallest, from a sharp point or edge rather than a flat surface (see corona discharge).
It would be easiest to pull electrons from a pointed electrode but a pointed electrode would erode after only a few seconds.
Instead, the electrons emit from the sharp edges of the end of the electrode; as these edges erode, the spark becomes weaker and less reliable.
At one time it was common to remove the spark plugs, clean deposits off the ends either manually or with specialized sandblasting equipment and file the end of the electrode to restore the sharp edges, but this practice has become less frequent for two reasons:
1.cleaning with tools such as a wire brush leaves traces of metal on the insulator which can provide a weak conduction path and thus weaken the spark (increasing emissions)
2. plugs are so cheap relative to labor cost, economics dictate replacement, particularly with modern long-life plugs.
The development of noble metal high temperature electrodes (using metals such as yttrium, iridium, tungsten, or palladium, as well as the relatively high value platinum, silver or gold) allows the use of a smaller center wire, which has sharper edges but will not melt or corrode away.
These materials are used because of their high melting points and durability, not because of their electrical conductivity (which is irrelevant in series with the plug resistor or wires).
The smaller electrode also absorbs less heat from the spark and initial flame energy.
At one point, Firestone marketed plugs with polonium in the tip, under the (questionable) theory that the radioactivity would ionize the air in the gap, easing spark formation.
Side (ground, earth) electrode
The side electrode is made from high nickel steel and is welded or hot forged to the side of the metal shell.
The side electrode also runs very hot, especially on projected nose plugs. Some designs have provided a copper core to this electrode, so as to increase heat conduction.
Multiple side electrodes may also be used, so that they don't overlap the central electrode.
Spark plug gap
Spark plugs are typically designed to have a spark gap which can be adjusted by the technician installing the spark plug, by bending the ground electrode slightly.
The same plug may be specified for several different engines, requiring a different gap for each.
Spark plugs in automobiles generally have a gap between 0.035"�0.070" (0.9�1.8 mm).
The gap may require adjustment from the out-of-the-box gap.
A spark plug gap gauge is a disc with a sloping edge, or with round wires of precise diameters, and is used to measure the gap.
Use of a feeler gauge with flat blades instead of round wires, as is used on distributor points or valve lash, will give erroneous results, due to the shape of spark plug electrodes.
The simplest gauges are a collection of keys of various thicknesses which match the desired gaps and the gap is adjusted until the key fits snugly.
With current engine technology, universally incorporating solid state ignition systems and computerized fuel injection, the gaps used are much larger than in the era of carburetors and breaker point distributors, to the extent that spark plug gauges from that era are much too small for measuring the gaps of current cars.
The gap adjustment can be crucial to proper engine operation.
A narrow gap may give too small and weak a spark to effectively ignite the fuel-air mixture, but the plug will almost always fire on each cycle.
A gap that is too wide might prevent a spark from firing at all or may missfire at high speeds, but will usually have a spark that is strong for a clean burn. A spark which intermittently fails to ignite the fuel-air mixture may not be noticeable directly, but will show up as a reduction in the engine's power and fuel efficiency.
As a plug ages, and the metal of both the tip and hook erode, the gap will tend to widen; therefore experienced mechanics often set the gap on new plugs at the engine manufacturer's minimum recommended gap, rather than in the middle of the specified acceptable range, to ensure longer life between plug changes.
On the other hand, since a larger gap gives a "hotter" or "fatter" spark and more reliable ignition of the fuel-air mixture, and since a new plug with sharp edges on the central electrode will spark more reliably than an older, eroded plug, experienced mechanics also realize that the maximum gap specified by the engine manufacturer is the largest which will spark reliably even with old plugs and will in fact be a bit narrower than necessary to ensure sparking with new plugs; therefore, it is possible to set the plugs to an extremely wide gap for more reliable ignition in high performance applications, at the cost of having to replace or re-gap the plugs more frequently, as soon as the tip begins to erode.
Variations on the basic design
Over the years variations on the basic spark plug design have attempted to provide either better ignition, longer life, or both.
Such variations include the use of two, three, or four equally spaced ground electrodes surrounding the central electrode.
Other variations include using a recessed central electrode surrounded by the spark plug thread, which effectively becomes the ground electrode (see "surface-discharge spark plug").
Also there is the use of a V-shaped notch in the tip of the ground electrode. Multiple ground electrodes generally provide longer life, as when the spark gap widens due to electric discharge wear, the spark moves to another closer ground electrode.
The disadvantage of multiple ground electrodes is that a shielding effect can occur in the engine combustion chamber inhibiting the flame face as the fuel air mixture burns.
This can result in a less efficient burn and increased fuel consumption.
Surface-discharge spark plug
A piston engine has a part of the combustion chamber that is always out of reach of the piston; and this zone is where the conventional spark plug is located.
A Wankel engine has a permanently varying combustion area; and the spark plug is inevitably swept by the tip seals. Clearly, if a spark plug were to protrude into the Wankel's combustion chamber it would foul the rotating tip; and if the plug were recessed to avoid this, the sunken spark might lead to poor combustion.
So a new type of "surface discharge" plug was developed for the Wankel. Such a plug presents an almost flat face to the combustion chamber.
A stubby centre electrode projects only very slightly; and the entire earthed body of the plug acts as the side electrode.
The advantage is that the plug sits just beneath the tip-seal that sweeps over it, keeping the spark accessible to the fuel/air mixture.
The "plug gap" remains constant throughout its life; and the spark path will continually vary (instead of darting from the centre to the side electrode as in a conventional plug).
Whereas a conventional side electrode will (admittedly, rarely) come adrift in use and potentially cause engine damage, this is impossible with a surface discharge plug, as there is nothing to break off.
Surface-discharge spark plugs have been produced by inter alia, Denso, Champion and Bosch.
Sealing to the cylinder head
Most spark plugs seal to the cylinder head with a single-use hollow or folded metal washer which is crushed slightly between the flat surface of the head and that of the plug, just above the threads.
Some spark plugs have a tapered seat that uses no washer.
The torque for installing these plugs is supposed to be lower than a washer-sealed plug.
Tip protrusion
The length of the threaded portion of the plug should be closely matched to the thickness of the head.
If a plug extends too far into the combustion chamber, it may be struck by the piston, damaging the engine internally.
Less dramatically, if the threads of the plug extend into the combustion chamber, the sharp edges of the threads act as point sources of heat which may cause preignition; in addition, deposits which form between the exposed threads may make it difficult to remove the plugs, even damaging the threads on aluminium heads in the process of removal.
The protrusion of the tip into the chamber also affects plug performance, however; the more centrally located the spark gap is, generally the better the ignition of the air-fuel mixture will be, although experts believe the process is more complex and dependent on combustion chamber shape.
On the other hand, if an engine is "burning oil", the excess oil leaking into the combustion chamber tends to foul the plug tip and inhibit the spark; in such cases, a plug with less protrusion than the engine would normally call for often collects less fouling and performs better, for a longer period. In fact, special "antifouling" adapters are sold which fit between the plug and the head to reduce the protrusion of the plug for just this reason, on older engines with severe oil burning problems; this will cause the ignition of the fuel-air mixture to be less effective, but in such cases, this is of lesser significance.
Heat range
The operating temperature of a spark plug is the actual physical temperature at the tip of the spark plug within the running engine.
This is important because it determines the efficiency of plug self-cleaning and is determined by a number of factors, but primarily the actual temperature within the combustion chamber.
There is no direct relationship between the actual operating temperature of the spark plug and spark voltage.
However, the level of torque currently being produced by the engine will strongly influence spark plug operating temperature because the maximum temperature and pressure occurs when the engine is operating near peak torque output (torque and RPM directly determine the power output).
The temperature of the insulator responds to the thermal conditions it is exposed to in the combustion chamber but not vice versa.
If the tip of the spark plug is too hot it can cause pre-ignition or sometimes detonation/knocking and damage may occur. I
f it is too cold, electrically conductive deposits may form on the insulator causing a loss of spark energy or the actual shorting-out of the spark current.
A spark plug is said to be "hot" if it is a better heat insulator, keeping more heat in the tip of the spark plug.
A spark plug is said to be "cold" if it can conduct more heat out of the spark plug tip and lower the tip's temperature.
Whether a spark plug is "hot" or "cold" is known as the heat range of the spark plug. The heat range of a spark plug is typically specified as a number, with some manufacturers using ascending numbers for hotter plugs and others doing the opposite, using ascending numbers for colder plugs.
The heat range of a spark plug is affected by the construction of the spark plug: the types of materials used, the length of insulator and the surface area of the plug exposed within the combustion chamber.
For normal use, the selection of a spark plug heat range is a balance between keeping the tip hot enough at idle to prevent fouling and cold enough at maximum power to prevent pre-ignition or engine knocking.
By examining "hotter" and "cooler" spark plugs of the same manufacturer side by side, the principle involved can be very clearly seen; the cooler plugs have a more substantial ceramic insulator filling the gap between the center electrode and the shell, effectively allowing more heat to be carried off by the shell, while the hotter plugs have less ceramic material, so that the tip is more isolated from the body of the plug and retains heat better.
Heat from the combustion chamber escapes through the exhaust gases, the side walls of the cylinder and the spark plug itself.
The heat range of a spark plug has only a minute effect on combustion chamber and overall engine temperature.
A cold plug will not materially cool down an engine's running temperature. (Too hot of a plug may, however, indirectly lead to a runaway pre-ignition condition that can increase engine temperature.)
Rather, the main effect of a "hot" or "cold" plug is to affect the temperature of the tip of the spark plug.
It was common before the modern era of computerized fuel injection to specify at least a couple of different heat ranges for plugs for an automobile engine; a hotter plug for cars which were mostly driven slowly around the city, and a colder plug for sustained high speed highway use.
This practice has, however, largely become obsolete now that cars' fuel/air mixtures and cylinder temperatures are maintained within a narrow range, for purposes of limiting emissions.
Racing engines, however, still benefit from picking a proper plug heat range. Very old racing engines will sometimes have two sets of plugs, one just for starting and another to be installed for driving once the engine is warmed up.
Spark plug manufacturers use different numbers to denote heat range of their spark plugs.
Reading spark plugs
The spark plug's firing end will be affected by the internal environment of the combustion chamber.
As the spark plug can be removed for inspection, the effects of combustion on the plug can be examined.
An examination, or "reading" of the characteristic markings on the firing end of the spark plug can indicate conditions within the running engine.
The spark plug tip will bear the marks as evidence of what is happening inside the engine.
Usually there is no other way to know what is going on inside an engine running at peak power.
Engine and spark plug manufacturers will publish information about the characteristic markings in spark plug reading charts.
Such charts are useful for general use but are of almost no use in reading racing engine spark plugs, which is an entirely different matter.
A light brownish discoloration of the tip of the block indicates proper operation; other conditions may indicate malfunction.
For example, a sandblasted look to the tip of the spark plug means persistent, light detonation is occurring, often unheard.
The damage that is occurring to the tip of the spark plug is also occurring on the inside of the cylinder.
Heavy detonation can cause outright breakage of the spark plug insulator and internal engine parts before appearing as sandblasted erosion but is easily heard.
As another example, if the plug is too cold, there will be deposits on the nose of the plug.
Conversely if the plug is too hot, the porcelain will be porous looking, almost like sugar.
The material which seals the central electrode to the insulator will boil out. Sometimes the end of the plug will appear glazed, as the deposits have melted.
An idling engine will have a different impact on the spark plugs than one running at full throttle.
Spark plug readings are only valid for the most recent engine operating conditions and running the engine under different conditions may erase or obscure characteristic marks previously left on the spark plugs.
Thus, the most valuable information is gathered by running the engine at high speed and full load, immediately cutting the ignition off and stopping without idling or low speed operation and removing the plugs for reading.
Spark plug reading viewers, which are simply combined flashlight/magnifiers, are available to improve the reading of the spark plugs.
Indexing spark plugs
A matter of some debate is the "indexing" of plugs upon installation, usually only for high performance or racing applications; this involves installing them so that the open area of the spark gap, not shrouded by the ground electrode, faces the center of the combustion chamber, towards the intake valve, rather than the wall.
Some engine tuners who believe that this will maximize the exposure of the fuel-air mixture to the spark, also ensuring that every combustion chamber is an even in layout and therefore result in better ignition ; others, however, believe that this is useful only to keep the ground electrode out of the way of the piston in ultra-high-compression engines if clearance is insufficient.
In any event, this is accomplished by marking the location of the gap on the outside of the plug, installing it, and noting the direction in which the mark faces; then the plug is removed and additional washers are added so as to change the orientation of the tightened plug.
This must be done individually for each plug, as the orientation of the gap with respect to the threads of the shell is random.
Some plugs are made with a non-random orientation of the gap and are usually marked as such by a suffix to the model number; typically these are specified by manufacturers of very small engines where the spark plug tip and electrodes form a significantly large part of the shape of the combustion chamber.
The Honda Insight has indexed spark plugs from factory, with four different part numbers available corresponding to the different degrees of indexing to achieve most efficient combustion and maximum fuel efficiency.
From wikipedia link below:
http://en.wikipedia.org/wiki/Spark_plug
New Link's
Reading Spark Plugs
(This applies to Naturally Aspirated as well as Nitrous Engines)
http://www.angelfire.com/fl4/pontiac...Readplugs.html
Reading Spark Plugs
by Meaux Racing Heads
http://www.dragstuff.com/techarticle...ead-plugs.html
Spark Plug Reading 101
by Mike Canter
http://www.dragstuff.com/techarticle...ark-plugs.html
Blown Alcohol Motor Spark Plug Reading 101
by Mike Canter
http://www.dragstuff.com/techarticle...ark-plugs.html
Nitrous Spark Plug Pictures
by John Heard and Friends...
http://www.dragstuff.com/techarticle...-pictures.html
So guy's feel free to ADD Tips.
Last edited by hussain-vtec; 07-04-2012 at 05:55 AM. Reason: New link's added NGK Spark plugs Reading And heat rang.
 06-09-2012, 05:24 AM
#3
Honda-Tech Member
Thread Starter
 06-09-2012, 06:29 AM
#5
Honda-Tech Member
Sweet, thank you for you efforts on both this thread and the cooling systerm thread. 
I agree with Spawn, STICKY !!!!!!!
I agree with Spawn, STICKY !!!!!!!
 06-09-2012, 01:11 PM
#7
Honda-Tech Member
Thread Starter
Thank's
Any thing you need guy's don't shy just ask.
I will always share major knowledge.
I will always share major knowledge.
Trending Topics
 06-11-2012, 05:00 AM
#10
Honda-Tech Member
Thread Starter
Bump For experiencing and sharing your own skills.
The best way to read a plug, Magnifying Glasses.
heat rang setups N/A or F/I,..Tips to guide us H-T members to the Top
The best way to read a plug, Magnifying Glasses.
heat rang setups N/A or F/I,..Tips to guide us H-T members to the Top
06-11-2012, 11:34 PM
#12
Honda-Tech Member
Thread Starter
Your welcome, Get a New spark plug's set make third gear WOT before rev limit and engine should be shut down after the run use a Magnifying Glass read it and take image shoot to share it with us.


Pro Spark Plug Viewer link below:
http://www.powerhouseproducts.com/ph...ug-viewer.html

SPARK PLUG LIGHT & MAGNIFIER link below:
http://www.speedwaymotors.com/Spark-...fier,2642.html
Tips:
With practice you will gain enough experience.
Pro Spark Plug Viewer link below:
http://www.powerhouseproducts.com/ph...ug-viewer.html
SPARK PLUG LIGHT & MAGNIFIER link below:
http://www.speedwaymotors.com/Spark-...fier,2642.html
Tips:
With practice you will gain enough experience.
Last edited by hussain-vtec; 06-15-2012 at 06:55 AM. Reason: TO ADD SPARK PLUG MAGNIFIER TOOLS

 06-12-2012, 08:07 PM
#18

This plug is from a third gear pull to 7500 with wideband reading 12.9 afr.. I cant really see any afr readings on it.. This was a brand new plug with one pull on it.. Do i have to do multiple pulls?? What do you think of it?
Last edited by yungmulacrx; 06-13-2012 at 12:31 PM.
06-13-2012, 12:41 AM
#19
Honda-Tech Member
Thread Starter
(Wow big images Above) change the size like these.
Things need to be considered & configured:
Engine specs N/A or F/I, Engine Compression, sparks plug set of 6's or 7's or 8's, where it's gapped at between 0.035"�0.070" (0.9�1.8 mm).
AEM Says on the AEM EFI Basics:
Engine Specs: Spark plug gap:
Natural aspirated up to 11.0:1 CR 1.1mm (.044'')
Natural aspirated up to 11.0:1 to 14.0: CR 1.8mm (.032'')
Forced Induction to 20-PSI .7mm (.028'')
Forced Induction to 40-PSI .6mm (.022'')
AEM PDF link below:
http://www.aemelectronics.com/files/...asics_V1.3.pdf
Need your Engine Specs along with your spark plugs don't forget to mention in your new post.
First: It's hard to see it when the plugs are fresh set.
Second: Depending where in the rpm range you shut down, Color change should take place right at the bend of the ground strap.
I suggest doing the fallowing steps:
Try a couple Engine WOT shut downs somewhere in between 4000-5500 RPM & another full throttle from run 5000 to 7000 RPM and see the Color change of the bend of the ground strap.
By reading you will learn things but by practicing you well End up Expert.
06-13-2012, 03:03 AM
#20
Honda-Tech Member
Thread Starter
06-13-2012, 06:27 AM
#22
Sorry for the big pics. Engine is a f20b ,11.0 compression, stock internals, euro r intake manifold, cheap ebay header w/2.5 in collector mod, custom 2.5in exhaust, cold air intake, and tuned on s300.. Spark plugs are zfr6f-11 gapped at .044. Thanks for the advice i will sure try it.. This is something ive been wanting to learn. Engine was shut down at 7500 wot..
 06-14-2012, 04:45 AM
#25
Honda-Tech Member
Thread Starter
Agree.
It's OK,Your welcome any time.
As mentioned in heat rang Above in Spark plug FAQ the level of torque currently being produced by the engine will strongly influence spark plug operating temperature because the maximum temperature and pressure occurs when the engine is operating near peak torque output (torque and RPM directly determine the power output).
This is why i mention to Try a couple Engine WOT shut downs somewhere in between 4000-5500 RPM & another full throttle from run 5000 to 7000 RPM and see the Color change of the bend of the ground strap.
See where is Peak Torque Output.
Spawne32 thank you for sharing this image,I believe that you read the
Entire thread.
So i would like you to read your spark plug what can you See from it!
Thank you.
Guys I make a new update to the thread New link's.
Sorry for the big pics. Engine is a f20b ,11.0 compression, stock internals, euro r intake manifold, cheap ebay header w/2.5 in collector mod, custom 2.5in exhaust, cold air intake, and tuned on s300.. Spark plugs are zfr6f-11 gapped at .044. Thanks for the advice i will sure try it.. This is something ive been wanting to learn. Engine was shut down at 7500 wot..
As mentioned in heat rang Above in Spark plug FAQ the level of torque currently being produced by the engine will strongly influence spark plug operating temperature because the maximum temperature and pressure occurs when the engine is operating near peak torque output (torque and RPM directly determine the power output).
This is why i mention to Try a couple Engine WOT shut downs somewhere in between 4000-5500 RPM & another full throttle from run 5000 to 7000 RPM and see the Color change of the bend of the ground strap.
See where is Peak Torque Output.
Spawne32 thank you for sharing this image,I believe that you read the
Entire thread.
So i would like you to read your spark plug what can you See from it!
Thank you.
Guys I make a new update to the thread New link's.

