
[DIY] How to remove a B-series cylinder head
 06-23-2011, 06:07 PM
#1
Honda-Tech Member
Thread Starter
This is a short guide i'm going to do because i have all the pictures already.
This DIY will be handy if you are changing headgaskets, camshafts, valves etc..
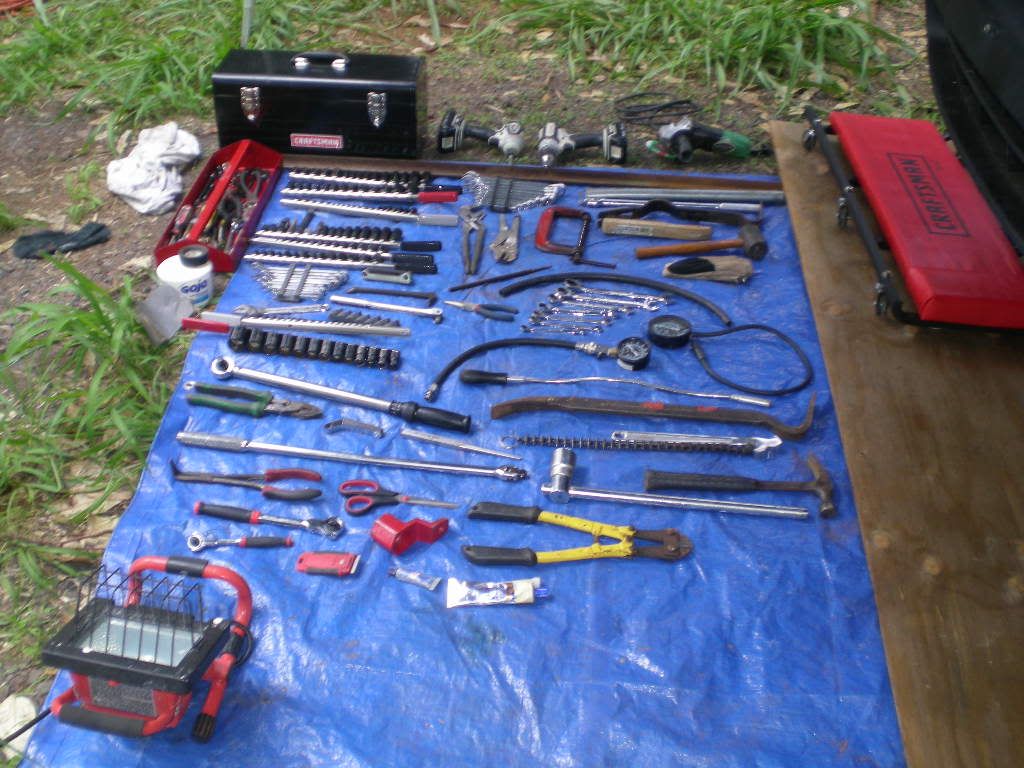
Alright, you need a basic set of tools. This is my tool set, which obviously has more than you would need for a simple job like removing your cylinder head from the block.
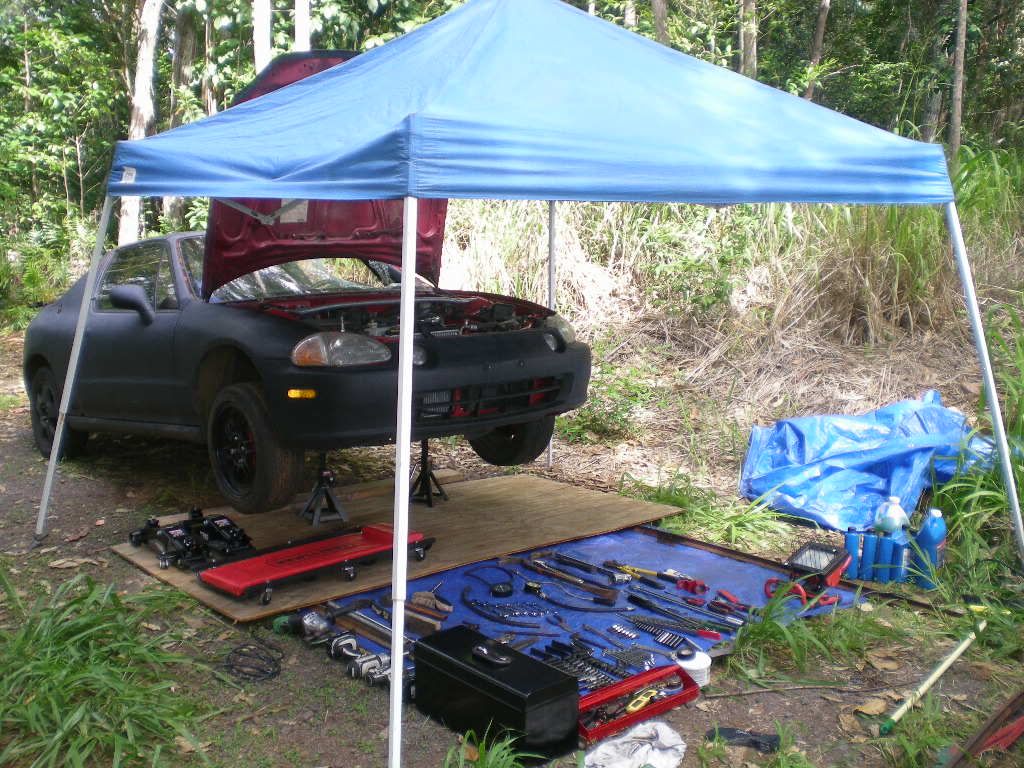
Once you have your tools, you can jack the car up or not. It's your choice. If you're tall, you may want the engine bay higher to work. If you're short, you may want the car on the ground. Personal preference.
The first IMPORTANT step is to disconnect the battery terminals. If you don't do this, you can easily bump the wrong electrical connectors with a wrench or other tool and cause shorts, burn out fuses, create other problems.
The next step is to drain the coolant. Some people drain into a clean pan with the intention of re-using coolant. I say spend 14 bucks and get some new coolant upon reassembly, because it's cheap insurance for the longevity of your motor. Always dispose of coolant properly, and never leave it sitting un-attended where an animal could drink it. (Stupid animals... but on another note COOLANT IS SWEET AND TASTY. I removed a radiator cap under pressure while hot once, and the coolant exploded into my face. Sizable amounts made their way into my mouth and YES COOLANT DOES TASTE GOOD!)
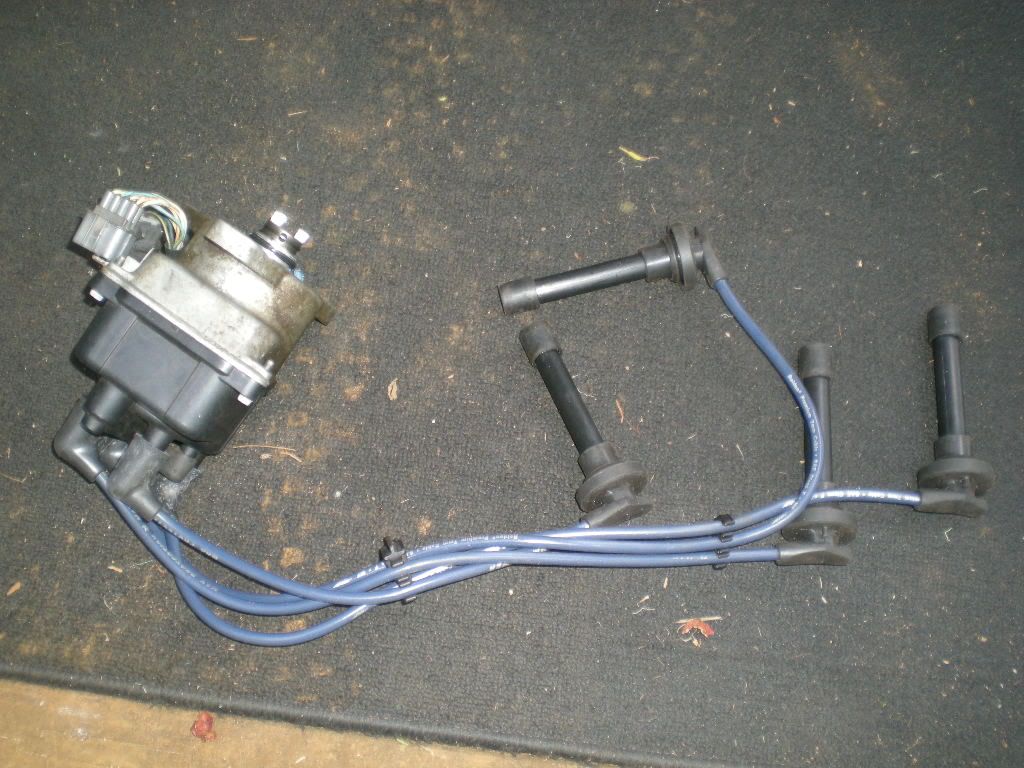
Next step is to remove the distributor. I recommend you make a scratch to mark the where the distributor timing is set.

There are three 12mm bolts. The top is easily accessible by a 12mm wrench.
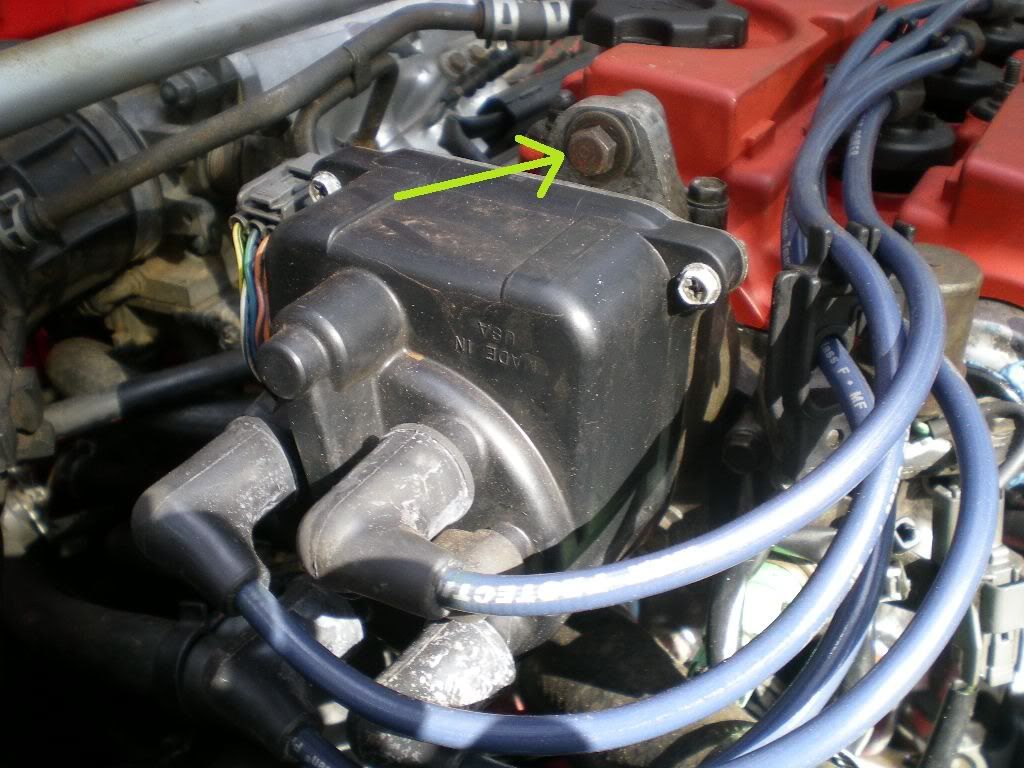
The second bolt is in the front, also 12mm. A socket w/extension will be the easiest for this.

Here's the third bolt. 12mm socket w/extension. Before you take this last bolt out, disconnect the two electrical connectors for the distributor. Snap connectors. Simple.

Snap connectors. Simple.

This is what your head looks like without a distributor.
Put your distributor someplace safe and out of the way. You do not have to remove the spark plug wires, this makes installation easier later.
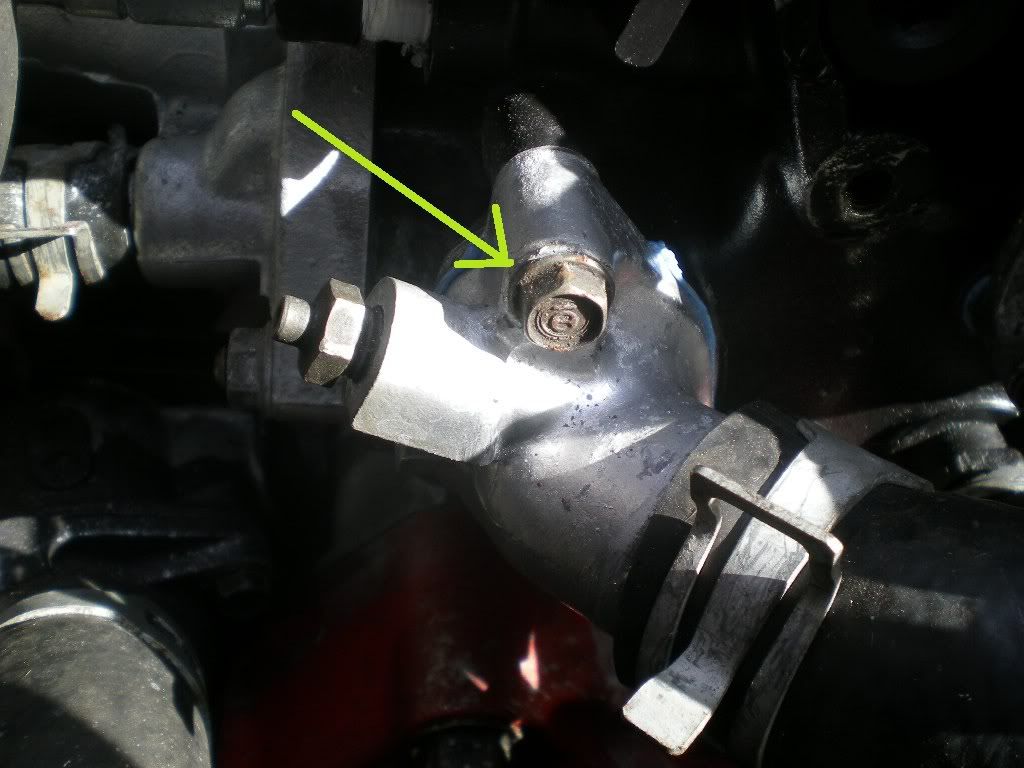
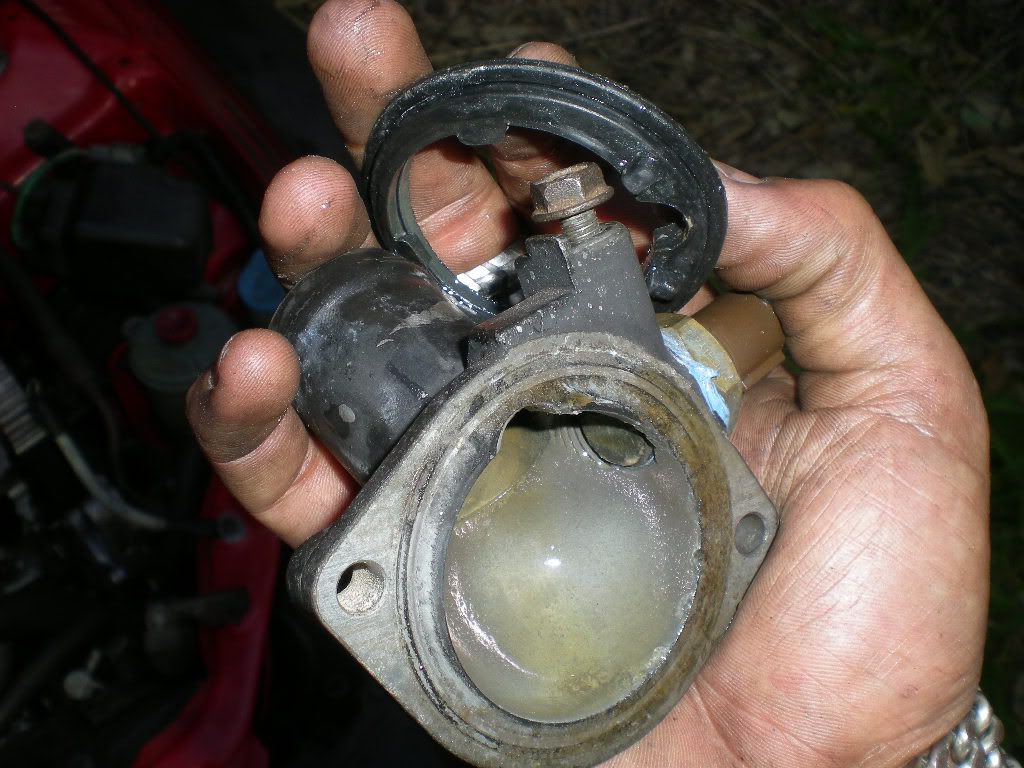
Next up we remove the top radiator hose and cooling neck. Removing the coolant neck is optional, but I think it makes things easier later. Here's the top bolt.
...And here's the bottom bolt. Leave the bleeder screw in and tight.
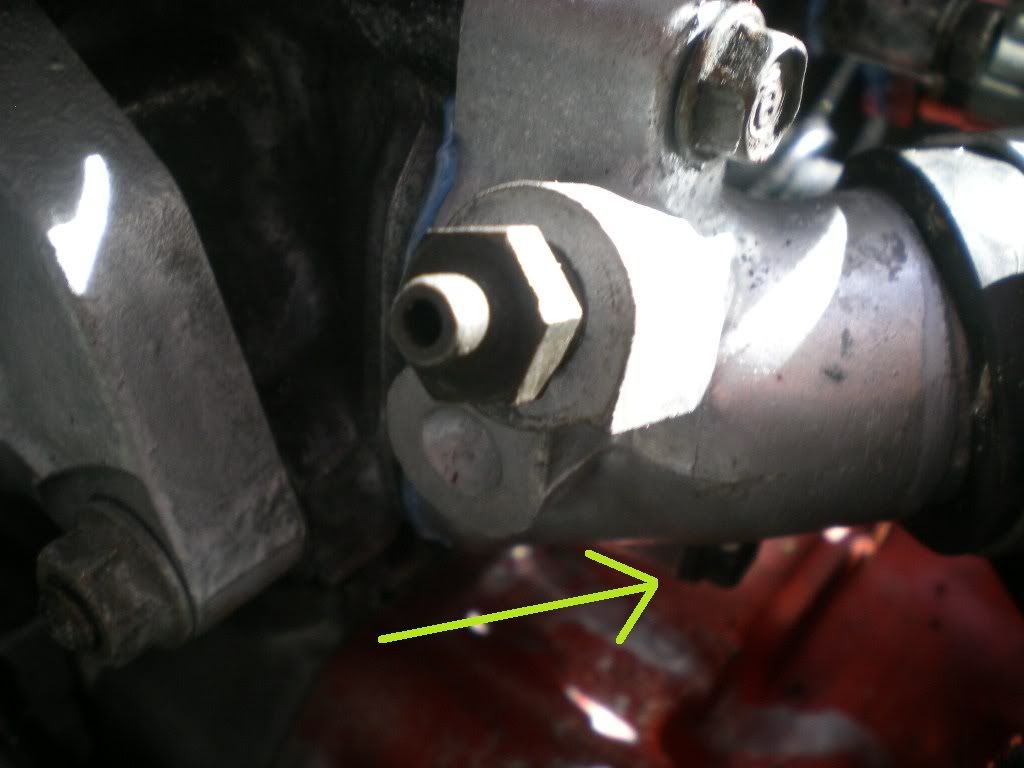
I recommend you leave the distributor/coolant neck bolts in the head. This makes them easier to find for reassembly and harder to lose.

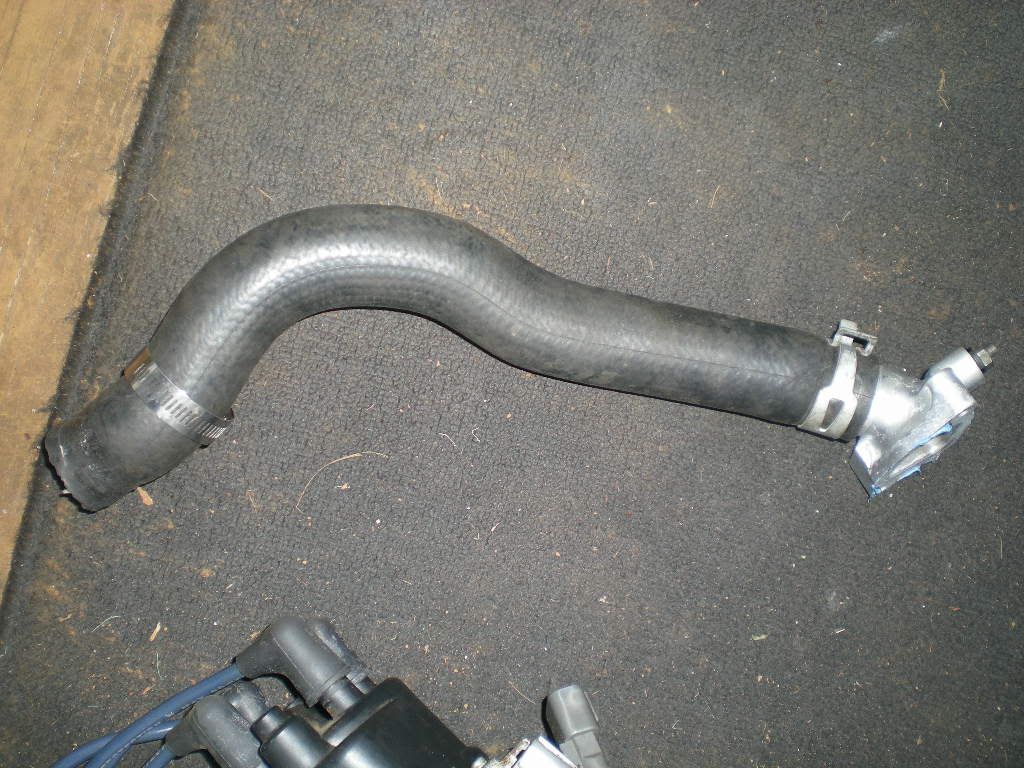
Put the coolant neck in the parts pile. Just like the distributor, we can leave the top radiator hose connected.
Next up is the powersteering bracket on the front of the head. These are the two 14mm bolts for the bracket.

Before you remove the bracket, loosen the tension on the belt so we don't damage anything with the belt torque.. Here are the two pinch bolts..
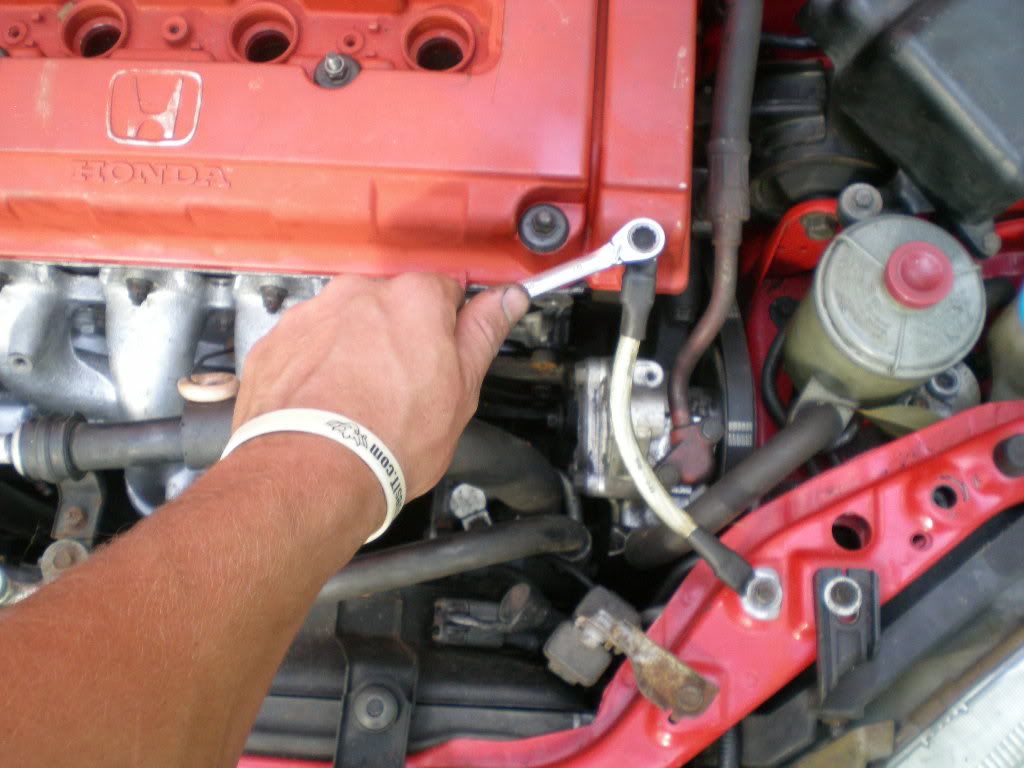
Here's the top pinch bolt.
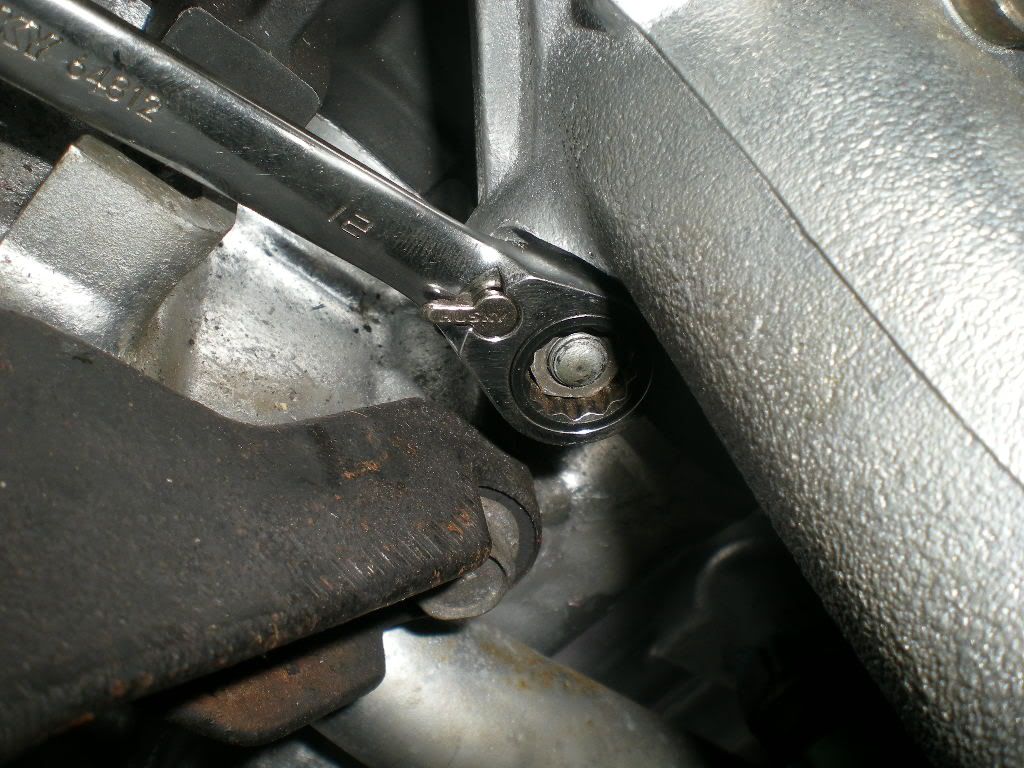
Best way to loosen it is a 12mm wrench, easily accessible from the front.
Next up is the bottom 12mm pinch bolt. It's hard to reach and should be pretty tight.

You may need a bar for added leverage with a 12mm socket.
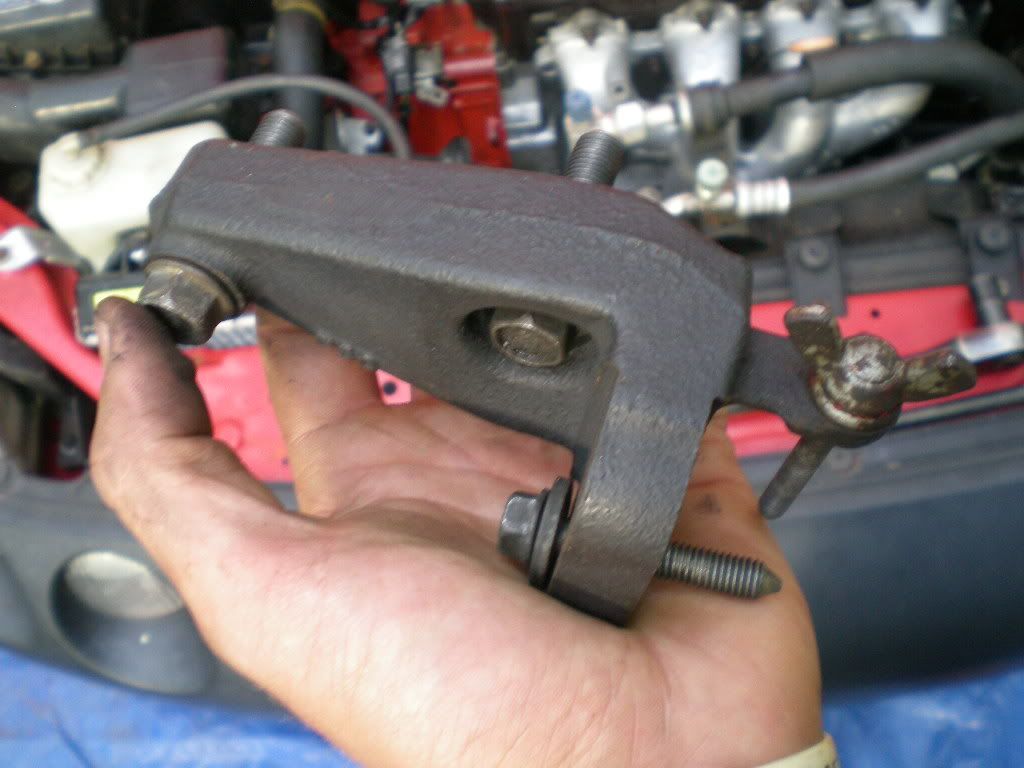
Now loosen the wingnut easily accessible on the top of the PS pump (not pictured) and then take the bracket off. Two 14mm bolts, easy with a breaker bar..
Or a ratchet..
The bolts are slightly different length..
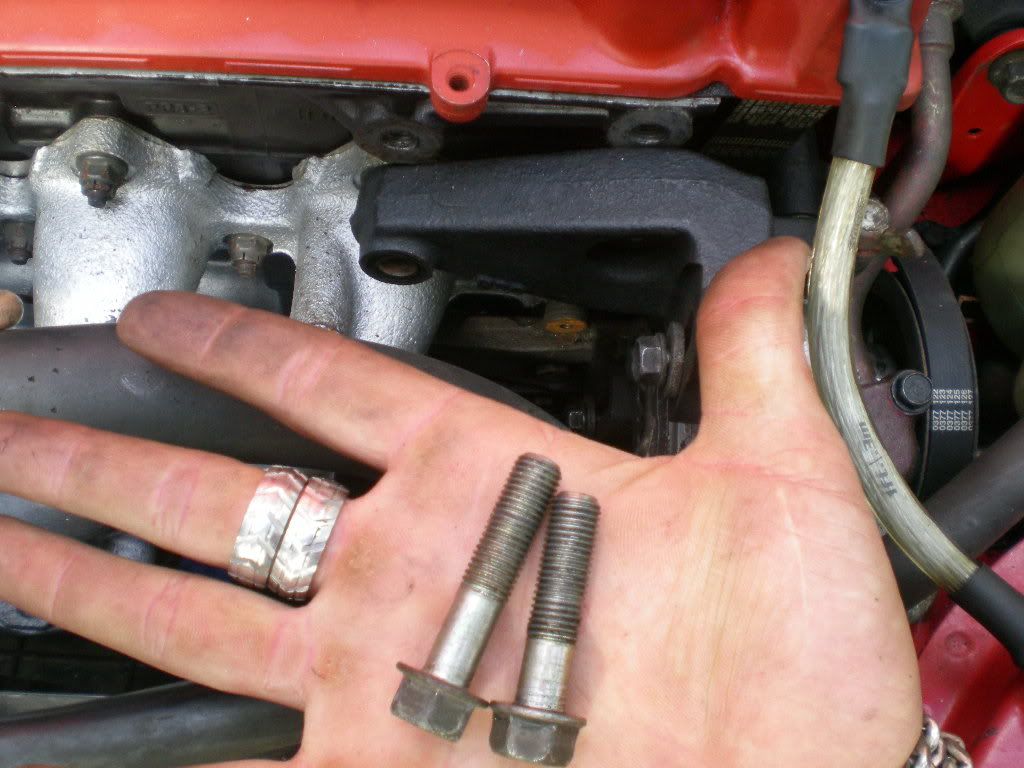
As you can see, the longer bolt goes on the left (passenger side of head). Shorter bolt on the right (driver side)
Leave all the bolts in the right holes and put the PS bracket off with the other parts.
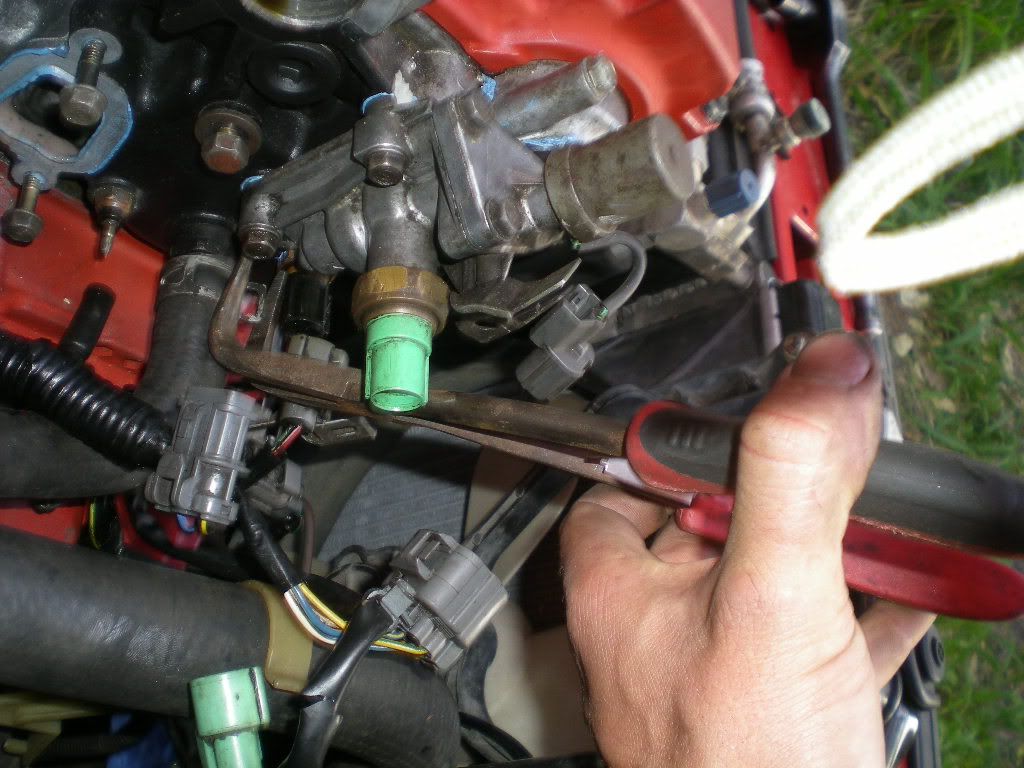
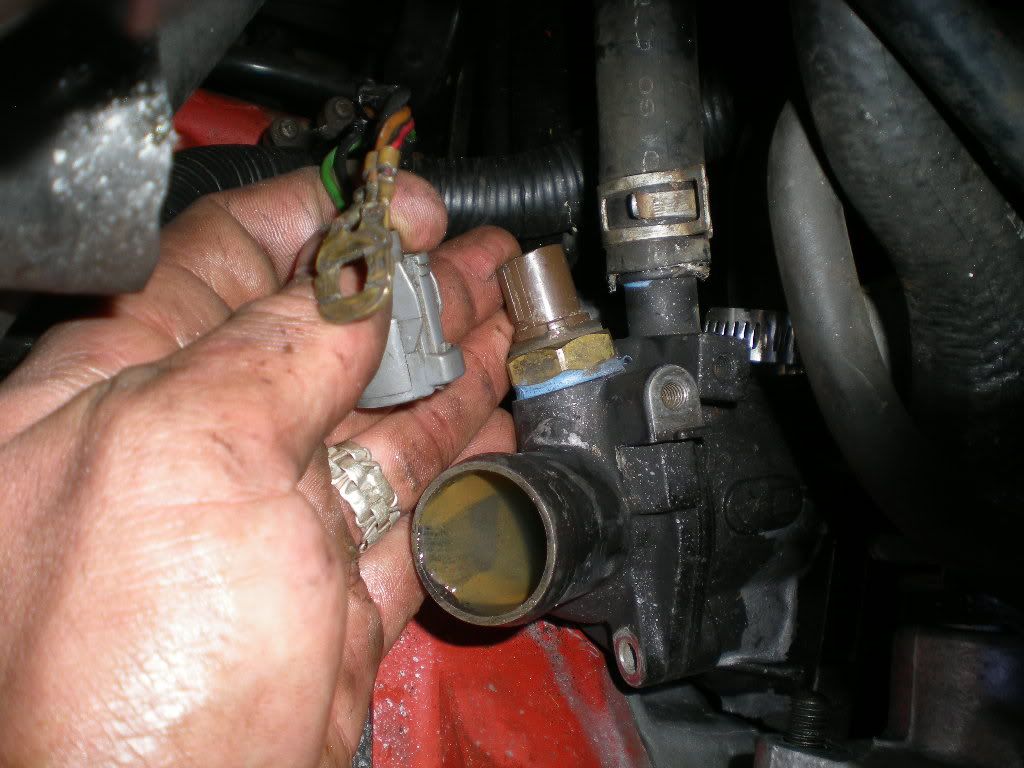
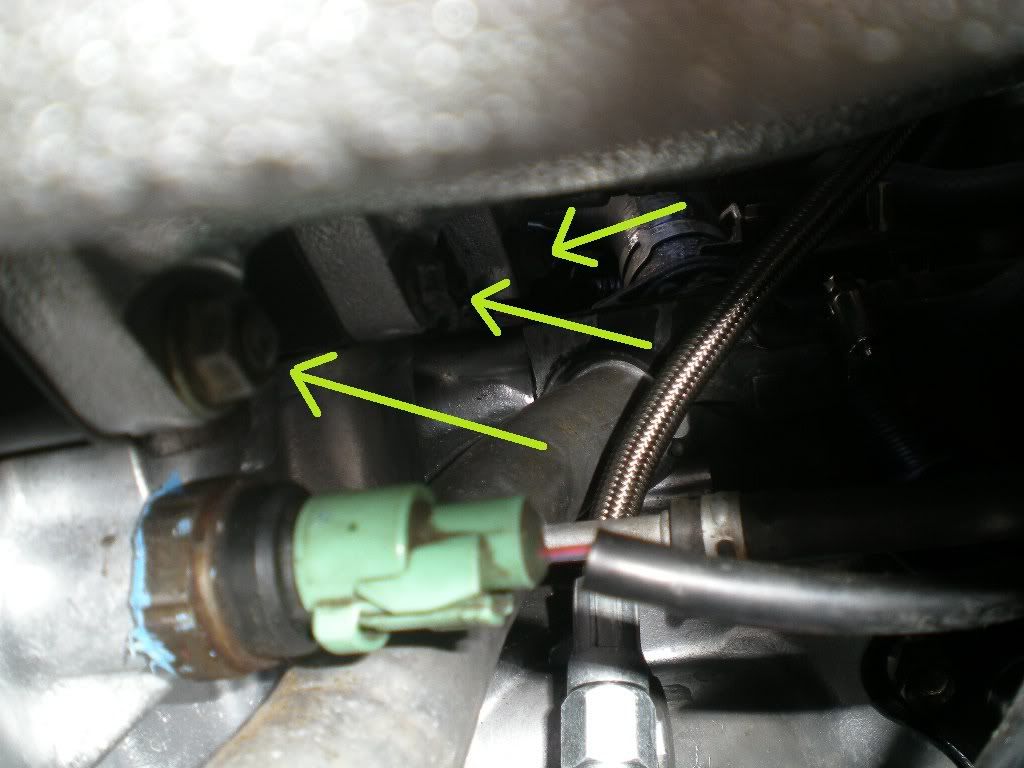
Back to the other passenger side of the head... Unplug the coolant dashboard gauge sensor (single pin, lower left) the ECU coolant temp sensor (gray plug in hand) and the VTEC solenoid oil pressure sensor switch (green plug, top right) AAAND the VTEC spool valve plug (further up/forward out of the picture.)

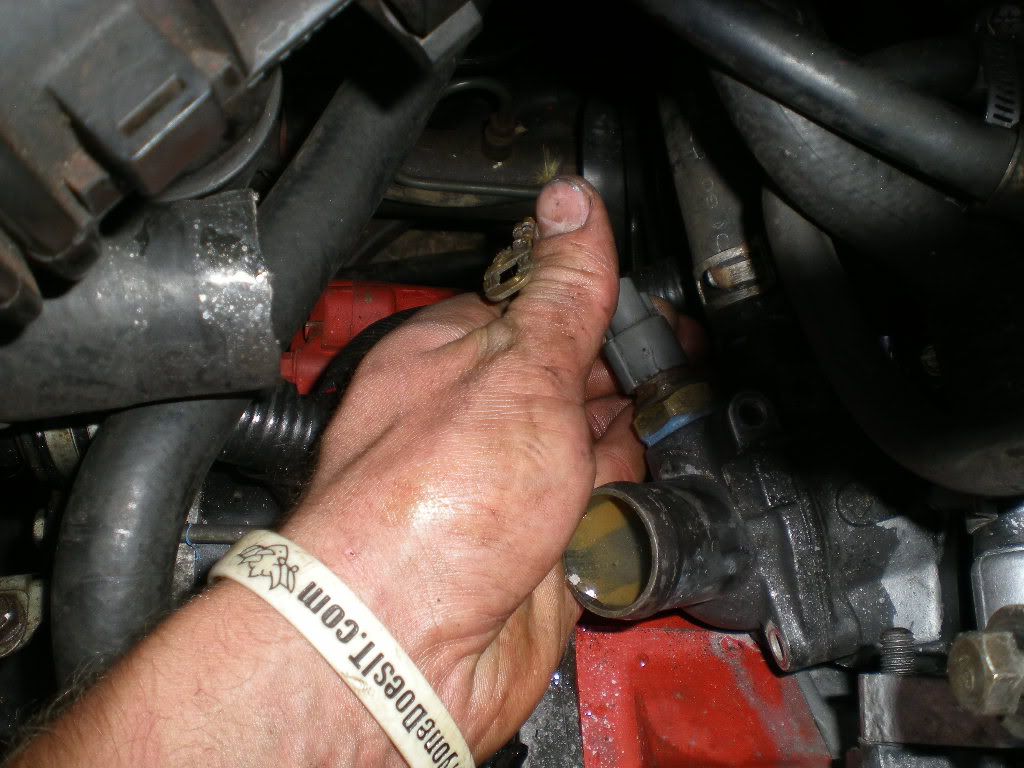
Now we have the wires out of the way, we can undo the heater-core hose with some needlenose pliers..
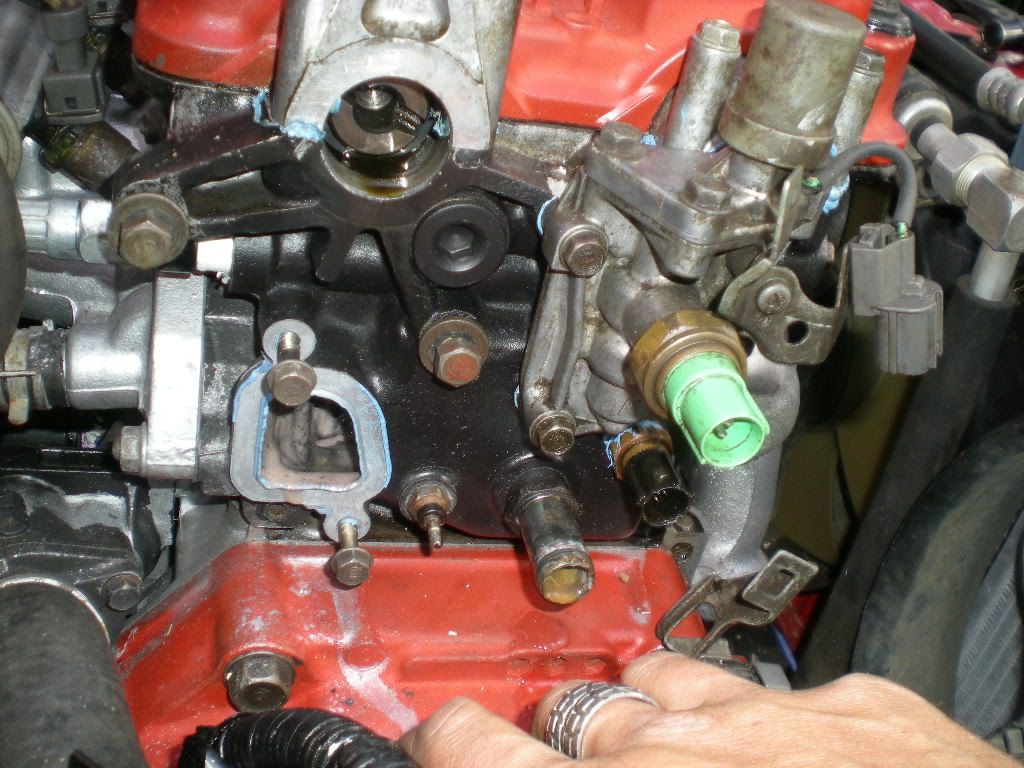
Now we can see the passenger side of the head is clean and fully disconnected.
Now lets get the valve cover out of the way. First up is the ground. 10mm
THIS BOLT STRIPS EASILY..
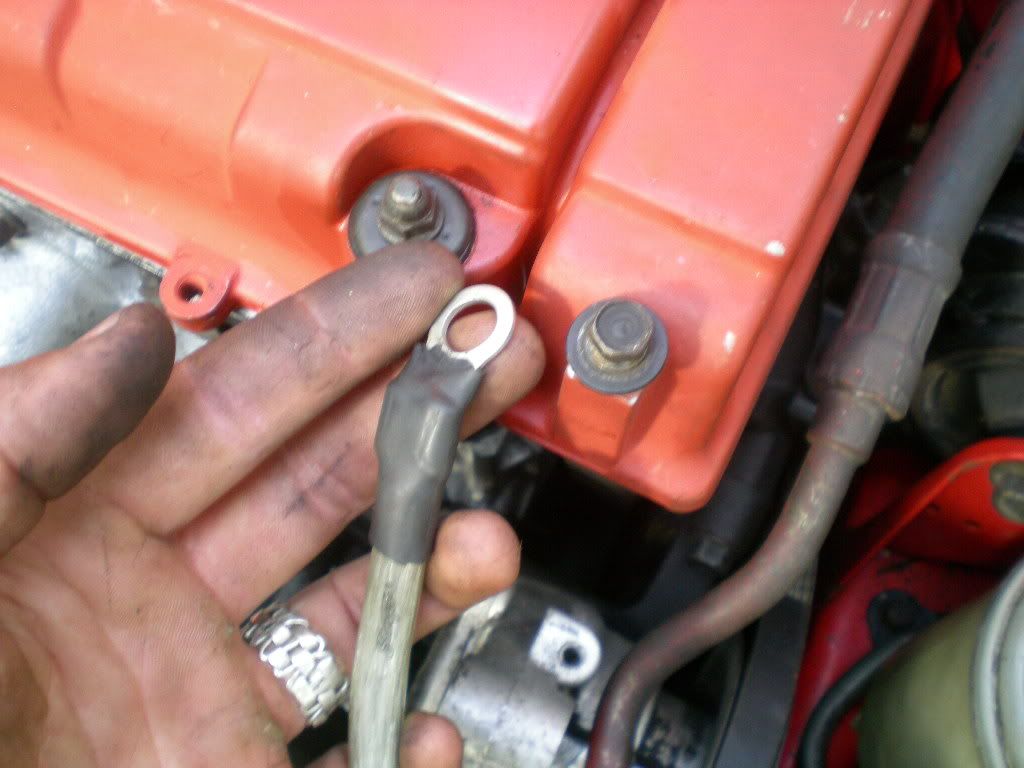
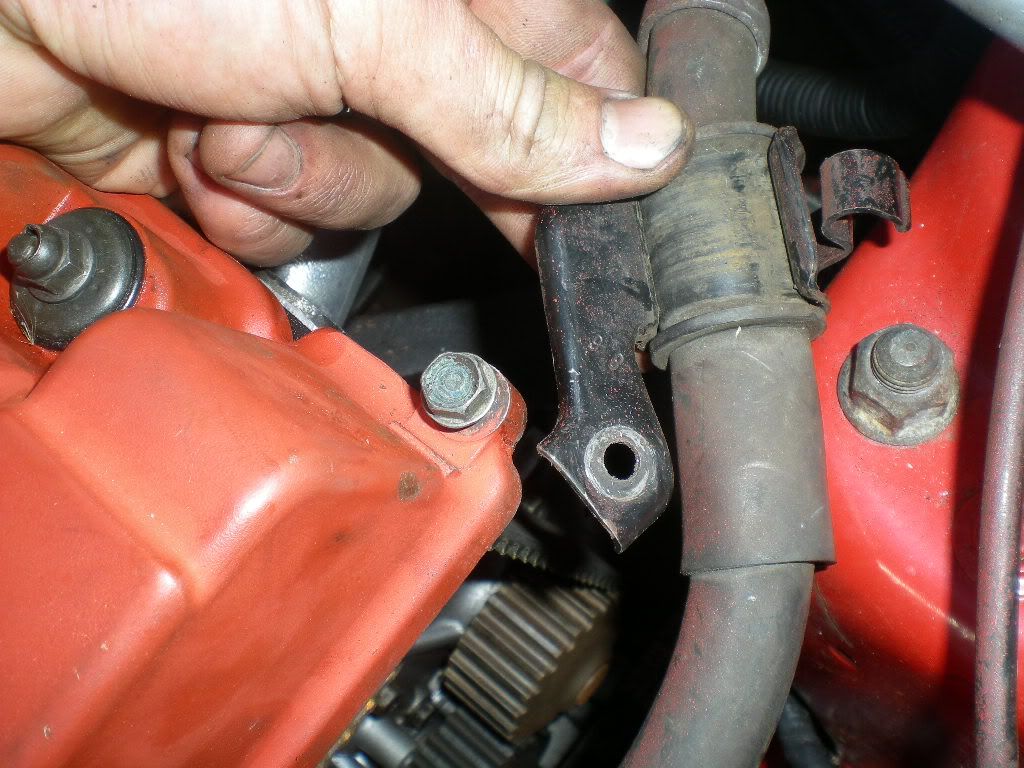
Then it's the power steering line bracket on the rear driver-side of the head.. 10mm
This bolt also strips easily. We can leave the ground strap/PS line right where they are, as long as you can flex them out of the way of the head for removal/installation.
Now we remove the eight valve cover nuts and grommets. They are all 10mm and the removal order is this...
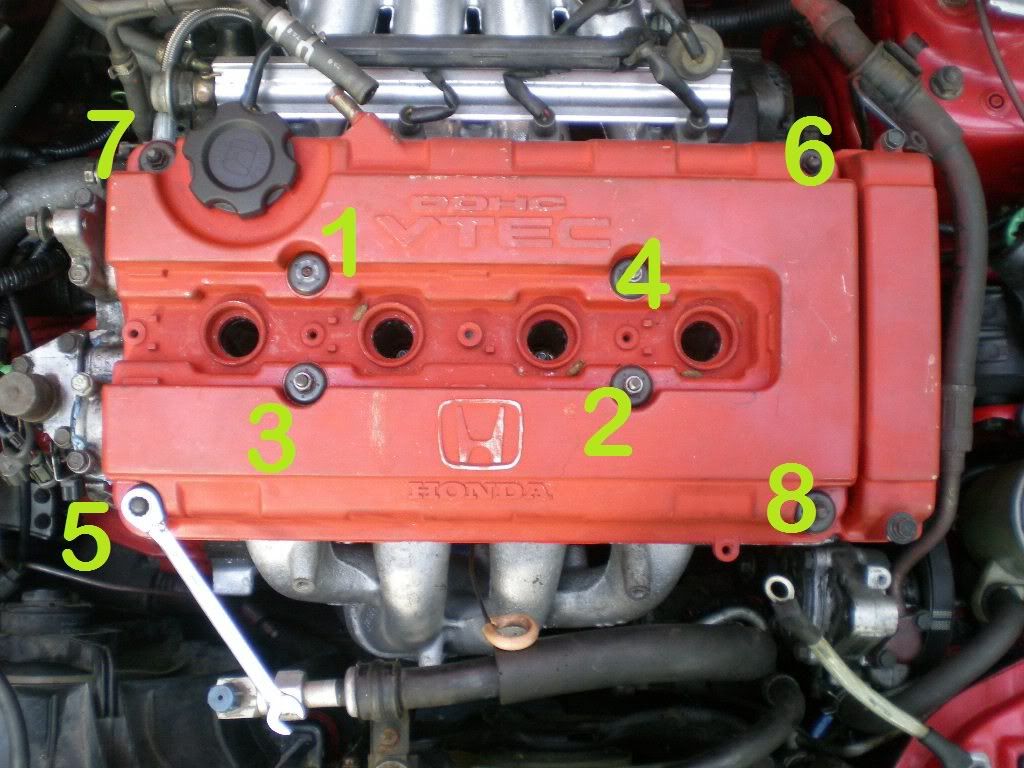
All bolts removed, you should pry out all grommets and the metal dished retainers that hold them down.

Put all these bolts/grommets/retainers in a bag so we don't lose them.
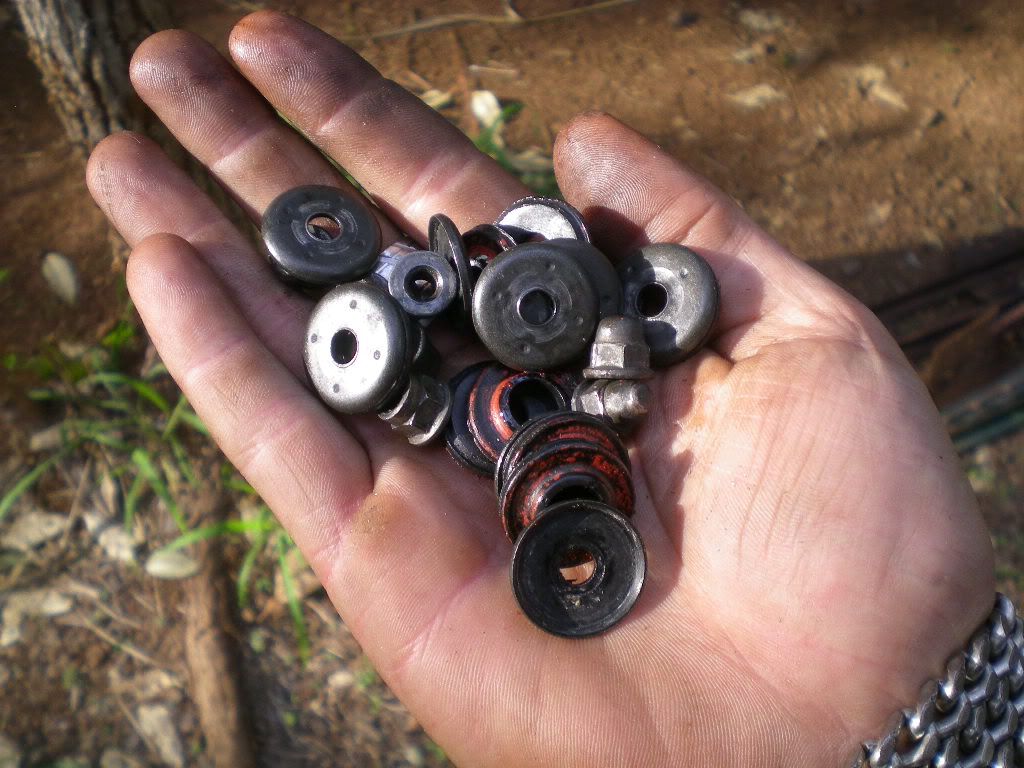
After lifting the valve cover off, make sure you have one of these donut gaskets in each spark plug hole. And make sure the perimeter gasket came with the cover and did not stick to the head.
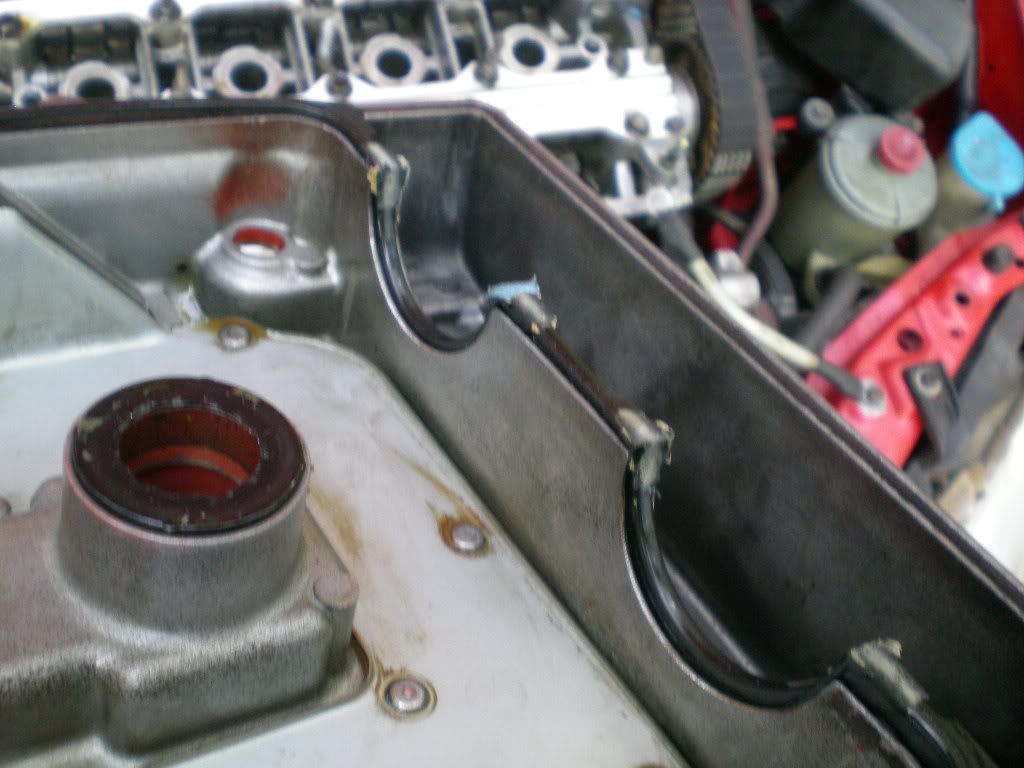
Here's our head without the valve cover. Now we will remove the timing belt from the cam gears. This is the order I do everything in, you can mix things up if you'd like. I don't mess with TDC before removing my head, because I always set TDC during reassembly.

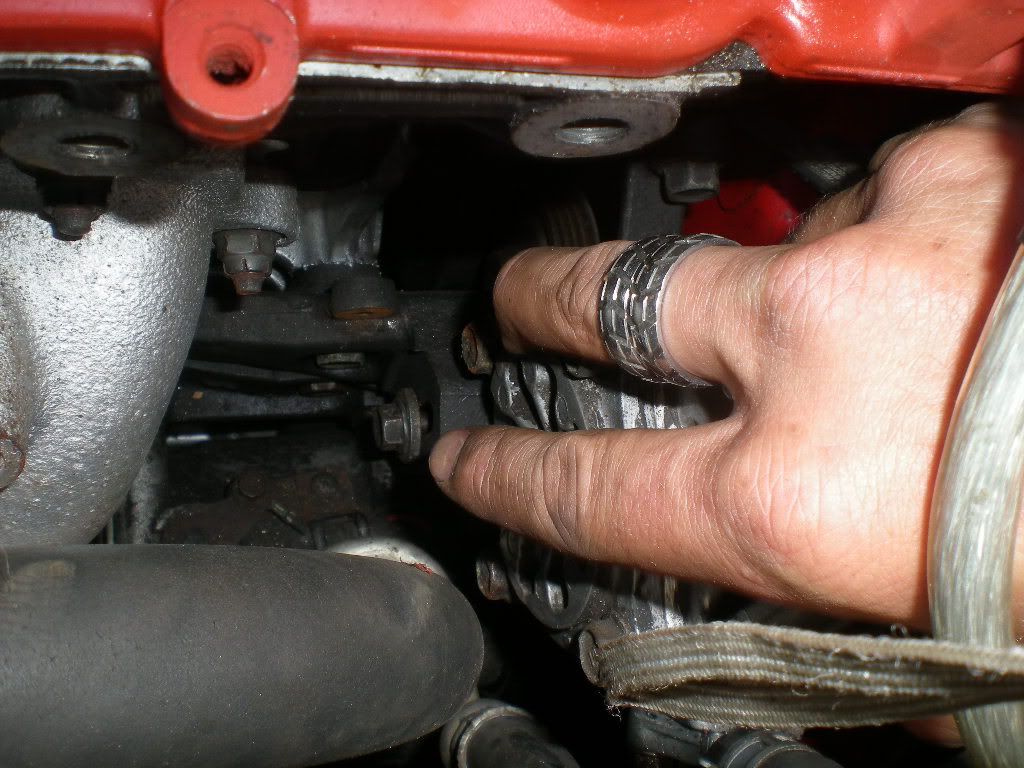
Reach down underneath the driver side motor mount and you will find a 14mm tensioner bolt. If your timing cover is off, it's the only 14mm bolt on that side of the motor. If your timing cover is on, it may be hiding underneath a plastic plug. DIRECTLY BELOW MOTOR MOUNT. You can't see it in this picture...
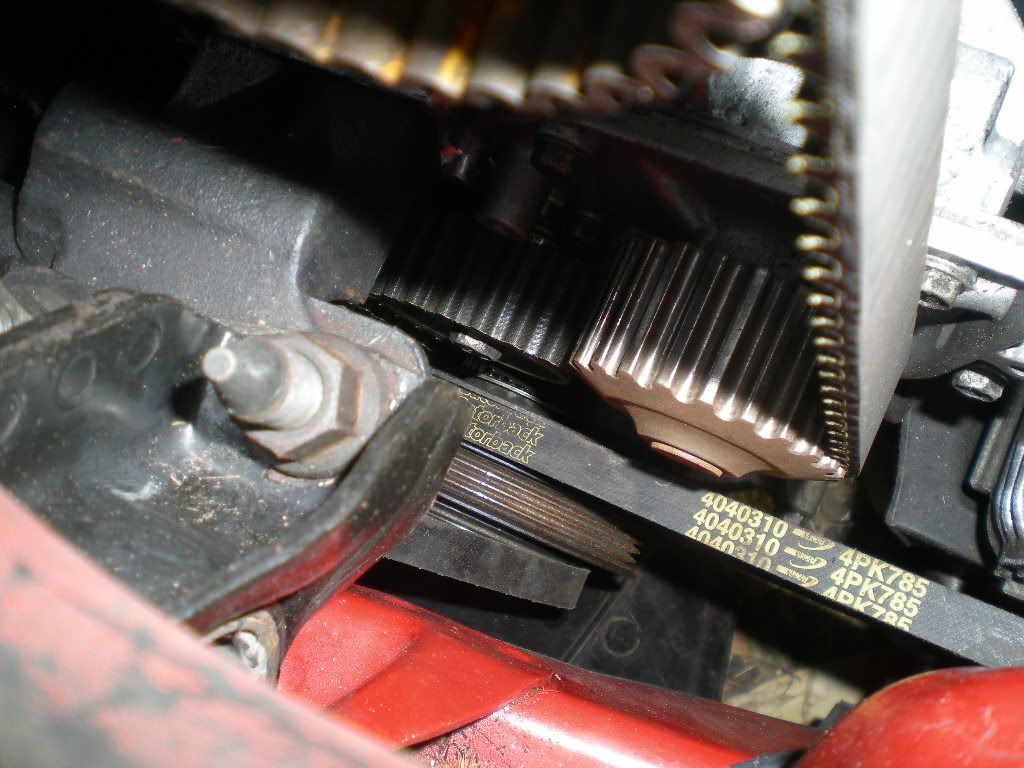
Here we go... 14mm socket w/extension is the best way I know to loosen it. WE ARE NOT REMOVING THIS BOLT. We are only unthreading the bolt a few turns to loosen the timing belt..

This will take the tension off the belt, and you can slide it off the cams little by little.
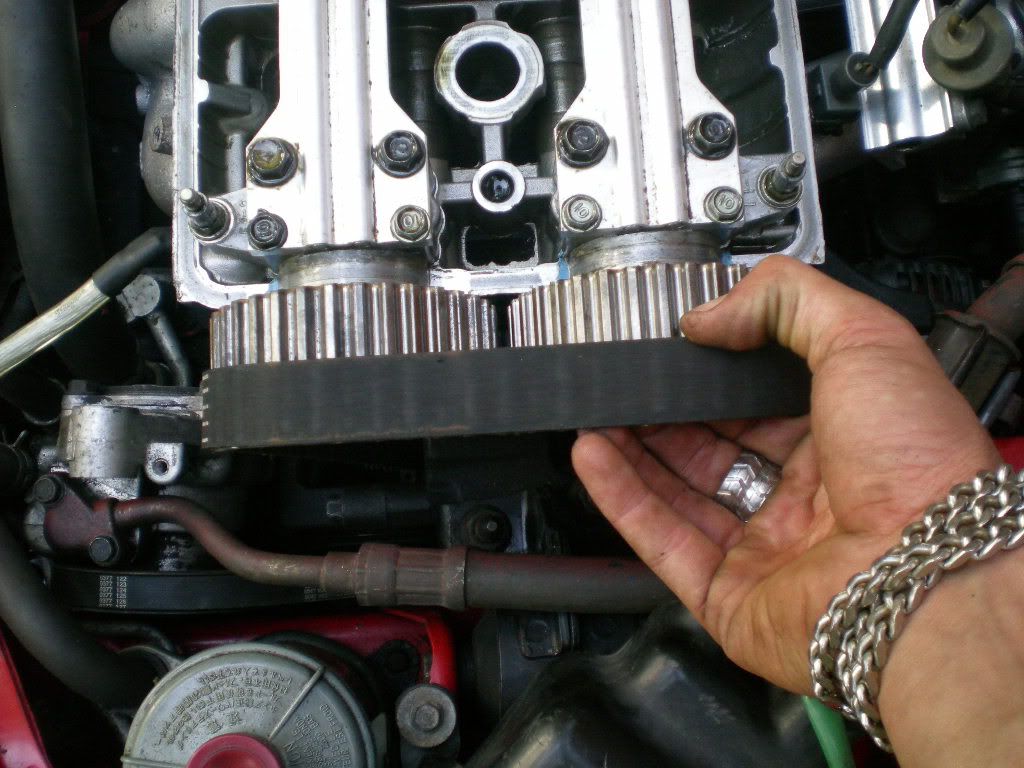
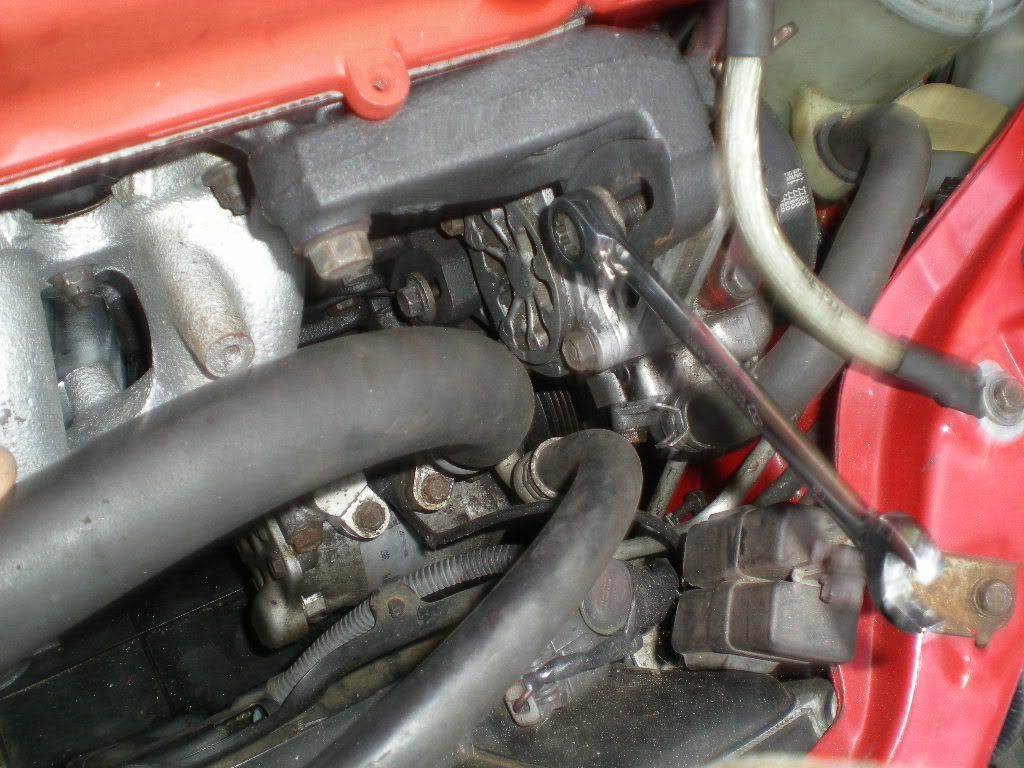
Once we have the belt off - we remove the header (exhaust manifold.) You may have a cover over your header it insulate heat. This cover does very little from a practical standpoint and I removed mine years ago. If you have a cover, there are three 12mm bolts holding it to the header. This is the order we undo the 9 exhaust manifold bolts.

A 12mm socket will get to most of the bolts - They are actually nuts because the header hangs on the studs but fck the rhetoric..
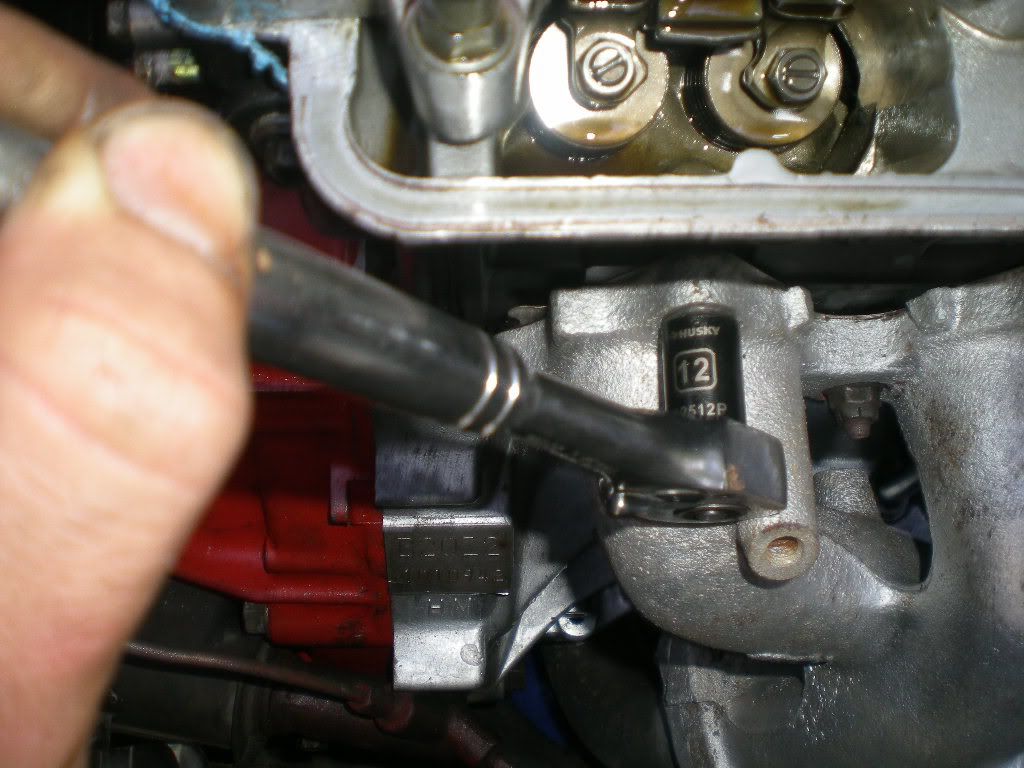
A 12mm socket on a 3/8" breaker bar will work for the ones you can't fit a ratchet into...

Remove the oil-dipstick at this point and put it in the parts pile..
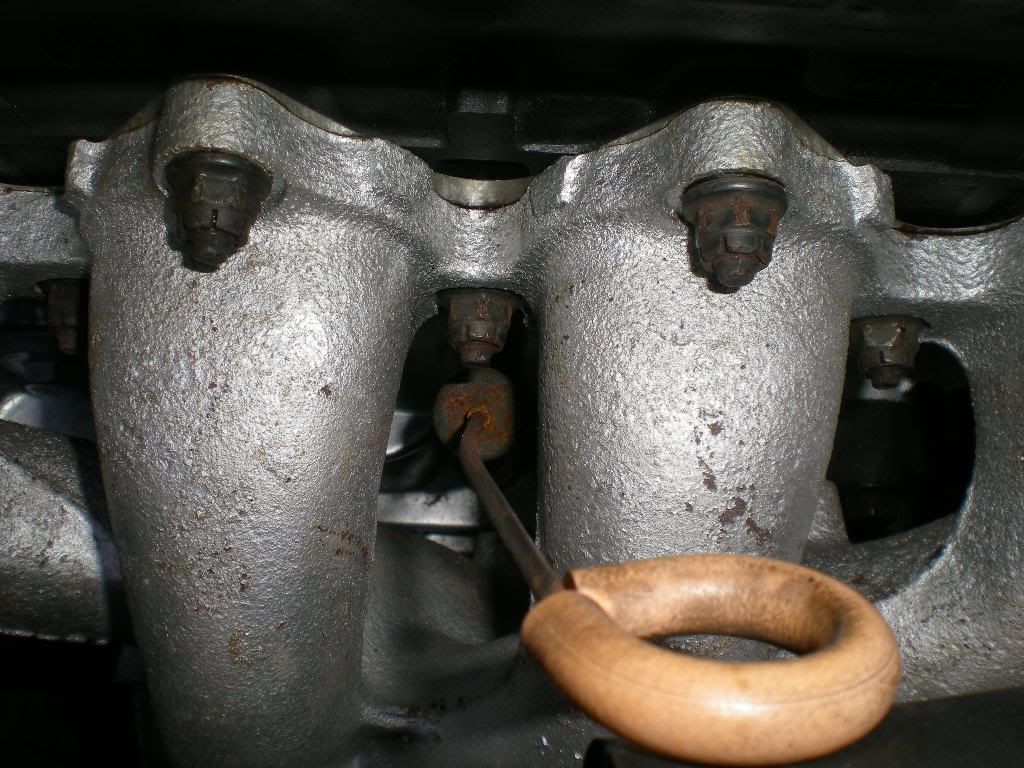
We have to get creative with the bolt close to the dipstick, but I'm sure you can figure it out...
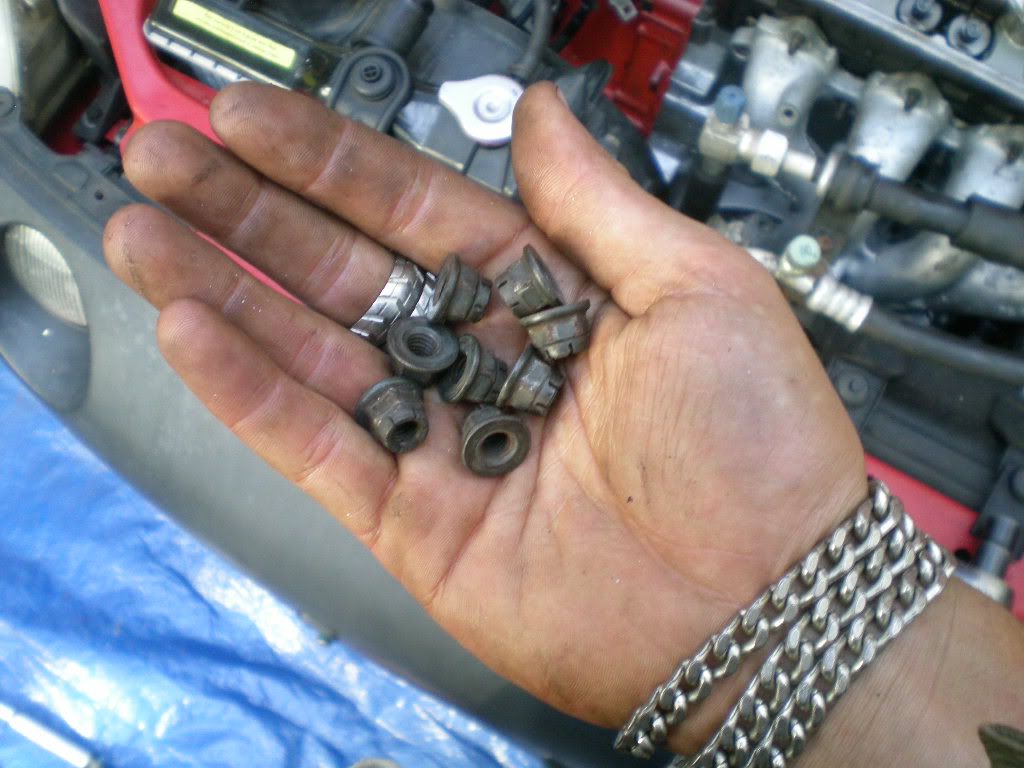
Here's the exhaust manifold with all the nuts removed from the studs. We can leave the header hanging on the studs for now.
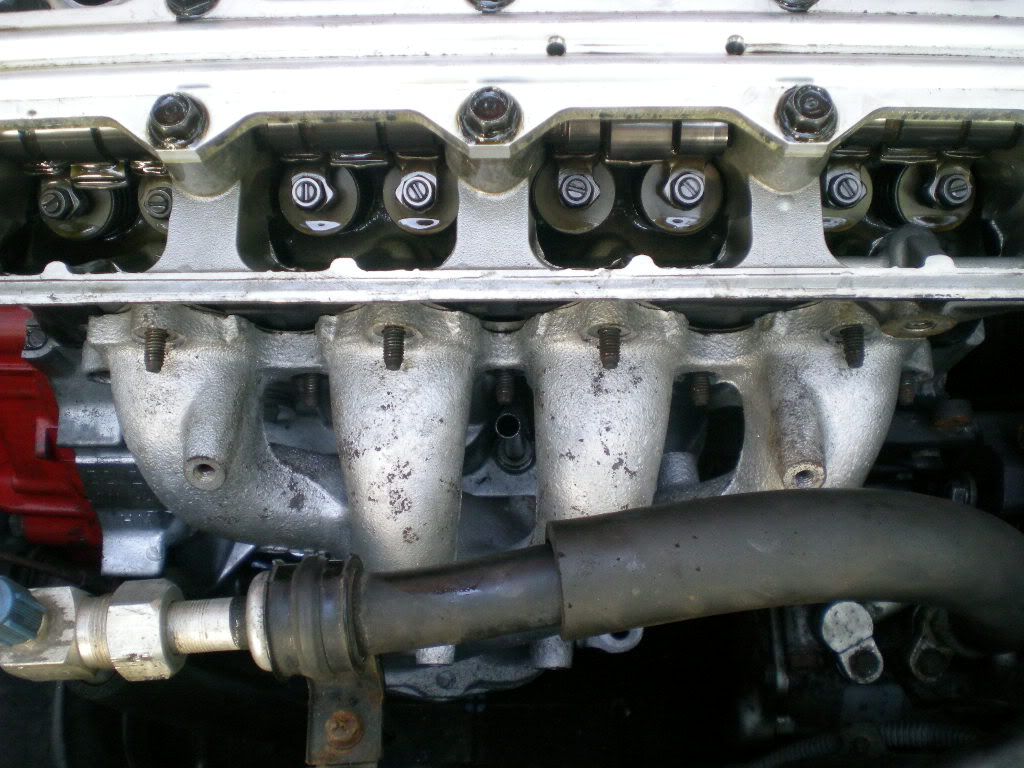
Leave the header just like this for now..
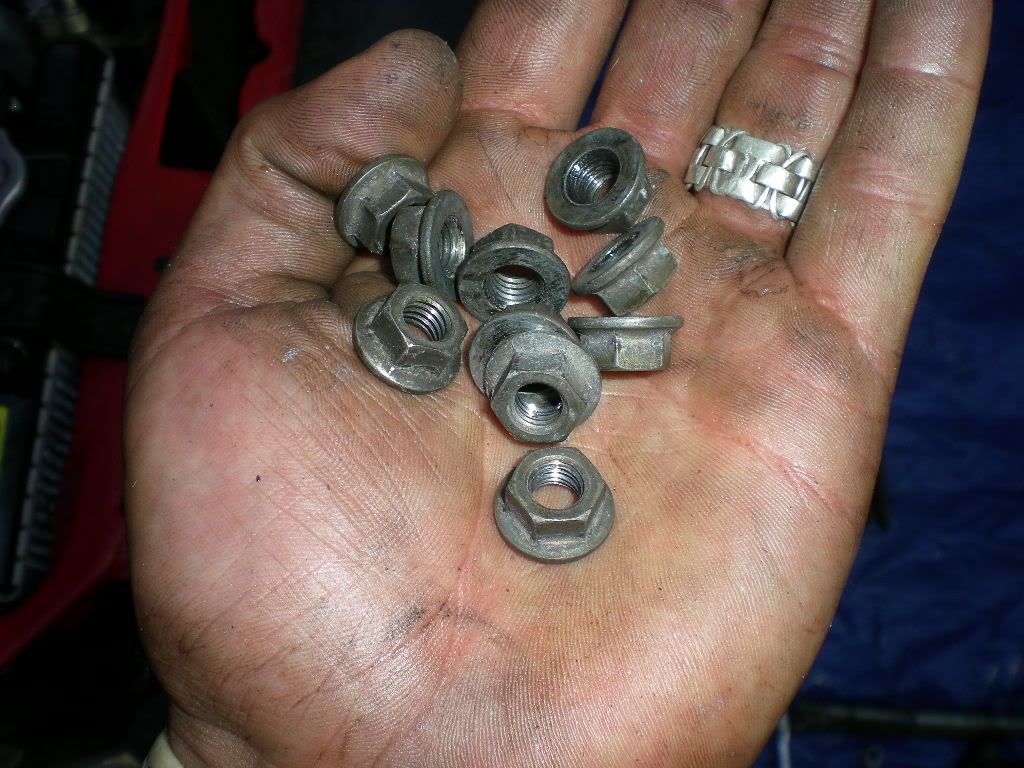
Put your nuts in a bag and keep them safe. Same with your tool. Put it in a bag and keep it safe. STDs are no fun. SIDE NOTE: THERE ARE MORE NUTS THAN PICTURED HERE, I WAS MISSING ONE
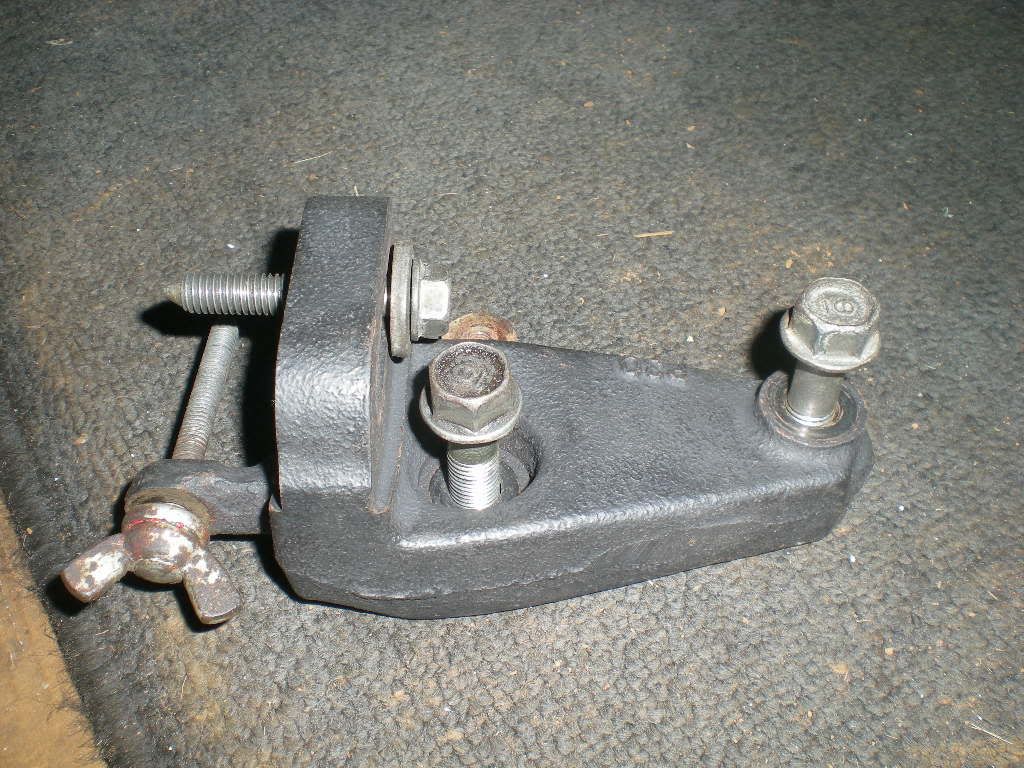
As an aside, there may be a bracket on the front of your block holding the header/block together. I don't have this, but if you do you will have to remove it. 14mm easily accessible from the front of the car. You can remove the bracket from the block or the header, it doesn't matter. You can even remove it from both, and put it in your parts pile to impress your girlfriend if you want.. There is also a bracket on the back of the block that everyone will have. It has two 12mm bolts holding the header to the block. You may be able to flex the header off the head studs later without removing this bracket. If you can't - remove the two 12mm nuts/bracket and the 12/14mm clamps holding the exhaust pipe to the header. Crawl under your car - you'll see what I mean.
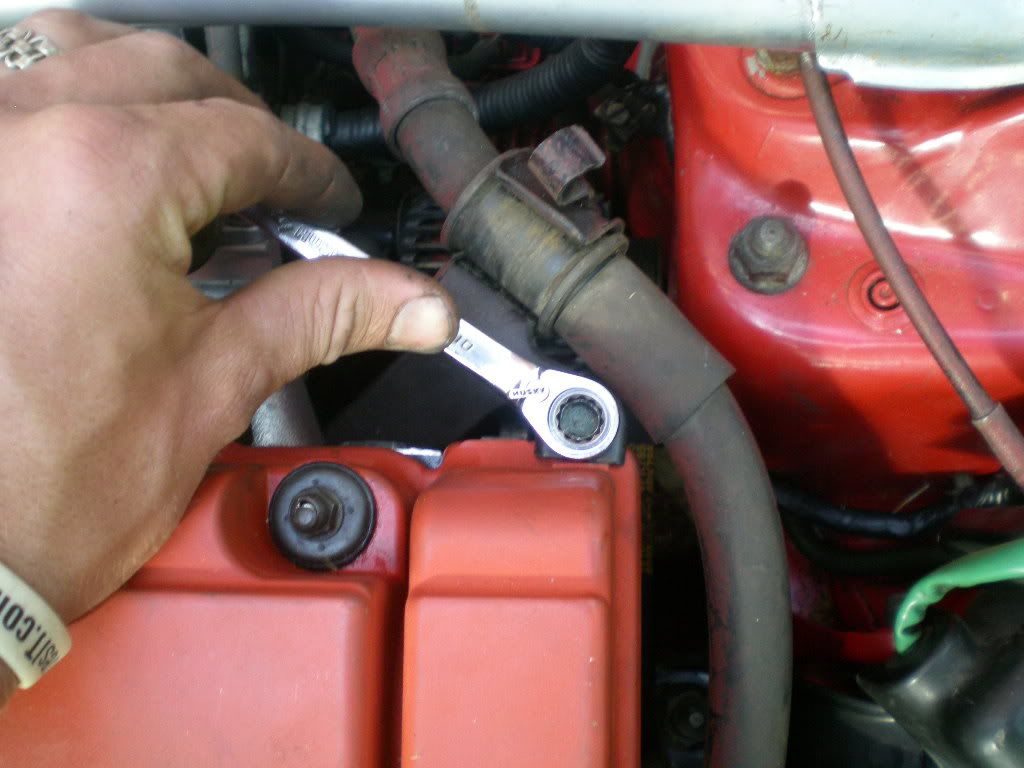
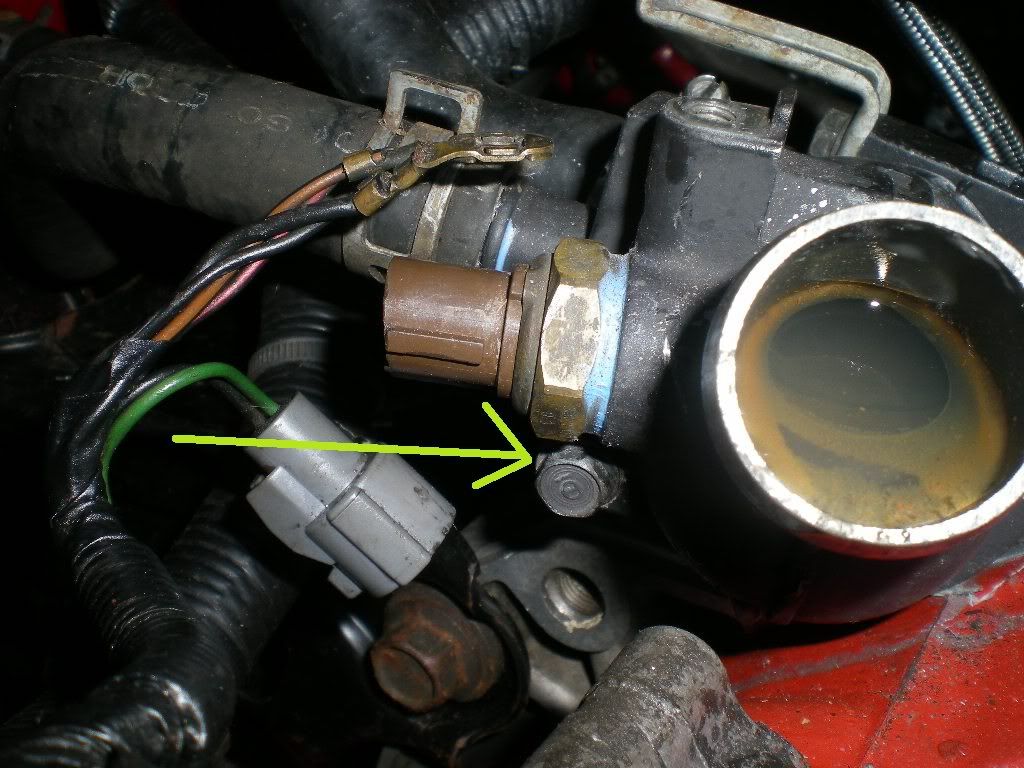
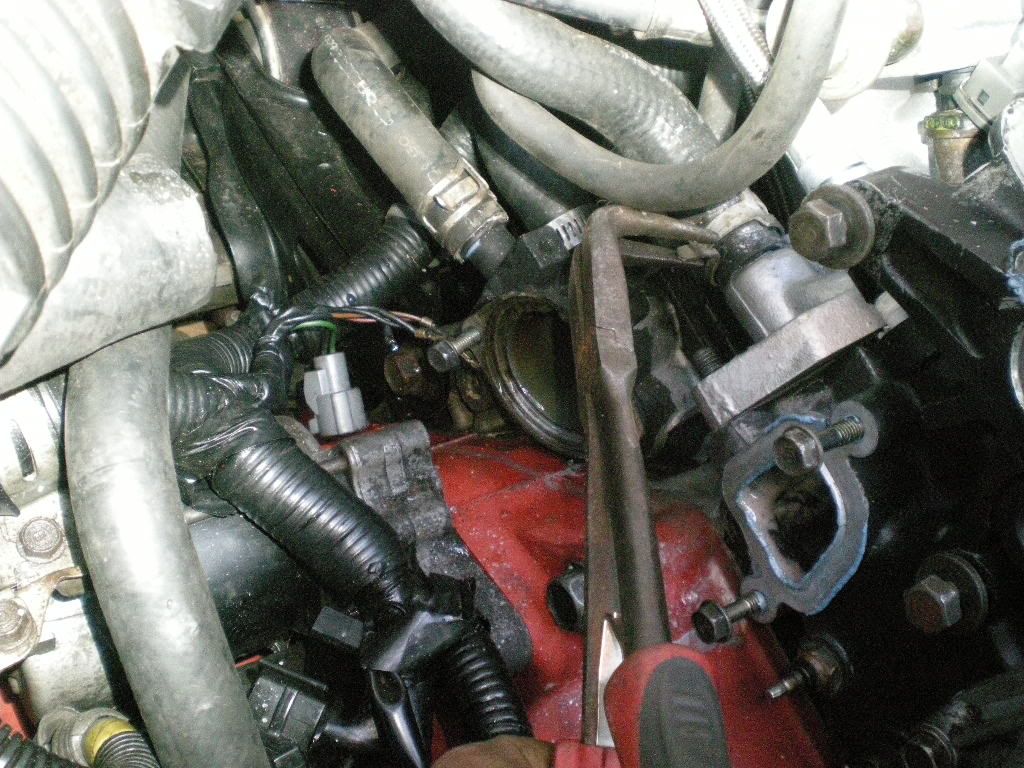
Now is the tricky part. It's time to move to the back of the head. Remove the thermostat housing and the thermostat - this isn't necessary, but makes things easier. I recommend it.. Remove the ground and the temperature sensor as indicated. The ground is a 10mm and the plug is another snap connector.
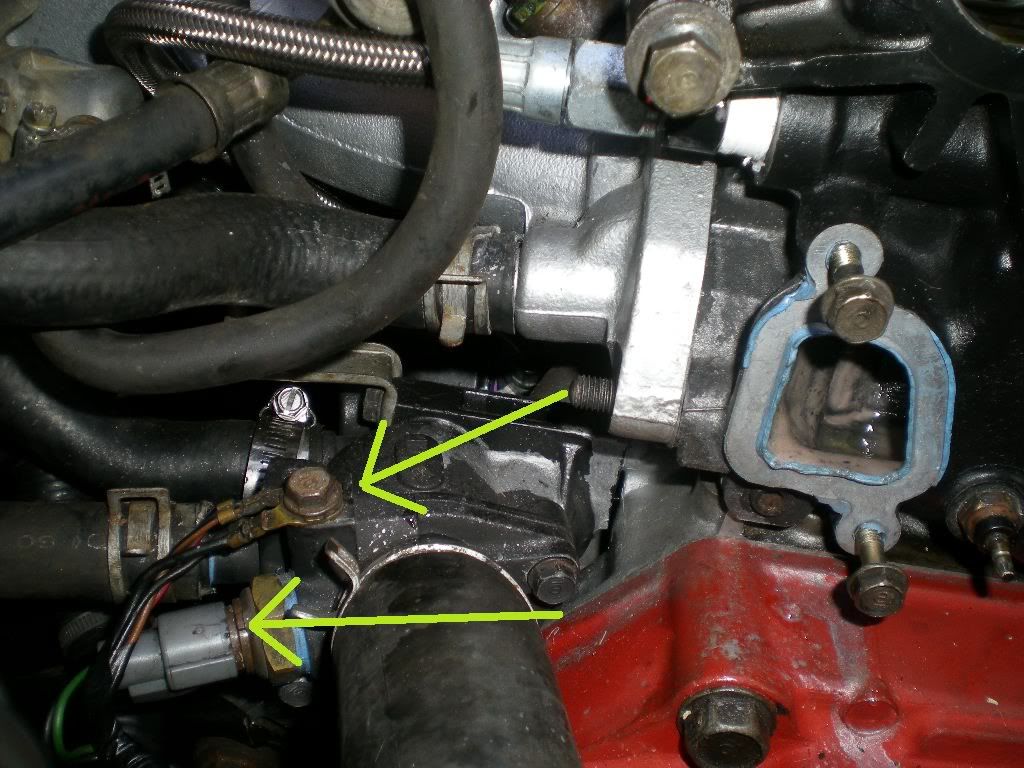
The ground is 10mm..
Snap connector...
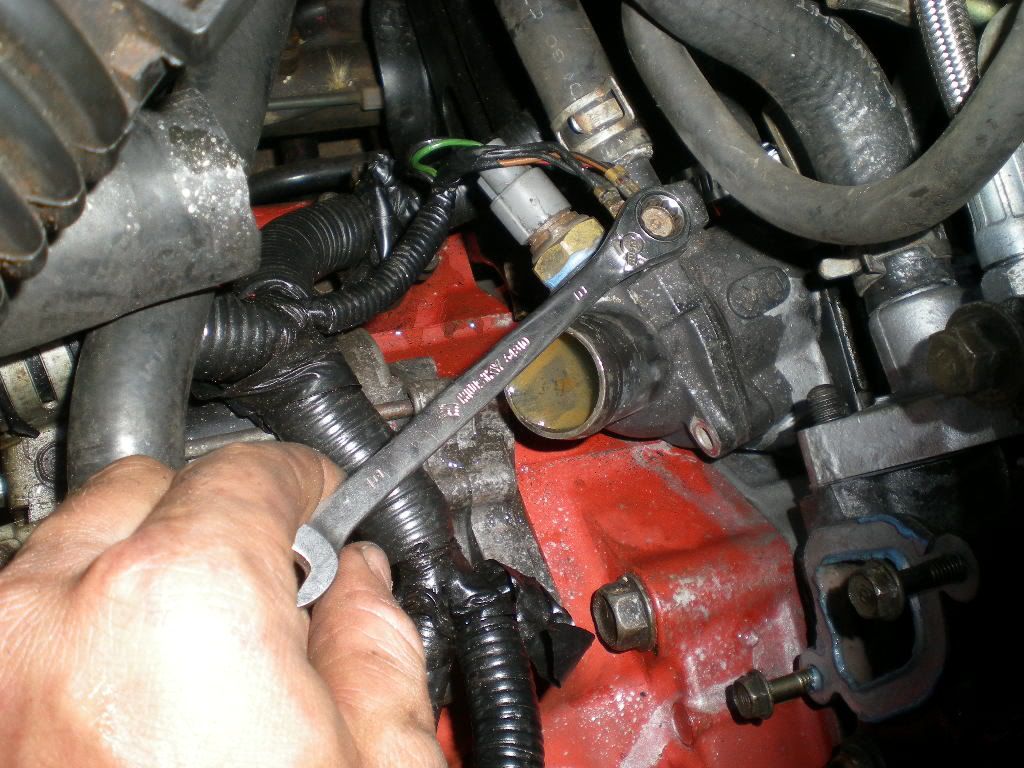
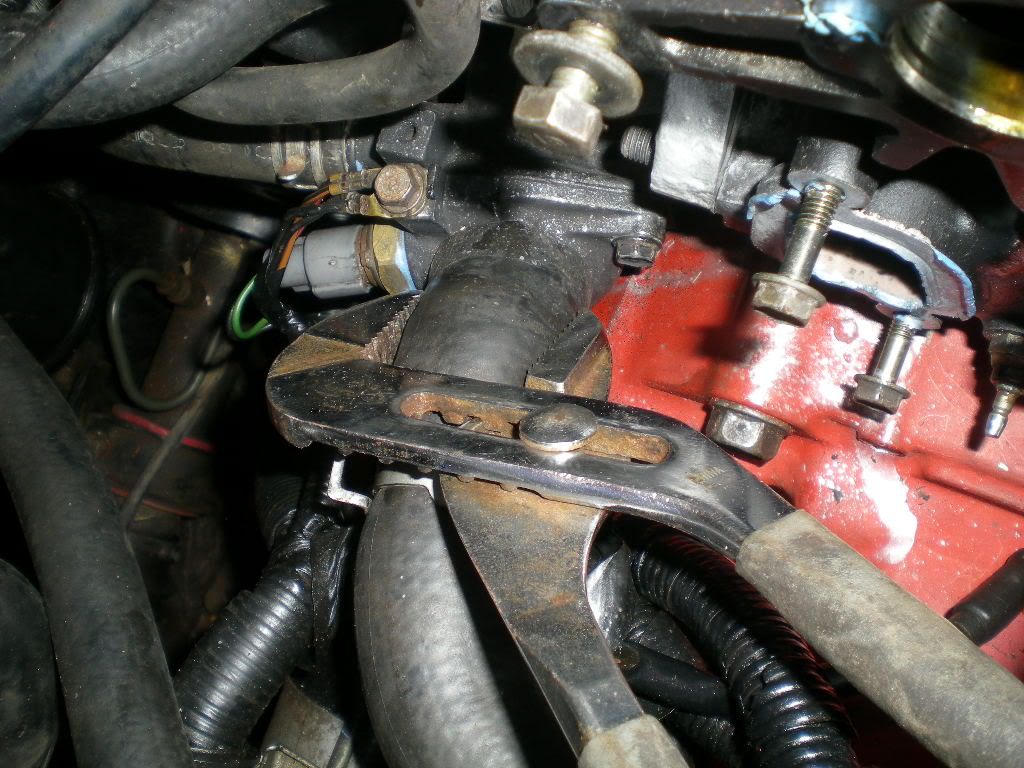
Now we remove the lower radiator hose with needlenose pliers...
If the hose wont come off (or any hose won't come off) try grabbing the hose with slipjoint pliers and moderate pressure and rotating the hose until you feel it come 'un-stuck' and then it will slide right off..
Now we remove the two bolts holding the thermostat housing. 10mm on the top...
And a 10mm on the bottom.. Socket and extension for this one..
Take off the thermostat housing/gasket/thermostat (I didn't have one installed) and put them in the parts pile.
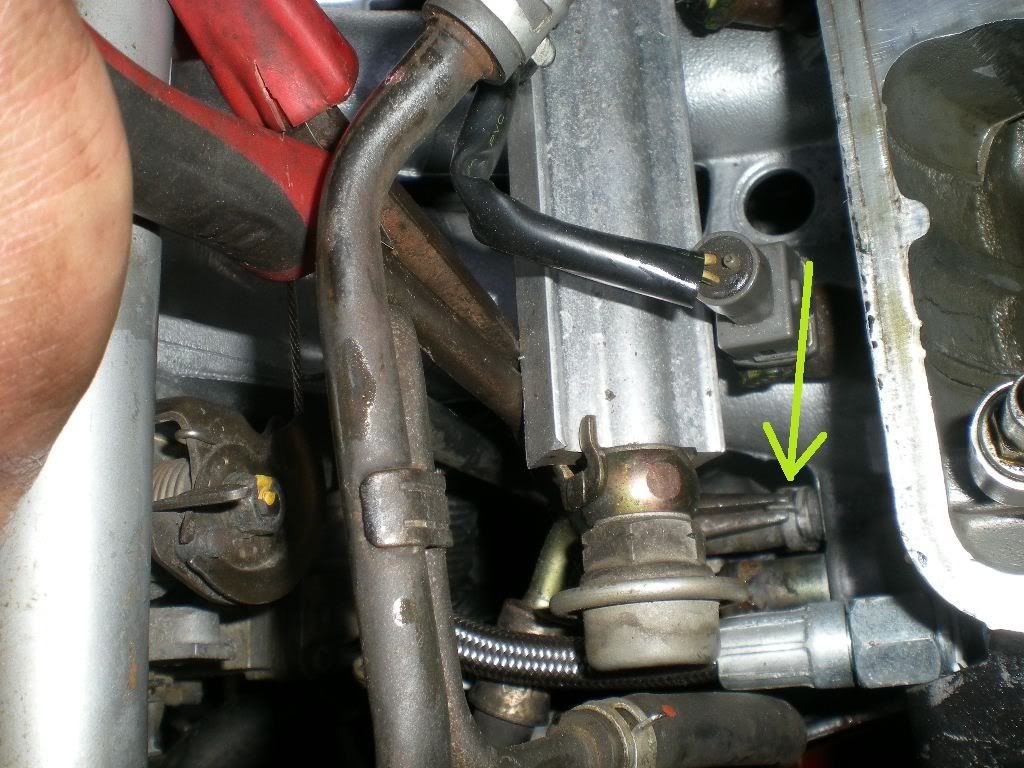
Now we remove the coolant bypass hose from the intake manifold with needlenose pliers.
And then the intake manifold vacuum line pre-heater with the same needlenose. You can see here that these long bent needlenose come in handy.
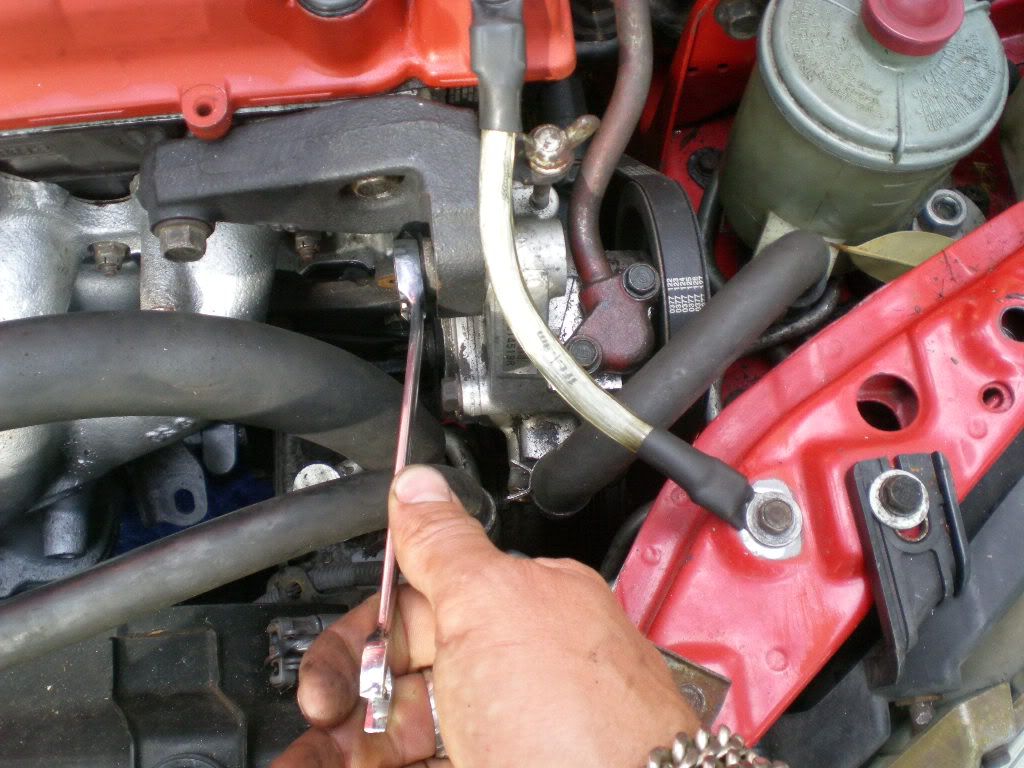
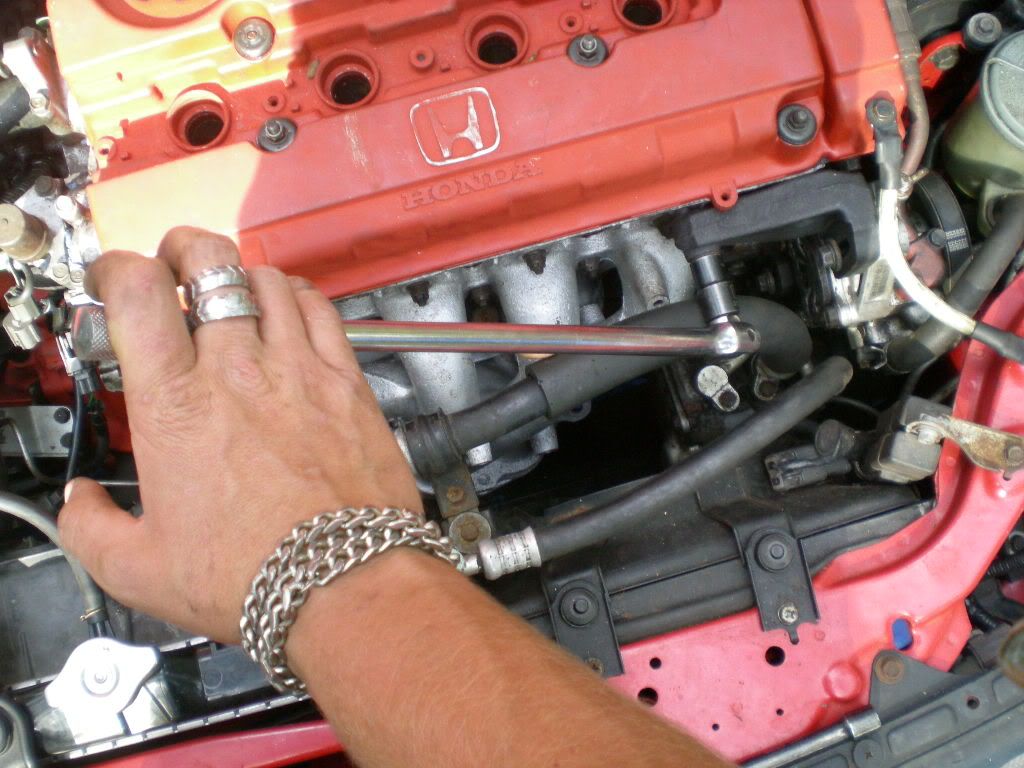
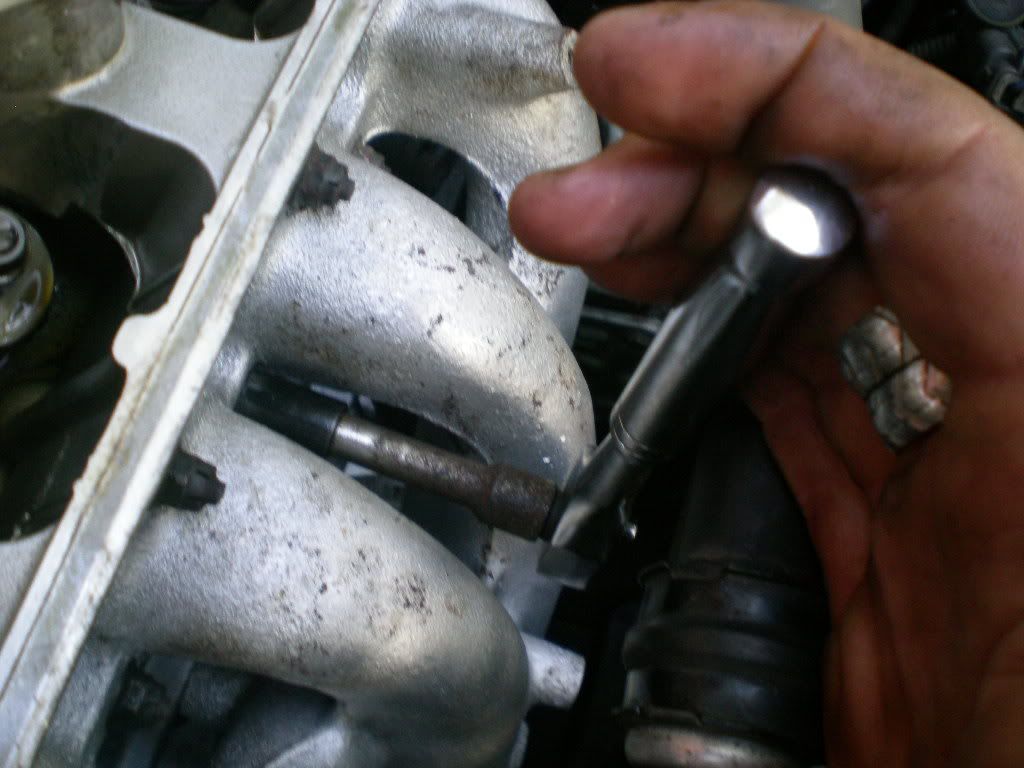
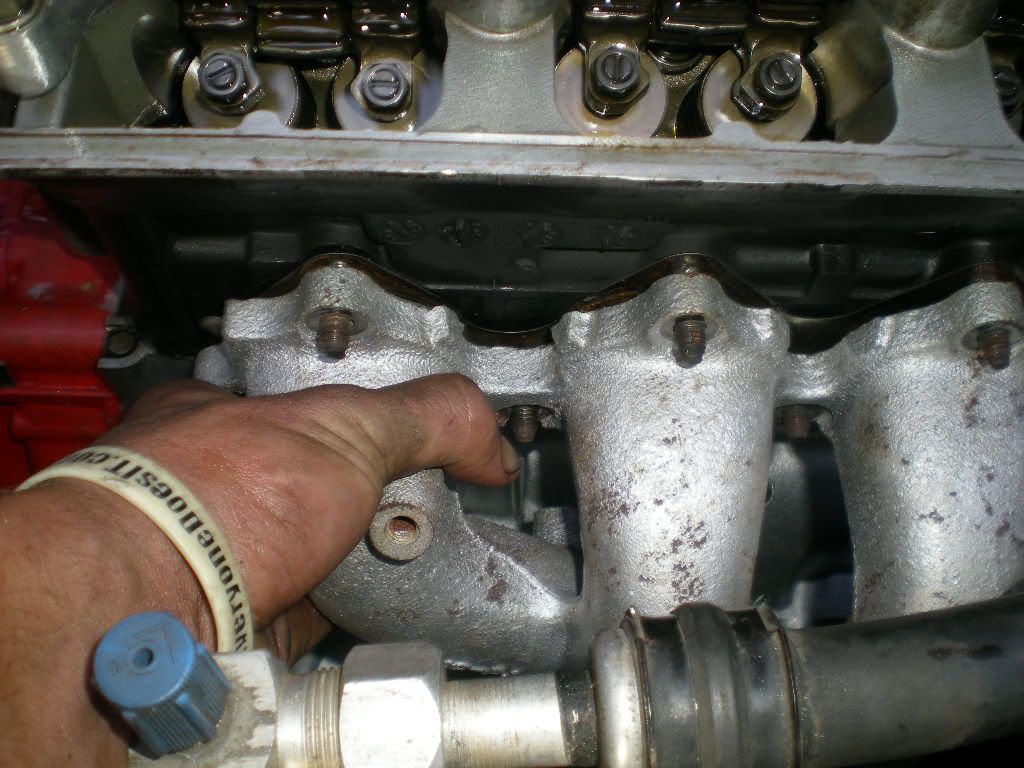
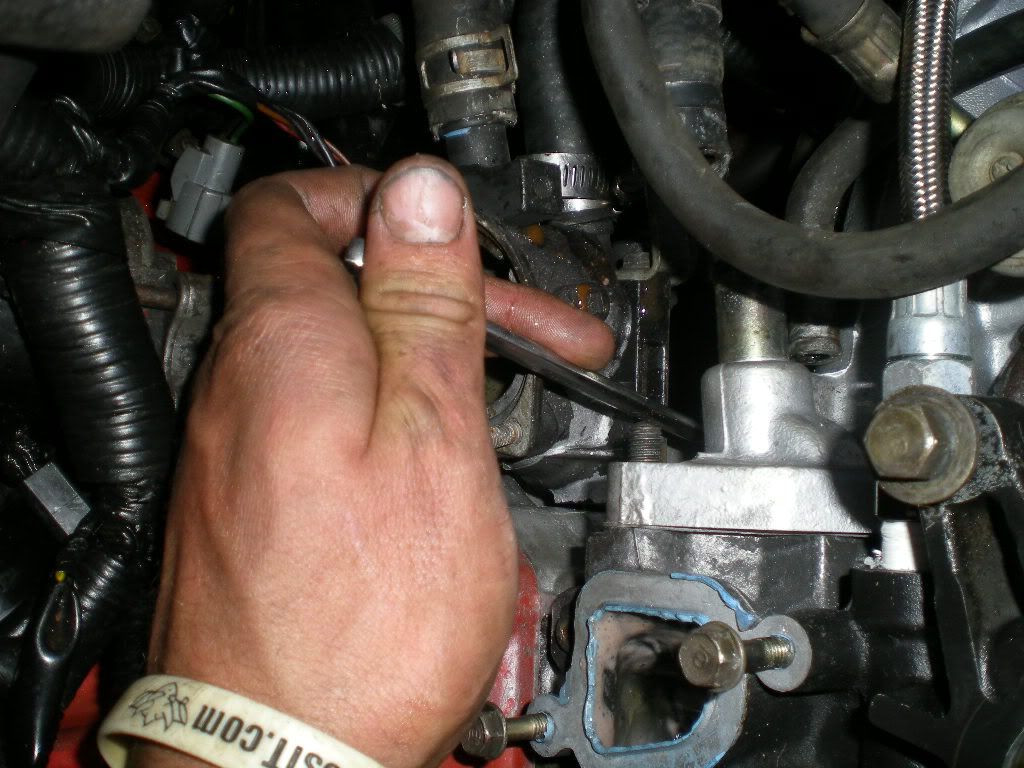
Next up is the intake manifold bolts (just like the exhaust manifold - these are studs with nuts on them if you want to get technical.) You can get to the top bolts easily with a wrench. (12mm)
Here are the bottom bolts..
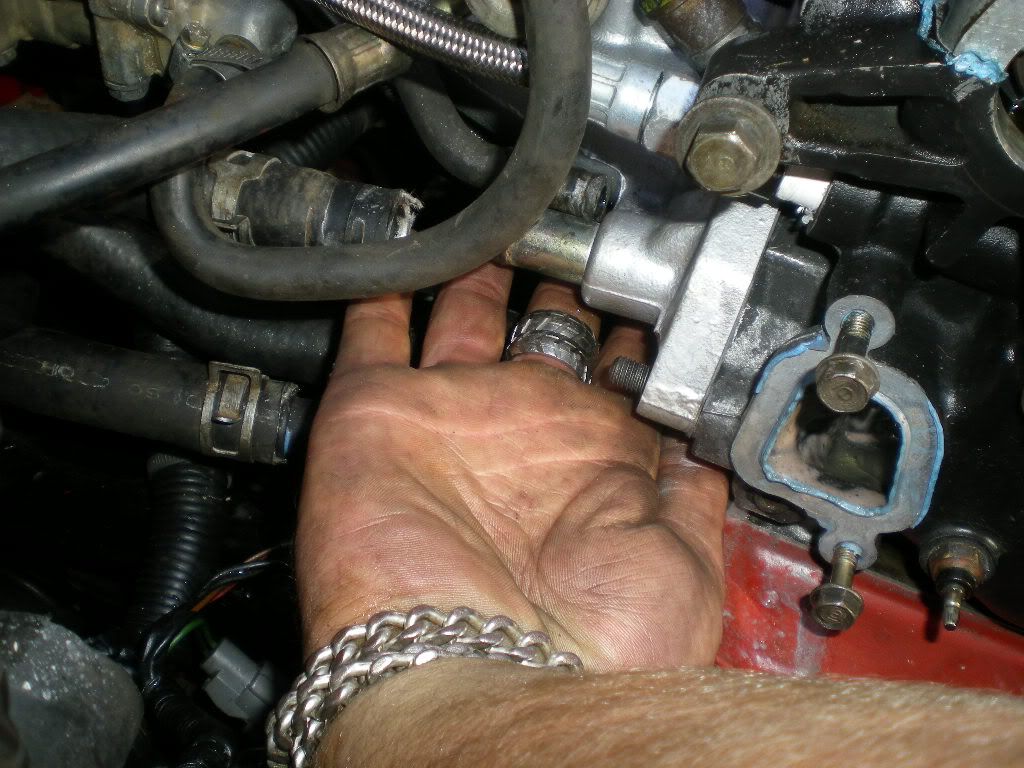
This is on the bottom row, furthest to the driver side..
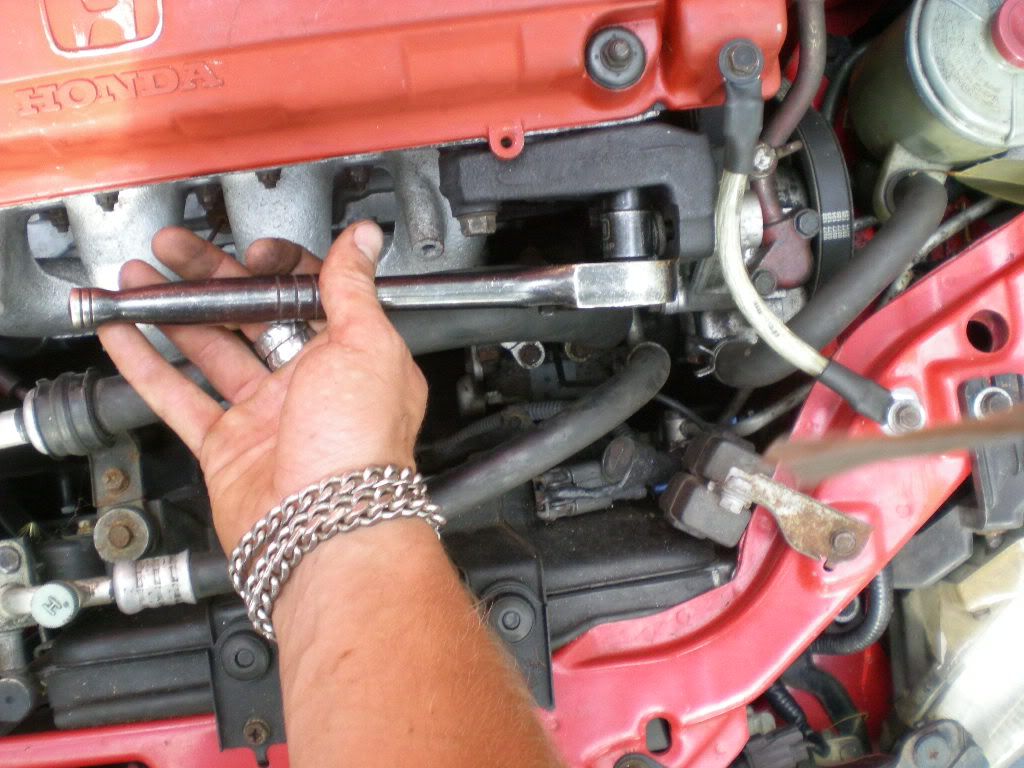
And this is the corresponding bolt (not pictured in bottom row either) all the way on the passenger side.. This is probably the hardest bolt to reach on the whole project. Crack it with a 12mm wrench..
And then spin it off with your fingers..
Assuming you got all the 12mm intake manifold bolts off, the manifold should be loose enough to flex out of the way... There is a bracket which holds the block to the intake manifold, and the bolts for this bracket can be found on the bottom of the intake manifold. You may need to unbolt the intake manifold from this bracket with the three 12mm bolts underneath the intake manifold. I do not have this bracket on my car, so it's not pictured.
Add your intake manifold nuts to the parts pile, individually bagged so you don't lose any. SIDE NOTE: THERE MAY BE MORE BOLTS THAN PICTURED I WAS MISSING ATLEAST ONE.
Now take a break, smoke some crack, drink a few energy drinks, crank up Tupac and get your head right for the final few steps.

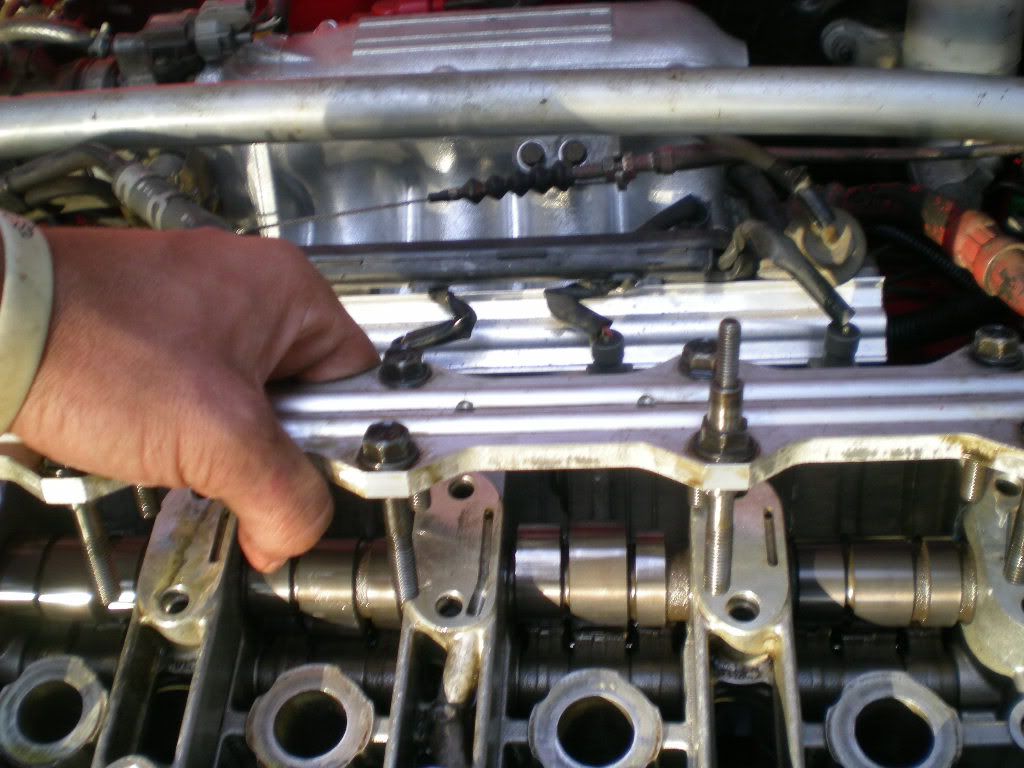
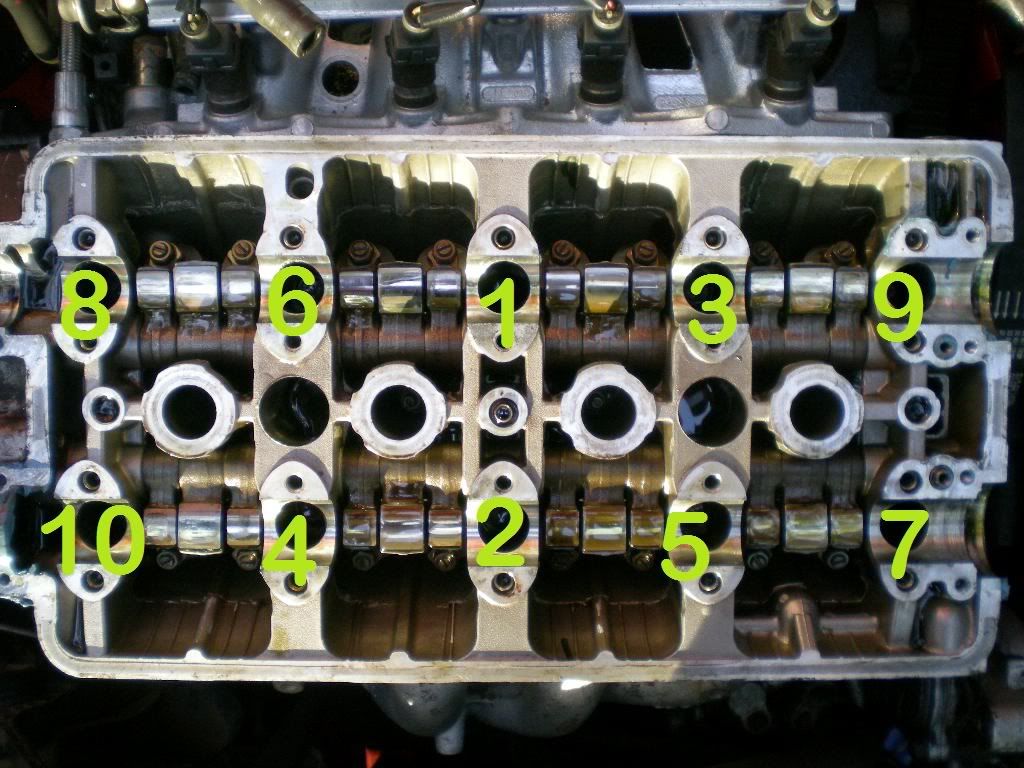
Time to remove the cam rails so we can get the cams out of the way and get at the headbolts. They are all 10/12mm bolts and here is the order to loosen them.. I recommend you loosen the four red X's first

Here are the four red X bolts, easily accessible with a 10mm wrench..
The rest are easily wrenchable..

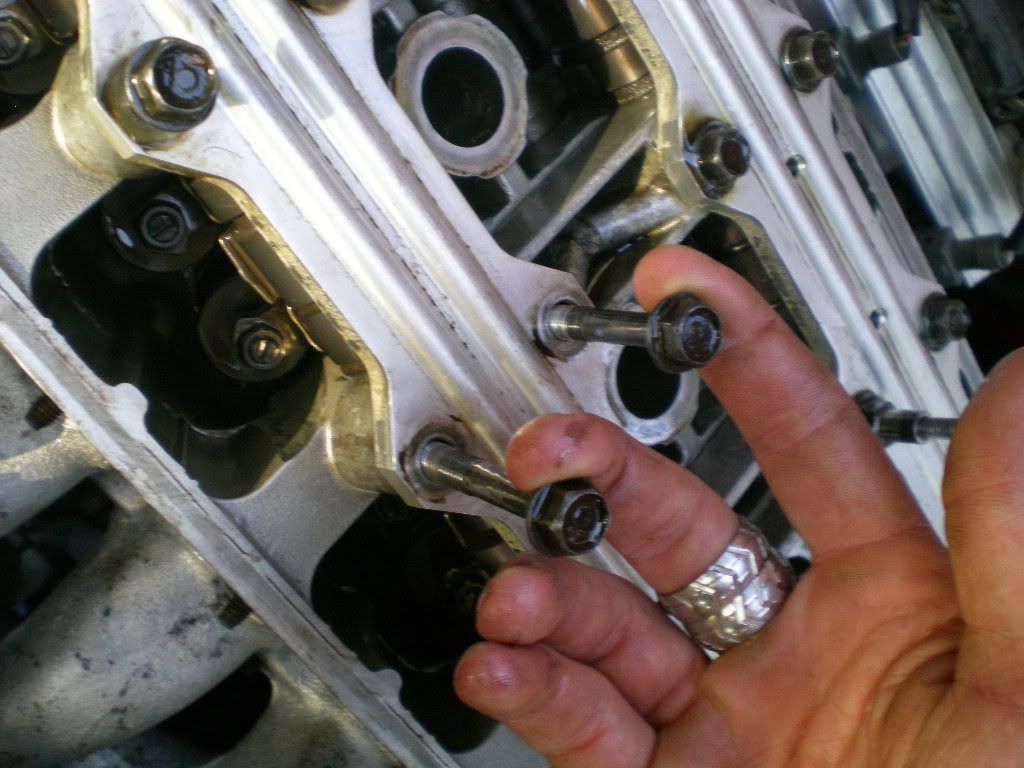
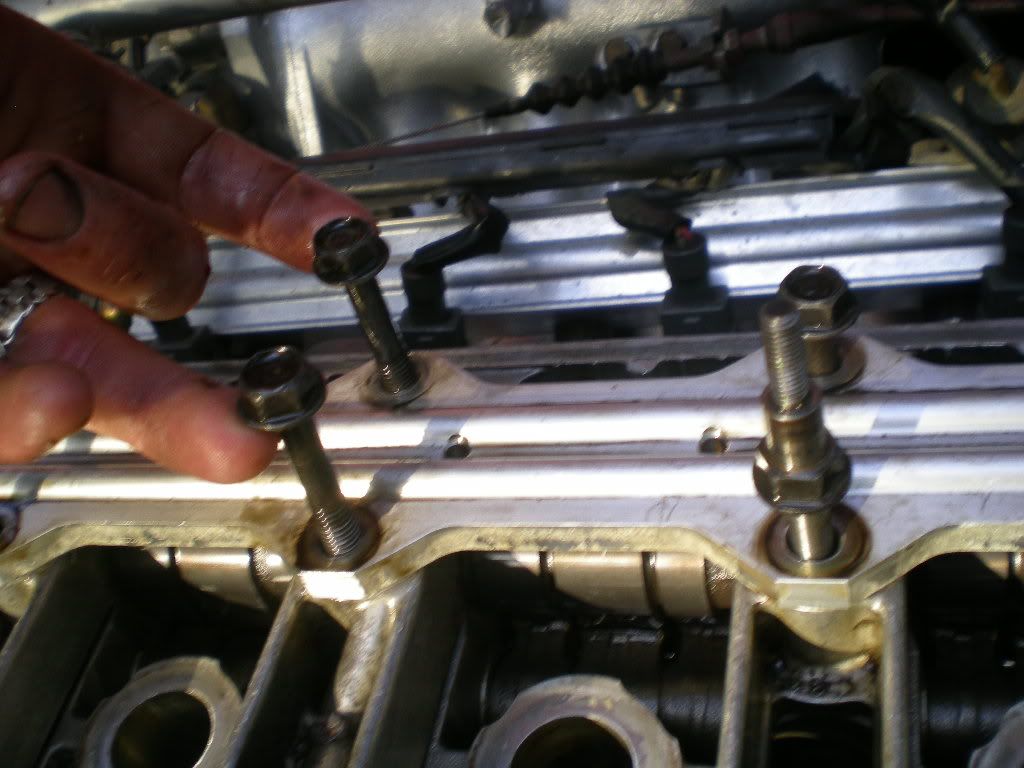
Or you can use a socket, but you will need a deep socket when you get to the tall bolts that the valve cover is held down by (pictured between index and ring finger)

Leave all the bolts in the holes - but fully unscrewed so you can lift them up and out if you had to..
Get the idea?
If the cam rail you are working on doesn't come free by lifting up with all the bolts free - tap it lightly with a rubber mallet. DO NOT USE A REGULAR HAMMER. Aluminum is very soft and you can easily damage it. It should only take a very light tap if all the bolts are removed.
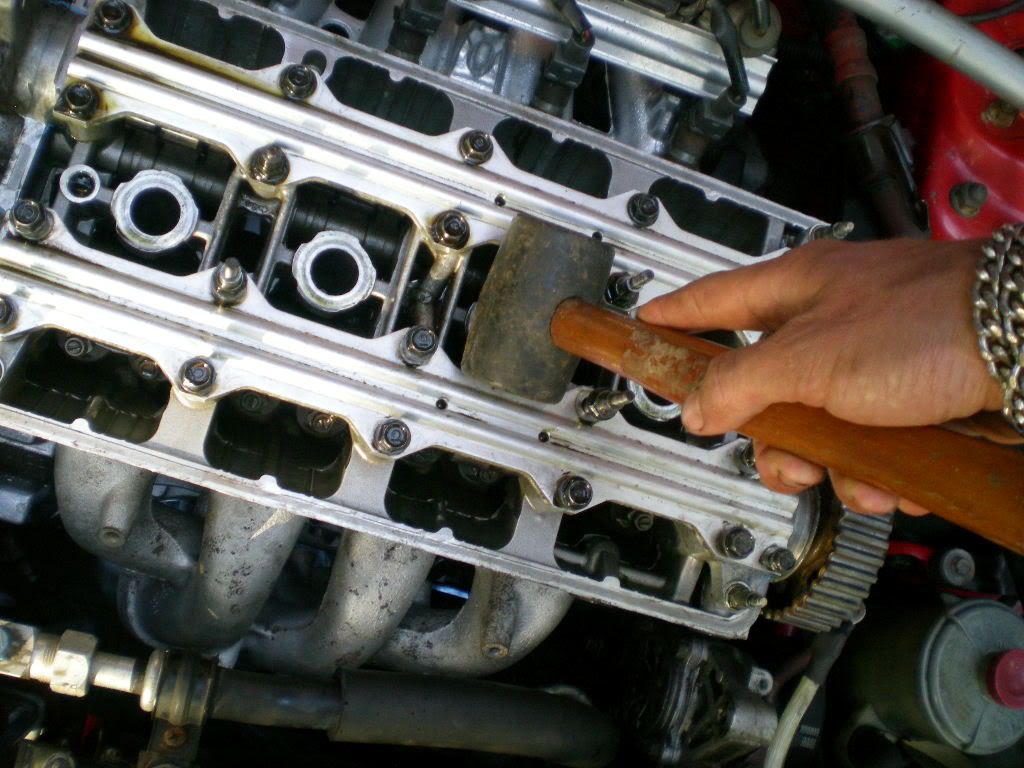
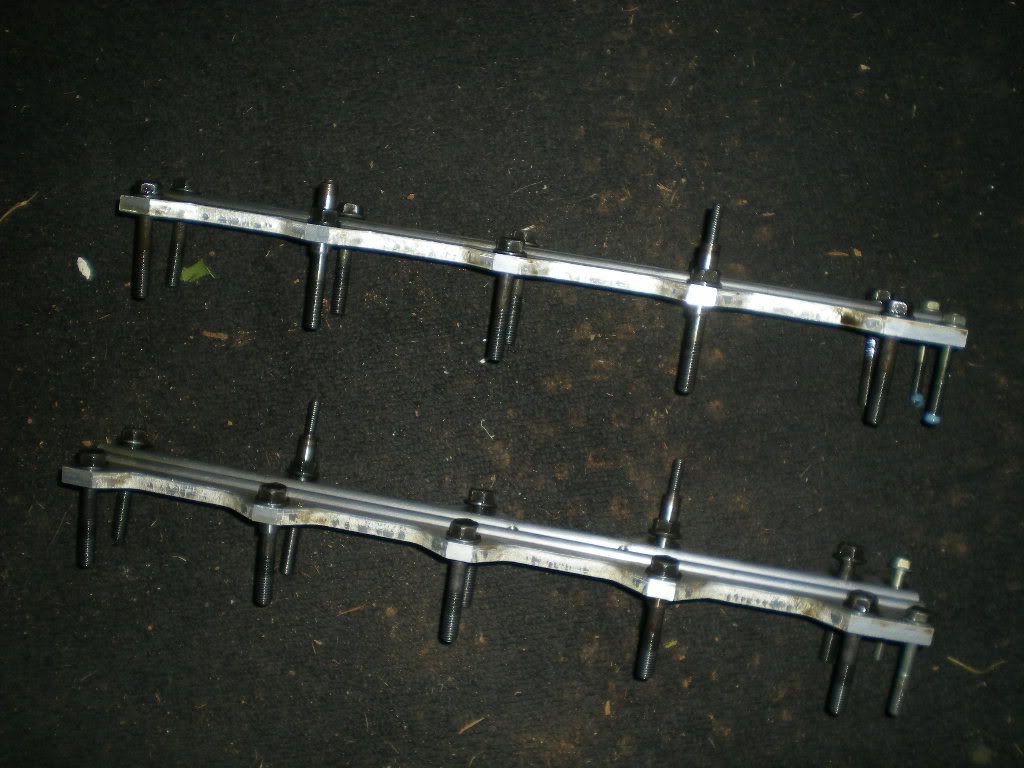
Remove the cam rail you did first...
Add it to the parts pile being careful not to mix up any of the cam rail bolts...
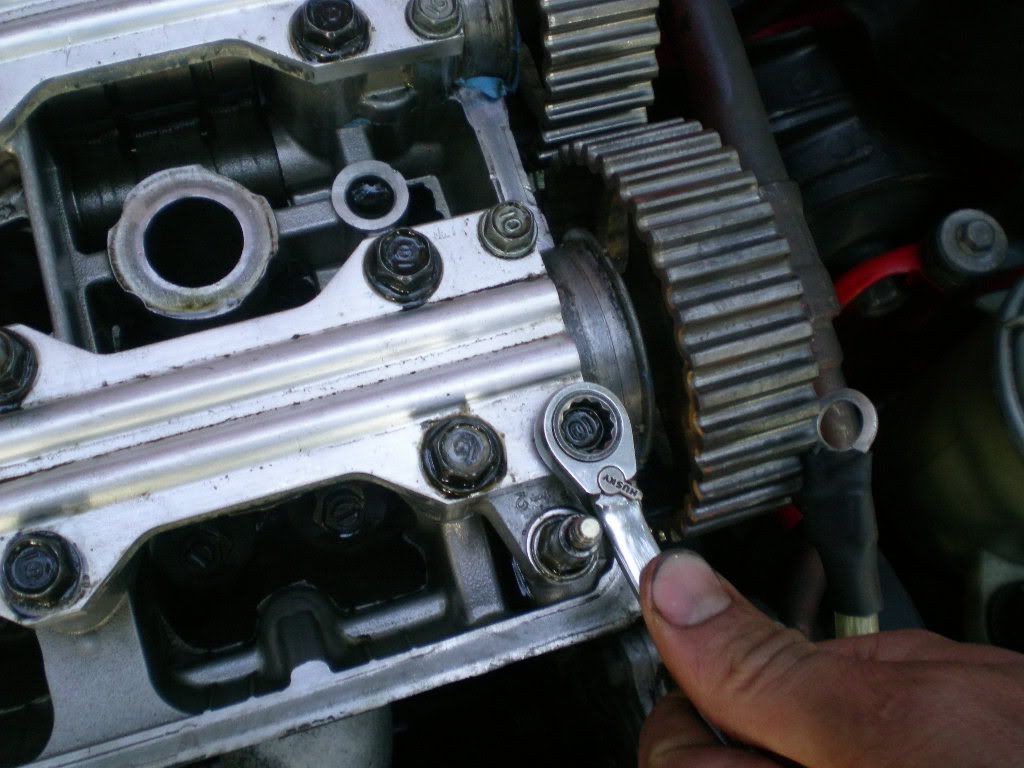
Same procedure for the other cam rail (doesn't matter which one you do first..) The small end bolts by the cam gears...

Then get all the other bolts loose...
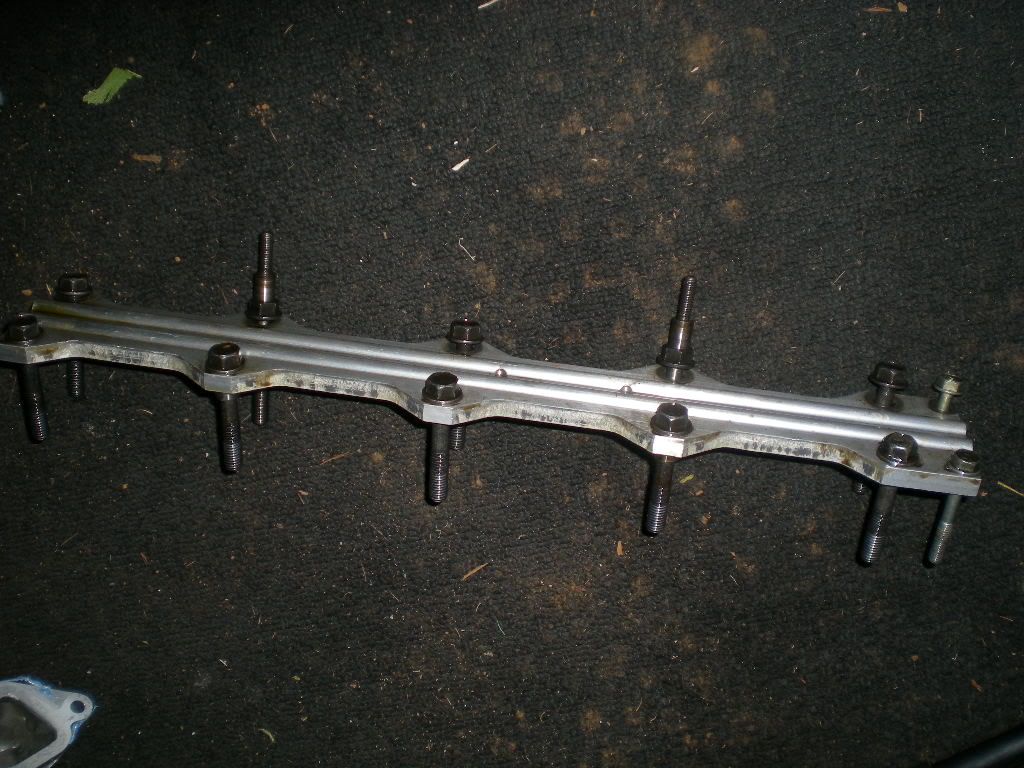
Add it to the parts pile without mixing up the intake and exhaust cam rails..
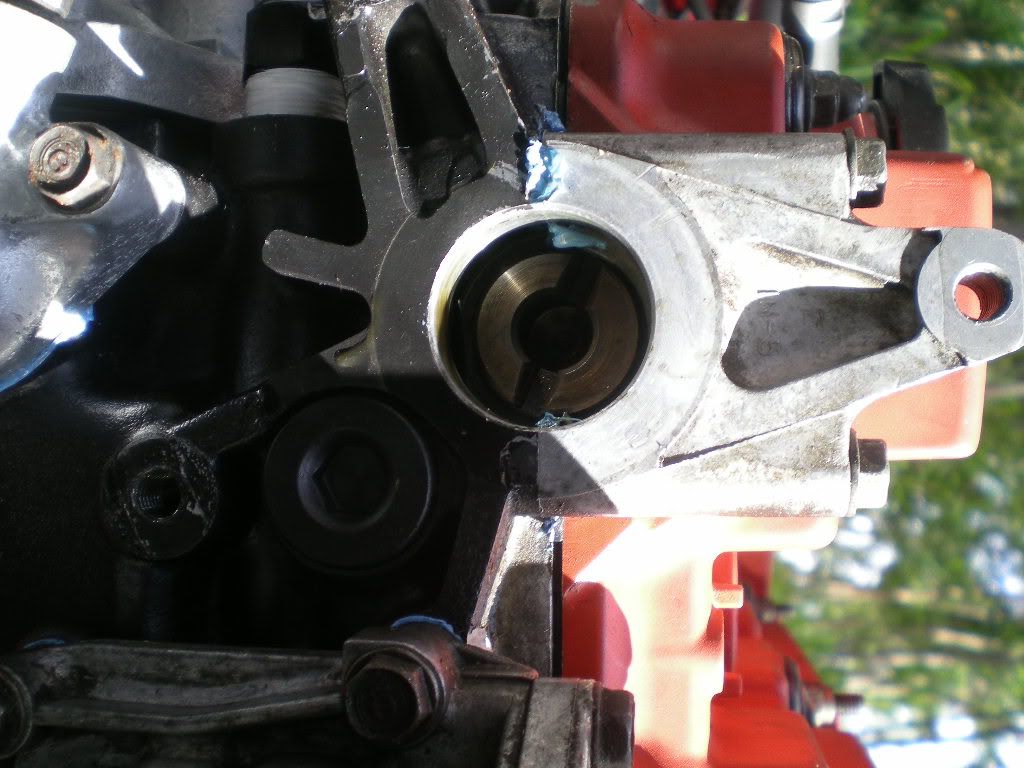
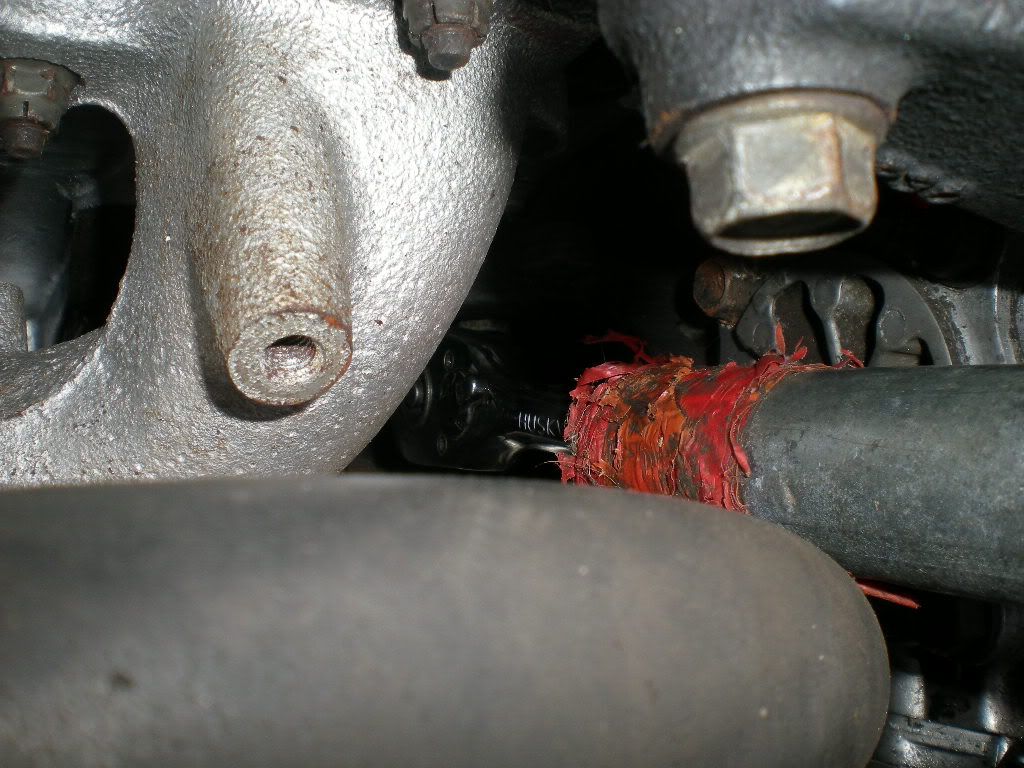
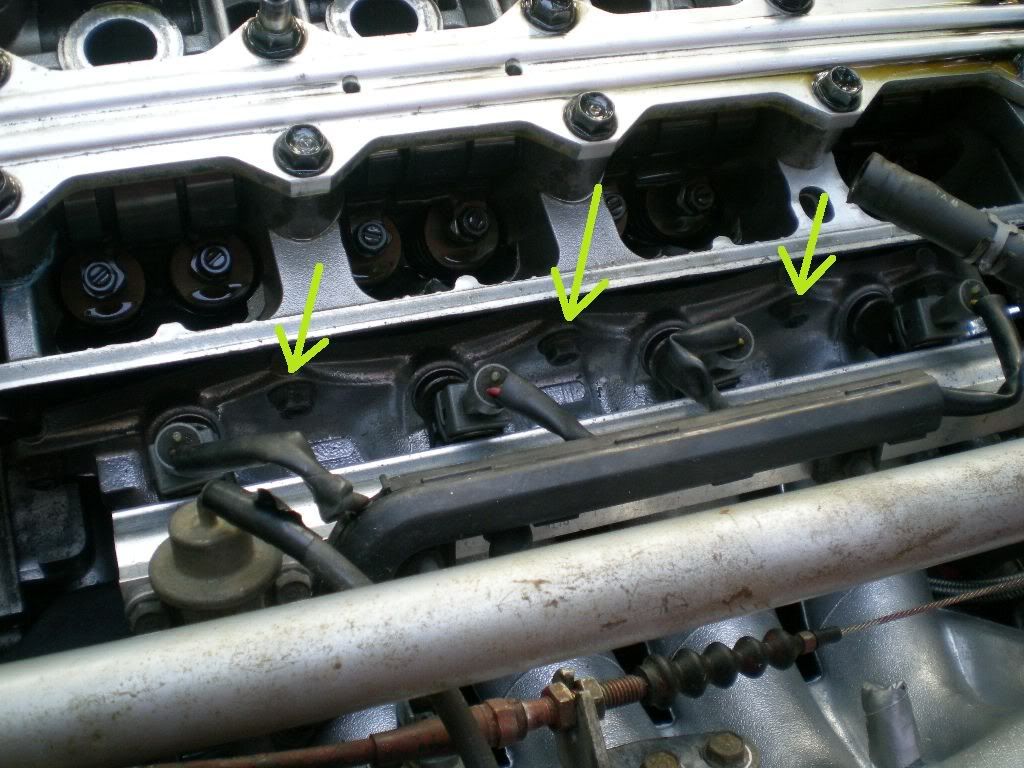
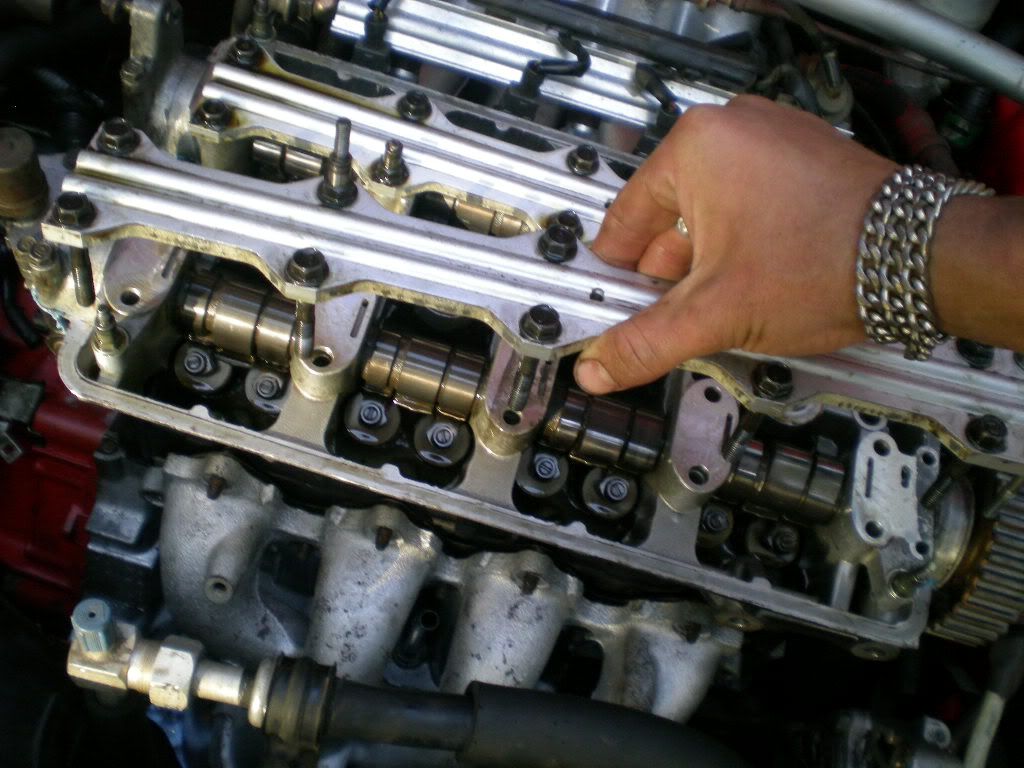
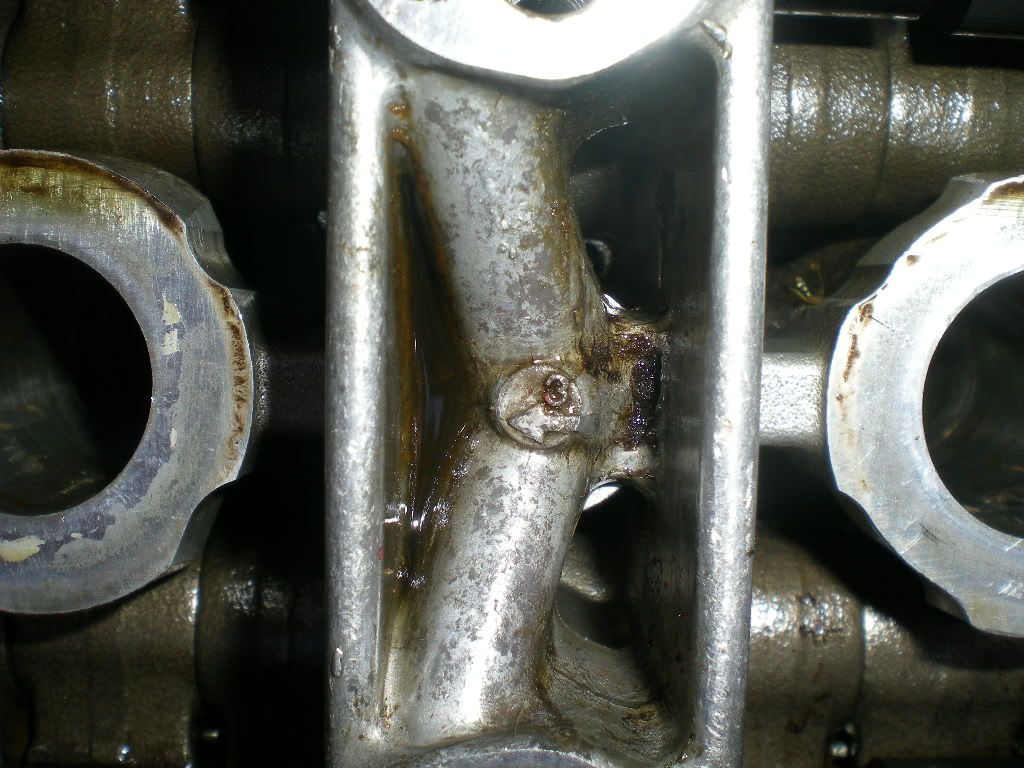
Here's what we see.. VERY IMPORTANT NOTE: THERE IS A SMALL METAL SLEEVE FOR THE OIL PASSAGE ON THE MIDDLE CAM HOLDER. IT MAY STAY IN THE HEAD, OR IT MAY COME OUT WITH THE CAM HOLDER. DO NOT LOSE THIS OR YOU WILL HAVE MAJOR PROBLEMS. THIS TINY METAL SLEEVE IS LESS THAN A CENTIMETER LONG AND WILL EASILY BE LOST IF YOU DONT KEEP TRACK OF IT. The sleeve location is circled in this picture. You cannot see the sleeve itself, but it goes into the marked hole and corresponding hole on the cam holder..

Now for the cam holders. A light tap with a RUBBER mallet should free these up. DON'T MIX THEM UP.

FOR THE LOVE OF ALL THINGS HONDA DO NOT PRY THESE OFF. THIS IS WRONG WRONG WRONG AND YOU WILL BE PUNISHED.
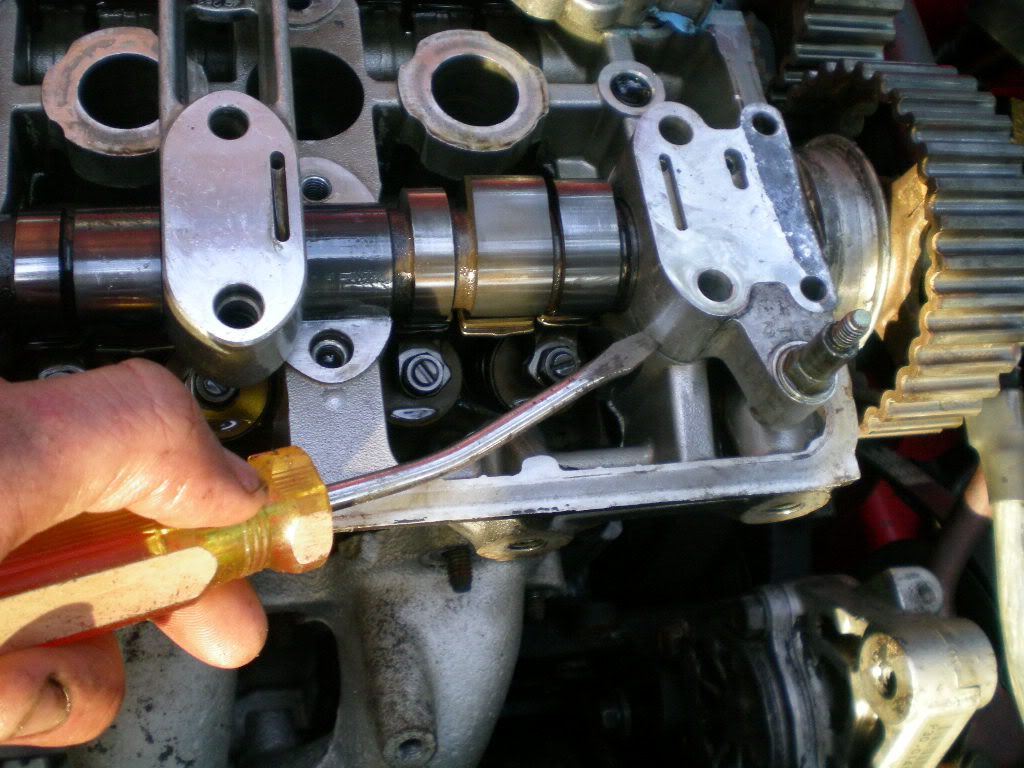
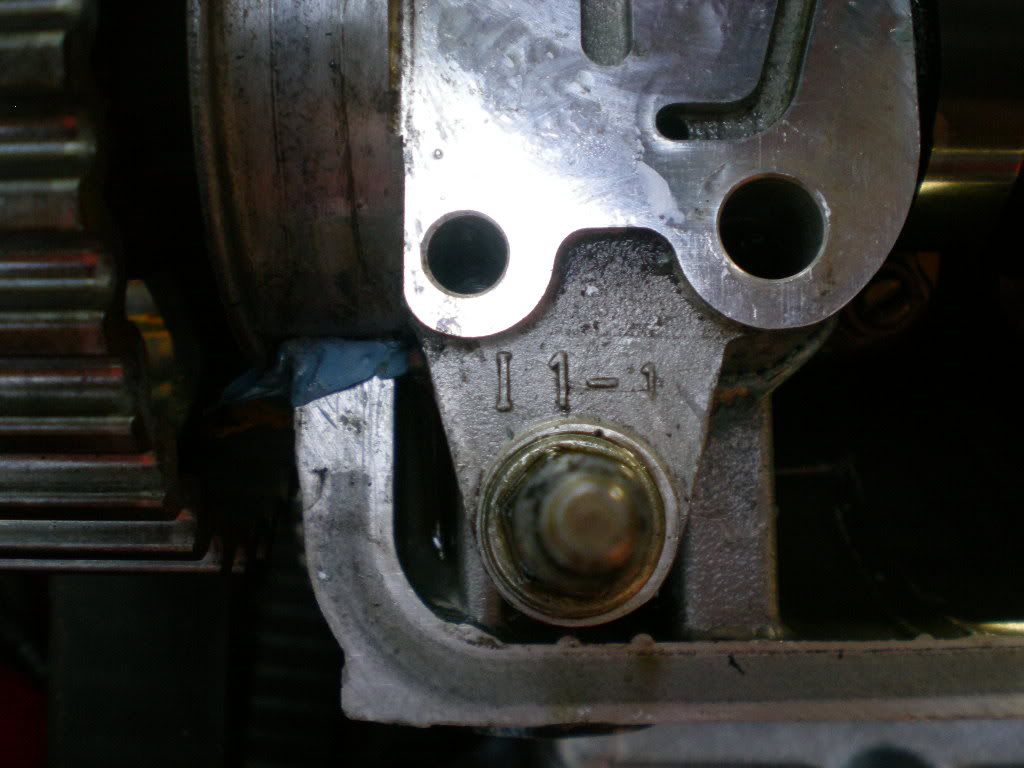
There are markings which tell you which cam holder goes where, you may want to take note. They denote which holder goes where in relation to the cylinders.
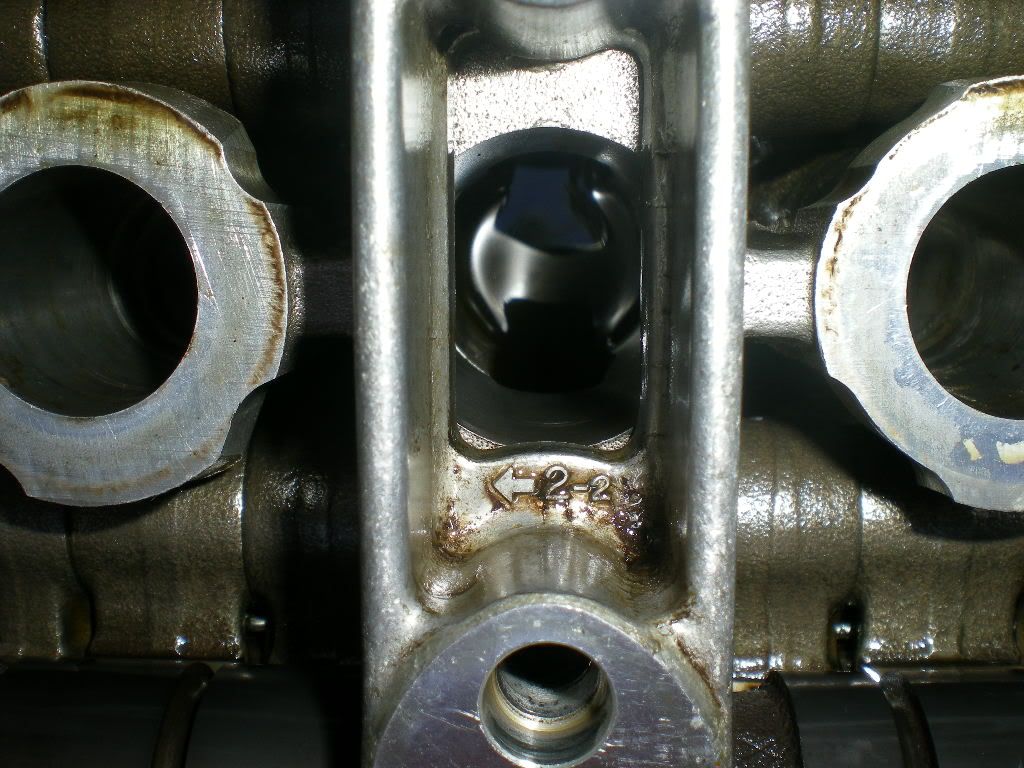
Another marking...
You get the idea. It's still not a good idea to mix anything up. Especially when you're working on high performance motors..

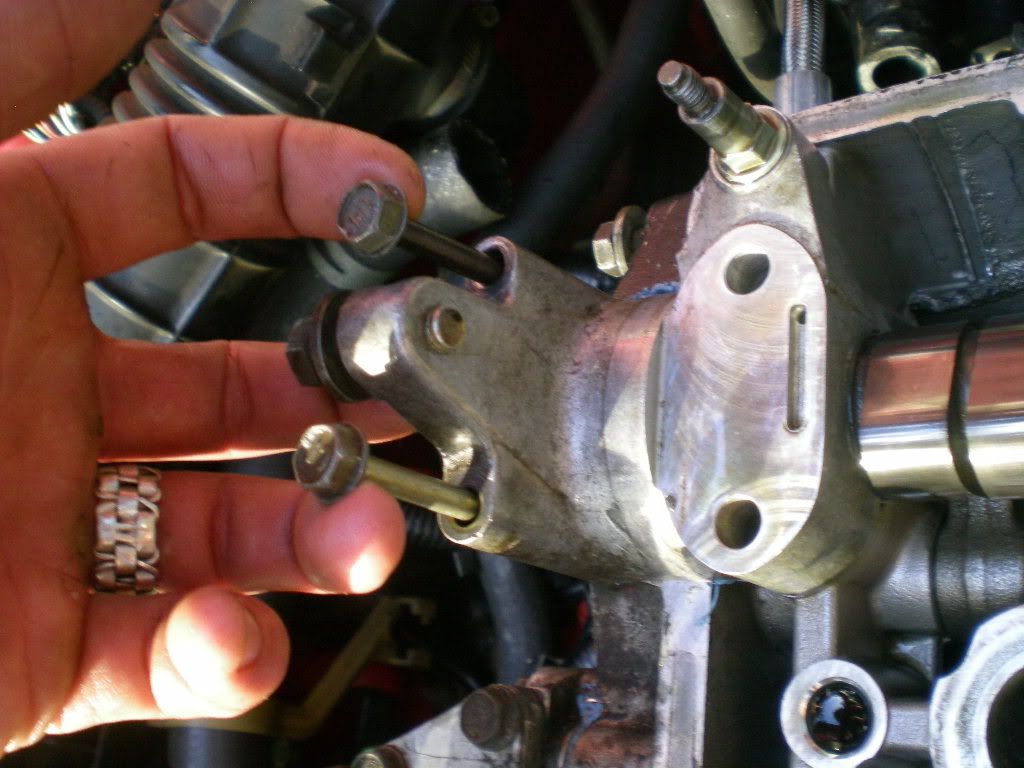
Now we remove the end cam holders on the passenger side of the motor. Also 10mm bolts...
Intake side is marked with an "I" and corresponding cylinder marks..
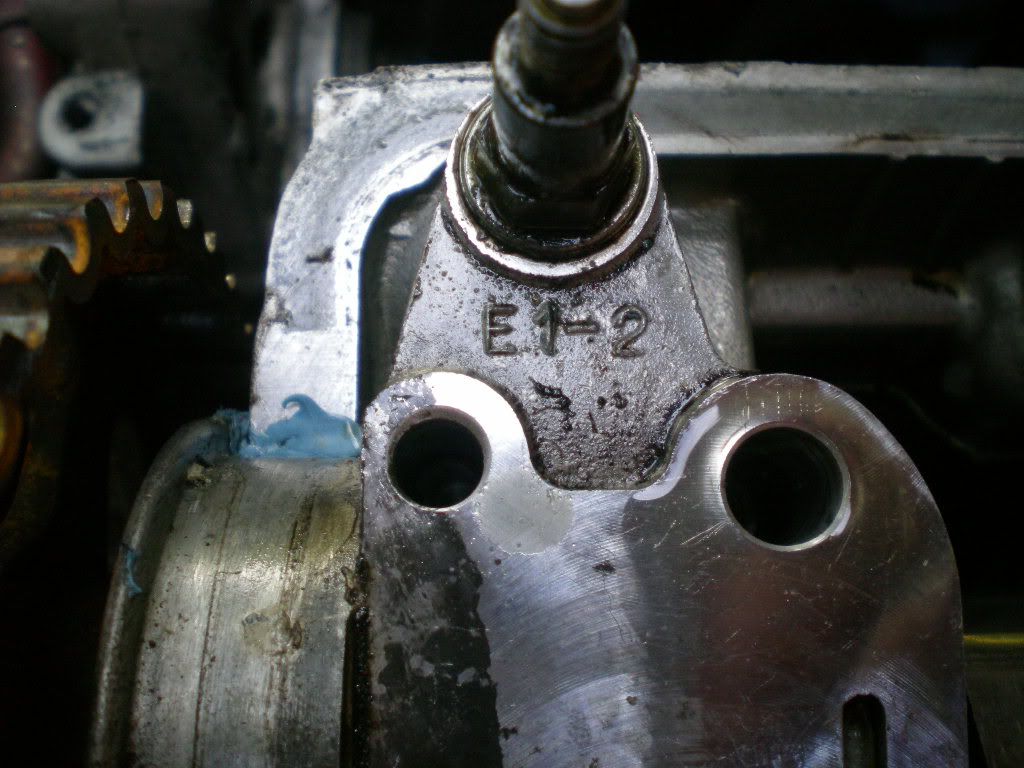
Same with the exhaust side... "E" and once again - a LIGHT TAP with a RUBBER MALLET should pop these free if they won't come off easily...
Simple simple simple..
This is what we see after removing the cam rail holders on the passenger side of the motor...
And this is the driver's side without the cam rail holders...
Set everything in order in your parts pile to keep things organized...
Now we can get at the head bolts. We are getting close... This is what we see with all the cam rails/holders off..

Remove the camshafts by lifting them carefully straight up from the motor. ALWAYS STORE CAMSHAFTS STANDING ON END TO MINIMIZE WARPING AND STRESS ON THE METAL.. Notice the groove is for the distributor (intake camshaft.)

Now we take out the headbolts. Here is the order for loosening. I recommend a half-turn per bolt, then move on to the next one. Do not take the bolt from fully tight to loose in one motion. Loosen the bolts in series, the same way you tighten them. This prevents head warping...
I recommend a long breaker bar to remove the bolts - THEY ARE VERY TIGHT. I have aftermarket head studs so I don't know the head-bolt size or torque. I do no FOR A FACT that the head bolts should not be loosened UNLESS YOU HAVE THE RIGHT SOCKET. If you feel any play whatsoever in the socket when you try to turn it, don't use it. I have heard nightmares of people stripping headbolts and having to drill them out.

I think the OEM head bolts are 6 point - if so, USE A SIX POINT SOCKET. Use a flashlight to look into the hole and double check this. My aftermarket head studs were 9/16" 12pt nuts, so I had to use a different socket setup as you will. DOUBLE AND TRIPLE CHECK THIS BEFORE TRYING TO LOOSEN YOUR HEAD BOLTS.
Now our head should be loose. There should be nothing connecting the head to the block. It should be sitting on the dowel pins. It may take more than one person to flex the header/intake manifold out of the way for lifting the head out but if you made it this far I'm sure you can handle it.
Now crack a beer and get ready to lift you head out.
SIDE NOTE - I have an external oil line to my head for a B20v, 99% of ppl will not have this but if you do YOU HAVE TO DISCONNECT THIS OIL LINE.
This DIY will be handy if you are changing headgaskets, camshafts, valves etc..
Alright, you need a basic set of tools. This is my tool set, which obviously has more than you would need for a simple job like removing your cylinder head from the block.
Once you have your tools, you can jack the car up or not. It's your choice. If you're tall, you may want the engine bay higher to work. If you're short, you may want the car on the ground. Personal preference.
The first IMPORTANT step is to disconnect the battery terminals. If you don't do this, you can easily bump the wrong electrical connectors with a wrench or other tool and cause shorts, burn out fuses, create other problems.
The next step is to drain the coolant. Some people drain into a clean pan with the intention of re-using coolant. I say spend 14 bucks and get some new coolant upon reassembly, because it's cheap insurance for the longevity of your motor. Always dispose of coolant properly, and never leave it sitting un-attended where an animal could drink it. (Stupid animals... but on another note COOLANT IS SWEET AND TASTY. I removed a radiator cap under pressure while hot once, and the coolant exploded into my face. Sizable amounts made their way into my mouth and YES COOLANT DOES TASTE GOOD!)
Next step is to remove the distributor. I recommend you make a scratch to mark the where the distributor timing is set.
There are three 12mm bolts. The top is easily accessible by a 12mm wrench.
The second bolt is in the front, also 12mm. A socket w/extension will be the easiest for this.
Here's the third bolt. 12mm socket w/extension. Before you take this last bolt out, disconnect the two electrical connectors for the distributor. Snap connectors. Simple.
Snap connectors. Simple.
This is what your head looks like without a distributor.
Put your distributor someplace safe and out of the way. You do not have to remove the spark plug wires, this makes installation easier later.
Next up we remove the top radiator hose and cooling neck. Removing the coolant neck is optional, but I think it makes things easier later. Here's the top bolt.
...And here's the bottom bolt. Leave the bleeder screw in and tight.
I recommend you leave the distributor/coolant neck bolts in the head. This makes them easier to find for reassembly and harder to lose.
Put the coolant neck in the parts pile. Just like the distributor, we can leave the top radiator hose connected.
Next up is the powersteering bracket on the front of the head. These are the two 14mm bolts for the bracket.
Before you remove the bracket, loosen the tension on the belt so we don't damage anything with the belt torque.. Here are the two pinch bolts..
Here's the top pinch bolt.
Best way to loosen it is a 12mm wrench, easily accessible from the front.
Next up is the bottom 12mm pinch bolt. It's hard to reach and should be pretty tight.
You may need a bar for added leverage with a 12mm socket.
Now loosen the wingnut easily accessible on the top of the PS pump (not pictured) and then take the bracket off. Two 14mm bolts, easy with a breaker bar..
Or a ratchet..
The bolts are slightly different length..
As you can see, the longer bolt goes on the left (passenger side of head). Shorter bolt on the right (driver side)
Leave all the bolts in the right holes and put the PS bracket off with the other parts.
Back to the other passenger side of the head... Unplug the coolant dashboard gauge sensor (single pin, lower left) the ECU coolant temp sensor (gray plug in hand) and the VTEC solenoid oil pressure sensor switch (green plug, top right) AAAND the VTEC spool valve plug (further up/forward out of the picture.)
Now we have the wires out of the way, we can undo the heater-core hose with some needlenose pliers..
Now we can see the passenger side of the head is clean and fully disconnected.
Now lets get the valve cover out of the way. First up is the ground. 10mm
THIS BOLT STRIPS EASILY..
Then it's the power steering line bracket on the rear driver-side of the head.. 10mm
This bolt also strips easily. We can leave the ground strap/PS line right where they are, as long as you can flex them out of the way of the head for removal/installation.
Now we remove the eight valve cover nuts and grommets. They are all 10mm and the removal order is this...
All bolts removed, you should pry out all grommets and the metal dished retainers that hold them down.
Put all these bolts/grommets/retainers in a bag so we don't lose them.
After lifting the valve cover off, make sure you have one of these donut gaskets in each spark plug hole. And make sure the perimeter gasket came with the cover and did not stick to the head.
Here's our head without the valve cover. Now we will remove the timing belt from the cam gears. This is the order I do everything in, you can mix things up if you'd like. I don't mess with TDC before removing my head, because I always set TDC during reassembly.
Reach down underneath the driver side motor mount and you will find a 14mm tensioner bolt. If your timing cover is off, it's the only 14mm bolt on that side of the motor. If your timing cover is on, it may be hiding underneath a plastic plug. DIRECTLY BELOW MOTOR MOUNT. You can't see it in this picture...
Here we go... 14mm socket w/extension is the best way I know to loosen it. WE ARE NOT REMOVING THIS BOLT. We are only unthreading the bolt a few turns to loosen the timing belt..
This will take the tension off the belt, and you can slide it off the cams little by little.
Once we have the belt off - we remove the header (exhaust manifold.) You may have a cover over your header it insulate heat. This cover does very little from a practical standpoint and I removed mine years ago. If you have a cover, there are three 12mm bolts holding it to the header. This is the order we undo the 9 exhaust manifold bolts.
A 12mm socket will get to most of the bolts - They are actually nuts because the header hangs on the studs but fck the rhetoric..
A 12mm socket on a 3/8" breaker bar will work for the ones you can't fit a ratchet into...
Remove the oil-dipstick at this point and put it in the parts pile..
We have to get creative with the bolt close to the dipstick, but I'm sure you can figure it out...
Here's the exhaust manifold with all the nuts removed from the studs. We can leave the header hanging on the studs for now.
Leave the header just like this for now..
Put your nuts in a bag and keep them safe. Same with your tool. Put it in a bag and keep it safe. STDs are no fun. SIDE NOTE: THERE ARE MORE NUTS THAN PICTURED HERE, I WAS MISSING ONE
As an aside, there may be a bracket on the front of your block holding the header/block together. I don't have this, but if you do you will have to remove it. 14mm easily accessible from the front of the car. You can remove the bracket from the block or the header, it doesn't matter. You can even remove it from both, and put it in your parts pile to impress your girlfriend if you want.. There is also a bracket on the back of the block that everyone will have. It has two 12mm bolts holding the header to the block. You may be able to flex the header off the head studs later without removing this bracket. If you can't - remove the two 12mm nuts/bracket and the 12/14mm clamps holding the exhaust pipe to the header. Crawl under your car - you'll see what I mean.
Now is the tricky part. It's time to move to the back of the head. Remove the thermostat housing and the thermostat - this isn't necessary, but makes things easier. I recommend it.. Remove the ground and the temperature sensor as indicated. The ground is a 10mm and the plug is another snap connector.
The ground is 10mm..
Snap connector...
Now we remove the lower radiator hose with needlenose pliers...
If the hose wont come off (or any hose won't come off) try grabbing the hose with slipjoint pliers and moderate pressure and rotating the hose until you feel it come 'un-stuck' and then it will slide right off..
Now we remove the two bolts holding the thermostat housing. 10mm on the top...
And a 10mm on the bottom.. Socket and extension for this one..
Take off the thermostat housing/gasket/thermostat (I didn't have one installed) and put them in the parts pile.
Now we remove the coolant bypass hose from the intake manifold with needlenose pliers.
And then the intake manifold vacuum line pre-heater with the same needlenose. You can see here that these long bent needlenose come in handy.
Next up is the intake manifold bolts (just like the exhaust manifold - these are studs with nuts on them if you want to get technical.) You can get to the top bolts easily with a wrench. (12mm)
Here are the bottom bolts..
This is on the bottom row, furthest to the driver side..
And this is the corresponding bolt (not pictured in bottom row either) all the way on the passenger side.. This is probably the hardest bolt to reach on the whole project. Crack it with a 12mm wrench..
And then spin it off with your fingers..
Assuming you got all the 12mm intake manifold bolts off, the manifold should be loose enough to flex out of the way... There is a bracket which holds the block to the intake manifold, and the bolts for this bracket can be found on the bottom of the intake manifold. You may need to unbolt the intake manifold from this bracket with the three 12mm bolts underneath the intake manifold. I do not have this bracket on my car, so it's not pictured.
Add your intake manifold nuts to the parts pile, individually bagged so you don't lose any. SIDE NOTE: THERE MAY BE MORE BOLTS THAN PICTURED I WAS MISSING ATLEAST ONE.
Now take a break, smoke some crack, drink a few energy drinks, crank up Tupac and get your head right for the final few steps.
Time to remove the cam rails so we can get the cams out of the way and get at the headbolts. They are all 10/12mm bolts and here is the order to loosen them.. I recommend you loosen the four red X's first
Here are the four red X bolts, easily accessible with a 10mm wrench..
The rest are easily wrenchable..
Or you can use a socket, but you will need a deep socket when you get to the tall bolts that the valve cover is held down by (pictured between index and ring finger)
Leave all the bolts in the holes - but fully unscrewed so you can lift them up and out if you had to..
Get the idea?
If the cam rail you are working on doesn't come free by lifting up with all the bolts free - tap it lightly with a rubber mallet. DO NOT USE A REGULAR HAMMER. Aluminum is very soft and you can easily damage it. It should only take a very light tap if all the bolts are removed.
Remove the cam rail you did first...
Add it to the parts pile being careful not to mix up any of the cam rail bolts...
Same procedure for the other cam rail (doesn't matter which one you do first..) The small end bolts by the cam gears...
Then get all the other bolts loose...
Add it to the parts pile without mixing up the intake and exhaust cam rails..
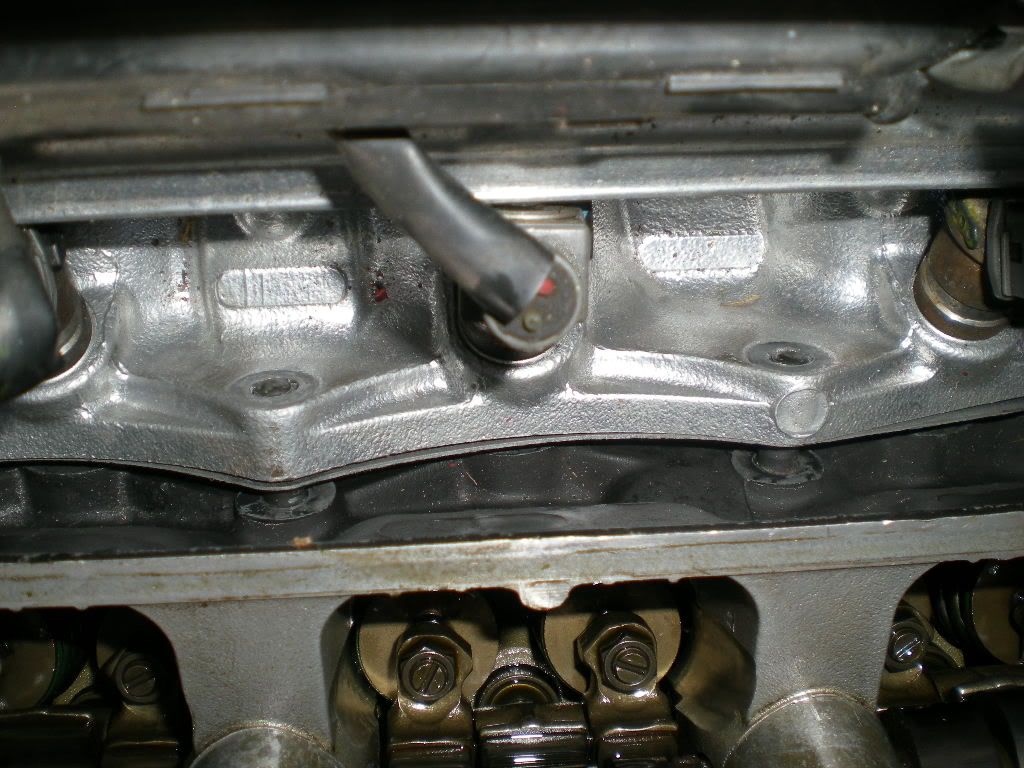
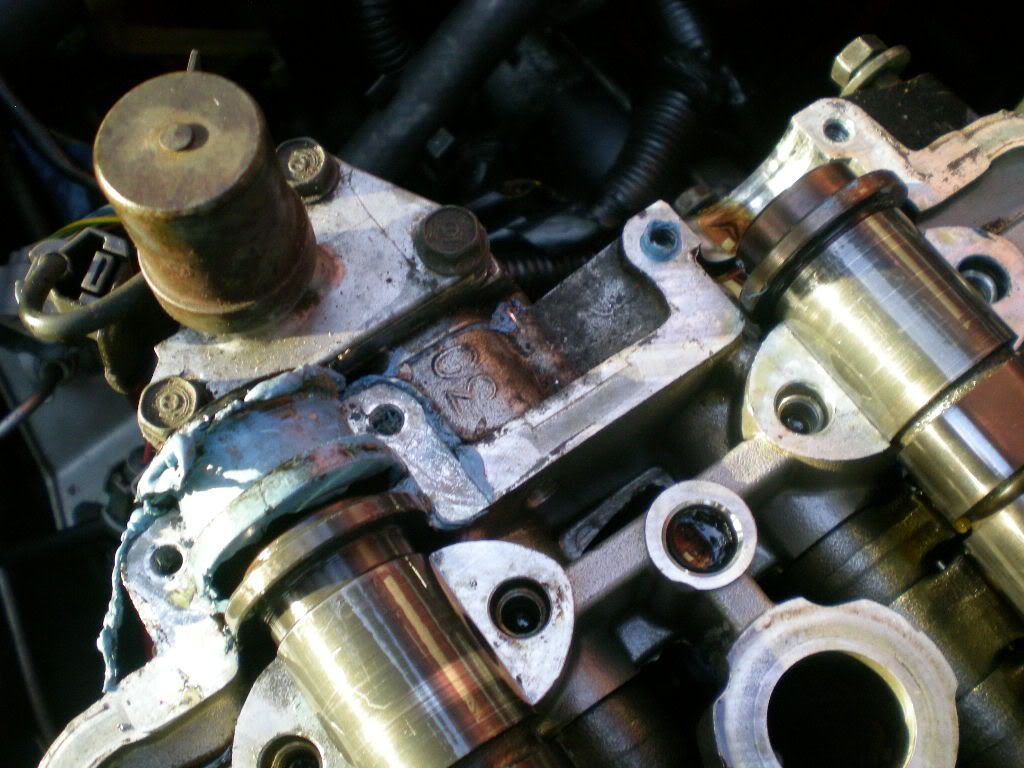
Here's what we see.. VERY IMPORTANT NOTE: THERE IS A SMALL METAL SLEEVE FOR THE OIL PASSAGE ON THE MIDDLE CAM HOLDER. IT MAY STAY IN THE HEAD, OR IT MAY COME OUT WITH THE CAM HOLDER. DO NOT LOSE THIS OR YOU WILL HAVE MAJOR PROBLEMS. THIS TINY METAL SLEEVE IS LESS THAN A CENTIMETER LONG AND WILL EASILY BE LOST IF YOU DONT KEEP TRACK OF IT. The sleeve location is circled in this picture. You cannot see the sleeve itself, but it goes into the marked hole and corresponding hole on the cam holder..
Now for the cam holders. A light tap with a RUBBER mallet should free these up. DON'T MIX THEM UP.
FOR THE LOVE OF ALL THINGS HONDA DO NOT PRY THESE OFF. THIS IS WRONG WRONG WRONG AND YOU WILL BE PUNISHED.
There are markings which tell you which cam holder goes where, you may want to take note. They denote which holder goes where in relation to the cylinders.
Another marking...
You get the idea. It's still not a good idea to mix anything up. Especially when you're working on high performance motors..
Now we remove the end cam holders on the passenger side of the motor. Also 10mm bolts...
Intake side is marked with an "I" and corresponding cylinder marks..
Same with the exhaust side... "E" and once again - a LIGHT TAP with a RUBBER MALLET should pop these free if they won't come off easily...
Simple simple simple..
This is what we see after removing the cam rail holders on the passenger side of the motor...
And this is the driver's side without the cam rail holders...
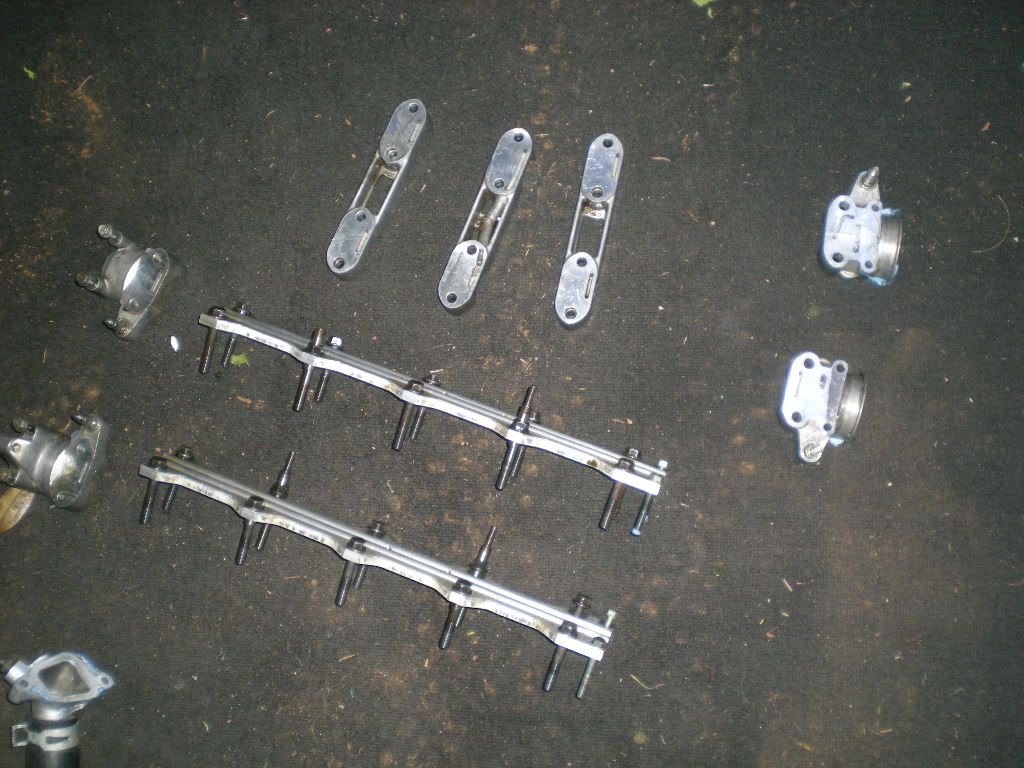
Set everything in order in your parts pile to keep things organized...
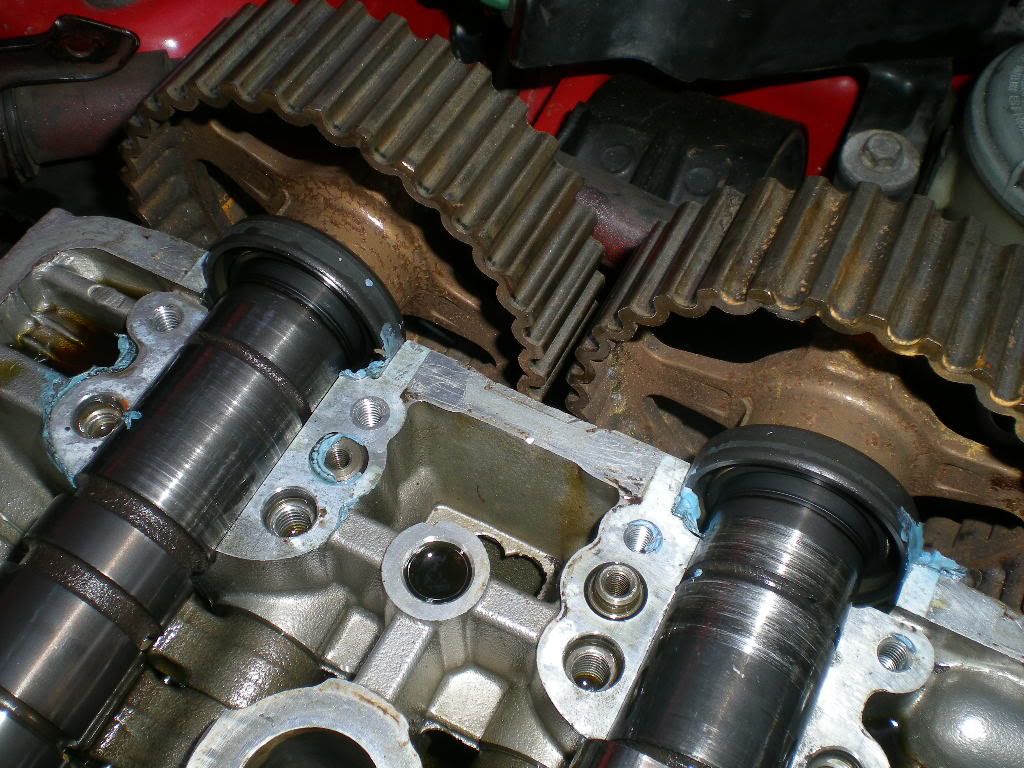
Now we can get at the head bolts. We are getting close... This is what we see with all the cam rails/holders off..
Remove the camshafts by lifting them carefully straight up from the motor. ALWAYS STORE CAMSHAFTS STANDING ON END TO MINIMIZE WARPING AND STRESS ON THE METAL.. Notice the groove is for the distributor (intake camshaft.)
Now we take out the headbolts. Here is the order for loosening. I recommend a half-turn per bolt, then move on to the next one. Do not take the bolt from fully tight to loose in one motion. Loosen the bolts in series, the same way you tighten them. This prevents head warping...
I recommend a long breaker bar to remove the bolts - THEY ARE VERY TIGHT. I have aftermarket head studs so I don't know the head-bolt size or torque. I do no FOR A FACT that the head bolts should not be loosened UNLESS YOU HAVE THE RIGHT SOCKET. If you feel any play whatsoever in the socket when you try to turn it, don't use it. I have heard nightmares of people stripping headbolts and having to drill them out.
I think the OEM head bolts are 6 point - if so, USE A SIX POINT SOCKET. Use a flashlight to look into the hole and double check this. My aftermarket head studs were 9/16" 12pt nuts, so I had to use a different socket setup as you will. DOUBLE AND TRIPLE CHECK THIS BEFORE TRYING TO LOOSEN YOUR HEAD BOLTS.
Now our head should be loose. There should be nothing connecting the head to the block. It should be sitting on the dowel pins. It may take more than one person to flex the header/intake manifold out of the way for lifting the head out but if you made it this far I'm sure you can handle it.
Now crack a beer and get ready to lift you head out.
SIDE NOTE - I have an external oil line to my head for a B20v, 99% of ppl will not have this but if you do YOU HAVE TO DISCONNECT THIS OIL LINE.
Last edited by Corksil; 06-24-2011 at 11:23 AM.

The following users liked this post:
06-23-2011, 06:09 PM
#2
Honda-Tech Member
Thread Starter
plz proofread this and let me know about any corrections.
ive been makin it for the past while and i can't be fcked to read it all again.
maybe ill post up torque ratings for reassembly at a later time... i cant think about this anymore right now.
ive been makin it for the past while and i can't be fcked to read it all again.
maybe ill post up torque ratings for reassembly at a later time... i cant think about this anymore right now.


Trending Topics
 06-23-2011, 10:40 PM
#9
Honda-Tech Member
Join Date: Dec 2010
Posts: 574
Likes: 0
Received 0 Likes
on
0 Posts
Hmm..so THAT'S what folks mean by having to remove the camshafts to pull the head on a B-series
Not as tough as I thought
^^
Great write up!
Not as tough as I thought
^^
Great write up!

 06-24-2011, 05:17 AM
#12
Honda-Tech Member
iTrader: (1)
Join Date: Feb 2011
Location: Jersey
Posts: 863
Likes: 0
Received 0 Likes
on
0 Posts
I just learned how to swap a head on a B series motor..never thought it could be that simple (than again, nothing Honda is ever simple haha). Awesome write-up
06-24-2011, 11:24 AM
#13
Honda-Tech Member
Thread Starter
Thanks HT for the shouts.
PM me topics for the next writeup/diy.
Thanks McV, I updated with your suggestions.
And yes coolant is tasty and your pets will drink it - i got a bunch in my mouth once and it tasted so sweet and yummy i almost wanted to swallow it. ....like blueberries and honey on a fine summer morning.
PM me topics for the next writeup/diy.
Thanks McV, I updated with your suggestions.
And yes coolant is tasty and your pets will drink it - i got a bunch in my mouth once and it tasted so sweet and yummy i almost wanted to swallow it. ....like blueberries and honey on a fine summer morning.
 01-23-2012, 10:19 PM
#15
Honda-Tech Member
Thread Starter
thanks dude. i take my engine apart on an hourly basis. lemme know if you want to see anything else.
02-29-2012, 06:31 AM
#16
Honda-Tech Member

Join Date: Dec 2011
Location: Houston, Texas
Posts: 14
Likes: 0
Received 0 Likes
on
0 Posts
Im almost done with re-installing my head. For some reason, the Belt will not loosen to wrap over the Cams! I've tried turning the crankshaft, tried loosening the bolt, no clue on what to do. I may just take the shafts off, slide it under the belt, then bolt them back down with a little pressure.
Any idea???

Any idea???
02-29-2012, 09:51 AM
#18
I think That's what he meant.
No I wouldn't do that.
If the tensioner is moving free, you should be able to pull "up" on the belt (side
closest to the firewall) and feel the tensioner move and give a little slack.
If it's not, I would pull the timing covers and see what's up.
No I wouldn't do that.
If the tensioner is moving free, you should be able to pull "up" on the belt (side
closest to the firewall) and feel the tensioner move and give a little slack.
If it's not, I would pull the timing covers and see what's up.
 03-11-2012, 09:34 AM
#20
Honda-Tech Member
Thread Starter
yeh cool i hope it's in the faq.
the man obviously had a business meeting with his chiefly smokable products and they advised him as to the proper methods of reinstalling the belt.
the man obviously had a business meeting with his chiefly smokable products and they advised him as to the proper methods of reinstalling the belt.
04-02-2012, 06:30 AM
#21
Honda-Tech Member
How would you reinstall belt and set tension,
Really need pics on setting tension
People say turn 3 teeth some say do cam some say crank
Could you post pics and steps to just putting on tension
Really need pics on setting tension
People say turn 3 teeth some say do cam some say crank
Could you post pics and steps to just putting on tension
 05-07-2012, 08:12 PM
#23

I have always dpne crank 3 teeth with someone holding onto the cams
This is my first time reading this write up... good work with the pics and details.. I couldnt help but to think you lived in the rainforest or something lol. I then read where your from I use to be stationed on Oahu.
This is my first time reading this write up... good work with the pics and details.. I couldnt help but to think you lived in the rainforest or something lol. I then read where your from I use to be stationed on Oahu.
06-03-2012, 10:41 AM
#24
Honda-Tech Member
Thread Starter
thanks for the idea!
@hiddenplanview - yeah oahu is nice, lots more people though.. but they have hawaiian brian's... the pool hall near ala moana.. I've spent days in there.
yes, that's the way I used to tension the belt.

