
DIY 96-00 Honda Civic Tune up and fuel filter
 12-11-2010, 12:11 PM
#1
Technical Hero
Thread Starter
Join Date: May 2002
Location: Charlotte, NC, 28227
Posts: 9,876
Likes: 0
Received 28 Likes
on
20 Posts
This writeup/DIY is for a 96-00 Honda Civic DX with the D16Y7 SOHC Non-VTEC engine fuel filter replacement and tune up. This however will work just the same for the 96-00 D16Y8 engine as the part numbers are identical. The methods involved are compatible however for almost any Honda/Acura 4 cylinder engine from 88-00 as the firing orders are the same and most of the parts are in like places. If you have any comments or questions feel free to post them. I also take criticism very well and am open to it. I’m just hear to spread the knowledge and help you save some money while learning in the process. Let’s begin.
FUEL FILTER
Tools Needed:
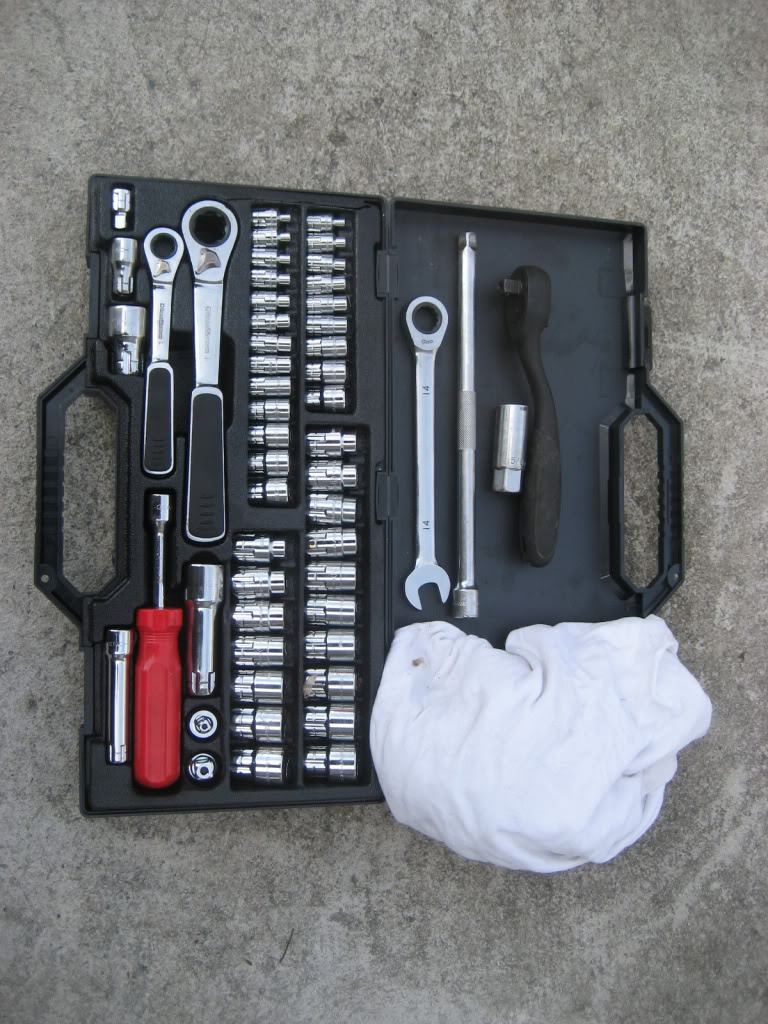
Socket Wrench and sockets – 10mm, 17mm
Shop rags
Line wrench (Gearwrench not required) or combination wrench - 14mm
(I show my box of Gearwrench sockets because I prefer them but they are not required)
Parts Needed:
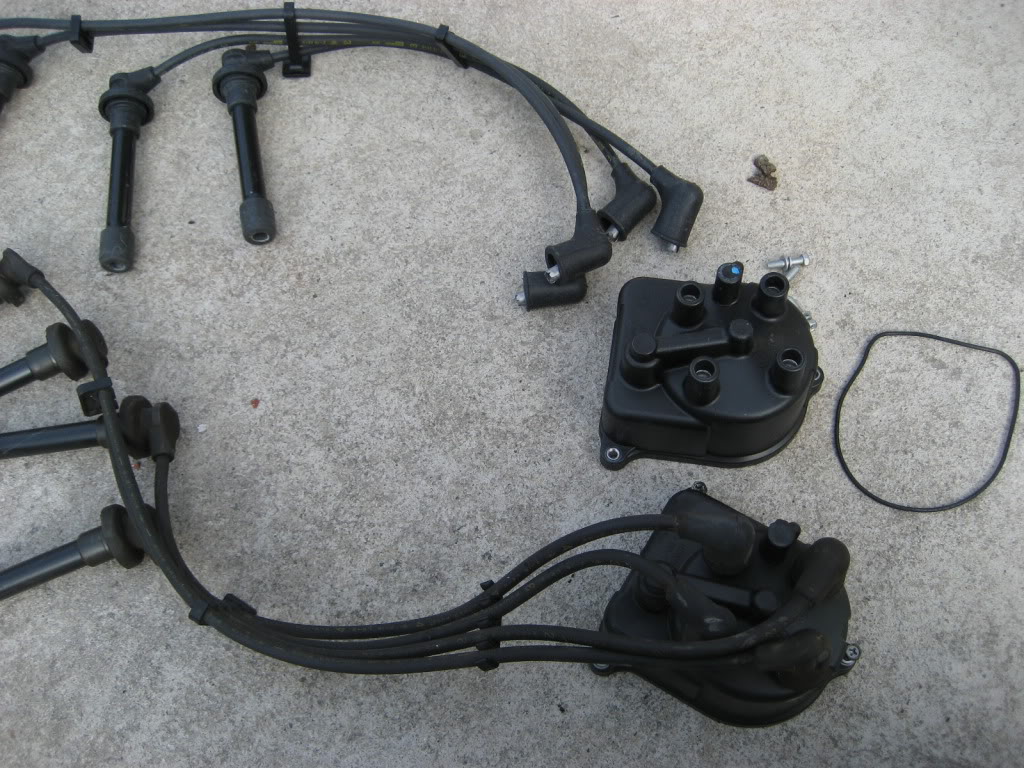
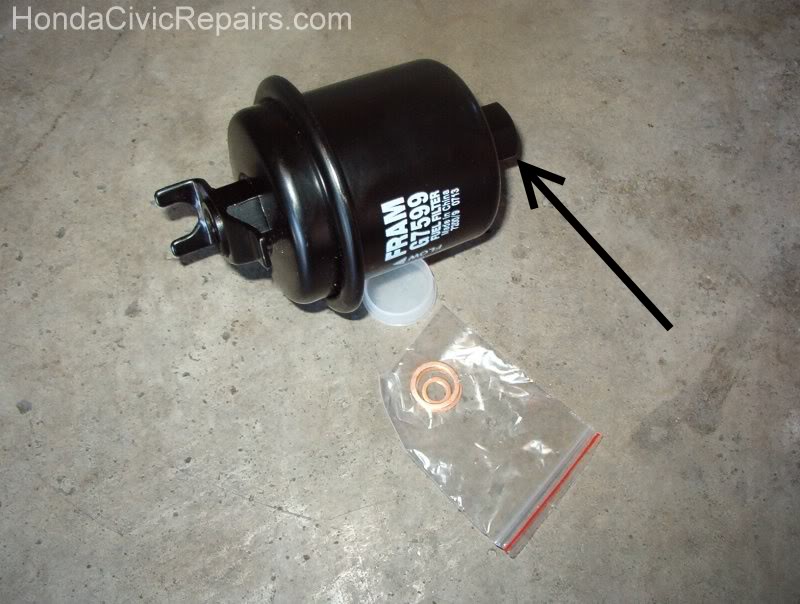
Fuel Filter - 16010-S01-A32(I didn’t use the Honda one but a similar part from Advance)
4 Spark plugs – NGK ZFR5F-11 or ZFR5FGP (platinum) or your preferred plug
Distributor Cap - 30102-P54-006 (includes three 8mm bolts and dist. gasket)
Distributor Rotor - 30103-P08-003
Spark plug wire set - 32722-P2F-A03 (includes wire clips and holder)
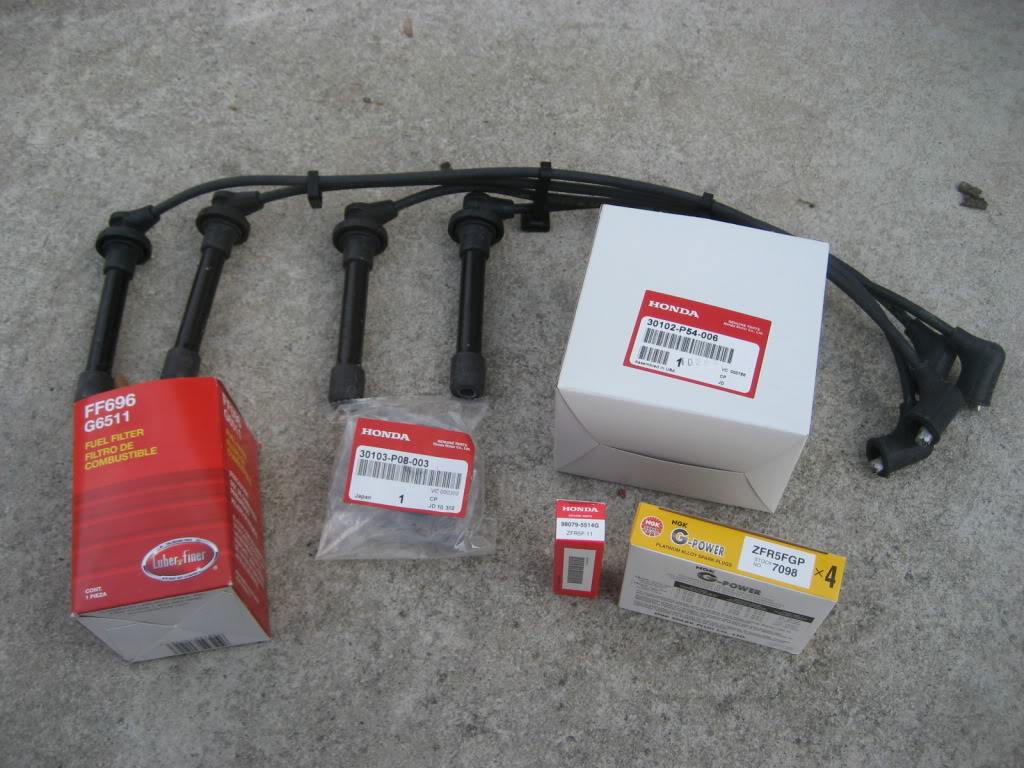
I usually don’t use any other parts for ignition other than Honda OEM parts. I usually get them from a dealership that sells on eBay. If you search for Honda Civic tune up you’ll find them. I got the spark plugs, cap, rotor, wires, oil filter and drain plug washer for about $100 shipped as a set. I bought the fuel filter locally at Advance for around $22 along with the platinum plugs for about $12 total. The set comes with 4 copper resistor plugs but I prefer the platinums and they are usually only a dollar more a plug than the copper.
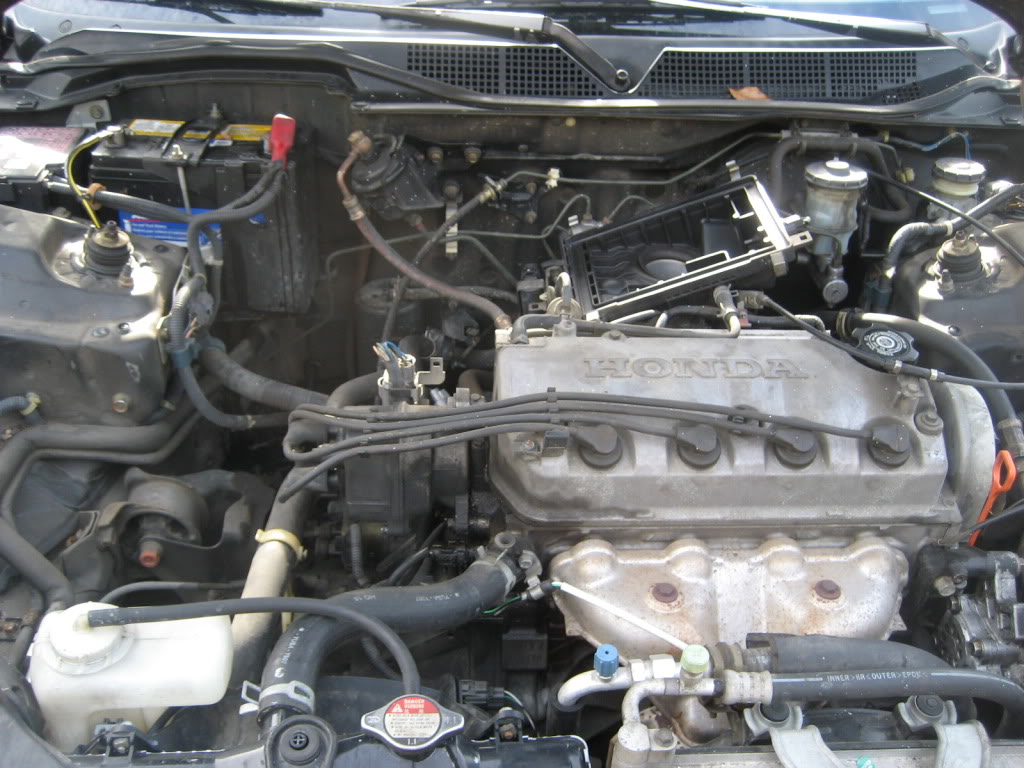
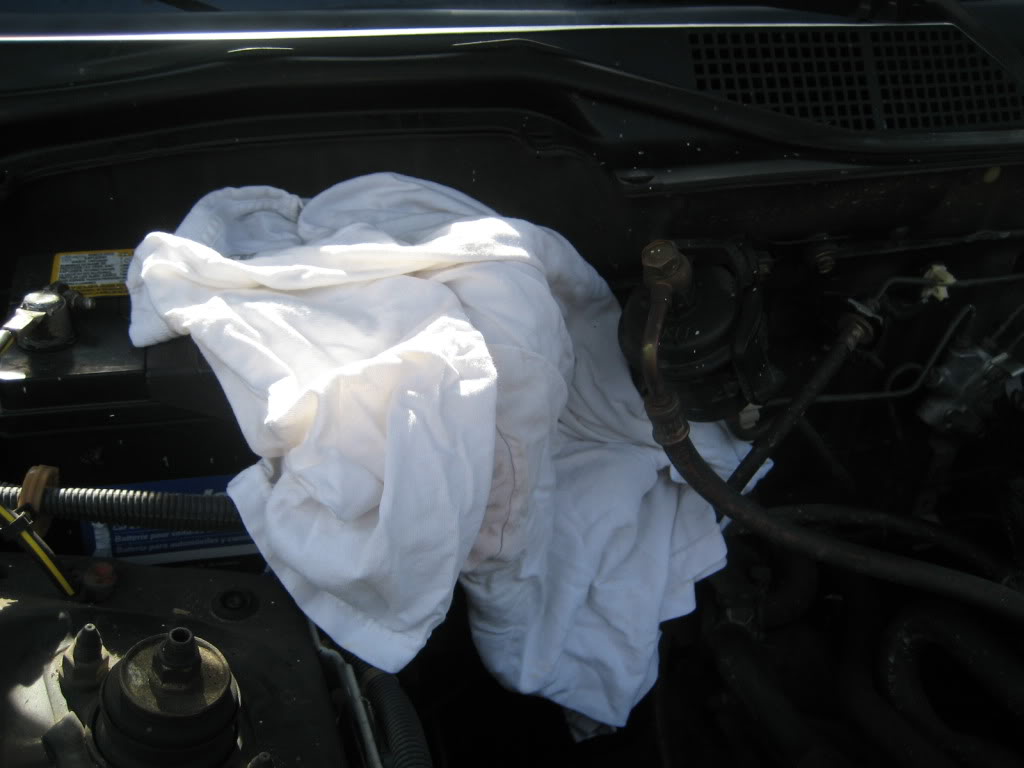
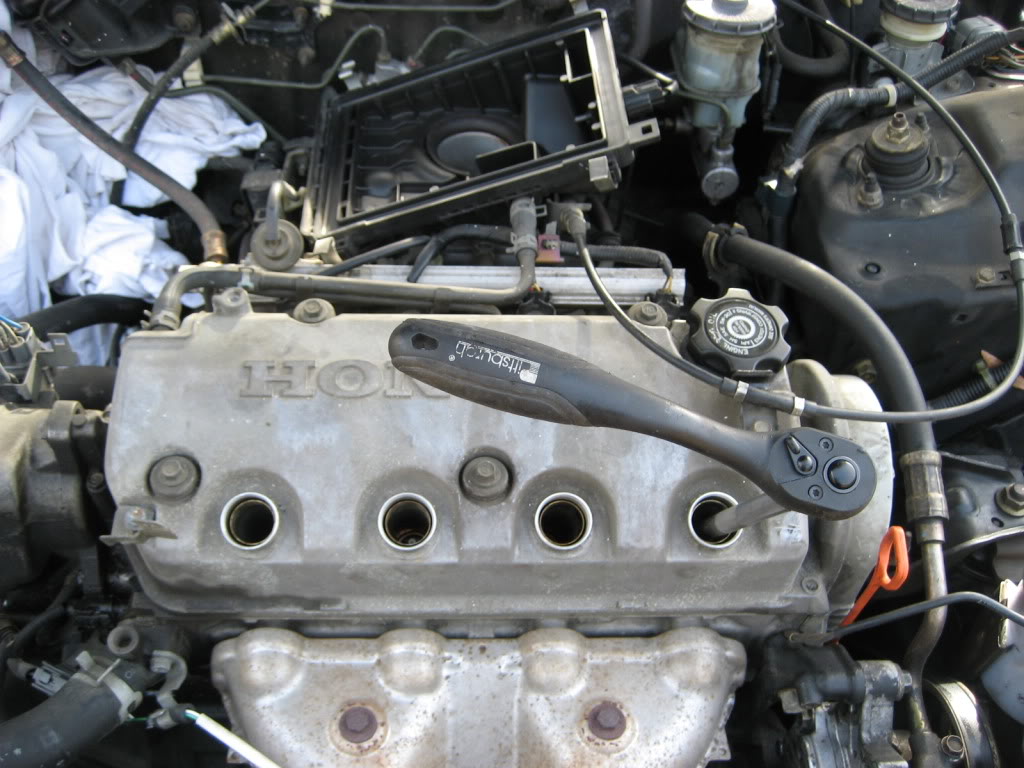
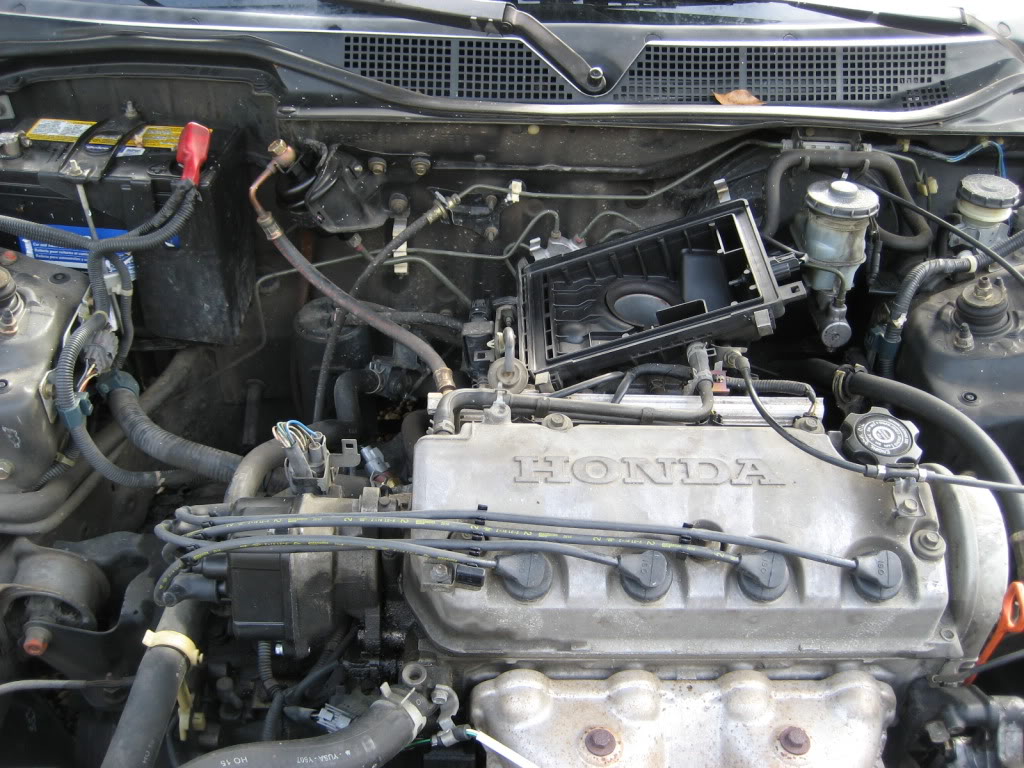
Here’s what your engine bay should look like. The fuel filter is on the firewall on the back left of the photo next to the battery. The distributor is on the left side of the engine above the transmission and the plug wires are across the engine in the front. I’ve removed the air box assembly with the “snorkel” air cleaner tube in this photo. This isn’t required but does make the process a bit smoother and easier to access everything.
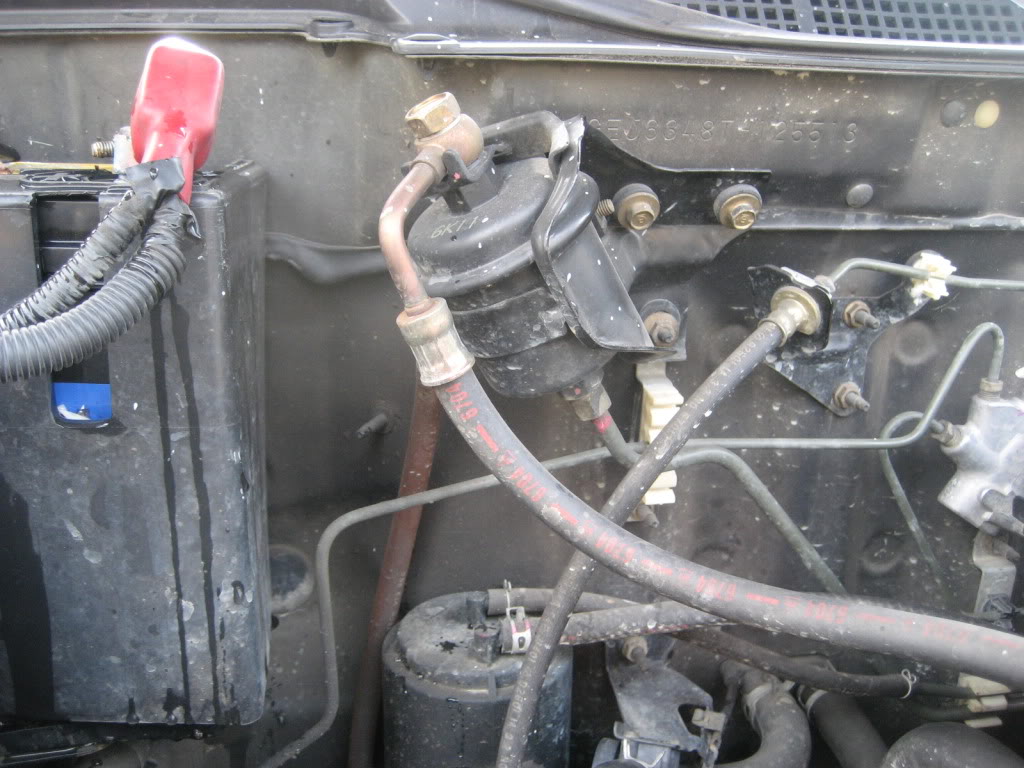
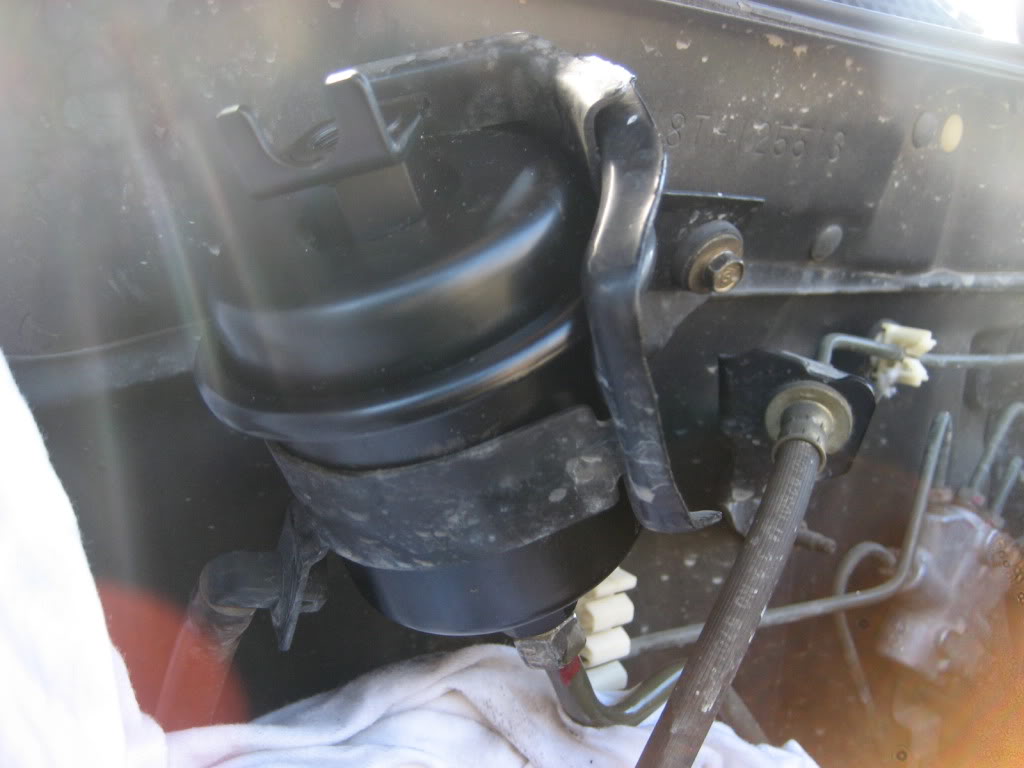
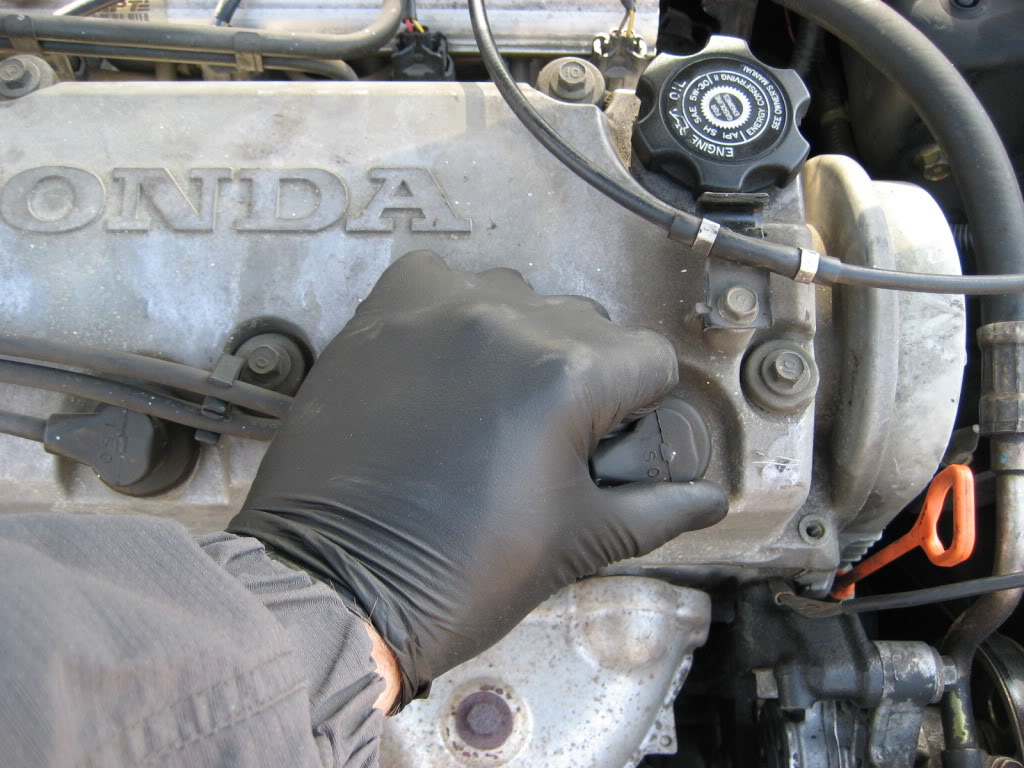
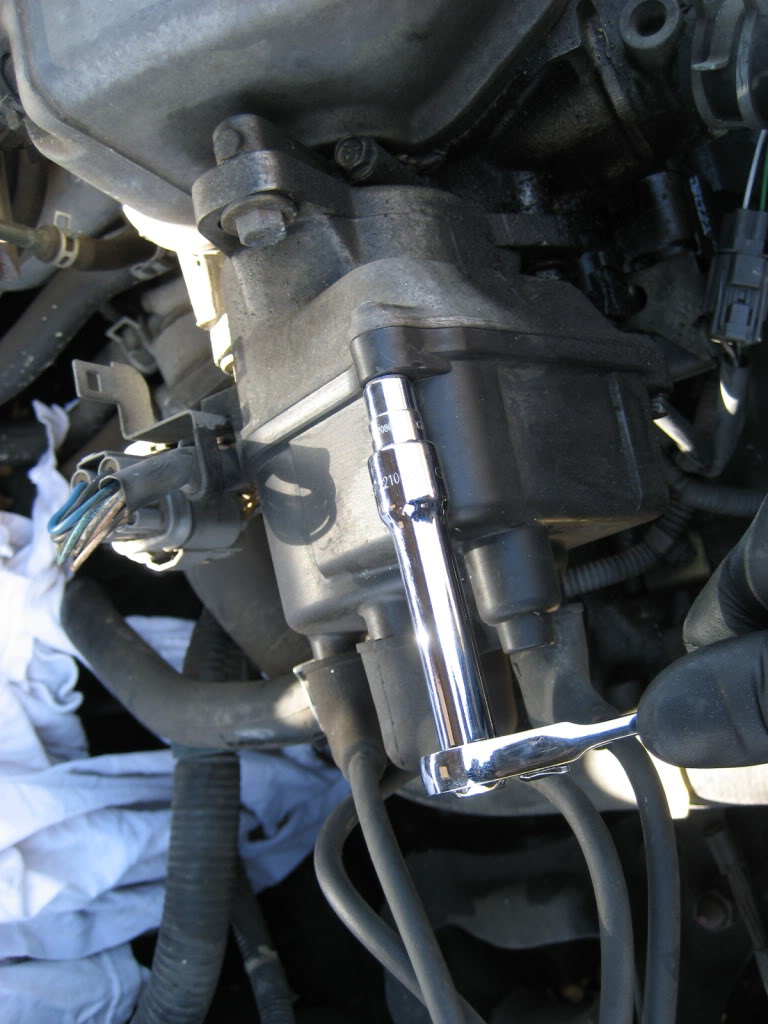
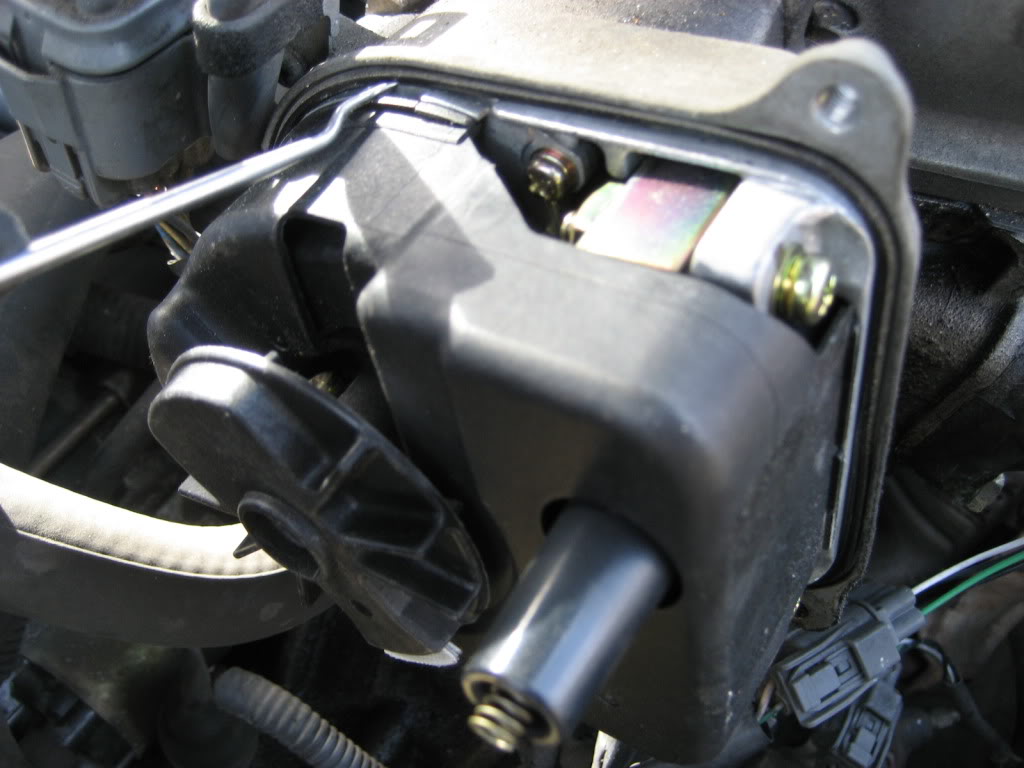
Here’s a close up of the fuel filter. You’ll notice on the top is a 17mm bolt and on the bottom is a 14mm fuel line fitting. These are two you will need to remove along with the 10mm bracket bolt to remove the fuel filter.
Step 1
You’ll want to release any pressure you’ve built up in the fuel system. One of the easiest ways is to remove the gas cap and allow any excess pressure to be released. Some models have a service bolt (usually 12 or 10mm on top of the top bolt) that can be removed to relieve pressure but this model didn’t so you will have some leakage. So you’ll also need to place a shop rag under the fuel filter. I also placed on on the battery to prevent arching, you can however disconnect the battery but remember to write down your radio code as this will reset it (for some reason it doesn’t on my model).

Step 2
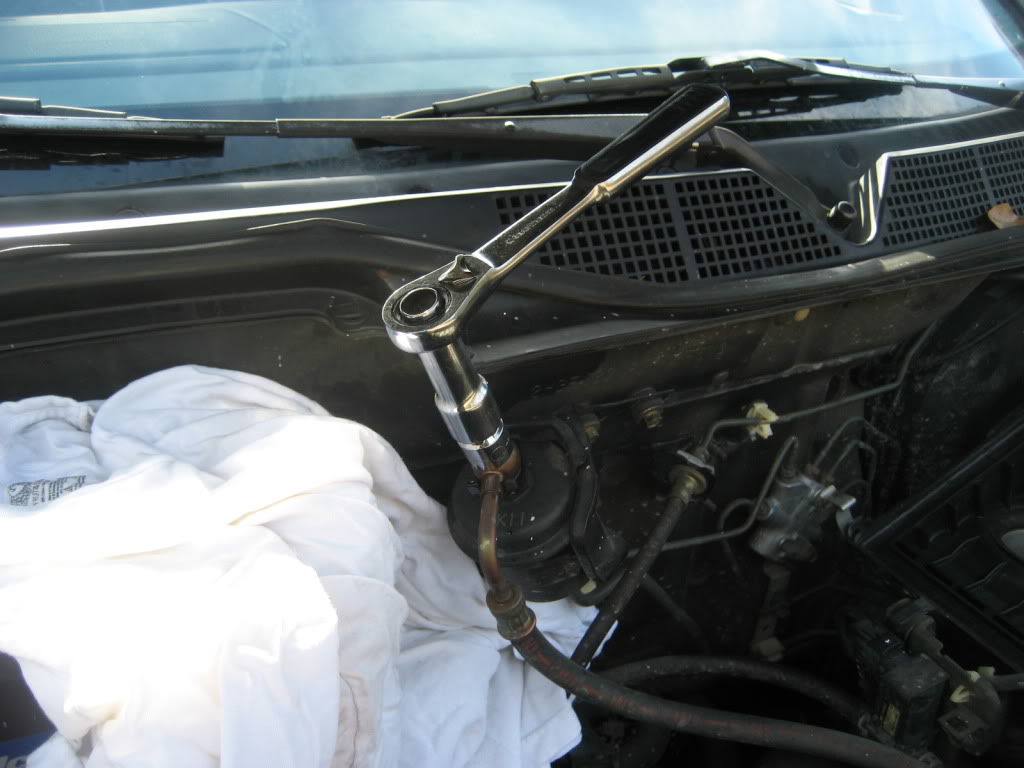
Using your 17mm socket wrench (or a 17mm combination wrench can be used as well) remove the top bolt. If you are having a hard time or the filter holder is twisting to much another combination wrench may be used under this bolt on the bolt shaped portion to keep the filter in place. I didn’t need to do this.
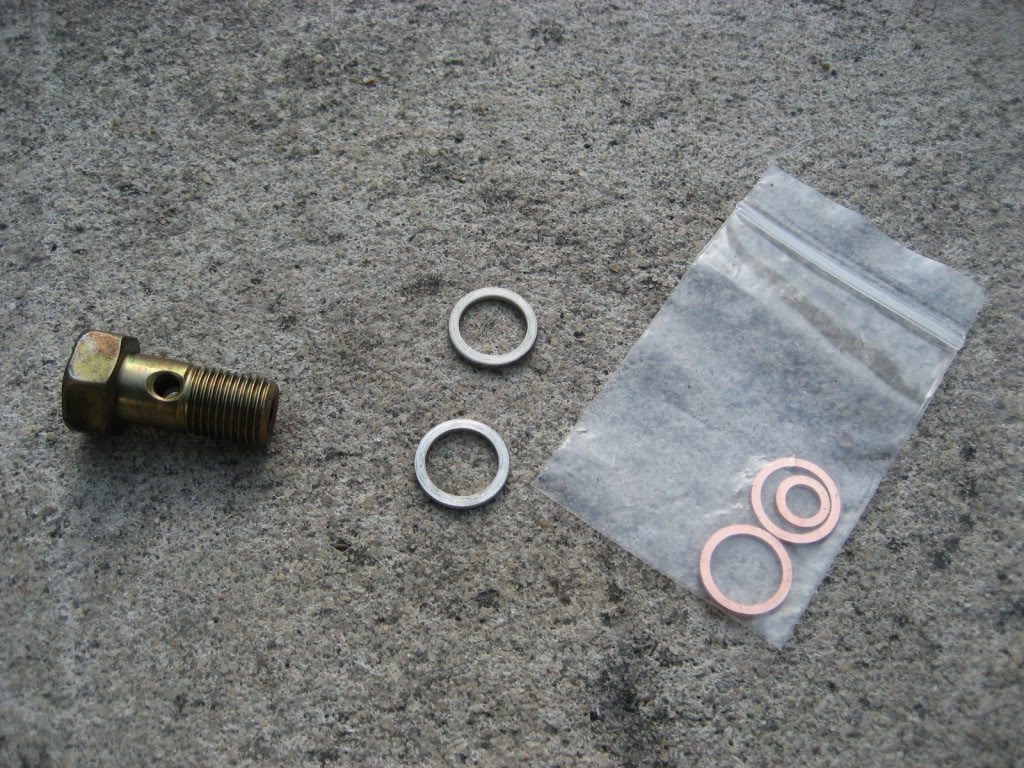
Once you have loosened the bolt notice that the bolt has a washer under the head on top of the fuel line fitting and one under the fitting. Your new filter should come with two new crush washers, so make sure you have new ones as if you reuse these they may or may not seal. You’ll notice also in the bag a third smaller crusher washer. This washer is for the service bolt if your model is so equipped but won’t be used in this application.
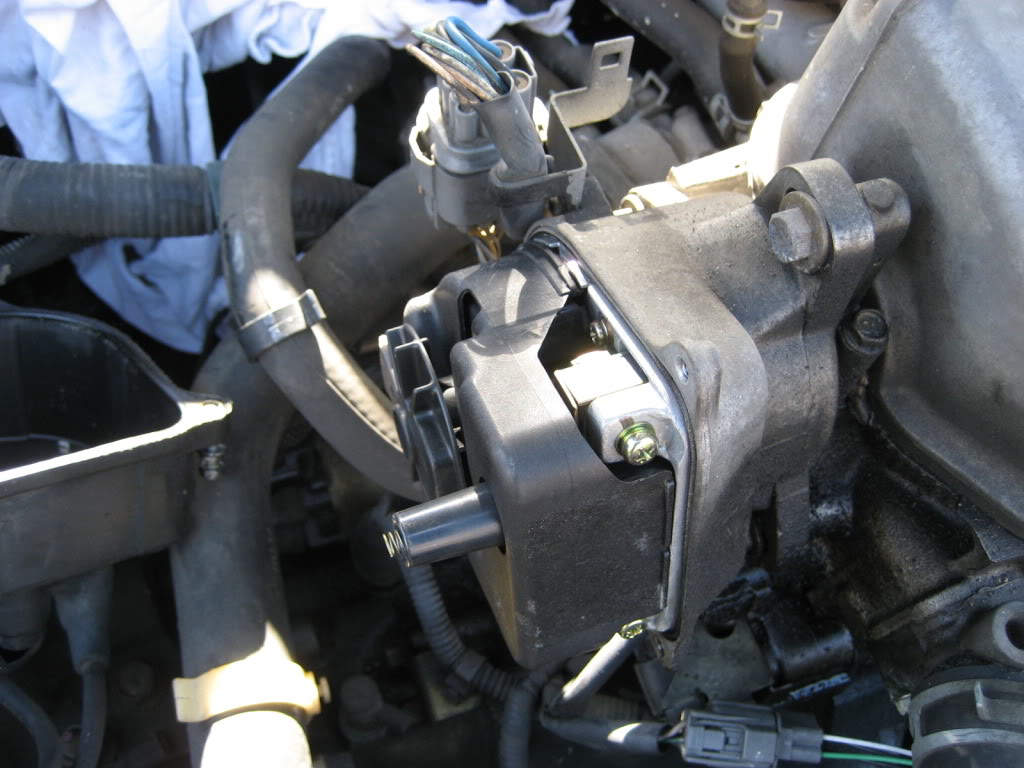
Step 3
Using your 14mm combination or line wrench loosen your bottom 14mm line bolt.

Step 4
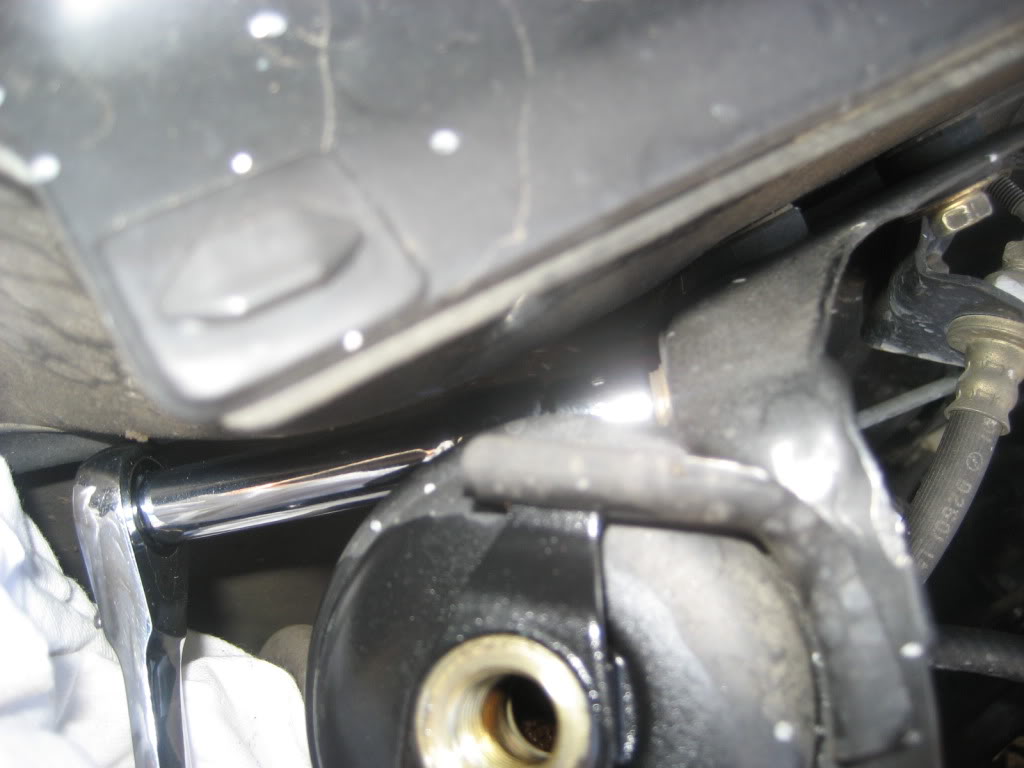
On the back side of the filter housing there is a 10mm bolt holding the swing portion of the bracket clasp. Take your socket wrench and short extension and remove this bolt. After this you should be able to pull your older filter out. More gas will probably pour out.
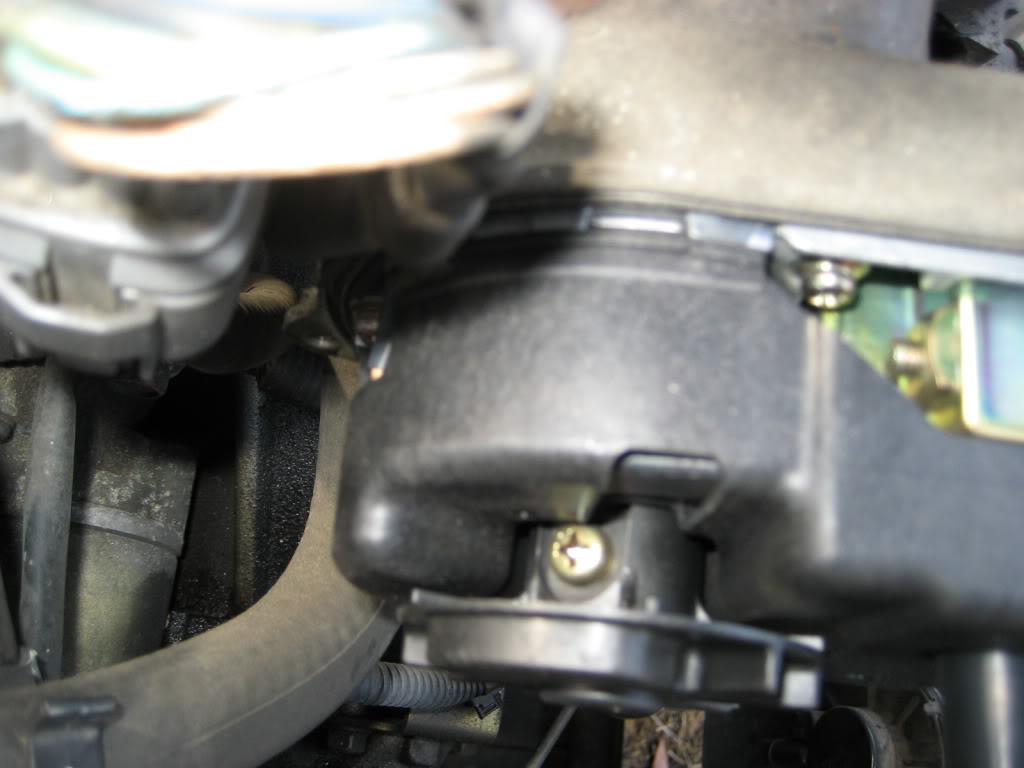
[Step 5]
Place your new filter into the bracket. Screw the bottom 14mm line back into the filter by hand making sure not to cross thread it and then tighten it with the wrench. Then attach the swing bracket to the holder and replace your 10mm bolt back into place and tighten.
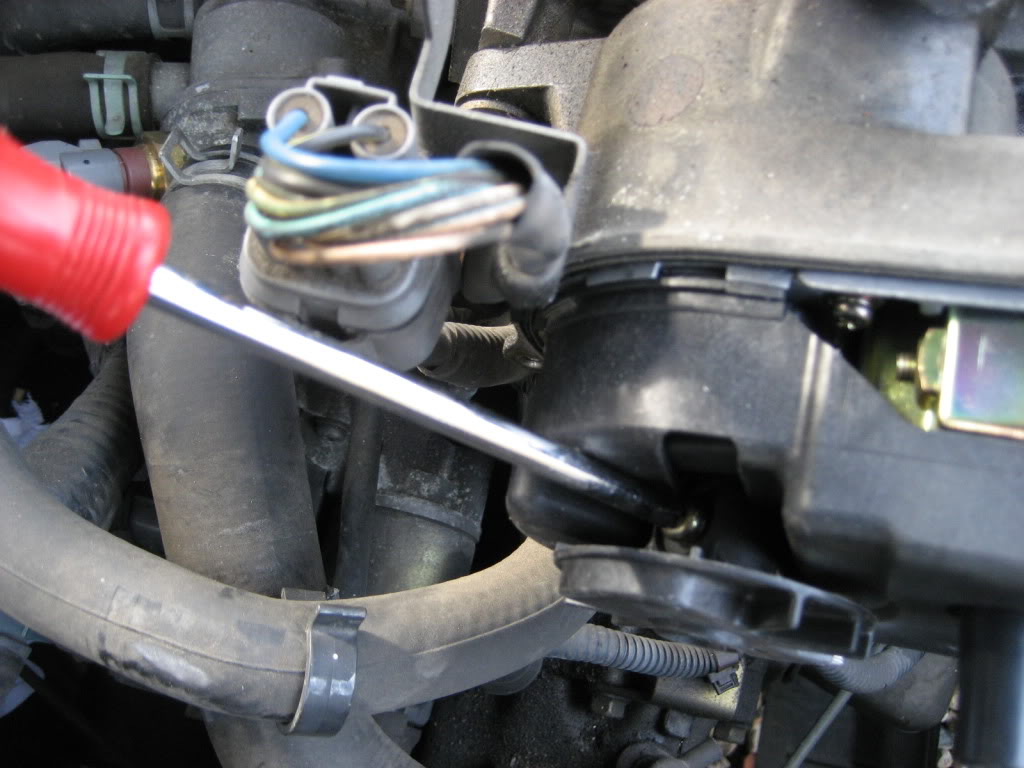
Step 6
Now take your top 17mm bolt and two crush washers and place them as so pictured onto the fuel line fitting. Screw the bolt back on to 25 ft/lbs of torque. Now you’re done make sure all your bolts are tight and then check for leaks by turning the igntion to accessory a few times. After you are sure of no leaks crank the car and confirm there are no leaks. Congrats!
TUNE UP
Tools Needed:
Socket Wrench and sockets – 8mm,spark plug socket
Extra long extension for socket wrench
Phillips head screw driver (not pictured)
(I show my box of Gearwrench sockets because I prefer them but they are not required)
Parts Needed:
4 Spark plugs – NGK ZFR5F-11 or ZFR5FGP (platinum) or your preferred plug
Distributor Cap - 30102-P54-006 (includes three 8mm bolts and dist. gasket)
Distributor Rotor - 30103-P08-003
Spark plug wire set - 32722-P2F-A03 (includes wire clips and holder)

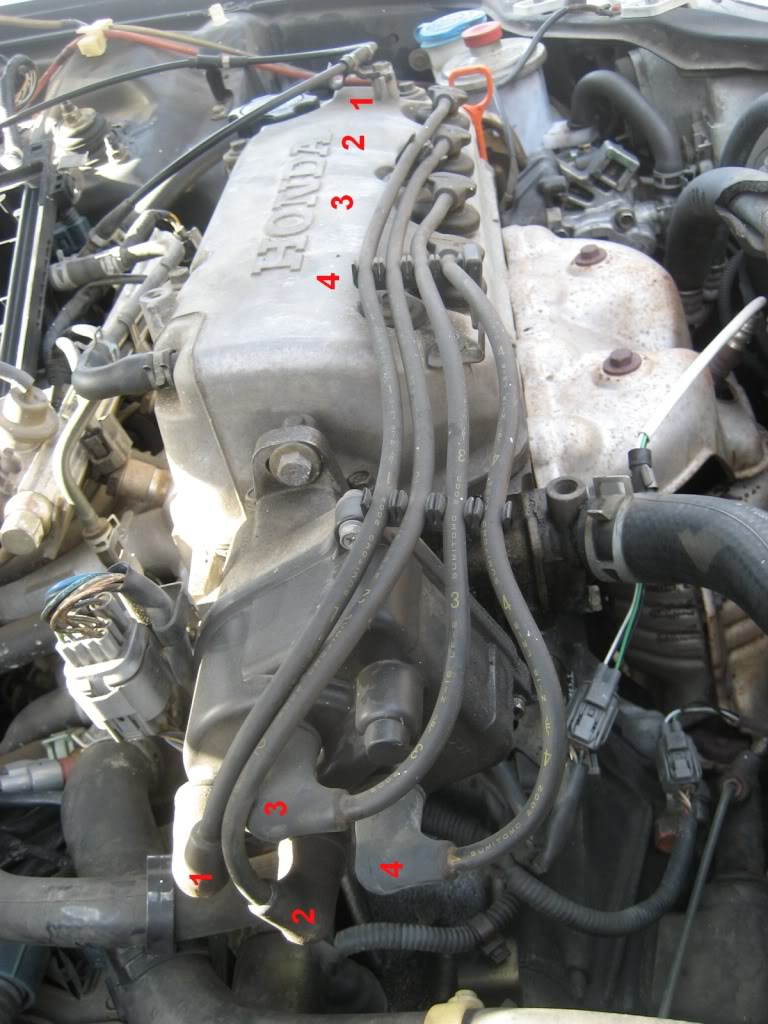
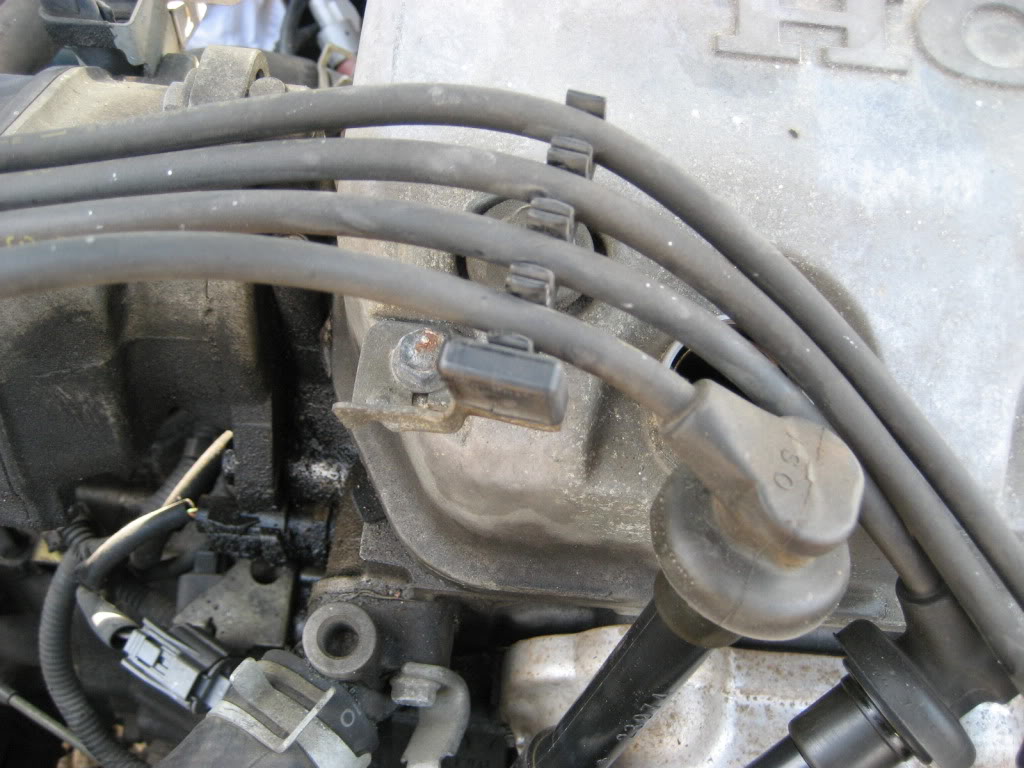
Its good to get a view of how things are routed on the ignition portion of this write up. Mostly because one of the largest mistakes made when doing tune ups is placing the plug wires in the wrong order thereby causing the car not to start or to run poorly. Here’s a firing order diagram of how it should be on any 4 cylinder Honda/Acura with plug wires.
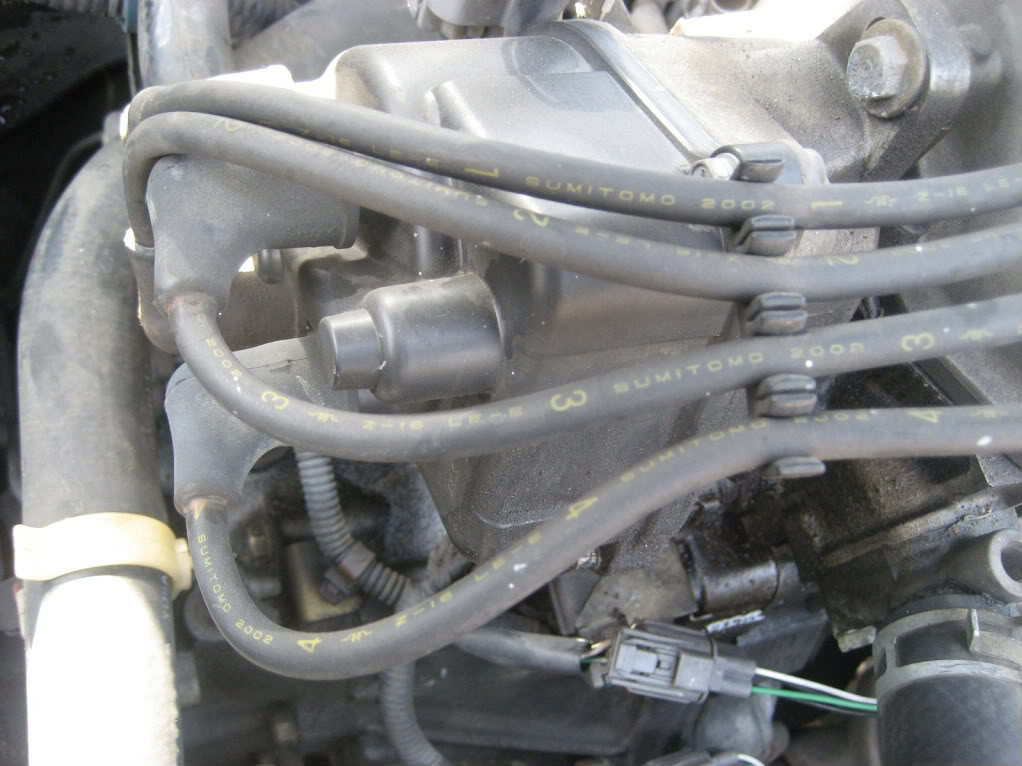
Also the OEM plug wires are labeled with which number they are as well as the manufactured date as well. These are from 2002.
Lets begin
Step 1
Begin by taking each of the plug wires one by one and twist it side to side to break it loose from the plug. Then pull up and out. At this point leave the other ends on the distributor cap as we will use this to match up our new set. On the last holder pull up and it will release it from the bracket.
Step 2
Now you’ll need to remove the 3 8mm bolts holding on the distributor cap. There are two here
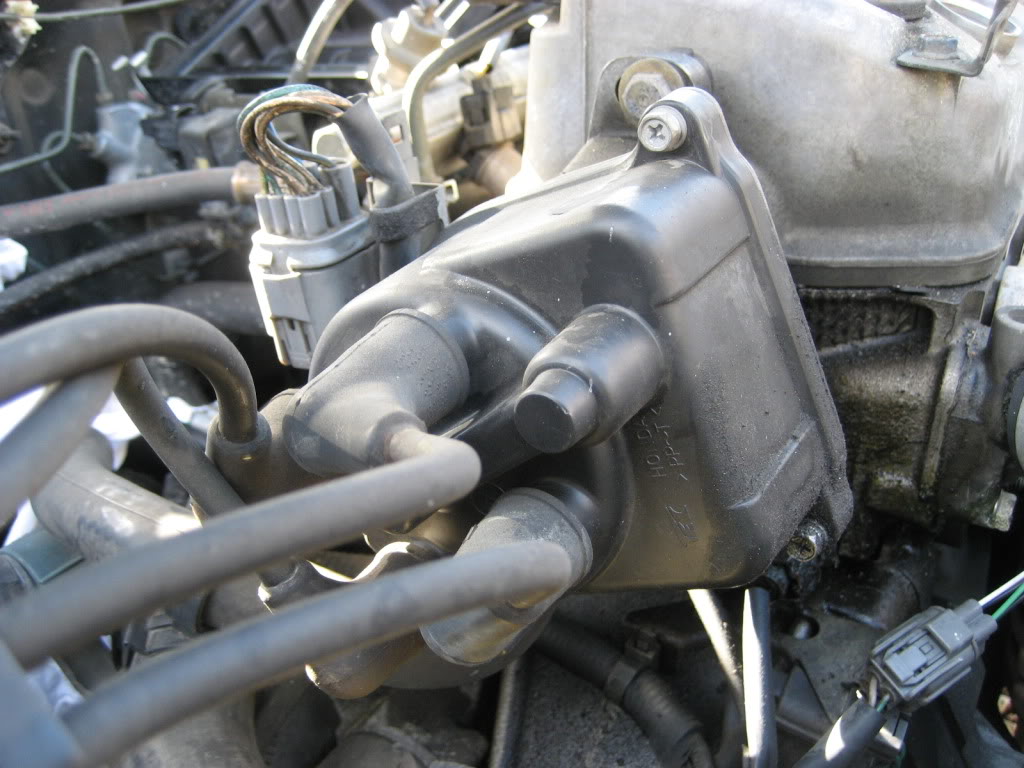
And one here
Now remove the 3 bolts using your socket wrench and 8mm socket and pull off and now you’ll see your rotor.
Step 3
Look at the rotor there should be a phillips head screw holding it on. At this point if you don’t see the screw you’ll have to do one of two things. One is turn your crank pulley until the screw is face up. Or using the key crank your car over quickly until the screw is face up. Here’s what it should like.
Now taking your screwdriver remove the screw. If it won’t come off that easy DO NOT STRIP IT or use a drill. Insert the screwdriver tightly in the screw and take a wrench on the handle and turn it ensuring you don’t loose the screw.
Now place your new rotor on (it’ll only go on one way) and replace the screw ensuring it is tight. I used the screw driver wrench combo to do this.
Step 4
Now laying your old cap and wires beside your new cap and rotor attach the wires to the cap in the same order as your old ones. This photo shows your new cap with new 8mm bolts and disributor gasket.
Taking a small screw driver, pick tool or your fingernail remove the old gasket and place the new one back in place, it’ll only go on one way. No sealant is needed.
Place your new cap on the distributor, replace the 3 8mm bolts and tighten. We’ll replace the spark plugs then attach the wires afterwards. They’ll only reach one way so don’t worry at this point about messing them up.
Step 5
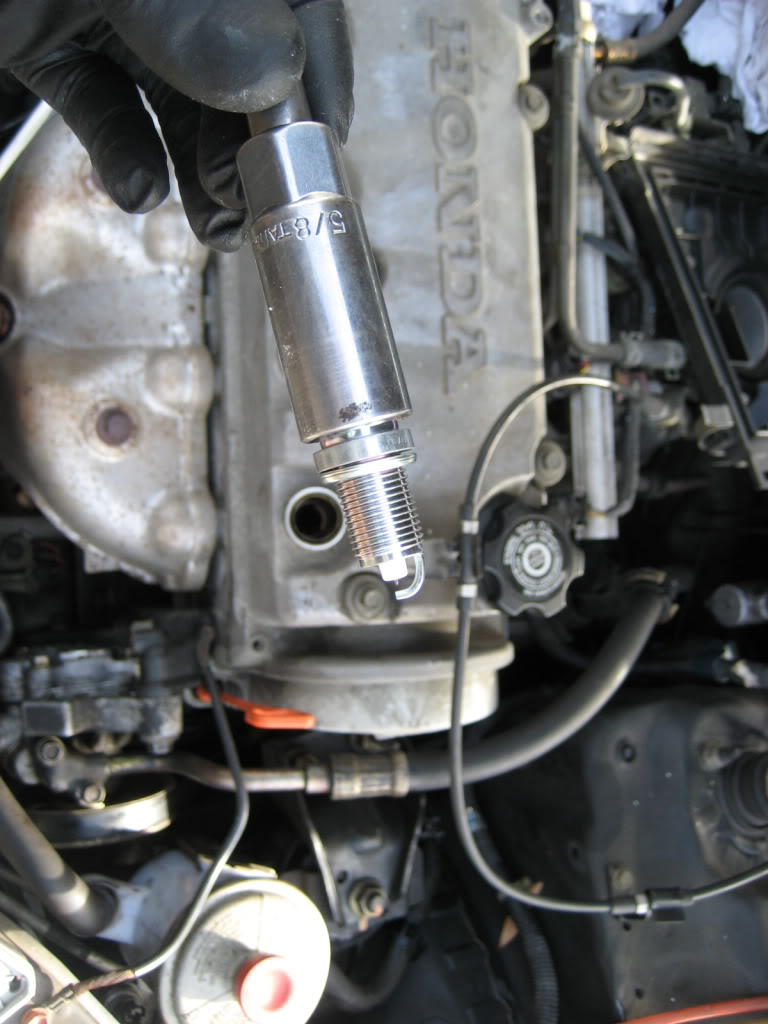
Taking your socket wrench and spark plug socket begin by removing one plug at a time and replacing it. This way you’ll have less of a chance of dropping anything down into the holes.
Here’s a comparison of the old plug (left), new OEM plug (center) and new Platinum plug (right). You can see that about half the electrode is worn down on the old plug but it looks like a good color (not real white, no black, no oil). You’ll want to at this point if you use the center plug (copper) to gap it using a ramp style gapper or wire gapper. If you are using the platinum plug you can check gap but don’t gap it as you could wear off the platinum on the tip. The gap should be .044” (+.004”/-.004”).

Now taking one plug at a time place the plug into the spark plug socket and slowly lower it down into the hole ensuring not to drop it as it could gap the plug smaller. Hand tighten the plug and torque the plug to 13 ft/lb. Repeat with the other 3 plugs.
Now you can place the plug wires onto the spark plugs ensuring they clip onto the plug. Clip the plug clip on the bracket. Your done! Replace your airbox if you removed it. Check your work area under the hood and crank the car to ensure all is well and go for a test drive. You just saved a grip of $$$ and you can brag to your family that you accomplished something.
FUEL FILTER
Tools Needed:
Socket Wrench and sockets – 10mm, 17mm
Shop rags
Line wrench (Gearwrench not required) or combination wrench - 14mm
(I show my box of Gearwrench sockets because I prefer them but they are not required)
Parts Needed:
Fuel Filter - 16010-S01-A32(I didn’t use the Honda one but a similar part from Advance)
4 Spark plugs – NGK ZFR5F-11 or ZFR5FGP (platinum) or your preferred plug
Distributor Cap - 30102-P54-006 (includes three 8mm bolts and dist. gasket)
Distributor Rotor - 30103-P08-003
Spark plug wire set - 32722-P2F-A03 (includes wire clips and holder)
I usually don’t use any other parts for ignition other than Honda OEM parts. I usually get them from a dealership that sells on eBay. If you search for Honda Civic tune up you’ll find them. I got the spark plugs, cap, rotor, wires, oil filter and drain plug washer for about $100 shipped as a set. I bought the fuel filter locally at Advance for around $22 along with the platinum plugs for about $12 total. The set comes with 4 copper resistor plugs but I prefer the platinums and they are usually only a dollar more a plug than the copper.
Here’s what your engine bay should look like. The fuel filter is on the firewall on the back left of the photo next to the battery. The distributor is on the left side of the engine above the transmission and the plug wires are across the engine in the front. I’ve removed the air box assembly with the “snorkel” air cleaner tube in this photo. This isn’t required but does make the process a bit smoother and easier to access everything.
Here’s a close up of the fuel filter. You’ll notice on the top is a 17mm bolt and on the bottom is a 14mm fuel line fitting. These are two you will need to remove along with the 10mm bracket bolt to remove the fuel filter.
Step 1
You’ll want to release any pressure you’ve built up in the fuel system. One of the easiest ways is to remove the gas cap and allow any excess pressure to be released. Some models have a service bolt (usually 12 or 10mm on top of the top bolt) that can be removed to relieve pressure but this model didn’t so you will have some leakage. So you’ll also need to place a shop rag under the fuel filter. I also placed on on the battery to prevent arching, you can however disconnect the battery but remember to write down your radio code as this will reset it (for some reason it doesn’t on my model).
Step 2
Using your 17mm socket wrench (or a 17mm combination wrench can be used as well) remove the top bolt. If you are having a hard time or the filter holder is twisting to much another combination wrench may be used under this bolt on the bolt shaped portion to keep the filter in place. I didn’t need to do this.
Once you have loosened the bolt notice that the bolt has a washer under the head on top of the fuel line fitting and one under the fitting. Your new filter should come with two new crush washers, so make sure you have new ones as if you reuse these they may or may not seal. You’ll notice also in the bag a third smaller crusher washer. This washer is for the service bolt if your model is so equipped but won’t be used in this application.
Step 3
Using your 14mm combination or line wrench loosen your bottom 14mm line bolt.
Step 4
On the back side of the filter housing there is a 10mm bolt holding the swing portion of the bracket clasp. Take your socket wrench and short extension and remove this bolt. After this you should be able to pull your older filter out. More gas will probably pour out.
[Step 5]
Place your new filter into the bracket. Screw the bottom 14mm line back into the filter by hand making sure not to cross thread it and then tighten it with the wrench. Then attach the swing bracket to the holder and replace your 10mm bolt back into place and tighten.
Step 6
Now take your top 17mm bolt and two crush washers and place them as so pictured onto the fuel line fitting. Screw the bolt back on to 25 ft/lbs of torque. Now you’re done make sure all your bolts are tight and then check for leaks by turning the igntion to accessory a few times. After you are sure of no leaks crank the car and confirm there are no leaks. Congrats!
TUNE UP
Tools Needed:
Socket Wrench and sockets – 8mm,spark plug socket
Extra long extension for socket wrench
Phillips head screw driver (not pictured)
(I show my box of Gearwrench sockets because I prefer them but they are not required)
Parts Needed:
4 Spark plugs – NGK ZFR5F-11 or ZFR5FGP (platinum) or your preferred plug
Distributor Cap - 30102-P54-006 (includes three 8mm bolts and dist. gasket)
Distributor Rotor - 30103-P08-003
Spark plug wire set - 32722-P2F-A03 (includes wire clips and holder)
Its good to get a view of how things are routed on the ignition portion of this write up. Mostly because one of the largest mistakes made when doing tune ups is placing the plug wires in the wrong order thereby causing the car not to start or to run poorly. Here’s a firing order diagram of how it should be on any 4 cylinder Honda/Acura with plug wires.
Also the OEM plug wires are labeled with which number they are as well as the manufactured date as well. These are from 2002.
Lets begin
Step 1
Begin by taking each of the plug wires one by one and twist it side to side to break it loose from the plug. Then pull up and out. At this point leave the other ends on the distributor cap as we will use this to match up our new set. On the last holder pull up and it will release it from the bracket.
Step 2
Now you’ll need to remove the 3 8mm bolts holding on the distributor cap. There are two here
And one here
Now remove the 3 bolts using your socket wrench and 8mm socket and pull off and now you’ll see your rotor.
Step 3
Look at the rotor there should be a phillips head screw holding it on. At this point if you don’t see the screw you’ll have to do one of two things. One is turn your crank pulley until the screw is face up. Or using the key crank your car over quickly until the screw is face up. Here’s what it should like.
Now taking your screwdriver remove the screw. If it won’t come off that easy DO NOT STRIP IT or use a drill. Insert the screwdriver tightly in the screw and take a wrench on the handle and turn it ensuring you don’t loose the screw.
Now place your new rotor on (it’ll only go on one way) and replace the screw ensuring it is tight. I used the screw driver wrench combo to do this.
Step 4
Now laying your old cap and wires beside your new cap and rotor attach the wires to the cap in the same order as your old ones. This photo shows your new cap with new 8mm bolts and disributor gasket.
Taking a small screw driver, pick tool or your fingernail remove the old gasket and place the new one back in place, it’ll only go on one way. No sealant is needed.
Place your new cap on the distributor, replace the 3 8mm bolts and tighten. We’ll replace the spark plugs then attach the wires afterwards. They’ll only reach one way so don’t worry at this point about messing them up.
Step 5
Taking your socket wrench and spark plug socket begin by removing one plug at a time and replacing it. This way you’ll have less of a chance of dropping anything down into the holes.
Here’s a comparison of the old plug (left), new OEM plug (center) and new Platinum plug (right). You can see that about half the electrode is worn down on the old plug but it looks like a good color (not real white, no black, no oil). You’ll want to at this point if you use the center plug (copper) to gap it using a ramp style gapper or wire gapper. If you are using the platinum plug you can check gap but don’t gap it as you could wear off the platinum on the tip. The gap should be .044” (+.004”/-.004”).
Now taking one plug at a time place the plug into the spark plug socket and slowly lower it down into the hole ensuring not to drop it as it could gap the plug smaller. Hand tighten the plug and torque the plug to 13 ft/lb. Repeat with the other 3 plugs.
Now you can place the plug wires onto the spark plugs ensuring they clip onto the plug. Clip the plug clip on the bracket. Your done! Replace your airbox if you removed it. Check your work area under the hood and crank the car to ensure all is well and go for a test drive. You just saved a grip of $$$ and you can brag to your family that you accomplished something.


 12-11-2010, 06:13 PM
#7
Technical Hero
Thread Starter
Join Date: May 2002
Location: Charlotte, NC, 28227
Posts: 9,876
Likes: 0
Received 28 Likes
on
20 Posts
Good call, I believe some actually have a bolt instead of a screw from the factory, can't remember if its accord or ef
Trending Topics
12-11-2010, 06:30 PM
#9
Honda-Tech Member
Join Date: Mar 2010
Location: California
Posts: 1,042
Likes: 0
Received 0 Likes
on
0 Posts
have you ever had a plug seize inside? Some people use that anti-seize compound on the plug to prevent that headache. But maybe they over-torqued the plugs to begin with. 13lbs isn't that much.
 12-11-2010, 08:38 PM
#11
Honda-Tech Member
Join Date: Sep 2009
Posts: 155
Likes: 0
Received 0 Likes
on
0 Posts
good write-up i just did this last week except i couldn't get the damn fuel filter bolt off the top, gonna try it again next week or else resort to impact wrench.
and 2 of the bolts on the rotor cap broke off in the dizzy so i had to drill them out.
guess thats what happens to all original parts from a 97
and 2 of the bolts on the rotor cap broke off in the dizzy so i had to drill them out.
guess thats what happens to all original parts from a 97
12-12-2010, 05:13 AM
#12
Technical Hero
Thread Starter
Join Date: May 2002
Location: Charlotte, NC, 28227
Posts: 9,876
Likes: 0
Received 28 Likes
on
20 Posts
It does seem a bit smoother but it could be in my head. I suppose the wires were probably ok to keep as I wasn't having any performance problems. I just wanted to get it done because I bought the car 6 months ago and it wasn't in the greatest shape and I like to stay on top of maintenance, plus I will be doing a Y8 mini me in the spring so I wanted to get this done now as they use the same parts. The guy told me he did some things but I don't really believe him. I'll add a bit more to this write up next week if it warms up. I was thinking a few things like: how to check ignition timing, change PCV valve, checking spark plug wire resistance, etc. Let me know if you have any suggestions.
Yeah I've done some cars that have had that. The factory service manual does recommend this I just didn't have any handy and at that torque I've never really had a problem with it.
sounds like a future write up 
I've had to do that before with my cordless impact just didn't want to show that in this DIY, ha.
have you ever had a plug seize inside? Some people use that anti-seize compound on the plug to prevent that headache. But maybe they over-torqued the plugs to begin with. 13lbs isn't that much.
look like you need to replace the valve cover gasket also....
good write-up i just did this last week except i couldn't get the damn fuel filter bolt off the top, gonna try it again next week or else resort to impact wrench.
01-08-2011, 04:04 PM
#14
The Grumpiest
iTrader: (4)
Join Date: May 2008
Location: Oak Ridge, TN, USA
Posts: 28,333
Likes: 0
Received 16 Likes
on
15 Posts
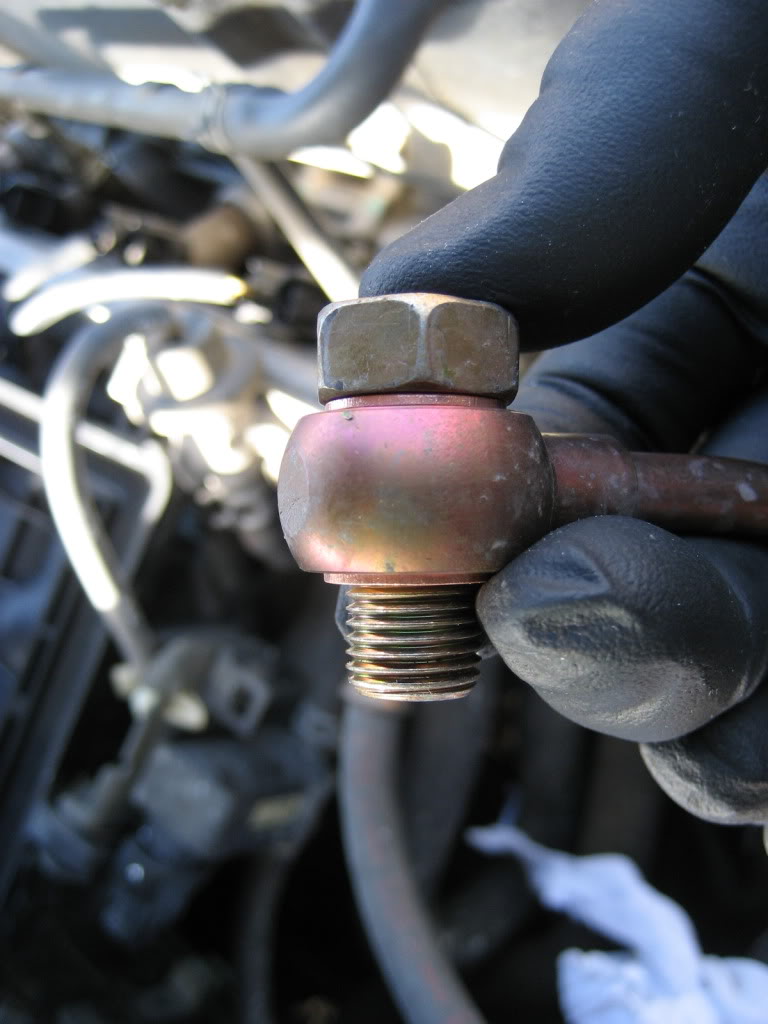
See step #3 the first picture? There is a place that you can get a wrench in for leverage at the top of the filter just below the banjo bolt but right above the flat top of the filter. You can see it also in the pic after the fuel line is removed. I don't remember how big it is but that's what I used to get mine off. I think it's 19mm.
01-08-2011, 05:21 PM
#15
Technical Hero
Thread Starter
Join Date: May 2002
Location: Charlotte, NC, 28227
Posts: 9,876
Likes: 0
Received 28 Likes
on
20 Posts
See step #3 the first picture? There is a place that you can get a wrench in for leverage at the top of the filter just below the banjo bolt but right above the flat top of the filter. You can see it also in the pic after the fuel line is removed. I don't remember how big it is but that's what I used to get mine off. I think it's 19mm.
try putting a 17mm or 19mm here to hold it in place while turning the 14mm
01-25-2011, 12:11 PM
#16
Ek Forever y0!
Join Date: May 2005
Location: Beating people with a stick, GA
Posts: 16,712
Likes: 0
Received 6 Likes
on
6 Posts
Just ordered my tune up kit from the Ebay dealer you recommended. 
Edit: Tired of getting 30mpg. Can't wait to get back to 35-40.
Edit: Tired of getting 30mpg. Can't wait to get back to 35-40.
01-25-2011, 12:14 PM
#17

Just ordered my tune up kit from the Ebay dealer you recommended.

 09-28-2011, 08:27 AM
#22
Trial User

Join Date: Sep 2011
Location: WI
Posts: 3
Likes: 0
Received 0 Likes
on
0 Posts
Great DIY! I just received my parts to do this. A heads up--there is an Ignition Kit 06300-P2A-305 which is cap, rotor, and wires. The kit is cheaper than the individual parts.
I priced things out and went Majestic for some things, but got one of those ebay kits with cap, rotor, wires, oil filter, plugs, etc. Now that I have the box with that part number, it would have been cheaper to just buy the entire kit from Majestic (and I could have saved an extra $5 by not buying that honda branded oil filter).
Live and learn. :-)
 11-03-2011, 12:46 PM
#24
Honda-Tech Member
Join Date: Dec 2005
Location: MIDWEST
Posts: 167
Likes: 0
Received 0 Likes
on
0 Posts
Does anyone know if it really matters what direction the whole in that bolt faces on the fuel line exiting the filter to the engine, seems like facing the rubber line would be best... ?

