

The Definitive Guide to a GSR-EG Swap!
 09-06-2011, 02:04 PM
#1
Honda-Tech Member
Thread Starter

From Start to Finish GSR Swap-all you need to know...EVERYTHING!
Parts Needed:
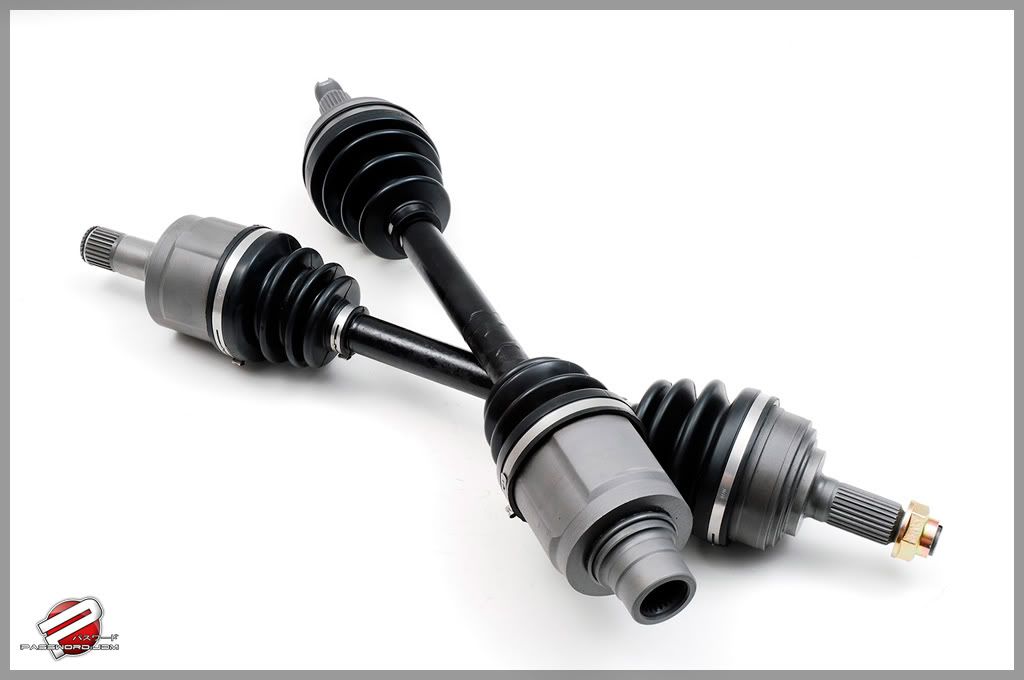
B Series Hydro Trans Axle’s
“Any 1994-2001 Integra, 94-97 Del Sol VTEC, or 99-00 Civic Si axles will work just fine.”
Half Shaft you need
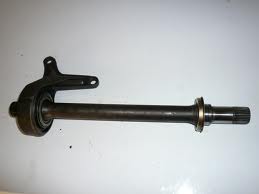
B Series Axles
*edit
Motor Mounts and “T Bracket”
These are eBay Mounts(Pic used to show how the mounts should look) which I can vouch for(Still Holding Fine in My EG Hatch. But if you feel the need to get Hasports or Innovative Mounts go ahead.
*edit
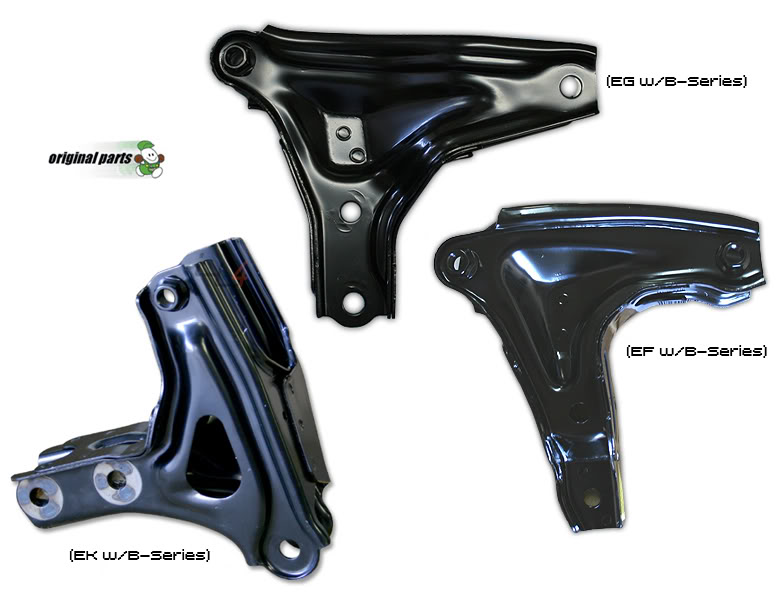
Obviously you’ll need the EG w/B Series One
They go for $72.98 on http://www.inlinefour.com/oemtbracmoun.html (Which is a website I prefer to Order from) you can also call your local Acura/Honda Dealership to Order this part(Or browse For Sale Threads on Forums for the best deal).
94-01 DC2 Integra Shift Linkage(Not 90-93 or DA Linkage) The linkages all look the same but you can play if safe and order your linkage from Hasport so you know its the correct one. Here’s a link to the Hasport Linkage: http://hasport.com/store/index.php/a...e/egblink.html It is also possible to cut and fabricate a DA 90-93 Linkage to fit your setup(The DA Linkage is cheaper and easier to find on forums for sale). There’s a couple good write up’s on how to do this but I don’t recommend it so I will not put those links in here.(I cut my DA Linkage and it did not matter how exact I was with measuring, it came out like **** and I’m in the market now for the correct linkage).
94 Del Sol VTEC Lower Radiator Hose and a GSR Upper Hose. Your old ones will not work.
OBD Info See this link: http://www.ff-squad.com/technet/ (also ECU wiring/a lot more other swap info in here as well) I will provide the most info I know/can find about OBD1 to OBD1 on this thread:
OBD1 to OBD1
You will need your engine harness that comes with the OBD1 motor. If you buy your motor used from a forum/Craigslist/ or eBay. Make sure you have the corresponding OBD matching parts on the motor. i.e
the Distributor/ Knock Sensor/Oil Pressure Sensor/ Stock Intake Manifold(On GSR’s Commonly called the Whale *****/Snail/Shell Intake). And account for all the other necessary sensor’s too. VTEC Solenoid, VTEC Oil Pressure Sensor, Intake Air Temp Sensor(mounted differently on aftermarket Intakes), VSS(hydro speed sensor), Electronic Air Control Valve(E.A.C.V)…Not needed if running a aftermarket Intake(Unless in Cali and need to pass SMOG and other Cali certifications if I‘m not mistaken), TPS(throttle Positioning Sensor), and MAP Sensor. Should be about all of them. Here’s pics of them all.
MAP Sensor(Disregard the forum in the back lol). This will be ontop of your OBD1 Throttle Body. If there is no place for it there you have an OBD2 Throttle Body and it needs to be mounted on the Firewall.
Sensors Previously noted and a couple extra/ but hard to see…Sorry
Hydro Speed Sensor
Throttle Positioning Sensor
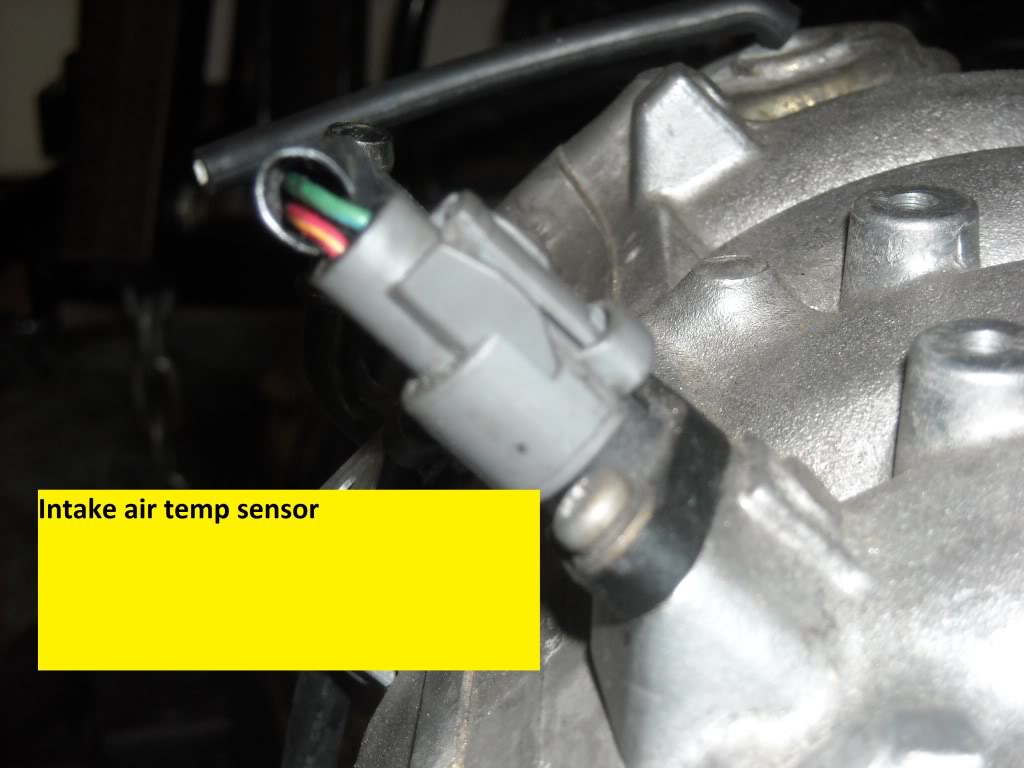
Intake Air Temp Sensor
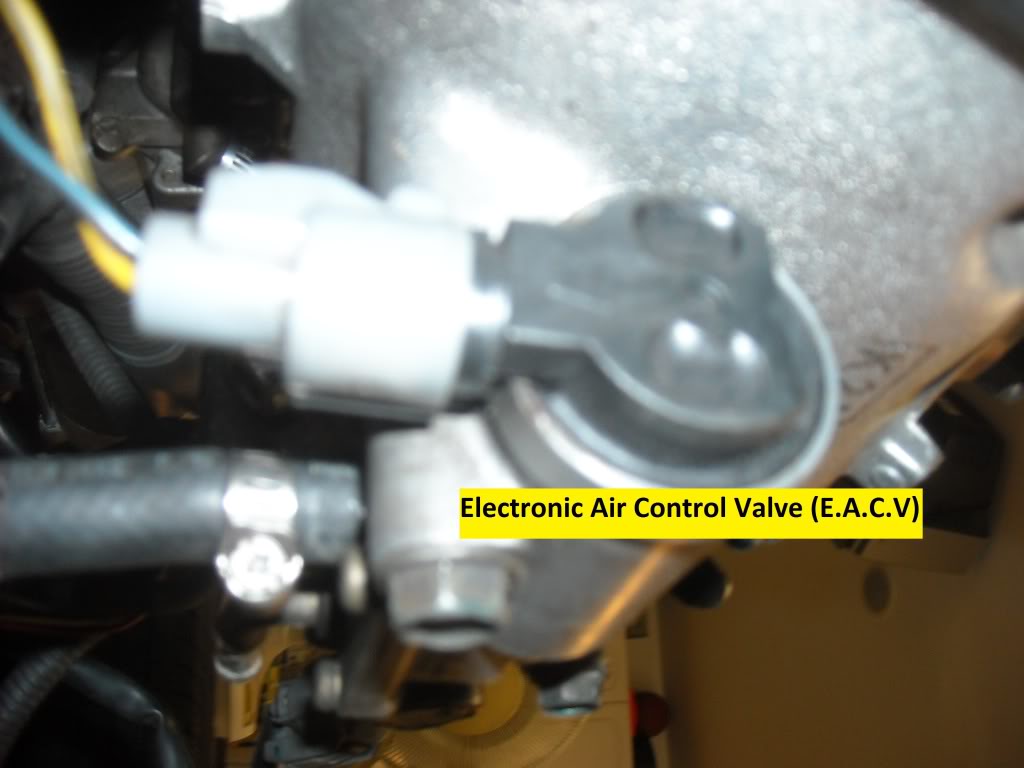
E.A.C.V
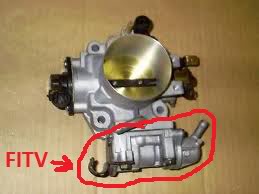
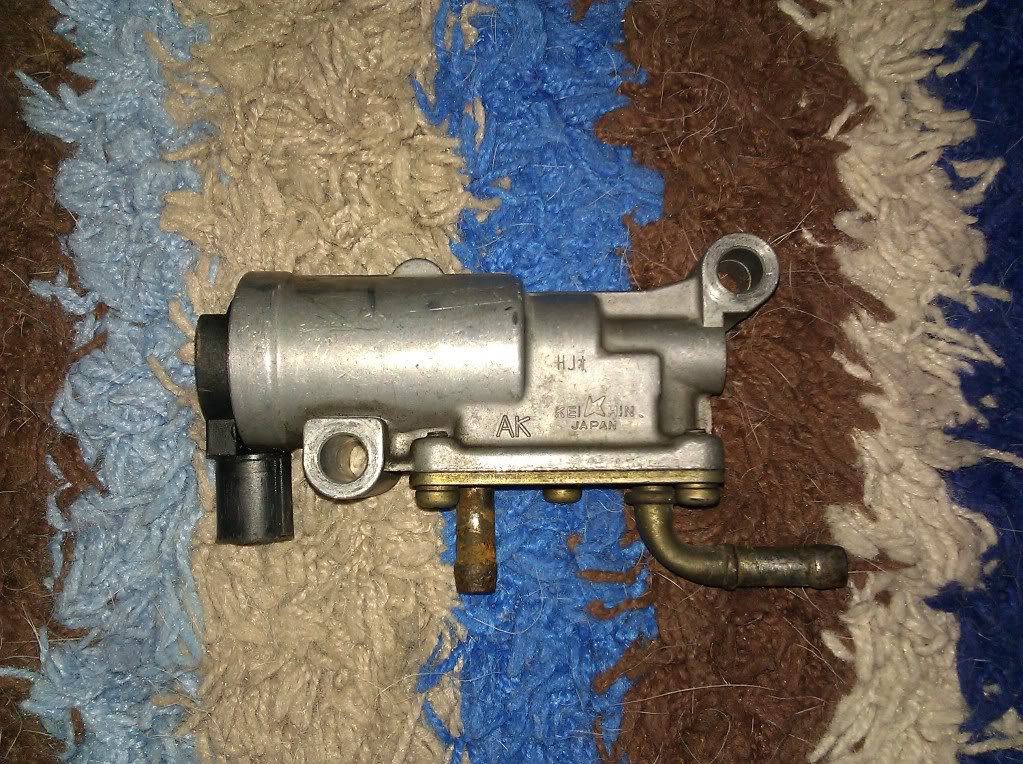
You will also have a FITV(Fast Idle Thermo Valve) Mounted under your Throttle Body if it is OBD1 here’s what it looks like
And a IACV(Make sure to clean before startup(There’s a How-To in the FAQ’s Section on here)
And if you want to stay with the Stock intake you’ll need this IAB unit and wiring also
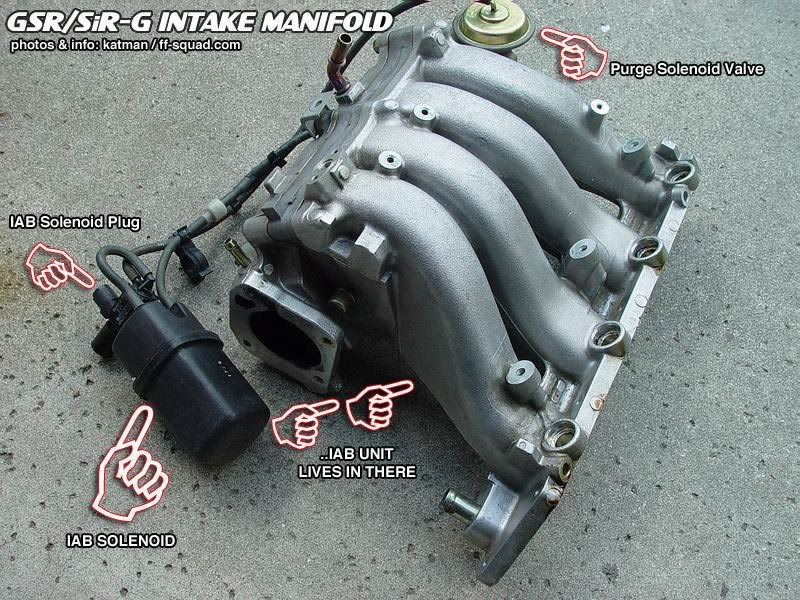
If you go with a Aftermarket IM you will not need this though…which brings me to my next Point.
The ECU you need:
Has to be a OBD1 P72
For Distinguishing between OBD1 and 2 etc ECU’s see this page: http://www.hondata.com/techecuid.html
ECU Wiring(If you have a VX all you need to rewire is the 5 Wire O2 Sensor to a 4 Wire, and if it’s a CX it has a 1 Wire O2 Sensor and again like the VX needs to be changed to a 4 Wire). All other models have to run the wires for IAB’s and E.A.C.V(if you have the stock IM), Knock Sensor, VTEC Solenoid, and VTEC Oil Pressure Switch.
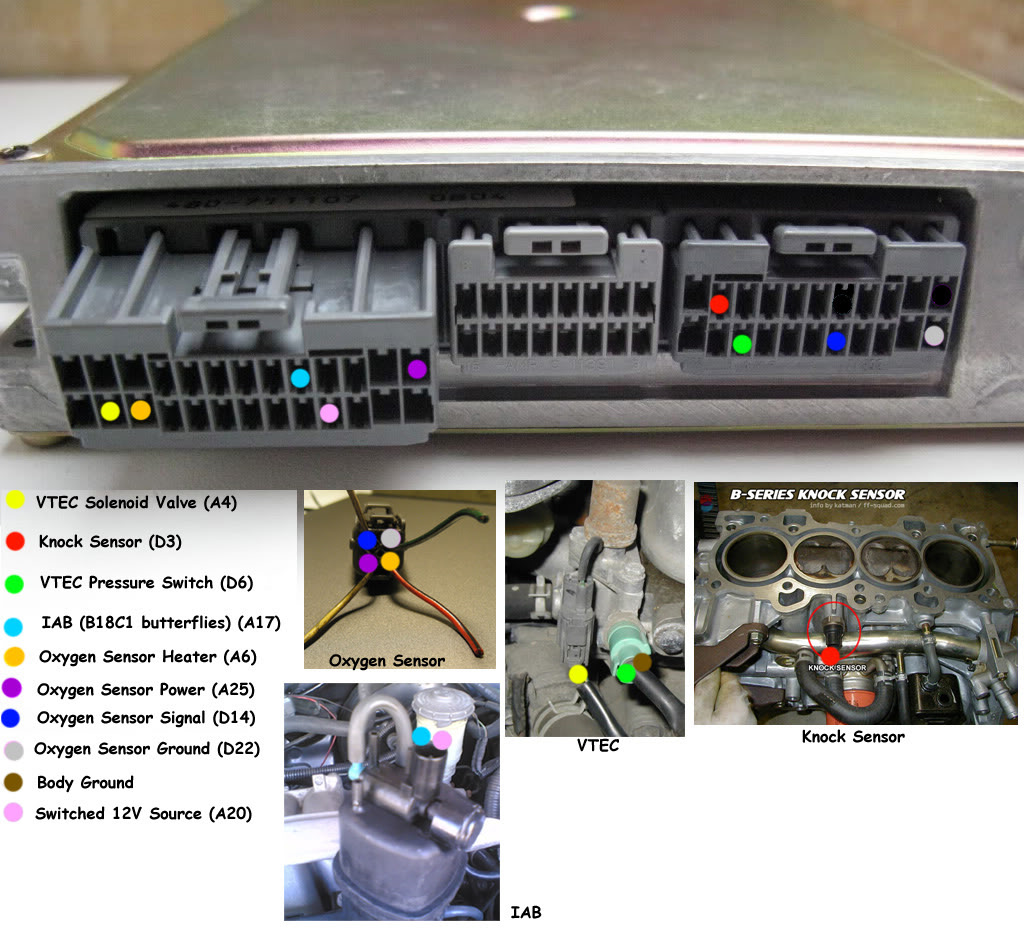
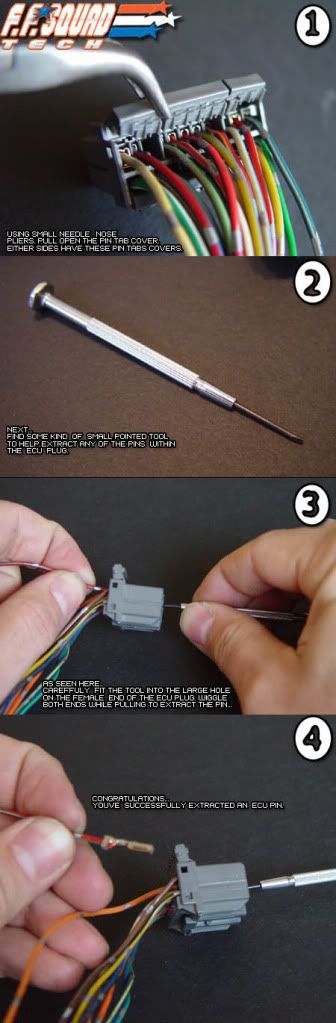
ECU Pinout
(Also Available here if pic is to small: http://www.ff-squad.com/tech/wiring/...in_removal.jpg
Running VTEC Wire’s
You need to do the following
http://www.ff-squad.com/tech/wiring/wiring.92-95.jpg
And I strongly recommend going to Hondapartshero( a Member on Honda Tech) for a harness to make all the wiring plug and play.
and if you must know every wire that goes into your ECU
http://www.ff-squad.com/technet/wiring.obd1.htm
Anything Else you need to know about this See This: http://www.ff-squad.com/technet/ and go down to the ECU & Wiring Tech Section.
And if you go with an Aftermarket Intake Manifold Setup
http://www.ff-squad.com/technet/how-to/sk2im/
Now to the Swap Process
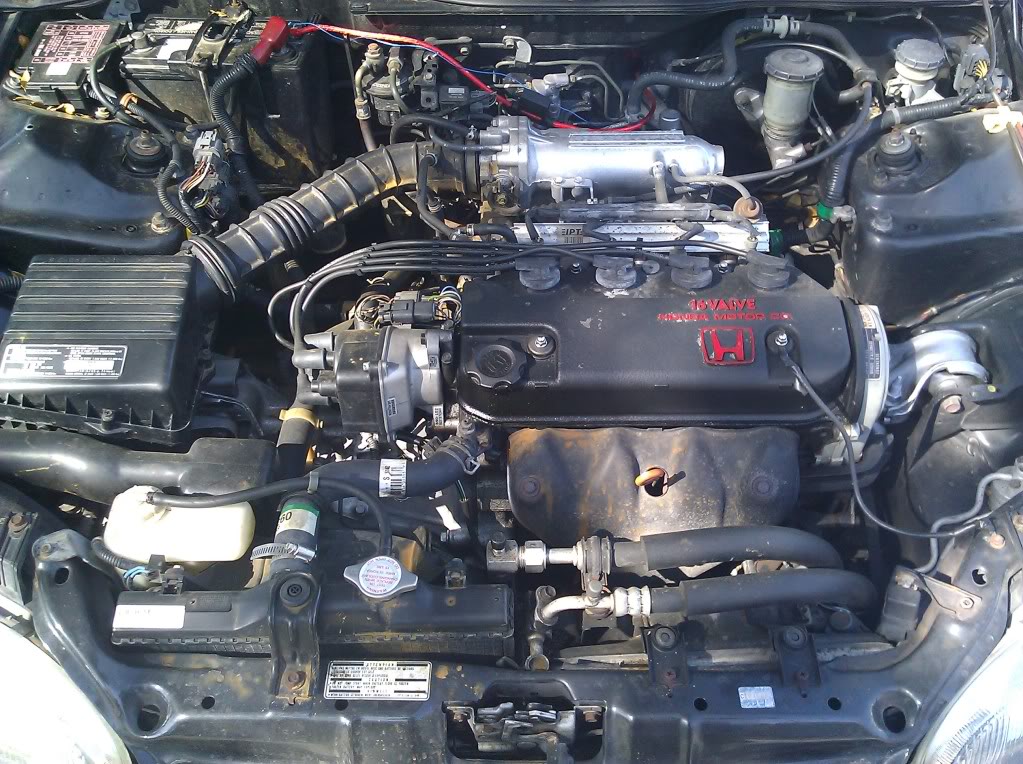
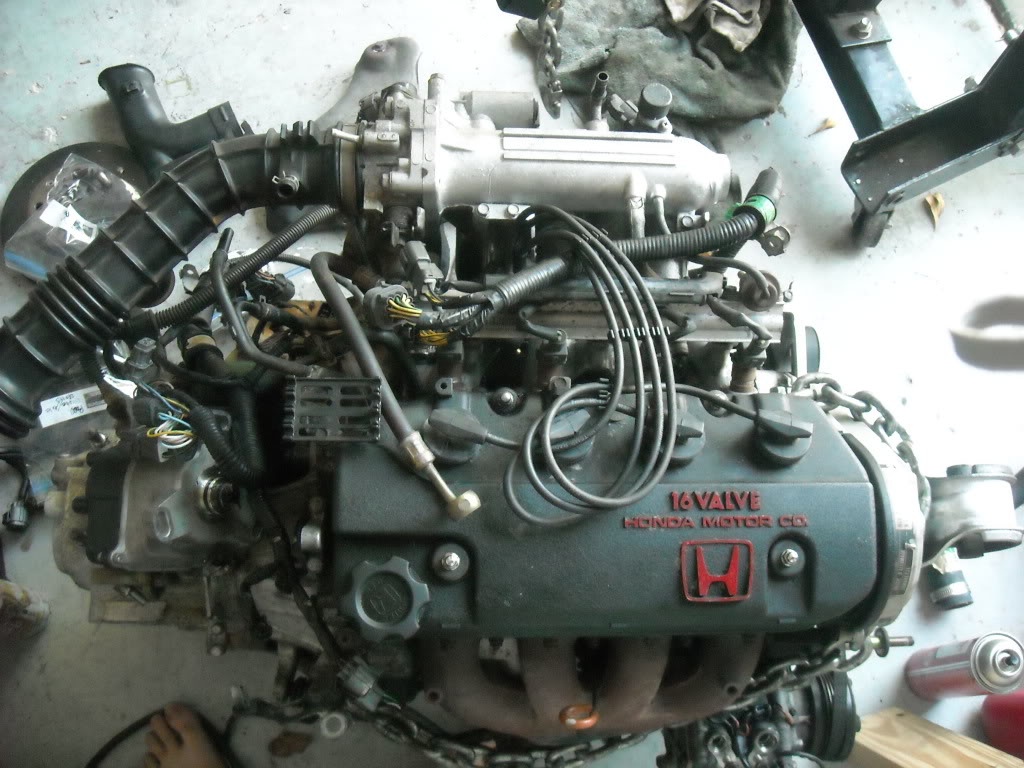
Here’s what your old motor will look like roughly.
Start by Draining all the fluids from your OLD motor. Oil/Coolant/Transmission/Clutch.
To Relieve the Fuel Pressure Take out the BACKUP Fuse and turn over your engine 6-7 times for about 4 Seconds at a time. (This will help you when you remove the Fuel Lines so they don’t spray everywhere)
Once its bone dry then you can proceed…
Next Step is Removing the Axles
IF you have a Impact Gun then disregard these following steps on removing the spindle/axle nut. If you do not then this is what you need to do to get your axle nuts off.
Remove center cap from wheel or remove hubcap- this may require wheel removal
Have the car sitting on the ground on all wheels
Remove spindle nut from end of axle through center of wheel (it's really hard to do with the car in the air)
Now for the rest of the Axle Removal
Both Sides
Jack up car and put it on Jack Stands
Remove wheel
Remove 17mm castle nut that holds lower control arm to spindle
Remove 17mm (may be 14mm) bolt that secures bottom of damper fork to lower control arm
Use mallet or hammer to break control arm free from spindle
Swing the Fork up and out of the way
Passengers Side
Bang end of axle through back side of spindle to free it from the hub in the Transmission
Remove Axle
Driver’s Side
Wrap pipe wrench jaws around axle between axle cup and transmission housing (or intermediate shaft housing, depending on transmission)
Tighten pipe wrench, but leave a bit of slack
Kick pipe wrench handle so axle pops free
Remove Axle
Once the Axles are out you can go ahead and unplug everything that ties your motor to your engine bay. All Shock towers disconnected, Remove your Air Box, Clutch Line from the Clutch Slave Cylinder on the front of the transmission, Fuse Box Wires and Battery Terminal Connection Cables, Fuel Lines(Return line on the right of the fuel rail, and 2 Lines going into the fuel filter on the left side of the firewall.), Radiator Hoses, Engine Ground, Heater Hoses. And Anything else I missed.
Those should be all of them. Then you Need to Remove the Shift Linkage from the Trans.
You want to take off the shift linkage by knocking out the BITCH! Pin located where the linkage and trans. meet. its covered by a rubber boot.(seriously, your going to have different Linkage to install so...do yourself a favor and just hack off the damn thing. Took me at least 4 hours to get that ****in pin out). If you don’t want to cut it you have to use an 8mm Punch tool and a hammer to knock out the Pin. Or take one of your A/C bracket bolts out and hammer the pin out from the bottom of the car.
Then Disconnect your CAT Converter from your exhaust manifold . Just to Bolts on each side of the exhaust Flange.
Then I would have an appointment set up to get your exhaust system of your choice installed because if you have aftermarket headers they will not match up to your stock exhaust. Yes you could fabricate something but this is not recommended since I have done this and it should only be a temporary fix until you can run the appropriate exhaust piping and muffler setup.
Now for actually pulling the old engine out.
I would strongly recommended getting an engine lift for this. although you can drop your engine from the bottom of the car, I think its easier to lift it out.
So hook up your lift to your engine, you want to make sure the motor will hang level when you pull it so take the chain and bolt it to the top right transmission bell housing bolt and the other end of the chain to any secure place you can find on the upper right side of the engine. Then you’ll need to make it taught so theres no slack in the chain.
This is when you remove your motor mounts. There’s the Driver Side mount, Rear mount(on firewall), Transmission mount(on top of Trans), another Trans Mount on the front side of the trans(will not fit your GSR), and the A/C Bracket/Mount located underneath the driver side mount.
Once all these are removed you can start to lift out your motor. you’ll have to finagle it a bit to get it out but its not that hard.
Then you should be looking at this
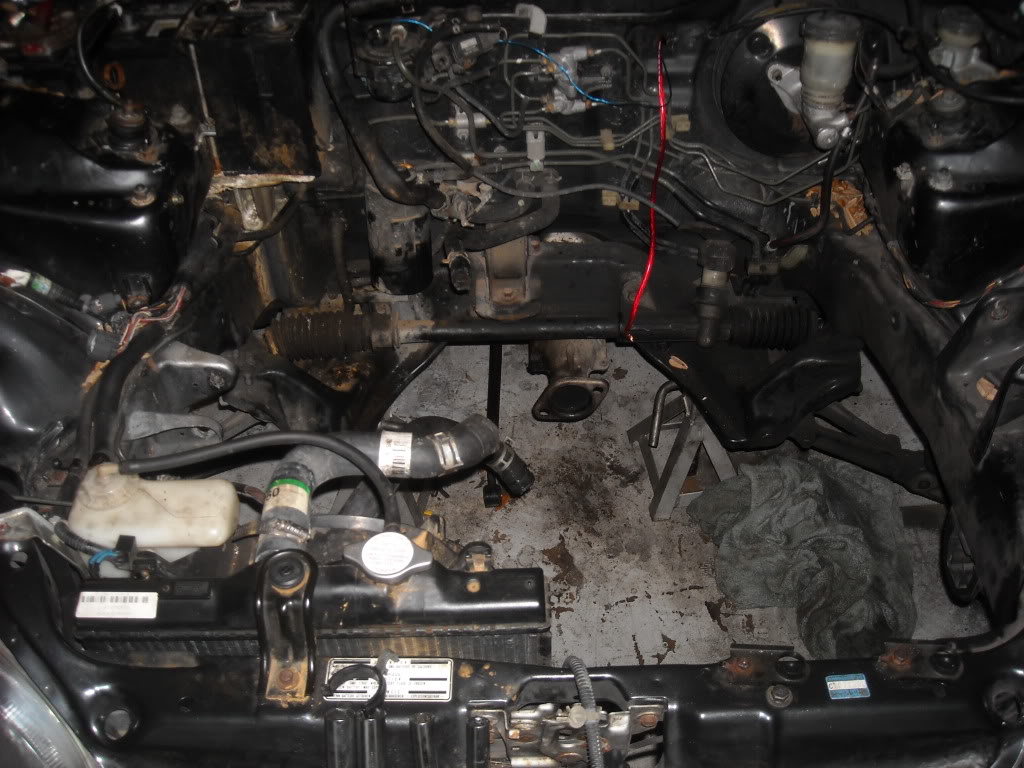
And This
Now I would wait to sell your old engine until you know you don’t need anything from it. For example I had to use my FITV, my Clutch Slave Cylinder, and The Gold Throttle Cable Pulley off my Throttle Body since I was running a Aftermarket Intake Manifold. Trust me…Keep your old motor until your new motor runs correctly and without any problems. Otherwise you’ll have to hunt down parts that you could of had already had you not sold your motor so quick.
Now for putting in your GSR!
Before putting in the GSR make sure you connect the engine harness first! And also make sure your mechanical Timing is Correct, and make sure you do a valve adjustment to spec, and make sure everything is torqued down to spec.
Here’s the best info i found about torque specs for my head studs. i found this this from Honda-Tech. and I’m not sure where i found the pictures.
This guy has the torque specs for everything in your B Series motor
https://honda-tech.com/forums/honda-crx-ef-civic-1988-1991-3/faq-b-series-torque-specs-953151/
and heres how to identify which number goes with which stud and cam cover bolts
Studs
Cam Covers
^^^the above is if your motor was in pieces when you got it like mine was lol. But you should check out the torque spec for everything link so you don’t improperly seal your intake manifold or anything else you have to bolt on(like some new headers).
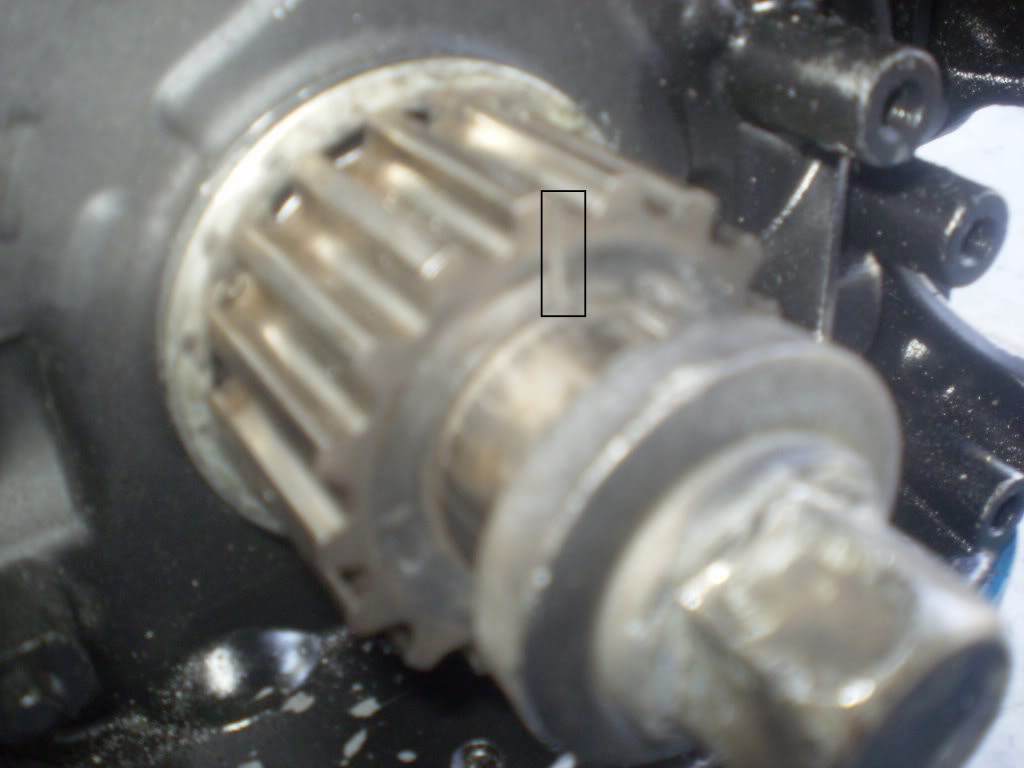
make sure your piston closest to the timing belt is top dead center and its on the compression stroke(otherwise your motor wont start). the way you do this is pretty simple there is a notch on the gear behind the pulley system(to get the pulley's off i used a impact wrench) then you can see the notch on the gear the timing belt goes on.
Here’s the notch(i outlined where it is because you cant really see it that well with my camera but you should have no trouble finding it)
When your motor is on the engine stand try to connect everything together sensor wise. and make sure your spark plugs are setup correctly. And also Bolt on your Intake if it is not already on as it is much easier to install with the motor out of the car. Make sure you account for all the sensors and put your Oil Filter on also.
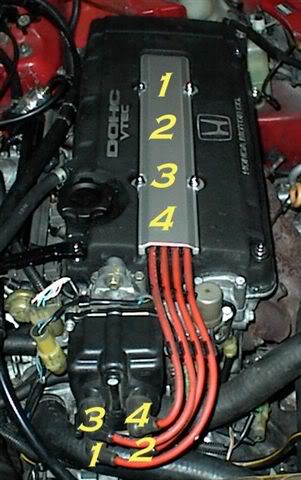
Here’s the Firing Order and correct Spark Plug to Dizzy Setup
And then you can take it off of the Engine Stand and bolt up the Transmission to the block(Before you do this I would suggest you check out your Flywheel and Clutch situation and see if the Flywheel needs to be resurfaced/replaced or if the Clutch kits needs to be replaced.
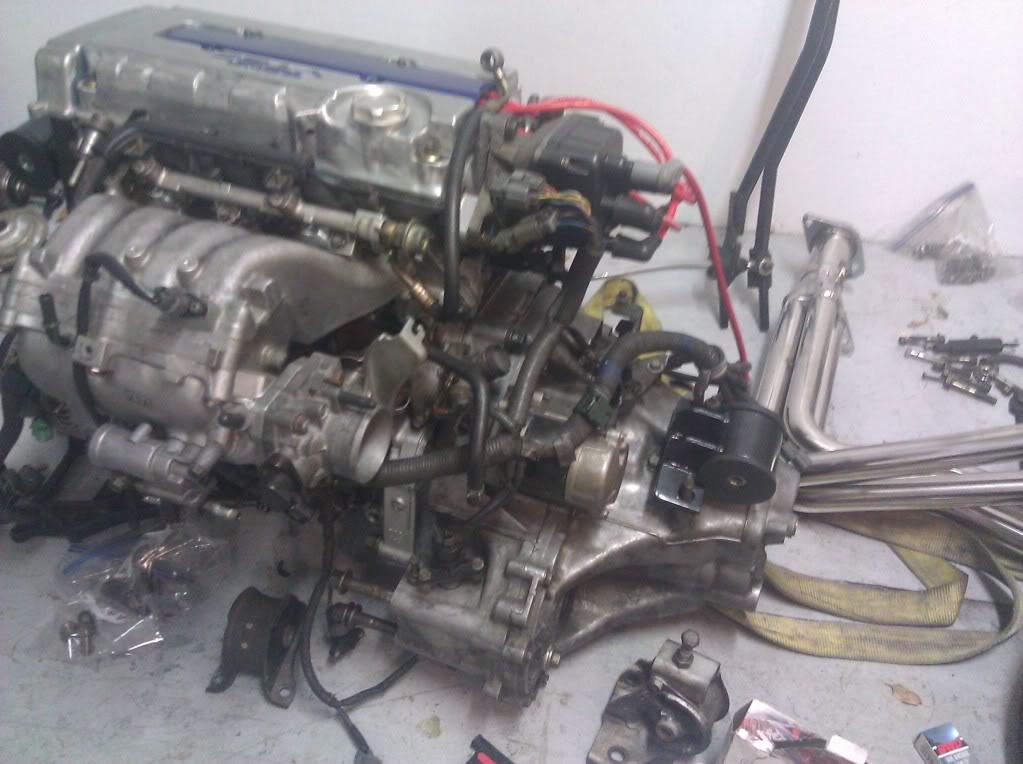
Once you got your transmission bolted up you should be looking at this.
Then Double Check everything and Triple Check everything.
Then you can hook up your GSR to your lift I don’t recommend using a tow strap like I had to. Use a Chain, its much easier(or get it under your car if you can’t get a lift)
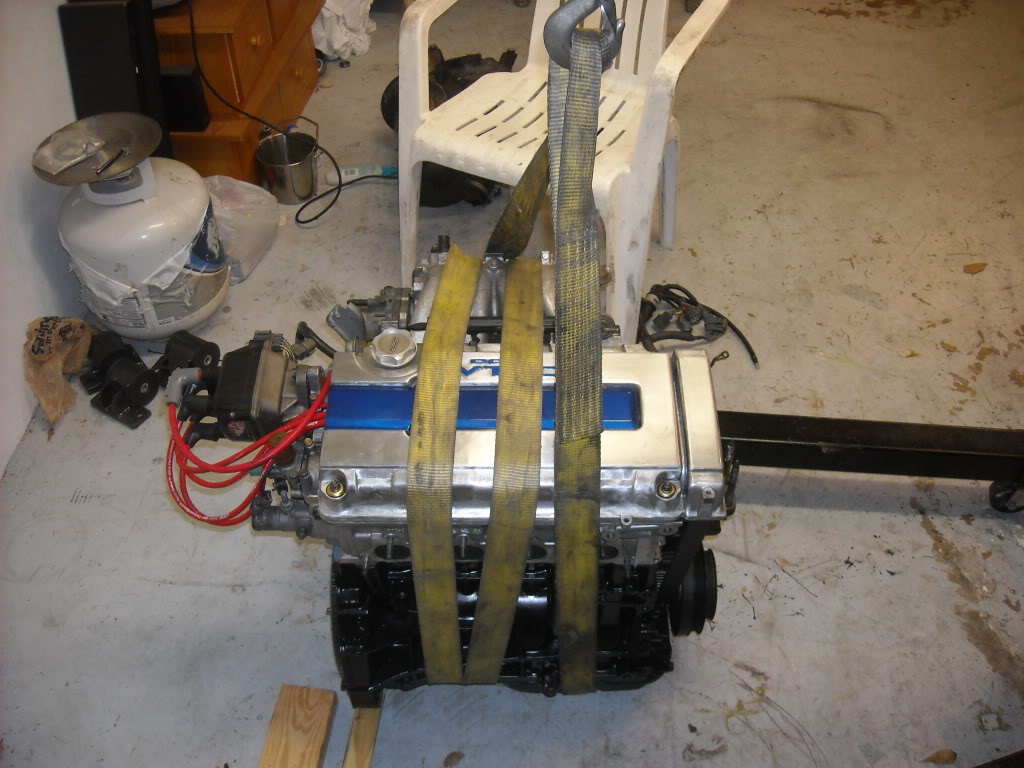
Then Lift your engine to prepare to drop it into your engine bay. You’ll want to line up the rear T Bracket mount first and everything else will be much easier to line up.
I only used the T Bracket, Driver Side, Rear, and Top Transmission mounts and I don’t have any bad vibration issues.
Also if you have an A/C Compressor You’ll need the A/C Bracket for that and it will have to be mounted along with the other motor mounts.
Can’t really give you any tips here other than wiggle and align the mounts and make sure you don’t crush any lines or important parts in the process. Just take your time. it will Fit. Oh and if your hood doesn’t close you probably put the Driver side mount in upside down.
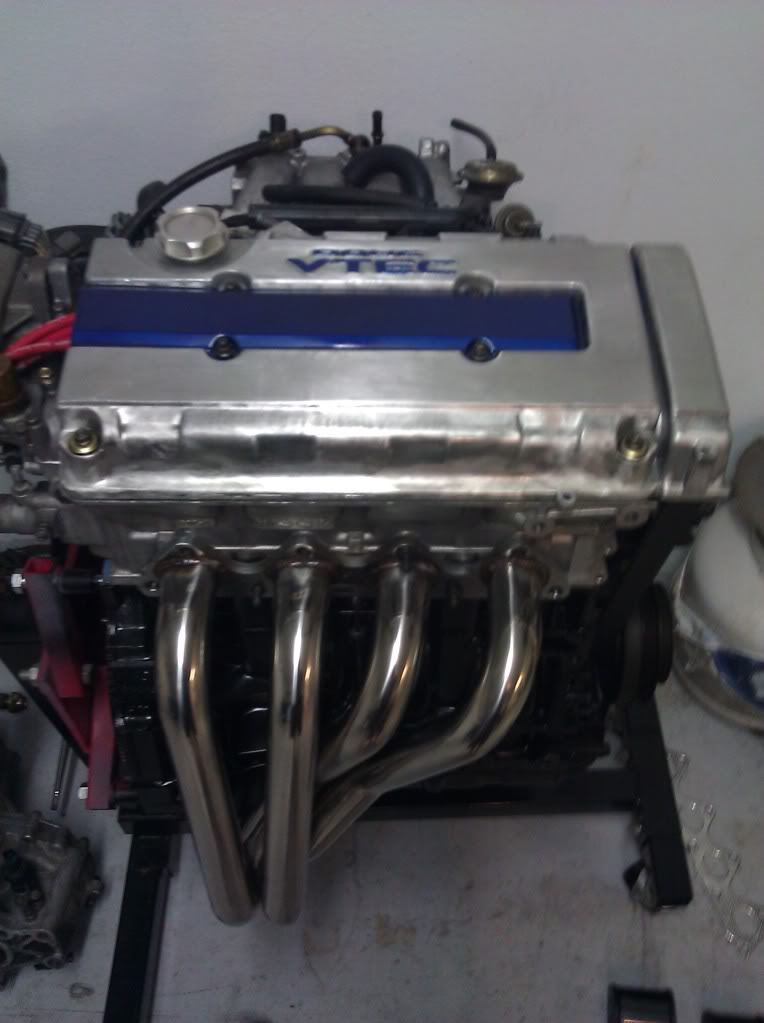
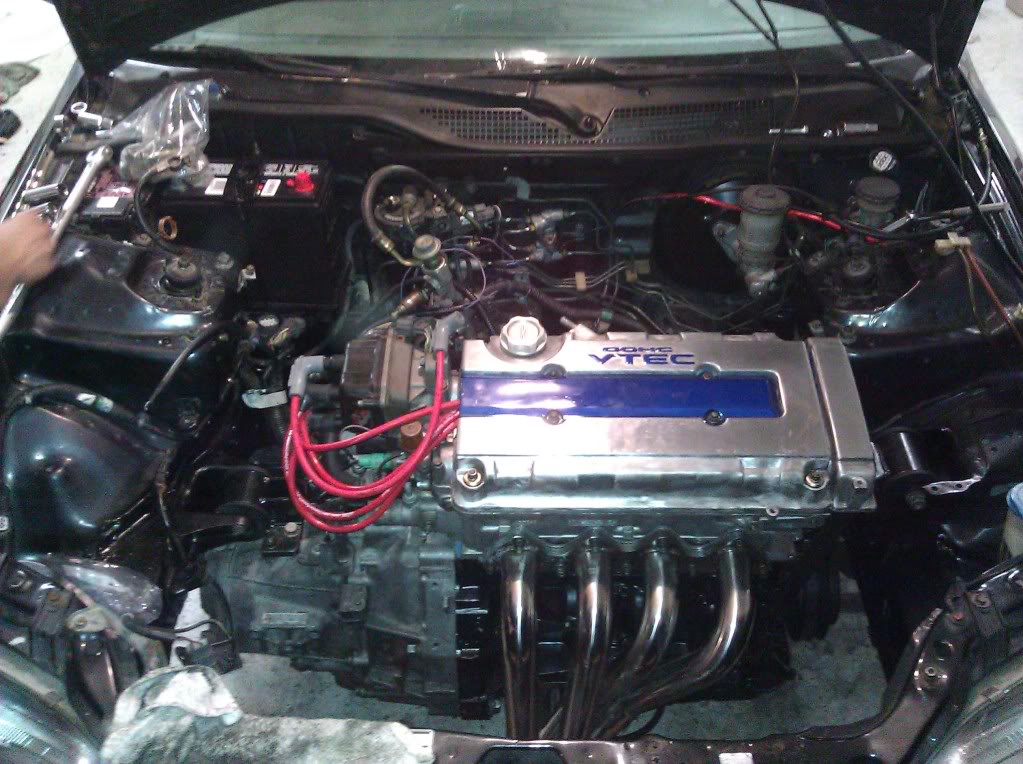
Once its set in and bolted down it will look like this. Only you will/should have an intake on yours lol I had to wait for mine to get shipped.
Then connect the shock towers to the Engine harness and put your P72 ECU in.
ECU Location

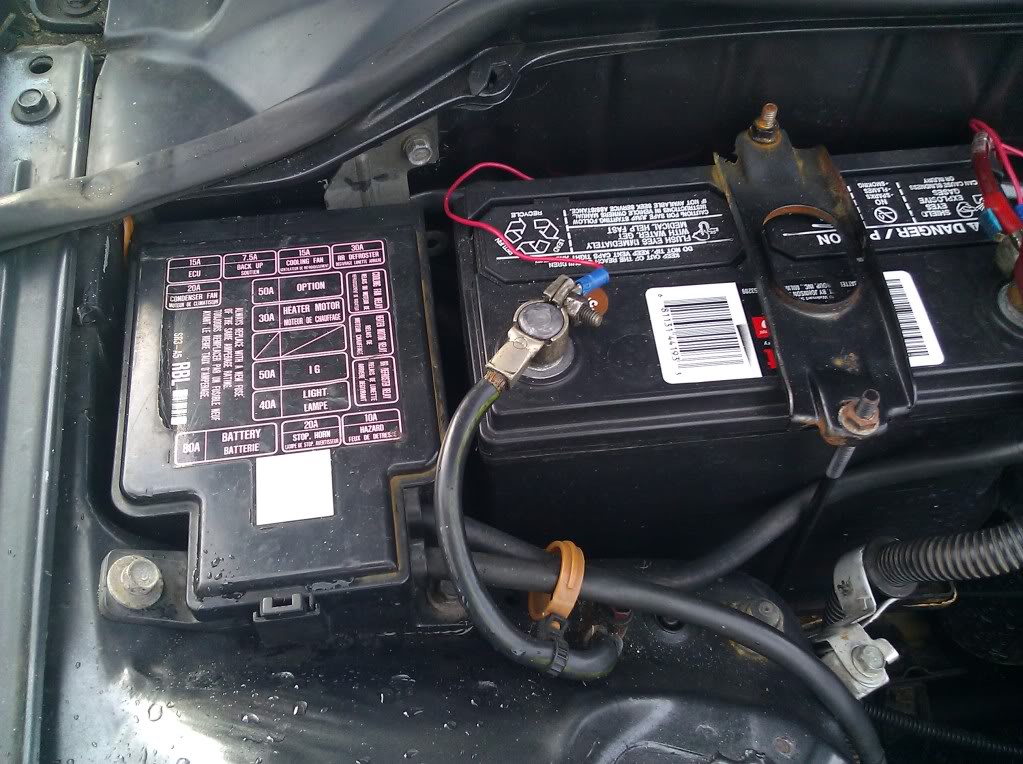
Where I ran my VTEC wiring. You can’t see it but there’s a hole in the firewall behind the battery that already has your stock wires going into it. I poked a hole in the rubber sealer and fed the wires though. Then I reached my hand up under the dash on the other side to grab the wires(easier said then done).
Then hook up your Vacuum lines to the appropriate locations.
Then make sure you Hooked up all your hoses.
Then Double and Triple and Quadruple Check all of your wires, sensors, hoses, vacuum lines. And make sure its all accounted for and correctly setup.
After this Just Reverse the steps for taking off your axles(Make sure you put these back on before you fill your trans fluid!) when putting on your ones for the GSR.
And then Fill up on your Fluids! Oil, 4.3 Quarts(10W/30). Honda Manual Trans Fluid(from Honda) for the Tranny, 2.2 Quarts. 50/50 for the Radiator(till its full). DOT 3 Brake Fluid and Same for the Clutch Fluid(Fill to MAX Line).
Look for leaks. Fix the ones you have.
After this Just Reverse the steps for taking off your axles when putting on your ones for the GSR. Bolt up all the suspension and put the tires on…And your Done!
Woo! A total of 7-8 hours into this write up. Please Feel free to include any other info I left out. I’m sure there’s a couple things. But yeah, so, ENJOY!
Parts Needed:
B Series Hydro Trans Axle’s
“Any 1994-2001 Integra, 94-97 Del Sol VTEC, or 99-00 Civic Si axles will work just fine.”
Half Shaft you need
B Series Axles
*edit
"The half shaft and T bracket must be from manual transmission vehicles. There is a difference, auto parts WON'T fit."
These are eBay Mounts(Pic used to show how the mounts should look) which I can vouch for(Still Holding Fine in My EG Hatch. But if you feel the need to get Hasports or Innovative Mounts go ahead.
*edit
All manual transmission mounts are the same. The rear mounts are also the same. The driver's side mount is one of like 3, and from my experience usually VTEC motors come with a 3 bolt mount with bolt holes parallel with the valve cover, and non-VTEC are usually 2 angled bolts.
Obviously you’ll need the EG w/B Series One
They go for $72.98 on http://www.inlinefour.com/oemtbracmoun.html (Which is a website I prefer to Order from) you can also call your local Acura/Honda Dealership to Order this part(Or browse For Sale Threads on Forums for the best deal).
94-01 DC2 Integra Shift Linkage(Not 90-93 or DA Linkage) The linkages all look the same but you can play if safe and order your linkage from Hasport so you know its the correct one. Here’s a link to the Hasport Linkage: http://hasport.com/store/index.php/a...e/egblink.html It is also possible to cut and fabricate a DA 90-93 Linkage to fit your setup(The DA Linkage is cheaper and easier to find on forums for sale). There’s a couple good write up’s on how to do this but I don’t recommend it so I will not put those links in here.(I cut my DA Linkage and it did not matter how exact I was with measuring, it came out like **** and I’m in the market now for the correct linkage).
94 Del Sol VTEC Lower Radiator Hose and a GSR Upper Hose. Your old ones will not work.
OBD Info See this link: http://www.ff-squad.com/technet/ (also ECU wiring/a lot more other swap info in here as well) I will provide the most info I know/can find about OBD1 to OBD1 on this thread:
OBD1 to OBD1
You will need your engine harness that comes with the OBD1 motor. If you buy your motor used from a forum/Craigslist/ or eBay. Make sure you have the corresponding OBD matching parts on the motor. i.e
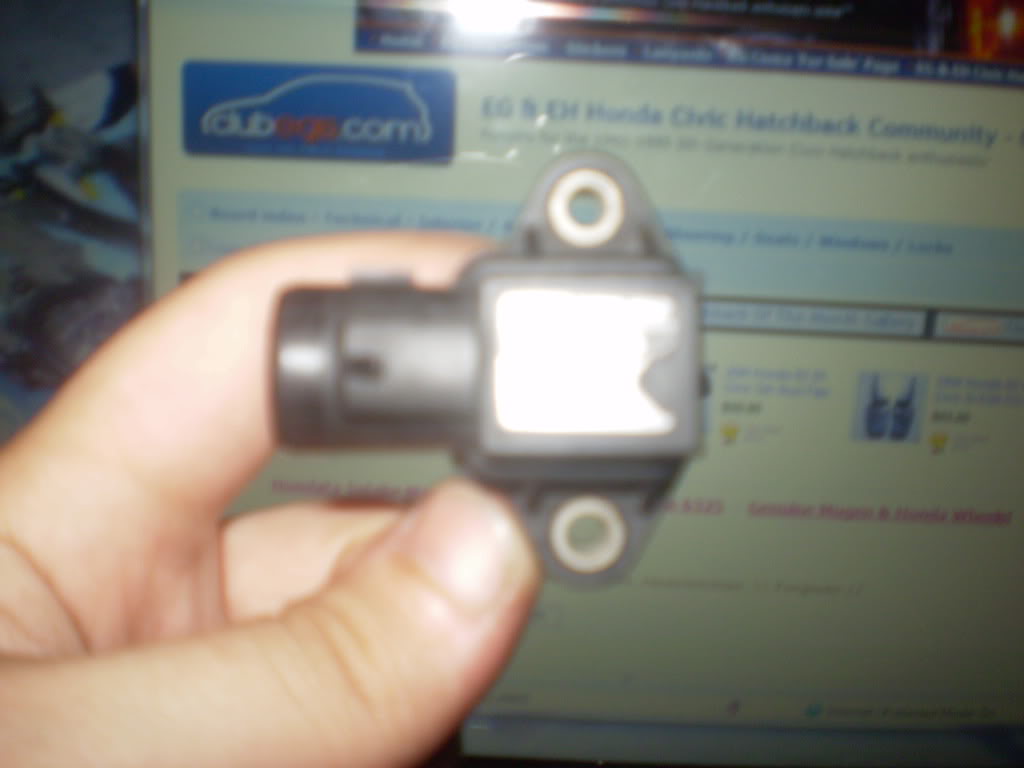
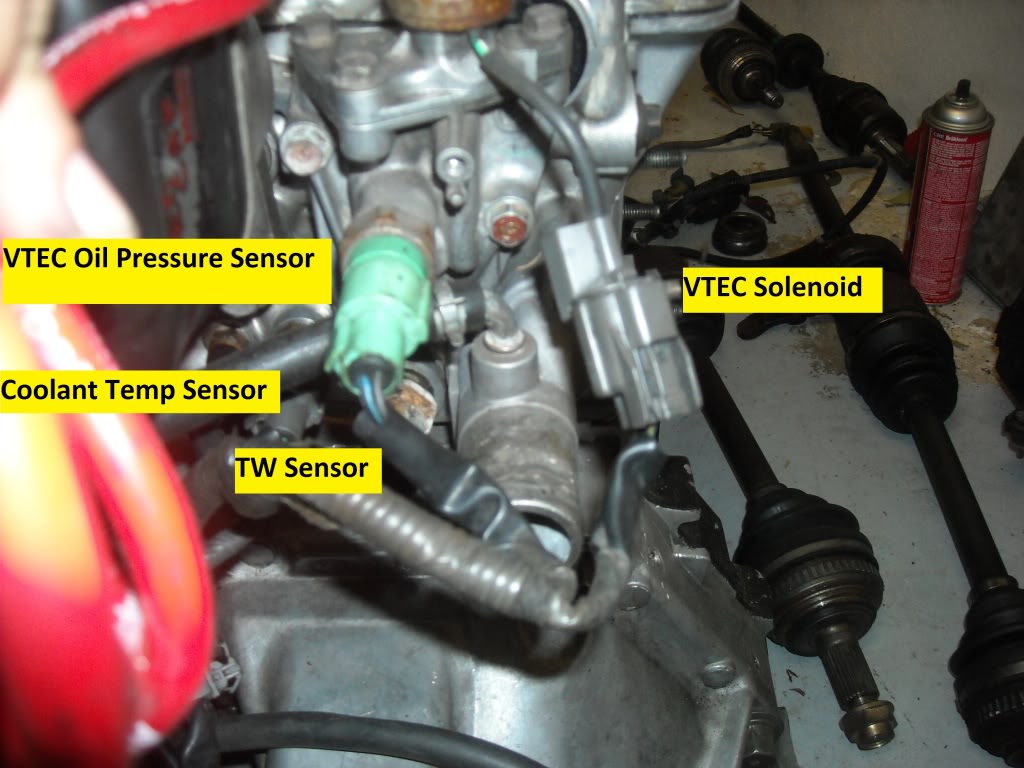
the Distributor/ Knock Sensor/Oil Pressure Sensor/ Stock Intake Manifold(On GSR’s Commonly called the Whale *****/Snail/Shell Intake). And account for all the other necessary sensor’s too. VTEC Solenoid, VTEC Oil Pressure Sensor, Intake Air Temp Sensor(mounted differently on aftermarket Intakes), VSS(hydro speed sensor), Electronic Air Control Valve(E.A.C.V)…Not needed if running a aftermarket Intake(Unless in Cali and need to pass SMOG and other Cali certifications if I‘m not mistaken), TPS(throttle Positioning Sensor), and MAP Sensor. Should be about all of them. Here’s pics of them all.
MAP Sensor(Disregard the forum in the back lol). This will be ontop of your OBD1 Throttle Body. If there is no place for it there you have an OBD2 Throttle Body and it needs to be mounted on the Firewall.
Sensors Previously noted and a couple extra/ but hard to see…Sorry
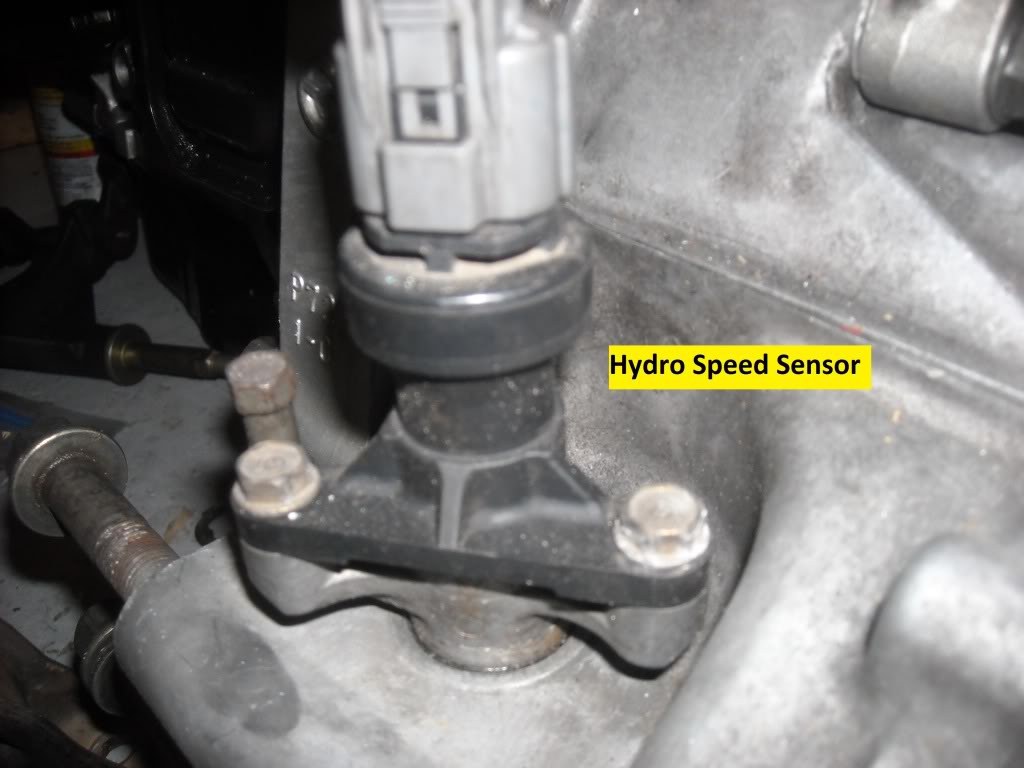
Hydro Speed Sensor
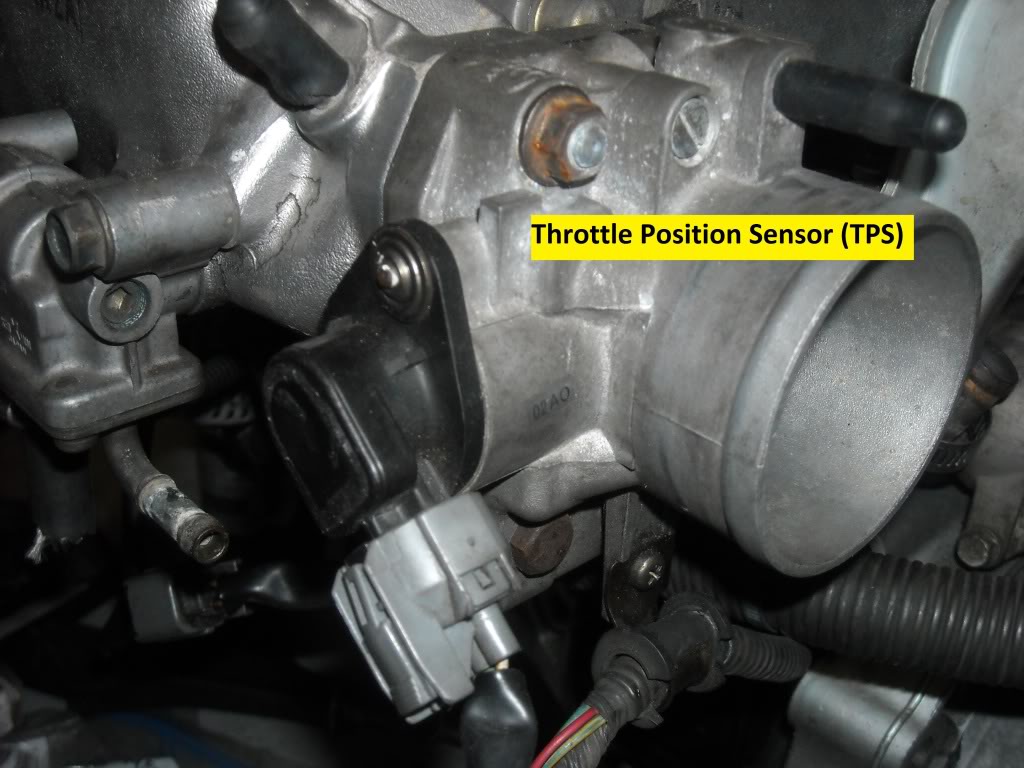
Throttle Positioning Sensor
Intake Air Temp Sensor
E.A.C.V
You will also have a FITV(Fast Idle Thermo Valve) Mounted under your Throttle Body if it is OBD1 here’s what it looks like
And a IACV(Make sure to clean before startup(There’s a How-To in the FAQ’s Section on here)
And if you want to stay with the Stock intake you’ll need this IAB unit and wiring also
If you go with a Aftermarket IM you will not need this though…which brings me to my next Point.
The ECU you need:
Has to be a OBD1 P72
For Distinguishing between OBD1 and 2 etc ECU’s see this page: http://www.hondata.com/techecuid.html
ECU Wiring(If you have a VX all you need to rewire is the 5 Wire O2 Sensor to a 4 Wire, and if it’s a CX it has a 1 Wire O2 Sensor and again like the VX needs to be changed to a 4 Wire). All other models have to run the wires for IAB’s and E.A.C.V(if you have the stock IM), Knock Sensor, VTEC Solenoid, and VTEC Oil Pressure Switch.
ECU Pinout
(Also Available here if pic is to small: http://www.ff-squad.com/tech/wiring/...in_removal.jpg
Running VTEC Wire’s
You need to do the following
http://www.ff-squad.com/tech/wiring/wiring.92-95.jpg
And I strongly recommend going to Hondapartshero( a Member on Honda Tech) for a harness to make all the wiring plug and play.
and if you must know every wire that goes into your ECU
http://www.ff-squad.com/technet/wiring.obd1.htm
Anything Else you need to know about this See This: http://www.ff-squad.com/technet/ and go down to the ECU & Wiring Tech Section.
And if you go with an Aftermarket Intake Manifold Setup
http://www.ff-squad.com/technet/how-to/sk2im/
Now to the Swap Process
Here’s what your old motor will look like roughly.
Start by Draining all the fluids from your OLD motor. Oil/Coolant/Transmission/Clutch.
To Relieve the Fuel Pressure Take out the BACKUP Fuse and turn over your engine 6-7 times for about 4 Seconds at a time. (This will help you when you remove the Fuel Lines so they don’t spray everywhere)
Once its bone dry then you can proceed…
Next Step is Removing the Axles
IF you have a Impact Gun then disregard these following steps on removing the spindle/axle nut. If you do not then this is what you need to do to get your axle nuts off.
Remove center cap from wheel or remove hubcap- this may require wheel removal
Have the car sitting on the ground on all wheels
Remove spindle nut from end of axle through center of wheel (it's really hard to do with the car in the air)
Now for the rest of the Axle Removal
Both Sides
Jack up car and put it on Jack Stands
Remove wheel
Remove 17mm castle nut that holds lower control arm to spindle
Remove 17mm (may be 14mm) bolt that secures bottom of damper fork to lower control arm
Use mallet or hammer to break control arm free from spindle
Swing the Fork up and out of the way
Passengers Side
Bang end of axle through back side of spindle to free it from the hub in the Transmission
Remove Axle
Driver’s Side
Wrap pipe wrench jaws around axle between axle cup and transmission housing (or intermediate shaft housing, depending on transmission)
Tighten pipe wrench, but leave a bit of slack
Kick pipe wrench handle so axle pops free
Remove Axle
Once the Axles are out you can go ahead and unplug everything that ties your motor to your engine bay. All Shock towers disconnected, Remove your Air Box, Clutch Line from the Clutch Slave Cylinder on the front of the transmission, Fuse Box Wires and Battery Terminal Connection Cables, Fuel Lines(Return line on the right of the fuel rail, and 2 Lines going into the fuel filter on the left side of the firewall.), Radiator Hoses, Engine Ground, Heater Hoses. And Anything else I missed.
Those should be all of them. Then you Need to Remove the Shift Linkage from the Trans.
You want to take off the shift linkage by knocking out the BITCH! Pin located where the linkage and trans. meet. its covered by a rubber boot.(seriously, your going to have different Linkage to install so...do yourself a favor and just hack off the damn thing. Took me at least 4 hours to get that ****in pin out). If you don’t want to cut it you have to use an 8mm Punch tool and a hammer to knock out the Pin. Or take one of your A/C bracket bolts out and hammer the pin out from the bottom of the car.
Then Disconnect your CAT Converter from your exhaust manifold . Just to Bolts on each side of the exhaust Flange.
Then I would have an appointment set up to get your exhaust system of your choice installed because if you have aftermarket headers they will not match up to your stock exhaust. Yes you could fabricate something but this is not recommended since I have done this and it should only be a temporary fix until you can run the appropriate exhaust piping and muffler setup.
Now for actually pulling the old engine out.
I would strongly recommended getting an engine lift for this. although you can drop your engine from the bottom of the car, I think its easier to lift it out.
So hook up your lift to your engine, you want to make sure the motor will hang level when you pull it so take the chain and bolt it to the top right transmission bell housing bolt and the other end of the chain to any secure place you can find on the upper right side of the engine. Then you’ll need to make it taught so theres no slack in the chain.
This is when you remove your motor mounts. There’s the Driver Side mount, Rear mount(on firewall), Transmission mount(on top of Trans), another Trans Mount on the front side of the trans(will not fit your GSR), and the A/C Bracket/Mount located underneath the driver side mount.
Once all these are removed you can start to lift out your motor. you’ll have to finagle it a bit to get it out but its not that hard.
Then you should be looking at this
And This
Now I would wait to sell your old engine until you know you don’t need anything from it. For example I had to use my FITV, my Clutch Slave Cylinder, and The Gold Throttle Cable Pulley off my Throttle Body since I was running a Aftermarket Intake Manifold. Trust me…Keep your old motor until your new motor runs correctly and without any problems. Otherwise you’ll have to hunt down parts that you could of had already had you not sold your motor so quick.
Now for putting in your GSR!
Before putting in the GSR make sure you connect the engine harness first! And also make sure your mechanical Timing is Correct, and make sure you do a valve adjustment to spec, and make sure everything is torqued down to spec.
Here’s the best info i found about torque specs for my head studs. i found this this from Honda-Tech. and I’m not sure where i found the pictures.
This guy has the torque specs for everything in your B Series motor
https://honda-tech.com/forums/honda-crx-ef-civic-1988-1991-3/faq-b-series-torque-specs-953151/
and heres how to identify which number goes with which stud and cam cover bolts
Studs
Cam Covers
^^^the above is if your motor was in pieces when you got it like mine was lol. But you should check out the torque spec for everything link so you don’t improperly seal your intake manifold or anything else you have to bolt on(like some new headers).
make sure your piston closest to the timing belt is top dead center and its on the compression stroke(otherwise your motor wont start). the way you do this is pretty simple there is a notch on the gear behind the pulley system(to get the pulley's off i used a impact wrench) then you can see the notch on the gear the timing belt goes on.
Here’s the notch(i outlined where it is because you cant really see it that well with my camera but you should have no trouble finding it)
When your motor is on the engine stand try to connect everything together sensor wise. and make sure your spark plugs are setup correctly. And also Bolt on your Intake if it is not already on as it is much easier to install with the motor out of the car. Make sure you account for all the sensors and put your Oil Filter on also.
Here’s the Firing Order and correct Spark Plug to Dizzy Setup
And then you can take it off of the Engine Stand and bolt up the Transmission to the block(Before you do this I would suggest you check out your Flywheel and Clutch situation and see if the Flywheel needs to be resurfaced/replaced or if the Clutch kits needs to be replaced.
Once you got your transmission bolted up you should be looking at this.
Then Double Check everything and Triple Check everything.
Then you can hook up your GSR to your lift I don’t recommend using a tow strap like I had to. Use a Chain, its much easier(or get it under your car if you can’t get a lift)
Then Lift your engine to prepare to drop it into your engine bay. You’ll want to line up the rear T Bracket mount first and everything else will be much easier to line up.
I only used the T Bracket, Driver Side, Rear, and Top Transmission mounts and I don’t have any bad vibration issues.
Also if you have an A/C Compressor You’ll need the A/C Bracket for that and it will have to be mounted along with the other motor mounts.
Can’t really give you any tips here other than wiggle and align the mounts and make sure you don’t crush any lines or important parts in the process. Just take your time. it will Fit. Oh and if your hood doesn’t close you probably put the Driver side mount in upside down.
Once its set in and bolted down it will look like this. Only you will/should have an intake on yours lol I had to wait for mine to get shipped.
Then connect the shock towers to the Engine harness and put your P72 ECU in.
ECU Location
Where I ran my VTEC wiring. You can’t see it but there’s a hole in the firewall behind the battery that already has your stock wires going into it. I poked a hole in the rubber sealer and fed the wires though. Then I reached my hand up under the dash on the other side to grab the wires(easier said then done).
Then hook up your Vacuum lines to the appropriate locations.
Then make sure you Hooked up all your hoses.
Then Double and Triple and Quadruple Check all of your wires, sensors, hoses, vacuum lines. And make sure its all accounted for and correctly setup.
After this Just Reverse the steps for taking off your axles(Make sure you put these back on before you fill your trans fluid!) when putting on your ones for the GSR.
And then Fill up on your Fluids! Oil, 4.3 Quarts(10W/30). Honda Manual Trans Fluid(from Honda) for the Tranny, 2.2 Quarts. 50/50 for the Radiator(till its full). DOT 3 Brake Fluid and Same for the Clutch Fluid(Fill to MAX Line).
Look for leaks. Fix the ones you have.
After this Just Reverse the steps for taking off your axles when putting on your ones for the GSR. Bolt up all the suspension and put the tires on…And your Done!
Woo! A total of 7-8 hours into this write up. Please Feel free to include any other info I left out. I’m sure there’s a couple things. But yeah, so, ENJOY!
Last edited by MeCrObS; 02-01-2012 at 08:42 AM.
 09-06-2011, 02:06 PM
#2
Honda-Tech Member
Thread Starter
Oh one more thing! Set your Ignition Timing!!!!!!
Here's a Link!
http://www.youtube.com/watch?v=sGzxCCaxDjI
Here's a Link!
http://www.youtube.com/watch?v=sGzxCCaxDjI
Last edited by MeCrObS; 09-06-2011 at 02:24 PM.
 09-06-2011, 02:30 PM
#7
Honda-Tech Member
iTrader: (2)
Join Date: Aug 2009
Location: Virginia Beach
Posts: 425
Likes: 0
Received 0 Likes
on
0 Posts
Nice write-up but 94-01 integra and 99-00 civic si axels and shift linkage will not work for a b-series in a eg
Trending Topics
09-06-2011, 03:42 PM
#10
Honda-Tech Member
Thread Starter
Thanks Everyone. I just couldn't stand people always asking the same swap questions, and with me i couldn't figure out why no one had ever put the time in to making all this stuff available in one place. So mission accomplished!
09-07-2011, 09:48 AM
#14
Honda-Tech Member
STICKY STICKY STICKY!!!!! Love this write up. Coppied it on my comp as a hard file forever and after to refer to. Thanks mayne!!!!!!!!!!

 09-07-2011, 06:42 PM
#21
Honda-Tech Member
Thread Starter
Thanks I was just looking for this as I will do my first swap into my first ever honda.
Nice write up and thanks for the vouch!
09-07-2011, 11:04 PM
#22
Honda-Tech Member
Thread Starter
PROPZ! Put in sticky... Do it please.
STICKY STICKY STICKY!!!!!
 . i don't think its quite perfect yet though. I'll probably edit some more pics in tomorrow.
09-08-2011, 08:46 AM
. i don't think its quite perfect yet though. I'll probably edit some more pics in tomorrow.
09-08-2011, 08:46 AM
#24
Honda-Tech Member
Thread Starter
Good job! You deserve a pazookie!

