
Project 'Make Gagnar's Car Nice Again:' My Build Thread
 12-20-2009, 12:34 PM
#1
A few months ago I was walking to my car in the airport parking lot and I saw a super clean SSBP Integra. Then I got to my car with its chipped paint, busted shifter boot and patina of neglect, and it made me realize something: the only difference between my car and the crappy beat up DSMs and Probes I see all over town is that my car used to be a nice car.
I made a resolution that I was going to restore my car to nice car status, so I’m fixing all the things that are wrong with her and getting back into the upgrade game. I’ll be posting my improvements (technical and cosmetic) here in this thread, and I’ll do some DIY walkthroughs as I go along. I’ll also welcome, questions, comments and suggestions, as long as they are constructive.
Here’s a brief history of the car before I get started.
Milano red GS-R coupe
Purchased bone stock in 2001 from a single owner with 76000 miles
2001: added AEM CAI and stereo
2002: car stolen and recovered sans stereo (subsequently replaced)
2005: added WS2 catback, Fidanza 7 lb. flywheel and Exedy OEM clutch
2009 (139k): put in Blox A cams and valve springs, timing belt change, water pump change, new Brembo blanks with Hawk Performance pads, repaired shift boot, new MTF fluid
So that’s where we’re at. In the future I’ll be doing the following:
Spring 2010: suspension bushing overhaul, ITR sway bar + ASR brace, possible new coilovers
Summer/Fall 2010: complete breather mods (header, cat) and tune
Down the line I’ll also be doing a DIY repaint, and I’ll document any routine maintenance that I encounter, for posterity and as a resource for DIY tips. I’m anticipating shift bushing, fuel pump, fuel filter, and injector changing/cleaning next year as well as everything else I’ve got planned. I’m going to get this car in great shape again.
Today, it’ll be something a little more mundane. Saturday I replaced the clutch master cylinder (details below) and I got the locking lugs I need to install my new Feathers, so I’ll talk about those below.
Note: I’ll be documenting all my performance and cosmetic DIY work as how-to’s for anyone who’s interested, but I won’t document security-related work. I will not discuss the theft prevention steps that I have taken, or that I will take. That said, onto the master cylinder installation…
Last edited by GagnarTheUnruly; 12-20-2009 at 01:40 PM.
 12-20-2009, 12:39 PM
#2
Clutch Master Cylinder Install
Warning: Use this guide at your own risk. I am not a professional mechanic and am not responsible for injury to you, your vehicle, or anyone else if you chose to follow this guide, or for any false information presented here.
Tools & supplies:
Needle nosed pliers
8 mm open ended wrench
10 mm socket and/or open wrench
12 mm socket and/or open wrench
New small cotter pin (optional)
Turkey baster (possible)
New clutch master cylinder
Small bottle of DOT3 brake fluid
Paper towels
Old container for bled clutch fluid
Plastic tubing
A partner for ~15 min.
A few weeks ago, my clutch takeup point began moving closer and closer to the firewall. The clutch could still be disengaged, but the pedal had to be almost to the firewall before that happened. Eventually (this happened while my wife had the car), the pedal would stick � it would not spring back up to its resting position after it was pressed down.
This problem can be caused by a variety of failures in the clutch itself and in its relatively simple hydraulic control system. During a visual inspection of the system, I saw that the master cylinder was covered in grease (pictured below). The master cylinder passes through the firewall and clips onto the clutch pedal in the drivers footwell. Grease on the cylinder is a sure sign that it�s leaking and needs to be replaced. Here�s a picture of the problem (circled in red):

Step one in fixing the problem is to use a baster to suck all of the clutch fluid out of the reservoir and to clean out any gunk with a paper towel. The reservoir is located near the brake fluid reservoir, in the back of the engine bay on the drivers side. Mine was already empty so I didn�t have to worry about this step!

The next step is to disconnect the hoses plugged into the master cylinder, which sits just below the reservoir. The large hose carries unpressurized fluid in from the reservoir and clips on. To loosen it just slide up the clip with needle nosed pliers, and then twist the hose with the pliers to break the seal between the hose and the nipple on the master cylinder.
Here�s a picture of the master cylinder as you can see it in the engine bay:
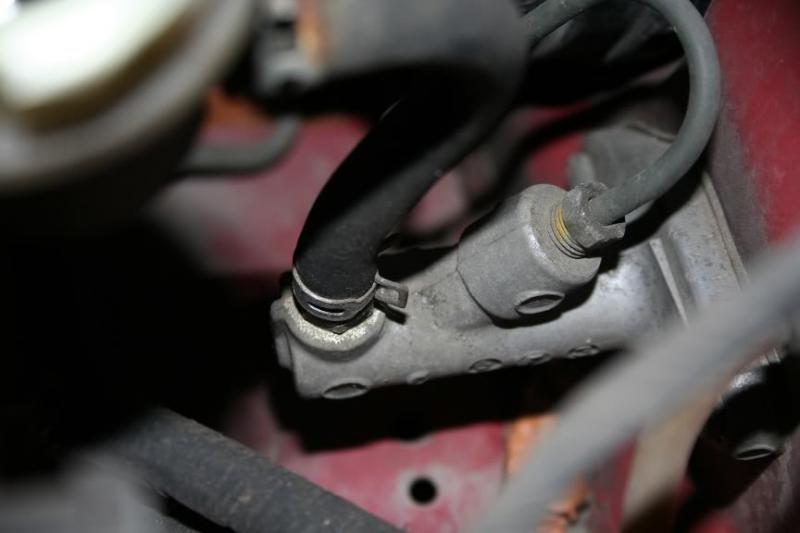
The metal line carries pressurized fluid, and screws into the master cylinder via a pretty obnoxious bolt. It�s not tight but the location is a pain. I could only turn it about 1/6 of a rotation before I had to reposition my wrench, so this step took a frustratingly long time. As you disconnect the hoses, it could be a good idea to plug them with paper towels. The clutch fluid is DOT3 brake fluid and will corrode your paint. If you spill, clean up well with paper towels.
Once the hoses are disconnected, it�s time to go into the cabin. There are four things you need to do here. First, pull the cotter pin that helps hold the master cylinder to the back of the clutch pedal. These pins can be tenacious, and you will probably need to use leverage to pull them off. Needle nosed pliers or a small screwdriver will do the trick. Here I�m prying out the pin:
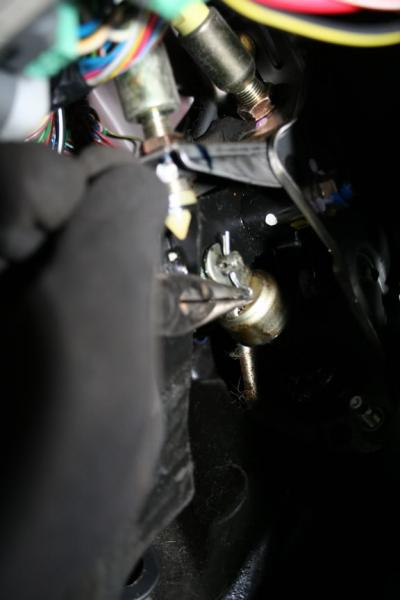
The cotter pin holds a brass pin that connects the master cylinder and the clutch pedal. Push this out with your finger. Next, loosen the two 12mm nuts that hold the master cylinder bolts tight against the firewall. The one on the right is easy, the one on the left can be a real PITA to reach depending upon the lengths of your sockets and the size of your socket wrench. I couldn�t get my socket wrench in there, and had to remove the cruise control module to reach the nut with an open wrench. In the picture above you can see one of these nuts on in the shadows, just below and to the right of where I�m removing the cotter pin. The other nut is on the other side of the master cylinder.
Once these nuts are removed, you can pull the master out through the engine bay. There will also be a rubber gasket that may or may not stay stuck to the firewall. You�ll reuse that gasket.
Before you install the new master cylinder, inspect it to make sure that the brass pin can go all the way through. If it doesn�t, file it or the fork on the new master cylinder so that the pin can go far enough that the hole for the cotter pin gets as far as it needs to. Also, adjust the length of the new master cylinder so that it is as long as the old one. The �head� of mine just screwed up and down on threads that were located on the rod protruding from the cylinder. You want the clutch to hit the plastic stop when it comes up. If the master cylinder is too short, the clutch pedal can't come out all the way. You'll see what I mean if you put it in and it isn't the right length.
When you�re ready, install the new master cylinder in the reverse order of removal. You can reuse the cotter pin or insert a new one (better). Snug everything up and refill the clutch fluid reservoir with DOT3 brake fluid. Tighten the cap back down.
Now you need a partner. Locate the clutch slave cylinder. It�s in the engine bay on the passenger side towards the front. It�s mounted on the transaxle near the radiator and a VIN location on the engine (next to the header). It has a clutch fluid line going in and a bleeder valve. Remove the rubber cap and fix some plastic tubing onto the valve. I used aquarium tubing that I stretched the end of with my pliers. Let the tubing run through the bottom of the engine bay into a bottle you put in front of the car.
Here�s an out-of-focus shot of the bleeder. Ironically, I bled all over the slave cylinder because I cut myself when the bleeder valve broke loose. It took me a while to figure out why there a was a blot of red (PS?) fluid on the slave cylinder:

Loosen the bleeder valve with an open ended wrench, and have your partner pump the clutch pedal. In all likelihood, the system will be full of air, and the pedal will not spring back on its own, so your partner will have to pump it back and forth with his/her hands. You will see and hear air bubbles moving through the line. Every five or ten pumps, have your partner stop while you refill the clutch fluid, recapping it when you are done. Continue until no air is present in the line.
Warning: if the reservoir ever empties, you will need to bleed the system all over again.
Warning #2: as the air bubbles leave the system, more fluid will leak out with each pump of the pedal. Towards the end 4 or 5 pumps is all it takes to drain the reservoir. Your partner will also probably feel more resistance as this happens.
When you are confident no more air is in the line, tighten the bleeder valve, top off the reservoir and tighten the cap. A small bottle of brake fluid should be more than enough to fully bleed the system several times. Your partner should feel normal resistance from the clutch pedal, and it should spring to its rest position spontaneously. Turn on the car and make sure that the clutch functions properly. If it does, you�re done!
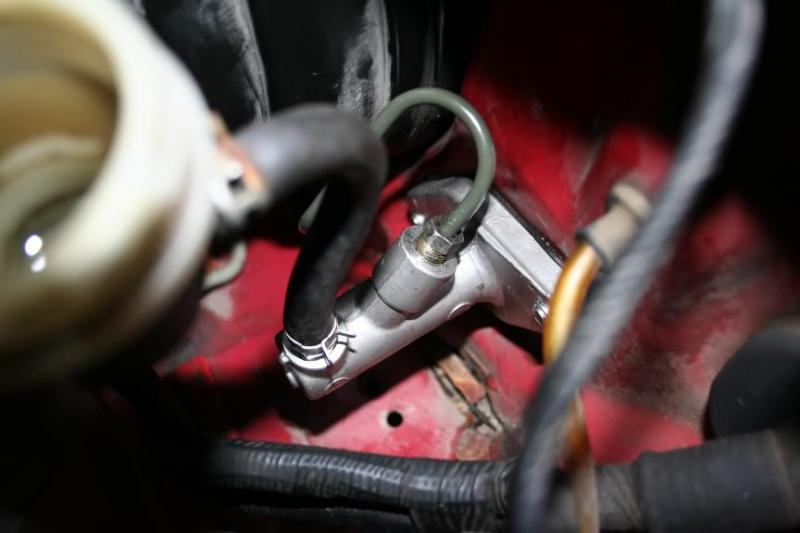
With picture taking, instruction finding, and puttering, this job took me about 2 hours. It�s pretty straightforward and the results are completely underwhelming. My clutch works again, and that�s a good thing.
Here�s the new MC, installed. Pretty ain�t she?
Warning: Use this guide at your own risk. I am not a professional mechanic and am not responsible for injury to you, your vehicle, or anyone else if you chose to follow this guide, or for any false information presented here.
Tools & supplies:
Needle nosed pliers
8 mm open ended wrench
10 mm socket and/or open wrench
12 mm socket and/or open wrench
New small cotter pin (optional)
Turkey baster (possible)
New clutch master cylinder
Small bottle of DOT3 brake fluid
Paper towels
Old container for bled clutch fluid
Plastic tubing
A partner for ~15 min.
A few weeks ago, my clutch takeup point began moving closer and closer to the firewall. The clutch could still be disengaged, but the pedal had to be almost to the firewall before that happened. Eventually (this happened while my wife had the car), the pedal would stick � it would not spring back up to its resting position after it was pressed down.
This problem can be caused by a variety of failures in the clutch itself and in its relatively simple hydraulic control system. During a visual inspection of the system, I saw that the master cylinder was covered in grease (pictured below). The master cylinder passes through the firewall and clips onto the clutch pedal in the drivers footwell. Grease on the cylinder is a sure sign that it�s leaking and needs to be replaced. Here�s a picture of the problem (circled in red):
Step one in fixing the problem is to use a baster to suck all of the clutch fluid out of the reservoir and to clean out any gunk with a paper towel. The reservoir is located near the brake fluid reservoir, in the back of the engine bay on the drivers side. Mine was already empty so I didn�t have to worry about this step!
The next step is to disconnect the hoses plugged into the master cylinder, which sits just below the reservoir. The large hose carries unpressurized fluid in from the reservoir and clips on. To loosen it just slide up the clip with needle nosed pliers, and then twist the hose with the pliers to break the seal between the hose and the nipple on the master cylinder.
Here�s a picture of the master cylinder as you can see it in the engine bay:
The metal line carries pressurized fluid, and screws into the master cylinder via a pretty obnoxious bolt. It�s not tight but the location is a pain. I could only turn it about 1/6 of a rotation before I had to reposition my wrench, so this step took a frustratingly long time. As you disconnect the hoses, it could be a good idea to plug them with paper towels. The clutch fluid is DOT3 brake fluid and will corrode your paint. If you spill, clean up well with paper towels.
Once the hoses are disconnected, it�s time to go into the cabin. There are four things you need to do here. First, pull the cotter pin that helps hold the master cylinder to the back of the clutch pedal. These pins can be tenacious, and you will probably need to use leverage to pull them off. Needle nosed pliers or a small screwdriver will do the trick. Here I�m prying out the pin:
The cotter pin holds a brass pin that connects the master cylinder and the clutch pedal. Push this out with your finger. Next, loosen the two 12mm nuts that hold the master cylinder bolts tight against the firewall. The one on the right is easy, the one on the left can be a real PITA to reach depending upon the lengths of your sockets and the size of your socket wrench. I couldn�t get my socket wrench in there, and had to remove the cruise control module to reach the nut with an open wrench. In the picture above you can see one of these nuts on in the shadows, just below and to the right of where I�m removing the cotter pin. The other nut is on the other side of the master cylinder.
Once these nuts are removed, you can pull the master out through the engine bay. There will also be a rubber gasket that may or may not stay stuck to the firewall. You�ll reuse that gasket.
Before you install the new master cylinder, inspect it to make sure that the brass pin can go all the way through. If it doesn�t, file it or the fork on the new master cylinder so that the pin can go far enough that the hole for the cotter pin gets as far as it needs to. Also, adjust the length of the new master cylinder so that it is as long as the old one. The �head� of mine just screwed up and down on threads that were located on the rod protruding from the cylinder. You want the clutch to hit the plastic stop when it comes up. If the master cylinder is too short, the clutch pedal can't come out all the way. You'll see what I mean if you put it in and it isn't the right length.
When you�re ready, install the new master cylinder in the reverse order of removal. You can reuse the cotter pin or insert a new one (better). Snug everything up and refill the clutch fluid reservoir with DOT3 brake fluid. Tighten the cap back down.
Now you need a partner. Locate the clutch slave cylinder. It�s in the engine bay on the passenger side towards the front. It�s mounted on the transaxle near the radiator and a VIN location on the engine (next to the header). It has a clutch fluid line going in and a bleeder valve. Remove the rubber cap and fix some plastic tubing onto the valve. I used aquarium tubing that I stretched the end of with my pliers. Let the tubing run through the bottom of the engine bay into a bottle you put in front of the car.
Here�s an out-of-focus shot of the bleeder. Ironically, I bled all over the slave cylinder because I cut myself when the bleeder valve broke loose. It took me a while to figure out why there a was a blot of red (PS?) fluid on the slave cylinder:
Loosen the bleeder valve with an open ended wrench, and have your partner pump the clutch pedal. In all likelihood, the system will be full of air, and the pedal will not spring back on its own, so your partner will have to pump it back and forth with his/her hands. You will see and hear air bubbles moving through the line. Every five or ten pumps, have your partner stop while you refill the clutch fluid, recapping it when you are done. Continue until no air is present in the line.
Warning: if the reservoir ever empties, you will need to bleed the system all over again.
Warning #2: as the air bubbles leave the system, more fluid will leak out with each pump of the pedal. Towards the end 4 or 5 pumps is all it takes to drain the reservoir. Your partner will also probably feel more resistance as this happens.
When you are confident no more air is in the line, tighten the bleeder valve, top off the reservoir and tighten the cap. A small bottle of brake fluid should be more than enough to fully bleed the system several times. Your partner should feel normal resistance from the clutch pedal, and it should spring to its rest position spontaneously. Turn on the car and make sure that the clutch functions properly. If it does, you�re done!
With picture taking, instruction finding, and puttering, this job took me about 2 hours. It�s pretty straightforward and the results are completely underwhelming. My clutch works again, and that�s a good thing.
Here�s the new MC, installed. Pretty ain�t she?
Last edited by GagnarTheUnruly; 01-07-2010 at 08:11 AM.
12-20-2009, 01:05 PM
#3
Good write up on the Clutch Master Cylinder Install
ATR brace what is this? Did you mean ASR?
Here is a little write up I did, March 2008.
DC2 ASR SwayBar Reinforcement USDM ITR 22mm SwayBar
https://honda-tech.com/forums/acura-integra-6/dc2-asr-swaybar-reinforcement-usdm-22mm-swaybar-2256572/
ATR brace what is this? Did you mean ASR?
Here is a little write up I did, March 2008.
DC2 ASR SwayBar Reinforcement USDM ITR 22mm SwayBar
https://honda-tech.com/forums/acura-integra-6/dc2-asr-swaybar-reinforcement-usdm-22mm-swaybar-2256572/
12-20-2009, 01:41 PM
#5
Thx, yeah, I meant ASR. Now it's fixed and nobody is going to know what you're talking about LOL.
Thanks for the link. I'll remember to check that this spring when I'm getting ready.
Thanks for the link. I'll remember to check that this spring when I'm getting ready.
12-20-2009, 02:58 PM
#6
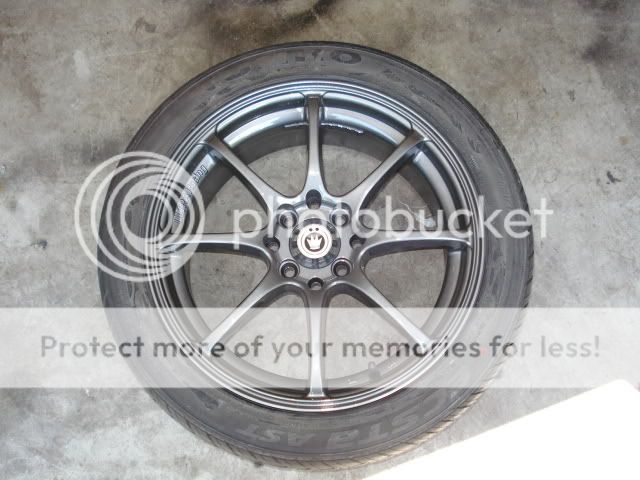
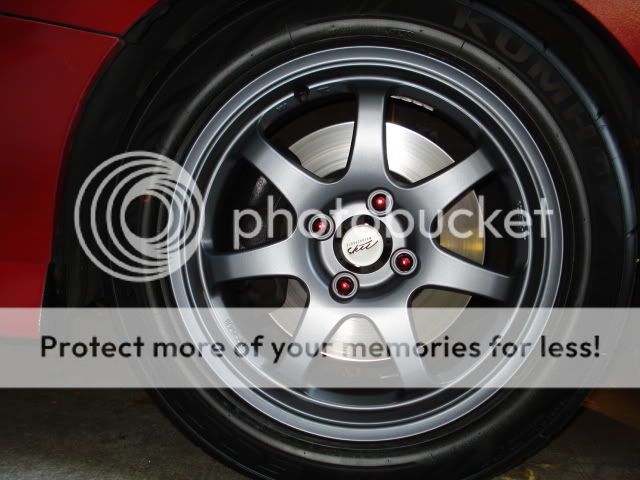
Allright, the new Feathers are on, and I love them. I can't wait to get out and drive them... in May. They're coming right back off tomorrow, after I take my old Snowflakes to the tire shop and get winter tires put on.
Also, I LMAO'd when I saw the fender gaps on the car. Trust me when I say it looks better in person. Stage 1 of convincing my wife to let me get coilovers is now complete...


And here are the dirty old snowflakes:

Edit: I forgot to mention that I had some trouble finding locking lugs for these wheels. I know they aren't super valuable but I don't like the idea of leaving them unlocked all the same. I've had bad experience with McGard locks, and there are few lugs and even fewer locks that will fit the tiny lug holes on Feathers.
I looked all over until I contacted DRFlickner at JLBMotorsports, and he gave me a great deal on Gorilla locking small diameter lugs. For anyone who's having trouble finding locking lugs on Feathers, I recommend these Gorilla locks (small diameter only). The locks are 'true' locks -- there are a large number of lock patterns and the key to one lock will not work on the other locks. However, the cool thing is that all the keys will work on the standard small diameter splined lugs. This way you only have to run one lock on each wheel, but the lock key can be used on all the regular lugs, so you don't have to switch keys on each wheel. Also, the locks look like regular lugs from a distance. There's a 'G' cast into the top that lets you see which are the locks, but they don't look awkward from a distance. It's a clever system.
Also, I LMAO'd when I saw the fender gaps on the car. Trust me when I say it looks better in person. Stage 1 of convincing my wife to let me get coilovers is now complete...
And here are the dirty old snowflakes:
Edit: I forgot to mention that I had some trouble finding locking lugs for these wheels. I know they aren't super valuable but I don't like the idea of leaving them unlocked all the same. I've had bad experience with McGard locks, and there are few lugs and even fewer locks that will fit the tiny lug holes on Feathers.
I looked all over until I contacted DRFlickner at JLBMotorsports, and he gave me a great deal on Gorilla locking small diameter lugs. For anyone who's having trouble finding locking lugs on Feathers, I recommend these Gorilla locks (small diameter only). The locks are 'true' locks -- there are a large number of lock patterns and the key to one lock will not work on the other locks. However, the cool thing is that all the keys will work on the standard small diameter splined lugs. This way you only have to run one lock on each wheel, but the lock key can be used on all the regular lugs, so you don't have to switch keys on each wheel. Also, the locks look like regular lugs from a distance. There's a 'G' cast into the top that lets you see which are the locks, but they don't look awkward from a distance. It's a clever system.
Last edited by GagnarTheUnruly; 12-20-2009 at 05:23 PM.

Trending Topics
12-20-2009, 03:39 PM
#8
Honda-Tech Member

Join Date: Oct 2009
Posts: 236
Likes: 0
Received 0 Likes
on
0 Posts
thanks alot bro this is gonna save me so much time instead of having to look and search all around the internet for a how-to +1
12-21-2009, 05:22 AM
#9
Honda-Tech Member
Join Date: Oct 2004
Location: Hazzard County, MD
Posts: 874
Likes: 0
Received 0 Likes
on
0 Posts
while I can't see the pictures because I'm at work, the write-up itself is more than adequate. I'm ready to do mine now, as I'm having the same problem and found this thread via our lovely search feature.
Thank you again sir!
Thank you again sir!
12-21-2009, 06:14 AM
#10
I think I've seen a half dozen people at least in the past couple months that have had this problem. I'm glad I could help!
Also, if anyone finds errors, please let me know and I will fix them.
Also, if anyone finds errors, please let me know and I will fix them.
12-23-2009, 03:33 PM
#11
Well, the new wheels are off and the old snowflakes are back on with Michelin X-ice winter tires on them (fitting). Here's the car with snow tires, basically how she used to look before I got the new wheels.

Even with those tires the Integra is probably going to be a garage queen for most of the winter. We've already got a Civic that's been heavily modified for off roading and winter traction:

Since there's nothing to do for the winter, I'll probably not be updating this thread until spring. I notice that there are only 8 pages of threads in this section. What happens to threads after they roll off the first eight pages?
Even with those tires the Integra is probably going to be a garage queen for most of the winter. We've already got a Civic that's been heavily modified for off roading and winter traction:
Since there's nothing to do for the winter, I'll probably not be updating this thread until spring. I notice that there are only 8 pages of threads in this section. What happens to threads after they roll off the first eight pages?
12-24-2009, 11:09 AM
#13
I hope that's not true because the mods probably wouldn't like me bumping this thread every week LOL. I guess there's no way that we'd have all these zombie threads if they got permanently deleted.
OK, so here's a question I have:
This spring I'm going to be doing a much-needed bushing overhaul on my car. I'm getting a full Hardrace bushing set. I'm also using Christmas money to buy an ASR/ITR combo. I'll have a bit of leftover money to spend, and I can use it either to:
A -- get coilovers and install them when I do the suspension work
B -- get headers and a cat and work on completing my mild all motor build
C -- get a Demon & OBD1 and do a DIY Crome tune
The engine mods I have done are:
AEM CAI
Apexi WS2
Blox A cams
I obiously need a header and a cat to complete the breather mods, and the other issue is that the car has never been tuned. What would you do?
12-24-2009, 08:27 PM
#14
Honda-Tech Member

Join Date: Apr 2009
Location: San Diego, CA
Posts: 1,262
Likes: 0
Received 0 Likes
on
0 Posts
you'll be okay without a tune, however you certainly won't get the most out of what you have. depending on what your plans are, good suspension is always a fine choice. since you are doing a bushing overhall, i'd get some quality coilovers to complete it and when you save enough get headers+cat(stock should be fine?) and then a tune.
12-24-2009, 09:07 PM
#15
King of Lions
Join Date: Aug 2009
Location: Pride Rock
Posts: 272
Likes: 0
Received 0 Likes
on
0 Posts
I really like where your going with this, im in for updates on your project
as for your question, i would go with option A first...
as for your question, i would go with option A first...
12-26-2009, 07:47 AM
#17
Finishing off the suspension first is what I was leaning towards, too. It makes sense to put in new coilovers while I've got the suspension off, anyways. I'd really like to get the engine stuff done, too, but it'll have to wait. I know a guy who runs a landscaping business and I might put in some work for him to raise extra cash.
Right now I'm thinking about getting Progress 2 250/350 coilovers. I'd rather get Koni/GC but they are much more expensive and would delay the rest of my build and I hear great things about Progress.
Right now I'm thinking about getting Progress 2 250/350 coilovers. I'd rather get Koni/GC but they are much more expensive and would delay the rest of my build and I hear great things about Progress.
12-26-2009, 09:38 AM
#19
Honda-Tech Member
Join Date: Nov 2007
Location: Stockton, Ca, USA
Posts: 477
Likes: 0
Received 0 Likes
on
0 Posts
lower your car already!! it looks like a truck!! hahaha.. all those mods, and the one dope thing that will change the whole look is the drop in the ride.. doooooo ittttt...
love the mods though.. keep it up!
love the mods though.. keep it up!
12-31-2009, 11:13 AM
#23
Thanks for all of the positive comments so far. I'm going to try to do some odd jobs (selling art and working for a landscaper) to raise some extra $$$ and finish off this build sooner rather than later. Wish me luck!
12-31-2009, 11:53 AM
#24
Honda-Tech Member
this car of yours strongly reminds me of the history of my gsr.
first, i bought it, had to get the feathers

then i decide an engine build would be fun. one small problem came up

now i'm pissed and order a JDM ITR engine and some rays 17s to trade on and off with the feathers

it dawns on me no one has gunmetal feathers so the new corvette cyber grey is used
koni/gc naturally comes next

i sell the rays 17s and feathers and go buy two sets of 15s. one with kumho xs and the other with hankook icebears

itr brake upgrade also took place BIG improvement
the LSD and icebears are great in the snow and forest trails

corbeau cr1 seats, a nice exhaust, fidanza flywheel, garage paint job, system and quite a few other things came along.
appears that your car is going a similar route
first, i bought it, had to get the feathers
then i decide an engine build would be fun. one small problem came up
now i'm pissed and order a JDM ITR engine and some rays 17s to trade on and off with the feathers
it dawns on me no one has gunmetal feathers so the new corvette cyber grey is used
koni/gc naturally comes next
i sell the rays 17s and feathers and go buy two sets of 15s. one with kumho xs and the other with hankook icebears
itr brake upgrade also took place BIG improvement
the LSD and icebears are great in the snow and forest trails
corbeau cr1 seats, a nice exhaust, fidanza flywheel, garage paint job, system and quite a few other things came along.
appears that your car is going a similar route
12-31-2009, 12:06 PM
#25
Yeah, it's sort of disturbingly similar. I doubt I'll be dropping in a B18C5 but I'll hopefully be building my way close to one eventually. I was even considering painting my Feathers that color some day LOL.
BTW, those 7's look awesome. I tried to find the weight on those wheels online but couldn't so I went Konig instead.
BTW, those 7's look awesome. I tried to find the weight on those wheels online but couldn't so I went Konig instead.

