
DIY: Foggy/Hazy/Oxidized Headlight Fix (56k Warning)
 07-04-2008, 01:21 PM
#1
***As of 09-05-10 this is a work in progress***
See below for original post.
DIY: How to restore the clarity of your aged acrylic headlight lenses.
http://www.flickr.com/photos/26016203@N03/4962082864/http://www.flickr.com/photos/26016203@N03/4962077492/
I've finally gotten around to doing this the right way, and decided to
document it at the same time.
The car is my '96 Civic DX 4-door beater. Every year the lenses turn
a nasty yellow oxidized color. They emit a dim beam and just look
gross.
Below this update you will find my old DYI from '08 where I show
what just polishing can do. What polish won't do is get rid pits and of all the
yellowing. That's what this update is all about.
Materials and Tools
This is simply what I used to do this. Yours may differ,
depending mostly on severity.
➔ (4) 9"x11" sheets 320 grit sandpaper
➔ (4) 9"x11" sheets 800 grit sandpaper
➔ (4) 9"x11" sheets 1000 grit sandpaper
➔ (4) 3.5x9" sheets 2000 grit sandpaper
➔ (2) 3"x4" NEW regular kitchen sponges
➔ Scissors
➔ 1+ gallon container of soapy water
➔ Many clean, relatively lint free rags. A couple
of old cotton T-shirts work well for me.
➔ Drill (plug-in type is ideal)
➔ Fine buffing wheel w/ arbor
➔ Plenty of newspaper etc.
➔ Roll of wide masking tape
1. Goal: Remove contaminants
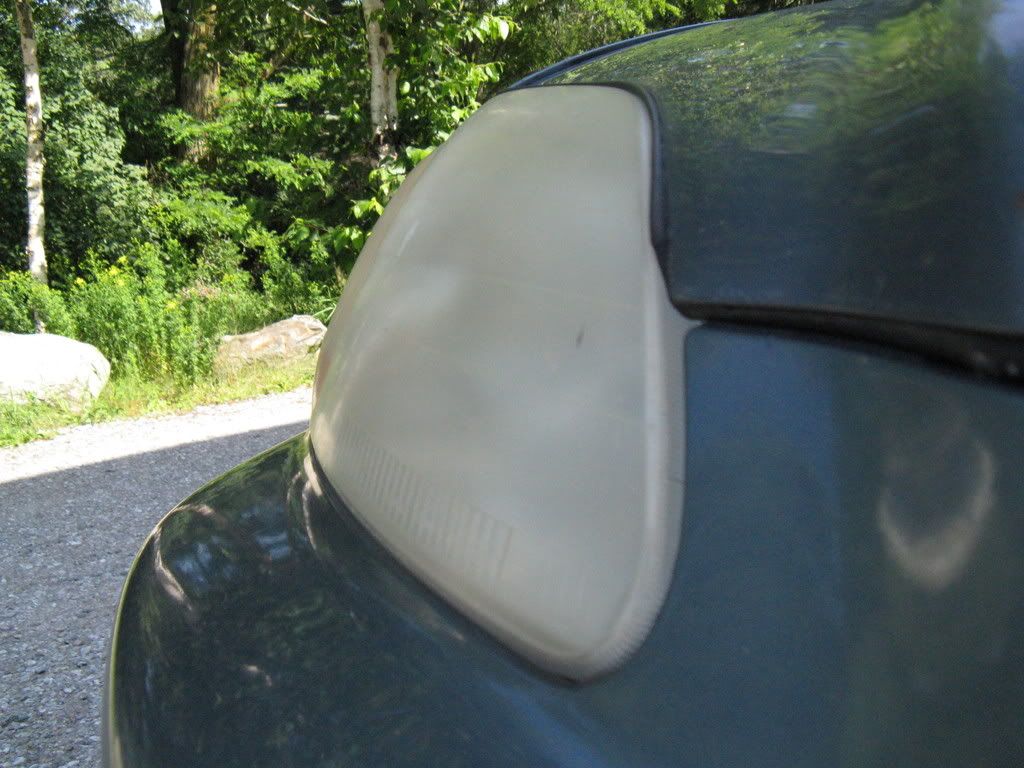
Here is how they look after less than a year since I last polished them.
Take one of the sponges and lightly scrub the lens with clean water.
I didn't feel the need to use masking tape for this step.
http://www.flickr.com/photos/26016203@N03/4962081934/
In this pic you can see the peeling remnants of the 'special' clear coating my
friend at a shop applied a couple months ago.
http://www.flickr.com/photos/26016203@N03/4962077492/
Many vehicles have this hazing problem. 1998 Integra GS-R:
http://www.flickr.com/photos/26016203@N03/4962081308/
2. Goal: Mask off area around lens
I did not feel the need to use newspaper yet. Dry everything well and grab
the masking tape. I recommend using more and wider tape than I have
pictured here.
http://www.flickr.com/photos/26016203@N03/4961485879/
More like this.
http://www.flickr.com/photos/26016203@N03/4962083908/
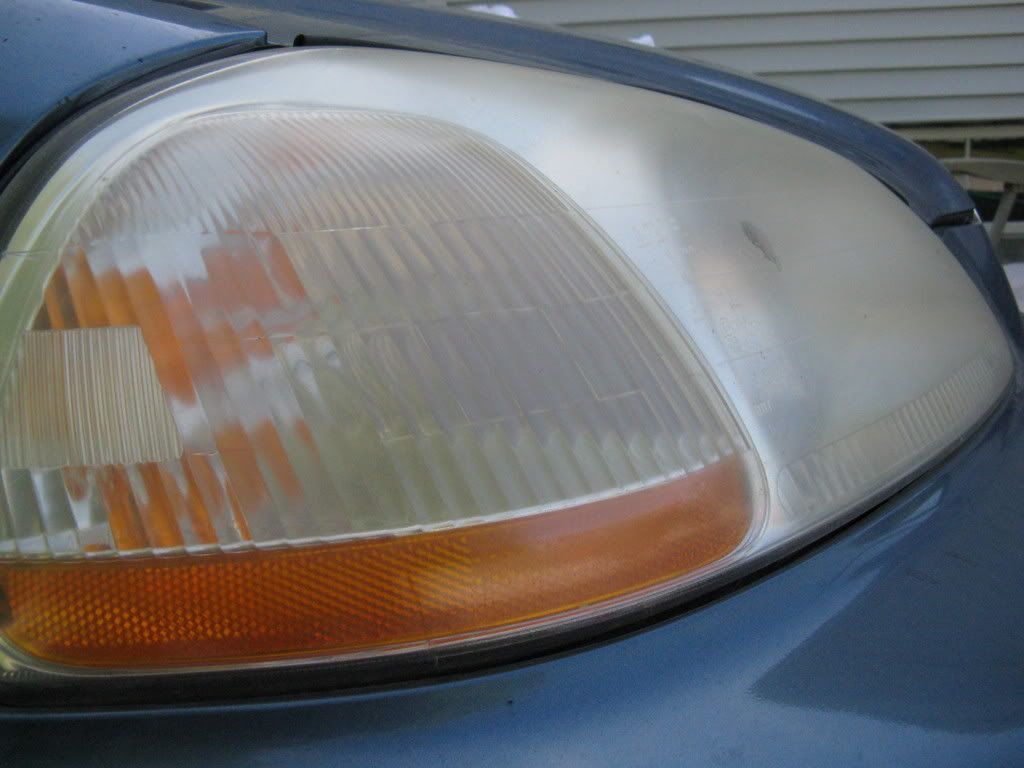
After 190,000 miles, the lenses are in rough shape.
http://www.flickr.com/photos/26016203@N03/4962083602/
3. Goal: Remove pits, scratches and yellow oxidization
I wrapped one of the sponges with sandpaper, rolled up worked well.
The sponge conforms to the contour of the lens and also also provide
a good grip of the paper so more and even pressure can be applied.
http://www.flickr.com/photos/26016203@N03/4962080612/http://www.flickr.com/photos/26016203@N03/4961485409/http://www.flickr.com/photos/26016203@N03/4962078324/http://www.flickr.com/photos/26016203@N03/4962085908/
Mine were so bad that I decided to start with 320 grit sandpaper
(not pictured). Any decent auto parts store should have 800, 1000, 2000 and even 2500 grit automotive sandpaper.
http://www.flickr.com/photos/26016203@N03/4961483013/
THIS IS IMPORTANT:
Sand in one direction from one side of the lense to the other, and then perpendicular to that direction.
This way, material is removed evenly from the lens.
DO NOT SAND IN A CIRCULAR MOTION ON THE LENSES.
It should look something like this (320 grit):
http://www.flickr.com/photos/26016203@N03/4962086998/
Keep the sponge, sandpaper and lens wet at all times.
Wipe down the lens often. Use the soapy water and the other clean sponge
(in the same direction you just sanded) and switch to a new area of sandpaper when necessary.
This is what happens to the sandpaper when sanding without water.
http://www.flickr.com/photos/26016203@N03/4962079276/http://www.flickr.com/photos/26016203@N03/4962080088/
Here are the steps for sanding:
1. Evenly sand in one direction, from one side of the lens to the other
keeping the lens and sandpaper wet.
2. Wipe off the lens with the sponge and water.
3. Inspect and use a new area of sandpaper if nessesary
4. Switch sanding direction.
*Depending upon severity, Repeat these steps with the coarse
sandpaper until the pits and yellowing are removed to your satisfaction.
*Repeat these steps 4 times with each grade of finer sandpaper.
The reason behind using successive grades of sandpaper is to basically
remove the scraches of the previous grade to the point that the polish
can take easily care of the rest.
Lenses ready for polish.
http://www.flickr.com/photos/26016203@N03/4962079844/http://www.flickr.com/photos/26016203@N03/4962087332/
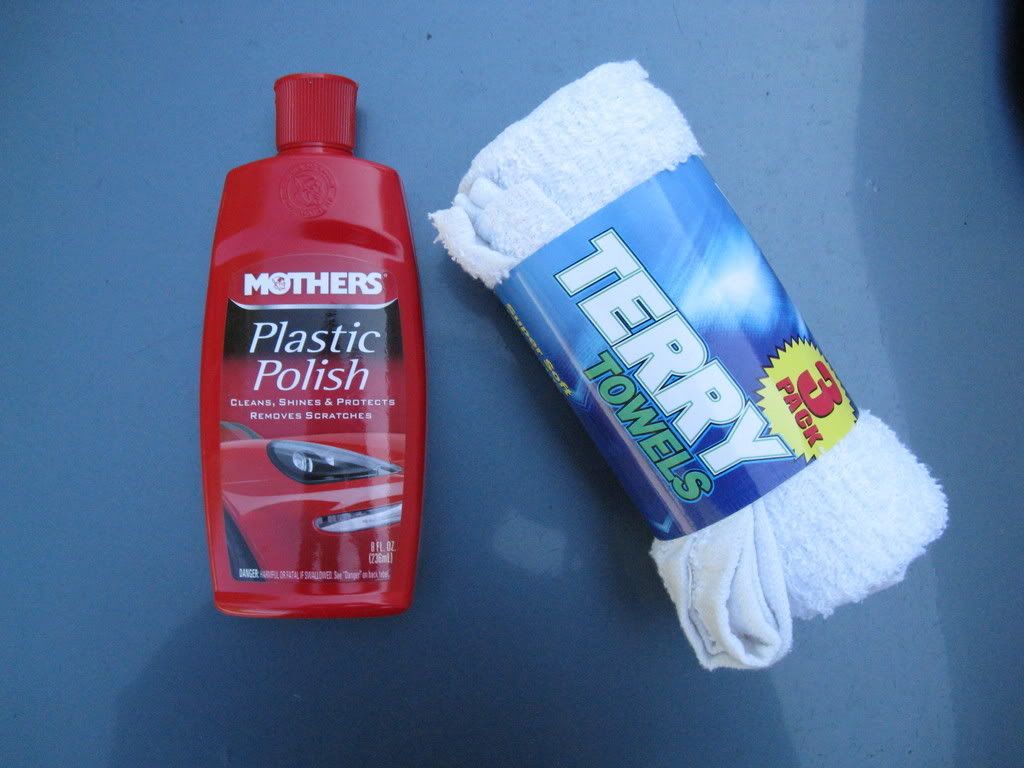
Here is the Novus polish and the Mother's polish I used in the OP in '08.
I used the step 1 cleaner and the step 2 polish, but I feel the Mother's
polish is almost or as good or than the step 3 Novus.
Plus I can apply it in the larger quantities needed for power buffing.
A little goes a long way when hand buffing, but a whole bunch more
works really well for power buffing.
http://www.flickr.com/photos/26016203@N03/4961494923/http://www.flickr.com/photos/26016203@N03/4961493901/http://www.flickr.com/photos/26016203@N03/4961494591/
I knew it would fling a little polish so I masked off the front end.
http://www.flickr.com/photos/26016203@N03/4961497017/
Buff in a CIRCULAR MOTION and follow the direction on the polish
container.
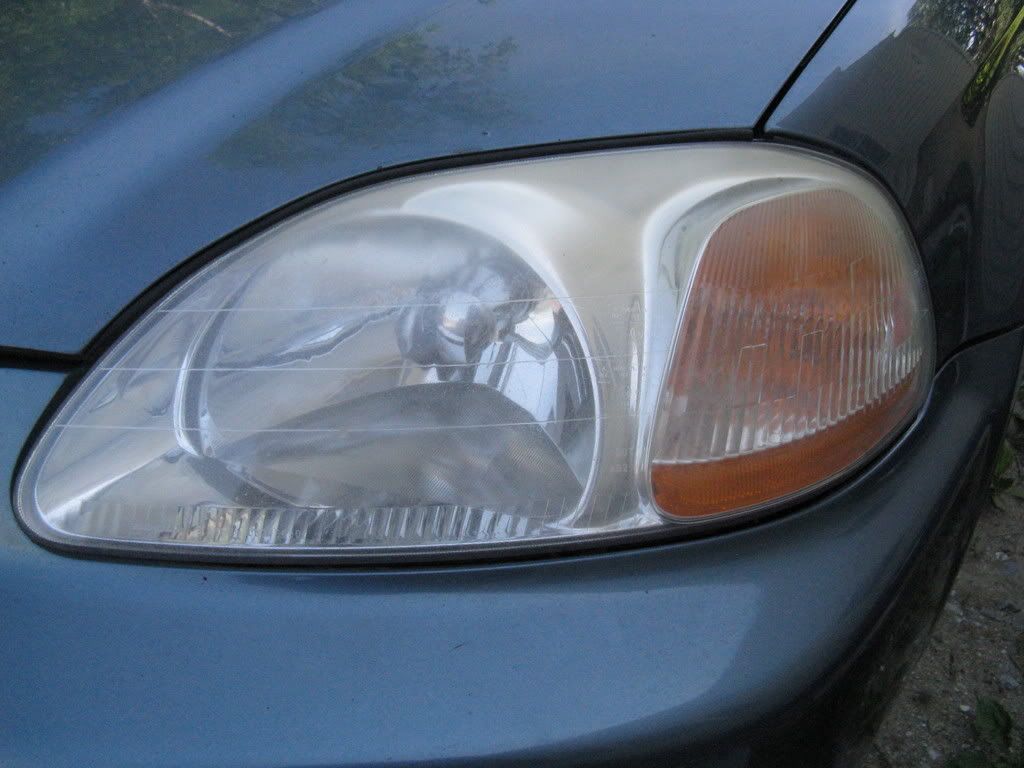
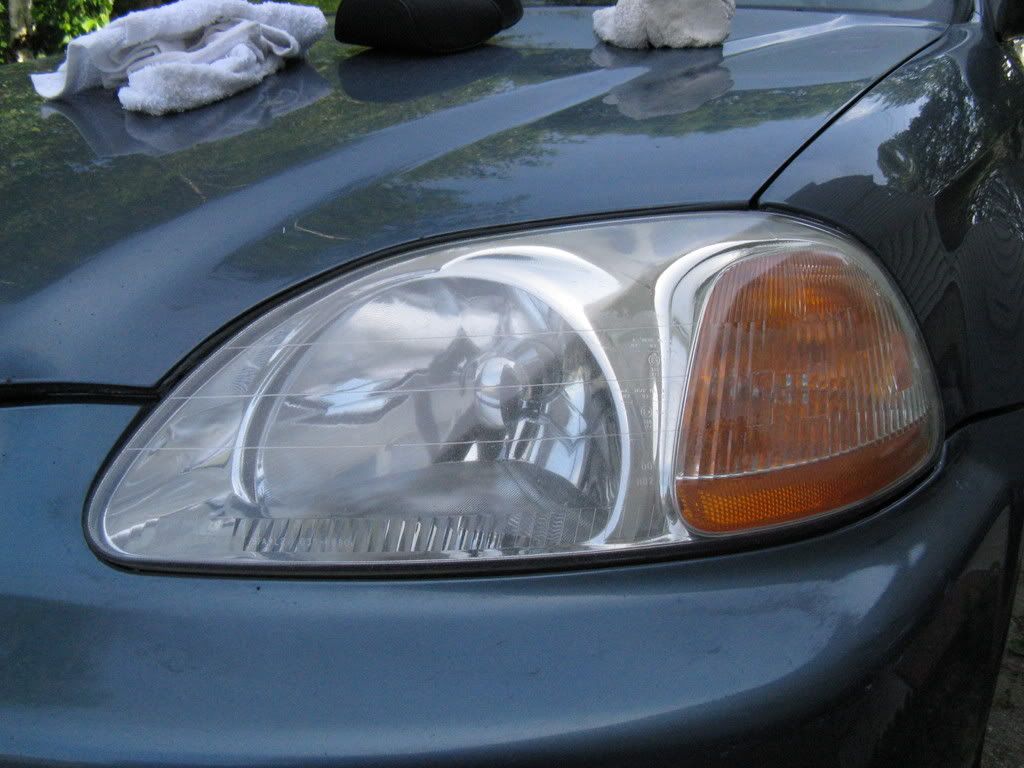
I think my results were quite good.
http://www.flickr.com/photos/26016203@N03/4962093858/http://www.flickr.com/photos/26016203@N03/4961499099/
***Original Post 07-04-08***
I did this DIY because all the other ones I could find in the 92-00 Civic forum had non-working pics. I just wanted to show how well plastic polish works on 96-00 Civic headlights (and 94-01 Integras as well).
Here you can see how bad my '96 headlights are, the the passenger's side is very oxidized while the driver's isn't too bad but could certainly use some work.

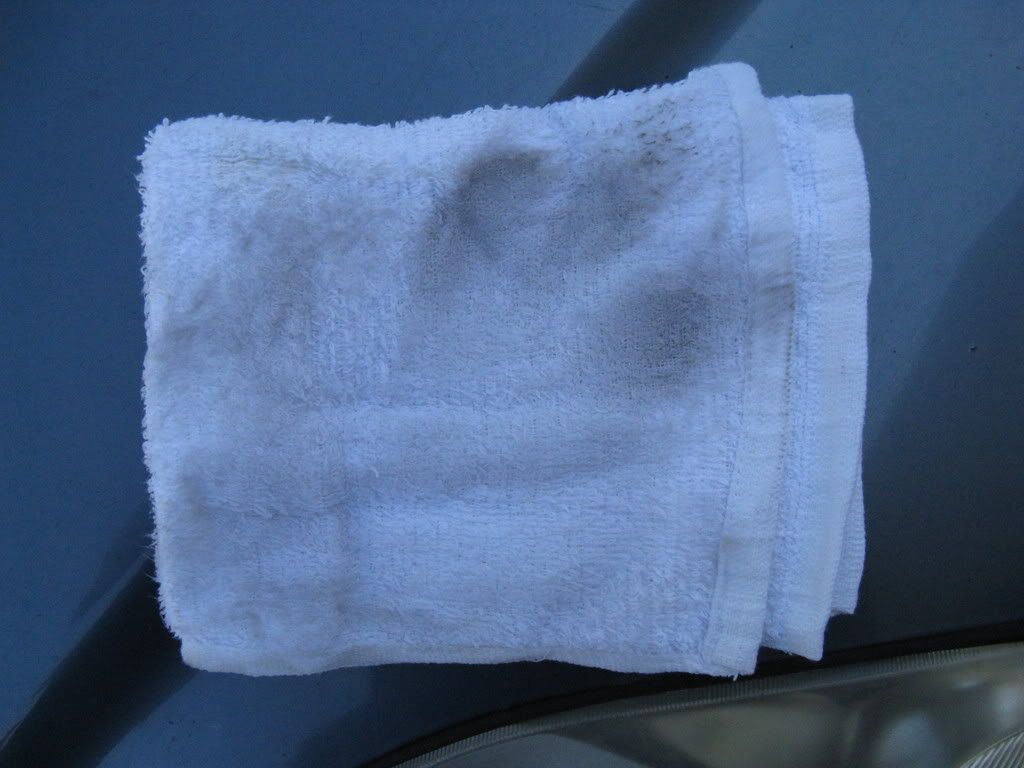
I used Mothers Plastic Polish and 3 large terry clothes for this job, use at least 3 clothes, I recommend having 6 on hand. Other companies make plastic polishes as well.
Dedicate at least one of the rags for washing/wiping. I used water and nothing else. Use at least one rag for drying. You can see how much grime was on just one headlight.
Once you're satisfied the headlight is clean enough, apply a liberal amount of polish. That's what the directions say so I did.
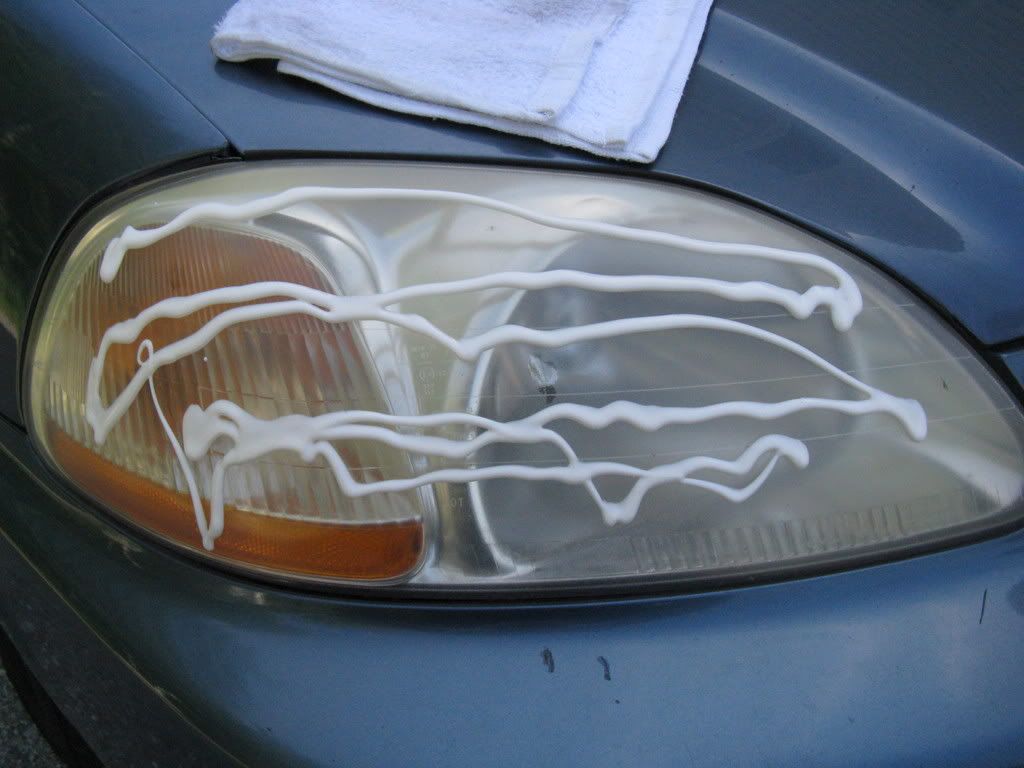
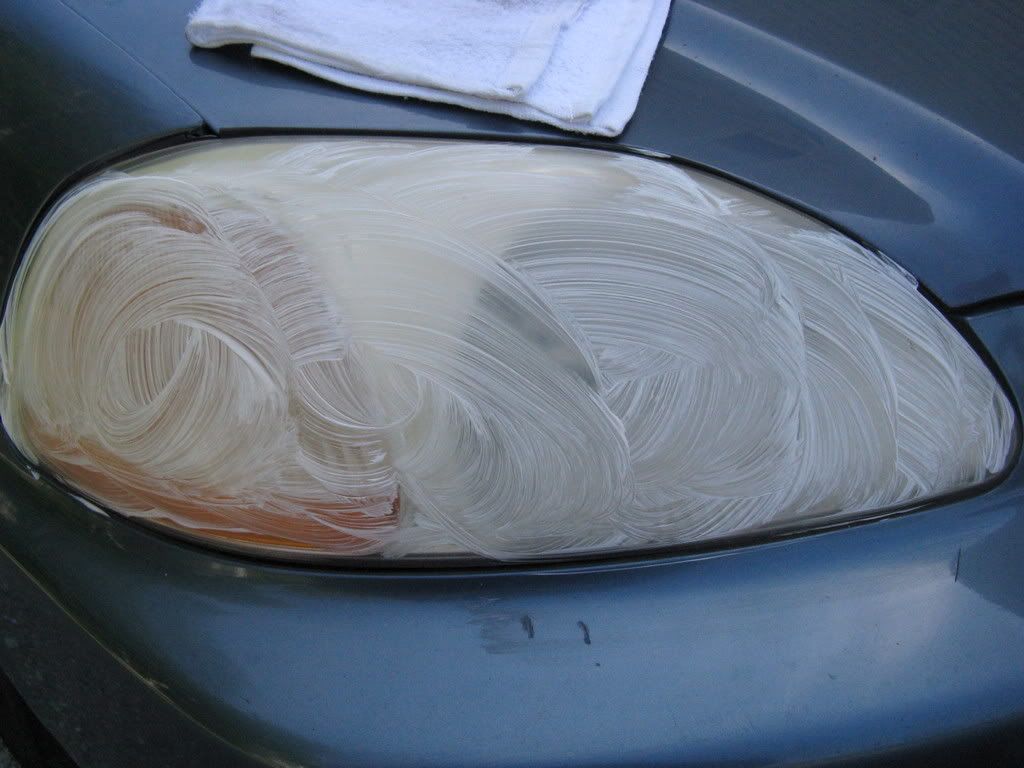
Rub in the polish in a circular motion just like you're waxing the car, paying special attention to the edges. I can't help but think a buffer would be an ideal tool for this step.
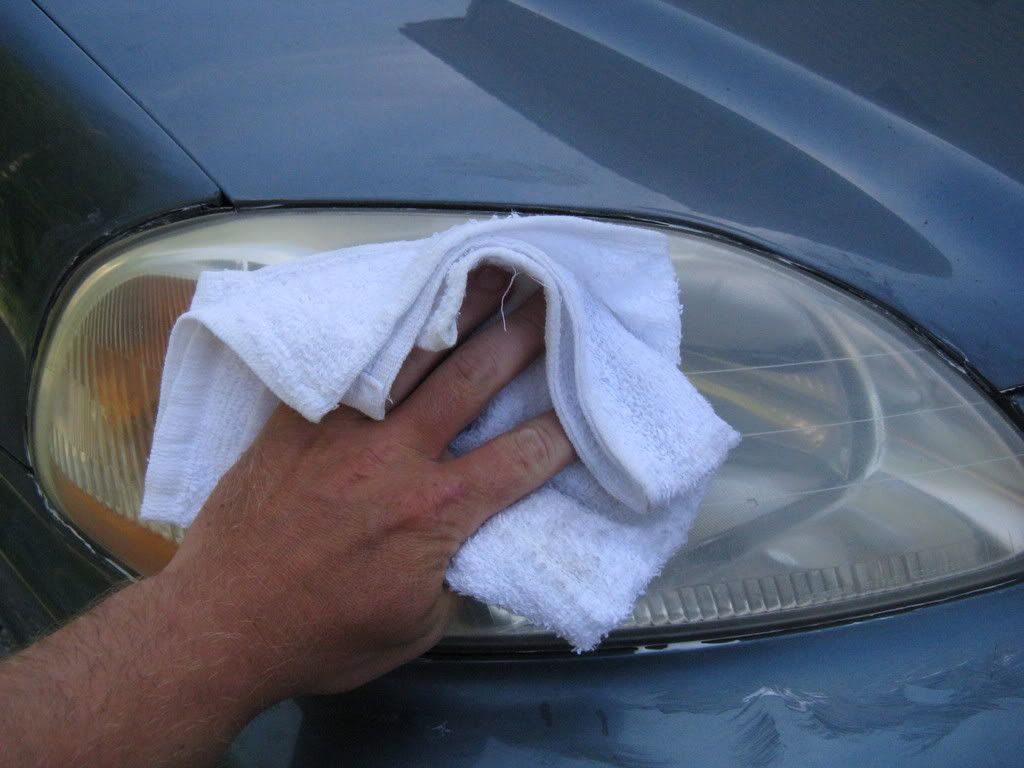
Wipe down the light with the wet cloth after each application, bare down hard as if you are still polishing to get of the excess. Be sure to dry it off as well, still baring down.
I recommend repeating these steps 3 times. Here are my results after 3 applications:

A lot better, but not exactly brand new looking. I may use a buffer, and if the results are noticeably better, I'll update with a couple more pics. -mcvtec-
See below for original post.
DIY: How to restore the clarity of your aged acrylic headlight lenses.
http://www.flickr.com/photos/26016203@N03/4962082864/http://www.flickr.com/photos/26016203@N03/4962077492/
I've finally gotten around to doing this the right way, and decided to
document it at the same time.
The car is my '96 Civic DX 4-door beater. Every year the lenses turn
a nasty yellow oxidized color. They emit a dim beam and just look
gross.
Below this update you will find my old DYI from '08 where I show
what just polishing can do. What polish won't do is get rid pits and of all the
yellowing. That's what this update is all about.
Materials and Tools
This is simply what I used to do this. Yours may differ,
depending mostly on severity.
➔ (4) 9"x11" sheets 320 grit sandpaper
➔ (4) 9"x11" sheets 800 grit sandpaper
➔ (4) 9"x11" sheets 1000 grit sandpaper
➔ (4) 3.5x9" sheets 2000 grit sandpaper
➔ (2) 3"x4" NEW regular kitchen sponges
➔ Scissors
➔ 1+ gallon container of soapy water
➔ Many clean, relatively lint free rags. A couple
of old cotton T-shirts work well for me.
➔ Drill (plug-in type is ideal)
➔ Fine buffing wheel w/ arbor
➔ Plenty of newspaper etc.
➔ Roll of wide masking tape
1. Goal: Remove contaminants
Here is how they look after less than a year since I last polished them.
Take one of the sponges and lightly scrub the lens with clean water.
I didn't feel the need to use masking tape for this step.
http://www.flickr.com/photos/26016203@N03/4962081934/
In this pic you can see the peeling remnants of the 'special' clear coating my
friend at a shop applied a couple months ago.
http://www.flickr.com/photos/26016203@N03/4962077492/
Many vehicles have this hazing problem. 1998 Integra GS-R:
http://www.flickr.com/photos/26016203@N03/4962081308/
2. Goal: Mask off area around lens
I did not feel the need to use newspaper yet. Dry everything well and grab
the masking tape. I recommend using more and wider tape than I have
pictured here.
http://www.flickr.com/photos/26016203@N03/4961485879/
More like this.
http://www.flickr.com/photos/26016203@N03/4962083908/
After 190,000 miles, the lenses are in rough shape.
http://www.flickr.com/photos/26016203@N03/4962083602/
3. Goal: Remove pits, scratches and yellow oxidization
I wrapped one of the sponges with sandpaper, rolled up worked well.
The sponge conforms to the contour of the lens and also also provide
a good grip of the paper so more and even pressure can be applied.
http://www.flickr.com/photos/26016203@N03/4962080612/http://www.flickr.com/photos/26016203@N03/4961485409/http://www.flickr.com/photos/26016203@N03/4962078324/http://www.flickr.com/photos/26016203@N03/4962085908/
Mine were so bad that I decided to start with 320 grit sandpaper
(not pictured). Any decent auto parts store should have 800, 1000, 2000 and even 2500 grit automotive sandpaper.
http://www.flickr.com/photos/26016203@N03/4961483013/
THIS IS IMPORTANT:
Sand in one direction from one side of the lense to the other, and then perpendicular to that direction.
This way, material is removed evenly from the lens.
DO NOT SAND IN A CIRCULAR MOTION ON THE LENSES.
It should look something like this (320 grit):
http://www.flickr.com/photos/26016203@N03/4962086998/
Keep the sponge, sandpaper and lens wet at all times.
Wipe down the lens often. Use the soapy water and the other clean sponge
(in the same direction you just sanded) and switch to a new area of sandpaper when necessary.
This is what happens to the sandpaper when sanding without water.
http://www.flickr.com/photos/26016203@N03/4962079276/http://www.flickr.com/photos/26016203@N03/4962080088/
Here are the steps for sanding:
1. Evenly sand in one direction, from one side of the lens to the other
keeping the lens and sandpaper wet.
2. Wipe off the lens with the sponge and water.
3. Inspect and use a new area of sandpaper if nessesary
4. Switch sanding direction.
*Depending upon severity, Repeat these steps with the coarse
sandpaper until the pits and yellowing are removed to your satisfaction.
*Repeat these steps 4 times with each grade of finer sandpaper.
The reason behind using successive grades of sandpaper is to basically
remove the scraches of the previous grade to the point that the polish
can take easily care of the rest.
Lenses ready for polish.
http://www.flickr.com/photos/26016203@N03/4962079844/http://www.flickr.com/photos/26016203@N03/4962087332/
[...] I think the company has even more grades of polish now, I got my Novus polish from MCM Electronics online but here is the company that makes the stuff:
http://www.novuspolish.com/
http://www.novuspolish.com/
I used the step 1 cleaner and the step 2 polish, but I feel the Mother's
polish is almost or as good or than the step 3 Novus.
Plus I can apply it in the larger quantities needed for power buffing.
A little goes a long way when hand buffing, but a whole bunch more
works really well for power buffing.
http://www.flickr.com/photos/26016203@N03/4961494923/http://www.flickr.com/photos/26016203@N03/4961493901/http://www.flickr.com/photos/26016203@N03/4961494591/
I knew it would fling a little polish so I masked off the front end.
http://www.flickr.com/photos/26016203@N03/4961497017/
Buff in a CIRCULAR MOTION and follow the direction on the polish
container.
I think my results were quite good.
http://www.flickr.com/photos/26016203@N03/4962093858/http://www.flickr.com/photos/26016203@N03/4961499099/
***Original Post 07-04-08***
I did this DIY because all the other ones I could find in the 92-00 Civic forum had non-working pics. I just wanted to show how well plastic polish works on 96-00 Civic headlights (and 94-01 Integras as well).
Here you can see how bad my '96 headlights are, the the passenger's side is very oxidized while the driver's isn't too bad but could certainly use some work.
I used Mothers Plastic Polish and 3 large terry clothes for this job, use at least 3 clothes, I recommend having 6 on hand. Other companies make plastic polishes as well.
Dedicate at least one of the rags for washing/wiping. I used water and nothing else. Use at least one rag for drying. You can see how much grime was on just one headlight.
Once you're satisfied the headlight is clean enough, apply a liberal amount of polish. That's what the directions say so I did.
Rub in the polish in a circular motion just like you're waxing the car, paying special attention to the edges. I can't help but think a buffer would be an ideal tool for this step.
Wipe down the light with the wet cloth after each application, bare down hard as if you are still polishing to get of the excess. Be sure to dry it off as well, still baring down.
I recommend repeating these steps 3 times. Here are my results after 3 applications:
A lot better, but not exactly brand new looking. I may use a buffer, and if the results are noticeably better, I'll update with a couple more pics. -mcvtec-
Last edited by BryanM.; 09-18-2010 at 05:49 PM.
 07-04-2008, 04:12 PM
#3
Honda-Tech Member
Join Date: May 2007
Location: Pompano Beach, FL, USA
Posts: 137
Likes: 0
Received 0 Likes
on
0 Posts
Man, that is sweet! You did a really good job dude, I feel for ya having to do all of that rubbing like you did. I work electronics and have experience with plastic polish. The best plastic polish in the world, for my money, is Novus plastic polish. I am not saying this to be an ad for the company or anything like that, I am saying it because when I got some for work, they gave you two bottles, one coarse and one super fine. If you applied the coarse and rubbed around and around with a wet T-shirt scrap, it made the plastic super flat and took out any scratch perfectly, but it left the plastic like wax paper, you could not see through it anymore. Then you applied the super fine polish and it made the whole thing super clear and 100% transparent again and like WOW! Like brand new again! I have taken several CDs and DVDs that were scraped on the ground and would not work anymore or had scratches in them and made them brand new and totally working again.
I think the company has even more grades of polish now, I got my Novus polish from MCM Electronics online but here is the company that makes the stuff:
http://www.novuspolish.com/
Where to buy it I don't know, some "In the know" places sell it or you might be able to get it from the web site, oh yeah, they have a store, you get three bottles of different grade polish for $20. Anyway, this stuff rocks and you for sure would not have to do that much rubbing with this stuff. Just wanted to spread the word. Your lights rock dude, you did a great job. Thanks for the great tip!
07-04-2008, 04:51 PM
#5
<TABLE WIDTH="90%" CELLSPACING=0 CELLPADDING=0 ALIGN=CENTER><TR><TD>Quote, originally posted by Ohmster »</TD></TR><TR><TD CLASS="quote">Man, that is sweet! You did a really good job dude, I feel for ya having to do all of that rubbing like you did. I work electronics and have experience with plastic polish. The best plastic polish in the world, for my money, is Novus plastic polish. I am not saying this to be an ad for the company or anything like that, I am saying it because when I got some for work, they gave you two bottles, one coarse and one super fine. If you applied the coarse and rubbed around and around with a wet T-shirt scrap, it made the plastic super flat and took out any scratch perfectly, but it left the plastic like wax paper, you could not see through it anymore. Then you applied the super fine polish and it made the whole thing super clear and 100% transparent again and like WOW! Like brand new again! I have taken several CDs and DVDs that were scraped on the ground and would not work anymore or had scratches in them and made them brand new and totally working again.
I think the company has even more grades of polish now, I got my Novus polish from MCM Electronics online but here is the company that makes the stuff:
http://www.novuspolish.com/
Where to buy it I don't know, some "In the know" places sell it or you might be able to get it from the web site, oh yeah, they have a store, you get three bottles of different grade polish for $20. Anyway, this stuff rocks and you for sure would not have to do that much rubbing with this stuff. Just wanted to spread the word. Your lights rock dude, you did a great job. Thanks for the great tip!</TD></TR></TABLE>
Thank you, and thanks for the heads up on that product. I just ordered it online.
<TABLE WIDTH="90%" CELLSPACING=0 CELLPADDING=0 ALIGN=CENTER><TR><TD>Quote, originally posted by hotrod99 »</TD></TR><TR><TD CLASS="quote">sweet dude thanx alot,i need to do this to my em1 my lights are getting really bad </TD></TR></TABLE>
You're welcome but I would hold up and lets see how this Novus stuff works. I'll update this soon.
<TABLE WIDTH="90%" CELLSPACING=0 CELLPADDING=0 ALIGN=CENTER><TR><TD>Quote, originally posted by rSol93 »</TD></TR><TR><TD CLASS="quote">wet sanding would probably turn out better, but it looks nice.</TD></TR></TABLE>
Wet sanding would almost certainly come out better, as you can probably see the lenses are very pitted. In my state (and I'm sure others) they can fail your vehicle inspection if the lenses are too hazy. The product I used would allow it to pass.
I promise to update after using the Novus polish. -mcvtec-

I think the company has even more grades of polish now, I got my Novus polish from MCM Electronics online but here is the company that makes the stuff:
http://www.novuspolish.com/
Where to buy it I don't know, some "In the know" places sell it or you might be able to get it from the web site, oh yeah, they have a store, you get three bottles of different grade polish for $20. Anyway, this stuff rocks and you for sure would not have to do that much rubbing with this stuff. Just wanted to spread the word. Your lights rock dude, you did a great job. Thanks for the great tip!</TD></TR></TABLE>
Thank you, and thanks for the heads up on that product. I just ordered it online.
<TABLE WIDTH="90%" CELLSPACING=0 CELLPADDING=0 ALIGN=CENTER><TR><TD>Quote, originally posted by hotrod99 »</TD></TR><TR><TD CLASS="quote">sweet dude thanx alot,i need to do this to my em1 my lights are getting really bad
</TD></TR></TABLE>You're welcome but I would hold up and lets see how this Novus stuff works. I'll update this soon.
<TABLE WIDTH="90%" CELLSPACING=0 CELLPADDING=0 ALIGN=CENTER><TR><TD>Quote, originally posted by rSol93 »</TD></TR><TR><TD CLASS="quote">wet sanding would probably turn out better, but it looks nice.</TD></TR></TABLE>
Wet sanding would almost certainly come out better, as you can probably see the lenses are very pitted. In my state (and I'm sure others) they can fail your vehicle inspection if the lenses are too hazy. The product I used would allow it to pass.
I promise to update after using the Novus polish. -mcvtec-
07-04-2008, 06:08 PM
#6
H-T White Ops
Trending Topics
09-04-2008, 04:26 PM
#10
Junior Member
Join Date: Aug 2008
Location: Orlando, FL, USA
Posts: 99
Likes: 0
Received 0 Likes
on
0 Posts
This isn't exactly on topic, but since it's related....
Has anyone used Micromesh for unhazing headlights? I'm an aircraft mechanic by trade, and have used Micromesh on aircraft windows a bunch with great results... (windshields on many small aircraft are the same kind of acrylic ascar headlights).
Anyway, this is the product here:
Headlight Restoration Kits
Not too expensive ($20) even in the power-tool version.
Haven't needed to do this yet, but was curious if someone else has tried it ... and was planning to myself someday.
09-04-2008, 05:09 PM
#11
I don't know why this thread doesn't come up in my watched topics when posted in. Subscribed 
<TABLE WIDTH="90%" CELLSPACING=0 CELLPADDING=0 ALIGN=CENTER><TR><TD>Quote, originally posted by EkFG »</TD></TR><TR><TD CLASS="quote">this work for awhile then the hazing comes back, I would recomend sanding with 800 then 1000 then 1500 and 2000 then polish .. last alot longer</TD></TR></TABLE>
I don't doubt that.
<TABLE WIDTH="90%" CELLSPACING=0 CELLPADDING=0 ALIGN=CENTER><TR><TD>Quote, originally posted by brucepick »</TD></TR><TR><TD CLASS="quote">Really nice job!
It's just over a year since you did it.
Does it still look real good?</TD></TR></TABLE>
<u>DIY: Foggy/Hazy/Oxidized Headlight Fix (56k Warning) 5:21 PM 7/4/2008</u>
My join date is just over a year, not the date of this write up.
It has begun to get foogy again, but not nearly as bad as it was.
<TABLE WIDTH="90%" CELLSPACING=0 CELLPADDING=0 ALIGN=CENTER><TR><TD>Quote, originally posted by PerryRT »</TD></TR><TR><TD CLASS="quote">This isn't exactly on topic, but since it's related....
Has anyone used Micromesh for unhazing headlights? I'm an aircraft mechanic by trade, and have used Micromesh on aircraft windows a bunch with great results... (windshields on many small aircraft are the same kind of acrylic ascar headlights).
Anyway, this is the product here:
Headlight Restoration Kits
Not too expensive ($20) even in the power-tool version.
Haven't needed to do this yet, but was curious if someone else has tried it ... and was planning to myself someday.
</TD></TR></TABLE>
This is just another way to polish Acrylic.
The issue is that the silicon protective coating has worn away from abrassive debris. The coating prevents the Acrylic from becoming foggy (oxidized), as it will from being exposed to 02.
Modified by mcvtec at 8:41 PM 9/14/2008
09-04-2008, 05:30 PM
#12
Junior Member
Join Date: Aug 2008
Location: Orlando, FL, USA
Posts: 99
Likes: 0
Received 0 Likes
on
0 Posts
<TABLE WIDTH="90%" CELLSPACING=0 CELLPADDING=0 ALIGN=CENTER><TR><TD>Quote, originally posted by mcvtec »</TD></TR><TR><TD CLASS="quote">This is just another way to polish Acrylic.
The issue is that the polymer (can't remember the exact name of it ) protective coating has worn away from abrasive debris. The coating prevents the Acrylic from becoming foggy (oxidized), as it will from being exposed to 02.</TD></TR></TABLE>
Yeah, I've been wondering about that. The problem with any given polishing method is that, of course, that polishing is, essentially, just the process of making really really small uniform scratches. And scratches, of course, remove material....in this case, whatever protective coating you had left. Which in turn means that the surface will just haze faster the next time.
So... is there any way to replace the coating?
The issue is that the polymer (can't remember the exact name of it
) protective coating has worn away from abrasive debris. The coating prevents the Acrylic from becoming foggy (oxidized), as it will from being exposed to 02.</TD></TR></TABLE>Yeah, I've been wondering about that. The problem with any given polishing method is that, of course, that polishing is, essentially, just the process of making really really small uniform scratches. And scratches, of course, remove material....in this case, whatever protective coating you had left. Which in turn means that the surface will just haze faster the next time.
So... is there any way to replace the coating?


 09-04-2008, 06:41 PM
#14
Honda-Tech Member
Join Date: Aug 2003
Location: Edisto Beach
Posts: 1,909
Likes: 0
Received 0 Likes
on
0 Posts
Very nice. It works better if you wetsand first with some 1000, 1500 grit and then use some rubbing compound before the plastic polish. 
Edit...yeah what the guy above me said. Doh!
Edit...yeah what the guy above me said. Doh!
09-05-2008, 02:24 PM
#15
<TABLE WIDTH="90%" CELLSPACING=0 CELLPADDING=0 ALIGN=CENTER><TR><TD>Quote, originally posted by Slystone »</TD></TR><TR><TD CLASS="quote">600
1200
1500
2000 wet sand paper....some compond after that and wax and Voilas!</TD></TR></TABLE>
Excellent results! How long did that take? Feel free to add to this write up
<TABLE WIDTH="90%" CELLSPACING=0 CELLPADDING=0 ALIGN=CENTER><TR><TD>Quote, originally posted by PerryRT »</TD></TR><TR><TD CLASS="quote">Yeah, I've been wondering about that. The problem with any given polishing method is that, of course, that polishing is, essentially, just the process of making really really small uniform scratches. And scratches, of course, remove material....in this case, whatever protective coating you had left. Which in turn means that the surface will just haze faster the next time.
So... is there any way to replace the coating?</TD></TR></TABLE>
[In bold] That is the $64,000 question. I have been looking into this off and on since I did this write-up.
<FONT COLOR="red">***If anyone reading this knows, please chime in***</FONT>
09-05-2008, 02:27 PM
#16
<TABLE WIDTH="90%" CELLSPACING=0 CELLPADDING=0 ALIGN=CENTER><TR><TD>Quote, originally posted by mcvtec »</TD></TR><TR><TD CLASS="quote">I promise to update after using the Novus polish. -mcvtec-</TD></TR></TABLE>
BTW, the Novus polish didn't make a noticeable improvement on <u>my</u> headlights a week after using the Mother's plastic polish.
BTW, the Novus polish didn't make a noticeable improvement on <u>my</u> headlights a week after using the Mother's plastic polish.
09-05-2008, 04:29 PM
#19
I am my avatar
Join Date: Aug 2008
Location: 714
Posts: 480
Likes: 0
Received 0 Likes
on
0 Posts
<TABLE WIDTH="90%" CELLSPACING=0 CELLPADDING=0 ALIGN=CENTER><TR><TD>Quote, originally posted by mcvtec »</TD></TR><TR><TD CLASS="quote">Hours?! LOL...
Yeah, it's just polishing Acrylic which will just haze again...</TD></TR></TABLE>
Well, not continuous hours like 5 hours a day. But I'd probably spend 10 minutes doing each light, almost every day lol. Added up to a few hours
Yeah, it's just polishing Acrylic which will just haze again...</TD></TR></TABLE>
Well, not continuous hours like 5 hours a day. But I'd probably spend 10 minutes doing each light, almost every day lol. Added up to a few hours
09-06-2009, 06:10 AM
#20
New User

Join Date: Aug 2009
Posts: 1
Likes: 0
Received 0 Likes
on
0 Posts
There's a body shop in my area that will first sand the headlights and then apply clear coat. Perhaps that would make for a more permanent fix.
09-06-2009, 07:05 AM
#22
Honda-Tech Member

Join Date: Jul 2009
Location: PA
Posts: 184
Likes: 0
Received 0 Likes
on
0 Posts
u guys need a buffer..u wona see a old but brand new head light...I think i wasted alot time doing that way. Get a buffer and use 3m plastic wax..I do head lights all the time...$25 a head light....if it doesn't work get 600 wet sand paper and sand then sand with 1000 Then buff it with 3m plastic wax and it will look brand new..if u or anyone needs more info just let me know and ill be happy to help......
09-06-2009, 07:20 AM
#23
Honda-Tech Member
Yes, a much more permanent fix is to clear coat the headlights. If the finish isn't super smooth when done, wet sand the clear until it's smooth then buff. Coat must be uniform or you can mess up the optics.

Thread
Thread Starter
Forum
Replies
Last Post
Pooby88
Honda Civic / Del Sol (1992 - 2000)
66
07-13-2008 12:59 AM
EDJames22
Honda / Acura
5
03-18-2008 02:29 PM

