
DIY- 01-02 civic manual cluster to 03-05 cluster swap
 01-21-2008, 12:54 PM
#1
Honda-Tech Member
Thread Starter
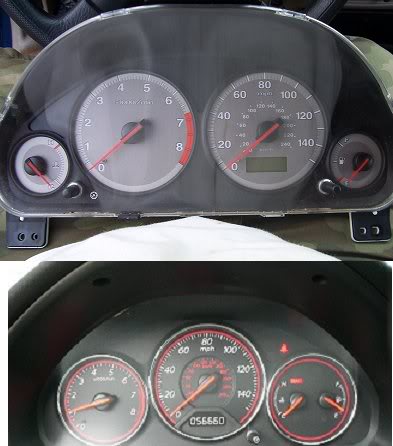
DIY- 01-02 civic manual cluster to 03-05 cluster swap.
Go from the top one to the bottom one. i went from a 02 ex coupe cluster to a 05 lx cluster from a 4 door, the blue ring one. but i think it doesnt matter what model the cluster comes from
This swap is pretty easy once you get the hang of how you are suppose to get the wires out of each connector. The swap took like an hour and 10 min., but is not that hard.
Tools needed.
1) Philips screwdriver
2) wire cutters/strippers
3) black electrical tape
4) a razor blade
5) a jumbo size paper clip, this is to take out the wire from the connectors, you can also use a safety pin or a sewing needle but it will be a little bit harder to use cause of the size. the jumbo paper clip is the perfect size and makes life much easier, trust me i tried everything.
STEP 1
remove plastic from around the cluster.
there are two screws on the top remove them and it should come out with little force. it helps may to take the top cover off of your steering Colum. to do that take screw driver or your hand and push up on it. it will release from its tabs. be careful not to break the tabs.
STEP 2
remove cluster
there are three screws holding it in. one on top and two on each side on the bottom. remove them and the cluster is ready to come out. then pull the two plugs from it. a green one and a blue one. then put the cluster aside you will not need it any more because a better one will be replacing it.
STEP 3
take both connectors apart. start with the green one first. i did but its up to you .
on the top and bottom of the connectors at the part where the wires go in, you will see a very small gap. If you use your finger nail or the tip of a razor like i did, push it in the gap and attempt to pry up, do this with care, cause if you break it your wire may not stay in place once you put them back. it should release from its tabs and come free. then just fold it back. do this on both connectors on both sides. there is a top and a bottom to each connector. after you have them open then come the part that takes the most time removing the wires from the connectors.
STEP 4
remove wires from connector. ONE connector at a time green first.
this part is tricky but once you get one out the rest come easy.
insert the jumbo size paper or safety pin in the top hole of the wire you need to remove. do this from the front side. its the bigger of the two holes. insert the paper clip at a slight angle down pointing towards the middle of the connector. as you slide it in you will feel it drop down a little, once it does push a little, it doesn�t take much force at all so don�t force it. you will hear a click sound, that�s the wire coming out the tab inside the connector. then try to take that wire out it should come free, if not try it again. this take time so don�t get upset if you don�t get it the first time. once you get all the wires out the connector you ready reorder them.
STEP 5
repining the connectors.
back to the green connector first. there is a bunch of wires that need to be switched from the blue connector to the green one a one wire from the green to the blue one. the yellow wire with the black stripe is the fuel sending wire. this is the only wire that requires an extension to the be wired to the blue connector. remove it and tuck it away or put a piece of tape on it so you wont forget about it until we are ready for blue connector.
here are some diagrams of the green connector of what it looked like and what it needs to look like when your done. Done worry about the 04 vp and 03 ex on the diagrams. The bottom one is what it looks like when you took it out. You need to make it look like the top one. You will notice the there are a few wire on the top one the are not on the bottom one that�s because those wire are on the blue connector and need to be moved to the green one and those are on the top diagram # 2, 5, 19, 14, 12, 11

STEP 6
Wire the blue plug. The bottom one is how it looked when you took it out ,the top is how you it needs to look like, you will have one wire that is not used and on the cart I think in the cart it green/orange but I think the wire is yellow with another color, just tape that wire up and tuck it away. Here is the diagram for the blue plug.

STEP 7
After all the wire are back into the connector, connect it and test to see everything work. If it does you and start putting everything back into and enjoy.
Hope this helps, do have a camera so no pics. I�ll try to get one from a friend, then I�ll post some.
Modified by stinkypinky1011 at 10:01 AM 1/24/2008
Go from the top one to the bottom one. i went from a 02 ex coupe cluster to a 05 lx cluster from a 4 door, the blue ring one. but i think it doesnt matter what model the cluster comes from

This swap is pretty easy once you get the hang of how you are suppose to get the wires out of each connector. The swap took like an hour and 10 min., but is not that hard.
Tools needed.
1) Philips screwdriver
2) wire cutters/strippers
3) black electrical tape
4) a razor blade
5) a jumbo size paper clip, this is to take out the wire from the connectors, you can also use a safety pin or a sewing needle but it will be a little bit harder to use cause of the size. the jumbo paper clip is the perfect size and makes life much easier, trust me i tried everything.
STEP 1
remove plastic from around the cluster.
there are two screws on the top remove them and it should come out with little force. it helps may to take the top cover off of your steering Colum. to do that take screw driver or your hand and push up on it. it will release from its tabs. be careful not to break the tabs.
STEP 2
remove cluster
there are three screws holding it in. one on top and two on each side on the bottom. remove them and the cluster is ready to come out. then pull the two plugs from it. a green one and a blue one. then put the cluster aside you will not need it any more because a better one will be replacing it.
STEP 3
take both connectors apart. start with the green one first. i did but its up to you .
on the top and bottom of the connectors at the part where the wires go in, you will see a very small gap. If you use your finger nail or the tip of a razor like i did, push it in the gap and attempt to pry up, do this with care, cause if you break it your wire may not stay in place once you put them back. it should release from its tabs and come free. then just fold it back. do this on both connectors on both sides. there is a top and a bottom to each connector. after you have them open then come the part that takes the most time removing the wires from the connectors.
STEP 4
remove wires from connector. ONE connector at a time green first.
this part is tricky but once you get one out the rest come easy.
insert the jumbo size paper or safety pin in the top hole of the wire you need to remove. do this from the front side. its the bigger of the two holes. insert the paper clip at a slight angle down pointing towards the middle of the connector. as you slide it in you will feel it drop down a little, once it does push a little, it doesn�t take much force at all so don�t force it. you will hear a click sound, that�s the wire coming out the tab inside the connector. then try to take that wire out it should come free, if not try it again. this take time so don�t get upset if you don�t get it the first time. once you get all the wires out the connector you ready reorder them.
STEP 5
repining the connectors.
back to the green connector first. there is a bunch of wires that need to be switched from the blue connector to the green one a one wire from the green to the blue one. the yellow wire with the black stripe is the fuel sending wire. this is the only wire that requires an extension to the be wired to the blue connector. remove it and tuck it away or put a piece of tape on it so you wont forget about it until we are ready for blue connector.
here are some diagrams of the green connector of what it looked like and what it needs to look like when your done. Done worry about the 04 vp and 03 ex on the diagrams. The bottom one is what it looks like when you took it out. You need to make it look like the top one. You will notice the there are a few wire on the top one the are not on the bottom one that�s because those wire are on the blue connector and need to be moved to the green one and those are on the top diagram # 2, 5, 19, 14, 12, 11

STEP 6
Wire the blue plug. The bottom one is how it looked when you took it out ,the top is how you it needs to look like, you will have one wire that is not used and on the cart I think in the cart it green/orange but I think the wire is yellow with another color, just tape that wire up and tuck it away. Here is the diagram for the blue plug.

STEP 7
After all the wire are back into the connector, connect it and test to see everything work. If it does you and start putting everything back into and enjoy.
Hope this helps, do have a camera so no pics. I�ll try to get one from a friend, then I�ll post some.
Modified by stinkypinky1011 at 10:01 AM 1/24/2008

The following 2 users liked this post by stinkypinky1011:
01-21-2008, 02:19 PM
#3
Join Date: Jan 2008
Posts: 1
Likes: 0
Received 0 Likes
on
0 Posts
Thanks for the info. A quick question on the plastic cover in front of the cluster. After removing the two screws, should you pull cover towards you when releasing the clips or lift cover up? Trying to avoid breaking the clips. I have not tried removing the steering wheel cover yet. Will give it a try tomorrow.
01-30-2008, 08:02 PM
#6
Honda-Tech Member
Join Date: Jun 2007
Location: NC, U.S.A
Posts: 62
Likes: 0
Received 0 Likes
on
0 Posts
ok how hard is this to do because im going to buy an 03-05 cluster and i need to re wire i have an 01.. do u re wire from the cluster or from the blue/green from the car itself?
01-30-2008, 10:20 PM
#7
Needs to be About 20% Cooler
iTrader: (1)
Join Date: Jun 2004
Location: San Bernardino, CA, USA
Posts: 1,878
Likes: 0
Received 1 Like
on
1 Post
if u have LX cluster in a EX now u dont have a ABS light. the EX cluster has the ABS light. and LX dosent. also the red ring is from the coupe and the blue from the sedan.
Trending Topics
01-31-2008, 04:21 AM
#8
Honda-Tech Member
Thread Starter
it was my first time doing something like that and it took a lil over a hour to do but is really easy, you rewire the blue and green connector plug from the car.
01-31-2008, 04:26 AM
#9
Honda-Tech Member
Thread Starter
<TABLE WIDTH="90%" CELLSPACING=0 CELLPADDING=0 ALIGN=CENTER><TR><TD>Quote, originally posted by DieMaster »</TD></TR><TR><TD CLASS="quote">if u have LX cluster in a EX now u dont have a ABS light. the EX cluster has the ABS light. and LX dosent. also the red ring is from the coupe and the blue from the sedan. </TD></TR></TABLE>
well that may be true but if you want to keep it youll have to get an ex cluster, but this write up work on any 03-05 cluster. you right the blue is from a sedan, i but it in a blue coupe to match the outside, it looks nice in blue.
well that may be true but if you want to keep it youll have to get an ex cluster, but this write up work on any 03-05 cluster. you right the blue is from a sedan, i but it in a blue coupe to match the outside, it looks nice in blue.
01-31-2008, 06:05 PM
#10
Honda-Tech Member
Join Date: Jun 2007
Location: NC, U.S.A
Posts: 62
Likes: 0
Received 0 Likes
on
0 Posts
ok well i might have some questions along the way once it comes in. u cant mess up anything from re wireing can you?? just wondering
02-01-2008, 04:38 AM
#11
Honda-Tech Member
Thread Starter
no its not really <TABLE WIDTH="90%" CELLSPACING=0 CELLPADDING=0 ALIGN=CENTER><TR><TD>Quote, originally posted by firetyphoon1 »</TD></TR><TR><TD CLASS="quote">ok well i might have some questions along the way once it comes in. u cant mess up anything from re wireing can you?? just wondering
</TD></TR></TABLE>
no it not really rewiring its more like changing the wire order in the connector
</TD></TR></TABLE>
no it not really rewiring its more like changing the wire order in the connector
02-01-2008, 12:32 PM
#12
Honda-Tech Member
Join Date: Jun 2007
Location: NC, U.S.A
Posts: 62
Likes: 0
Received 0 Likes
on
0 Posts
ohh ok im gettin an 05 cluster in about a week so ill prob have some questions, so chek this post again 
02-02-2008, 11:26 PM
#16
<TABLE WIDTH="90%" CELLSPACING=0 CELLPADDING=0 ALIGN=CENTER><TR><TD>Quote, originally posted by s13_240sx_92 »</TD></TR><TR><TD CLASS="quote">Is the mileage stored on the cluster or the ECU???</TD></TR></TABLE>
It's stored in the cluster.
It's stored in the cluster.
 02-04-2008, 09:39 AM
#18
Join Date: Jan 2008
Location: Findlay, Ohio, USA
Posts: 4
Likes: 0
Received 0 Likes
on
0 Posts
Is there anyway to make the cluster read what the old one read? for the miles driven?
where did you get your gauge cluster? i called my local honda dealer, the gauge cluster would cost about $500 there. Also do note, there was a recall on 03 civic clusters.
Modified by Apollyon02ex at 10:58 AM 2/4/2008
where did you get your gauge cluster? i called my local honda dealer, the gauge cluster would cost about $500 there. Also do note, there was a recall on 03 civic clusters.
Modified by Apollyon02ex at 10:58 AM 2/4/2008
02-04-2008, 01:02 PM
#20
Honda-Tech Member
Join Date: Jun 2007
Location: NC, U.S.A
Posts: 62
Likes: 0
Received 0 Likes
on
0 Posts
u know i found a cluster with 56K and i got 54900 so ill just drive mines out till then haha so i can save 250 haha i got mines for 65 nice diy see this link too
http://www.civicforums.com/for....html
http://www.civicforums.com/for....html
02-07-2008, 09:10 AM
#21
Join Date: Feb 2008
Location: Rochester, NY, USA
Posts: 4
Likes: 0
Received 0 Likes
on
0 Posts
Just looking at the diagrams before tackling this swap. There are 25 wires in the "to be" diagram and 24 in the "as-is" diagram. Where does the 25th wire come from? Matching the color codes, where do the blu/red wire to go in hole Green14 and the blu/yel wire to go into G12 come from? They don't show in either "as-is" plug diagrams. The wht/red wire that starts out in Blue1 doesn't get a home in the "as-is" diagram. There seem to be two wht/red wires in the as-is state, one on each plug.
Can anyone who has done this swap enlighten me?
Can anyone who has done this swap enlighten me?
02-07-2008, 10:33 AM
#22
Honda-Tech Member
Thread Starter
first off there are no two wire the same colors so you may want to check it over. you will be left with on wire the you will not use and is stated in like step 5. i also stated what wires need to be moved from each connector to the other .
02-07-2008, 12:04 PM
#23
Join Date: Jul 2007
Location: Kenosha, WI
Posts: 213
Likes: 0
Received 0 Likes
on
0 Posts
I see from the link to civicforums, there was an issue at the end of the DIY there about the gas and temp needles. Did you experience the same issue or are they automatically adjusted when u rearranged the wire connections?
02-07-2008, 03:28 PM
#24
Join Date: Feb 2008
Location: Rochester, NY, USA
Posts: 4
Likes: 0
Received 0 Likes
on
0 Posts
Sorry to be dense, and I haven't torn into the actual plugs yet, but I have looked over the diagrams again and what I see is that the instructions say the as-is diagrams are on the bottom and the to-be diagrams are on the top. There are a total of 24 wires shown on the bottom diagrams and 25 shown on the top, so that raises a question about where does the 25th wire come from (unless the to-be's are on the bottom). Secondly, there is a blue red wire in the to-be Green 14 position and a blue yellow wire in the to-be Green 12 position that don't show on either the as-is diagrams for the blue or green plugs, creating another mystery about where they come from.
I'll go look at my plugs and see if I'm mis-interpreting something here.
I'll go look at my plugs and see if I'm mis-interpreting something here.
02-07-2008, 03:35 PM
#25
Join Date: Feb 2008
Location: Rochester, NY, USA
Posts: 4
Likes: 0
Received 0 Likes
on
0 Posts
Just to get this off my chest, the diagrams also show a white red wire in position Blue1 and position Green15 in the VP diagrams but only once in the EX diagrams at position Green17, so which wire goes to Green 17? Do you twist them together?